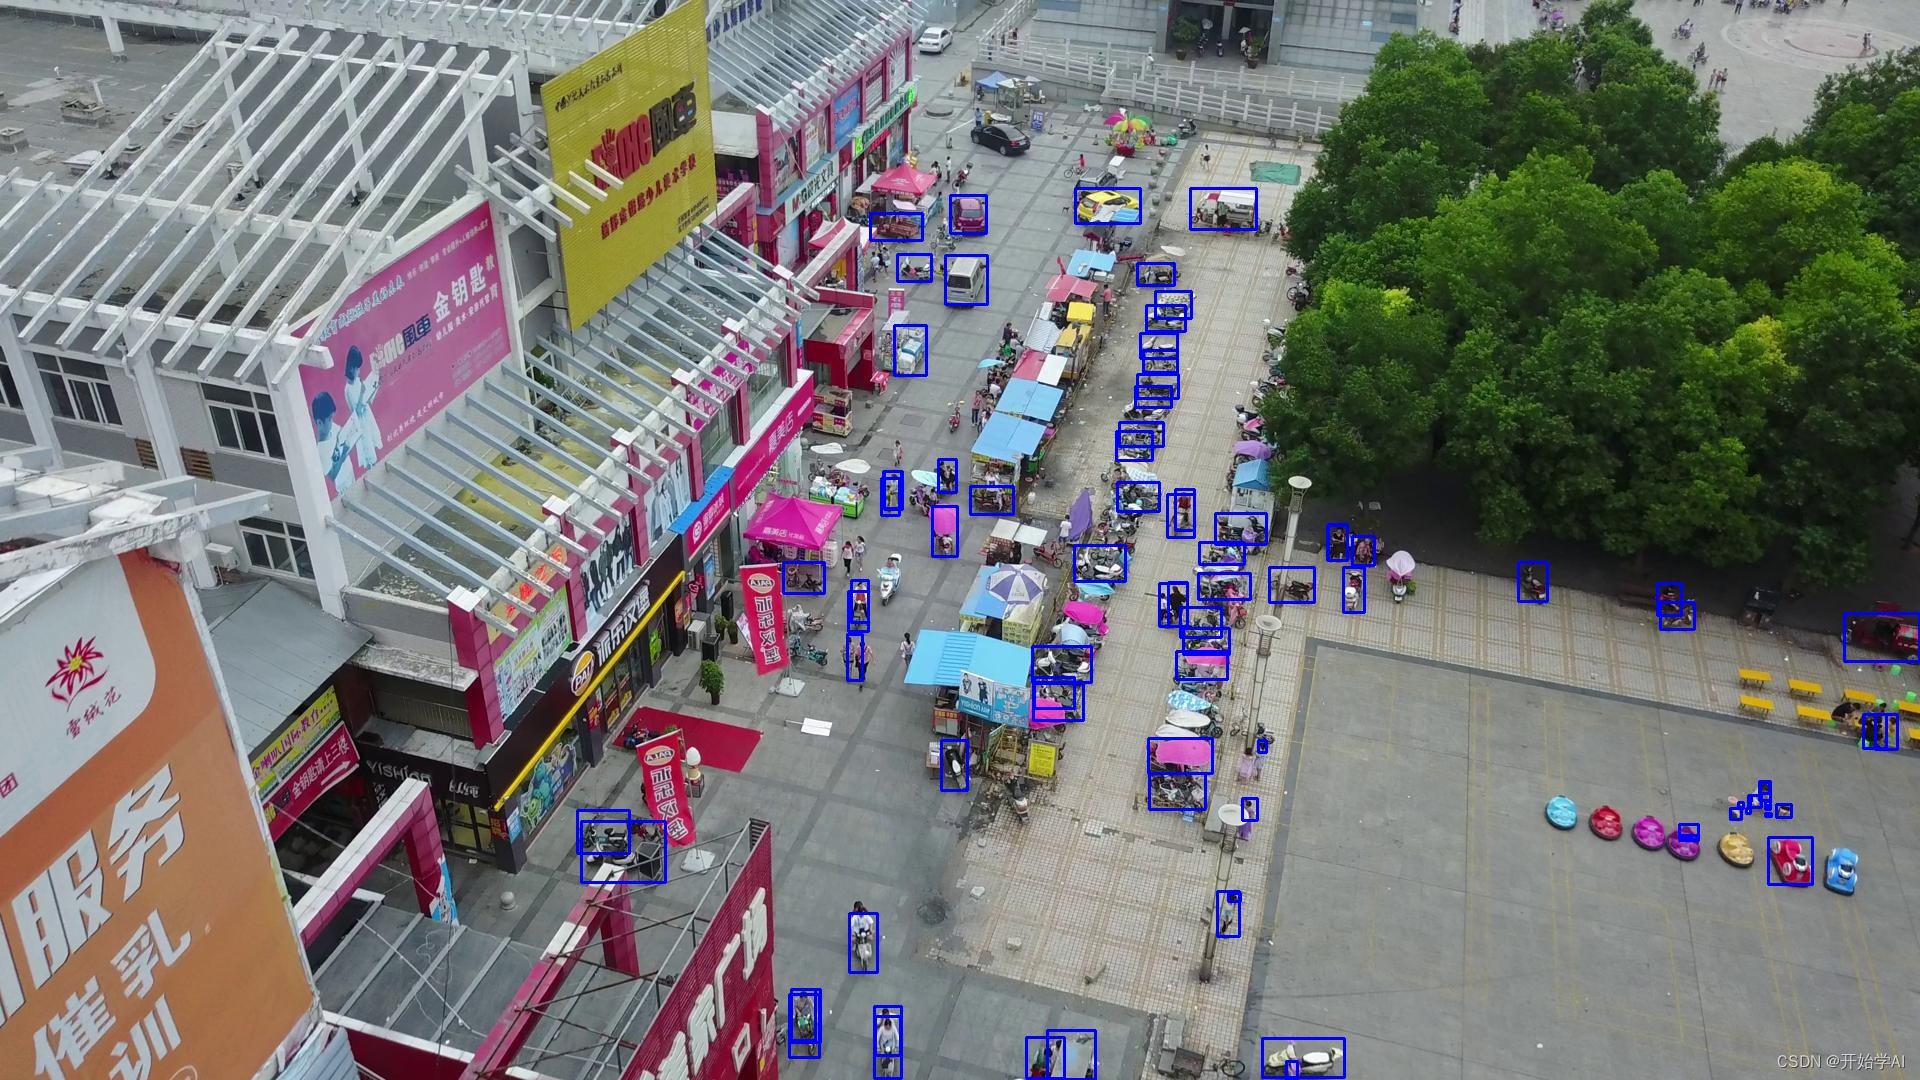
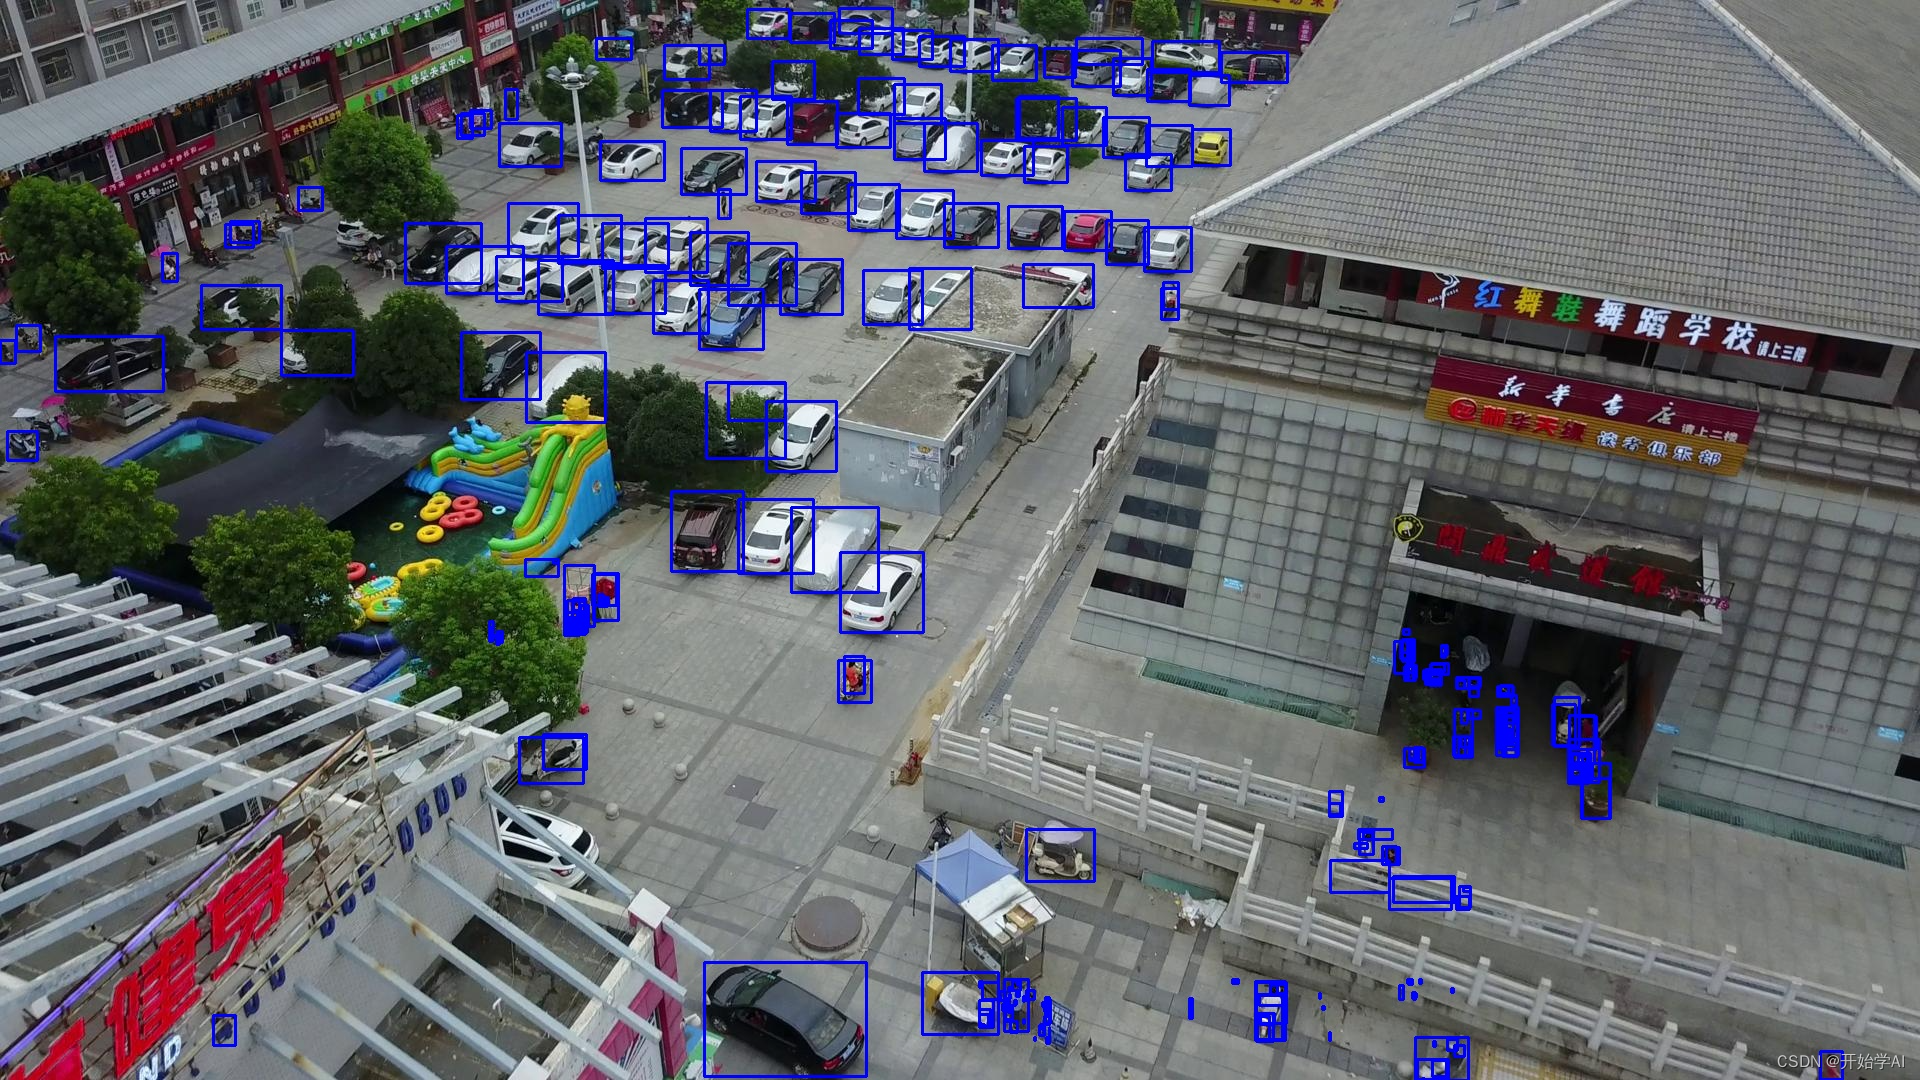
以前用Swin Transformer Tiny训练了40epoch的,官方用的Faster RCNN,这里先用Swin Transformer Tiny进行测试。
模型训练
采用基于MMDetection的框架Swin Transformer Tiny进行训练,训练方法可参考官方教程。
融合检测
Global Image 检测
这是我的配置文件及目录

需要用训练好的权重进行全局图像检测,将结果保存为.bbox.json文件。
环境信息:
sys.platform: linux
Python: 3.8.10 (default, Jun  4 2021, 15:09:15) [GCC 7.5.0]
CUDA available: True
numpy_random_seed: 2147483648
GPU 0: NVIDIA GeForce RTX 3090
CUDA_HOME: /usr/local/cuda
NVCC: Cuda compilation tools, release 11.3, V11.3.109
GCC: gcc (Ubuntu 9.3.0-17ubuntu1~20.04) 9.3.0
PyTorch: 1.10.0+cu113
PyTorch compiling details: PyTorch built with:
  - GCC 7.3
  - C++ Version: 201402
  - Intel(R) Math Kernel Library Version 2020.0.0 Product Build 20191122 for Intel(R) 64 architecture applications
  - Intel(R) MKL-DNN v2.2.3 (Git Hash 7336ca9f055cf1bfa13efb658fe15dc9b41f0740)
  - OpenMP 201511 (a.k.a. OpenMP 4.5)
  - LAPACK is enabled (usually provided by MKL)
  - NNPACK is enabled
  - CPU capability usage: AVX512
  - CUDA Runtime 11.3
  - NVCC architecture flags: -gencode;arch=compute_37,code=sm_37;-gencode;arch=compute_50,code=sm_50;-gencode;arch=compute_60,code=sm_60;-gencode;arch=compute_70,code=sm_70;-gencode;arch=compute_75,code=sm_75;-gencode;arch=compute_80,code=sm_80;-gencode;arch=compute_86,code=sm_86
  - CuDNN 8.2
  - Magma 2.5.2
  - Build settings: BLAS_INFO=mkl, BUILD_TYPE=Release, CUDA_VERSION=11.3, CUDNN_VERSION=8.2.0, CXX_COMPILER=/opt/rh/devtoolset-7/root/usr/bin/c++, CXX_FLAGS= -Wno-deprecated -fvisibility-inlines-hidden -DUSE_PTHREADPOOL -fopenmp -DNDEBUG -DUSE_KINETO -DUSE_FBGEMM -DUSE_QNNPACK -DUSE_PYTORCH_QNNPACK -DUSE_XNNPACK -DSYMBOLICATE_MOBILE_DEBUG_HANDLE -DEDGE_PROFILER_USE_KINETO -O2 -fPIC -Wno-narrowing -Wall -Wextra -Werror=return-type -Wno-missing-field-initializers -Wno-type-limits -Wno-array-bounds -Wno-unknown-pragmas -Wno-sign-compare -Wno-unused-parameter -Wno-unused-variable -Wno-unused-function -Wno-unused-result -Wno-unused-local-typedefs -Wno-strict-overflow -Wno-strict-aliasing -Wno-error=deprecated-declarations -Wno-stringop-overflow -Wno-psabi -Wno-error=pedantic -Wno-error=redundant-decls -Wno-error=old-style-cast -fdiagnostics-color=always -faligned-new -Wno-unused-but-set-variable -Wno-maybe-uninitialized -fno-math-errno -fno-trapping-math -Werror=format -Wno-stringop-overflow, LAPACK_INFO=mkl, PERF_WITH_AVX=1, PERF_WITH_AVX2=1, PERF_WITH_AVX512=1, TORCH_VERSION=1.10.0, USE_CUDA=ON, USE_CUDNN=ON, USE_EXCEPTION_PTR=1, USE_GFLAGS=OFF, USE_GLOG=OFF, USE_MKL=ON, USE_MKLDNN=ON, USE_MPI=OFF, USE_NCCL=ON, USE_NNPACK=ON, USE_OPENMP=ON,

TorchVision: 0.11.1+cu113
OpenCV: 4.6.0
MMEngine: 0.8.4
mmdetection: 2.11.0+461e003
采用以下配置文件
python tools/test.py work_dirs/swin_s/swin_tiny_global_detection.py /root/autodl-tmp/result/swin_s/epoch_40.pth --eval bbox# 继承之前的配置文件
_base_ = ["./mask_rcnn_swin_tiny_patch4_window7_mstrain_480-800_adamw_1x_coco.py"]
# 修改数据路径
dataset_type = 'CocoDataset'
data_root = '/root/autodl-tmp/VisDrone2019/'
data = dict(
samples_per_gpu=1,
workers_per_gpu=0,
train=dict(
type=dataset_type,
ann_file=data_root + 'VisDrone2019-DET-train/Global/train.json',
img_prefix=data_root + 'VisDrone2019-DET-train/Global/images/',),
val=dict(
type=dataset_type,
ann_file=data_root + 'VisDrone2019-DET-val/Global/val.json',
img_prefix=data_root + 'VisDrone2019-DET-val/Global/images/',),
test=dict(
type=dataset_type,
ann_file=data_root + 'VisDrone2019-DET-test-dev/Global/test.json',
img_prefix=data_root + 'VisDrone2019-DET-test-dev/Global/images/',))这个mmdetect版本有点老了,生成json文件得靠以下命令:
python tools/test.py work_dirs/swin_s/swin_tiny_global_detection.py /root/autodl-tmp/result/swin_s/epoch_40.pth --format-only --options "jsonfile_prefix=./work_dirs/Global/Global_swin_tiny_test-dev_results"Local Image 检测
配置文件
# 继承之前的配置文件
_base_ = ["./mask_rcnn_swin_tiny_patch4_window7_mstrain_480-800_adamw_1x_coco.py"]

# 修改数据路径
dataset_type = 'CocoDataset'
data_root = '/root/autodl-tmp/VisDrone2019/'

data = dict(
    samples_per_gpu=1,
    workers_per_gpu=0,
    train=dict(
        type=dataset_type,
        ann_file=data_root + 'VisDrone2019-DET-train/Global/train.json',
        img_prefix=data_root + 'VisDrone2019-DET-train/Global/images/',),
    val=dict(
        type=dataset_type,
        ann_file=data_root + 'VisDrone2019-DET-val/Global/val.json',
        img_prefix=data_root + 'VisDrone2019-DET-val/Global/images/',),
    test=dict(
        type=dataset_type,
        ann_file=data_root + 'VisDrone2019-DET-test-dev/Density/VisDrone2019-DET-test-dev.json',
        img_prefix=data_root + 'VisDrone2019-DET-test-dev/Density/images/',))
命令
python tools/test.py work_dirs/swin_s/swin_tiny_global_detection.py /root/autodl-tmp/result/swin_s/epoch_40.pth --format-only --options "jsonfile_prefix=./work_dirs/Density/Density_swin_tiny_test-dev_results"由于原论文采用的Faster RCNN对验证集进行测试,这里想对比一下精度,就再对验证集生成一下json文件
Global图像检测命令
python tools/test.py work_dirs/swin_s/swin_tiny_global_detection.py /root/autodl-tmp/result/swin_s/epoch_40.pth --format-only --options "jsonfile_prefix=./work_dirs/Global/swin_tiny_val_results"Local图像检测命令
python tools/test.py work_dirs/swin_s/swin_tiny_global_detection.py /root/autodl-tmp/result/swin_s/epoch_40.pth --format-only --options "jsonfile_prefix=./work_dirs/Density/swin_tiny_val_results"检测结果融合
代码:
import os
import glob
import copy, cv2
import numpy as np
from tqdm import tqdm
from plot_utils import overlay_func, overlay_bbox_img
from eval_utils import resize_bbox_to_original, wrap_initial_result, results2json, coco_eval, nms, class_wise_nms
import argparse
from pycocotools.coco import COCO

"""
Code for DMnet, Global-local fusion detection
The fusion result of annotations will be saved to output json files
Author: Changlin Li
Code revised on : 7/18/2020

The data should be arranged in following structure before you call any function within this script:
dataset(Train/val/test)
-----mode(Train/val/test)
------Global
--------images
--------Annotations (Optional, not available only when you conduct inference steps)
------Density
--------images
--------Annotations (Optional, not available only when you conduct inference steps)

Sample command line to run:
python fusion_detection_result_official.py crop_data_fusion_mcnn --mode val

"""


def parse_args():
    parser = argparse.ArgumentParser(
        description='DMNet -- Global-local fusion detection')
    parser.add_argument('root_dir', default=".",
                        help='the path for source data')
    parser.add_argument('--mode', default="train", help='Indicate if you are working on train/val/test set')
    parser.add_argument('--truncate_threshold', type=float, default=0,
                        help='Threshold defined to select the cropped region')
    parser.add_argument('--iou_threshold', type=float, default=0.7,
                        help='Iou Threshold defined to filter out bbox, recommend val by mmdetection: 0.7')
    parser.add_argument('--TopN', type=int, default=500,
                        help='Only keep TopN bboxes with highest score, default value 500, '
                             'enforced by visiondrone competition')
    parser.add_argument('--show', action='store_true', help='Need to keep original image?')
    args = parser.parse_args()
    return args


if __name__ == "__main__":
    # start by providing inference result based on your file path
    # if you perform fusion in val phase, then your img_path belongs to val folder
    # pay attention to id and image_id in ann, same val but different name
    print("PLEASE CHANGE ALL PATHS BEFORE U GO!!!")
    args = parse_args()
    mode = args.mode
    show = args.show
    root = "."
    truncate_threshold = args.truncate_threshold
    folder_name = args.root_dir
    classList = ["pedestrian", "people", "bicycle", "car", "van", "truck", "tricycle", "awning-tricycle",
                 "bus", "motor","0","1"]

    #-------------------------------------------------------------------#
    #-----------------------写死验证集路径-------------------------------#
    img_path = os.path.join(root, folder_name, mode, "Global", "images")
    dens_path = os.path.join(root, folder_name, mode, "Density", "images")
    img_gt_file = os.path.join(root, folder_name, mode, "Global", "val.json")
    img_detection_file = os.path.join(root, folder_name, mode, "Global_swin_tiny_val_results.bbox.json")
    dens_gt_file = os.path.join(root, folder_name, mode, "Density", mode + ".json")
    dens_detection_file = os.path.join(root, folder_name, mode, "Density_swin_tiny_val_results.bbox.json")
    output_file = os.path.join(root, folder_name, mode, "Global", "final_fusion_result")

    # use coco api to retrieve detection result.
    # global == all_image dens == density map
    cocoGt_global = COCO(img_gt_file)
    cocoDt_global = cocoGt_global.loadRes(img_detection_file)
    cocoGt_density = COCO(dens_gt_file)
    print(len(cocoDt_global.dataset['categories']))
    assert len(cocoDt_global.dataset['categories']) == len(
        classList), "Not enough classes in global detection json file"
    cocoDt_density = cocoGt_density.loadRes(dens_detection_file)

    # load image_path and dens_path
    # Here we only load part of the data but both separate dataset are required
    # for fusion
    img_list = glob.glob(f'{img_path}/*.jpg')
    # dens means the way to generate data. Not "npy" type.
    dens_list = glob.glob(f'{dens_path}/*.jpg')
    assert len(img_list) > 0, "Failed to find any images!"
    assert len(dens_list) > 0, "Failed to find any inference!"
    valider = set()

    # initialize image detection result
    final_detection_result = []
    img_fusion_result_collecter = []
    # We have to match the idx for both density crops and original images, otherwise
    # we will have issues when merging them
    crop_img_matcher = {cocoDt_density.loadImgs(idx)[0]["file_name"]: cocoDt_density.loadImgs(idx)[0]["id"]
                        for idx in range(len(dens_list))}
    assert len(crop_img_matcher) > 0, "Failed to match images"
    for img_id in tqdm(cocoGt_global.getImgIds(), total=len(img_list)):
        # DO NOT use img/dens name to load data, there is a filepath error
        # start by dealing with global detection result
        # target 1: pick up all idx that belongs to original detection in the same pic
        # find img_id >> load img >>visual img+bbox
        img_density_detection_result = []
        img_initial_fusion_result = []
        global_img = cocoDt_global.loadImgs(img_id)
        img_name = global_img[0]["file_name"]
        global_detection_not_in_crop = None
        # matched_dens_file: Match 1 original image with its multiple crops
        matched_dens_file = {filename for filename in dens_list if img_name in filename}
        # 'id' from image json
        global_annIds = cocoDt_global.getAnnIds(imgIds=global_img[0]['id'],
                                                catIds=[i + 1 for i in range(len(classList))], iscrowd=None)
        # global_annIds might be empty, if you use subset to train expert model. So we do not check
        # the length here.
        current_global_img_bbox = cocoDt_global.loadAnns(global_annIds)
        current_global_img_bbox_cp = current_global_img_bbox.copy()
        current_global_img_bbox_total = len(current_global_img_bbox)
        # Firstly overlay result on global detection
        print("filename: ", os.path.join(img_path, img_name))
        # You may want to visualize it, for debugging purpose
        overlay_func(os.path.join(img_path, img_name), current_global_img_bbox,
                     classList, truncate_threshold, exclude_region=None, show=show)
        exclude_region = []
        for dens_img_id, dens_fullname in enumerate(matched_dens_file):
            # example of name path: 323_0_648_4160000117_02708_d_0000090
            dens_name = dens_fullname.split(r"/")[-1]
            # if you use density map crop, by default the first two coord are top and left.
            start_y, start_x = dens_name.split("_")[0:2]
            start_y, start_x = int(start_y), int(start_x)
            # get crop image bbox from detection result
            crop_img_id = crop_img_matcher[dens_name]
            # get annotation of current crop image
            crop_img_annotation = \
                overlay_bbox_img(cocoDt_density, dens_path, crop_img_id,
                                 truncate_threshold=truncate_threshold, show=show)
            # get bounding box detection for all boxes in crop one. Resized to original scale
            crop_bbox_to_original = resize_bbox_to_original(crop_img_annotation, start_x, start_y)
            img_density_detection_result.extend(crop_bbox_to_original)

            # Afterwards, scan global detection result and get out those detection that not in
            # cropped region
            # dens_fullname (example below)
            # './crop_data/val/density/images/566_1169_729_13260000117_02708_d_0000090.jpg'
            crop_img = cv2.imread(os.path.join(dens_fullname))
            crop_img_h, crop_img_w = crop_img.shape[:-1]
            global_detection_not_in_crop = []

            current_global_count, removal = len(current_global_img_bbox), 0
            for global_ann in current_global_img_bbox:
                bbox_left, bbox_top, bbox_width, bbox_height = global_ann['bbox']
                if start_x + truncate_threshold <= int(bbox_left) < int(
                        bbox_left + bbox_width) <= start_x + crop_img_w - truncate_threshold and \
                        start_y + truncate_threshold <= int(bbox_top) < int(
                    bbox_top + bbox_height) <= start_y + crop_img_h - truncate_threshold:
                    removal += 1
                    continue
                global_detection_not_in_crop.append(global_ann)
            del current_global_img_bbox[:]
            current_global_img_bbox = global_detection_not_in_crop
            exclude_region.append([start_x, start_y, crop_img_w, crop_img_h])
        # To verify result, show overlay on global image, after processed all of images
        # print out original image with bbox in crop region
        if global_detection_not_in_crop is None:
            # In this case, there is no density crop generate, we directly use original detection result.
            global_detection_not_in_crop = current_global_img_bbox
            assert len(img_density_detection_result) == 0, "for the case there is no crop, there should be no " \
                                                           "density detection result"
        else:
            assert len(matched_dens_file) > 0, "Density file should be 0"

        overlay_func(os.path.join(img_path, img_name), img_density_detection_result, classList, truncate_threshold,
                     exclude_region=exclude_region, show=show)
        # print out original image with bbox in Non-crop region
        overlay_func(os.path.join(img_path, img_name), global_detection_not_in_crop, classList, truncate_threshold,
                     exclude_region=exclude_region, show=show)
        # modify density crop id to align with updated result
        global_image_id = None
        if len(global_detection_not_in_crop) > 0:
            global_image_id = global_detection_not_in_crop[0]['image_id']
        for i in range(len(img_density_detection_result)):
            if global_image_id:
                img_density_detection_result[i]['image_id'] = global_image_id
            else:
                img_density_detection_result[i]['image_id'] = img_id
        img_initial_fusion_result = current_global_img_bbox_cp + img_density_detection_result
        img_fusion_result_collecter.append(img_initial_fusion_result)
        overlay_func(os.path.join(img_path, img_name), img_initial_fusion_result,
                     classList, truncate_threshold, exclude_region=None, show=show)
        print("collected box: ", len(img_initial_fusion_result))
        overlay_func(os.path.join(img_path, img_name), img_initial_fusion_result,
                     classList, truncate_threshold, exclude_region=None, show=show)

    # After we collect global/local bbox result, we then perform class-wise NMS to fuse bbox.
    iou_threshold = args.iou_threshold
    TopN = args.TopN
    for i in tqdm(cocoGt_global.getImgIds(), total=len(img_list)):
        current_nms_target = img_fusion_result_collecter[i - 1]
        global_img = cocoDt_global.loadImgs(i)
        img_name = global_img[0]["file_name"]
        nms_preprocess = wrap_initial_result(current_nms_target)
        length_pre, length_after = len(current_nms_target), 0
        keep = class_wise_nms(nms_preprocess, iou_threshold, TopN)
        class_wise_nms_result = [current_nms_target[i] for i in keep]
        final_detection_result.extend(class_wise_nms_result)
        final_nms_result = class_wise_nms_result
        overlay_func(os.path.join(img_path, img_name), final_nms_result,
                     classList, truncate_threshold, exclude_region=None, show=False)

    # Finally, we export fusion detection result to indicated json files, then evaluate it (if not inference)
    results2json(final_detection_result, out_file=output_file)
    if mode != "test-challenge":
        coco_eval(result_files=output_file + ".bbox.json",
                  result_types=['bbox'],
                  coco=cocoGt_global,
                  max_dets=(100, 300, 1000),
                  classwise=True)
主要需要改一下路径
DMNet库采用了很古老的mmcv库,需要重新装个mmcv库,但是这会覆盖原来的库,建议使用新环境装一下,隔离以下之前的mmdetection环境。
pip install mmcv==0.6.2验证集命令
python fusion_detection/fusion_detection_result_official.py /root/autodl-tmp/VisDrone2019 --mode VisDrone2019-DET-val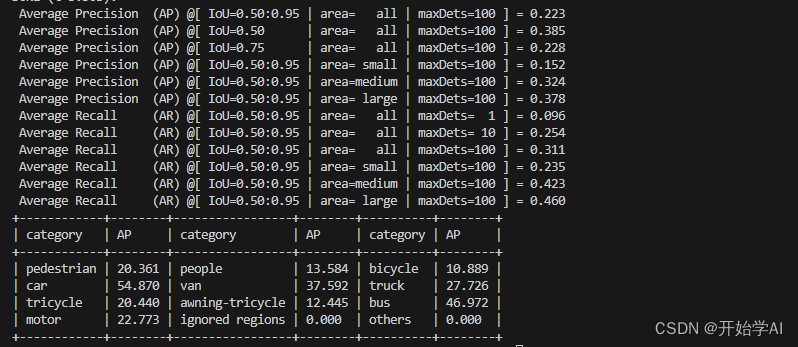
我去 这还没论文效果好。
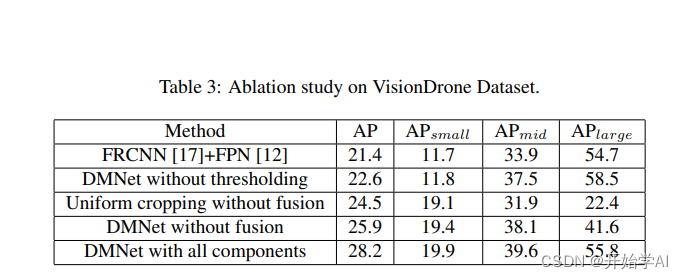
看下图像效果:
有些目标的框滤不掉,参数选择是个问题