class GNNStack(torch.nn.Module):
    def __init__(self, input_dim, hidden_dim, output_dim, args, emb=False):
        super(GNNStack, self).__init__() #这里的继承表示参见 https://blog.csdn.net/wanzew/article/details/106993425
        # 继承时运行继承类别的函数 总之 __mro__的目的就是 按照一定顺序,保证父类的函数只调用一次
本作业用到了GAT和GraphSAGE,故简单复习了一遍基本思想:
GraphSAGE: 采样和聚合,
简单来说就是聚合邻居节点信息,每次聚合下一层节点信息时有一个待学习的权重矩阵W,每层一个W矩阵,以无监督方式训练,损失函数如下 可参考【图神经网络】GraphSAGE 无监督训练源码剖析 - 知乎 (zhihu.com)
3.2_GraphSAGE_哔哩哔哩_bilibili
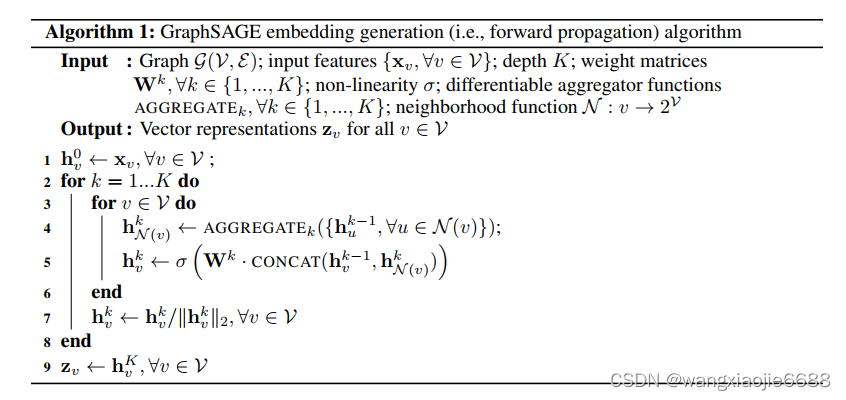
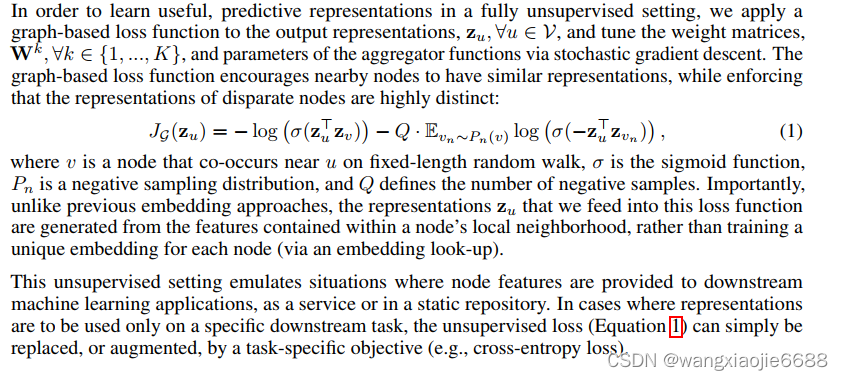
Zu和Zv为中心节点和周围(邻居)节点的向量表示,跟Word2vec有相似之处 是否可以理解为使用了节点特征的Word2vec?----有不同之处 思想类似,细节不同(正负采样损失函数,skip-gram随机采样窗口内值,多跳;但是GraphSAGE同样可以通过残差连接实现这一跳跃连接,默认聚合层数两层,层数多了反而没有什么优势)。
self.post_mp = nn.Sequential(
    nn.Linear(hidden_dim * num_heads, hidden_dim), nn.Dropout(args.dropout),
    nn.Linear(hidden_dim, output_dim)) #linear全连接层

class Sequential(Module):
    r"""A sequential container.
r""""一个顺序容器。
    模块将按照在构造函数中传递的顺序被添加到其中。
    构造函数中传递的顺序添加模块。或者,也可以将模块的 ``OrderedDict``
    传入。顺序 "的 ``forward()`` 方法接受任何输入,并将其转发给第一个模块。
    输入,并将其转发给其中包含的第一个模块。然后
    将输出依次 "链 "到其后每个模块的输入、
    最后返回最后一个模块的输出。

    与手动调用模块序列相比,``Sequential`` 的价值在于
    模块序列的价值在于,它允许将整个容器视为一个
    单个模块,这样在
    序列 "适用于它所存储的每个模块(每个模块都是
    序列 "的注册子模块)。

    一个 ``Sequential`` 和一个
    class:`torch.nn.ModuleList`有什么区别?模块列表(ModuleList)和它听起来一样
    模块列表 "听起来就像--一个用于存储 "模块 "的列表!另一方面、
    序列 "中的层是以层叠方式连接的。
def forward(self, data): #计算得到该层的输出X,用于随后的计算损失等等
x, edge_index, batch = data.x, data.edge_index, data.batch
for i in range(self.num_layers):
x = self.convs[i](x, edge_index)
x = F.relu(x)
x = F.dropout(x, p=self.dropout,training=self.training)
#删除一些连接层,增加模型的健壮性Generally, the forward function is where the actual message passing is conducted. All logic in each iteration happens in forward, where we'll call propagate function to propagate information from neighbor nodes to central nodes. So the general paradigm will be pre-processing -> propagate -> post-processing.
以上 很多细节没整明白 去读大佬写的代码了2233
GraphSAGE graphSAGEpytorch
4.3_GraphSAGE代码_哔哩哔哩_bilibili 中对应的代码。
			with open(cora_content_file) as fp:
				for i,line in enumerate(fp):
					info = line.strip().split()  # 字符分割等等
					feat_data.append([float(x) for x in info[1:-1]])

					node_map[info[0]] = i  # 节点的index
					if not info[-1] in label_map: # 查询  info[-1] 所对应的类别是否在  label_map(字典 ,列表 等等均可?) 中出现过
						label_map[info[-1]] = len(label_map) # 未出现过添加
					labels.append(label_map[info[-1]])  #出现过,直接添加对应的索引,这里是不是有更便利的api??


			with open(cora_cite_file) as fp:
				for i,line in enumerate(fp):
					info = line.strip().split()
					assert len(info) == 2   # 出现错误条件时崩溃 否则继续运行
					paper1 = node_map[info[0]]
					paper2 = node_map[info[1]]
					adj_lists[paper1].add(paper2)
					adj_lists[paper2].add(paper1)  #边连接信息转换
Python setattr() 函数 | 菜鸟教程 (runoob.com)
部分代码解析,代码在附件
models = [graphSage, classification]

graphSage
GraphSage(
  (sage_layer1): SageLayer()
  (sage_layer2): SageLayer()
)
classification
Classification(
  (layer): Sequential(
    (0): Linear(in_features=128, out_features=7, bias=True)
  )
)
models
[GraphSage(
  (sage_layer1): SageLayer()
  (sage_layer2): SageLayer()
), Classification(
  (layer): Sequential(
    (0): Linear(in_features=128, out_features=7, bias=True)
  )
)]
if param.requires_grad: params.append(param)
Pytorch关于requires_grad_(True)的理解_requires_grad=true_一叶知秋境的博客-CSDN博客
pytorch自动求梯度—详解_pythorch求梯度函数_浩波的笔记的博客-CSDN博客
以下内容部分摘抄自上面博客
x=torch.tensor(3.0,requires_grad=True)
y=torch.pow(x,2)
#判断x,y是否是可以求导的
print(x.requires_grad)
print(y.requires_grad)
#求导,通过backward函数来实现
y.backward()
#查看导数,也即所谓的梯度
print(x.grad)

True
True
tensor(6.) #这和我们自己算的是一模一样的。


x=torch.tensor(3.0,requires_grad=True)
c=torch.tensor(3.0,requires_grad=True)
y=torch.pow(x,2) + torch.pow(x*2,2)
#判断x,y是否是可以求导的
print(x.requires_grad)
print(c.requires_grad)
print(y.requires_grad)
#求导,通过backward函数来实现
y.backward()
#查看导数,也即所谓的梯度
print(x.grad)

True
True
True
tensor(30.)


x=torch.tensor(3.0,requires_grad=True)
c=torch.tensor(3.0,requires_grad=True)
y=torch.pow(x,2) + torch.pow(c*2,2)
#判断x,y是否是可以求导的
print(x.requires_grad)
print(c.requires_grad)
print(y.requires_grad)
#求导,通过backward函数来实现
y.backward()
#查看导数,也即所谓的梯度
print(x.grad) #求偏导

True
True
True
tensor(6.)
optimizer = torch.optim.SGD(params, lr=0.7) #要使用torch.optim,您必须构造一个optimizer对象。这个对象能保存当前的参数状态并且基于计算梯度更新参数。
print(optimizer.param_groups)
[{'params': [Parameter containing:
tensor([[ 0.0169, 0.0145, -0.0135, ..., 0.0339, -0.0121, 0.0044],
[-0.0005, -0.0139, 0.0170, ..., 0.0170, 0.0016, -0.0133],
[ 0.0273, -0.0281, 0.0107, ..., 0.0145, 0.0195, 0.0181],
...,
[ 0.0177, 0.0305, 0.0214, ..., -0.0376, 0.0134, 0.0319], ....
optimizer.step() 更新梯度
nodes_batch = np.asarray(list(unsupervised_loss.extend_nodes(nodes_batch, num_neg=num_neg))) # nodes_batch原本存的是目标节点 在无监督上进行负采样的操作
#np.asarray(a, dtype=None, order=None) 将结构数据转化为ndarray。
self.unique_nodes_batch = list(set([i for x in self.positive_pairs for i in x]) | set([i for x in self.negtive_pairs for i in x]))
visited_nodes |= set(nodes_batch) #缺少信息 对于无监督应打开 在Python中,|=是位运算符的一种,表示按位或运算并赋值。它用于将左操作数与右操作数进行按位或运算,并将结果赋值给左操作数。 #set(nodes_batch) Build an unordered collection of unique elements.
embs_batch = graphSage(nodes_batch) # 跳到models的GraphSge 根据节点序列(nodes_batch)聚合节点信息(在forward函数中聚合信息)
loss_net = unsupervised_loss.get_loss_margin(embs_batch, nodes_batch) #边缘损失???
assert len(self.node_positive_pairs) == len(self.node_negtive_pairs) #使用assert是学习python的一个非常好的习惯,在没完善一个程序之前,我们不知道程序在哪里会出错,与其让它在运行时崩溃,不如在出现错误条件时就崩溃。 def get_loss_sage(self, embeddings, nodes): 这里为GraphSAGE的精华部分 聚合 计算损失 采样在其他函数定义
assert len(embeddings) == len(self.unique_nodes_batch)
assert False not in [nodes[i]==self.unique_nodes_batch[i] for i in range(len(nodes))]
node2index = {n:i for i,n in enumerate(self.unique_nodes_batch)}
nodes_score = []
assert len(self.node_positive_pairs) == len(self.node_negtive_pairs) #使用assert是学习python的一个非常好的习惯,在没完善一个程序之前,我们不知道程序在哪里会出错,与其让它在运行时崩溃,不如在出现错误条件时就崩溃。
for node in self.node_positive_pairs: #得到目标节点 被采样(树根节点)案例节点 node = 439
pps = self.node_positive_pairs[node] #pps [(439, 97), (439, 388)]
nps = self.node_negtive_pairs[node]
if len(pps) == 0 or len(nps) == 0:
continue
# Q * Exception(negative score)
indexs = [list(x) for x in zip(*nps)]
node_indexs = [node2index[x] for x in indexs[0]]
neighb_indexs = [node2index[x] for x in indexs[1]]
neg_score = F.cosine_similarity(embeddings[node_indexs], embeddings[neighb_indexs])#计算余弦相似性 负采样对
neg_score = self.Q*torch.mean(torch.log(torch.sigmoid(-neg_score)), 0)
#print(neg_score)
# multiple positive score
indexs = [list(x) for x in zip(*pps)] #[[439, 439], [97, 388]]
node_indexs = [node2index[x] for x in indexs[0]] #索引值转换
neighb_indexs = [node2index[x] for x in indexs[1]]
pos_score = F.cosine_similarity(embeddings[node_indexs], embeddings[neighb_indexs]) #计算余弦相似性 正采样对 可以为多对采样节点的损失
pos_score = torch.log(torch.sigmoid(pos_score))
#print(pos_score)
nodes_score.append(torch.mean(- pos_score - neg_score).view(1,-1)) # .view(1, -1) 和 .view(-1, 1) 都是用于改变张量的形状,1为行/列为1,对应列/行的维度自己推断 https://blog.csdn.net/u013593554/article/details/131365170
loss = torch.mean(torch.cat(nodes_score, 0))
return loss
	def apply_model(dataCenter, ds, graphSage, classification, unsupervised_loss, b_sz, unsup_loss, device, learn_method):
...................................................................

	print('Step [{}/{}], Loss: {:.4f}, Dealed Nodes [{}/{}] '.format(index+1, batches, loss.item(), len(visited_nodes), len(train_nodes)))
		loss.backward()
		for model in models:
			nn.utils.clip_grad_norm_(model.parameters(), 5)  # ????梯度的二范数和不超过5(平方和开根号) Returns Total norm of the parameters (viewed as a single vector). 参数的总范数(视为单个向量)。
		optimizer.step()

		optimizer.zero_grad()
		for model in models:
			model.zero_grad()

	return graphSage, classification  #最终返回训练好的模型及分类器


		graphSage, classification = apply_model(dataCenter, ds, graphSage, classification, unsupervised_loss, args.b_sz, args.unsup_loss, device, args.learn_method)
		# if (epoch+1) % 2 == 0 and args.learn_method == 'unsup': ??
		if args.learn_method == 'unsup':
			classification, args.max_vali_f1 = train_classification(dataCenter,
						graphSage, classification, ds, device, args.max_vali_f1, args.name,epochs=10)
		if args.learn_method != 'unsup':
			args.max_vali_f1 = evaluate(dataCenter, ds, graphSage, classification, device, args.max_vali_f1, args.name, epoch)
代码打包放附件里了
GAT pyGAT
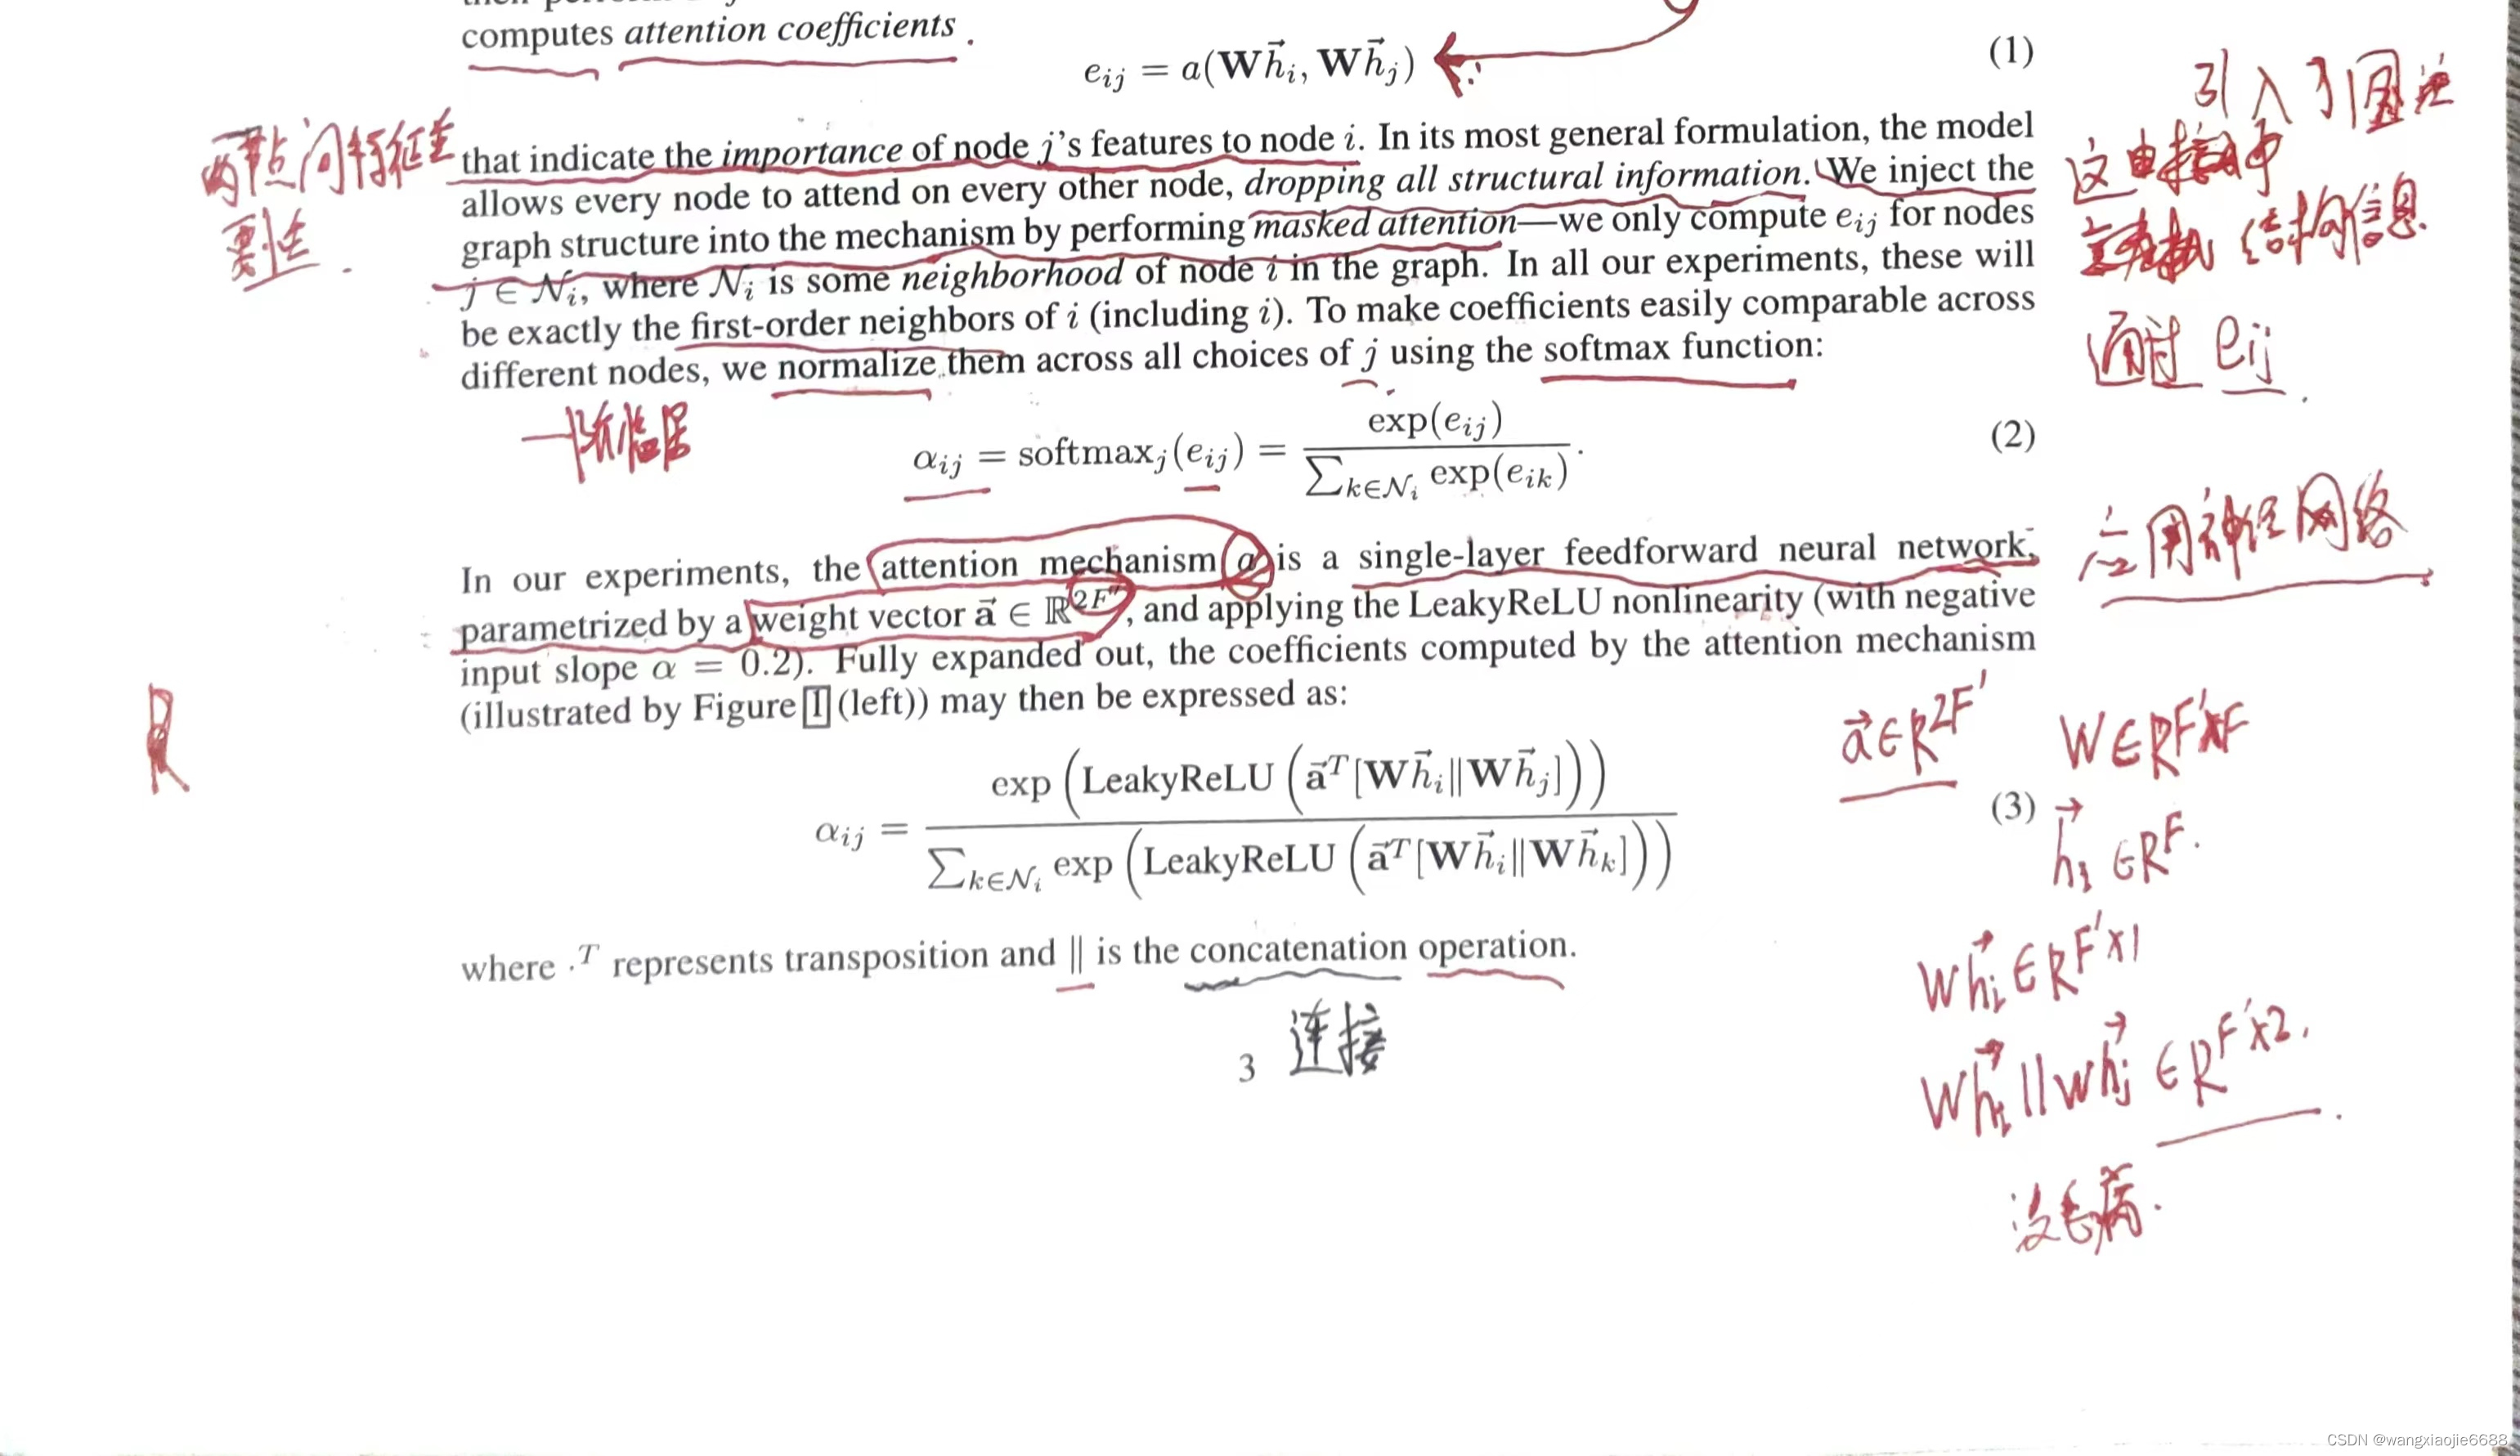
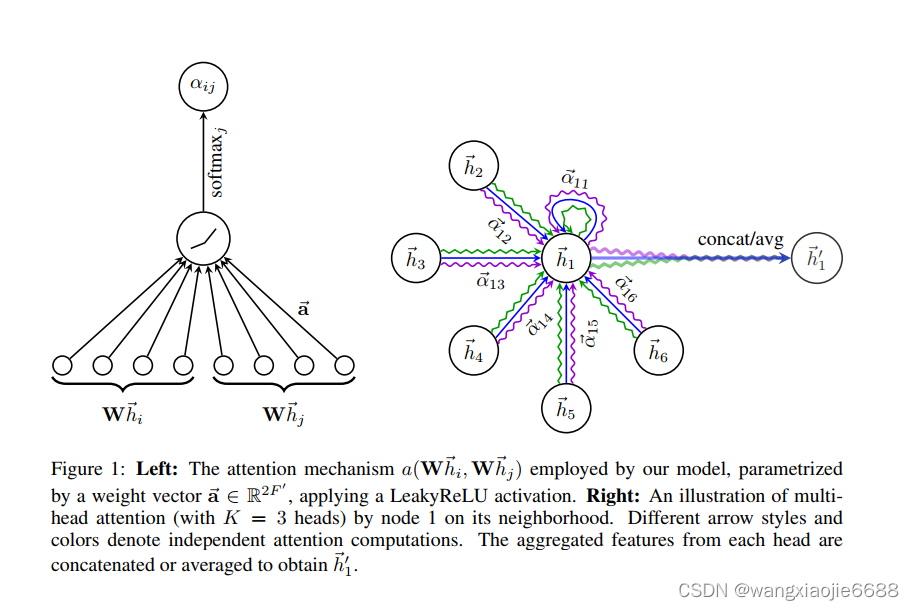 这里注意权重向量a的维度2F'
简单来说,如图1右边所示,对每对节点间的节点特征学习多组(K)注意力分数(a权重表示),即不同的注意力得分说明对该节点最终学习到的特征表示所占比重不同,当然其中还有权重矩阵W。
a,W训练细节??准备扣代码。。 一个损失函数,两个待更新参数,
,前面的几层使用向量拼接,最后一层使用求平均进行表示。

加载的数据类型

参数a和w在这里
class SpGraphAttentionLayer(nn.Module):
.............................................
        self.W = nn.Parameter(torch.zeros(size=(in_features, out_features)))
        nn.init.xavier_normal_(self.W.data, gain=1.414) #根据《理解深度前馈神经网络训练的困难》一书中描述的方法,用正态分布给输入张量填充值-格洛特,X。 & Bengio,Y。(2010)。

        self.a = nn.Parameter(torch.zeros(size=(1, 2*out_features)))
        nn.init.xavier_normal_(self.a.data, gain=1.414)

         参数a和w在这里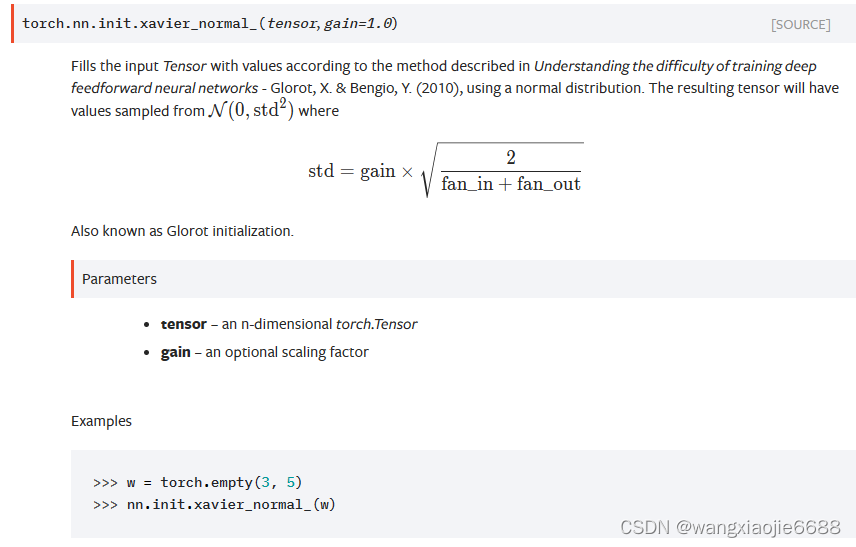
根据《理解深度前馈神经网络训练的困难》一书中描述的方法,用正态分布给输入张量填充值-格洛特,X。 & Bengio,Y。(2010)。得到的张量的值取自N(0,std2):......
class SpecialSpmm(nn.Module):
    def forward(self, indices, values, shape, b):
        return SpecialSpmmFunction.apply(indices, values, shape, b) #仅用于稀疏区域反向探测层的特殊功能。 ?????????????
self.attentions
Out[x]:
[SpGraphAttentionLayer (1433 -> 8),
 SpGraphAttentionLayer (1433 -> 8),
 SpGraphAttentionLayer (1433 -> 8),
 SpGraphAttentionLayer (1433 -> 8),
 SpGraphAttentionLayer (1433 -> 8),
 SpGraphAttentionLayer (1433 -> 8),
 SpGraphAttentionLayer (1433 -> 8),
 SpGraphAttentionLayer (1433 -> 8)] 一共八个注意力层
for i, attention in enumerate(self.attentions):
self.add_module('attention_{}'.format(i), attention)
def add_module(self, name: str, module: Optional['Module']) -> None:
r"""Adds a child module to the current module.
The module can be accessed as an attribute using the given name.
Args:
name (str): name of the child module. The child module can be
accessed from this module using the given name
module (Module): child module to be added to the module. self.attentions = [SpGraphAttentionLayer(nfeat,
nhid, #隐藏单元
dropout=dropout,
alpha=alpha,
concat=True) for _ in range(nheads)] # for循环加入多个注意力头部
for i, attention in enumerate(self.attentions):
self.add_module('attention_{}'.format(i), attention)
self.out_att = SpGraphAttentionLayer(nhid * nheads, #这里的输出层 in_features = nhid * nheads
nclass, #最终的类别数量
dropout=dropout,
alpha=alpha,
concat=False) #如原论文所述,不再进行连接操作 forward函数中有定义
if args.sparse:
    model = SpGAT(nfeat=features.shape[1],
                nhid=args.hidden,
                nclass=int(labels.max()) + 1,
                dropout=args.dropout,
                nheads=args.nb_heads,
                alpha=args.alpha)

model
Out[10]:
SpGAT(
  (attention_0): SpGraphAttentionLayer (1433 -> 8)
  (attention_1): SpGraphAttentionLayer (1433 -> 8)
  (attention_2): SpGraphAttentionLayer (1433 -> 8)
  (attention_3): SpGraphAttentionLayer (1433 -> 8)
  (attention_4): SpGraphAttentionLayer (1433 -> 8)
  (attention_5): SpGraphAttentionLayer (1433 -> 8)
  (attention_6): SpGraphAttentionLayer (1433 -> 8)
  (attention_7): SpGraphAttentionLayer (1433 -> 8)
  (out_att): SpGraphAttentionLayer (64 -> 7)
)
for epoch in range(args.epochs):
loss_values.append(train(epoch))
torch.save(model.state_dict(), '{}.pkl'.format(epoch)) #state_dict其实就是一个字典,该自点中包含了模型各层和其参数tensor的对应关系。
model.state_dict()
Out[11]:
OrderedDict([('attention_0.W',
tensor([[-0.0321, 0.0013, -0.0343, ..., 0.0293, -0.0442, -0.1344],
[-0.0339, 0.0500, 0.0024, ..., -0.0225, 0.0450, -0.0504],
[-0.0206, -0.0523, -0.0195, ..., -0.1319, -0.0335, 0.0088],
...,
[ 0.0260, 0.0611, -0.0970, ..., 0.0497, -0.0037, -0.0721],
[-0.0722, -0.0548, 0.0485, ..., -0.0783, 0.0368, -0.0621],
[-0.1570, 0.0491, -0.0276, ..., -0.0671, -0.0957, 0.0466]])),
('attention_0.a',
tensor([[-0.2627, -0.2468, 0.5891, -0.5921, -0.5617, 0.6863, -0.1551, 0.8884,
-0.7958, 0.2184, -0.4388, 0.4412, -0.0634, -0.4050, -0.1861, 1.2922]])),
('attention_1.W',
tensor([[-0.0284, 0.0512, 0.0544, ..., 0.0910, -0.0501, -0.1090],
[-0.0118, -0.0347, 0.0210, ..., 0.0478, 0.0415, -0.0088],
[ 0.0070, -0.0006, 0.0310, ..., 0.0664, -0.0134, -0.0094],
...,
[-0.0442, 0.0300, 0.0419, ..., 0.0454, -0.0556, 0.0554],
[-0.0083, -0.0153, -0.0581, ..., -0.0188, 0.0537, -0.0135],
[ 0.0844, 0.0414, 0.0077, ..., -0.0025, 0.0920, -0.0528]])),
('attention_1.a',
tensor([[ 0.4257, -0.1104, 0.7901, 0.2498, -0.4384, 0.2586, 0.2466, 0.7317,
0.4937, -0.1867, 0.8183, -0.0086, -0.0662, -0.0533, -0.1305, 0.2558]])), x = torch.cat([att(x, adj) for att in self.attentions], dim=1) 这个代码怎么理解
这段代码是使用PyTorch库中的`torch.cat`函数将多个张量拼接在一起。
在这里,`self.attentions`是一个包含多个注意力模型的列表。通过循环遍历`self.attentions`
列表中的每个注意力模型`att`,然后将输入张量`x`和邻接矩阵`adj`作为参数传递给每个注意力模型
的调用函数`att(x, adj)`。
`att(x, adj)`的调用会返回一个张量,表示通过注意力机制处理后的输入张量`x`。这个过程可能涉
及到计算注意力权重、对输入进行加权求和等操作,具体实现取决于`att`的定义。
最后,`torch.cat`函数将所有通过注意力模型处理后的张量按照指定的维度(`dim=1`)进行拼接,
得到最终的输出张量`x`。
感叹*pt的牛逼!!
x = F.dropout(x, self.dropout, training=self.training) #torch.Size([2708, 1433])
#training=self.training 表训练模式
x = torch.cat([att(x, adj) for att in self.attentions], dim=1) # torch.Size([2708, 64])参数a和w在这里更新
def train(epoch):
    t = time.time()
    model.train()
    optimizer.zero_grad()
    output = model(features, adj)  # GAT模块 torch.Size([2708, 7])
    loss_train = F.nll_loss(output[idx_train], labels[idx_train]) #tensor(1.9474, grad_fn=<NllLossBackward0>)
    acc_train = accuracy(output[idx_train], labels[idx_train])
    loss_train.backward()
    optimizer.step()
补一张参数图,注意a的维度,与前文相对应

二、loss.backward():
PyTorch的反向传播(即tensor.backward())是通过autograd包来实现的,autograd包会根据tensor进行过的数学运算来自动计算其对应的梯度。
具体来说,torch.tensor是autograd包的基础类,如果你设置tensor的requires_grads为True,就会开始跟踪这个tensor上面的所有运算,如果你做完运算后使用tensor.backward(),所有的梯度就会自动运算,tensor的梯度将会累加到它的.grad属性里面去。
更具体地说,损失函数loss是由模型的所有权重w经过一系列运算得到的,若某个w的requires_grads为True,则w的所有上层参数(后面层的权重w)的.grad_fn属性中就保存了对应的运算,然后在使用loss.backward()后,会一层层的反向传播计算每个w的梯度值,并保存到该w的.grad属性中。
如果没有进行tensor.backward()的话,梯度值将会是None,因此loss.backward()要写在optimizer.step()之前。
原文链接:https://blog.csdn.net/PanYHHH/article/details/107361827
import torch
x=torch.tensor(3.0,requires_grad=True)
c=torch.tensor(3.0,requires_grad=True)

y=torch.pow(x,2) + torch.pow(c*2,2)

#判断x,y是否是可以求导的
print(x.requires_grad)
print(c.requires_grad)
print(y.requires_grad)

#求导,通过backward函数来实现
y.backward()

#查看导数,也即所谓的梯度
print(x.grad)
print(c.grad)

True
True
True
tensor(6.)
tensor(24.)

import torch
x=torch.tensor(3.0,requires_grad=True)
c=torch.tensor(3.0,requires_grad=True)

y=torch.pow(x,2) + torch.pow(c*2,2)
z=2*y

#判断x,y是否是可以求导的
print(x.requires_grad)
print(c.requires_grad)
print(y.requires_grad)
print(z.requires_grad)

#求导,通过backward函数来实现
# y.backward()
z.backward()

#查看导数,也即所谓的梯度
print(x.grad)
print(c.grad)

True
True
True
True
tensor(12.)
tensor(48.)

在多变量的参数中,求得函数偏导,而后更新梯度 这里也侧面可以反映出参数a和W的更新。
若理解有误 欢迎告知。
def train(epoch):
.........................
loss_train.backward()
optimizer.step()
if not args.fastmode:
# Evaluate validation set performance separately,
# deactivates dropout during validation run.
model.eval() #修改为评估模式 不更新梯度
output = model(features, adj)
loss_val = F.nll_loss(output[idx_val], labels[idx_val])
acc_val = accuracy(output[idx_val], labels[idx_val])
print('Epoch: {:04d}'.format(epoch+1),
'loss_train: {:.4f}'.format(loss_train.data.item()),
'acc_train: {:.4f}'.format(acc_train.data.item()),
'loss_val: {:.4f}'.format(loss_val.data.item()),
'acc_val: {:.4f}'.format(acc_val.data.item()),
'time: {:.4f}s'.format(time.time() - t))
return loss_val.data.item()
有一个保留最佳训练表现的代码 以后可能用到
for epoch in range(args.epochs):
    loss_values.append(train(epoch))

    torch.save(model.state_dict(), '{}.pkl'.format(epoch)) #state_dict其实就是一个字典,该自点中包含了模型各层和其参数tensor的对应关系。
    if loss_values[-1] < best:
        best = loss_values[-1]
        best_epoch = epoch
        bad_counter = 0
    else:
        bad_counter += 1

    if bad_counter == args.patience:
        break

    files = glob.glob('*.pkl')
    for file in files:
        epoch_nb = int(file.split('.')[0])
        if epoch_nb < best_epoch:
            os.remove(file)

files = glob.glob('*.pkl')
for file in files:
    epoch_nb = int(file.split('.')[0])
    if epoch_nb > best_epoch:
        os.remove(file)