目录
- 一. 前期准备
- 1.1 国际化项目获取类
- 1.2 国际化配置文件类
- 1.3 项目配置文件
- 1.4 国际化资源文件
- 二. `__${表达式}__`预处理表达式
- 2.1 在Thymeleaf中使用Spring的Bean
- 2.2 通过#{}获取国际化资源
- 2.3 预处理表达式`__${表达式}__`的使用
- 三. 效果
- 四. 表格案例
一. 前期准备
1.1 国际化项目获取类
- 缓存数据库查询到的国际化资源文件
import org.springframework.beans.factory.InitializingBean;
import org.springframework.stereotype.Component;
import org.springframework.util.ObjectUtils;

import java.util.HashMap;
import java.util.Map;

@Component
public class ThymeleafMsgPreProcess implements InitializingBean {

    // 中文项目缓存
    private final static Map<String, String> msgCh = new HashMap<>();

    // 日文项目缓存
    private final static Map<String, String> msgJP = new HashMap<>();

    // 可以在此处进行数据库查询国际化项目的操作
    @Override
    public void afterPropertiesSet() throws Exception {

        // 清空所有的国际化项目
        msgCh.clear();
        msgJP.clear();

        // 模拟从数据库获取数据 -> 中文
        msgCh.put("E001", "香蕉");
        msgCh.put("E002", "苹果");

        // 模拟从数据库获取数据 -> 日语
        msgJP.put("E001", "バナナ");
        msgJP.put("E002", "リンゴ");
    }

    // 获取中文项目
    public String getChMsgByCode(String code) {
        String msg = msgCh.get(code);
        if (ObjectUtils.isEmpty(msg)) {
            return "";
        }

        return msg;
    }

    // 获取日文项目
    public String getJpMsgByCode(String code) {
        String msg = msgJP.get(code);
        if (ObjectUtils.isEmpty(msg)) {
            return "";
        }

        return msg;
    }
}
1.2 国际化配置文件类
import org.springframework.context.annotation.Bean;
import org.springframework.context.annotation.Configuration;
import org.springframework.web.servlet.LocaleResolver;
import org.springframework.web.servlet.config.annotation.InterceptorRegistry;
import org.springframework.web.servlet.config.annotation.WebMvcConfigurer;
import org.springframework.web.servlet.i18n.LocaleChangeInterceptor;
import org.springframework.web.servlet.i18n.SessionLocaleResolver;
import java.util.Locale;

@Configuration
public class InternationalConfig implements WebMvcConfigurer {

    // 默认解析器,用来设置当前会话默认的国际化语言
    @Bean
    public LocaleResolver localeResolver() {
        SessionLocaleResolver sessionLocaleResolver = new SessionLocaleResolver();
        // 指定当前项目的默认语言是中文
        sessionLocaleResolver.setDefaultLocale(Locale.SIMPLIFIED_CHINESE);
        return sessionLocaleResolver;
    }

    // 默认拦截器,用来指定切换国际化语言的参数名
    @Bean
    public LocaleChangeInterceptor localeChangeInterceptor() {

        LocaleChangeInterceptor localeChangeInterceptor = new LocaleChangeInterceptor();
        /*
            设置国际化请求参数为language
            设置完成之后,URL中的 ?language=zh 表示读取国际化文件messages_zh.properties
         */
        localeChangeInterceptor.setParamName("language");
        return localeChangeInterceptor;
    }

    // 将我们自定义的国际化语言参数拦截器放入Spring MVC的默认配置中
    @Override
    public void addInterceptors(InterceptorRegistry registry) {
        registry.addInterceptor(localeChangeInterceptor());
    }
}
1.3 项目配置文件
spring:
  messages:
    basename: i18n/messages
    encoding: UTF-8
1.4 国际化资源文件
@Bean名称.方法名(参数)可以在Thymeleaf的HTML中调用Java中的Bean类
⏹messages_zh.properties
# 在中文资源文件中获取中文项目
item.text=@thymeleafMsgPreProcess.getChMsgByCode({0})
⏹messages_ja.properties
# 在日文资源文件中获取日文项目
item.text=@thymeleafMsgPreProcess.getJpMsgByCode({0})
二. __${表达式}__预处理表达式
预处理是在普通表达式执行之前的执行的表达式,预处理表达式执行之后的结果会再作为普通表达式要执行的内容被普通表达式再处理一遍,最终渲染到页面上。
2.1 在Thymeleaf中使用Spring的Bean
我们在后台定义了国际化项目获取类ThymeleafMsgPreProcess,并将其放入了Spring的Bean中,因此可以在前台这样使用
<div>
	[[${@thymeleafMsgPreProcess.getChMsgByCode('E001')}]]
</div>
渲染之后
<div>
	香蕉
</div>
2.2 通过#{}获取国际化资源
<div>
    [[#{item.text('E001')}]]
</div>
⏹渲染之后,可以看到直接把资源文件中的信息原封不动的展示在页面上
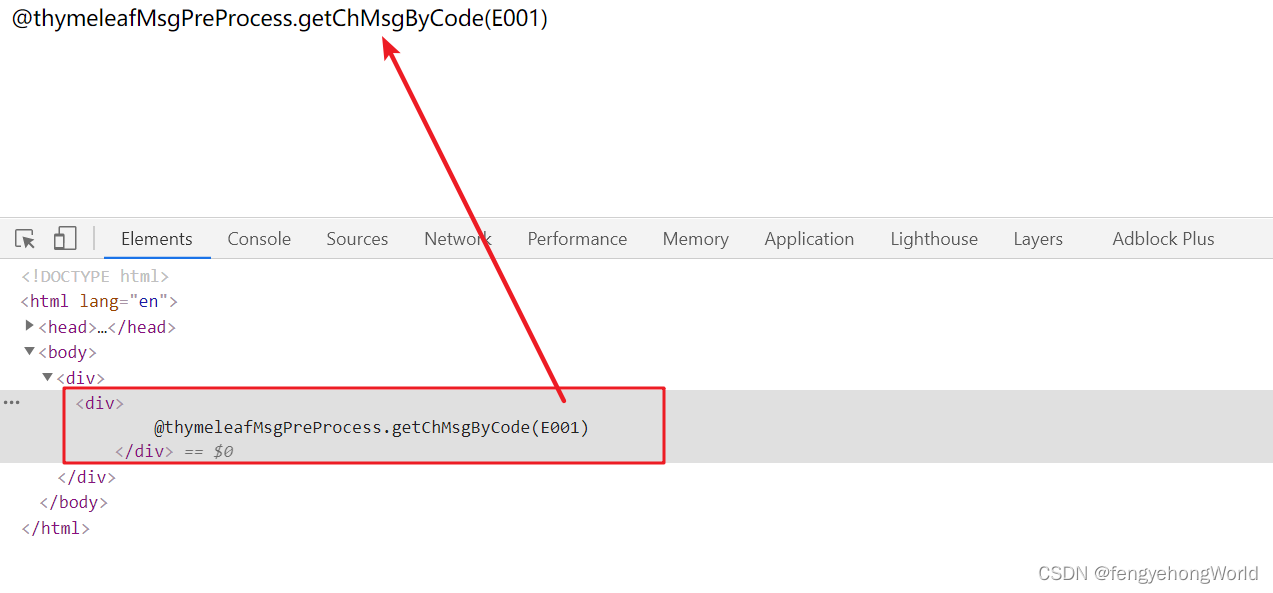
也就是说,如果能先通过 #{} 来将获取国际化资源的表达式渲染出来,再通过 ${} 执行国际化资源获取,就可以直接展示国际化资源了
2.3 预处理表达式__${表达式}__的使用
__${表达式}__会预先进行处理,得到@thymeleafMsgPreProcess.getChMsgByCode(E001)
然后再通过${}指定普通的表达式处理,最终就可以得到效果
<div th:with="itemCode='E001'">
    [[${__#{item.text(itemCode)}__}]]
</div>
渲染之后
<div>
	香蕉
</div>
需要注意的是,如果我们打算直接将Code写死到HTML中的话,不能这么写
<div>
    [[${__#{item.text('E001')}__}]]
</div>
而是要使用|字符串拼接|这样的写法,否则无法正确传参
<div>
    [[${__#{item.text(|'E001'|)}__}]]
</div>
三. 效果
<div th:with="itemCode='E001'">
    [[${__#{item.text(itemCode)}__}]]
</div>

<div>
    [[${__#{item.text(|'E001'|)}__}]]
</div>

四. 表格案例
⏹实体类
import lombok.Data;
import java.util.List;

@Data
public class Test16Form {

    private List<TestBean> beanList;
}

@Data
public class TestBean {

    private Integer fromAge;

    private Integer toAge;

    private Integer fromDate;

    private Integer toData;
}
⏹Controller层
@Controller
@RequestMapping("/test16")
public class Test16Controller {

    @Resource
    private HttpServletRequest request;

    @GetMapping("/init")
    public ModelAndView init() {

		// 准备测试数据
        TestBean testBean1 = new TestBean();
        testBean1.setFromAge(1);
        testBean1.setToAge(2);
        testBean1.setFromDate(2021);
        TestBean testBean2 = new TestBean();
        testBean2.setFromAge(11);
        testBean2.setToAge(22);
        testBean2.setFromDate(2022);
        ArrayList<TestBean> testBeans = new ArrayList<>();
        testBeans.add(testBean1);
        testBeans.add(testBean2);

		// 放入实体类中
        Test16Form test16Form = new Test16Form();
        test16Form.setBeanList(testBeans);

        // 返回到页面中
        ModelAndView modelAndView = new ModelAndView();
        modelAndView.setViewName("test16");
        modelAndView.addObject("entity", test16Form);
        return modelAndView;
    }
}
⏹Thymeleaf页面
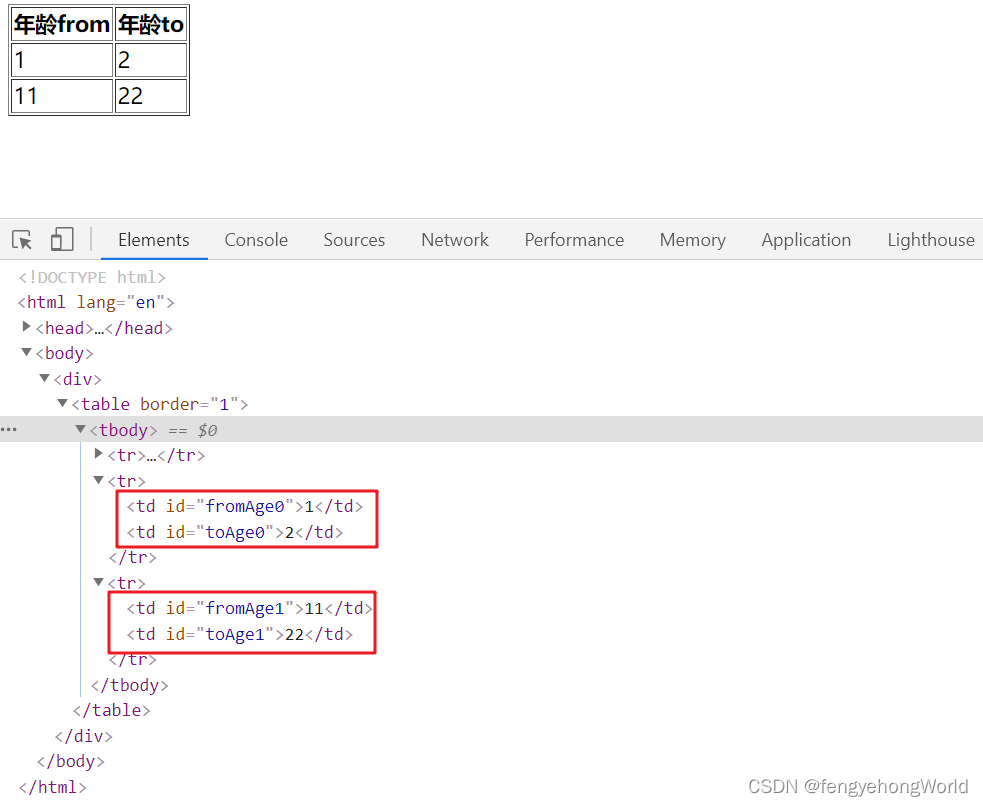
th:id="fromAge__${state.index}__"和th:id="|toAge${state.index}|"的作用相同- 第1种写法中,使用
预处理表达式__${表达式}__先将 ${state.index} 处理为下标,也就是说变成了th:id="fromAge0",然后使用th:id渲染为id="fromAge0" - 第2种写法中,使用字符串拼接的方法处理为
th:id="toAge0",然后使用th:id渲染为id="toAge0"
<!DOCTYPE html>
<html lang="en" xmlns:th="http://www.thymeleaf.org">
<head>
    <meta charset="UTF-8">
    <title>Title</title>
</head>
<body>
<div th:object="${entity}">
    <table border="1">
        <tr>
            <th>年龄from</th>
            <th>年龄to</th>
        </tr>
        <th:block th:each="bean,state: *{beanList}">
            <tr>
                <td th:id="fromAge__${state.index}__">[[${bean.fromAge}]]</td>
                <td th:id="|toAge${state.index}|">[[${bean.toAge}]]</td>
            </tr>
        </th:block>
    </table>
</div>
</body>
</html>
⏹渲染之后
