一、背景
sprinbBoot的cache是不是支持动态设置缓存注解的,因此本次自己实现一个可以动态设置缓存时间的配置。
源码:示例地址
二、步骤
1、pom.xml添加依赖配置
        <dependency>
            <groupId>org.springframework.boot</groupId>
            <artifactId>spring-boot-starter-data-redis</artifactId>
            <version>2.7.0</version>
        </dependency>
        <dependency>
            <groupId>com.fasterxml.jackson.core</groupId>
            <artifactId>jackson-databind</artifactId>
            <version>2.13.0</version>
        </dependency>
2、application.properties配置文件的配置
spring.application.name=springboot_cache
#缓存前缀统一
spring.redis.key.prefix=SPRINGBOOT_CACHE
#redis的配置
spring.cache.type=redis
spring.data.redis.host=localhost
spring.data.redis.jedis.pool.enabled=true
spring.data.redis.jedis.pool.max-active=8
spring.data.redis.jedis.pool.max-idle=8
spring.data.redis.jedis.pool.max-wait=3000ms
spring.data.redis.jedis.pool.min-idle=20
spring.data.redis.port=6379
spring.data.redis.timeout=3000ms
3、自定义一个RedisCacheManager
自定义的类继承org.springframework.data.redis.cache.RedisCacheManager。
package com.example.springboot_cache.config;

import lombok.SneakyThrows;
import org.springframework.data.redis.cache.RedisCache;
import org.springframework.data.redis.cache.RedisCacheConfiguration;
import org.springframework.data.redis.cache.RedisCacheManager;
import org.springframework.data.redis.cache.RedisCacheWriter;

import java.time.Duration;

public class CustomRedisCacheManager extends RedisCacheManager {

    public CustomRedisCacheManager(RedisCacheWriter cacheWriter, RedisCacheConfiguration defaultCacheConfiguration) {
        super(cacheWriter, defaultCacheConfiguration);
    }

    @SneakyThrows
    @Override
    protected RedisCache createRedisCache(String name, RedisCacheConfiguration cacheConfiguration){
        if(!name.isEmpty() && name.contains(":")){
            String[] spelStr = name.split(":");
            String key = spelStr[0];
            String valueStr = spelStr[1];
            int cycleTime = Integer.parseInt(valueStr.substring(0, 1));
            String cycleUnit = valueStr.substring(1, 2);

            if(cycleUnit.equals("D")){//表示天
                return super.createRedisCache(key, cacheConfiguration.entryTtl(Duration.ofDays(cycleTime)));
            }
            if(cycleUnit.equals("H")){//表示小时
                return super.createRedisCache(key, cacheConfiguration.entryTtl(Duration.ofHours(cycleTime)));
            }
            if(cycleUnit.equals("M")){//表示分钟
                return super.createRedisCache(key, cacheConfiguration.entryTtl(Duration.ofMinutes(cycleTime)));
            }
            if(cycleUnit.equals("S")){//表示秒
                return super.createRedisCache(key, cacheConfiguration.entryTtl(Duration.ofSeconds(cycleTime)));
            }else{
                throw new Exception("未识别的有效缓存时间单位");
            }
        }
        return super.createRedisCache(name, cacheConfiguration);

    }
}
4、使用自定义的RedisCacheManager覆盖springBoot的RedisCacheManager
package com.example.springboot_cache.config;

import com.fasterxml.jackson.annotation.JsonAutoDetect;
import com.fasterxml.jackson.annotation.JsonTypeInfo;
import com.fasterxml.jackson.annotation.PropertyAccessor;
import com.fasterxml.jackson.databind.DeserializationFeature;
import com.fasterxml.jackson.databind.ObjectMapper;
import com.fasterxml.jackson.databind.jsontype.impl.LaissezFaireSubTypeValidator;
import org.springframework.beans.factory.annotation.Value;
import org.springframework.context.annotation.Bean;
import org.springframework.context.annotation.Configuration;
import org.springframework.data.redis.cache.RedisCacheConfiguration;
import org.springframework.data.redis.cache.RedisCacheManager;
import org.springframework.data.redis.cache.RedisCacheWriter;
import org.springframework.data.redis.connection.RedisConnectionFactory;
import org.springframework.data.redis.core.RedisTemplate;
import org.springframework.data.redis.serializer.Jackson2JsonRedisSerializer;
import org.springframework.data.redis.serializer.RedisSerializationContext;
import org.springframework.data.redis.serializer.StringRedisSerializer;

@Configuration
public class RedisConfig {

    @Value("${spring.redis.key.prefix}")
    private String keyPreFix;

    /**
     * redis序列化方式
     * @param factory
     * @return
     */
    @Bean
    public RedisTemplate redisTemplate(RedisConnectionFactory factory){
        //指定Jackson2JsonRedisSerializer为Object的序列化器,替代redis默认的序列化器JdkSerializationRedisSerializer
        Jackson2JsonRedisSerializer jackson2JsonRedisSerializer = new Jackson2JsonRedisSerializer(Object.class);
        RedisTemplate<Object, Object> redisTemplate = new RedisTemplate<>();
        redisTemplate.setConnectionFactory(factory);

        ObjectMapper objectMapper = new ObjectMapper();
        //注意:enableDefaultTyping方法已过期
//        objectMapper.enableDefaultTyping(ObjectMapper.DefaultTyping.NON_FINAL, JsonTypeInfo.As.PROPERTY);
        //扩展知识:JsonTypeInfo.As属性认知
        //JsonTypeInfo.As.PROPERTY:作为数据的兄弟属性
        //JsonTypeInfo.As.EXISTING_PROPERTY:作为POJO中已经存在的属性
        //JsonTypeInfo.As.EXTERNAL_PROPERTY:作为扩展属性
        //JsonTypeInfo.As.WRAPPER_OBJECT:作为一个包装的对象
        //JsonTypeInfo.As.WRAPPER_ARRAY:作为一个包装的数组

        objectMapper.activateDefaultTyping(LaissezFaireSubTypeValidator.instance,
                ObjectMapper.DefaultTyping.NON_FINAL, JsonTypeInfo.As.PROPERTY);
        //反序列化时智能识别变量名(识别没有按驼峰格式命名的变量名)
        objectMapper.setVisibility(PropertyAccessor.ALL, JsonAutoDetect.Visibility.ANY);
        //反序列化如果有多的属性,不抛出异常
        objectMapper.configure(DeserializationFeature.FAIL_ON_UNKNOWN_PROPERTIES, false);
        //反序列化如果碰到不识别的枚举值,是否作为空值解释,true:不会抛不识别的异常, 会赋空值,false:会抛不识别的异常
        objectMapper.configure(DeserializationFeature.READ_UNKNOWN_ENUM_VALUES_AS_NULL, true);

        jackson2JsonRedisSerializer.setObjectMapper(objectMapper);
        redisTemplate.setValueSerializer(jackson2JsonRedisSerializer);
        redisTemplate.setKeySerializer(new StringRedisSerializer());
        redisTemplate.afterPropertiesSet();

        return redisTemplate;

    }


    /*
     * @description Redis缓存的序列化方式使用redisTemplate.getValueSerializer(),不在使用JDK默认的序列化方式
     * @param redisTemplate
     * @return RedisCacheManager
     **/
    @Bean
    public RedisCacheManager redisCacheManager(RedisTemplate redisTemplate) {
        RedisCacheWriter redisCacheWriter = RedisCacheWriter.nonLockingRedisCacheWriter(redisTemplate.getConnectionFactory());
        RedisCacheConfiguration redisCacheConfiguration = RedisCacheConfiguration.defaultCacheConfig()
                .serializeValuesWith(RedisSerializationContext.SerializationPair.fromSerializer(redisTemplate.getValueSerializer()))
                //使用prefixCacheNameWith需要注意系统自动拼接的双”:“问题
                .computePrefixWith(cacheName -> keyPreFix  + ":" + cacheName + ":")
                .serializeKeysWith(RedisSerializationContext.SerializationPair.fromSerializer(redisTemplate.getKeySerializer()));
        //return new RedisCacheManager(redisCacheWriter, redisCacheConfiguration);
        return new CustomRedisCacheManager(redisCacheWriter, redisCacheConfiguration);
    }
}
三、注解测试
1、定义一个service, 写三个方法,分别测试以下四个加粗注解
| 对象 | 功能 |
|---|---|
| Cache | 缓存接口,定义缓存操作。实现:RedisCache,EnCacheCache等 |
| CacheManager | 缓存管理器,管理各种缓存(Cache)组件 |
| @Cacheable | 主要针对方法配置,能够根据方法的请求参数对其结果进行缓存 |
| @CacheEvict | 清空缓存 |
| @CachePut | 保证方法被调用,又希望结果被缓存。 |
| @EnableCaching | 开启基于注解的缓存 |
| keyGenerator | 缓存数据时key生成策略 |
| serialize | 缓存数据时value序列化策略 |
代码:
package com.example.springboot_cache.service;

import com.example.springboot_cache.entity.User;
import lombok.extern.slf4j.Slf4j;
import org.springframework.beans.BeanUtils;
import org.springframework.cache.annotation.CacheEvict;
import org.springframework.cache.annotation.CachePut;
import org.springframework.cache.annotation.Cacheable;
import org.springframework.stereotype.Component;
import org.springframework.util.Assert;

import java.util.ArrayList;
import java.util.List;
import java.util.Optional;

@Slf4j
@Component
public class UserService {

    private static List<User> userList =  new ArrayList<>();

    static{
        userList.add(new User("张三",33, 1));
        userList.add(new User("李四",30, 2));
        userList.add(new User("王五",28, 3));
        userList.add(new User("赵六",22, 4));

    }

    //添加缓存
    @Cacheable(value = "user:5M", key = "#userId")
    public User getUser(Integer userId){
        log.info("没使用缓存...");
        Optional<User> first = userList.stream().filter(u -> u.getId() == userId).findFirst();
        if(first.isPresent()){
            return first.get();
        }
        return null;
    }

    //清除缓存
    @CacheEvict(value = "user", key = "#user.id")
    public void update(User user) throws Exception {
        Assert.notNull(user, "the param user cannot be null");
        Assert.notNull(user.getId(), "the param user.id cannot be null");
        Optional<User> first = userList.stream().filter(u -> u.getId() == user.getId()).findFirst();
        if(first.isPresent()){
            User user1 = first.get();
            BeanUtils.copyProperties(user, user1);
        }else{
            throw new Exception("未查询到用户");
        }
    }

    //更新缓存
    @CachePut(value = "user", key = "#result.id")
    public User updateNameByUserId(String name, Integer userId) throws Exception {
        Assert.notNull(name, "the param user cannot be null");
        Assert.notNull(userId, "the param user.id cannot be null");
        Optional<User> first = userList.stream().filter(u -> u.getId() == userId).findFirst();
        if(first.isPresent()){
            User user1 = first.get();
            user1.setName(name);
            return user1;
        }else{
            throw new Exception("未查询到用户");
        }
    }

}
2、启动类启动springboot的cache
启动类上加上注解@EnableCaching
package com.example.springboot_cache;

import org.springframework.boot.SpringApplication;
import org.springframework.boot.autoconfigure.SpringBootApplication;
import org.springframework.cache.annotation.EnableCaching;

@SpringBootApplication
@EnableCaching
public class SpringbootCacheApplication {

    public static void main(String[] args) {
        SpringApplication.run(SpringbootCacheApplication.class, args);
    }

}
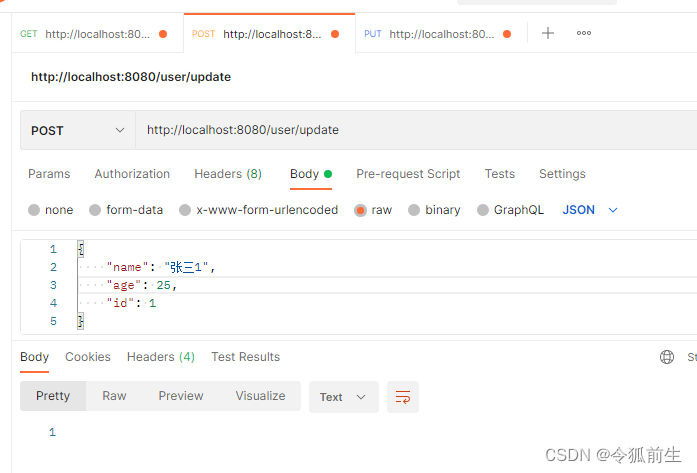
3、写一个controller, 分别调用service的三个方法。
package com.example.springboot_cache.controller;

import com.example.springboot_cache.entity.User;
import com.example.springboot_cache.service.UserService;
import org.springframework.beans.factory.annotation.Autowired;
import org.springframework.web.bind.annotation.*;

@RestController
@RequestMapping(value = "user/")
public class UserController {

    @Autowired
    private UserService userService;

    @GetMapping(value = "{userId}")
    public User queryUserById(@PathVariable Integer userId){
        return userService.getUser(userId);
    }

    @PostMapping(value = "update")
    public void update(@RequestBody User user) throws Exception {
        userService.update(user);
    }

    @PutMapping(value = "updateName/{userId}")
    public User updateNameByUserId(@RequestParam(name = "userName") String userName, @PathVariable Integer userId) throws Exception {
        return userService.updateNameByUserId(userName, userId);
    }
}
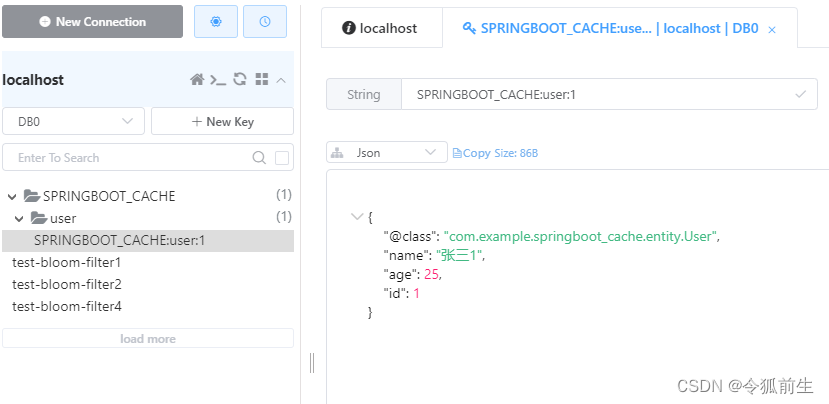
3.1、查询请求
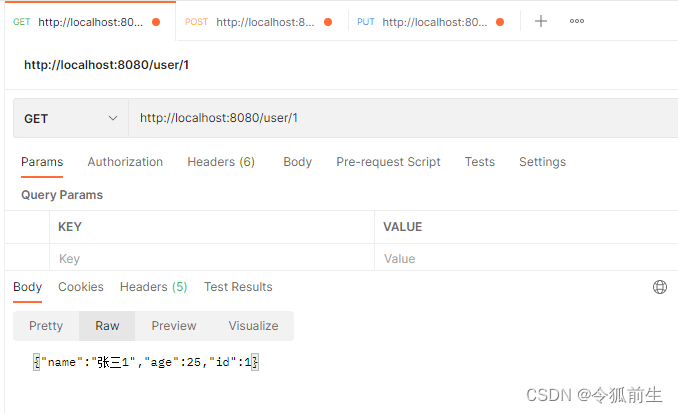
请求后redis:
3.2、清除缓存请求
请求后redis:

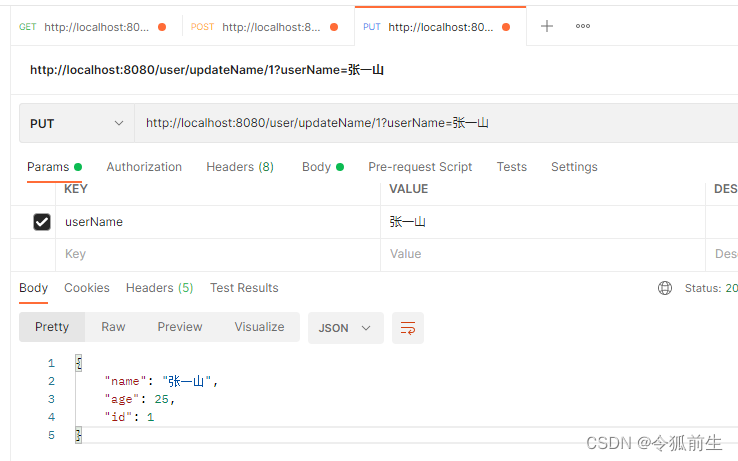
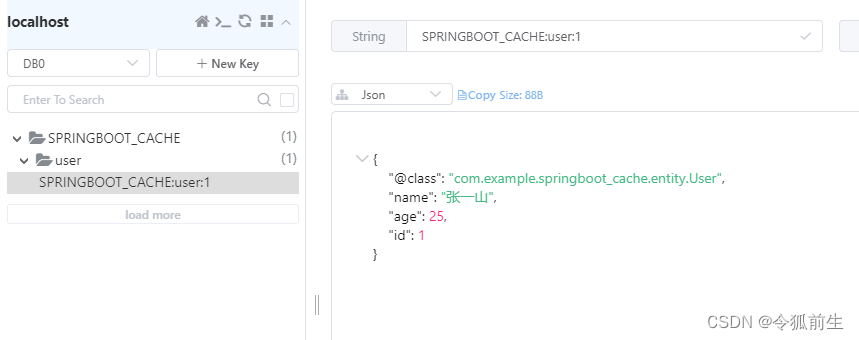
3.3、更新缓存请求
请求后redis:
四、Spring boot Cache原理
第一步、自动配置类;
自动启动类:CacheAutoConfiguration
属性配置:CacheProperties
主启动类添加:@EnableCaching注解
cache POM添加:
<dependency>
  <groupId>org.springframework.boot</groupId>
  <artifactId>spring-boot-starter-cache</artifactId>
  <version>${spring-boot-cache.version}<version>
</dependency>
第二步、从缓存的配置类 中获取 多个cache
CacheConfigurationImportSelector.selectImports()方法获取
static class CacheConfigurationImportSelector implements ImportSelector {

    @Override
    public String[] selectImports(AnnotationMetadata importingClassMetadata) {
      CacheType[] types = CacheType.values();
      String[] imports = new String[types.length];
      for (int i = 0; i < types.length; i++) {
        imports[i] = CacheConfigurations.getConfigurationClass(types[i]);
      }
      return imports;
    }

}
获取结果:SimpleCacheConfiguration 默认cache
 org.springframework.boot.autoconfigure.cache.GenericCacheConfiguration
  org.springframework.boot.autoconfigure.cache.JCacheCacheConfiguration
  org.springframework.boot.autoconfigure.cache.EhCacheCacheConfiguration
  org.springframework.boot.autoconfigure.cache.HazelcastCacheConfiguration
  org.springframework.boot.autoconfigure.cache.InfinispanCacheConfiguration
  org.springframework.boot.autoconfigure.cache.CouchbaseCacheConfiguration
  org.springframework.boot.autoconfigure.cache.RedisCacheConfiguration
  org.springframework.boot.autoconfigure.cache.CaffeineCacheConfiguration
  org.springframework.boot.autoconfigure.cache.GuavaCacheConfiguration
  org.springframework.boot.autoconfigure.cache.SimpleCacheConfiguration【默认】
  org.springframework.boot.autoconfigure.cache.NoOpCacheConfiguration
第三步:SimpleCacheConfiguration.cacheManager()
此方法中给容器中注册了一个CacheManager组件:类型为ConcurrentMapCacheManager
@Bean
public ConcurrentMapCacheManager cacheManager() {
  ConcurrentMapCacheManager cacheManager = new ConcurrentMapCacheManager();
  List<String> cacheNames = this.cacheProperties.getCacheNames();
  if (!cacheNames.isEmpty()) {
   cacheManager.setCacheNames(cacheNames);
  }
  return this.customizerInvoker.customize(cacheManager);
}
第四步:查看获取缓存方法getCache()
ConcurrentMapCacheManager 类里,数据都存储到为ConcurrentMap 中
public Cache getCache(String name) {
  Cache cache = this.cacheMap.get(name); //cacheMap 为ConcurrentMap 类型,获取一个cache组件
  if (cache == null && this.dynamic) {
   synchronized (this.cacheMap) {
     cache = this.cacheMap.get(name); //cahceMap不为空获取
     if (cache == null) {
      //可以获取或者创建ConcurrentMapCache类型的缓存组件;他的作用将数据保存在ConcurrentMap中;
      cache = createConcurrentMapCache(name);
      this.cacheMap.put(name, cache); //ConcurrentMapCache.lookup();
     }
   }
  }
  return cache;
}
五、Cacheable运行流程
1、方法运行之前,先去查询Cache(缓存组件),按照cacheNames指定的名字获取; (CacheManager先获取相应的缓存),第一次获取缓存如果没有Cache组件会自动创建。
2、去Cache中查找缓存的内容(ConcurrentMapCache.lookup()方法中去查找),使用一个key,默认就是方法的参数; key是按照某种策略生成的;默认是使用keyGenerator生成的,默认使用SimpleKeyGenerator生成key; SimpleKeyGenerator生成key的默认策略; 如果没有参数;key=new SimpleKey(); 如果有一个参数:key=参数的值 如果有多个参数:key=new SimpleKey(params);
 //这个方法 SimpleKeyGenerator.generateKey()  方法生成key
public static Object generateKey(Object... params) {
  if (params.length == 0) {
   return SimpleKey.EMPTY;
  }
  if (params.length == 1) { //如果只有一个参数,直接返回这个参数为key
   Object param = params[0];
   if (param != null && !param.getClass().isArray()) {
     return param;
   }
  }
  return new SimpleKey(params);
}
3、没有查到缓存就调用目标方法;
4、将目标方法返回的结果,放进缓存中ConcurrentMapCache.put();
SimpleKey(params);
 //这个方法 SimpleKeyGenerator.generateKey()  方法生成key
public static Object generateKey(Object... params) {
  if (params.length == 0) {
   return SimpleKey.EMPTY;
  }
  if (params.length == 1) { //如果只有一个参数,直接返回这个参数为key
   Object param = params[0];
   if (param != null && !param.getClass().isArray()) {
     return param;
   }
  }
  return new SimpleKey(params);
}
3、没有查到缓存就调用目标方法;
4、将目标方法返回的结果,放进缓存中ConcurrentMapCache.put();
@Cacheable标注的方法执行之前先来检查缓存中有没有这个数据,默认按照参数的值作为key去查询缓存, 如果没有就运行方法并将结果放入缓存;以后再来调用就可以直接使用缓存中的数据;
参考文章:
1、[springboot学习笔记]SpringBoot缓存机制
2、Springboot-cache原理与源码


![[ 数据结构 -- 手撕排序算法第六篇 ] 快速排序](https://img-blog.csdnimg.cn/a66f33245a62495fbda32023d66f2235.png)
