文章目录
- redux是什么
- redux使用情况
- redux工作原理
- redux安装
- redux的3个核心概念
- Action——形成动作
- Reducers——操作状态
- store——存储状态
- API
- redux的响应式
- redux实现加减案例
- 不使用ActionCreators实现
- 使用ActionCreators实现
- 异步Action
- react-redux
- 使用
- 容器组件创建
- 修改App.jsx在渲染容器组件而不是UI组件
- UI组件接收容器组件传递过来的属性和方法做相应的修改
- 优化一:容器组件的简写
- 优化二:优化store传参、优化检测渲染
- 优化三:容器组件和UI组件的融合_最终版
- React-redux的使用总结
- Redux的多组件共享——实现redux的意义
- 编写personUI组件
- 配置Person的redux
- store引入
- 编写personUI组件的容器化——实现addPerson
- 实现Person组件读取Count组件使用的store数据
- 目录结构
- 注意:reducers中返回结果的形式
- 注意:纯函数
- Redux的开发者工具
redux是什么
- redux是一个用于做
状态管理(即数据管理)的JS库。
注意:它是JS库不是react的插件库,vue和Angular有都可以使用redux(只是redux和react结合使用的情况比较多,vue有自己专门的状态管理库——vuex - 作用:集中式管理react应用中
多个组件的共享状态(数据)
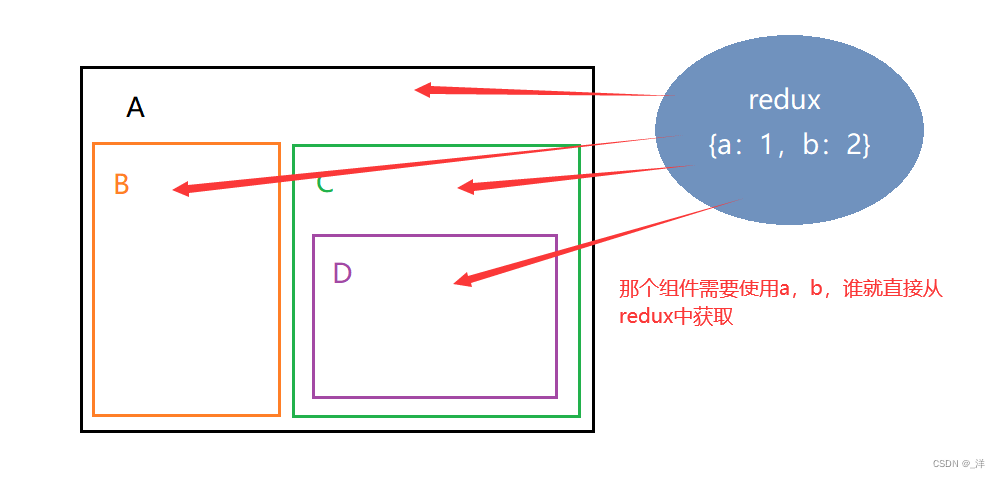
redux使用情况
- 共享:当一个组件中的数据其他组件都需要使用的时候可以使用redux。redux将公共数据进行存储,哪个组件需要使用,直接获取即可。
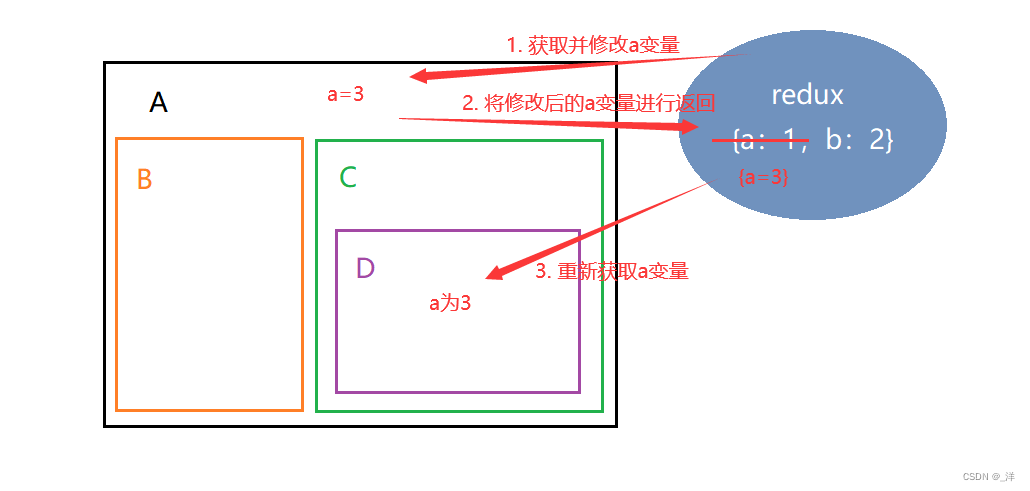
- 通信:一个组件需要改变另一个组件的状态的时候
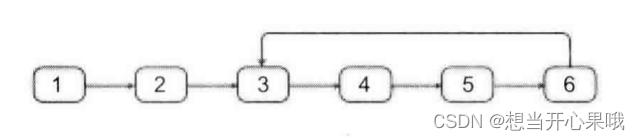
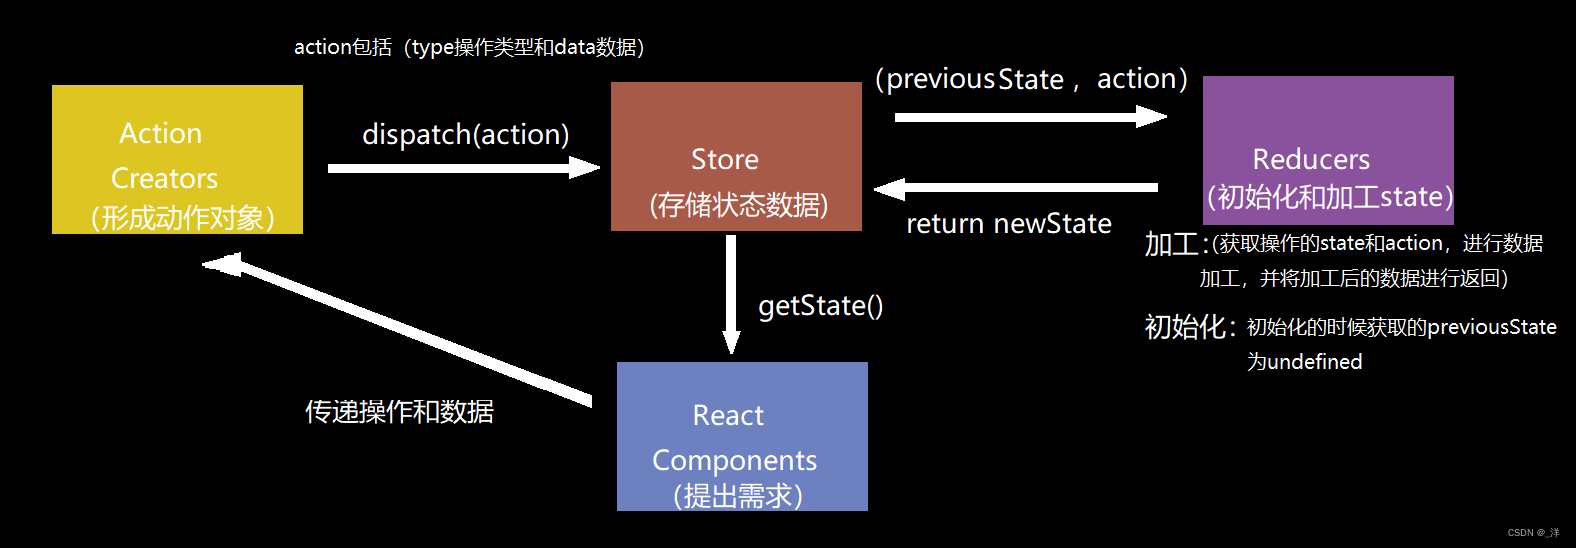
redux工作原理
redux安装
npm i redux
redux的3个核心概念
Action——形成动作
包含2个属性
- type:标识属性,值为字符串,唯一,必要属性
- data:数据属性,值类型任意,可选属性
例子:{ type: 'ADD_STUDENT',data:{name: 'tom',age:18} }
Reducers——操作状态
用于初始化状态、加工状态。
- 加工时,根据旧的state和action,产生新的state数据
- 初始化时,旧的state为undefined,action中的type为
@@redux/INITk.s.p.9.6.9
k.s.p.9.6.9是随机值
(Reducers的初始化是store自动触发的)
注意: Reducers一般放的都是最基础的操作,不带任何逻辑判断的操作。
store——存储状态
将state、action、reducer联系在一起的对象,使整个redux得以运行
API
store.getState()获取redux中存储的数据store.dispatch({type:'increment',data:value})更新redux中的数据store.subscribe(()=>{})检测redux中存储的状态是否发生改变,只要redux中所保存的任意一个状态发生改变,都会调用该回调
redux的响应式
注意: react的state中的属性如果使用setState()方法进行更新,react就会重新调用render方法进行页面渲染,实现state中的数据一更新页面中的数据就更新的效果。
但是redux只是一个数据存储库,里面的数更新后react不会重新渲染页面,这就需要我们利用store.subscribe(()=>{})和this.setState({})手动重新渲染。
componentDidMount(){
    // 检测redux中状态的变化,只要发生改变就调用render(利用setState方法调用render )
        store.subscribe(()=>{
            // 只要redux中所保存的任意一个状态发生改变,都会调用该回调
            this.setState({})
        })
    }
如果组件过多每个组件都需要添加该段代码,可能有些麻烦。可以直接在index.jsx中直接监听,一旦redux中的状态发生变化就进行整个项目的重新渲染:
index.jsx
import React from "react";
import ReactDOM from "react-dom";
import App from "./App"
import store from "./redux/store"

ReactDOM.render(<App/>, document.getElementById("root"))

store.subscribe(()=>{
  ReactDOM.render(<App/>, document.getElementById("root"))
})
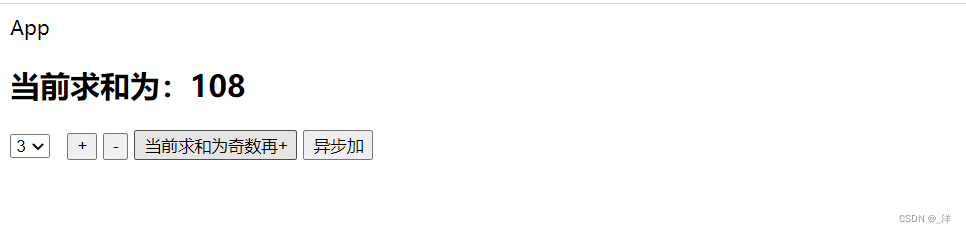
redux实现加减案例
效果:
不使用ActionCreators实现
代码:
components/Count/index.jsx
import React, { Component } from 'react'
import store from "../../redux/store"
export default class Count extends Component {
componentDidMount(){
// 检测redux中状态的变化,只要发生改变就调用render(利用setState方法调用render )
store.subscribe(()=>{
// 只要redux中所保存的任意一个状态发生改变,都会调用该回调
this.setState({})
})
}
increment=()=>{
const {value} = this.selectNumber
store.dispatch({type:'increment',data:value*1})
}
decrement=()=>{
const {value} = this.selectNumber
store.dispatch({type:'decrement',data:value*1})
}
oddIncrement=()=>{
const count = store.getState()
const {value} = this.selectNumber
if(count%2 !== 0) {
store.dispatch({type:'increment',data:value*1})
}
}
asyncIncrement=()=>{
const {value} = this.selectNumber
setTimeout(()=>{
store.dispatch({type:'increment',data:value*1})
},500)
}
render() {
return (
<div>
{/* store.getState()获取state值 */}
<h2>当前求和为:{store.getState()}</h2>
<select ref={c => this.selectNumber = c}>
<option value={1}>1</option>
<option value={2}>2</option>
<option value={3}>3</option>
</select>
<button onClick={this.increment}>+</button>
<button onClick={this.decrement}>-</button>
<button onClick={this.oddIncrement}>当前求和为奇数再+</button>
<button onClick={this.asyncIncrement}>异步加</button>
</div>
)
}
}
redux/count_reducer.js
// reducer的本质就是一个函数
// reducer接收收到两个参数;之前的状态参数(preState),动作对象(action)
export default function countReducer(preState, action) {
    if(preState === undefined) {
        preState = 99
    }

    const {type, data} = action
    // 根据type决定如何加工数据
    switch(type) {
        case 'increment':
            return preState+data
        case 'decrement':
            return preState-data
        default://初始化
            return preState
    }
}
redux/store.js
// 暴露store对象
import {createStore} from "redux"
import countReducer from "./count_reducer"

export default createStore(countReducer)
App.jsx
import React, { Component } from 'react'
import Count from './components/Count'

export default class App extends Component {
  render() {
    return (
      <div>App
        <Count/>
      </div>
    )
  }
}
index.jsx
import React from "react";
import ReactDOM from "react-dom";
import App from "./App"

ReactDOM.render(<App/>, document.getElementById("root"))
使用ActionCreators实现
在上面代码的基础上添加 count_action.js文件, 并对Count/index.jsx文件做相应修改
redux/count_action.js
import {INCREMENT,DECREMENT} from './const'

// 如果箭头函数的函数体只需要返回一个对象时,简写形式对象需要加上一个括号
export const createIncrementAction = data=>({type:'increment', data})
export const createDecrementAction = data=>({type:'decrement', data})
components/Count/index.jsx
import React, { Component } from 'react'
// 引入store用户获取redux中保存的对象
import store from "../../redux/store"
// 引入actionCreator用于创建action对象
import { createIncrementAction, createDecrementAction } from '../../redux/count_action'
export default class Count extends Component {
increment=()=>{
const {value} = this.selectNumber
store.dispatch(createIncrementAction(value*1))
}
decrement=()=>{
const {value} = this.selectNumber
store.dispatch(createDecrementAction(value*1))
}
oddIncrement=()=>{
const count = store.getState()
const {value} = this.selectNumber
if(count%2 !== 0) {
store.dispatch(createIncrementAction(value*1))
}
}
asyncIncrement=()=>{
const {value} = this.selectNumber
setTimeout(()=>{
store.dispatch(createIncrementAction(value*1))
},500)
}
render() {
return (
<div>
{/* store.getState()获取state值 */}
<h2>当前求和为:{store.getState()}</h2>
<select ref={c => this.selectNumber = c}>
<option value={1}>1</option>
<option value={2}>2</option>
<option value={3}>3</option>
</select>
<button onClick={this.increment}>+</button>
<button onClick={this.decrement}>-</button>
<button onClick={this.oddIncrement}>当前求和为奇数再+</button>
<button onClick={this.asyncIncrement}>异步加</button>
</div>
)
}
}
异步Action
ActionCreators可以创建两种Action对象:
- 同步action, 即action的值为
对象形式 - 异步action, 即action的值为
函数function形式(开启异步任务的function)
但是使用异步action必须引用一个中间件redux-thunk进行处理.
安装 :npm i redux-thunk
在store.js中引用 :
// 暴露store对象
import {createStore} from "redux"
import countReducer from "./count_reducer"
import {applyMiddleware} from "redux"
import thunk from 'redux-thunk'

export default createStore(countReducer, applyMiddleware(thunk))
异步action中一般都会调用同步action:
eg:
import {INCREMENT,DECREMENT} from './const'
import store from './store'

// 如果箭头函数的函数体只需要返回一个对象时,简写形式对象需要加上一个括号
export const createIncrementAction = data=>({type:INCREMENT, data})
export const createDecrementAction = data=>({type:DECREMENT, data})
// 异步action
export const createIncrementAsyncAction = (data, time)=>{
    return ()=>{
        setTimeout(()=>{
            store.dispatch(createIncrementAction(data))
        },time)
    }
}
还可以简写为
import {INCREMENT,DECREMENT} from './const'

// 如果箭头函数的函数体只需要返回一个对象时,简写形式对象需要加上一个括号
export const createIncrementAction = data=>({type:INCREMENT, data})
export const createDecrementAction = data=>({type:DECREMENT, data})
export const createIncrementAsyncAction = (data, time)=>{
    return (dispatch)=>{
        setTimeout(()=>{
          dispatch(createIncrementAction(data))
        },time)
    }
}
react-redux
- 所有的
UI组件都应该被一个容器组件包裹,他们是父子关系。 容器组件是真正和redux打交道的,里面可以随意的使用redux的api。 UI组件中不能使用任何redux的api。- 容器组件会传给UI组件:
- redux中所保存的状态。
- 用于操作状态的方法。
并且均通过props属性传递。

容器组件一般写在containers文件夹中,UI组件一般写在components文件夹中。
使用
容器组件创建
- 创建containers文件夹,创建容器组件文件如
containers/Count/index.jsx - 下载react-redux:
npm i react-redux - 在容器组件中,引入并使用react-redux
containers/Count/index.jsx
// 引入Count的UI组件
import CountUI from "../../components/Count";

// 引入action
import {
    createIncrementAction,
    createDecrementAction,
    createIncrementAsyncAction } from "../../redux/count_action";

// 引入redux中的store,但是不能通过import引入,需要在父组件中通过组件的props传递过来

// 引入connect用于连接UI组件与redux
import {connect} from 'react-redux'

// mapStateToProps函数返回的对象中的key就作为传递给UI组件props的key,vale就作为传递给UI组件props的value——传递状态
function mapStateToProps(state){
    // state参数,就是从store.getState()中获取的,react-redux直接为我们提供好了
    return {count:state}
}

// mapDispatchToProps函数返回的对象中的key就作为传递给UI组件props的key,vale就作为传递给UI组件props的value——传递操作状态的方法
function mapDispatchToProps(dispatch){
    // diapatch参数,就是从store.dispatch()中获取的
    return {
        increment:data=>dispatch(createIncrementAction(data)),
        decrement:data=>dispatch(createDecrementAction(data)),
        incrementAsync:(data,time)=>dispatch(createIncrementAsyncAction(data, time)),
    }
}

// 创建与UI组件建立联系的容器组件
// const CountContainer = connect()(CountUI)
 export default connect(mapStateToProps, mapDispatchToProps)(CountUI)
修改App.jsx在渲染容器组件而不是UI组件
App.jsx
渲染容器组件而不是UI组件,并将渲染容器所需要的store作为参数传递过去。
import React, { Component } from 'react'
import Count from './containers/Count'
import store from './redux/store'

export default class App extends Component {
  render() {
    return (
      <div>App
        <Count store={store}/>
      </div>
    )
  }
}
UI组件接收容器组件传递过来的属性和方法做相应的修改
components/count/index.jsx
import React, { Component } from 'react'
export default class Count extends Component {
increment=()=>{
const {value} = this.selectNumber
this.props.increment(value*1)
}
decrement=()=>{
const {value} = this.selectNumber
this.props.decrement(value*1)
}
oddIncrement=()=>{
const {value} = this.selectNumber
if(this.props.count%2===1){
this.props.increment(value*1)
}
}
asyncIncrement=()=>{
const {value} = this.selectNumber
this.props.incrementAsync(value*1, 500)
}
render() {
return (
<div>
{/* store.getState()获取state值 */}
<h2>当前求和为:{this.props.count}</h2>
<select ref={c => this.selectNumber = c}>
<option value={1}>1</option>
<option value={2}>2</option>
<option value={3}>3</option>
</select>
<button onClick={this.increment}>+</button>
<button onClick={this.decrement}>-</button>
<button onClick={this.oddIncrement}>当前求和为奇数再+</button>
<button onClick={this.asyncIncrement}>异步加</button>
</div>
)
}
}
优化一:容器组件的简写
containers/Count/index.jsx
// 引入Count的UI组件
import CountUI from "../../components/Count";

// 引入action
import {
    createIncrementAction,
    createDecrementAction,
    createIncrementAsyncAction } from "../../redux/count_action";

// 引入redux中的store,但是不能通过import引入,需要在父组件中通过组件的props传递过来

// 引入connect用于连接UI组件与redux
import {connect} from 'react-redux'

// 映射状态
// const mapStateToProps = state =>({count:state})

// 映射操作状态的方法
// const mapDispatchToProps = (dispatch)=>(
//     {
//         increment:data=>dispatch(createIncrementAction(data)),
//         decrement:data=>dispatch(createDecrementAction(data)),
//         incrementAsync:(data,time)=>dispatch(createIncrementAsyncAction(data, time)),
//     }
// )

// 创建与UI组件建立联系的容器组件
// const CountContainer = connect()(CountUI)
 export default connect(
    state =>({count:state}),
    // mapDispatchToProps一般写法
    // (dispatch)=>(
    //     {
    //         increment:data=>dispatch(createIncrementAction(data)),
    //         decrement:data=>dispatch(createDecrementAction(data)),
    //         incrementAsync:(data,time)=>dispatch(createIncrementAsyncAction(data, time)),
    //     }
    // )

    // mapDispatchToProps的简写(react-redux自动调用dispatch)
    {
        increment:createIncrementAction,
        decrement:createDecrementAction,
        incrementAsync:createIncrementAsyncAction,
    }

    )(CountUI)
优化二:优化store传参、优化检测渲染
src/index.js
import React from "react";
import ReactDOM from "react-dom";
import App from "./App"
import store from "./redux/store"
import {Provider} from "react-redux"

ReactDOM.render(
  // Provider为<App/>中的所有容器组件提供一个store,那么容器中无需自己传递store
  <Provider store={store}>
    <App/>
  </Provider>,
  document.getElementById("root")
)

// react-redux可以不用手动检测,容器组件的connect可以检测
// store.subscribe(()=>{
//   ReactDOM.render(<App/>, document.getElementById("root"))
// })
优化三:容器组件和UI组件的融合_最终版
删除components/Count/index.jsx文件
修改container/Count/index.jsx:
// 引入action
import {
createIncrementAction,
createDecrementAction,
createIncrementAsyncAction } from "../../redux/count_action";
import {connect} from 'react-redux'
import React, { Component } from 'react'
// UI组件
class Count extends Component {
increment=()=>{
const {value} = this.selectNumber
this.props.increment(value*1)
}
decrement=()=>{
const {value} = this.selectNumber
this.props.decrement(value*1)
}
oddIncrement=()=>{
const {value} = this.selectNumber
if(this.props.count%2===1){
this.props.increment(value*1)
}
}
asyncIncrement=()=>{
const {value} = this.selectNumber
this.props.incrementAsync(value*1, 500)
}
render() {
return (
<div>
{/* store.getState()获取state值 */}
<h2>当前求和为:{this.props.count}</h2>
<select ref={c => this.selectNumber = c}>
<option value={1}>1</option>
<option value={2}>2</option>
<option value={3}>3</option>
</select>
<button onClick={this.increment}>+</button>
<button onClick={this.decrement}>-</button>
<button onClick={this.oddIncrement}>当前求和为奇数再+</button>
<button onClick={this.asyncIncrement}>异步加</button>
</div>
)
}
}
// 容器组件
export default connect(
state =>({count:state}),
{
increment:createIncrementAction,
decrement:createDecrementAction,
incrementAsync:createIncrementAsyncAction,
}
)(Count)
React-redux的使用总结
新建container/组件名/index.jsx文件,编写如下内容:
- 定义UI组件,不暴露
在UI组件中使用this.props.XXXXX来读取状态和方法 - 定义容器组件,并进行暴露
利用connect生成一个容器组件
export default connect(
    // 映射状态
    state =>({count:state}),
    // 映射操作状态的方法(从readux/action中引入)
    {
        increment:createIncrementAction,
        decrement:createDecrementAction,
        incrementAsync:createIncrementAsyncAction,
    }

)(Count)
Redux的多组件共享——实现redux的意义
编写personUI组件
container/Person/index.jsx
import React, { Component } from 'react'
import {nanoid} from 'nanoid'

export default class Person extends Component {

    addPerson=()=>{
        const name = this.nameNode.value
        const age = this.ageNode.value
        const personObj ={
            id:nanoid(),
            name,
            age
        }
    }
  render() {
    return (
      <div>
        <hr/>
        <h2>Person组件</h2>
        <input ref={c=>this.nameNode=c} type="text" placeholder='请输入名字'></input>
        <input ref={c=>this.ageNode=c} type="text" placeholder='请输入年龄'></input>
        <button onClick={this.addPerson}>添加</button>
      </div>
    )
  }
}
配置Person的redux
- redux/actions/person.js
import { ADD_PERSON } from "../const";

export const createAddPersonAction =(personObj)=>({type:ADD_PERSON, data:personObj})
- redux/reducers/person.js
import {INCREMENT,DECREMENT} from '../const'

// reducer的本质就是一个函数
// reducer接收收到两个参数;之前的状态参数(preState),动作对象(action)
export default function countReducer(preState, action) {
    if(preState === undefined) {
        preState = 99
    }

    const {type, data} = action
    // 根据type决定如何加工数据
    switch(type) {
        case INCREMENT:
            return preState+data
        case DECREMENT:
            return preState-data
        default://初始化
            return preState
    }
}
store引入
多个组件必须使用combineReducers进行引入。
// 暴露store对象
import {createStore, combineReducers} from "redux"
// 引入CountReducer
import countReducer from "./reducers/count"
// 引入PersonReducer
import personReducer from "./reducers/count"
import {applyMiddleware} from "redux"
import thunk from 'redux-thunk'

// 汇总所有的Reducer
const allReducer = combineReducers({
    count: countReducer,
    person: personReducer
})
export default createStore(allReducer, applyMiddleware(thunk))
编写personUI组件的容器化——实现addPerson
由于是多个组件,所以需要使用 state =>({person: state.person}),形式进行redux数据的引入
containers/Person/index.jsx
import React, { Component } from 'react'
import {nanoid} from 'nanoid'
import { connect } from 'react-redux'
import {createAddPersonAction} from '../../redux/actions/person'


class Person extends Component {

    addPerson=()=>{
        const name = this.nameNode.value
        const age = this.ageNode.value
        const personObj ={
            id:nanoid(),
            name,
            age
        }
        this.props.addPerson(personObj)

        this.nameNode.value=""
        this.ageNode.value=""
    }
  render() {
    return (
      <div>
        <hr/>
        <h2>Person组件</h2>
        <input ref={c=>this.nameNode=c} type="text" placeholder='请输入名字'></input>
        <input ref={c=>this.ageNode=c} type="text" placeholder='请输入年龄'></input>
        <button onClick={this.addPerson}>添加</button>
        <ul>
           {
            this.props.person.map((person)=>{
                return <li key={person.id}>{person.name}--{person.age}</li>
            })
           }
        </ul>
      </div>
    )
  }
}

export default connect(
    state =>({person: state.person}),
    {addPerson: createAddPersonAction}
)(Person)
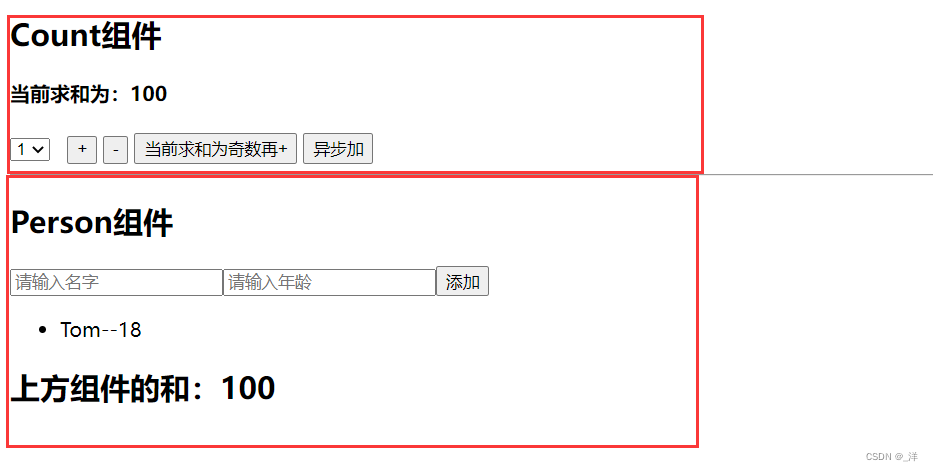
实现Person组件读取Count组件使用的store数据
import React, { Component } from 'react'
import {nanoid} from 'nanoid'
import { connect } from 'react-redux'
import {createAddPersonAction} from '../../redux/actions/person'


class Person extends Component {

    addPerson=()=>{
        const name = this.nameNode.value
        const age = this.ageNode.value
        const personObj ={
            id:nanoid(),
            name,
            age
        }
        this.props.addPerson(personObj)

        this.nameNode.value=""
        this.ageNode.value=""
    }
  render() {
    return (
      <div>
        <hr/>
        <h2>Person组件</h2>
        <input ref={c=>this.nameNode=c} type="text" placeholder='请输入名字'></input>
        <input ref={c=>this.ageNode=c} type="text" placeholder='请输入年龄'></input>
        <button onClick={this.addPerson}>添加</button>
        <ul>
           {
            this.props.person.map((person)=>{
                return <li key={person.id}>{person.name}--{person.age}</li>
            })
           }
        </ul>
        <h2>上方组件的和:{this.props.count}</h2>
      </div>
    )
  }
}

export default connect(
    state =>({person: state.person,
    count: state.count}),
    {addPerson: createAddPersonAction}
)(Person)
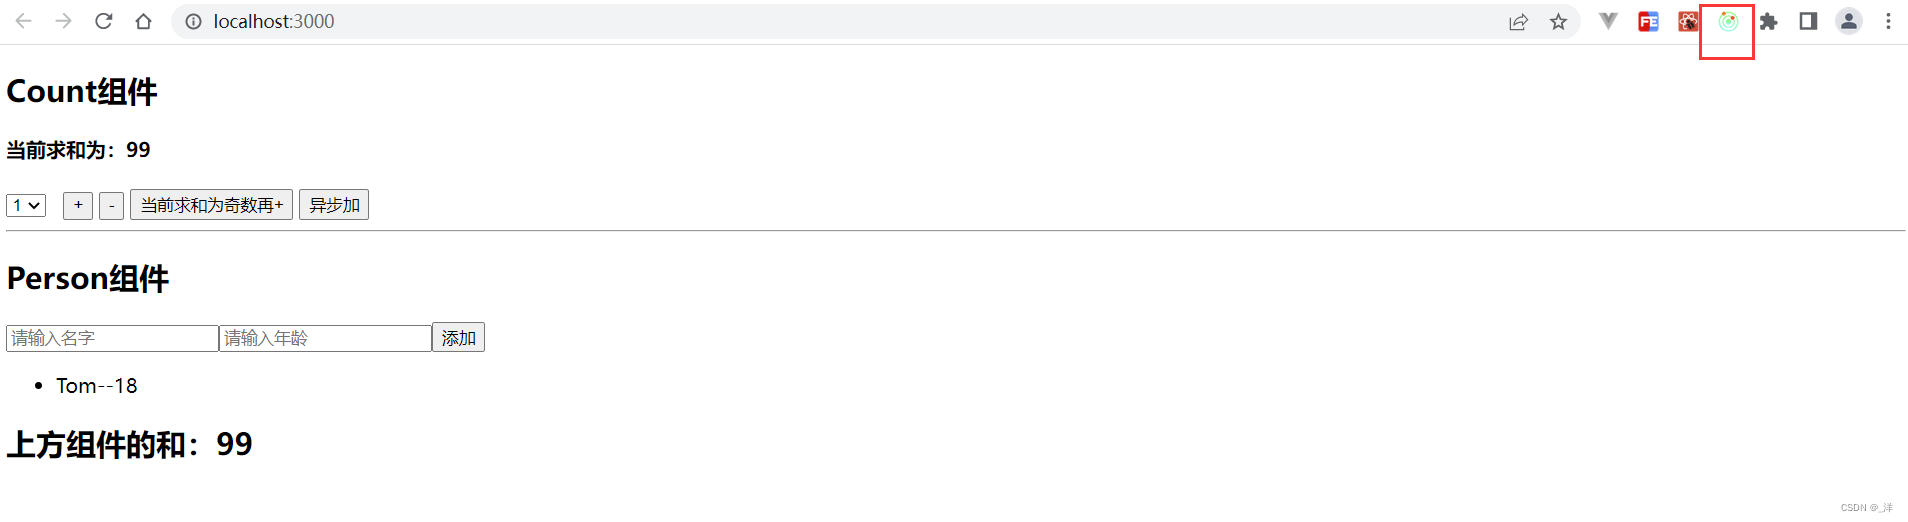
效果:
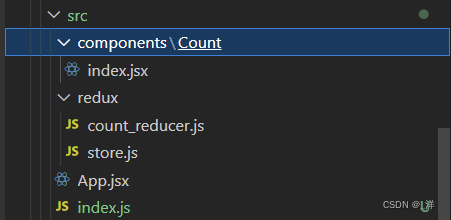
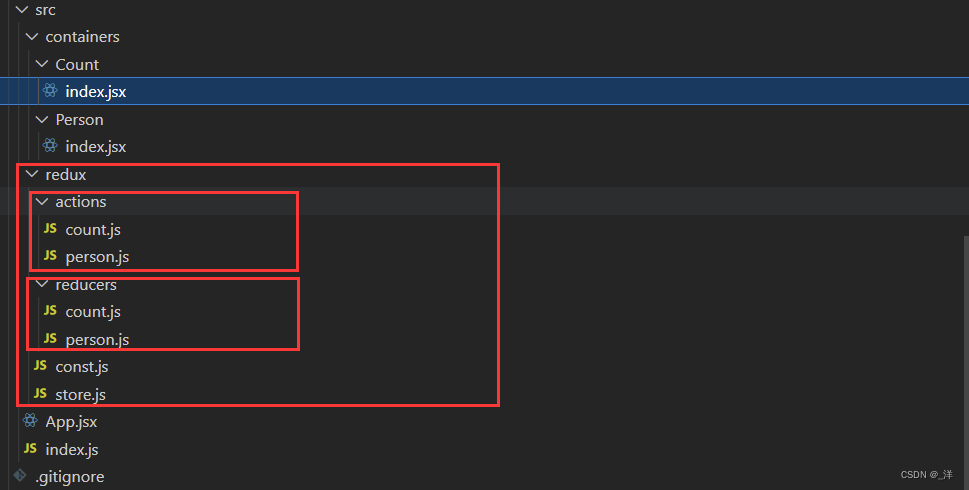
目录结构
注意:reducers中返回结果的形式
reducers中返回的结果:redux会对返回值进行浅比较,如果返回结果和之前的一样就不会更新页面
reducers/person.js
import { ADD_PERSON } from "../const"

const initState=[{id:'001', name:"Tom", age:18}]
export default function personReducer(preState=initState, action){
    const {type, data}= action
    switch(type){
        case ADD_PERSON:
            // preState.unshift(data)
            // return preState
            // 不能使用上述这种方式,因为redux会对返回值进行浅比较,如果返回结果和之前的一样就不会更新页面
            return [data, ...preState]
        default:
            return preState
    }

}
注意:纯函数
定义: 只要同样的输入必定得到同样的输出的函数叫做纯函数。
纯函数必须遵守如下约束:
- 不得改写参数数据
- 不会产生任何副作用:不可以发送网络请求、不可以使用输入输出设备
- 不能调用Data.now()、Math.random()等不纯的方法
redux的reducer必须是纯函数。
Redux的开发者工具
配置使用:
- 安装库:
npm i redux-devtools-extension - 引入:
store.js:
// 暴露store对象
import {createStore, combineReducers} from "redux"
// 引入CountReducer
import countReducer from "./reducers/count"
// 引入PersonReducer
import personReducer from "./reducers/person"
import {applyMiddleware} from "redux"
import thunk from 'redux-thunk'

// 引入devtools
import {composeWithDevTools} from "redux-devtools-extension"

// 汇总所有的Reducer
const allReducer = combineReducers({
    count: countReducer,
    person: personReducer
})
export default createStore(allReducer, composeWithDevTools(applyMiddleware(thunk)))
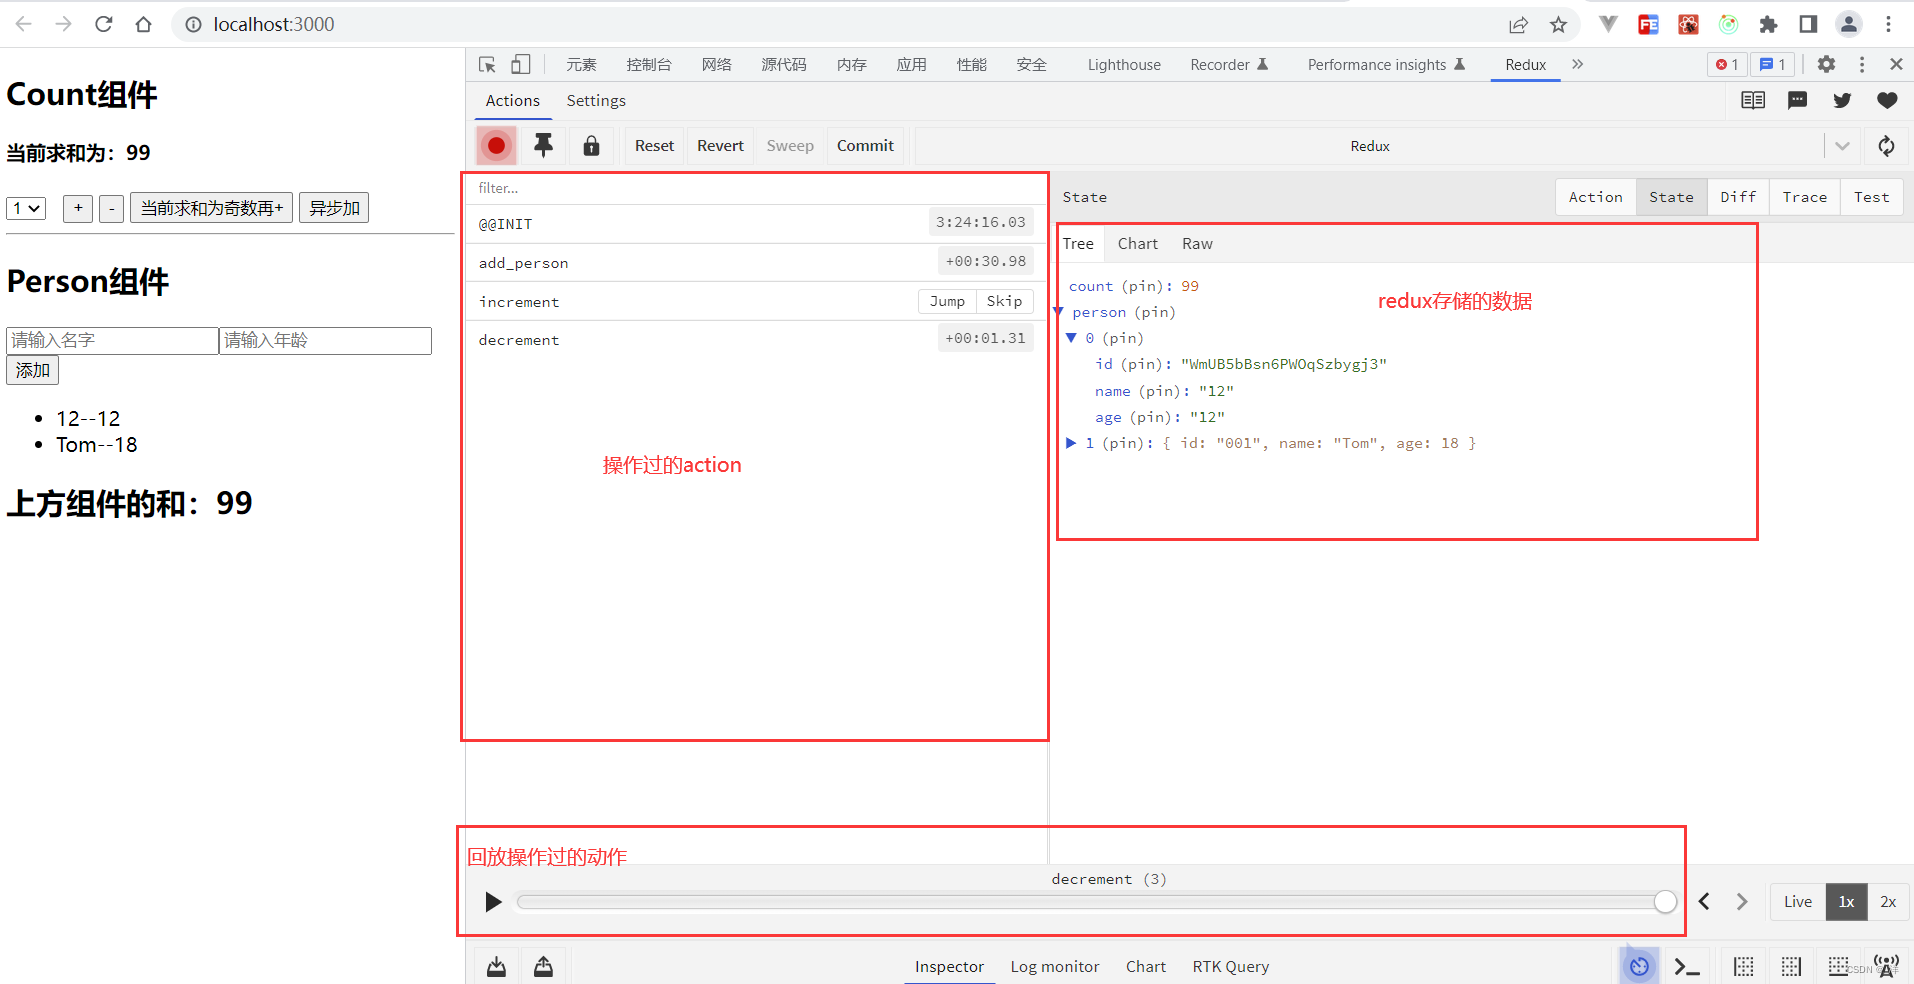
功能解释:

![[附源码]Python计算机毕业设计调查问卷及调查数据统计系统Django(程序+LW)](https://img-blog.csdnimg.cn/20ffe102cbe644c1a897a2d57d03b273.png)