镜像的获取
镜像可以从以下方式获得:
- 从远程镜像仓库拉取,可以是公有仓库,也可以是私有仓库
- 从Dockerfile构建
- 从文件导入(离线)
- 从容器提交
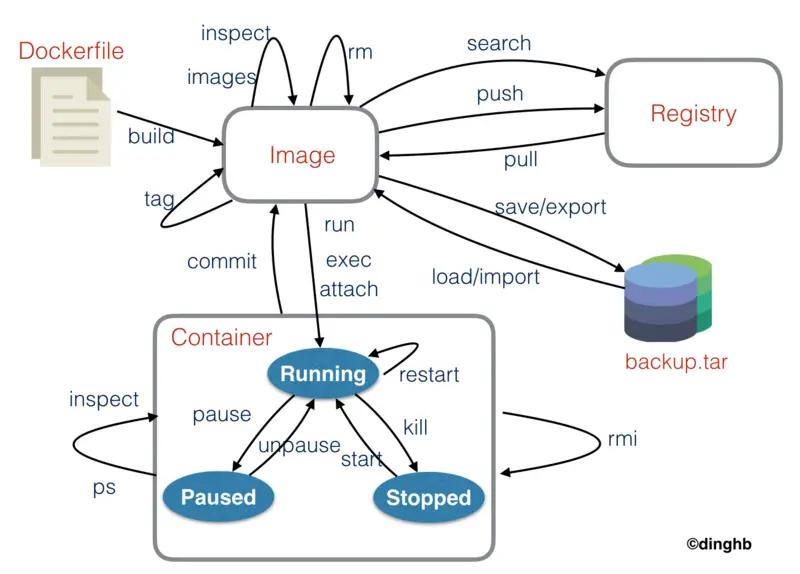
镜像的基本操作
跟镜像相关的命令如下:
$ docker image --help

Usage:  docker image COMMAND

Manage images

Commands:
  build       Build an image from a Dockerfile
  history     Show the history of an image
  import      Import the contents from a tarball to create a filesystem image
  inspect     Display detailed information on one or more images
  load        Load an image from a tar archive or STDIN
  ls          List images
  prune       Remove unused images
  pull        Pull an image or a repository from a registry
  push        Push an image or a repository to a registry
  rm          Remove one or more images
  save        Save one or more images to a tar archive (streamed to STDOUT by default)
  tag         Create a tag TARGET_IMAGE that refers to SOURCE_IMAGE

Run 'docker image COMMAND --help' for more information on a command.
docker image build
docker image build命令用于从Docker文件构建镜像。
一个简单的构建redis镜像的dockerfile如下:
from centos

maintainer morris131<morris131@163.com>

env WORK_DIR /usr/local

workdir $WORK_DIR

run yum install -y wget gcc gcc-c++ automake autoconf libtool make

run wget https://download.redis.io/releases/redis-6.2.5.tar.gz

run tar xzf redis-6.2.5.tar.gz && cd redis-6.2.5 && make

expose 6379

env REDIS_HOME $WORK_DIR/redis-6.2.5

env PATH $PATH:$REDIS_HOME/src

entrypoint ["redis-server"]
使用docker image build构建镜像:
$ docker image build -f redis.dockerfile -t redis:v6.2 .
Sending build context to Docker daemon  326.3MB
Step 1/11 : from centos
 ---> 5d0da3dc9764
Step 2/11 : maintainer morris131<morris131@163.com>
 ---> Using cache
 ---> 5cda723c8e72
Step 3/11 : env WORK_DIR /usr/local
 ---> Using cache
 ---> c533d0edc8eb
Step 4/11 : workdir $WORK_DIR
 ---> Using cache
 ---> cb590797901e
Step 5/11 : run yum install -y wget gcc gcc-c++ automake autoconf libtool make
 ---> Using cache
 ---> 3ad6eccd91bc
Step 6/11 : run wget https://download.redis.io/releases/redis-6.2.5.tar.gz
 ---> Using cache
 ---> 009fdc775e47
Step 7/11 : run tar xzf redis-6.2.5.tar.gz && cd redis-6.2.5 && make
 ---> Using cache
 ---> 55980a8ed7d4
Step 8/11 : expose 6379
 ---> Using cache
 ---> a0031636b6a8
Step 9/11 : env REDIS_HOME $WORK_DIR/redis-6.2.5
 ---> Using cache
 ---> 9fe2c6f4f2ea
Step 10/11 : env PATH $PATH:$REDIS_HOME/src
 ---> Using cache
 ---> a41d5925a64f
Step 11/11 : entrypoint ["redis-server"]
 ---> Using cache
 ---> dfa712f480f7
Successfully built dfa712f480f7
Successfully tagged redis:v6.2
选项说明:
--file, -f:Dockerfile的名称(默认为’PATH/Dockerfile’)--tag, -t:名称和可选的“name:tag”格式的标签path:指定构建镜像时的相对目录,当前目录用.代替,例如dockerfile经常会COPY一些文件,如果这些文件指定的是相对路径,那么这个相对路径是基于path指定的目录。
docker image history
docker image history显示镜像的历史记录,应该是镜像的分层结构。
$ docker image history redis:v6.2
IMAGE          CREATED         CREATED BY                                      SIZE      COMMENT
dfa712f480f7   20 months ago   /bin/sh -c #(nop)  ENTRYPOINT ["redis-server…   0B
a41d5925a64f   20 months ago   /bin/sh -c #(nop)  ENV PATH=/usr/local/sbin:…   0B
9fe2c6f4f2ea   20 months ago   /bin/sh -c #(nop)  ENV REDIS_HOME=/usr/local…   0B
a0031636b6a8   20 months ago   /bin/sh -c #(nop)  EXPOSE 6379                  0B
55980a8ed7d4   20 months ago   /bin/sh -c tar xzf redis-6.2.5.tar.gz && cd …   160MB
009fdc775e47   20 months ago   /bin/sh -c wget https://download.redis.io/re…   2.47MB
3ad6eccd91bc   20 months ago   /bin/sh -c yum install -y wget gcc gcc-c++ a…   270MB
cb590797901e   20 months ago   /bin/sh -c #(nop) WORKDIR /usr/local            0B
c533d0edc8eb   20 months ago   /bin/sh -c #(nop)  ENV WORK_DIR=/usr/local      0B
5cda723c8e72   20 months ago   /bin/sh -c #(nop)  MAINTAINER morris131<morr…   0B
5d0da3dc9764   23 months ago   /bin/sh -c #(nop)  CMD ["/bin/bash"]            0B
<missing>      23 months ago   /bin/sh -c #(nop)  LABEL org.label-schema.sc…   0B
<missing>      23 months ago   /bin/sh -c #(nop) ADD file:805cb5e15fb6e0bb0…   231MB
docker image import
docker image import将导出的压缩容器文件导入为镜像。与docker container export配合使用。
$ docker image import nginx.tar.gz nginx:v2.0
sha256:9b1c17b86c32c5a4fa2e811612dc2242ebb1725ff73391cd38c143d22f09ad87
docker image inspect
docker image inspect显示一个或多个镜像的详细信息。
$ docker image inspect redis:v6.2
docker image save
docker image save将一个或多个镜像保存到tar存档(默认情况下流式传输到STDOUT)。
$ docker image save -o nginx-v1.0.tar nginx:v1.0
docker image load
docker image load从tar存档或STDIN加载镜像。
$ docker image load -i nginx-v1.0.tar
Loaded image: nginx:v1.0
docker image ls
docker image ls列出镜像。
$ docker image ls
REPOSITORY   TAG       IMAGE ID       CREATED         SIZE
nginx        v1.0      0b36bf0f81dd   2 days ago      141MB
nginx        latest    f652ca386ed1   21 months ago   141MB
docker image prune
docker image prune清理镜像。
$ docker image prune
WARNING! This will remove all dangling images.
Are you sure you want to continue? [y/N] y
Total reclaimed space: 0B
后文会详细介绍docker image prune和docker image rm的区别。
docker image rm
docker image rm根据镜像名称或者镜像ID删除一个或多个镜像。
$ docker image rm 0b36bf0f81dd
Untagged: nginx:v1.0
Deleted: sha256:0b36bf0f81dda62c4ced29e84d0b44a7c812bb643b2c1d898df0b8897f58c964
docker image pull
docker image pull默认从官方的远程镜像仓库Docker Hub拉取镜像,如果不指定版本,会默认拉取最新版本,也可以指定远程镜像仓库的地址。
$ docker image pull nginx
Using default tag: latest
latest: Pulling from library/nginx
a2abf6c4d29d: Pull complete
a9edb18cadd1: Pull complete
589b7251471a: Pull complete
186b1aaa4aa6: Pull complete
b4df32aa5a72: Pull complete
a0bcbecc962e: Pull complete
Digest: sha256:0d17b565c37bcbd895e9d92315a05c1c3c9a29f762b011a10c54a66cd53c9b31
Status: Downloaded newer image for nginx:latest
docker.io/library/nginx:latest
指定版本拉取:
$ docker pull nginx:1.20.0
这里使用的是阿里云的镜像服务:https://cr.console.aliyun.com/
需要先登陆阿里云的镜像仓库:
$ docker login --username=xxxx registry.cn-hangzhou.aliyuncs.com
Password:
WARNING! Your password will be stored unencrypted in /home/morris/.docker/config.json.
Configure a credential helper to remove this warning. See
https://docs.docker.com/engine/reference/commandline/login/#credentials-store

Login Succeeded
指定镜像仓库拉取:
$ docker pull registry.cn-hangzhou.aliyuncs.com/morris131/mysql:5.7.35
docker image tag
docker image tag为本地镜像打上标签。
$ docker tag nginx:latest registry.cn-hangzhou.aliyuncs.com/morris131/nginx:1.20.0
打上标签后,IMAGE ID不变,这样就无法根据IMAGE ID进行删除镜像,因为一个IMAGE ID指向了多个镜像,可以根据REPOSITORY:TAG进行删除。
docker image push
docker image push将本地镜像推送到远程的镜像仓库。
$ docker push registry.cn-hangzhou.aliyuncs.com/morris131/nginx:1.20.0
镜像下载的加速
由于docker镜像访问很慢,所以使用阿里的镜像加速器。
参考:阿里官方教材
可以通过修改daemon配置文件/etc/docker/daemon.json来使用加速器
$ mkdir -p /etc/docker

$ vi /etc/docker/daemon.json
{
  "registry-mirrors": ["https://imjw08kj.mirror.aliyuncs.com"]
}

$ systemctl daemon-reload

$ systemctl restart docker
镜像的清理和删除
镜像的删除:删除某个镜像时,需要指定镜像的ID或者仓库+标签。
镜像的清理:主要用于资源的释放,不需要指定镜像的ID或者仓库+标签,可以清理中间的镜像层、缓存等系统存储空间。
未使用镜像
未使用镜像表示尚未在容器中分配或使用它。使用docker ps -a命令列出所有已退出以及当前正在运行的容器。在这个列表中的镜像都是“使用过的镜像”,而不在这个列表的镜像就是未使用镜像。
虚悬镜像(Dangling Image)
虚悬镜像 (Dangling Image) 指的是仓库名(镜像名)和标签TAG为<none>的镜像。
可以通过下面的命令来查看:
$ docker image ls -f dangling=true
REPOSITORY   TAG       IMAGE ID       CREATED       SIZE
nginx        <none>    7ab27dbbfbdf   2 years ago   133MB
可以使用docker image prune来清理虚悬镜像镜像。
$ docker image prune
WARNING! This will remove all dangling images.
Are you sure you want to continue? [y/N] y
Deleted Images:
untagged: nginx@sha256:ea4560b87ff03479670d15df426f7d02e30cb6340dcd3004cdfc048d6a1d54b4
deleted: sha256:7ab27dbbfbdf4031f0603a4b597cc43031ff883b54f9329f0309c80952dda6f5
deleted: sha256:5b2a9404d052ae4205f6139190fd4b0921ddeff17bf2aaf4ee97f79e1a8242fe
deleted: sha256:03ebf76f0cbf5fd32ca010bb589c2139ce7e44c050fe3de2d77addf4cfd25866
deleted: sha256:0191669d087dce47072254a93fe55cbedd687f27d3798e2260f846e8f8f5729a
deleted: sha256:17651c6a0ba04d31da14ac6a86d8fb3f600883f9e155558e8aad0b94aa6540a2
deleted: sha256:5a673ff4c07a1b606f2ad1fc53697c99c45b0675734ca945e3bb2bd80f43feb8
deleted: sha256:02c055ef67f5904019f43a41ea5f099996d8e7633749b6e606c400526b2c4b33

Total reclaimed space: 133.1MB
批量清除镜像
docker image prune:可以清除虚悬镜像。docker image prune -a:可以清除虚悬镜像和未使用镜像。
关于scratch镜像
Scratch是一个空的Docker镜像。
hello.c
#include <stdio.h>
int main()
{
    printf("hello docker\n");
}
编译成一个二进制文件:
$ gcc --static -o hello hello.c
$ ./hello
hello docker
通过scratch来构建一个基础镜像。
hello.dockerfile
FROM scratch
ADD hello /
CMD ["/hello"]
构建后查看镜像的大小为872KB:
$ docker build -t hello -f hello.dockerfile .
Sending build context to Docker daemon  875.5kB
Step 1/3 : FROM scratch
 --->
Step 2/3 : ADD hello /
 ---> a0c817454691
Step 3/3 : CMD ["/hello"]
 ---> Running in ae204eb2c697
Removing intermediate container ae204eb2c697
 ---> 114a8fd42e2f
Successfully built 114a8fd42e2f
Successfully tagged hello:latest

$ docker image ls
REPOSITORY   TAG       IMAGE ID       CREATED        SIZE
hello        latest    114a8fd42e2f   17 hours ago   872kB
查看hello执行文件的大小为872KB,发现镜像的大小和hello执行文件的大小是一样的,这样可以证明Scratch是一个空的Docker镜像。
$ ll --si
total 889k
drwxrwxr-x 2 morris morris 4.1k Sep  4 16:53 ./
drwxrwxr-x 3 morris morris 4.1k Sep  4 16:53 ../
-rwxrwxr-x 1 morris morris 872k Sep  4 16:53 hello*
-rw-rw-r-- 1 morris morris   64 Sep  4 16:52 hello.c
-rw-rw-r-- 1 morris morris   40 Sep  4 16:51 hello.dockerfile
另外可以通过docker history查看镜像只有hello执行文件这一层有size,正好是镜像的大小。
$ docker history hello
IMAGE          CREATED        CREATED BY                                      SIZE      COMMENT
114a8fd42e2f   17 hours ago   /bin/sh -c #(nop)  CMD ["/hello"]               0B
a0c817454691   17 hours ago   /bin/sh -c #(nop) ADD file:198e5a2b23e222ef7…   872kB
使用hello镜像创建一个容器运行:
$ docker container run --name hello hello
hello docker