目录
图像
图像形状
实例
对齐图像
实例
居中图像
实例
响应式图像
实例
Jumbotron
实例
图像
图像形状
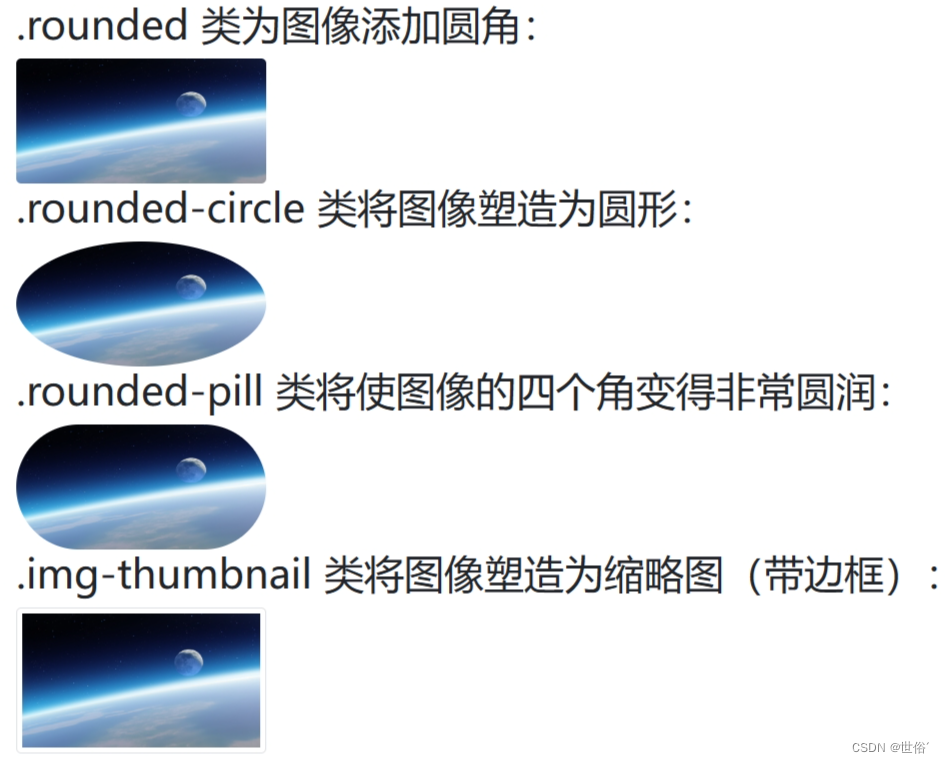
.rounded 类可以用于为图像或任何具有边框的元素添加圆角。这个类适用于Bootstrap的所有版本,并且在最新版本中得到了进一步的增强。
实例
<!DOCTYPE html>
<html lang="en">
	<head>
		<title>Bootstrap 实例</title>
		<meta charset="utf-8">
		<meta name="viewport" content="width=device-width, initial-scale=1">
		<link href="https://cdn.jsdelivr.net/npm/bootstrap@5.1.2/dist/css/bootstrap.min.css" rel="stylesheet">
		<script src="https://cdn.jsdelivr.net/npm/bootstrap@5.1.2/dist/js/bootstrap.bundle.min.js"></script>
	</head>
	<body>
		<div class="container mt-3">
			<img src="img/1.png" class="rounded" width="300px" height="200px" />
		</div>
	</body>
</html>
在上面的示例中,rounded 类将使图像的四个角变圆。可以通过添加更多的类来进一步定制圆角的大小和形状。例如,.rounded-circle 类将使图像变为完全圆形,而 .rounded-pill 类将使图像的四个角变得非常圆润。 .img-thumbnail 类将图像塑造为缩略图(带边框)。
此外,还可以使用 .border-radius 类来为元素添加自定义的边框半径。例如,border-radius: 10px; 将使元素的边框半径为10像素。
<!DOCTYPE html>
<html lang="en">
	<head>
		<title>Bootstrap 实例</title>
		<meta charset="utf-8">
		<meta name="viewport" content="width=device-width, initial-scale=1">
		<link href="https://cdn.jsdelivr.net/npm/bootstrap@5.1.2/dist/css/bootstrap.min.css" rel="stylesheet">
		<script src="https://cdn.jsdelivr.net/npm/bootstrap@5.1.2/dist/js/bootstrap.bundle.min.js"></script>
	</head>
	<body>
		<div class="container mt-3">
			<h2>.rounded 类为图像添加圆角:</h2>
			<img src="img/1.png" class="rounded" width="200px" height="100px" /><br />
			<h2>.rounded-circle 类将图像塑造为圆形:</h2>
			<img src="img/1.png" class="rounded-circle" width="200px" height="100px"/><br />
			<h2>.rounded-pill 类将使图像的四个角变得非常圆润:</h2>
			<img src="img/1.png" class="rounded-pill" width="200px" height="100px"/><br />
			<h2>.img-thumbnail 类将图像塑造为缩略图(带边框):</h2>
			<img src="img/1.png" class="img-thumbnail" width="200px" height="100px"/><br />
		</div>
	</body>
</html>
运行结果:
对齐图像
使用 .float-start 类来设置图片左对齐,使用 .float-end 类设置图片右对齐。
实例
<!DOCTYPE html>
<html lang="en">
	<head>
		<title>Bootstrap 实例</title>
		<meta charset="utf-8">
		<meta name="viewport" content="width=device-width, initial-scale=1">
		<link href="https://cdn.jsdelivr.net/npm/bootstrap@5.1.2/dist/css/bootstrap.min.css" rel="stylesheet">
		<script src="https://cdn.jsdelivr.net/npm/bootstrap@5.1.2/dist/js/bootstrap.bundle.min.js"></script>
	</head>
	<body>
		<div class="container mt-3">
			<img src="img/1.png" class="float-start" width="200px" height="100px" />
			<img src="img/1.png" class="float-end" width="200px" height="100px" />
		</div>
	</body>
</html>
运行结果:
居中图像
使用 .mx-auto 和 .d-block 是 Bootstrap 提供的一种方法,可以用于将图像居中。
.mx-auto 类将图像的左右边距设置为自动,这使得图像水平居中。而 .d-block 类则将图像的显示设置为块级元素,这是必需的,因为只有块级元素才能使用左右边距。
实例
<!DOCTYPE html>
<html lang="en">
	<head>
		<title>Bootstrap 实例</title>
		<meta charset="utf-8">
		<meta name="viewport" content="width=device-width, initial-scale=1">
		<link href="https://cdn.jsdelivr.net/npm/bootstrap@5.1.2/dist/css/bootstrap.min.css" rel="stylesheet">
		<script src="https://cdn.jsdelivr.net/npm/bootstrap@5.1.2/dist/js/bootstrap.bundle.min.js"></script>
	</head>
	<body>
		<div class="container mt-3">
			<div class="mx-auto d-block">
				<img src="img/1.png" class="mx-auto d-block" width="200px" height="100px" />
			</div>
		</div>
	</body>
</html>
在上面的示例中,通过将 .mx-auto 和 .d-block 类应用于 <div> 和 <img> 元素,图像将水平居中。
运行结果:
响应式图像
.img-fluid 是 Bootstrap 提供的一个类,可以用于创建响应式图像。这个类会将图像的最大宽度设置为 100%,并将高度自动调整以保持图像的纵横比。这样,无论屏幕的大小如何,图像都会自动缩放以适应。
实例
<!DOCTYPE html>
<html lang="en">
	<head>
		<title>Bootstrap 实例</title>
		<meta charset="utf-8">
		<meta name="viewport" content="width=device-width, initial-scale=1">
		<link href="https://cdn.jsdelivr.net/npm/bootstrap@5.1.2/dist/css/bootstrap.min.css" rel="stylesheet">
		<script src="https://cdn.jsdelivr.net/npm/bootstrap@5.1.2/dist/js/bootstrap.bundle.min.js"></script>
	</head>
	<body>

		<div class="container mt-3">
			<p>.img-fluid 类使图像可以很好地缩放到父元素(调整浏览器窗口的大小来查看效果):</p>
			<img src="img/1.png" class="img-fluid">
		</div>

	</body>
</html>
在上面的示例中,通过将 .img-fluid 类应用于 <img> 元素,图像将自动缩放以适应父元素(在这种情况下是一个 <div> 元素)的宽度。
使用 .img-fluid 类可以确保图像在不同设备和屏幕尺寸上都能以一致和可读的方式呈现。
Jumbotron
在 Bootstrap 3 中引入了 jumbotron,会生成大的填充框,用于引起对某些特殊内容或信息的额外关注。但Bootstrap 5 中不再有专门的 Jumbotron 类,但是可以通过组合一些现有的类来达到类似的效果。
如果想要创建一个类似 Jumbotron 的效果,可以使用 .bg-dark 或 .bg-primary 等背景颜色类,以及 .d-block 和 .d-sm-block 等 display 类。
实例
<!DOCTYPE html>
<html lang="en">
	<head>
		<title>Bootstrap 实例</title>
		<meta charset="utf-8">
		<meta name="viewport" content="width=device-width, initial-scale=1">
		<link href="https://cdn.jsdelivr.net/npm/bootstrap@5.1.2/dist/css/bootstrap.min.css" rel="stylesheet">
		<script src="https://cdn.jsdelivr.net/npm/bootstrap@5.1.2/dist/js/bootstrap.bundle.min.js"></script>
	</head>
	<body>

		<div class="container mt-3">
			<div class="bg-dark text-white d-block d-sm-block">
				<h1 class="display-1">Welcome to my Jumbotron</h1>
				<p class="lead">This is a Bootstrap 5 Jumbotron replacement.</p>
			</div>
		</div>

	</body>
</html>
在这个例子中,.bg-dark 提供了深色的背景,.text-white 使文字变为白色,.d-block 和 .d-sm-block 则确保了这个 div 在所有屏幕大小上都可见。.display-1 用于大标题,而 .lead 则用于主要内容。
请注意:可以根据需要调整这些类和样式。例如,可能想要改变背景颜色,或者调整标题和内容的字体大小等。

