文章目录
- 前言
- 数据集准备
- 数据初探
- 数据处理
- 分配标签
- 抽取有效列并搭建模型训练
- 失败分析
前言
LSTM完成ssd I/的预取
ref:
- git地址: https://github.com/Chandranil2606/Learning-IO-Access-Patterns-to-improve-prefetching-in-SSDs-
- paper地址: https://people.ucsc.edu/~hlitz/papers/ecml2020.pdf
- 作者的presentation://www.youtube.com/watch?v=5NlatYYzfrY
- 作者的ppt我也没有,在3中可以在线观看
Learning I/O Access Patterns to Improve Prefetching in SSDs 2020年 美国 , University of California Santa Cruz 小论文 引用量有25个左右是SSD预取中最高的之一。作者说自己是头一个将深度学习的方式引入到ssd上的,而且称为了sota。
数据集准备
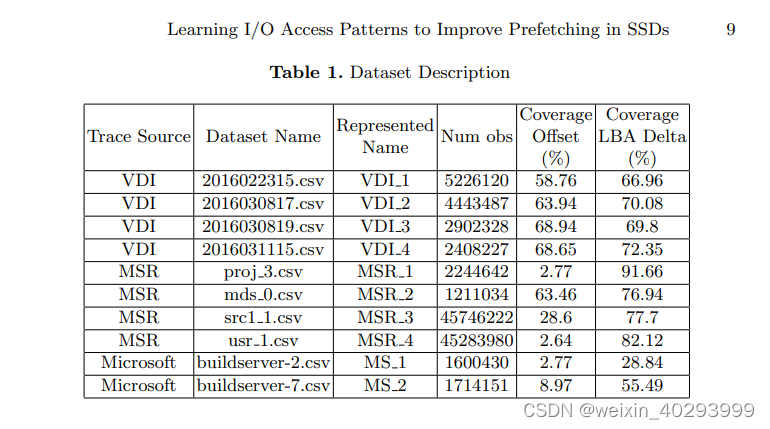
我是用vdi的数据集先试了一下:
数据集下载:http://server2.iotta.snia.org/downloaderinfos/new?trace_id=4934&type=file&sType=bwget&came_from=server2.iotta.snia.org
选取其中一天的csv:2016021612-LUN0.csv
数据初探
作者的git下有好多训练文件,最好用的是:Learning-IO-Access-Patterns-to-improve-prefetching-in-SSDs–main\NN Prefetcher\Multihead_model-(Batch_Generator) SYSTOR.ipynb
别问我是如何知道的,因为我先拿keras那个往下跑,跑到后面跑不下去了,好多写死的地方。
找到一个好的base能省很多事,吐槽一下,作者的代码风格是相当奔放的,可能企业和学术界的要求不一样吧.
但作者的pandas的使用是非常熟练的,可能nlp处理的是序列数据,pandas是基操。
先看官方对他数据的描述,数据是微软真实场景下跑出来的I/O request 序列
import pandas as pd
data_sample_path = r"F:\datasets\paper\0903-lstm-prefech\2016021612-LUN0.csv"
df = pd.read_csv(data_sample_path)
df.info()
<class 'pandas.core.frame.DataFrame'>
RangeIndex: 2761269 entries, 0 to 2761268
Data columns (total 6 columns):
 #   Column     Dtype
---  ------     -----
 0   Timestamp  float64
 1   Response   float64
 2   IOType     object
 3   LUN        int64
 4   Offset     int64
 5   Size       int64
dtypes: float64(2), int64(3), object(1)
memory usage: 126.4+ MB
一共6列,2761269 行,解释如下:
3. I/O trace file format
The files are gzipped csv (comma-separated text) files. The fields in
the csv are:

Timestamp,Response,IOType,LUN,Offset,Size

  - Timestamp is the time the I/O was issued.
    The timestamp is given as a Unix time (seconds since 1/1/1970) with a fractional part.
    Although the fractional part is nine digits, it is accurate only to the microsecond level;
    please  ignore the nanosecond part.
    If you need to process the timestamps in their original local timezone, it is UTC+0900 (JST).
    For example:
     > head 2016022219-LUN4.csv.gz  ← (Mon, 22 Feb 2016 19:00:00 JST)
       1456135200.013118000 ← (Mon, 22 Feb 2016 10:00:00 GMT)
  - Response is the time needed to complete the I/O.
  - IOType is "Read(R)", "Write(W)", or ""(blank).
    The blank indicates that there was no response message.
  - LUN is the LUN index (0,1,2,3,4, or 5).
  - Offset is the starting offset of the I/O in bytes from the start of
    the logical disk.
  - Size is the transfer size of the I/O request in bytes.
f分别是,请求发生的时刻,响应所用的时间段、IO类型(读、写、未知)、LUN 不重要、Offset 逻辑地址单元(LBA起始地址),size(IO请求大小)。
看下数据:
	Timestamp	Response	IOType	LUN	     Offset	    Size
0	1.455592e+09	0.006475	R	0	203468398592	32768
1	1.455592e+09	0.005276	R	0	4590576115200	4096
2	1.455592e+09	0.011025	R	0	4564742206976	65536
3	1.455592e+09	0.000170	W	0	3772221901312	4096
4	1.455592e+09	0.000167	W	0	3832104423424	16384
数据预处理前,先要观察和分析出数据特征,我直接出结论:
total_row=df.shape[0]
print("总行数:",total_row)
row_per_iotype = df['IOType'].value_counts()
print("分列统计:\n",row_per_iotype)
print("读写比:\n",round(row_per_iotype['R']/row_per_iotype['W'],2),":1")
总行数: 2761269
分列统计:
R 2064219
W 697050
Name: IOType, dtype: int64
读写比: 2.96 :1
``
294行含有null,但都是响应时间列,不是我们论文所关注的列,不用理会。
````python
# 含null的值都在哪些列,【只是想计算有多少行含有至少一个空值的数据】
num_rows_with_null = df.isnull().any(axis=1).sum()
num_rows_with_null
``
看一下还有null的行数据,肉眼看过去都是Response为None,不是我们需要处理的数据,没问题。`
···
none_rows = df[df.isnull().any(axis=1)]
none_rows
···

保险起见,把需要关注的列验证一下是否有None值,这几列都是false,没问题。
这里其实也是透剧了,只需要关注Timestape, IOType, offset,size. (其实这里还多说了,作者关注的更少。)
null_check = df[['Timestamp','IOType','Offset','Size']].isnull().any()
null_check
Timestamp    False
IOType       False
Offset       False
Size         False
dtype: bool
按时间序列排序,可以发现原始数据并不是完全严格按照时间序列排序,因此需要按时间序列处理,并重置index。
```python
df = df.sort_values(by=['Timestamp'])
df
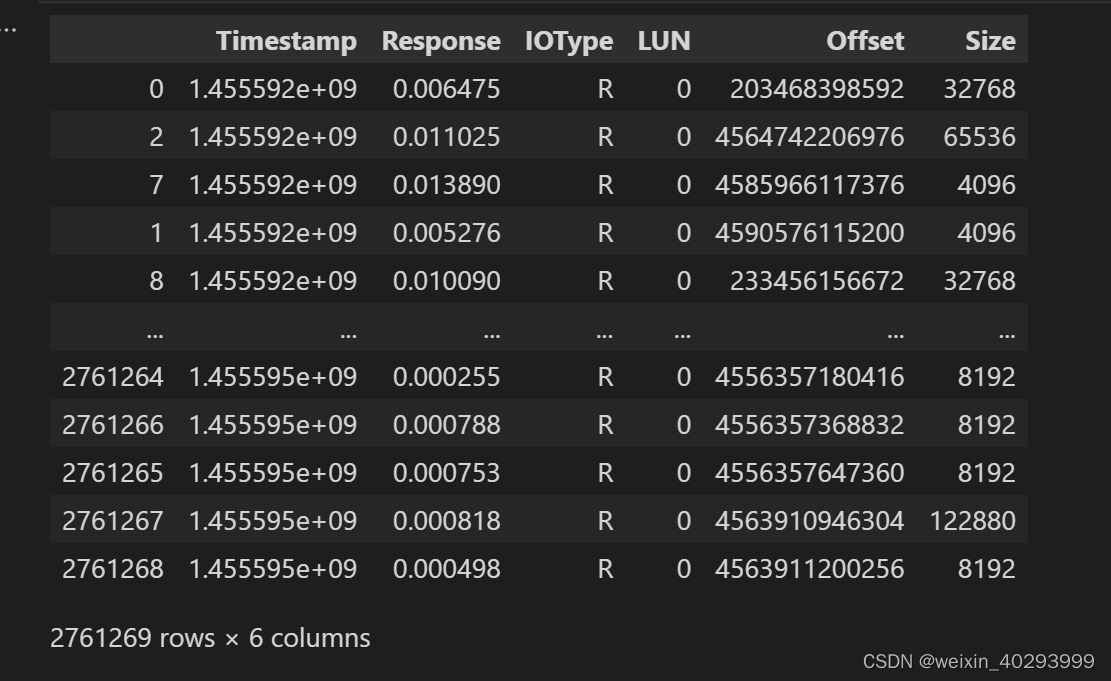
按io request time 重新排序后重置index
df.reset_index(inplace=True, drop=True)
----------------------------分割线----------------------------------
至此,可以按照作者mentioned 2 个trick处理数据集了
数据处理
delta offset, 就是地址列占的空间太大,用delta的方式把它缩放,i/o size也是这样;
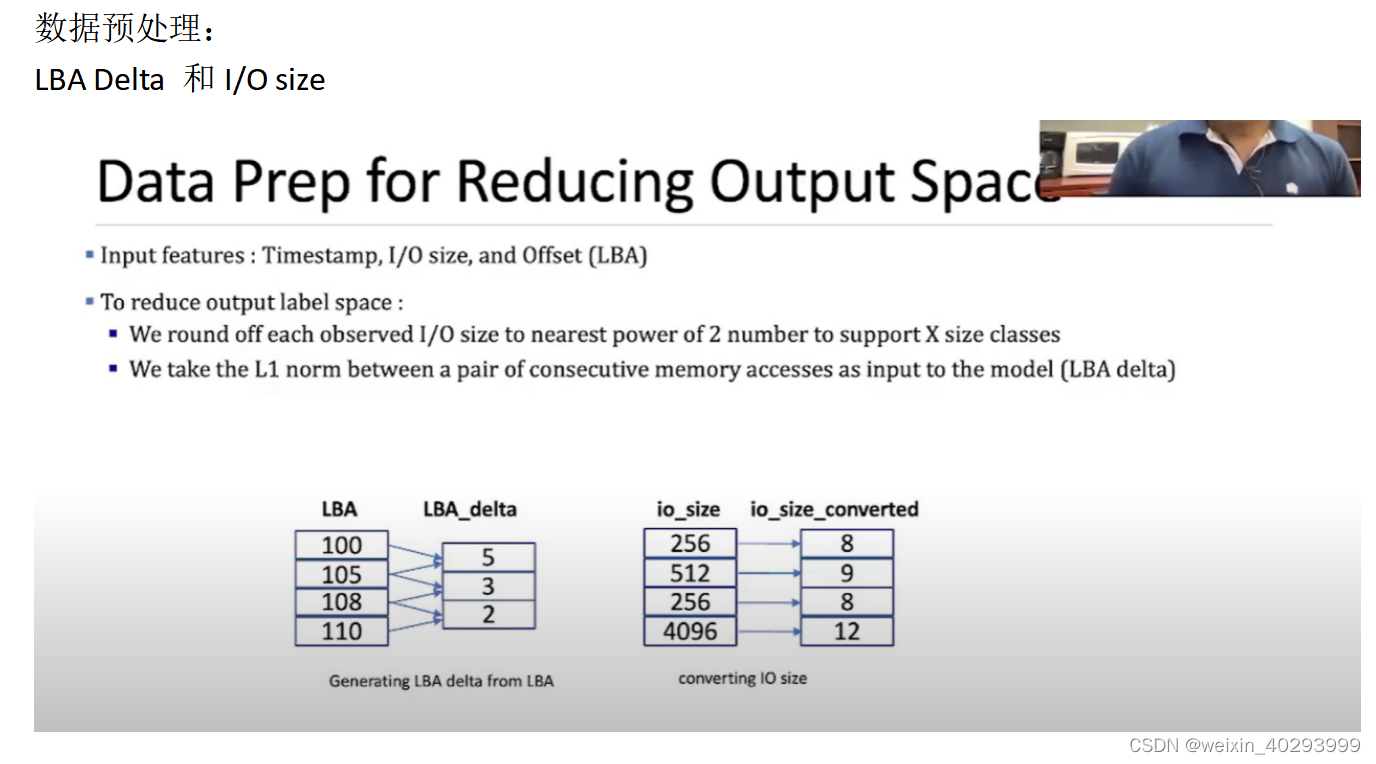
这是原论文的表述,一看就懂。但他其实代码实现要比描述的粗糙的多。某二位大牛老师在工程实践二结题的时候痛批我们的presentation【所谓做的好不如写得好,写得好不如吹的好】【我们不关注输出的呈现结果,更关注理论分析和原理架构的可行性】;
实际上,作者使用pandas的现成方法,LBA列是前项-后项, io_size 这里他做了合理数据裁剪,真实数据不是都是2^n, 可以用log函数计算成整数,也就是说现数据不齐。
作者的实现方式:
# 前项减去后项,最后一列没后项了,没的可减,所以产生了None,需要drop掉index为-1的列
df['ByteOffset_Delta'] = df['ByteOffset'] - df['ByteOffset'].shift(-1)
df = df.drop(df.index[-1])
# 看下前5行数据
df['ByteOffset_Delta'].head(5)

0   -4.361274e+12
1   -2.122391e+10
2   -4.609998e+09
3    4.357120e+12
4   -7.943132e+10
Name: ByteOffset_Delta, dtype: float64
统计一下ByteOffset_Delta还有多少中数值
from collections import Counter
x_offset_delta = Counter(df['ByteOffset_Delta'])
# 返回一个字典 {delta:counter},看一下top1000
x_offset_delta.most_common(10)
# offset 为-131072的为168291次,-4096.0的为167181次,
[(-131072.0, 168290),
 (-4096.0, 167181),
 (-32768.0, 42603),
 (-16384.0, 30777),
 (-8192.0, 30407),
 (8192.0, 21644),
 (0.0, 19829),
 (-12288.0, 15873),
 (-65536.0, 13315),
 (4096.0, 12503)]
top 1000 的delta 能够覆盖多少,后面是拿top1000来做训练的
# top 1000 的delta 能够覆盖多少,后面是拿top1000来做训练的
vals_offset_delta = x_offset_delta.most_common(1000)
coverage = 0
for k,value in vals_offset_delta:
    coverage = coverage + value
print("Percentage Coverage:\n",coverage/len(df)*100)
Percentage Coverage:
27.432686722187054
能覆盖27%,若我们不做delta,直接看逻辑地址的top1000 覆盖了多少呢?
# 原始的类别
x_raw_offset = Counter(df['Offset'])
vals = {}
vals =  x_raw_offset.most_common(1000)
coverage = 0
for key,value in vals:
    coverage = coverage + value
print("Percentage Coverage Offset")
print("原始的类别:\n",(coverage/len(df))*100)
Percentage Coverage Offset
原始的类别:
6.0314319363422895
原始offset的top1000 才6%.
再看size的log处理
# 这是论文中的对i/o request size的请求大小的工程trick,用2^n 表示比较省空间。其实核心思想和offset 的 delta相似。
import math
df['size_ex'] = df['Size'].apply(lambda x:math.log2(x))
可是这里隐藏着一个秘密:
LBA delta 使用float存的,它不会减少任何显存或者内存空间,仅仅会减少文本label的空间,那玩意是当字符串存的。读文章的时候,我差点,就联想到内存/显存侧了。
看一下现在的数据:重点关注ByteOffset_Delta和size_ex 是工程trick处理后的结果。

到这里,以上代码讲数据预处理的所有前置工作完成。后面的工作:
- 将序列数据划分标签,ByteOffset_Delta 的top1000 划分为0-1000个类(I/O请求模式),不在top1000的划分为1001类(背景类)
- 要预测出未来n次请求的offset和size
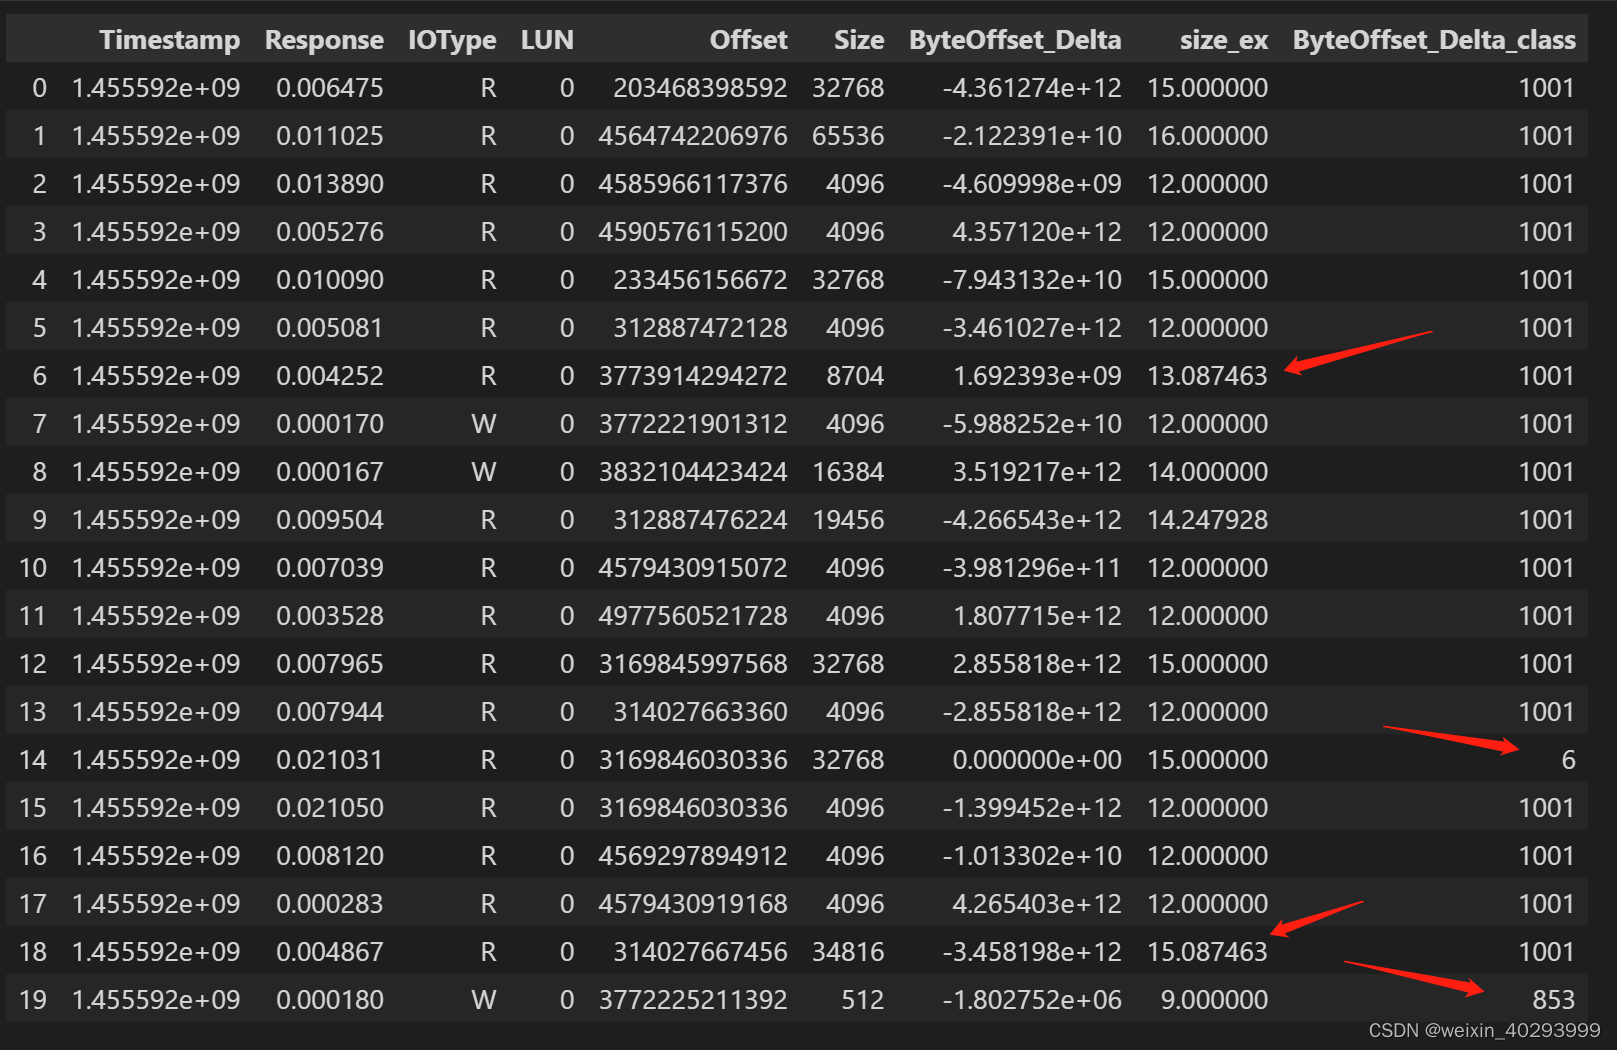
这里就暴露了一个问题,size_ex 列 log处理后数据不齐。 作者真实的代码又用round() 裁剪成了整数,个人任务ceil的方式更合理,否则你只预测对了起始地址,但size小了,后面的那部分还需要等flash侧的io啊:
In [1]: round(12.3)
Out[1]: 12

In [2]: round(12.7)
Out[2]: 13
df['IOSize_log'] = np.log2(df['IOSize'])
df['IOSize_log_roundoff']= round(df['IOSize_log'])
print(len(Counter(df['IOSize'])))
print(len(Counter(df['IOSize_log'])))
print(len(Counter(df['IOSize_log_roundoff'])))
259
259
11
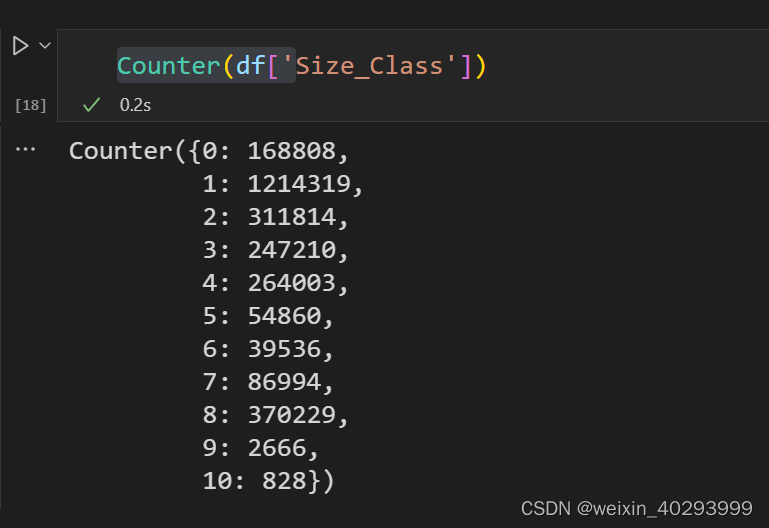
经过round之后,由259个数据变成了11个数据, 否则只是起到压缩空间的作用了。
按上面所有描述方式整理完数据集后:
	Timestamp	Response	IOType	LUN	ByteOffset	IOSize	ByteOffset_Delta	ByteOffset_Delta_class	ByteOffset_Delta_Class_1001	IOSize_log	IOSize_log_roundoff
0	1.455592e+09	0.011025	R	0	4564742206976	65536	-2.122391e+10	999999	0	16.000000	16.0
1	1.455592e+09	0.013890	R	0	4585966117376	4096	-4.609998e+09	999999	0	12.000000	12.0
2	1.455592e+09	0.005276	R	0	4590576115200	4096	4.357120e+12	999999	0	12.000000	12.0
3	1.455592e+09	0.010090	R	0	233456156672	32768	-7.943132e+10	999999	0	15.000000	15.0
4	1.455592e+09	0.005081	R	0	312887472128	4096	-3.461027e+12	999999	0	12.000000	12.0
...	...	...	...	...	...	...	...	...	...	...	...
2761262	1.455595e+09	0.000254	R	0	4556356860928	8192	-3.194880e+05	3529	107	13.000000	13.0
2761263	1.455595e+09	0.000255	R	0	4556357180416	8192	-1.884160e+05	6373	200	13.000000	13.0
2761264	1.455595e+09	0.000788	R	0	4556357368832	8192	-2.785280e+05	168	24	13.000000	13.0
2761265	1.455595e+09	0.000753	R	0	4556357647360	8192	-7.553299e+09	999999	0	13.000000	13.0
2761266	1.455595e+09	0.000818	R	0	4563910946304	122880	-2.539520e+05	322	35	16.906891	17.0
分配标签
IOsize 标签 11个
a = df['IOSize_log_roundoff'].unique().tolist()
size_id_map = {}
for i,id in enumerate(a): size_id_map[id] = i
df['Size_Class'] = df['IOSize_log_roundoff'].map(lambda x: size_id_map[x])
delta LBA, 1001类;
它把不属于top1000的类,delta 都按999999来的,所以说很粗暴。不清楚为啥选这个数数字,但我私下验证过,这个delta 的确没在top 1000中。
from collections import Counter
x = Counter(df['ByteOffset_Delta_class'])
vals = {}
vals =  x.most_common(1000)
bo_list = []

for x in vals:
    bo_list.append(x[0])

count = 0
label_list = []

while (count < len(df)):
    x = df['ByteOffset_Delta_class'].iloc[count]
    if x in bo_list:
        label_list.append(x)
    else:
        label_list.append(999999)
    count= count + 1

ByteOffset_Delta_class_backup  = df['ByteOffset_Delta_class']
df['ByteOffset_Delta_class']  = label_list
print(len(Counter(df['ByteOffset_Delta_class'])))

a = df['ByteOffset_Delta_class'].unique().tolist()
bo_map = {}
for i,id in enumerate(a): bo_map[id] = i
df['ByteOffset_Delta_Class_1001'] = df['ByteOffset_Delta_class'].map(lambda x: bo_map[x])

label_list = df['ByteOffset_Delta_Class_1001']

df['ByteOffset_Delta_Class_1001']  = label_list
看一看size_class 分的11个数字类。
抽取有效列并搭建模型训练
所以最有效的列就是 LBA delta 和 SIZE 列,作者确实也是这样抽取的。
其实timestamp,iotype 也有其存在的合理性,但我还是本着复现来做,这篇文章存疑的地方有一些。需要向作者大佬联系学习一下。
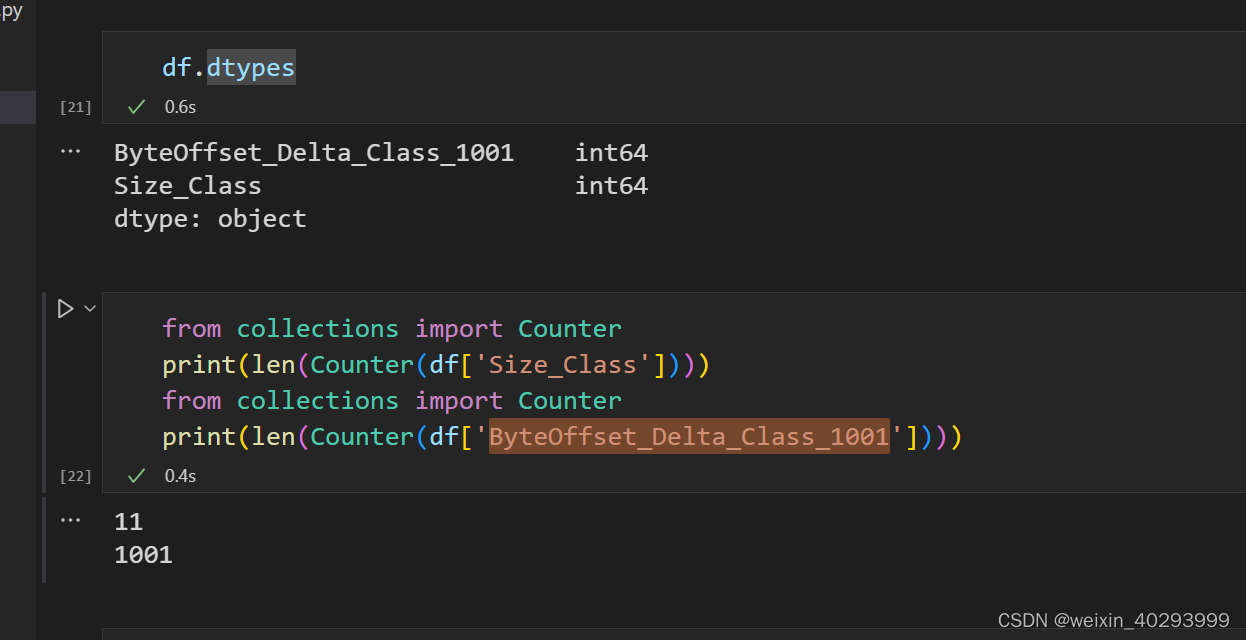
size_class 一共11类, byteoffsetdelta 一共1001类。
处理好的数据存放到文件,并作数据集train和test的切分:
0.75的比例切分,这个不能shuffle,因为是基于时间序列的。
# Split to train, validate and test
# Finding the value 75th percentile of TimeStamp
import math
training_pt_1 = math.floor((len(df)*0.75))

lba_train =df[:training_pt_1]['ByteOffset_Delta_Class_1001'].tolist()
lba_test = df[training_pt_1+1:]['ByteOffset_Delta_Class_1001'].tolist()
size_train = df[:training_pt_1]['Size_Class'].tolist()
size_test = df[training_pt_1+1:]['Size_Class'].tolist()
保存到文件:
data_path  = r'F:/datasets/paper/0903-lstm-prefech/handle_output/'
path_train  = os.path.join(data_path,"lba_train_2016021612.txt")


with open(path_train, 'w') as f:
    for item in lba_train:
        f.write("%s " % item)

path_test  = os.path.join(data_path,"lba_test_2016021612.txt")
with open(path_test, 'w') as f:
    for item in lba_test:
        f.write("%s " % item)


path_train  = os.path.join(data_path,"size_train_2016021612.txt")

with open(path_train, 'w') as f:
    for item in size_train:
        f.write("%s " % item)

path_test  = os.path.join(data_path,"size_test_2016021612.txt")
with open(path_test, 'w') as f:
    for item in size_test:
        f.write("%s " % item)
作者的网络结构:
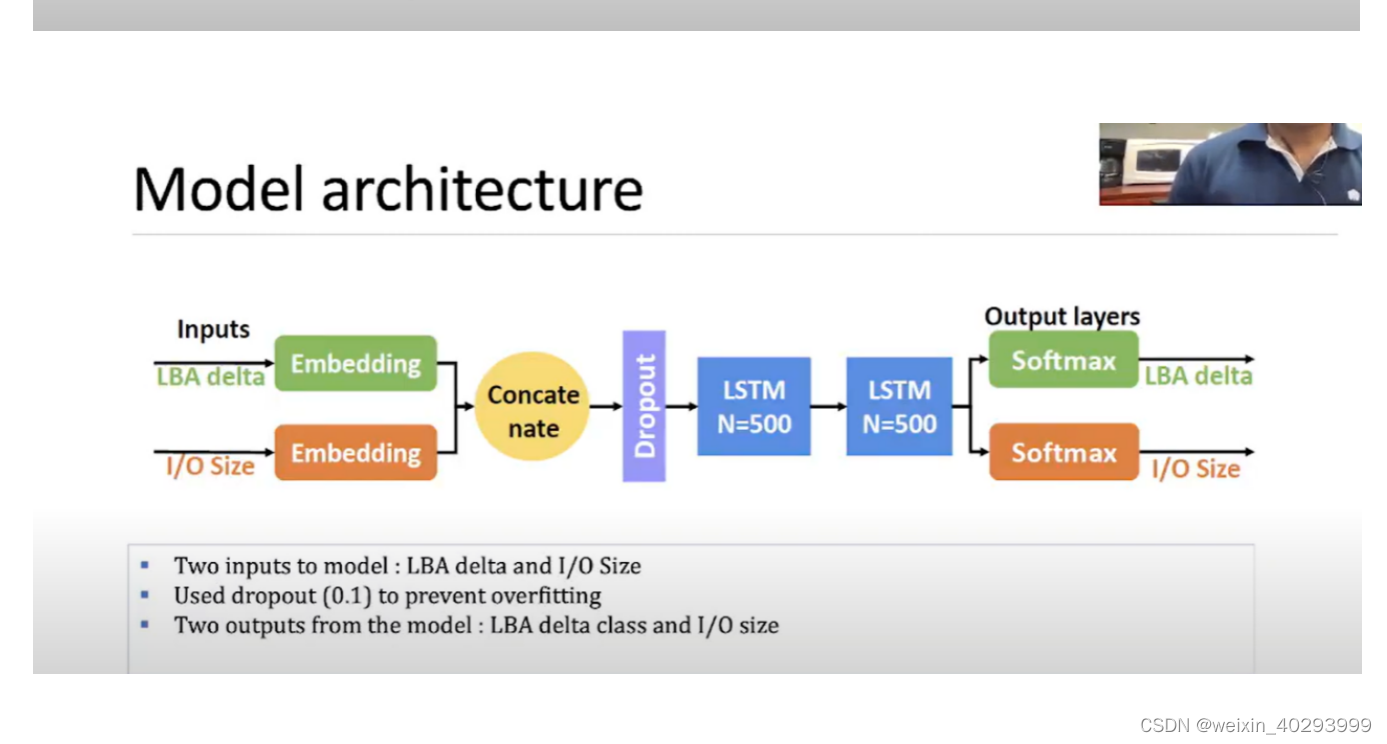
分别将LBA delta 和 I/O size 编码 然后concatenate
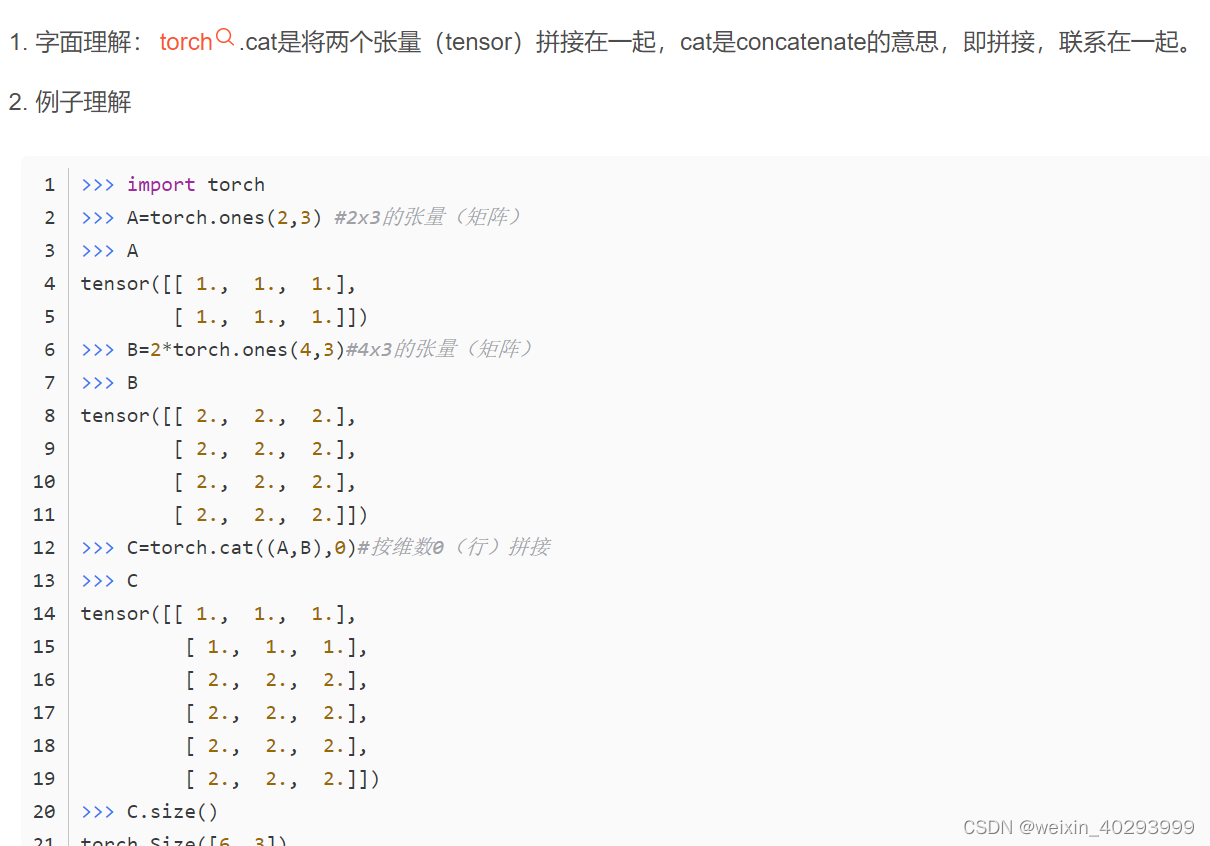
concate的作用是堆叠拼接:
然后紧接着dropout, 说实话这个dropout个人有点莫名其妙,啥也没干呢,先dropout???
然后两个lstm的堆叠,两个output,就完了。
模型搭建:
作者用的是keras,可能是年代久远训练的时候会有bug
os.environ[“TF_FORCE_GPU_ALLOW_GROWTH”]=“true” # https://github.com/tensorflow/tensorflow/issues/33721
用这种方式解决。
# Two classification outputs
import keras

from keras.preprocessing import sequence
from keras.models import Sequential
from keras.layers import Dense, Embedding
from keras.layers import LSTM
from keras.datasets import imdb


from tensorflow.python.client import device_lib
import numpy as np
import csv
import pandas as pd
import sys
import os
import glob
import tensorflow as tf


from keras.layers import Dense, Input
from keras.models import Model
from keras.optimizers import Adam
from keras.layers import Concatenate, Dense, LSTM, Input, concatenate , Dot
from keras.callbacks import EarlyStopping
from keras.layers import Dense, Activation, Embedding, Dropout, TimeDistributed, Reshape


# no_docs = len(y_train_lba)
maxlen= 32

# from collections import Counter
# print(len(Counter(df['Size_Class'])))
# from collections import Counter
# print(len(Counter(df['ByteOffset_Delta_Class_1001'])))

# # define two sets of inputs
# inputA = Input(shape=(32,))
# inputB = Input(shape=(32,))
# # inputA = Sequential()
# # inputB = Sequential()
vocabulary_1 = len(Counter(df['ByteOffset_Delta_Class_1001']))
vocabulary_2 = len(Counter(df['Size_Class']))
hidden_size = 500

# input=Input(shape=(no_docs,maxlen),dtype='float64')
inputA=Input(shape=(maxlen,),dtype='float64')
inputB=Input(shape=(maxlen,),dtype='float64')


# the first branch operates on the first input
x = Embedding(input_dim=vocabulary_1,output_dim=hidden_size,input_length=maxlen)(inputA)
x = Model(inputs=inputA, outputs=x)

# # the second branch opreates on the second input
y = Embedding(input_dim=vocabulary_2,output_dim=hidden_size,input_length=maxlen)(inputB)
y = Model(inputs=inputB, outputs=y)
# combine the output of the two branches
combined = keras.layers.concatenate([x.output, y.output])

lstm1 = LSTM(hidden_size,return_sequences=True)(combined)
lstm2 = LSTM(hidden_size, return_sequences=True)(lstm1)

# create classification output
offset = keras.layers.wrappers.TimeDistributed(Dense(units=vocabulary_1, activation='softmax'), name='offset')(lstm2)
iosize = keras.layers.wrappers.TimeDistributed(Dense(units=vocabulary_2, activation='softmax'), name='iosize')(lstm2)


model =Model([inputA,inputB],[offset,iosize]) # combining all into a Keras model

model.compile(optimizer='rmsprop',
              loss={'offset': 'categorical_crossentropy', 'iosize': 'categorical_crossentropy'},
              loss_weights={'offset': 2., 'iosize': 1.5},
              metrics={ 'offset': 'categorical_accuracy', 'iosize': 'categorical_accuracy'})
model.summary()
两个输出都是用的交叉熵损失, loss weight是 2:1.5
模型输出:
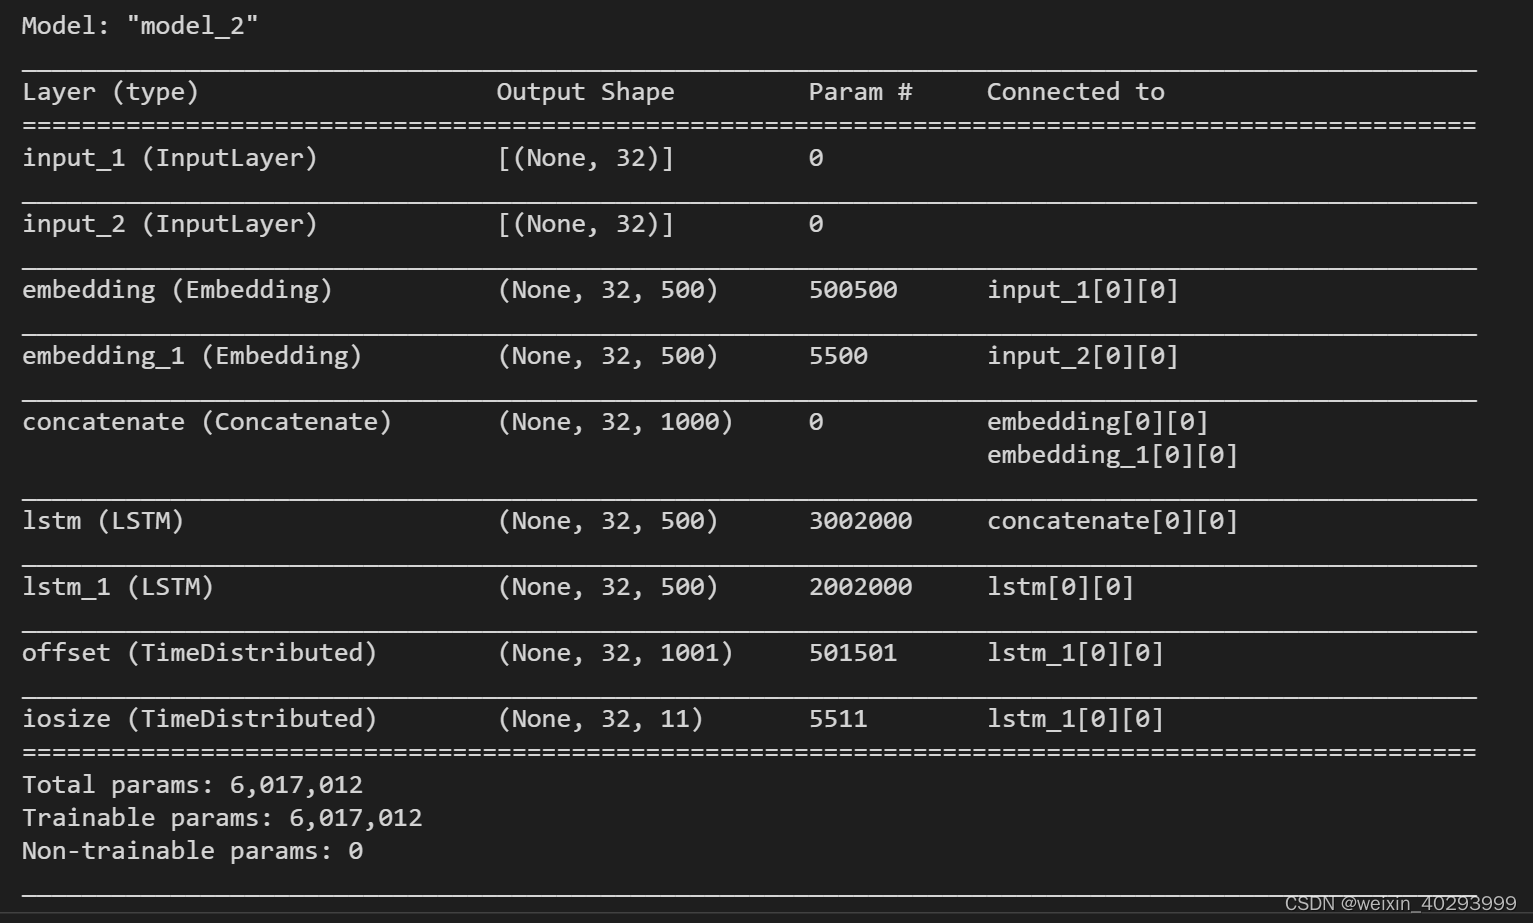
数据集生成器,里面还用到了迭代器。vocabulary1,vocabulary2 应该是标签。看命名风格应该是词袋子或者词向量。这个等复习完lstm再做详解。
class KerasBatchGenerator(object):

    def __init__(self, data_1, data_2, num_steps, batch_size, vocabulary1,vocabulary2, skip_step=0):
        self.data_1 = data_1
        self.data_2 = data_2
        self.num_steps = num_steps
        self.batch_size = batch_size
        self.vocabulary1 = vocabulary1
        self.vocabulary2 = vocabulary2
        # this will track the progress of the batches sequentially through the
        # data set - once the data reaches the end of the data set it will reset
        # back to zero
        self.current_idx = 0
        # skip_step is the number of words which will be skipped before the next
        # batch is skimmed from the data set
        self.skip_step = skip_step

    def generate(self):
        x_lba = np.zeros((self.batch_size, self.num_steps))
        x_size = np.zeros((self.batch_size, self.num_steps))
        y_lba = np.zeros((self.batch_size, self.num_steps, self.vocabulary1))
        y_size = np.zeros((self.batch_size, self.num_steps, self.vocabulary2))
        while True:
            for i in range(self.batch_size):
                predict_ahead = 32
                if self.current_idx + self.num_steps >= len(self.data_1):
                    # reset the index back to the start of the data set
                    self.current_idx = 0
                x_lba[i, :] = self.data_1[self.current_idx:self.current_idx + self.num_steps]
                x_size[i, :] = self.data_2[self.current_idx:self.current_idx + self.num_steps]

                temp_y_lba = self.data_1[self.current_idx + predict_ahead:self.current_idx + self.num_steps + 1]
                temp_y_size = self.data_2[self.current_idx + predict_ahead:self.current_idx + self.num_steps + 1]
                # convert all of temp_y into a one hot representation
                y_lba[i, :, :] = to_categorical(temp_y_lba, num_classes=self.vocabulary1)
                y_size[i, :, :] = to_categorical(temp_y_size, num_classes=self.vocabulary2)
                self.current_idx += self.skip_step

            #yield (np.array(x_lba),np.array(x_size)), (np.array(y_lba),np.array(y_size))
            # print("--------",[x_lba, x_size],[y_lba, y_size],"\n")
            yield [x_lba, x_size],[y_lba, y_size]
#            yield [np.array(top_batch), np.array(bot_batch)], np.array(batch_labels)
#             print(x)
#             print(y)
#             yield x,y
数据集提取
num_steps = 32
batch_size = 32

train_data_generator = KerasBatchGenerator(train_data_lba,train_data_size, num_steps, batch_size, vocabulary_1,vocabulary_2,skip_step=0)
test_data_generator = KerasBatchGenerator(test_data_lba,test_data_size, num_steps, batch_size, vocabulary_1, vocabulary_2, skip_step=0)
训练
import time
num_epochs = 1000
batch_size = 32
num_steps = 32
import os
os.environ["TF_FORCE_GPU_ALLOW_GROWTH"]="true"

monitor = EarlyStopping(monitor='val_loss', min_delta=1e-3, patience=3, verbose=1, mode='auto')
checkpointer = ModelCheckpoint(filepath=data_path + 'best_weights-4.hdf5', verbose=1,save_best_only=True)

print('Train...')
start_time = time.time()

# model.fit([X_train_lba,X_train_size],[y_train_lba,y_train_size],
#           verbose=1,epochs=1000,callbacks=[monitor,checkpointer])

valid_steps = len(train_data_lba)//(batch_size* 32)
train_steps = len(train_data_lba)//(batch_size *32)

model.fit_generator(train_data_generator.generate(),
                    train_steps,
                    num_epochs,
                    verbose=1,
                    validation_data=test_data_generator.generate(),
                    validation_steps= valid_steps,
                    callbacks=[checkpointer,monitor])


end_time = time.time()
print("--- %s seconds ---" % (end_time - start_time))
输出结果:
Train...
Epoch 1/1000
c:\ProgramData\Anaconda3\lib\site-packages\keras\engine\training.py:1915: UserWarning: `Model.fit_generator` is deprecated and will be removed in a future version. Please use `Model.fit`, which supports generators.
  warnings.warn('`Model.fit_generator` is deprecated and '
2022/2022 [==============================] - 62s 23ms/step - loss: 0.1504 - offset_loss: 0.0644 - iosize_loss: 0.0145 - offset_categorical_accuracy: 0.9960 - iosize_categorical_accuracy: 0.9960 - val_loss: 54.8147 - val_offset_loss: 15.7523 - val_iosize_loss: 15.5409 - val_offset_categorical_accuracy: 0.0000e+00 - val_iosize_categorical_accuracy: 0.0000e+00

Epoch 00001: val_loss improved from inf to 54.81469, saving model to F:/datasets/paper/0903-lstm-prefech/handle_output\best_weights-4.hdf5
Epoch 2/1000
2022/2022 [==============================] - 46s 23ms/step - loss: 4.1723e-07 - offset_loss: 1.1921e-07 - iosize_loss: 1.1921e-07 - offset_categorical_accuracy: 1.0000 - iosize_categorical_accuracy: 1.0000 - val_loss: 54.8147 - val_offset_loss: 15.7523 - val_iosize_loss: 15.5409 - val_offset_categorical_accuracy: 0.0000e+00 - val_iosize_categorical_accuracy: 0.0000e+00

Epoch 00002: val_loss did not improve from 54.81469
Epoch 3/1000
2022/2022 [==============================] - 47s 23ms/step - loss: 4.1723e-07 - offset_loss: 1.1921e-07 - iosize_loss: 1.1921e-07 - offset_categorical_accuracy: 1.0000 - iosize_categorical_accuracy: 1.0000 - val_loss: 54.8147 - val_offset_loss: 15.7523 - val_iosize_loss: 15.5409 - val_offset_categorical_accuracy: 0.0000e+00 - val_iosize_categorical_accuracy: 0.0000e+00

Epoch 00003: val_loss did not improve from 54.81469
Epoch 4/1000
2022/2022 [==============================] - 50s 25ms/step - loss: 4.1723e-07 - offset_loss: 1.1921e-07 - iosize_loss: 1.1921e-07 - offset_categorical_accuracy: 1.0000 - iosize_categorical_accuracy: 1.0000 - val_loss: 54.8147 - val_offset_loss: 15.7523 - val_iosize_loss: 15.5409 - val_offset_categorical_accuracy: 0.0000e+00 - val_iosize_categorical_accuracy: 0.0000e+00

Epoch 00004: val_loss did not improve from 54.81469
Epoch 00004: early stopping
--- 203.98740601539612 seconds ---
这是一次失败的复现,训练集上特别好,test集上不灵光。
失败分析
- 搭建的网络和论文中给的不符,没有dropout 层,所以在combined之后,添加这几行代码。论文给的参数是0.1, 其实也未必。
combined = keras.layers.concatenate([x.output, y.output])

layer = tf.keras.layers.Dropout(0.1, input_shape=combined.shape)
combined = layer(combined, training=True)
然后io LBA detla 就能很快预测准确,然而size没有什么变化而且epoch=4 的时候 就early stop了,val_loss就不动了。
2. 当我把文件:2016022216-LUN3.csv
的iotype只选择 read 的时候,
Train...
Epoch 1/1000
c:\ProgramData\Anaconda3\lib\site-packages\keras\engine\training.py:1915: UserWarning: `Model.fit_generator` is deprecated and will be removed in a future version. Please use `Model.fit`, which supports generators.
  warnings.warn('`Model.fit_generator` is deprecated and '
765/765 [==============================] - 22s 25ms/step - loss: 0.7252 - offset_loss: 0.1892 - iosize_loss: 0.0302 - offset_categorical_accuracy: 0.9825 - iosize_categorical_accuracy: 0.9906 - val_loss: 1.8265 - val_offset_loss: 0.3639 - val_iosize_loss: 0.0955 - val_offset_categorical_accuracy: 1.0000 - val_iosize_categorical_accuracy: 1.0000

Epoch 00001: val_loss improved from inf to 1.82645, saving model to F:/datasets/paper/0903-lstm-prefech/handle_output\best_weights-4.hdf5
Epoch 2/1000
765/765 [==============================] - 18s 23ms/step - loss: 1.6093e-06 - offset_loss: 1.1921e-07 - iosize_loss: 1.1921e-07 - offset_categorical_accuracy: 1.0000 - iosize_categorical_accuracy: 1.0000 - val_loss: 1.8258 - val_offset_loss: 0.3637 - val_iosize_loss: 0.0955 - val_offset_categorical_accuracy: 1.0000 - val_iosize_categorical_accuracy: 1.0000

Epoch 00002: val_loss improved from 1.82645 to 1.82580, saving model to F:/datasets/paper/0903-lstm-prefech/handle_output\best_weights-4.hdf5
Epoch 3/1000
765/765 [==============================] - 18s 24ms/step - loss: 1.6093e-06 - offset_loss: 1.1921e-07 - iosize_loss: 1.1921e-07 - offset_categorical_accuracy: 1.0000 - iosize_categorical_accuracy: 1.0000 - val_loss: 1.8262 - val_offset_loss: 0.3637 - val_iosize_loss: 0.0955 - val_offset_categorical_accuracy: 1.0000 - val_iosize_categorical_accuracy: 1.0000

Epoch 00003: val_loss did not improve from 1.82580
Epoch 4/1000
765/765 [==============================] - 18s 24ms/step - loss: 1.6093e-06 - offset_loss: 1.1921e-07 - iosize_loss: 1.1921e-07 - offset_categorical_accuracy: 1.0000 - iosize_categorical_accuracy: 1.0000 - val_loss: 1.8266 - val_offset_loss: 0.3637 - val_iosize_loss: 0.0956 - val_offset_categorical_accuracy: 1.0000 - val_iosize_categorical_accuracy: 1.0000

Epoch 00004: val_loss did not improve from 1.82580
Epoch 5/1000
765/765 [==============================] - 18s 24ms/step - loss: 1.6093e-06 - offset_loss: 1.1921e-07 - iosize_loss: 1.1921e-07 - offset_categorical_accuracy: 1.0000 - iosize_categorical_accuracy: 1.0000 - val_loss: 1.8261 - val_offset_loss: 0.3636 - val_iosize_loss: 0.0956 - val_offset_categorical_accuracy: 1.0000 - val_iosize_categorical_accuracy: 1.0000

Epoch 00005: val_loss did not improve from 1.82580
Epoch 00005: early stopping
--- 94.8677487373352 seconds ---
然后就两个都100%了,真神奇。


