路径规划 | 图解Lazy Theta*算法(附ROS C++/Python/Matlab仿真)

news2025/1/10 17:02:58

目录

  • 0 专栏介绍
  • 1 Theta*算法局限性
  • 2 Lazy Theta*算法原理
  • 3 Theta* VS. Lazy Theta*
  • 4 仿真实现
    • 4.1 ROS C++实现
    • 4.2 Python实现
    • 4.3 Matlab实现

0 专栏介绍

🔥附C++/Python/Matlab全套代码🔥课程设计、毕业设计、创新竞赛必备!详细介绍全局规划(图搜索、采样法、智能算法等);局部规划(DWA、APF等);曲线优化(贝塞尔曲线、B样条曲线等)。

🚀详情:图解自动驾驶中的运动规划(Motion Planning),附几十种规划算法


1 Theta*算法局限性

Theta*的运行瓶颈在于,每次扩展节点 v v v的邻节点 w w w时,都需要对 p a r e n t ( v ) \mathrm{parent}(v) parent(v) w w w进行一次Bresenham视线检测。然而,大部分邻节点最终不会被扩展,大量应用在视线检测上的计算资源被浪费。

在这里插入图片描述

Theta*的变种算法Lazy Theta*算法通过延迟评估技术提升Theta*的路径搜索速度。实验证明,在26邻域三维地图上,Lazy Theta*的视线检查数量比Theta*减少了一个数量级,且路径长度没有增加。

2 Lazy Theta*算法原理

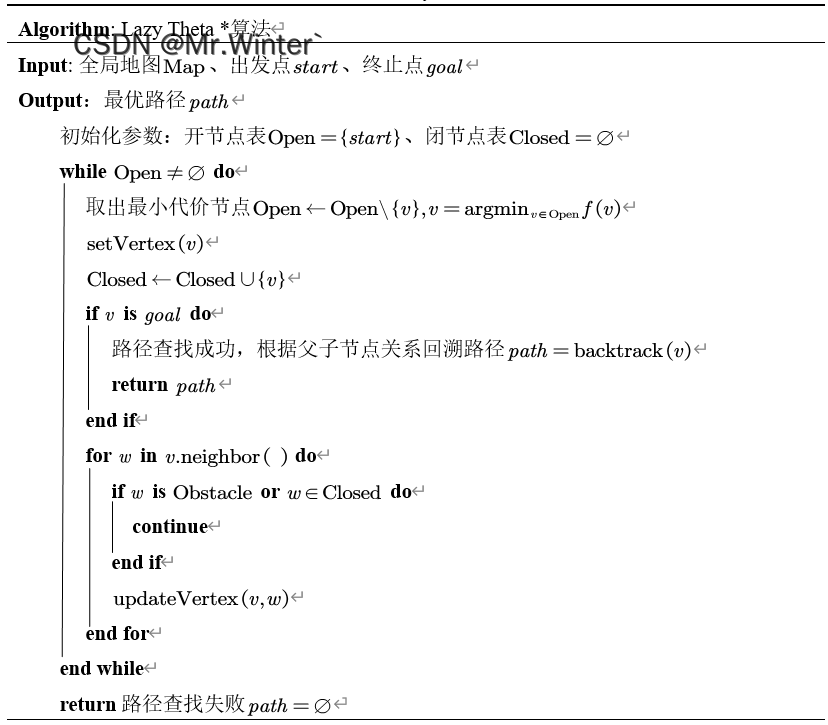
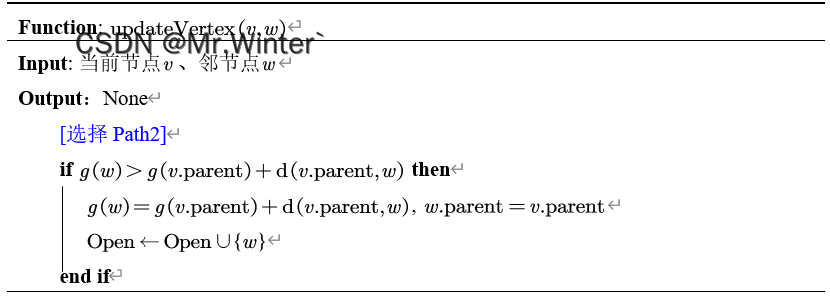
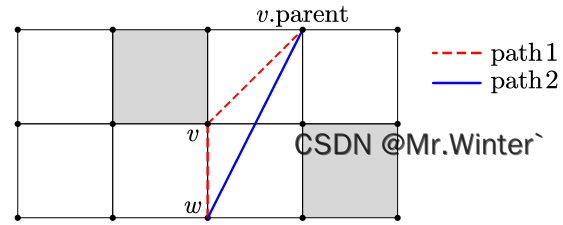
Lazy Theta*在扩展节点 v v v的邻节点 w w w时,默认 p a r e n t ( v ) \mathrm{parent}(v) parent(v) w w w间存在视线,而无需对 p a r e n t ( v ) \mathrm{parent}(v) parent(v) w w w进行碰撞检测。当以节点 w w w为基础开始扩展时,才正式对它与父节点 p a r e n t ( v ) \mathrm{parent}(v) parent(v)计算视线。若视线存在,则无需更新信息(path2);若视线不存在,则在邻域重新选择父节点(path1)。
在这里插入图片描述
Lazy Theta*的算法流程如下所示。

在这里插入图片描述

在这里插入图片描述

在这里插入图片描述

3 Theta* VS. Lazy Theta*

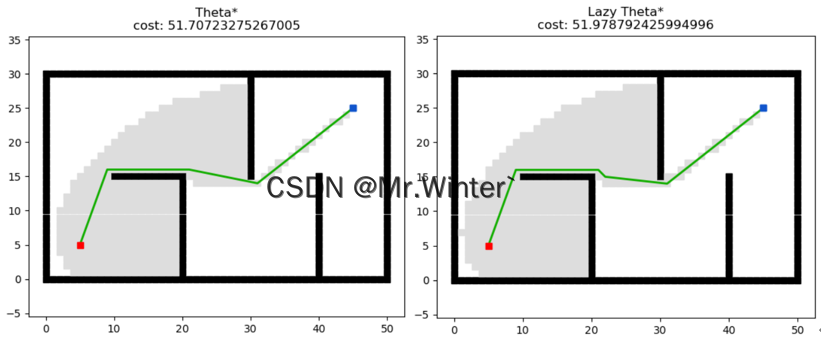
Lazy Theta*牺牲了一定的路径优度,因为节点 v v v与其父节点间可能存在障碍,使节点 v v v g g g值往往小于真实值,导致从Open表中取出的优先节点可能并非最优的,所以Lazy Theta*的规划路径可能会更长。同时,当判定节点 与其父节点间存在障碍后, v v v的父节点只能从邻域中更新,可能产生锯齿。Theta*与Lazy Theta*的对比实例如下
在这里插入图片描述

4 仿真实现

4.1 ROS C++实现

核心代码如下

bool LazyThetaStar::plan(const unsigned char* global_costmap, const Node& start, const Node& goal,
                         std::vector<Node>& path, std::vector<Node>& expand)
{
  // initialize
  costs_ = global_costmap;
  closed_list_.clear();
  path.clear();
  expand.clear();
  motion_ = getMotion();

  // push the start node into open list
  std::priority_queue<Node, std::vector<Node>, compare_cost> open_list;
  open_list.push(start);

  // main process
  while (!open_list.empty())
  {
    // pop current node from open list
    Node current = open_list.top();
    open_list.pop();

    _setVertex(current);

    if (current.g_ >= INFINITE_COST)
      continue;

    // current node does not exist in closed list
    if (closed_list_.find(current) != closed_list_.end())
      continue;

    closed_list_.insert(current);
    expand.push_back(current);

    // goal found
    if (current == goal)
    {
      path = _convertClosedListToPath(closed_list_, start, goal);
      return true;
    }

    // explore neighbor of current node
    for (const auto& m : motion_)
    {
      // explore a new node
      // path 1
      Node node_new = current + m;  // add the x_, y_, g_
      node_new.h_ = dist(node_new, goal);
      node_new.id_ = grid2Index(node_new.x_, node_new.y_);
      node_new.pid_ = current.id_;

      // current node do not exist in closed list
      if (closed_list_.find(node_new) != closed_list_.end())
        continue;

      // next node hit the boundary or obstacle
      if ((node_new.id_ < 0) || (node_new.id_ >= ns_) || (costs_[node_new.id_] >= lethal_cost_ * factor_))
        continue;

      // get parent node
      Node parent;
      parent.id_ = current.pid_;
      index2Grid(parent.id_, parent.x_, parent.y_);
      auto find_parent = closed_list_.find(parent);
      if (find_parent != closed_list_.end())
      {
        parent = *find_parent;
        // path 2
        _updateVertex(parent, node_new);
      }

      open_list.push(node_new);
    }
  }

  return false;
}

在这里插入图片描述

4.2 Python实现

核心代码如下

def plan(self):
	# OPEN set with priority and CLOSED set
	OPEN = []
	heapq.heappush(OPEN, self.start)
	CLOSED = []
	
	while OPEN:
	    node = heapq.heappop(OPEN)
	
	    # set vertex: path 1
	    try:
	        ...
	    except:
	        pass
	
	    # exists in CLOSED set
	    if node in CLOSED:
	        continue
	
	    # goal found
	    if node == self.goal:
	        CLOSED.append(node)
	        return self.extractPath(CLOSED), CLOSED
	
	    for node_n in self.getNeighbor(node):                
	        # exists in CLOSED set
	        if node_n in CLOSED:
	            continue
	        
	        # path1
	        node_n.parent = node.current
	        node_n.h = self.h(node_n, self.goal)
	
	        try:
	            p_index = CLOSED.index(Node(node.parent))
	            node_p = CLOSED[p_index]
	        except:
	            node_p = None
	
	        if node_p:
	            # path2
	            self.updateVertex(node_p, node_n)
	
	        # goal found
	        if node_n == self.goal:
	            heapq.heappush(OPEN, node_n)
	            break
	        
	        # update OPEN set
	        heapq.heappush(OPEN, node_n)
	    
	    CLOSED.append(node)
	return ([], []), []

4.3 Matlab实现

核心代码如下

while ~isempty(OPEN)
    % pop
    f = OPEN(:, 3) + OPEN(:, 4);
    [~, index] = min(f);
    cur_node = OPEN(index, :);
    OPEN(index, :) = [];
        
    % set vertex: path 1
    p_index = loc_list(cur_node(5: 6), CLOSED, [1, 2]);
    ...
    
    % exists in CLOSED set
    if loc_list(cur_node, CLOSED, [1, 2])
        continue
    end

    % update expand zone
    if ~loc_list(cur_node, EXPAND, [1, 2])
        EXPAND = [EXPAND; cur_node(1:2)];
    end

    % goal found
    if cur_node(1) == goal(1) && cur_node(2) == goal(2)
        CLOSED = [cur_node; CLOSED];
        goal_reached = true;
        cost = cur_node(3);
        break
    end
    if (cur_node(1) ==17) &&(cur_node(2) == 26)
        cur_node(1);
    end
    % explore neighbors
    for i = 1:motion_num
        % path 1
        node_n = [
            cur_node(1) + motion(i, 1), ...
            cur_node(2) + motion(i, 2), ...
            cur_node(3) + motion(i, 3), ...
            0, ...
            cur_node(1), cur_node(2)];
        node_n(4) = h(node_n(1:2), goal);

        % exists in CLOSED set
        if loc_list(node_n, CLOSED, [1, 2])
            continue
        end

        % obstacle
        if map(node_n(1), node_n(2)) == 2
            continue
        end

        p_index = loc_list(cur_node(5: 6), CLOSED, [1, 2]);
        if p_index
            node_p = CLOSED(p_index, :);
        else
            node_p = 0;
        end
        
        if node_p ~= 0
            node_n = update_vertex(node_p, node_n);
        end
        
        % update OPEN set
        OPEN = [OPEN; node_n];
    end
    CLOSED = [cur_node; CLOSED];
end

在这里插入图片描述

完整工程代码请联系下方博主名片获取


🔥 更多精彩专栏

  • 《ROS从入门到精通》
  • 《Pytorch深度学习实战》
  • 《机器学习强基计划》
  • 《运动规划实战精讲》

👇源码获取 · 技术交流 · 抱团学习 · 咨询分享 请联系👇

本文来自互联网用户投稿,该文观点仅代表作者本人,不代表本站立场。本站仅提供信息存储空间服务,不拥有所有权,不承担相关法律责任。如若转载,请注明出处:http://www.coloradmin.cn/o/970049.html

如若内容造成侵权/违法违规/事实不符,请联系多彩编程网进行投诉反馈,一经查实,立即删除!

相关文章

【nerfStudio】2-基于nerfStudio训练第一个NeRF模型

训练第一个NeRF模型 训练和运行查看器 以下内容将训练一个_nerfacto_模型: # 下载一些测试数据: ns-download-data nerfstudio --capture-name=poster # 训练模型 ns-train nerfacto --data data/nerfstudio/poster如果一切正常,应该会看到如下的训练进度: 在终端末尾的…

FPGA GTX aurora 8b/10b编解码 PCIE 板对板视频传输,提供2套工程源码加QT上位机源码和技术支持

目录 1、前言免责声明 2、我这里已有的 GT 高速接口解决方案3、GTX 全网最细解读GTX 基本结构GTX 发送和接收处理流程GTX 的参考时钟GTX 发送接口GTX 接收接口GTX IP核调用和使用 4、设计思路框架视频源选择ADV7611解码芯片配置及采集动态彩条视频数据组包GTX aurora 8b/10b数据…

基于永磁同步发电机的风力发电系统连接到可控的三相整流器(Simulink)

&#x1f4a5;&#x1f4a5;&#x1f49e;&#x1f49e;欢迎来到本博客❤️❤️&#x1f4a5;&#x1f4a5; &#x1f3c6;博主优势&#xff1a;&#x1f31e;&#x1f31e;&#x1f31e;博客内容尽量做到思维缜密&#xff0c;逻辑清晰&#xff0c;为了方便读者。 ⛳️座右铭&a…

机器学习——主成分分析PCA

机器学习——主成分分析PCA 文章目录 前言一、原理1.1. PCA介绍1.2. 算法步骤 二、代码实现2.1. 基于numpy实现2.2. 使用sklearn实现2.3. 观察方差分布2.4. 指定方差百分比求分量数 三、优&#xff0c;缺点3.1. 优点3.2. 缺点 总结 前言 当面对一个特征值极多的数据集时&#…

【核磁共振成像】观共享重建

目录 一、K空间关键孔技术-数据采集二、BRISK技术三、TRICKS技术四、实时成像和滑动窗重建五、心电触发电影(CINE)采集六、分段心脏采集和观共享 一、K空间关键孔技术-数据采集 对于笛卡尔K空间&#xff0c;一个相位编码行有时称为一个K空间观。一般情况下&#xff0c;每帧图像…

电源模块的降额曲线

大家好&#xff0c;这里是大话硬件。 今天想写这篇文章来分享在前段时间了解的一个知识点——电源模块的降额曲线。 为什么要写这个呢&#xff1f;对于专门做电源的同学来说&#xff0c;肯定觉得很简单。但是对于一个非电源行业的人来说&#xff0c;曲线应该如何解读&#xff…

春秋云镜 CVE-2018-1273

春秋云镜 CVE-2018-1273 Spring-data-commons 远程命令执行漏洞 靶标介绍 Spring Data是一个用于简化数据库访问&#xff0c;并支持云服务的开源框架&#xff0c;Spring Data Commons是Spring Data下所有子项目共享的基础框架。Spring Data Commons 在2.0.5及以前版本中&…

leetcode 1859.将句子排序

⭐️ 题目描述 &#x1f31f; leetcode链接&#xff1a;将句子排序 代码&#xff1a; class Solution { public:string sortSentence(string s) {vector<string> record;record.resize(9);string curString;for (auto val : s) {if (isdigit(val)) {record[ val - 0 - …

Linux内核基础知识

1.arm设备的启动过程 x86、Interl windows 启动过程: 电源 ---- >BIOS----->windows内核 --->文件系统(C盘、D盘) ---->应用程序启动嵌入式产品: 树莓派、mini2440、manopi、海思、RK(瑞芯微)等启动过程: 电源-->bootloader (引导操作系统启动) -->linux内…

【人工智能】—_一阶逻辑、量词的推理规则、一般化分离规则、合一、前向_反向链接算法、归结算法

文章目录 量词的推理规则全称量词实例化存在量词实例化 简化到命题逻辑推理Generalized Modus Ponens&#xff08;一般化分离规则&#xff09;举例 合一Forward chaining 前向链接算法示例 Backward chaining algorithm 反向链接算法一般FOL的FC/BC的完整性 归结算法归结推理规…

CEF内核和高级爬虫知识

(转)关于MFC中如何使用CEF内核&#xff08;CEF初解析&#xff09; Python GUI: cefpython3的简单分析和应用 cefpython3&#xff1a;一款强大的Python库 开始大多数抓取尝试可以从几乎一行代码开始&#xff1a; fun main() PulsarContexts.createSession().scrapeOutPages(&q…

PMP中常用英文术语

常用术语&#xff08;五&#xff09; Project 项目 为完成一个唯一的产品或服务的一种一次性努力。 Project Charter 项目许可证 由高级管理部门提供的一个文档&#xff0c;它给项目经理特权把组织的资源应用到项目工作中。 Project Communication Management 项目沟通管理 项目…

3D视觉测量:面对面的对称度 点对(附源码)

文章目录 0. 测试效果1. 基本内容2. 3D视觉测量对称度测量思路3. 代码实现4. 参考文章目录:3D视觉测量目录微信:dhlddxB站: Non-Stop_目标:通过3D视觉方法计算面对面的对称度0. 测试效果 数据说明:此测试点云是通过UG建模,Meshlab降采样得到,数据比较理想,仅作为测试使用…

Blazor前后端框架Known-V1.2.14

V1.2.14 Known是基于C#和Blazor开发的前后端分离快速开发框架&#xff0c;开箱即用&#xff0c;跨平台&#xff0c;一处代码&#xff0c;多处运行。 Gitee&#xff1a; https://gitee.com/known/KnownGithub&#xff1a;https://github.com/known/Known 概述 基于C#和Blazo…

ASIC-WORLD Verilog(16)综合

写在前面 在自己准备写一些简单的verilog教程之前&#xff0c;参考了许多资料----Asic-World网站的这套verilog教程即是其一。这套教程写得极好&#xff0c;奈何没有中文&#xff0c;在下只好斗胆翻译过来&#xff08;加点自己的理解&#xff09;分享给大家。 这是网站原文&…

HTML基础代码

以下是HTML基础代码&#xff1a; <!DOCTYPE html> <html> <head><title>网页标题</title> </head> <body><h1>这是一级标题</h1><p>这是一个段落。</p><img src"图片路径" alt"图片描述…

PNG图片压缩原理

png&#xff1f;&#xff1f;png的图片我们每天都在用&#xff0c;可是png到底是什么&#xff0c;它的压缩原理是什么&#xff1f; 很好&#xff0c;接下来我将会给大家一一阐述。 什么是PNG PNG的全称叫便携式网络图型&#xff08;Portable Network Graphics&#xff09;是…

一文讲清楚redis的线程池jedis

背景 在shigen实习的时候&#xff0c;遇到了日志系统的性能优化问题&#xff0c;当时的优化点就是&#xff1a;使用redis的线程池&#xff0c;实现并发状态下的性能优化。但是找了很多的技术方案&#xff0c;发现redis的线程池配置起来比较麻烦。正巧&#xff0c;这个周末shig…

arthas常用命令,排查cpu和内存场景

常用命令 命令&#xff1a;dashboard 查看jvm总体信息&#xff0c;包括线程&#xff0c;内存和运行环境 命令&#xff1a;monitor monitor -c 5 com.liubike.ta.controller.service.ApiService newString "param[1]2"每5秒统计一次监控方法被调用的次数 命令&…

numpy矩阵求MSE

MSE loss #官方示例 from sklearn.metrics import mean_squared_error y_true [[0.5, 1],[-1, 1],[7, -6]] y_pred [[0, 2],[-1, 2],[8, -5]] mean_squared_error(y_true, y_pred) #0.708验证 import numpy as np A np.array(y_true) B np.array(y_pred)mse (np.square…