关于作者:CSDN内容合伙人、技术专家, 从零开始做日活千万级APP。
专注于分享各领域原创系列文章 ,擅长java后端、移动开发、商业变现、人工智能等,希望大家多多支持。
目录
- 一、概览
- 二、setContentView()
- 三、inflate
- 四、view的绘制展示
- 4.1 Activity.onResume
- 4.2 WindowManager addView
- 4.3 ViewRootImpl
- 4.4 addWindow & makeVisible
- 五、 推荐阅读

接 - > 上 篇,Activity创建后,还只是调用了onCreate方法,页面并没有展示出来,还需要调用setContentView方法,加载页面布局,并进行渲染,最后展示。
一、概览
本源码基于Android 12
看代码前,我们先上一张Activity,Window, DecorView三者之间的关系图
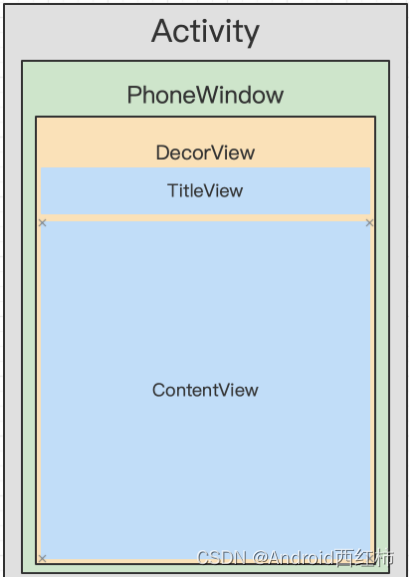
DecorView是整个ViewTree的最顶层View,它是一个FrameLayout布局,代表了整个应用的界面。
在该布局下面,有标题view和内容view两个子元素。
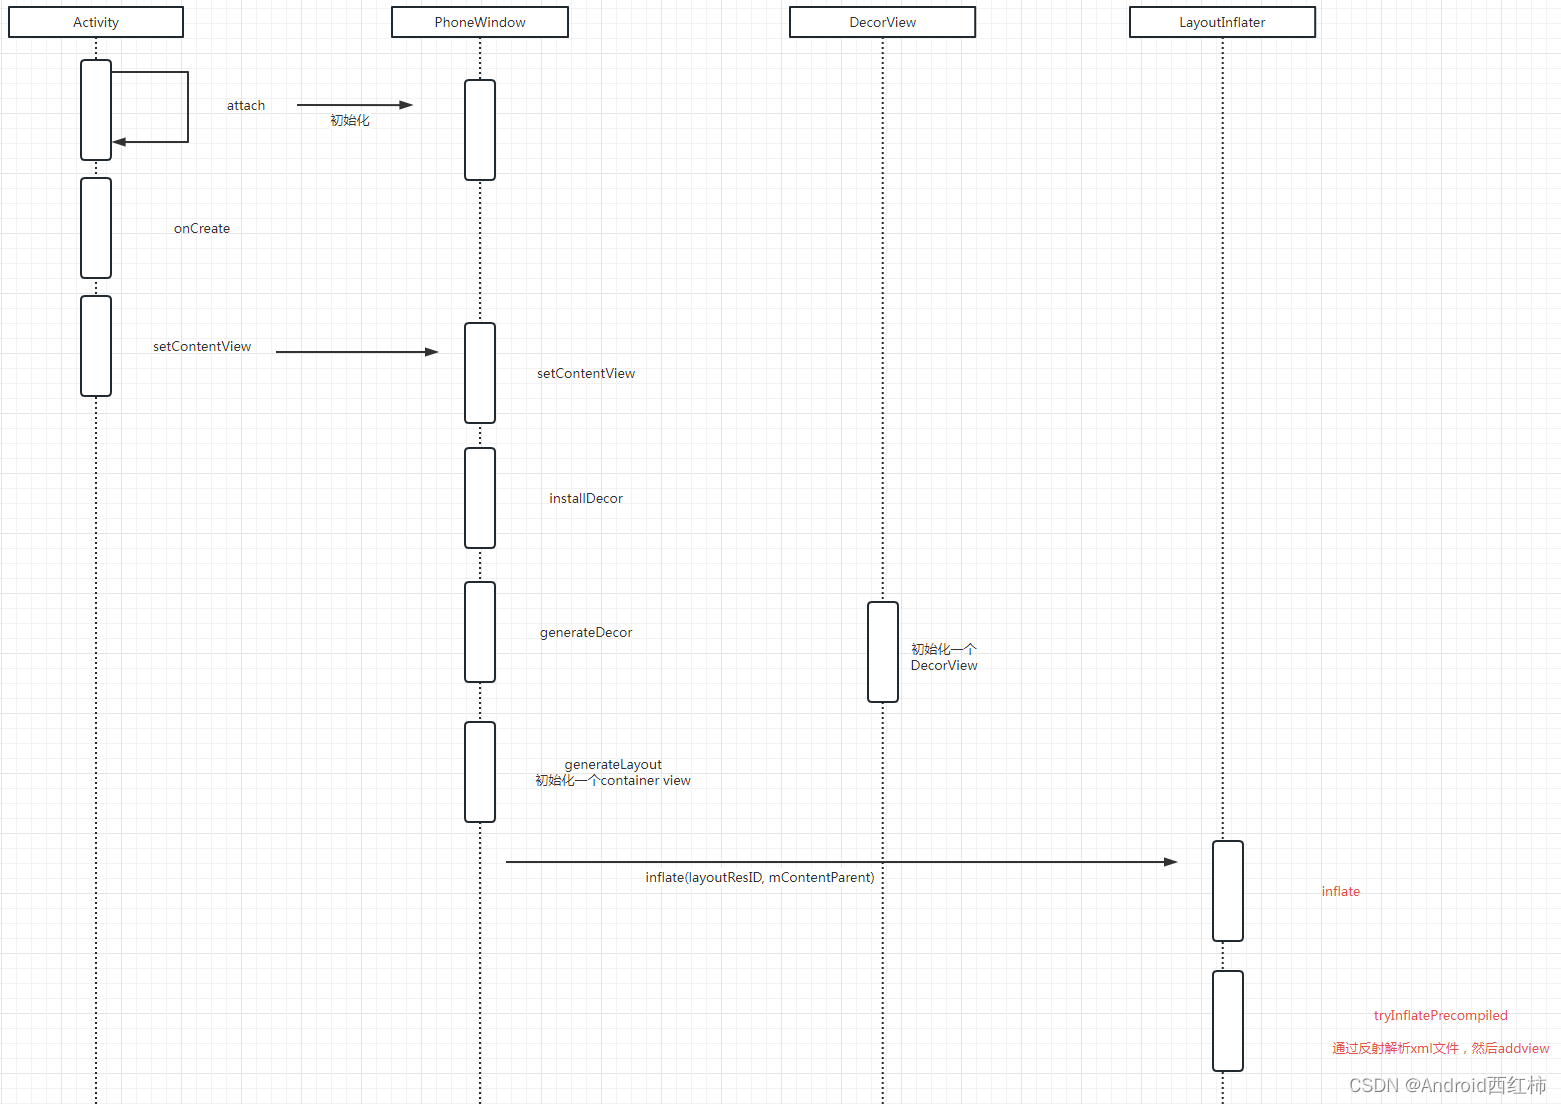
Activity setContentView 核心就是PhoneWindow的setContentView方法,其主要干了两件事:
1.完成DecorView的创建与加载,这个DecorView会在后面onresume后添加到window中
2.将MainActivity的布局加载到DecorView内的一个ViewGroup中
创建DecorView,即installDecor方法,其内部用到了两个核心的方法:
1.generateDecor方法创建出DecorView对象
2.generateLayout方法完成这个DecorView对象的布局加载,并完成了MainActivity的父容器的赋值(即contentParent变量)
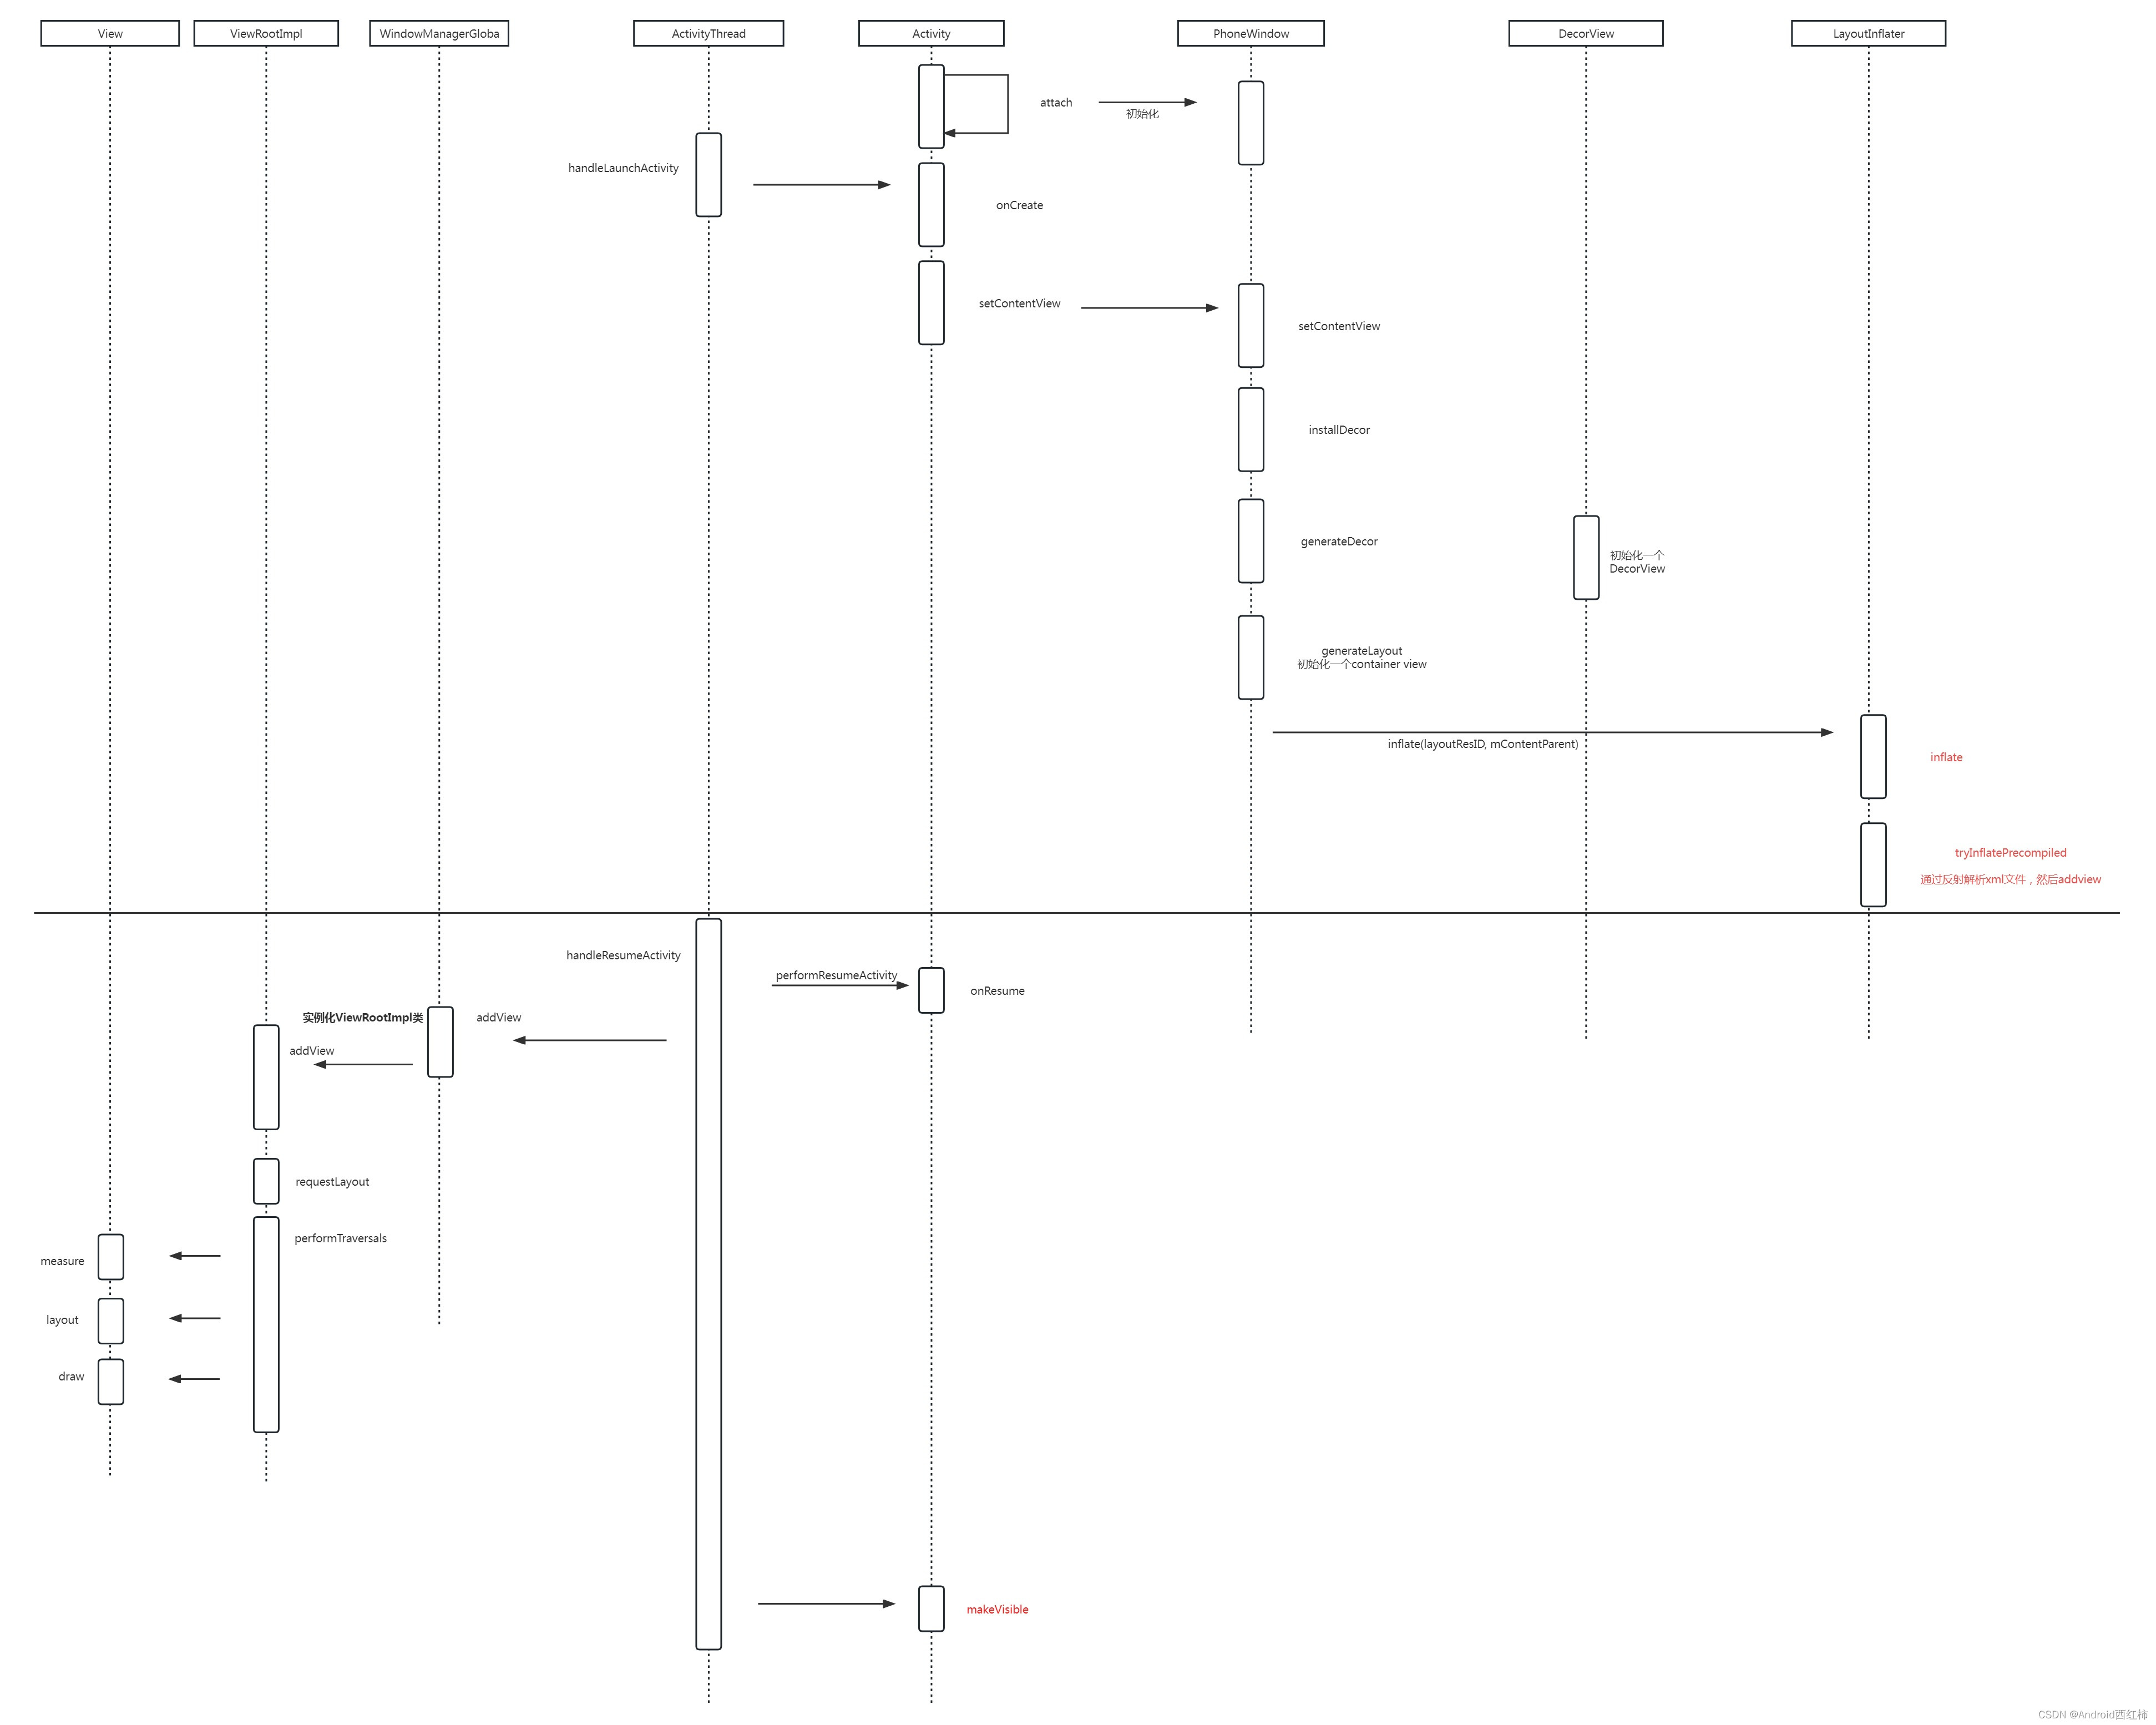
先上一张流程图
二、setContentView()
我们跟踪一下源码,看看这个方法是怎么做的
    public void setContentView(View view) {
        getWindow().setContentView(view);
        initWindowDecorActionBar();
    }
这里window即为 PhoneWindow,
window的初始化是在 Acticity 创建的时候初始化, 在Acticity对象创建后,会调用attach方法
    @UnsupportedAppUsage(maxTargetSdk = Build.VERSION_CODES.R, trackingBug = 170729553)
    final void attach(Context context, ActivityThread aThread, ...) {
        attachBaseContext(context);

        mFragments.attachHost(null /*parent*/);

        mWindow = new PhoneWindow(this, window, activityConfigCallback);
        mWindow.setWindowControllerCallback(mWindowControllerCallback);
        mWindow.setCallback(this);

        mWindow.setWindowManager(
                (WindowManager)context.getSystemService(Context.WINDOW_SERVICE),
                mToken, mComponent.flattenToString(),
                (info.flags & ActivityInfo.FLAG_HARDWARE_ACCELERATED) != 0);
    }
PhoneWindow.java
    @Override
    public void setContentView(int layoutResID) {
        根view 为空,则初始 mDecor view
        if (mContentParent == null) {
            installDecor();
        } else if (!hasFeature(FEATURE_CONTENT_TRANSITIONS)) {
            mContentParent.removeAllViews();
        }

        if (hasFeature(FEATURE_CONTENT_TRANSITIONS)) {
            final Scene newScene = Scene.getSceneForLayout(mContentParent, layoutResID,
                    getContext());
            transitionTo(newScene);
        } else {

            // 将布局文件添加到 mContentParent
            mLayoutInflater.inflate(layoutResID, mContentParent);
        }
        mContentParent.requestApplyInsets();
        final Callback cb = getCallback();
        if (cb != null && !isDestroyed()) {
            cb.onContentChanged();
        }
        mContentParentExplicitlySet = true;
    }

    调用installDecor()进行DecorView的初始化
    private void installDecor() {
        mForceDecorInstall = false;
        if (mDecor == null) {
            // 创建出一个DecorView并返回
            mDecor = generateDecor(-1);

        } else {
            mDecor.setWindow(this);
        }
        if (mContentParent == null) {
            //对mContentParent进行赋值,作为Activity布局的父容器,
            mContentParent = generateLayout(mDecor);

        }
    }
首先判断了mContentParent是否为null,如果为空则执行installDecor()方法,同时初始化一个mContentParent,这个就是Activity布局的父容器
三、inflate
LayoutInflater.java
    public View inflate(@LayoutRes int resource, @Nullable ViewGroup root, boolean attachToRoot) {
        final Resources res = getContext().getResources();
        View view = tryInflatePrecompiled(resource, res, root, attachToRoot);
        if (view != null) {
            return view;
        }
        XmlResourceParser parser = res.getLayout(resource);
        try {
            return inflate(parser, root, attachToRoot);
        } finally {
        }
    }
    private @Nullable
    View tryInflatePrecompiled(@LayoutRes int resource, Resources res, @Nullable ViewGroup root, boolean attachToRoot) {
        try {
            Class clazz = Class.forName("" + pkg + ".CompiledView", false, mPrecompiledClassLoader);
            Method inflater = clazz.getMethod(layout, Context.class, int.class);
            View view = (View) inflater.invoke(null, mContext, resource);

            if (view != null && root != null) {
                XmlResourceParser parser = res.getLayout(resource);
                try {
                    AttributeSet attrs = Xml.asAttributeSet(parser);
                    advanceToRootNode(parser);
                    ViewGroup.LayoutParams params = root.generateLayoutParams(attrs);

                    if (attachToRoot) {
                        root.addView(view, params);
                    } else {
                        view.setLayoutParams(params);
                    }
                } finally {
                    parser.close();
                }
            }

            return view;
        } catch (Throwable e) {
        } finally {
        }
        return null;
    }
布局就是这么添加进mContentParent中的。
但是,view还是没有显示出来的,此时代码所做的事情仅仅只是加载了布局,并没有开始view的测量、布局、绘制工作。
对应方法是onMeasure, onLayout, onDraw,这些操作在后面
四、view的绘制展示
每一个Activity组件都有一个关联的Window对象,用来描述一个应用程序窗口。每一个应用程序窗口内部又包含一个View对象,用来描述应用程序窗口的视图。
我们再看下图:

Activity#onResume()之后才是布局由不可见变为可见的,我们看源码
4.1 Activity.onResume
ActivityThread.java
下面这个方法是在Activity onCreate创建后调用的,handleResumeActivity,不清楚的可以看前面app启动文章.
    @Override
    public void handleResumeActivity(ActivityClientRecord r, boolean finalStateRequest,
        boolean isForward, String reason) {


        // 这个方法会调用 activity的 onResume 方法
        if (!performResumeActivity(r, finalStateRequest, reason)) {
            return;
        }

        final Activity a = r.activity;

        // window 未被添加进 windowmanager
        if (r.window == null && !a.mFinished && willBeVisible) {

            // window
            r.window = r.activity.getWindow();

            // decorView
            View decor = r.window.getDecorView();
            decor.setVisibility(View.INVISIBLE);

            ViewManager wm = a.getWindowManager();

            WindowManager.LayoutParams l = r.window.getAttributes();
            a.mDecor = decor;

        } else if (!willBeVisible){
        }

        if (a.mVisibleFromClient) {
            if (!a.mWindowAdded) {

                // DecorView 添加到 window
                wm.addView(decor, l);
            } else {
                a.onWindowAttributesChanged(l);
            }
        }

        if (!r.activity.mFinished && willBeVisible && r.activity.mDecor != null && !r.hideForNow) {

            使布局可见
            if (r.activity.mVisibleFromClient) {
                r.activity.makeVisible();
            }
        }

        r.nextIdle = mNewActivities;
    }
在上面的代码中,会先调用Activity的onResume, 然后再是view的绘制,最后将DecorView 设置 可见;
4.2 WindowManager addView
WindowManagerImpl.java
    private final WindowManagerGlobal mGlobal = WindowManagerGlobal.getInstance();
    ...
    @Override
    public void addView(View view, ViewGroup.LayoutParams params) {
        mGlobal.addView(view, params, mDisplay, mParentWindow);
    }
这里也是一个空壳代码,调用WindowManagerGlobal
WindowManagerGlobal.java
    public void addView(View view, ViewGroup.LayoutParams params,
            Display display, Window parentWindow, int userId) {


        final WindowManager.LayoutParams wparams = (WindowManager.LayoutParams) params;


        ViewRootImpl root;
        View panelParentView = null;

		// 加锁
        synchronized (mLock) {

			//实例化ViewRootImpl类
            root = new ViewRootImpl(view.getContext(), display);

            view.setLayoutParams(wparams);

            mViews.add(view);
            mRoots.add(root);
            mParams.add(wparams);

            // do this last because it fires off messages to start doing things
            try {
				// //调用ViewRootImpl.setView方法,把DecorView作为参数传递进去
                root.setView(view, wparams, panelParentView, userId);
            } catch (RuntimeException e) {
                // BadTokenException or InvalidDisplayException, clean up.
                if (index >= 0) {
                    removeViewLocked(index, true);
                }
                throw e;
            }
        }
    }
在方法内部,会通过跨进程方式向WMS(WindowManagerService)发起一个调用,从而将DecorView最终加到Window上,在这个过程中,ViewRootImpl、DecorView和WMS会彼此关联。
最后,WMS调用ViewRootImpl.performTraversals 方法开始View的测量、布局、绘制。
4.3 ViewRootImpl
一个 Window 对应着一个 ViewRootImpl 和 一个 VIew。这个 View 就是被 ViewRootImpl 操作的.
从上面代码,我们可以看到,ViewRootImpl的初始化是在WindowManagerGlobal的addView中
ViewRootImpl.java
/**
 * We have one child
 */
    public void setView(View view, WindowManager.LayoutParams attrs, View panelParentView, int userId) {
        synchronized (this) {
            if (mView == null) {
                mView = view;

                mAdded = true;
                int res; /* = WindowManagerImpl.ADD_OKAY; */

                // 刷新布局的操作,触发view的measure -> layout -> draw 操作
                requestLayout();


                try {
                    //将 View 添加到 WMS 中
                    res = mWindowSession.addToDisplayAsUser(mWindow, mWindowAttributes, ...);

                } catch (RemoteException e) {

                } finally {

                }

                // Set up the input pipeline. 设置了一系列的输入通道
                CharSequence counterSuffix = attrs.getTitle();
                mSyntheticInputStage = new SyntheticInputStage();
                InputStage viewPostImeStage = new ViewPostImeInputStage(mSyntheticInputStage);

            }
        }
    }
首先会调用requestLayout方法来刷新布局,然后将 View 添加到 WMS 中,最后是view事件的处理;
view事件的处理,最后还是会回到了 PhoneWindow 中的 DecorView 来处理,剩下的就是从 DecorView 开始将事件层层传递给内部的子 View 中了
这里就不展开
ViewGroup.java

    @Override
    public boolean dispatchTouchEvent(MotionEvent ev) {

    }
    @Override
    public void requestLayout() {
        if (!mHandlingLayoutInLayoutRequest) {
            checkThread();
            mLayoutRequested = true;
            scheduleTraversals();
        }
    }

    final class TraversalRunnable implements Runnable {
        @Override
        public void run() {
            doTraversal();
        }
    }

    void doTraversal() {
        if (mTraversalScheduled) {

            performTraversals();

        }
    }
requestLayout()最终会调用到performTraversals,在这个方法中会调用 View 的 measure() ,layout() ,draw() 方法。
我们看下面源码
private void performTraversals() {

	final View host = mView;

	if (mFirst || windowShouldResize || viewVisibilityChanged || params != null
			|| mForceNextWindowRelayout) {


		try {
			if (!mPendingMergedConfiguration.equals(mLastReportedMergedConfiguration)) {

				performConfigurationChange(new MergedConfiguration(mPendingMergedConfiguration),
						!mFirst, INVALID_DISPLAY /* same display */);
			}


		} catch (RemoteException e) {
		}

		if (!mStopped || wasReportNextDraw) {
                //View 的测量
				performMeasure(childWidthMeasureSpec, childHeightMeasureSpec);


				if (measureAgain) {
                    //View 的测量
					performMeasure(childWidthMeasureSpec, childHeightMeasureSpec);
				}

				layoutRequested = true;
			}
		}
	} else {

	}


	if (didLayout) {
        // View 的布局
		performLayout(lp, mWidth, mHeight);


	}


	if (!cancelDraw) {
        // View 的绘制
		performDraw();
	} else {
	}

	mIsInTraversal = false;
}
4.4 addWindow & makeVisible
com.android.server.wm.Session.java
    @Override
    public int addToDisplay(IWindow window, WindowManager.LayoutParams attrs,
            int viewVisibility, int displayId, InsetsVisibilities requestedVisibilities,
            InputChannel outInputChannel, InsetsState outInsetsState,
            InsetsSourceControl[] outActiveControls) {
        return mService.addWindow(this, window, attrs, viewVisibility, displayId,
                UserHandle.getUserId(mUid), requestedVisibilities, outInputChannel, outInsetsState,
                outActiveControls);
    }
Activity.java
	把DecorView的状态设置为可见,那么布局也就可见了
    void makeVisible() {
        if (!mWindowAdded) {
            ViewManager wm = getWindowManager();
            wm.addView(mDecor, getWindow().getAttributes());
            mWindowAdded = true;
        }
        mDecor.setVisibility(View.VISIBLE);
    }
五、 推荐阅读
Java 专栏
SQL 专栏
数据结构与算法
Android学习专栏
