目录
微信登录
登录方式
静态结构
获取登录凭证
获取手机号码
微信登录接口(生产环境)
模拟手机登录(开发环境)
用户信息持久化存储
涉及知识点:微信授权登录,文件上传,Store 状态管理等。
微信登录
微信小程序的开放能力,允许开发者获取微信用户的基本信息(昵称、性别、手机号码等),开发者常用来实现注册/登录的功能。
登录方式
常见登录/注册方式:
- 用户名/手机号 + 密码
- 手机号 + 验证码
- 授权登录
实际开发过程中常常需要实现以上的一种或多种方式,我们的项目主要实现授权登录。
微信授权登录
用户在使用小程序时,其实已登录微信,其本质上就是:微信授权给小程序读取微信用户信息。
开放接口 / 登录 / wx.login (qq.com)![]() https://developers.weixin.qq.com/miniprogram/dev/api/open-api/login/wx.login.html
https://developers.weixin.qq.com/miniprogram/dev/api/open-api/login/wx.login.html
开放能力 / 用户信息 / 手机号快速验证组件 (qq.com)![]() https://developers.weixin.qq.com/miniprogram/dev/framework/open-ability/getPhoneNumber.html
https://developers.weixin.qq.com/miniprogram/dev/framework/open-ability/getPhoneNumber.html
传统登录方式
传统登录方式,一般是通过输入密码或者手机验证码实现登录。
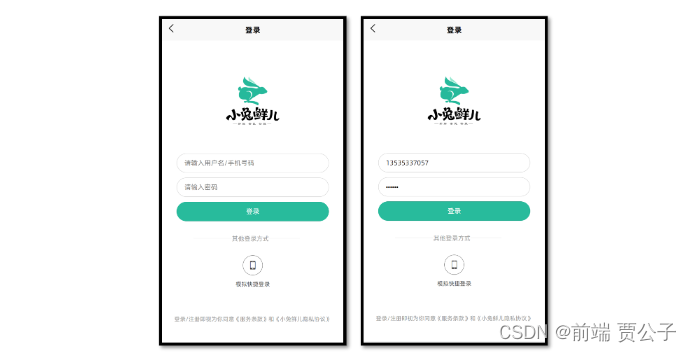
温馨提示:接口文档中提供练习使用的登录接口,大家可在课后自行完成。
静态结构
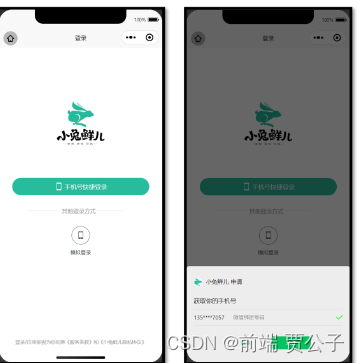
登录页
// src/pages/login/login.vue

<script setup lang="ts">
//
</script>

<template>
  <view class="viewport">
    <view class="logo">
      <image
        src="https://pcapi-xiaotuxian-front-devtest.itheima.net/miniapp/images/logo_icon.png"
      ></image>
    </view>
    <view class="login">
      <!-- 网页端表单登录 -->
      <!-- <input class="input" type="text" placeholder="请输入用户名/手机号码" /> -->
      <!-- <input class="input" type="text" password placeholder="请输入密码" /> -->
      <!-- <button class="button phone">登录</button> -->

      <!-- 小程序端授权登录 -->
      <button class="button phone">
        <text class="icon icon-phone"></text>
        手机号快捷登录
      </button>
      <view class="extra">
        <view class="caption">
          <text>其他登录方式</text>
        </view>
        <view class="options">
          <!-- 通用模拟登录 -->
          <button>
            <text class="icon icon-phone">模拟快捷登录</text>
          </button>
        </view>
      </view>
      <view class="tips">登录/注册即视为你同意《服务条款》和《小兔鲜儿隐私协议》</view>
    </view>
  </view>
</template>

<style lang="scss">
page {
  height: 100%;
}

.viewport {
  display: flex;
  flex-direction: column;
  height: 100%;
  padding: 20rpx 40rpx;
}

.logo {
  flex: 1;
  text-align: center;
  image {
    width: 220rpx;
    height: 220rpx;
    margin-top: 15vh;
  }
}

.login {
  display: flex;
  flex-direction: column;
  height: 60vh;
  padding: 40rpx 20rpx 20rpx;

  .input {
    width: 100%;
    height: 80rpx;
    font-size: 28rpx;
    border-radius: 72rpx;
    border: 1px solid #ddd;
    padding-left: 30rpx;
    margin-bottom: 20rpx;
  }

  .button {
    display: flex;
    align-items: center;
    justify-content: center;
    width: 100%;
    height: 80rpx;
    font-size: 28rpx;
    border-radius: 72rpx;
    color: #fff;
    .icon {
      font-size: 40rpx;
      margin-right: 6rpx;
    }
  }

  .phone {
    background-color: #28bb9c;
  }

  .wechat {
    background-color: #06c05f;
  }

  .extra {
    flex: 1;
    padding: 70rpx 70rpx 0;
    .caption {
      width: 440rpx;
      line-height: 1;
      border-top: 1rpx solid #ddd;
      font-size: 26rpx;
      color: #999;
      position: relative;
      text {
        transform: translate(-40%);
        background-color: #fff;
        position: absolute;
        top: -12rpx;
        left: 50%;
      }
    }

    .options {
      display: flex;
      justify-content: center;
      align-items: center;
      margin-top: 70rpx;
      button {
        padding: 0;
        background-color: transparent;
      }
    }

    .icon {
      font-size: 24rpx;
      color: #444;
      display: flex;
      flex-direction: column;
      align-items: center;

      &::before {
        display: flex;
        align-items: center;
        justify-content: center;
        width: 80rpx;
        height: 80rpx;
        margin-bottom: 6rpx;
        font-size: 40rpx;
        border: 1rpx solid #444;
        border-radius: 50%;
      }
    }
    .icon-weixin::before {
      border-color: #06c05f;
      color: #06c05f;
    }
  }
}

.tips {
  position: absolute;
  bottom: 80rpx;
  left: 20rpx;
  right: 20rpx;
  font-size: 22rpx;
  color: #999;
  text-align: center;
}
</style>获取登录凭证
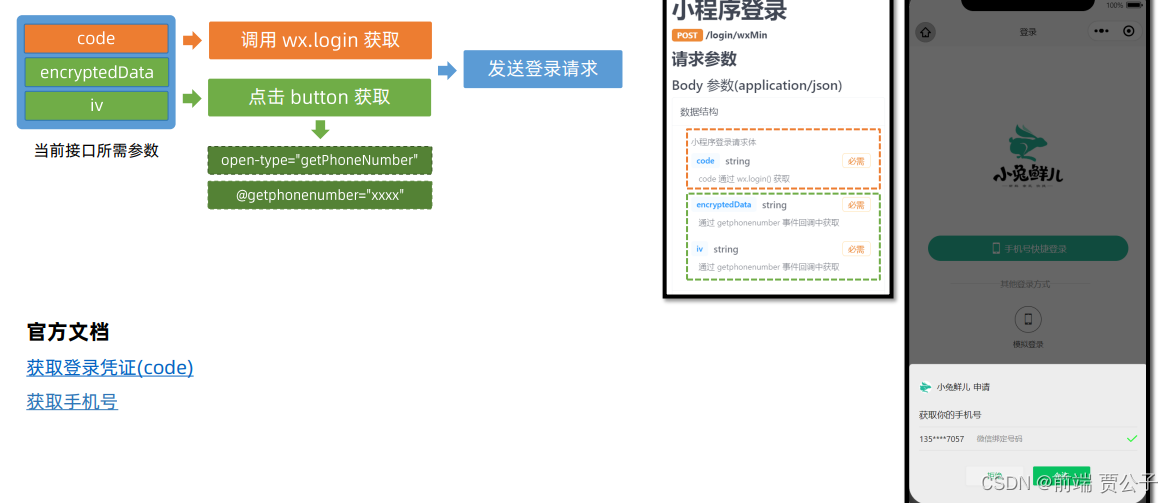
前端:调用 wx.login() 接口获取登录凭证(code)。
后端:通过凭证(code)向微信服务器换取用户登录态信息。
<script setup lang="ts">
import { onLoad } from '@dcloudio/uni-app'

// 获取 code 登录凭证
let code = ''
onLoad(async () => {
  const res = await wx.login()
  code = res.code
})
</script>
注意
code 的获取不要在 getphonenumber 事件回调函数调用,否则可能会出现错误!!!
温馨提示
用户登录态信息,不包含用户昵称、性别、手机号码等信息,作用是用于后端服务器与微信服务器通讯。
获取手机号码
出于安全限制,小程序【规定】想获取用户的手机号,必须由用户主动【点击按钮】并【允许申请】才可获取加密的手机号信息。
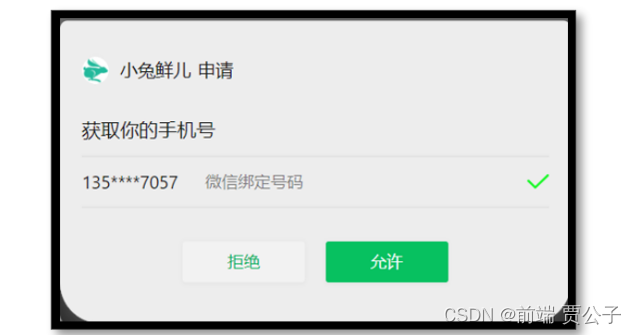
前端:提供 open-type 按钮,在事件处理函数中获取加密的手机号信息。
后端:解密手机号信息,把手机号和用户登录态关联在一起。
<script setup lang="ts">
// 获取用户手机号码
const onGetphonenumber: UniHelper.ButtonOnGetphonenumber = (ev) => {
  console.log(ev)
}
</script>

<template>
  <view class="viewport">
    <view class="login">
      <button class="button phone" open-type="getPhoneNumber" @getphonenumber="onGetphonenumber">
        <text class="icon icon-phone"></text>
        手机号快捷登录
      </button>
    </view>
  </view>
</template>
常见问题:
Q:为什么我无法唤起获取手机号的界面?
A:获取手机号功能目前针对非个人开发者,所以个人开发者无法唤起获取手机号界面,详见文档。
为方便开发者开发和体验小程序、小游戏的各种能力,开发者可以申请小程序或小游戏的 测试号,并使用此帐号在开发者工具创建项目进行开发测试,以及真机预览体验。申请测试号的过程非常简单。只需访问 申请地址 ,并使用微信扫描二维码,即可获得为自己分配好的小程序和小游戏测试账号。
项目提供了模拟登录 API 用于练习。
微信登录接口(生产环境)
接口调用
接口地址:/login/wxMin
请求方式:POST
请求参数:
Body
| 字段名称 | 是否必须 | 默认值 | 备注 |
|---|---|---|---|
| code | 是 | 无 | wx.login 获取 |
| iv | 是 | 无 | getphonenumber 事件回调获取 |
| encryptedData | 是 | 无 | getphonenumber 事件回调获取 |
// src/services/login.ts

import type { LoginResult } from '@/types/member'
import { http } from '@/utils/http'

type LoginParams = {
  code: string
  encryptedData: string
  iv: string
}
/**
 * 小程序登录
 * @param data 请求参数
 */
export const postLoginWxMinAPI = (data: LoginParams) => {
  return http<LoginResult>({
    method: 'POST',
    url: '/login/wxMin',
    data,
  })
}
类型声明
// src/types/member.d.ts

/** 小程序登录 登录用户信息 */
export type LoginResult = {
  /** 用户ID */
  id: number
  /** 头像  */
  avatar: string
  /** 账户名  */
  account: string
  /** 昵称 */
  nickname?: string
  /** 手机号 */
  mobile: string
  /** 登录凭证 */
  token: string
}
参考代码
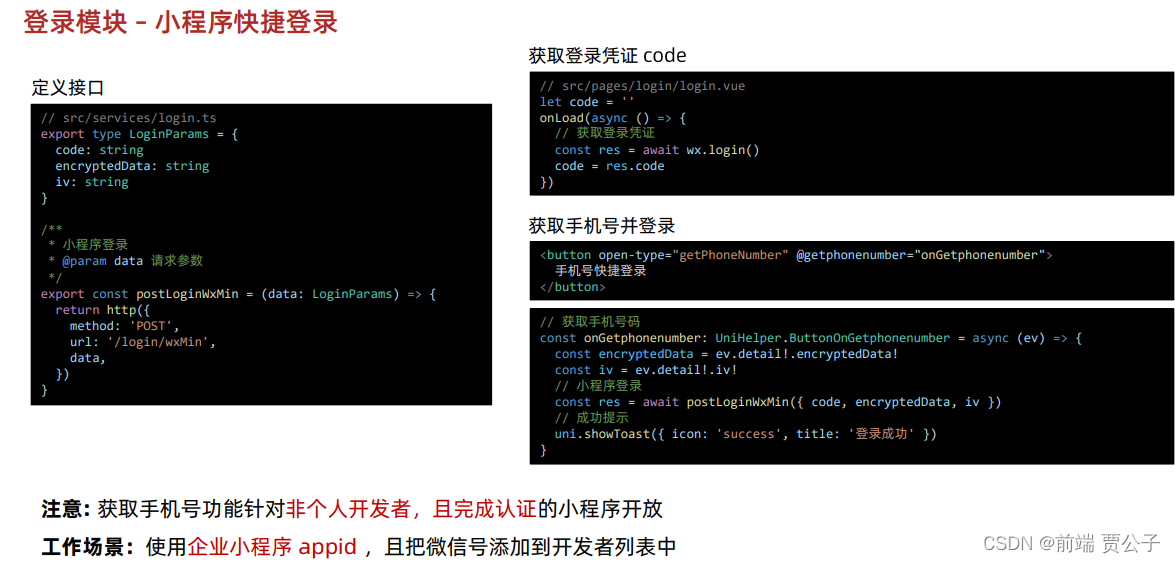
小兔鲜儿项目采用常见的 登录凭证 + 手机号 实现授权登录。
// src/pages/login/login.vue

<script setup lang="ts">
import { postLoginWxMinAPI } from '@/services/login'
import { onLoad } from '@dcloudio/uni-app'

// 获取 code 登录凭证
let code = ''
onLoad(async () => {
  const res = await wx.login()
  code = res.code
})

// 获取用户手机号码
const onGetphonenumber: UniHelper.ButtonOnGetphonenumber = async (ev) => {
  // 获取参数
  const encryptedData = ev.detail.encryptedData!
  const iv = ev.detail.iv!
  // 登录请求
  await postLoginWxMinAPI({ code, encryptedData, iv })
  // 成功提示
  uni.showToast({ icon: 'none', title: '登录成功' })
}
</script>

<template>
  <view class="viewport">
    <view class="login">
      <button class="button phone" open-type="getPhoneNumber" @getphonenumber="onGetphonenumber">
        <text class="icon icon-phone"></text>
        手机号快捷登录
      </button>
    </view>
  </view>
</template>
模拟手机登录(开发环境)
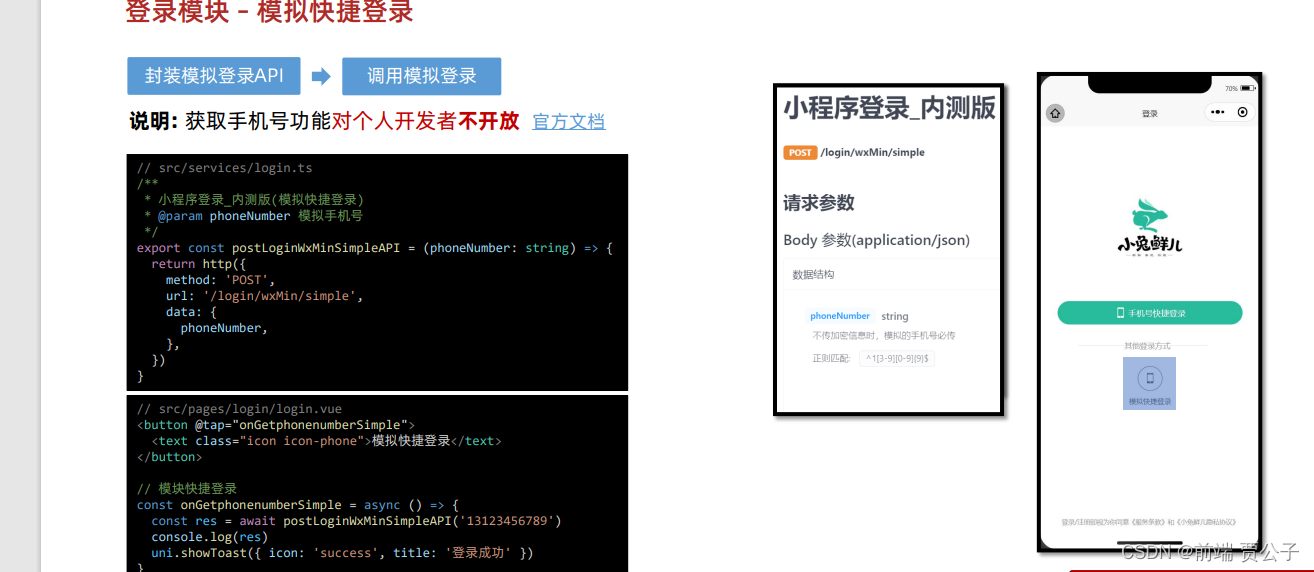
获取手机号功能,目前针对非个人开发者,且完成了认证的小程序开放,详见文档。
温馨提示
为了更好实现登录后续的业务,后端提供了一个内部测试用的接口,只需要传手机号即可实现快捷登录。
请求接口
接口地址:/login/wxMin/simple
请求方式:POST
请求参数:
Body
| 字段名称 | 是否必须 | 默认值 | 备注 |
|---|---|---|---|
| phoneNumber | 是 | 无 | 模拟的手机号 |
该接口跟微信登录接口返回的数据格式是相同的。
/**
 * 小程序登录_内测版
 * @param phoneNumber 模拟手机号码
 */
export const postLoginWxMinSimpleAPI = (phoneNumber: string) => {
  return http<LoginResult>({
    method: 'POST',
    url: '/login/wxMin/simple',
    data: {
      phoneNumber,
    },
  })
}
参考代码
 <button @tap="onGetphonenumberSimple">
   <text class="icon icon-phone">模拟快捷登录</text>
 </button>
const onGetphonenumberSimple = async () => {
  const res = await postLoginWxMinSimpleAPI("13123456789");
  console.log(res);
  uni.showToast({ icon: "success", title: "登录成功" });
};用户信息持久化存储
Pinia 的持久化存储插件在 项目起步 模块已经搭建完成,现在只需要在用户登录成功后,补充 TS 类型声明并保存用户信息即可。
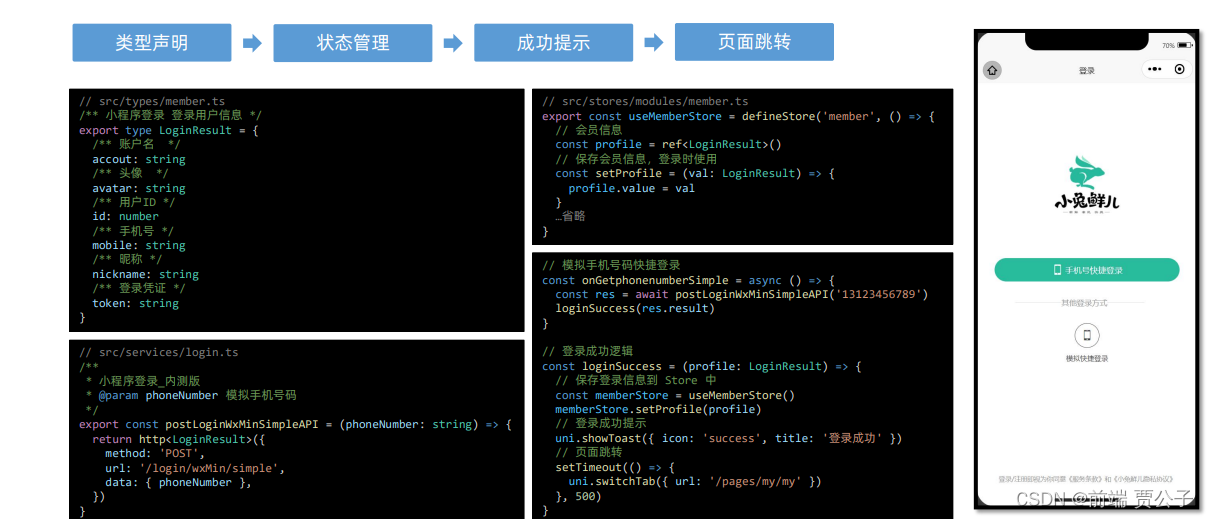
参考代码
Store
// src/stores/modules/member.ts

import type { LoginResult } from '@/types/member'
import { defineStore } from 'pinia'
import { ref } from 'vue'

// 定义 Store
export const useMemberStore = defineStore(
  'member',
  () => {
    // 会员信息
    const profile = ref<LoginResult>()

    // 保存会员信息,登录时使用
    const setProfile = (val: LoginResult) => {
      profile.value = val
    }

    // 清理会员信息,退出时使用
    const clearProfile = () => {
      profile.value = undefined
    }

    // 记得 return
    return { profile, setProfile, clearProfile }
  },
  {
    // 小程序端配置
    persist: {
      storage: {
        getItem(key) {
          return uni.getStorageSync(key)
        },
        setItem(key, value) {
          uni.setStorageSync(key, value)
        },
      },
    },
  },
)
登录页
<script setup lang="ts">
import { postLoginWxMinAPI, postLoginWxMinSimpleAPI } from '@/services/login'
import { useMemberStore } from '@/stores'
import type { LoginResult } from '@/types/member'
import { onLoad } from '@dcloudio/uni-app'

// 获取 code 登录凭证
let code = ''
onLoad(async () => {
  const res = await wx.login()
  code = res.code
})

// 获取用户手机号码(企业中写法)
const onGetphonenumber: UniHelper.ButtonOnGetphonenumber = async (ev) => {
  const encryptedData = ev.detail.encryptedData!
  const iv = ev.detail.iv!
  const res = await postLoginWxMinAPI({ code, encryptedData, iv })
  loginSuccess(res.result)
}

// 模拟手机号码快捷登录(开发练习)
const onGetphonenumberSimple = async () => {
  const res = await postLoginWxMinSimpleAPI('13123456789')
  loginSuccess(res.result)
}

const loginSuccess = (profile: LoginResult) => {
  // 保存会员信息
  const memberStore = useMemberStore()
  memberStore.setProfile(profile)
  // 成功提示
  uni.showToast({ icon: 'success', title: '登录成功' })
  setTimeout(() => {
    // 页面跳转
    uni.switchTab({ url: '/pages/my/my' })
  }, 500)
}
</script>



![[论文笔记]DSSM](https://img-blog.csdnimg.cn/img_convert/d3d54f15abf8c9fdcf623a7ef607be7a.png)


