@耕地单目标语义分割实践系列文章:
[1*] 语义分割实践数据集制作—以Sentinel-2 MSI数据为例_doll ~CJ的博客-CSDN博客
[2*] 耕地单目标语义分割实践——Pytorch网络过程实现理解_doll ~CJ的博客-CSDN博客
[3*] 基于Pytorch的神经网络部分自定义设计_doll ~CJ的博客-CSDN博客
[4*] 语义分割实践—耕地提取(二分类)_二分类语义分割_doll ~CJ的博客-CSDN博客
@TensorBoard适配设备选择及学习方案(自pytorch1.2.0版本已自带TensorBoard):
[5*] How to use TensorBoard with PyTorch — PyTorch Tutorials 2.0.1+cu117 documentation
[6*] Stack Overflow - Where Developers Learn, Share, & Build Careers(学习论坛)
Introduction(实验编程平台、深度学习框架)
一、实验编程平台
Visual Studio Code(Jupyter)
二、深度学习框架
Pytorch(GPU/CPU)+ TensorBoard(损失\准确率曲线可视化、训练最佳权重选取)
Module Analysis(模型分析)
一、Deeplab3+复现[2#](U-net复现,详见[3*])
Deeplab3+模型概述:
空间金字塔池化模块或编码解码器结构常被用于深度神经网络中的语义分割任务。金字塔池模块可以利用不同尺度的深层特征对上下文信息进行聚合,而编码解码器可以通过逐渐恢复空间信息来捕捉清晰的对象边界。Deeplab3+将深度可分离卷积应用在了“Atrous Spatial Pyramid Pooling-空洞金字塔池”和解码器模块,并添加了一个简单而有效的解码器模块来细化分割结果,同时模型还利用了辅助头损失优化(辅助分类器)学习过程。
相较于PSPnet,Deeplabv3+利用空洞卷积替代池化操作建立了深层特征图的金字塔池ASPP(其实,原论文也提出了一种空洞级联模型Cascade,详见原论文或[11]);同时,主干特征提取网络运用了Xception。
需要注意的是,下述引用博主(霹雳吧啦Wz)的网络结构图运用了ResNet-50作为backbone,若需其它backbone(如MobileNetv2、Xception等)可自行替换。
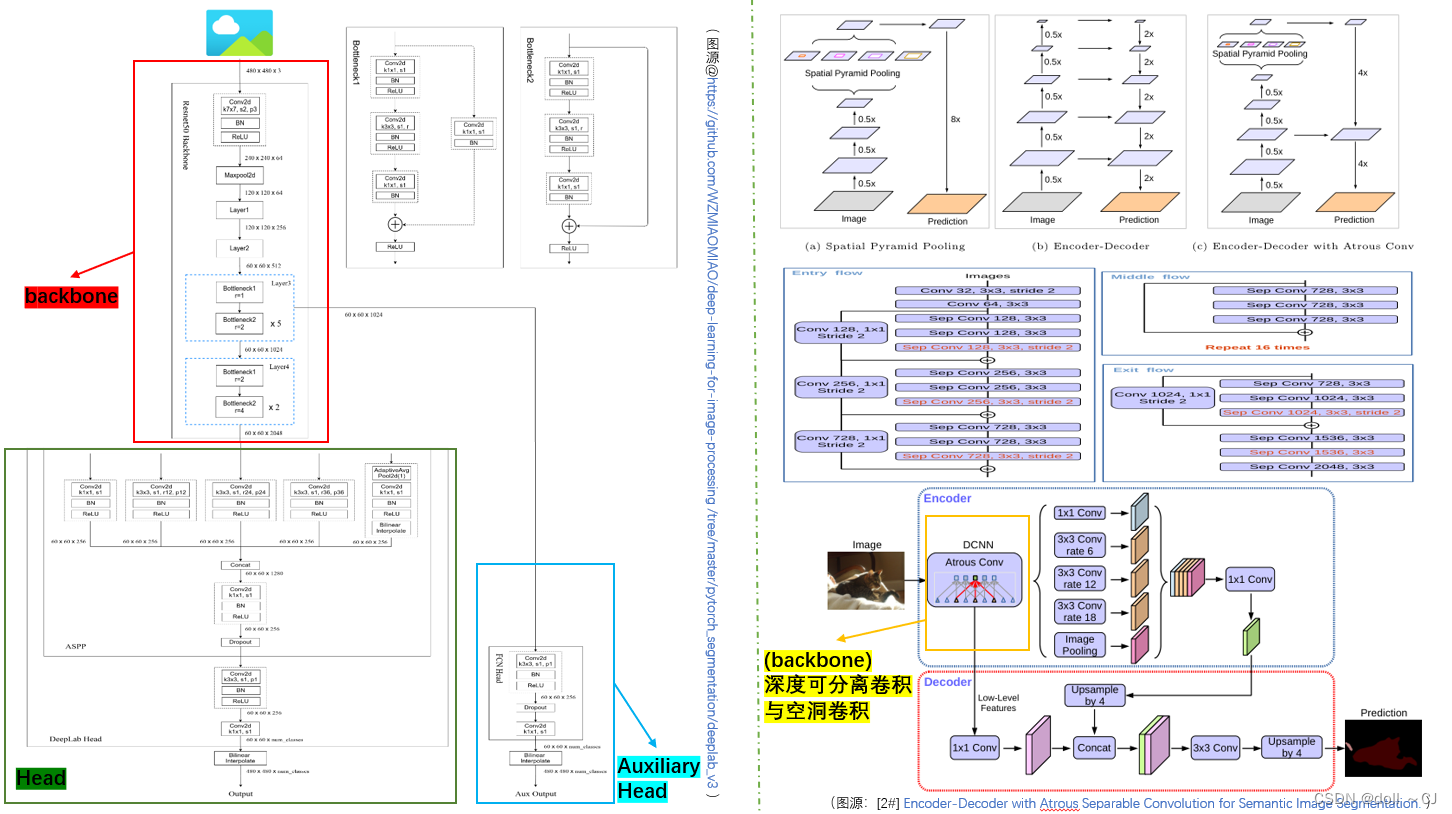
网络结构代码:
由于本地训练的硬件限制,本文参考[1][6#]设计Mobile Deeplabv3+语义分割模型,实验网络不添加辅助损失头且主干特征提取网络选择MobileNetv2。
DeepLabv3应用空洞卷积提取任意分辨率的特征图。原论文将output stride定义为输入图像分辨率与最后输出特征图分辨率的比值。(output stride中最后输出特征图指的是全局池化层之前的卷积模块作用结果。对比本文“关键基础网络结构分析—MobileNet“图示对比理解即可)此处,本人选择去除“关键基础网络结构分析—MobileNet“图示中的全局平均池化层的前一层CONV2d(1×1)块并针对后两个高宽跨步的逆残差综合块应用空洞卷积(倒数第二个块应用dilate=2,最后一块应用dilate=4),从而完成output stride=8的复现。
#——————————————————————————————————————————————————————————————————————————————————————————
# MobileNetv2(backbone)
class InvertedResidual(nn.Module):
    def __init__(self, inchannels, outchannels, stride, expand_ratio):
        super(InvertedResidual, self).__init__()
        # 要求扩展比为整数
        self.interDim = inchannels * expand_ratio
        # 输入和输出特征图大小且波段数一致下进行短接
        self.shortcut_code = stride == 1 and inchannels == outchannels
        self.Relu6 = nn.ReLU6(inplace=True)
        # InvertedResidual_Bottleneck
        if expand_ratio == 1:
            self.Bottleneck = nn.Sequential(
                # Depthwise
                nn.Conv2d(self.interDim, self.interDim, 3, stride, 1, groups=self.interDim, bias=False),
                nn.BatchNorm2d(self.interDim),
                nn.ReLU6(inplace=True),
                # pointwise
                nn.Conv2d(self.interDim, outchannels, 1, 1, 0, bias=False),
                nn.BatchNorm2d(outchannels)
            )
        else:
            self.Bottleneck = nn.Sequential(
                # 利用1x1卷积进行通道数的上升
                nn.Conv2d(inchannels, self.interDim, 1, 1, 0, bias=False),
                nn.BatchNorm2d(self.interDim),nn.ReLU6(inplace=True),
                # Depthwise
                nn.Conv2d(self.interDim, self.interDim, 3, stride, 1, groups=self.interDim, bias=False),
                nn.BatchNorm2d(self.interDim),nn.ReLU6(inplace=True),
                # Pointwise
                nn.Conv2d(self.interDim, outchannels, 1, 1, 0, bias=False),
                nn.BatchNorm2d(outchannels),nn.ReLU6(inplace=True)
            )
    def forward(self, x):
        if self.shortcut_code:
            return self.Relu6(x + self.Bottleneck(x))
        else:
            return self.Bottleneck(x)

class MobileNetv2(nn.Module):
    # 输入样本大小为3×256×256
    def __init__(self,inputchannels=3):
        super(MobileNetv2, self).__init__()
        self.model_struct = [nn.Sequential(nn.Conv2d(inputchannels,32,3,2,1,bias=False),nn.BatchNorm2d(32),nn.ReLU6(inplace=True))]
        # 逆残差块参数——t(扩展因子), c(输出channels), n(循环次数), s(步长)
        IRindex = [
            # 128, 128, 32 -> 128, 128, 16
            [1, 16, 1, 1],
            # 128, 128, 16 -> 64, 64, 24
            [6, 24, 2, 2],
             # 64, 64, 24 -> 32, 32, 32
            [6, 32, 3, 2],
            # 基于output stride=8,后添加空洞卷积变化改进后,后续特征图高宽不变,仅通道变化
            [6, 64, 4, 2],
            # 64 -> 96
            [6, 96, 3, 1],
            # 96 -> 160
            [6, 160, 3, 2],
            # 160 -> 320
            [6, 320, 1, 1]
        ]
        # 向模型结构添加逆残差块
        input_IRinput = 32
        for t, c, n, s in IRindex:
            for i in range(n):
                if i == 0:
                    # 首次完成高宽减半
                    self.model_struct.append(InvertedResidual(input_IRinput, c, s, t))
                else:
                    # 后续保持高宽不变
                    self.model_struct.append(InvertedResidual(input_IRinput, c, 1, t))
                input_IRinput = c
        # 列表转为网络序列(解包列表)
        self.model_struct = nn.Sequential(*self.model_struct)
        # 向倒数第二个分辨率跨步综合块应用dilate=2空洞卷积,向倒数第一个分辨率跨步综合块应用dilate=4空洞卷积
        # 倒数第二个分辨率跨步综合块位于self.model_struct索引[7,14),倒数第一个分辨率跨步综合块[14,17]
        # 注意:apply函数会深入迭代其子节点
        for i in range(7, 14):
            self.model_struct[i].apply(partial(self._addDilate, dilate=2))
        for i in range(14, 18):
            self.model_struct[i].apply(partial(self._addDilate, dilate=4))
        # 权重初始化
        for layer in self.modules():
            if type(layer) == nn.Conv2d:
                nn.init.kaiming_normal(layer.weight,mode="fan_out",nonlinearity="relu")
            elif type(layer) == nn.BatchNorm2d:
                nn.init.constant_(layer.weight,1)
                nn.init.constant_(layer.bias,0)


    # 辅助用于添加空洞卷积参数
    def _addDilate(self, layer, dilate):
            if type(layer) == nn.Conv2d:
                if layer.stride == (2, 2):
                    layer.stride = (1, 1)
                    if layer.kernel_size == (3, 3):
                        layer.dilation = (dilate//2, dilate//2)
                        layer.padding = (dilate//2, dilate//2)
                else:
                    if layer.kernel_size == (3, 3):
                        layer.dilation = (dilate, dilate)
                        layer.padding = (dilate, dilate)
    def forward(self,x):
        # 64×64特征图(通道数为24)为浅层特征(经过了3个block)
        lowlevel_features = self.model_struct[:4](x)
        x = self.model_struct[4:](lowlevel_features)
        return lowlevel_features, x
#——————————————————————————————————————————————————————————————————————————————————————————

#——————————————————————————————————————————————————————————————————————————————————————————
# ASPP-L(空洞空间金字塔池)
# 若选择output stride = 8,则需要将空洞参数翻倍,由[6,12,18] -> [12,24,36]。
# 但是,此处由于我个人样本设计原因,我仍保持[6,12,18](保持不同尺度空间的良好表征)
class ASPP(nn.Module):
    def __init__(self,inchannels,outchannels):
        super(ASPP, self).__init__()
        self.CONV_k1 = nn.Sequential(nn.Conv2d(inchannels,outchannels,1,bias=False),
                                     nn.BatchNorm2d(outchannels),nn.ReLU(inplace=True))
        self.CONV_AC1 = nn.Sequential(nn.Conv2d(inchannels,outchannels,3,padding=6,dilation=6,bias=False),
                                      nn.BatchNorm2d(outchannels),nn.ReLU(inplace=True))
        self.CONV_AC2 = nn.Sequential(nn.Conv2d(inchannels,outchannels,3,padding=12,dilation=12,bias=False),
                                      nn.BatchNorm2d(outchannels),nn.ReLU(inplace=True))
        self.CONV_AC3 = nn.Sequential(nn.Conv2d(inchannels,outchannels,3,padding=18,dilation=18,bias=False),
                                      nn.BatchNorm2d(outchannels),nn.ReLU(inplace=True))
        # 在forward函数内双线性插值返回
        self.pooling = nn.Sequential(nn.AdaptiveAvgPool2d(1),nn.Conv2d(inchannels,outchannels,1,bias=False),
                                     nn.BatchNorm2d(outchannels),nn.ReLU(inplace=True))
        self.mergeCONV_k3 = nn.Sequential(nn.Conv2d(5*outchannels,outchannels,1,bias=False),nn.BatchNorm2d(outchannels),
                                          nn.ReLU(inplace=True),nn.Dropout(0.5))
    def forward(self,x):
        x1 = self.CONV_k1(x)
        x2 = self.CONV_AC1(x)
        x3 = self.CONV_AC2(x)
        x4 = self.CONV_AC3(x)
        x5 = self.pooling(x)
        x5 = F.interpolate(x5,size=x.shape[-2:],mode="bilinear",align_corners=False)
        x = torch.cat([x1,x2,x3,x4,x5],dim=1)
        x = self.mergeCONV_k3(x)
        return x

# Head(实验样本高宽为256×256)
class Endhead(nn.Module):
    def __init__(self,inchannels,num_classes):
        super(Endhead, self).__init__()
        self.Head =nn.Sequential(nn.Conv2d(inchannels,inchannels,3,padding=1,bias=False),nn.BatchNorm2d(inchannels),
                               nn.ReLU(inplace=True),nn.Conv2d(inchannels,num_classes,1))
    def forward(self,x):
        x = self.Head(x)
        # 将特征图双线性插值回原样本大小
        x = F.interpolate(x,size=(256,256),mode="bilinear",align_corners=False)
        return x
#——————————————————————————————————————————————————————————————————————————————————————————

#——————————————————————————————————————————————————————————————————————————————————————————
# Deeplabv3+
class Deeplabv3plus(nn.Module):
    def __init__(self, inputchannels,num_classes):
        super(Deeplabv3plus, self).__init__()
        self.backbone = MobileNetv2(inputchannels)
        # backbone计算结果的特征图通道数为320
        self.ASPP = ASPP(320,256)
        # 浅层特征图1×1Conv
        self.lowlevel_conv = nn.Sequential(
            nn.Conv2d(24, 48, 1),nn.BatchNorm2d(48),nn.ReLU(inplace=True))
        # 低级-高级特征融合后卷积
        self.cat_conv = nn.Sequential(
            # 输入channels为48+256=304
            nn.Conv2d(304, 256, 3, stride=1, padding=1),nn.BatchNorm2d(256),nn.ReLU(inplace=True),nn.Dropout(0.5),
            nn.Conv2d(256, 256, 3, stride=1, padding=1),nn.BatchNorm2d(256),nn.ReLU(inplace=True),nn.Dropout(0.1)
        )
        # 结果输出层
        self.end = Endhead(256,num_classes)

    def forward(self,x):
        lowlevel_features, x = self.backbone(x)
        x = self.ASPP(x)
        lowlevel_features = self.lowlevel_conv(lowlevel_features)
        # 高级特征图上采样至与低级特征图大小一致
        x = F.interpolate(x, size=lowlevel_features.shape[-2:], mode='bilinear', align_corners=False)
        x = self.cat_conv(torch.cat((x, lowlevel_features), dim=1))
        x = self.end(x)
        return x
#——————————————————————————————————————————————————————————————————————————————————————————
二、关键基础网络结构分析
(一)PSPnet[3#]
1、模型概述:
在深度网络中,更高层的特征包含更多的语义和更少的位置信息,同时,卷积神经网络的经验感受野比理论感受野小得多(尤其在深层)。因此,在深层特征图结合多尺度特征,经验性地可以提高模型表现。
论文主要提出了:
①Pyramid Pooling Module(金字塔池化模块);
②Poly学习率变化策略(,baselr=0.01,power=0.9);
③辅助损失引入(进一步实现,可参考[7])。
参考资料[6]
原始论文:Object detectors emerge in deep scene cnns. arXiv:1412.6856, 2014.
理论感受野:卷积神经网络每一层输出的特征图上的像素点映射回输入图像上的区域大小。
经验(实际)感受野:有效感受野仅占理论感受野的一部分。并不是感受野内所有像素对输出向量的贡献相同,实际感受野是一个高斯分布。

2、模型主要创新点:
通过金字塔池化模块加强了模型通过不同的基于区域的上下文聚合来利用全局上下文信息的能力。
(二)Resnet[7#]
1、模型概述:
Resnet中“Identity mapping-恒等映射”的设计,使得卷积神经网络可以变得更深,从而获取到更多的深层特征。解决了随着网络深度增加,模型精度饱和后迅速退化的问题。
当输入和输出特征图的尺寸相同时,可以直接应用“Identity mapping-恒等映射”公式。而当输入和输出特征图的特征维度不同时,原文提供了如下两种设计(若是特征图高宽变化,可以通过卷积步长设定调整):
①当卷积前后维度增加时,通过将输入特征图维度扩增至与输出相同,扩增的维度全部填充零元素;
②当卷积前后维度增加时,通过对输入特征图进行1×1卷积增扩维度至与输出相同。
ResNet的辉煌时刻:
①ResNet在ILSVRC和COCO 2015取得了五项第一,并刷新了CNN模型在ImageNet上的历史。ResNet第一作者何恺明获得CVPR2016最佳论文奖;
②2023未来科学大奖——数学与计算机科学。
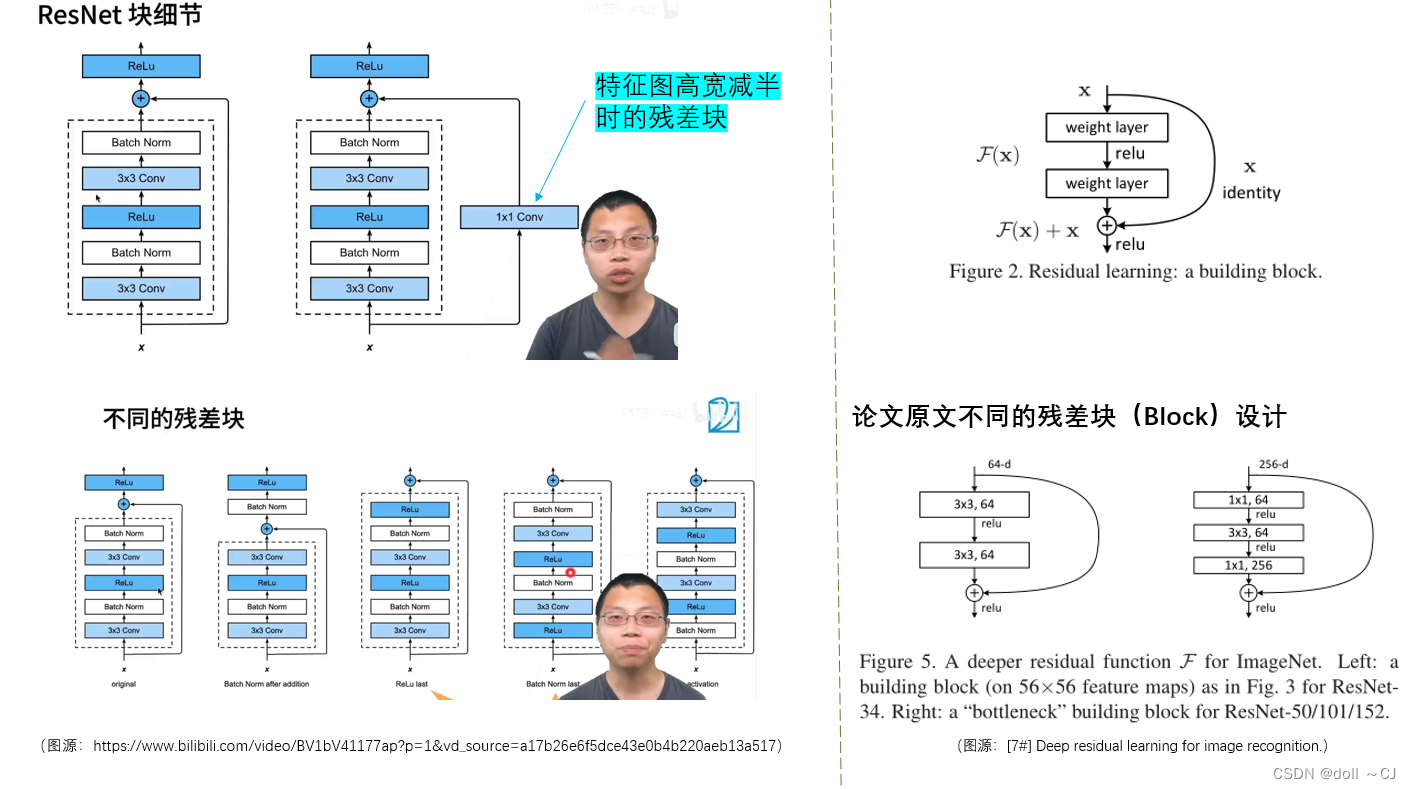
(右图源:[7#]Deep residual learning for image recognition.)
2、模型主要创新点:
深度网络以端到端的多层方式自然地集成了低/中/高级别特征和分类器,并且特征的“等级”可以通过堆叠卷积层的数量来丰富(即加深神经网络模型深度)。网络的深度至关重要,但是当更深层次的网络能够开始收敛时,就会遇到“随着网络深度的增加,精度会饱和,然后迅速退化”的问题(这里我认为与“我们在渴望深入学习某一个领域时,需要回顾该领域的基础概念”有异曲同工之妙。在领域的学习中,我们每个人就像一个学习权重,不断地基于前人的研究产生更多的成果。但是,如果仅仅根据某一个前人的研究再学习便独立产出并不能保证领悟到的方向就是正确的,而有可能学偏了并忽略了最重要、最本质的改进方向。然而,当我们每次对前人的研究进行进一步深入时,不仅有自己的领悟,同时还融合了前人一脉相承的本质思想,那么至少会对该领域有一个较为完整且正确的认识,大大减少了错误理解的可能),同时,这种退化并不是由过拟合引起的。经验上,在适当深度的模型中添加更多的层会导致更高的训练误差。
“Identity mapping-恒等映射”的提出,有效地解决了上述问题,使得卷积神经网络模型可以变得更深,从而学到更多有效的深层特征。ResidualNet推动了大模型训练的巨大发展。
(三)Mobilenet[6#]
1、模型概述:
MobileNets是针对移动和嵌入式视觉应用程序的高效模型。其基于一种流线型架构,该架构使用深度可分离卷积来构建轻量级深度神经网络。卷积神经网络(CNN)总的发展趋势是更深、更复杂,以实现更高的精度,然而,这些提高准确率的进步并不一定使网络在大小和速度方面更高效。如今,在机器人、自动驾驶汽车和增强现实等许多现实世界应用中,识别任务需要在计算有限的平台上及时执行。由此,MobileNets更为具有优势。
MobileNet模型基于深度可分离卷积,它将标准卷积转换为一组深度卷积(Depthwise convolution)和1×1卷积(pointwise convolution)。这种因子分解方法,能够显著减少计算和模型大小。同时,MobileNet保留了模型的深度,主要在特征图的高宽上进行了压缩。

2、模型主要创新点:
MobileNet应用了深度可分离卷积,大大减少了计算量与网络大小,使得模型计算快速且准确率较好。
3、MobileNetv2的逆残差结构[8][9]:
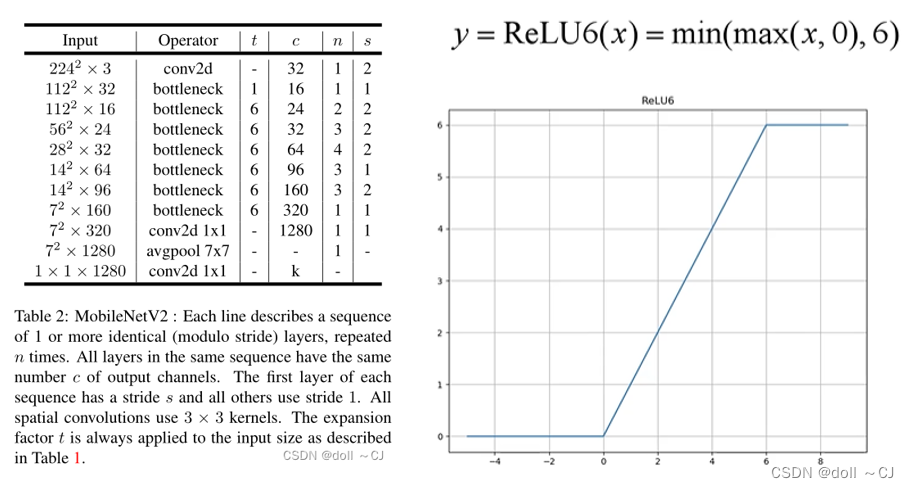
MobileNetv2设计了一个新的网络模块——inverted residual with linear bottleneck(逆残差结构)。该模块采用低维压缩特征图作为输入,该低维压缩特征图首先被扩展到高维,并用轻量级深度卷积进行滤波。然后,利用线性卷积将特征投影回低维特征图。

下述为MobileNetv2的网络结构。其中,扩展因子t指的是逆残差块中的升维特征图的channels数与逆残差块的输入特征图channels数之比。MobileNetv2使用了Relu6激活函数(低精度计算时具有鲁棒性),并在训练过程中使用了Dropout和BatchNorm。
Conclusion(整体实验结果分析)
一、网络性能评估分析
实验初期,在“基于残差块结构下的神经网络,网络越深,模型表现越好”与“mini_Batch在GPU允许的条件下越多越好”思想的指引下,我尝试在本机利用Resnet-50训练31239幅大小为256×256的样本。实验过程中,我发现本机GPU无法训练超过5的mini_Batch,所以为了保证具有足够的训练mini_Batch,我选择了一个“下下策”——利用CPU训练。显然,耗时指标的结果是消极的,当看到一个Epoch需要训练一天左右的时间。
通过分析实验结果,①基于Resnet50模型,本人在一定程度上验证了“足够大的mini_Batch是可以加速模型的收敛且相较于SGD的梯度下降方向更为准确、训练更为稳定”的思想是准确的;②基于Deeplabv3+模型(mobileNet为backbone)可以有效地减少模型训练耗时。
(个人见解)随着大模型的快速发展,深度学习更多地依赖于强大的算力(计算机的硬件),同时,各大厂“云计算”的强力布局,使得深度学习研究人员可以将精力更多地放在模型的设计之上。通常,为了获得足够的算力资源,我们可以进行GPU云服务器的租赁、建设计算机集群(知名建模软件Context Capture Center Master就具有集群计算功能)等。
GPU云服务器租赁平台:
①阿里云-计算,为了无法计算的价值
②AutoDL算力云 | 弹性、好用、省钱。租GPU就上AutoDL
③腾讯云 产业智变·云启未来 - 腾讯
二、模型精度评价( 未完全展示实验结果)
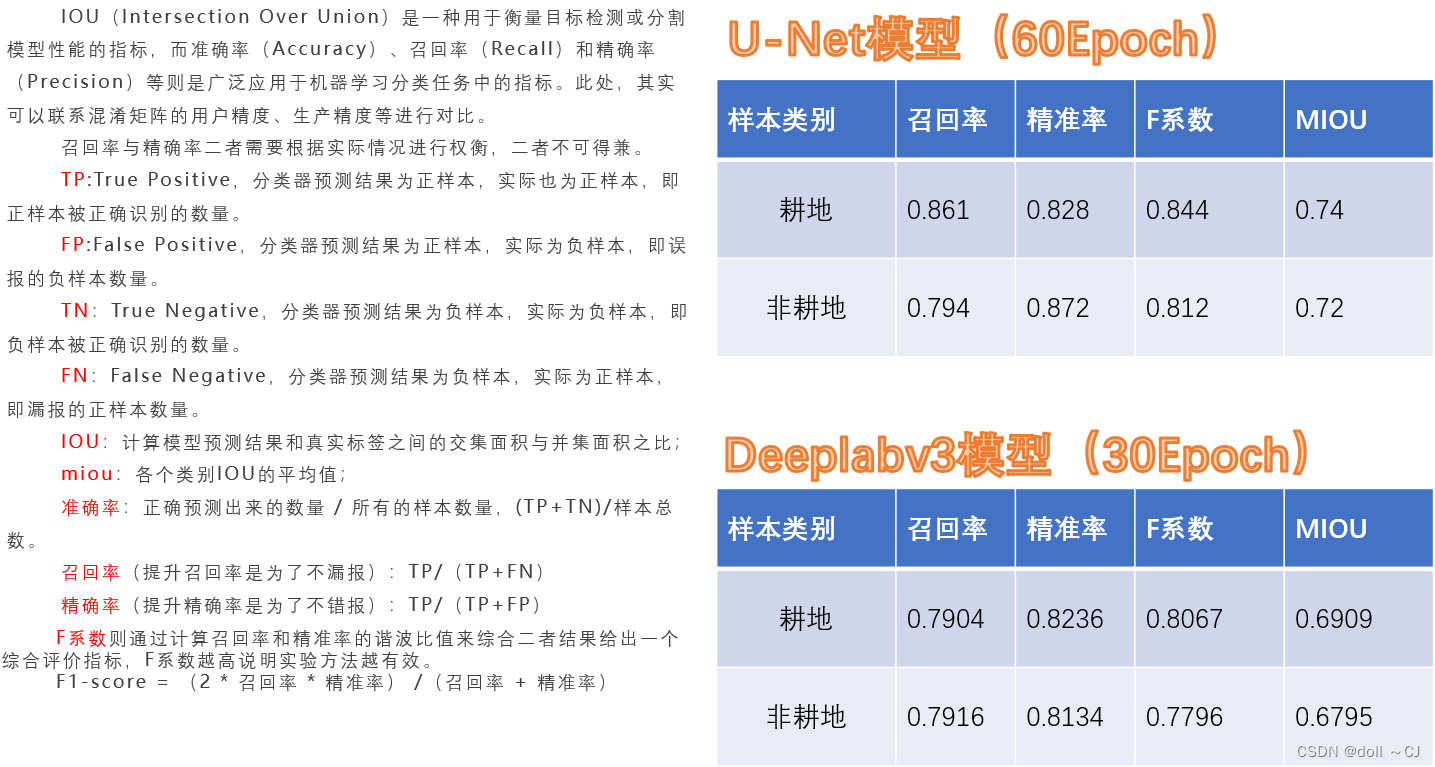
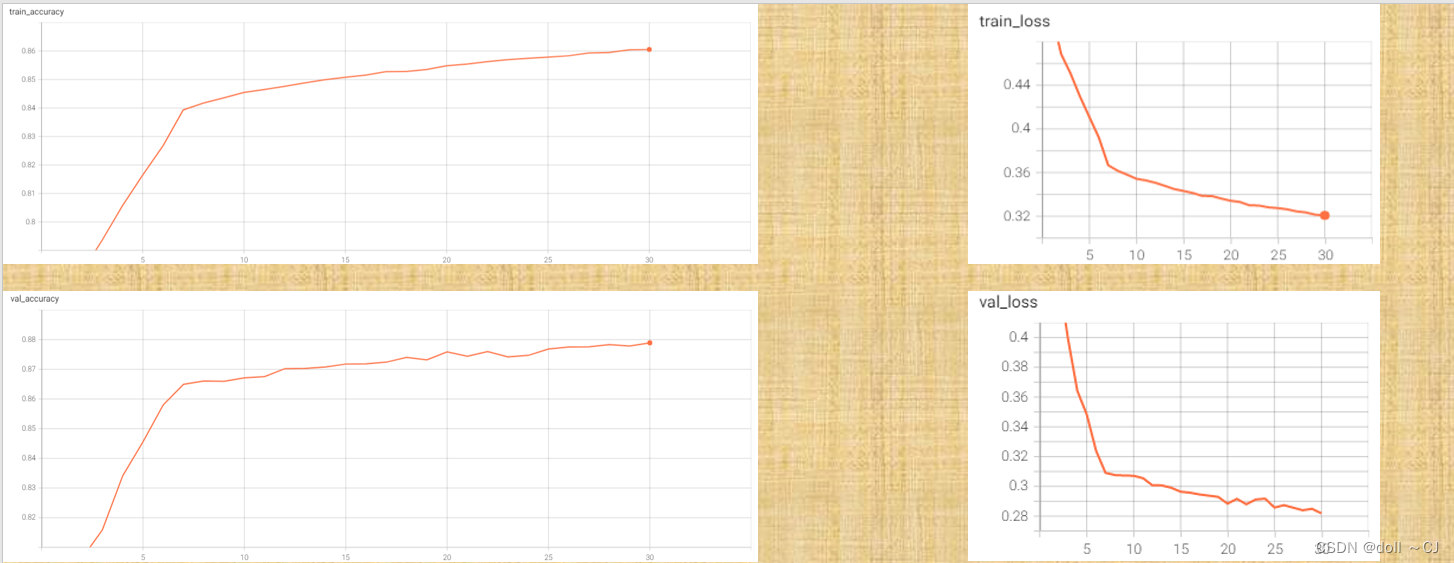
(由于未严格按照消融实验要求,所以仅为大致分析)通过训练精度与验证精度曲线图显然可以看出,在30Epoch下,模型并未取得最好表现,两者精度都还在不断上升的阶段。同时,根据评价指标,可以看出Deeplabv3模型的精准率已达到较好的水平。总而言之,笔者相信Deeplabv3模型再经过多次迭代学习可以获得一个较于U-Net模型各方面性能上的提升。
三、实验总结
笔者认为,一组分类逻辑自洽且人为标注准确的高质量样本集通常是深度学习的好的开始,同时,深度学习的神经网络模型设计的各类tricks也是提高模型表现的关键。再者,具体的一些调参技巧可以详见大佬的博客[12]。
“If you don't understand what you are doing.You are essentially doing Garbage in,Garbage out operation”
Reference(模型参考文献)
[1#] (U-net——语义分割)
U-Net: Convolutional Networks for Biomedical Image Segmentation.
Ronneberger, O., Fischer, P., Brox, T. (2015). In: Navab, N., Hornegger, J., Wells, W., Frangi, A. (eds) Medical Image Computing and Computer-Assisted Intervention – MICCAI 2015. MICCAI 2015. Lecture Notes in Computer Science(), vol 9351. Springer, Cham. https://doi.org/10.1007/978-3-319-24574-4_28.
[2#] (Deeplab3+——语义分割)
Encoder-Decoder with Atrous Separable Convolution for Semantic Image Segmentation.
Liang-Chieh Chen, Yukun Zhu, George Papandreou, Florian Schroff, Hartwig Adam; Proceedings of the European Conference on Computer Vision (ECCV), 2018, pp. 801-818.
[3#] (PSPnet)
Pyramid Scene Parsing Network.
Hengshuang Zhao, Jianping Shi, Xiaojuan Qi, Xiaogang Wang, Jiaya Jia; Proceedings of the IEEE Conference on Computer Vision and Pattern Recognition (CVPR), 2017, pp. 2881-2890.
[4#] (HRnet——关键点位检测——与本文相关性不大)
Deep High-Resolution Representation Learning for Human Pose Estimation.
Ke Sun, Bin Xiao, Dong Liu, Jingdong Wang; Proceedings of the IEEE/CVF Conference on Computer Vision and Pattern Recognition (CVPR), 2019, pp. 5693-5703.
[5#](Xception——深度可分离卷积)
Xception: Deep Learning With Depthwise Separable Convolutions.
Francois Chollet; Proceedings of the IEEE Conference on Computer Vision and Pattern Recognition (CVPR), 2017, pp. 1251-1258.
[6#](Mobilenet——轻量级网络)
MobileNets: Efficient Convolutional Neural Networks for Mobile Vision Applications
Andrew G. Howard, Menglong Zhu, Bo Chen, Dmitry Kalenichenko, Weijun Wang, Tobias Weyand, Marco Andreetto, Hartwig Adam.Computer Vision and Pattern Recognition (cs.CV). arXiv:1704.04861.
MobileNetV2: Inverted Residuals and Linear Bottlenecks.
Mark Sandler, Andrew Howard, Menglong Zhu, Andrey Zhmoginov, Liang-Chieh Chen; Proceedings of the IEEE Conference on Computer Vision and Pattern Recognition (CVPR), 2018, pp. 4510-4520.
[7#](Resnet——残差连接模型,加深模型训练深度)
Identity Mappings in Deep Residual Networks.
He, K., Zhang, X., Ren, S., Sun, J. (2016). In: Leibe, B., Matas, J., Sebe, N., Welling, M. (eds) Computer Vision – ECCV 2016. ECCV 2016. Lecture Notes in Computer Science(), vol 9908. Springer, Cham. https://doi.org/10.1007/978-3-319-46493-0_38.
Deep residual learning for image recognition.
He K, Zhang X, Ren S, et al. Proceedings of the IEEE conference on computer vision and pattern recognition. 2016: 770-778.
Acknowledge(优质网络学习资源贡献者)
@跟李沐学AI——亚马逊资深首席科学家——bilibili.
@Bubbliiiing——bilibili.
@Eve的科学频道——bilibili.
@狗中赤兔——bilibili.
@同济子豪兄——bilibili.
@pytorch教程——bilibili.
@霹雳吧啦Wz——bilibili.
@Pysource——YouTube.
@Pytorch——github/YouTube.
(神经网络构建参考)
[1]https://github.com/bubbliiiing
[2]https://github.com/WZMIAOMIAO/deep-learning-for-image-processing
[3]Welcome to PyTorch Tutorials — PyTorch Tutorials 2.0.1+cu117 documentation
[4]Pytorch教程[06]权值初始化_pytorch 初始化权重参数_迪菲赫尔曼的博客-CSDN博客
[5]pytorch之warm-up预热学习策略_pytorch warmup_还能坚持的博客-CSDN博客
[6]Anchor和目标检测中的理论感受野和实际感受野的关系_*pprp*的博客-CSDN博客
[7]深监督,辅助损失,auxiliary loss_翰墨大人的博客-CSDN博客
[8]精简CNN模型系列之五:MobileNet v2 - 简书
[9]轻量级网络——MobileNetV2_Clichong的博客-CSDN博客
[10]轻量化网络:MobileNet-V2_TensorSense的博客-CSDN博客
[11]DeepLabV3网络简介(语义分割)_哔哩哔哩_bilibili
[12]深度学习优化指南(调参宝典) - 知乎
(pytorch框架的进一步理解使用)
[13]理解optimizer.zero_grad(), loss.backward(), optimizer.step()的作用及原理_self.optimizer.step()_潜行隐耀的博客-CSDN博客
[14]python中*args和**kwargs的理解_千千Sama的博客-CSDN博客
[15]PyTorch~自定义数据读取_pytorch读取自定义数据集_whaosoft143的博客-CSDN博客
[16]pytorch使用TensorBoard可视化损失函数曲线、精度信息_tensor biard打印损失_海洋 之心的博客-CSDN博客
[17]用tensorboard显示DataLoader中的图像_如何查看dataloader图像_叶叶梓梓的博客-CSDN博客
[18]AdaptiveAvgPool2d理解(中网、外网整合)_xiyou__的博客-CSDN博客
(代码规范参考——进行规范编码,可以高效提升代码可读性)
[19] def __init__(self)->None 这个->None是什么意思_python init() ->none_Aaron-ywl的博客-CSDN博客
[20]python中*args和**kwargs的理解_千千Sama的博客-CSDN博客
[21]python之使用functools.partial_function.partial_keyson R的博客-CSDN博客
[22]Python中很常用的函数map(),一起来看看用法_python map_捣鼓Python的博客-CSDN博客
[23]每天学点pytorch--torch.nn.Module的apply()方法_pytorch apply_qiumokucao的博客-CSDN博客
