【快速学习系列】Spring理解,IOC、DI、AOP的使用和代码示例及spring扩展(bean作用域、自动装配类型和拆分策略)
Spring概述
- Spring设计理念
- Spring是面向Bean的编程
- Spring三大核心容器:
- Beans,Core,Context
- Spring 两大核心技术
- 控制反转(IoC:Inversion of Control ) /依赖
注入(DI:Dependency Injection )- 面向切面编程(AOP:Aspect Oriented Programming)
IOC(控制反转)和 DI 依赖注入
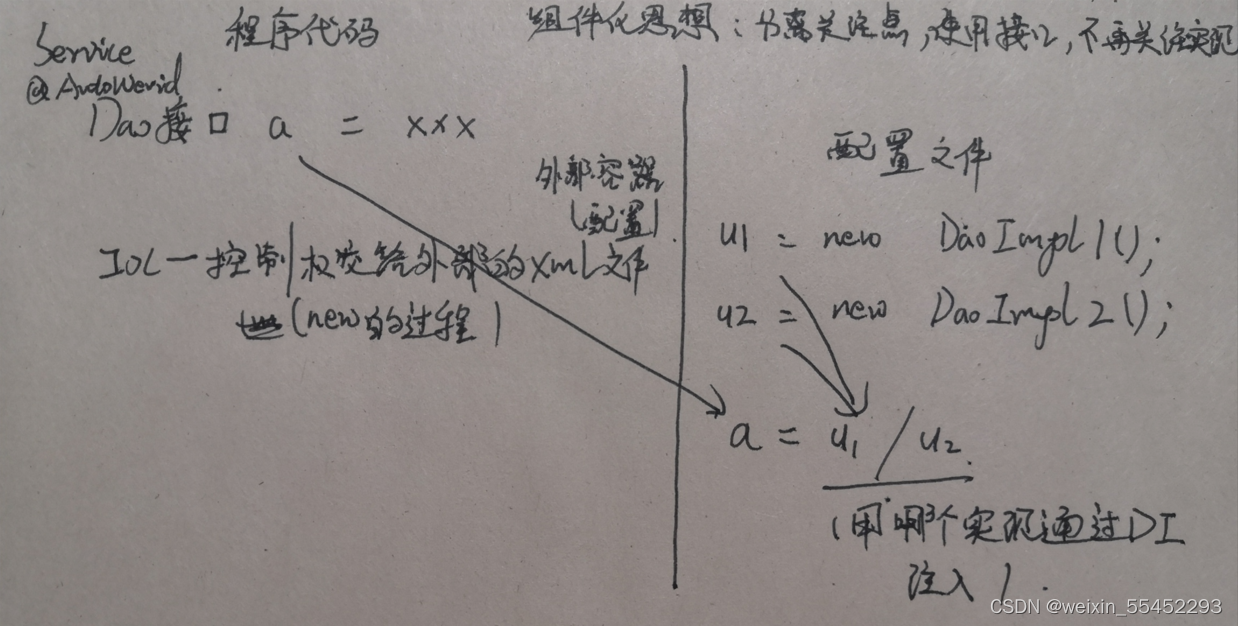
IOC(控制反转):
- 将组件对象的
控制权从代码本身转移到外部容器
- 通俗理解:
- 定义接口在代码中,配置文件为实现new接口的过程( 把new对象放到了配置文件里 )
控制权:new的过程外部容器:外部配置文件(xml、yml…)
组件化的思想:分离关注点,使用接口,不再关注实现
DI 依赖注入:
- 将组件的
构建和使用分开
- 通俗理解:
- 在xml中给对象属性赋值
构建:进行自动装配的dao层接口使用:dao层接口的实现方法
图解
使用
引入jar包
<spring.version>4.0.2.RELEASE</spring.version>
<!-- spring框架包 -->
<dependency>
    <groupId>org.springframework</groupId>
    <artifactId>spring-test</artifactId>
    <version>${spring.version}</version>
</dependency>
<dependency>
    <groupId>org.springframework</groupId>
    <artifactId>spring-core</artifactId>
    <version>${spring.version}</version>
</dependency>
<dependency>
    <groupId>org.springframework</groupId>
    <artifactId>spring-oxm</artifactId>
    <version>${spring.version}</version>
</dependency>
<dependency>
    <groupId>org.springframework</groupId>
    <artifactId>spring-tx</artifactId>
    <version>${spring.version}</version>
</dependency>
<dependency>
    <groupId>org.springframework</groupId>
    <artifactId>spring-jdbc</artifactId>
    <version>${spring.version}</version>
</dependency>
<dependency>
    <groupId>org.springframework</groupId>
    <artifactId>spring-aop</artifactId>
    <version>${spring.version}</version>
</dependency>
<dependency>
    <groupId>org.springframework</groupId>
    <artifactId>spring-context</artifactId>
    <version>${spring.version}</version>
</dependency>
<dependency>
    <groupId>org.springframework</groupId>
    <artifactId>spring-context-support</artifactId>
    <version>${spring.version}</version>
</dependency>
<dependency>
    <groupId>org.springframework</groupId>
    <artifactId>spring-expression</artifactId>
    <version>${spring.version}</version>
</dependency>
<dependency>
    <groupId>org.springframework</groupId>
    <artifactId>spring-orm</artifactId>
    <version>${spring.version}</version>
</dependency>

<!-- springMVC框架包(以后才用,只看spring可忽略) -->
<dependency>
    <groupId>org.springframework</groupId>
    <artifactId>spring-web</artifactId>
    <version>${spring.version}</version>
</dependency>
<dependency>
    <groupId>org.springframework</groupId>
    <artifactId>spring-webmvc</artifactId>
    <version>${spring.version}</version>
</dependency>
参数注入
示例
1、用spring打印Hello Spring!!!
新建一个HelloWord.java类
package com.r.test;

import lombok.Setter;

/**
 *
 * @Author Tuerlechat,
 * @Date 2022/10/28
 */
@Setter     //被注入的属性一定要有setter方法,否则Spring注入不进去呀也
public class HelloWorld {

    private String message;

    public void show() {
        System.out.println(message);
    }
}
在resources根目录下新建一个Spring Config类型文件(或者xml文件直接粘头部代码)为spring.xml
spring.xml
<?xml version="1.0" encoding="UTF-8"?>
<beans xmlns="http://www.springframework.org/schema/beans"
       xmlns:xsi="http://www.w3.org/2001/XMLSchema-instance"
       xsi:schemaLocation="http://www.springframework.org/schema/beans http://www.springframework.org/schema/beans/spring-beans.xsd">

    <!--
       创建bean
           id:bean名
           class:被注入bean的类(全限定名)
    -->
    <bean id="helloWorld" class="com.r.test.HelloWorld">
        <!--
            属性
                name:被注入类中的属性名(即要被注入的属性)
                value:被注入的属性值
         -->
        <property name="message" value="Hello Spring!!!"/>
    </bean>

</beans>
测试类HelloWorldTest.java
package com.r.test;

import org.junit.Test;
import org.springframework.context.ApplicationContext;
import org.springframework.context.support.ClassPathXmlApplicationContext;

/**
 *
 * @Author Tuerlechat,
 * @Date 2022/10/28
 */
public class HelloWorldTest {

    @Test
    public void show() {
        //读取spring配置文件
        ApplicationContext ac = new ClassPathXmlApplicationContext("spring.xml");
        //获取spring配置文件中的bean
        HelloWorld hw = (HelloWorld)ac.getBean("helloWorld");
        //调用被注入的类中的方法
        hw.show();
    }
}
2、墨盒打印机
墨盒接口Ink:
/**
 * 墨盒接口。
 */
public interface Ink {
    /**
     * 定义打印采用的颜色的方法。
     *
     * @param r
     *            红色值
     * @param g
     *            绿色值
     * @param b
     *            蓝色值
     * @return 返回打印采用的颜色
     */
    public String getColor(int r, int g, int b);
}
纸张接口Paper:
/**
 * 纸张接口。
 */
public interface Paper {
    public static final String newline = "\r\n";

    /**
     * 输出一个字符到纸张。
     */
    public void putInChar(char c);

    /**
     * 得到输出到纸张上的内容。
     */
    public String getContent();
}
彩色墨盒ColorInk类:
/**
 * 彩色墨盒。ColorInk实现Ink接口。
 */
public class ColorInk implements Ink {
	// 打印采用彩色
	public String getColor(int r, int g, int b) {
		Color color = new Color(r, g, b);
		return "#" + Integer.toHexString(color.getRGB()).substring(2);
	}
}
灰色墨盒GreyInk类:
/**
 * 灰色墨盒。GreyInk实现Ink接口。
 */
public class GreyInk implements Ink {
	// 打印采用灰色
	public String getColor(int r, int g, int b) {
		int c = (r + g + b) / 3;
		Color color = new Color(c, c, c);
		return "#" + Integer.toHexString(color.getRGB()).substring(2);
	}
}
打印文本纸张TextPaper类:
/**
 * 文本打印纸张实现。TextPaper实现Paper接口。
 */
public class TextPaper implements Paper {
    // 每行字符数
    private int charPerLine = 16;
    // 每页行数
    private int linePerPage = 5;
    // 纸张中内容
    private String content = "";
    // 当前横向位置,从0到charPerLine-1
    private int posX = 0;
    // 当前行数,从0到linePerPage-1
    private int posY = 0;
    // 当前页数
    private int posP = 1;

    public String getContent() {
        String ret = this.content;
        // 补齐本页空行,并显示页码
        if (!(posX == 0 && posY == 0)) {
            int count = linePerPage - posY;
            for (int i = 0; i < count; ++i) {
                ret += Paper.newline;
            }
            ret += "== 第" + posP + "页 ==";
        }
        return ret;
    }

    public void putInChar(char c) {
        content += c;
        ++posX;
        // 判断是否换行
        if (posX == charPerLine) {
            content += Paper.newline;
            posX = 0;
            ++posY;
        }
        // 判断是否翻页
        if (posY == linePerPage) {
            content += "== 第" + posP + "页 ==";
            content += Paper.newline + Paper.newline;
            posY = 0;
            ++posP;
        }
    }

    // setter方法,用于属性注入
    public void setCharPerLine(int charPerLine) {
        this.charPerLine = charPerLine;
    }

    // setter方法,用于属性注入
    public void setLinePerPage(int linePerPage) {
        this.linePerPage = linePerPage;
    }
}
打印机程序Printer类:
/**
 * 打印机程序。
 */
public class Printer {
	// 面向接口编程,而不是具体的实现类
	private Ink ink = null;
	// 面向接口编程,而不是具体的实现类
	private Paper paper = null;

	/**
	 * 设值注入所需的setter方法。
	 *
	 * @param ink
	 *            传入墨盒参数
	 */
	public void setInk(Ink ink) {
		this.ink = ink;
	}

	/**
	 * 设值注入所需的setter方法。
	 *
	 * @param paper
	 *            传入纸张参数
	 */
	public void setPaper(Paper paper) {
		this.paper = paper;
	}

	/**
	 * 打印机打印方法。
	 *
	 * @param str
	 *            传入打印内容
	 */
	public void print(String str) {
		// 输出颜色标记
		System.out.println("使用" + ink.getColor(255, 200, 0) + "颜色打印:\n");
		// 逐字符输出到纸张
		for (int i = 0; i < str.length(); ++i) {
			paper.putInChar(str.charAt(i));
		}
		// 将纸张的内容输出
		System.out.print(paper.getContent());
	}
}
spring.xml
<?xml version="1.0" encoding="UTF-8"?>
<beans xmlns="http://www.springframework.org/schema/beans"
       xmlns:xsi="http://www.w3.org/2001/XMLSchema-instance"
       xsi:schemaLocation="http://www.springframework.org/schema/beans http://www.springframework.org/schema/beans/spring-beans.xsd">

<!-- 打印机 -->

    <!-- 创建彩色墨盒 -->
    <bean id="color" class="com.r.test.ColorInk"/>
    <!-- 创建灰白墨盒 -->
    <bean id="grey" class="com.r.test.GreyInk"/>
    <!-- 创建A4纸 -->
    <bean id="A4Paper" class="com.r.test.TextPaper">
        <!-- 每行字符数 -->
        <property name="charPerLine" value="10"/>
        <!-- 每页行数 -->
        <property name="linePerPage" value="8"/>
    </bean>
    <!-- 创建B5纸 -->
    <bean id="B5Paper" class="com.r.test.TextPaper">
        <!-- 每行字符数 -->
        <property name="charPerLine" value="6"/>
        <!-- 每页行数 -->
        <property name="linePerPage" value="5"/>
    </bean>
    <!-- 创建打印机 -->
    <bean id="printer" class="com.r.test.Printer">
        <!-- ref:引用其它bean -->
        <property name="ink" ref="color"/>
        <property name="paper" ref="A4Paper"/>
    </bean>
</beans>
测试类PrinterTest:
package com.r.test;

import org.junit.Test;
import org.springframework.context.ApplicationContext;
import org.springframework.context.support.ClassPathXmlApplicationContext;

/**
 *
 * @Author Tuerlechat,
 * @Date 2022/10/28
 */
public class PrinterTest {

    @Test
    public void printer() {
        //读取spring配置文件
        ApplicationContext ac = new ClassPathXmlApplicationContext("spring.xml");
        //获取spring配置文件中的bean
        Printer printer = (Printer) ac.getBean("printer");
        //调用被注入的类中的方法
        printer.print("“拥有梦想是一件很棒很幸运的事情,如果你能享受为梦想奋斗,\n" +
                "享受实现梦想的过程,那没有什么比这更好的事情了。\n" +
                "当你享受其中你就会投入更多,当你享受其中,\n" +
                "所有的事都会相辅相成、相互促进”\n" +
                "“꿈을갖는것은멋지고행운이다.\n" +
                "꿈을이루기위해분투하는과정을즐길수있다면이보다더좋은것은없다.\n" +
                "당신이그것을즐길때당신은더많은것을투자할것입니다.\n" +
                "당신이그것을즐길때,모든것이상호보완적이고상호촉진될” -박채영");
    }
}
构造函数注入 (constructor-arg)
示例
构造注入新增user
dao层接口
/**
 * @Author Tuerlechat,
 * @Date 2022/10/31
 */
public interface UserDao {
    /**
     * 构造注入新增user
     * @param user
     * @return
     */
    public int addNewUser(User user);

}
dao层实现
/**
 * @Author Tuerlechat,
 * @Date 2022/10/31
 */
public class UserDaoImpl implements UserDao {

    @Override
    public int addNewUser(User user) {
        System.out.println("新增用户addNewUser。");
        return 0;
    }

}
service层接口
/**
 * @Author Tuerlechat,
 * @Date 2022/10/31
 */
public interface UserService {
    public int addNewUser(User user);

}
service层实现
/**
 * @Author Tuerlechat,
 * @Date 2022/10/31
 */
@AllArgsConstructor    //有参构造
@NoArgsConstructor     //无参构造
@Setter
public class UserServiceImpl implements UserService {

    private UserDao userDao;    //构造注入

    @Override
    public int addNewUser(User user) {
        return userDao.addNewUser(user);
    }

}
配置文件spring.xml
<!-- 构造注入 -->
<bean id="userDao" class="com.r.dao.impl.UserDaoImpl"/>
<bean id="userService"
      class="com.r.service.impl.UserServiceImpl">
    <!-- 将userDao构造注入到userService中 -->
    <constructor-arg>
        <ref bean="userDao"/>
    </constructor-arg>
</bean>
测试类
/**
 * 测试类
 * @Author Tuerlechat,
 * @Date 2022/10/31
 */
public class UserDaoTest {

    @Test
    public void addNewUser() {
        ApplicationContext ac = new ClassPathXmlApplicationContext("spring.xml");
        UserService us =  (UserService)ac.getBean("userService");
        us.addNewUser(new User());
    }

}
p命名空间注入属性值
示例
打印:
张嘎说:“三天不打小鬼子,手都痒痒!”
Rod说:“世界上有10种人,认识二进制的和不认识二进制的。”
dao层接口
/**
 * @Author Tuerlechat,
 * @Date 2022/10/31
 */
public interface PersonSayDao {
    /**
     * p命名空间注入
     * @param
     * @return
     */
    public int userSay();
}
dao层实现
import lombok.Setter;

/**
 * @Author Tuerlechat,
 * @Date 2022/10/31
 */
@Setter
public class PersonSayDaoImpl implements PersonSayDao {
    private String zg;
    private String rod;
    private String say1;
    private String say2;

    @Override
    public int userSay() {
        System.out.println(zg+"说:"+say1);
        System.out.println(rod+"说:"+say2);
        return 0;
    }
}
配置文件spring.xml
头部引入命名空间
xmlns:p="http://www.springframework.org/schema/p"
引入之后
<?xml version="1.0" encoding="UTF-8"?>
<beans xmlns="http://www.springframework.org/schema/beans"
       xmlns:xsi="http://www.w3.org/2001/XMLSchema-instance"
       xmlns:p="http://www.springframework.org/schema/p"
       xsi:schemaLocation="http://www.springframework.org/schema/beans
       http://www.springframework.org/schema/beans/spring-beans.xsd">

<!-- p命名空间注入 -->
<bean id="personSayDao"
      p:zg="张嘎"
      p:rod="Rod"
      p:say1="“三天不打小鬼子,手都痒痒!”"
      p:say2="“世界上有10种人,认识二进制的和不认识二进制的。”"
      class="com.r.dao.impl.PersonSayDaoImpl"/>
测试类
/**
 * @Author Tuerlechat,
 * @Date 2022/10/31
 */
public class PersonSayDaoTest {

    @Test
    public void userSay() {
        ApplicationContext ac = new ClassPathXmlApplicationContext("spring.xml");
        PersonSayDao psd =  (PersonSayDao)ac.getBean("personSayDao");
        psd.userSay();
    }
}
注入各种类型
示例
注入特殊字符、数组、集合。。。等各种类型
用于测试各种类型的实体类
/**
 * 注入各类型测试实体类
 */
public class TestEntity {
	private String specialCharacter1; // 特殊字符值1
	private String specialCharacter2; // 特殊字符值2
	private User innerBean; // JavaBean类型
	private List<String> list; // List类型
	private String[] array; // 数组类型
	private Set<String> set; // Set类型
	private Map<String, String> map; // Map类型
	private Properties props; // Properties类型
	private String emptyValue; // 注入空字符串值
	private String nullValue = "init value"; // 注入null值

	public void setSpecialCharacter1(String specialCharacter1) {
		this.specialCharacter1 = specialCharacter1;
	}

	public void setSpecialCharacter2(String specialCharacter2) {
		this.specialCharacter2 = specialCharacter2;
	}

	public void setInnerBean(User user) {
		this.innerBean = user;
	}

	public void setList(List<String> list) {
		this.list = list;
	}

	public void setArray(String[] array) {
		this.array = array;
	}

	public void setSet(Set<String> set) {
		this.set = set;
	}

	public void setMap(Map<String, String> map) {
		this.map = map;
	}

	public void setProps(Properties props) {
		this.props = props;
	}

	public void setEmptyValue(String emptyValue) {
		this.emptyValue = emptyValue;
	}

	public void setNullValue(String nullValue) {
		this.nullValue = nullValue;
	}

	public void showValue() {
		System.out.println("特殊字符1:" + this.specialCharacter1);
		System.out.println("特殊字符2:" + this.specialCharacter2);
		System.out.println("内部Bean:" + this.innerBean.getUserName());
		System.out.println("List属性:" + this.list);
		System.out.println("数组属性[0和1]:" + this.array[0] + this.array[1]);
		System.out.println("Set属性:" + this.set);
		System.out.println("Map属性:" + this.map);
		System.out.println("Properties属性:" + this.props);
		System.out.println("注入空字符串:[" + this.emptyValue + "]");
		System.out.println("注入null值:" + this.nullValue);
	}
}
配置文件spring.xml
<!-- 注入各类型测试 -->
<bean id="testEntity" class="com.r.test.TestEntity">
<!-- 注入特殊符号 -->
<property name="specialCharacter1">
<value><![CDATA[P&G]]></value>
</property>
<property name="specialCharacter2">
<value>P&G</value>
</property>
<!-- 注入JavaBean -->
<property name="innerBean">
<!-- 写入要注入的实体类 -->
<bean class="com.r.pojo.User">
<property name="userName" value="Hank"/>
</bean>
</property>
<!-- 注入List集合 -->
<property name="list">
<list>
<value>Leo</value>
<value>Lily</value>
<value>Louis</value>
</list>
</property>
<!-- 注入数组(这里也要写list标签) -->
<property name="array">
<list>
<value>唱</value>
<value>跳</value>
<value>Rap</value>
</list>
</property>
<!-- 注入set集合 -->
<property name="set">
<set>
<value>kuma</value>
<value>呆古米</value>
</set>
</property>
<!-- 注入map集合 -->
<property name="map">
<map>
<entry>
<key>
<value>普通犬</value>
</key>
<value>呆古米</value>
</entry>
<entry>
<key>
<value>海胆</value>
</key>
<value>kuma</value>
</entry>
</map>
</property>
<!-- 注入properties文件 -->
<property name="props">
<props>
<prop key="url">我是数据库url</prop>
<prop key="driver">我是数据库驱动</prop>
<prop key="userName">Tuerlechat,</prop>
</props>
</property>
<!-- 注入空字符串 -->
<property name="emptyValue">
<value></value>
</property>
<!-- 注入null值 -->
<property name="nullValue">
<null></null>
</property>
</bean>
测试类
/**
 * @Author Tuerlechat,
 * @Date 2022/10/31
 */
public class TestEntityTest {

    @Test
    public void testEntity() {
        ApplicationContext ac = new ClassPathXmlApplicationContext("spring.xml");
        TestEntity te = (TestEntity)ac.getBean("testEntity");
        te.showValue();
    }
}
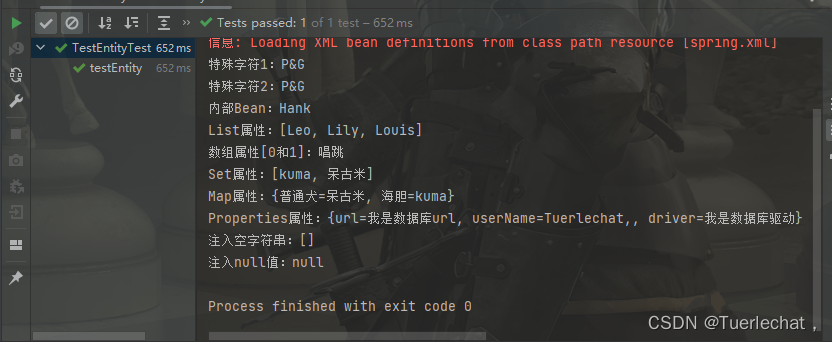
结果:
利用注解使用IOC
Spring IOC常用注解
@Component:实现Bean组件的定义(创建bean实例)(方便一些项目中的其它业务类使用,比如AOP)
@Repository([实例化名称]):用于标注DAO类
@Service([实例化名称]):用于标注业务类
@Controller:用于标注控制器类
@Autowired+@Qualifier("userDao")等价于@Resource(name = "userDao")
注解含义
比如:
package com.xxx.service.impl;

@Service
public class UserServiceImpl implements UserService {}
当注解没有被特别设置名字时,相当于我们在spring.xml创建了
<!-- 注意:这里的id是小写的类名哦 -->
<bean id="userServiceImpl" class="com.xxx.service.UserServiceImpl"/>
当被特别设置名字时
package com.xxx.service.impl;

@Service("hank")	//在这里设置个名字为hank
public class UserServiceImpl implements UserService {}
相当于我们在spring.xml创建了
<!-- 注意:这里的id是我们自己设置的名字 -->
<bean id="hank" class="com.xxx.service.UserServiceImpl"/>
tips:@Component、@Repository、@Service、@Controller 本质并无区别,只是为了开发看着比较方便,实际都是创建bean
注解@Autowired、@Qualifier(“xxx”)和@Resource(name = “xxx”)具体区别
- Spring下
- @AutoWired:按数据类型查找
- @Qualifier(“xxx”):按名字查找
- tips:一般这两个混合用效果不错的
- Java下
- @Resource(name = “xxx”)
- 不特别设置名字时,先按名字查找,如果名字找不到,再按照数据类型查找(如果还没有那不就报错了嘛。。。)
- 特别设置名字时,按名字查找
用于深入理解的例子
tips:用IOC、AOP注解前均需记得先设置扫包!!!
一个接口UserDao
/**
 * @Author Tuerlechat,
 * @Date 2022/10/31
 */
public interface UserDao {
    /**
     * 构造注入新增user
     * @param user
     * @return
     */
    public int addNewUser(User user);

}
两个实现
第一个UserDaoImpl
/**
 * @Author Tuerlechat,
 * @Date 2022/10/31
 */
@Repository("aa")	//创建这个bean叫aa
public class UserDaoImpl implements UserDao {

    @Override
    public int addNewUser(User user) {
        user.setUserName("张三");
        System.out.println("新增用户addNewUser == " + user.getUserName());
        return 0;
    }
}
第二个UserDaoImpl1
/**
 * @Author Tuerlechat,
 * @Date 2022/10/31
 */
@Repository("bb")   //创建这个bean叫bb
public class UserDaoImpl1 implements UserDao {

    @Override
    public int addNewUser(User user) {
        user.setUserName("李四");
        System.out.println("新增用户addNewUserbb == " + user.getUserName());
        return 0;
    }
}
业务接口两个方法UserService
/**
 * @Author Tuerlechat,
 * @Date 2022/10/31
 */
public interface UserService {
    public int addNewUser(User user);

    public int addNewUser11(User user);
}
业务实现UserServiceImpl
/**
 * @Author Tuerlechat,
 * @Date 2022/10/31
 */
@Service
public class UserServiceImpl implements UserService {
    @Autowired
    @Qualifier("aa")
    private UserDao aa;    //将bean(aa)注入到bean(UserServiceImpl)中
	//如果同一个接口在特殊情况下需要用两次,那么@AutoWired是无法识别的,所以这个时候就需要和@Qualifier配合使用,当然也可以直接用@Resource
    @Resource(name = "bb")
    private UserDao bb;    //将bean(bb)注入到bean(UserServiceImpl)中

    @Override
    public int addNewUser(User user) {
        return aa.addNewUser(user);
    }

    @Override
    public int addNewUser11(User user) {
        return bb.addNewUser(user);
    }
}
测试类同时调用这两个dao层同一接口的方法(但service层是两个)
/**
 * 测试类
 * @Author Tuerlechat,
 * @Date 2022/10/31
 */
public class UserDaoTest {

    @Test
    public void addNewUser() {
        ApplicationContext ac = new ClassPathXmlApplicationContext("spring.xml");
        UserService us =  (UserService)ac.getBean("userServiceImpl");
        us.addNewUser(new User());
        us.addNewUser11(new User());
    }
}
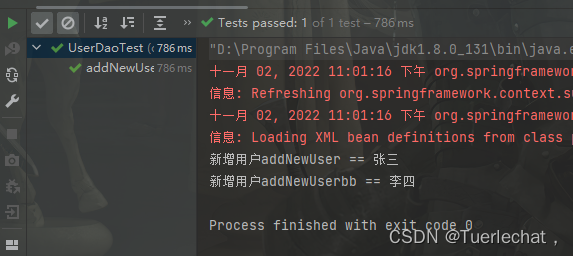
可以看到两个方法都可以成功运行(说明注入都是成功的)
面向切面编程(AOP)
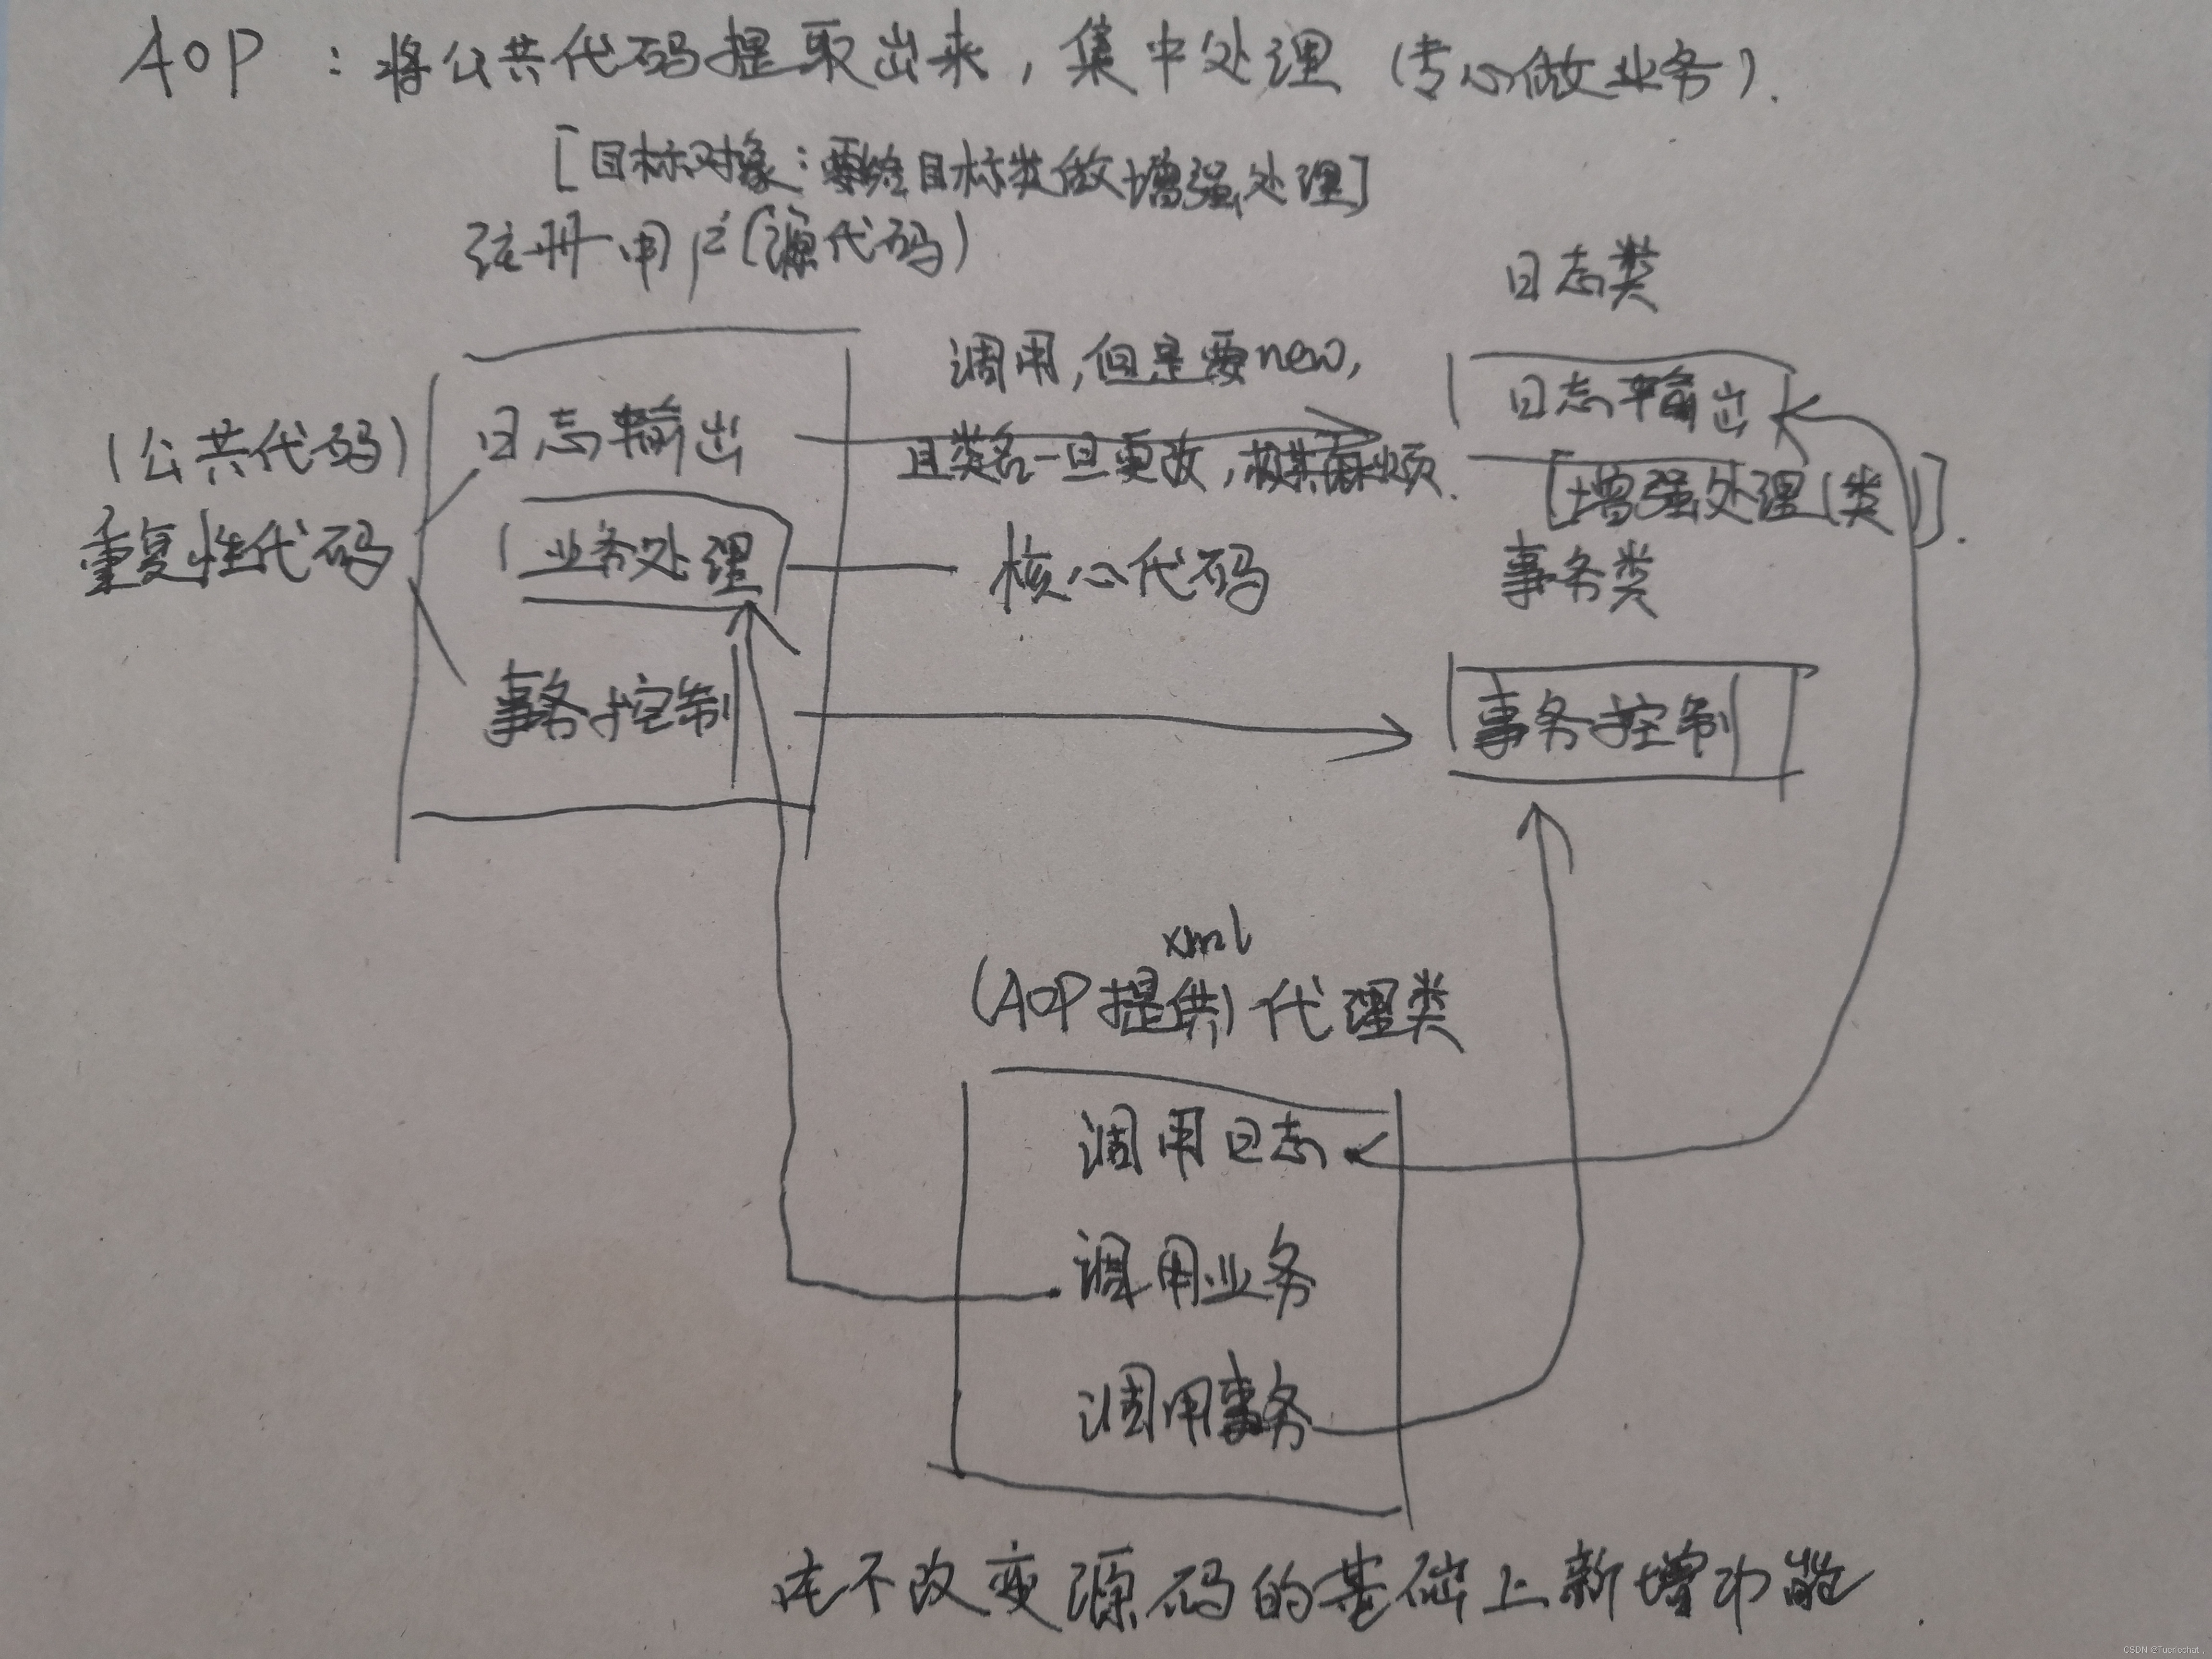
- AOP的目标:让我们可以“专心做事”
- AOP原理
- 将复杂的需求分解出不同方面,将散布在系统中的公共功能集中解决
- 采用代理机制组装起来运行,在不改变原程序的基础上对代码段进行增强处理,增加新的功能
所谓面向切面编程,是一种通过预编译和运行期动态代理的方式实现在不修改源代码的情况下给程序动态添加功能的技术
- AOP相关术语
- 切入点(Pointcut):切哪里(要给哪些方法做增强处理)
- 增强处理(Advice):想怎么个切法(要哪种增强的方法类型)
* 前置增强
* 后置增强
* 环绕增强、异常抛出增强、最终增强等类型- 连接点(Join Point)
- 切面(Aspect): 切面 = 切入点 + 通知,通俗点就是:在什么时机,什么地方,做什么增强!
- 目标对象(Target object):给哪个目标类(方法)做增强处理
- AOP代理(AOP proxy)
- 织入(Weaving):切好了然后将其拼接好(把增强处理类织入到目标对象中,也可以说是把切面加入到对象,并创建出代理对象的过程。(由 Spring 来完成))
图解
五种增强方法
| 目录 | 说明 | 使用 |
|---|---|---|
| 前置增强 | 在一个方法执行之前,执行通知。 | before |
| 后置增强 | 在一个方法执行之后,只有在方法成功完成时,执行通知。(如果方法报错了就不会执行了) | after-returning |
| 最终增强 | 在一个方法执行之后,不考虑其结果,均执行通知。(类似finally,方法无论是否报错都执行) | after |
| 异常增强 | 在一个方法执行之后,只有在方法退出抛出异常时,才能执行通知(报错有异常了就执行了) | after-throwing |
| 环绕增强 | 在一个方法执行的前后,同时执行通知。(看起来很像:前置增强+最终增强???😂) | around |
使用
引用jar包
<!--使用aop需要引入包 ,另外还需引入log4j包-->
<dependency>
  <groupId>org.aspectj</groupId>
  <artifactId>aspectjweaver</artifactId>
  <version>1.9.5</version>
</dependency>
创建目标方法:
/**
 * @Author Tuerlechat,
 * @Date 2022/10/31
 */
@AllArgsConstructor    //有参构造
@NoArgsConstructor     //无参构造
@Setter
public class UserServiceImpl implements UserService {

    private UserDao userDao;    //构造注入

    @Override
    public int addNewUser(User user) {
        return userDao.addNewUser(user);
    }

}
创建增强处理类
/**
 * aop切面增强类
 * @Author Tuerlechat,
 * @Date 2022/10/31
 */
public class UserServiceLogger {
    /**
     * 前置增强方法
     */
    public void beforeLogger() {
        System.out.println("我是前置增强方法,正在打印日志。。。。");
    }

    /**
     * 后置增强方法
     */
    public void afterLogger() {
        System.out.println("我是后置增强方法,正在打印日志。。。。");
    }
}
在spring配置文件中引入xml头部,配置aop
<!-- 放到各自地方 -->
<!-- 命名标签 -->
xmlns:aop="http://www.springframework.org/schema/aop"
<!-- 标签库 -->
http://www.springframework.org/schema/aop
http://www.springframework.org/schema/aop/spring-aop.xsd
放好了是这样
<?xml version="1.0" encoding="UTF-8"?>
<beans xmlns="http://www.springframework.org/schema/beans"
       xmlns:xsi="http://www.w3.org/2001/XMLSchema-instance"
       xmlns:p="http://www.springframework.org/schema/p"
       xmlns:aop="http://www.springframework.org/schema/aop"
       xsi:schemaLocation="http://www.springframework.org/schema/beans
       http://www.springframework.org/schema/beans/spring-beans.xsd
       http://www.springframework.org/schema/aop
       http://www.springframework.org/schema/aop/spring-aop.xsd">

    <!-- 创建目标对象bean -->
    <bean id="userServiceLogger" class="com.r.aop.UserServiceLogger"/>
    <!-- aop切面 -->
    <aop:config>
        <!-- 定义切入点(规则) -->
        <aop:pointcut id="pointcut" expression="execution(* com.r.service..*.*(..))"/>
        <!-- 织入增强处理 -->
        <aop:aspect ref="userServiceLogger">
            <!-- 使用前置增强,将切入点与before方法绑定 -->
            <aop:before method="beforeLogger" pointcut-ref="pointcut"/>
            <aop:after method="afterLogger" pointcut-ref="pointcut"/>
        </aop:aspect>
    </aop:config>
execution表达式匹配规则:
<!--
public * addNewUser(entity.User): “*”表示匹配所有类型的返回值。
public void *(entity.User): “*”表示匹配所有方法名。
public void addNewUser(..): “..”表示匹配所有参数个数和类型。
* com.service.*.*(..):匹配com.service包下所有类的所有方法。
* com.service..*.*(..):匹配com.service包及其子包下所有类的所有方法
-->
然后运行测试类即可
/**
 * 测试类
 * @Author Tuerlechat,
 * @Date 2022/10/31
 */
public class UserDaoTest {

    @Test
    public void addNewUser() {
        ApplicationContext ac = new ClassPathXmlApplicationContext("spring.xml");
        UserService us =  (UserService)ac.getBean("userService");
        us.addNewUser(new User());
    }

}
利用注解使用AOP
注意:使用之前先扫包
配置文件spring.xml
1、头部文件(扫描包的,粘过了就不用粘了)
命名空间:
xmlns:context="http://www.springframework.org/schema/context"
标签库:
http://www.springframework.org/schema/context
       http://www.springframework.org/schema/context/spring-context-3.2.xsd
2、代码
<!-- 扫描包中注解标注的类 -->
<!-- 如果使用aop一定要扫aop所在的包!!! -->
<context:component-scan base-package="com.r.aop" />

<!-- 使用AOP注解,这个一定要有!!! -->
<aop:aspectj-autoproxy/>
然后回到切面注解类
切面注解类UserServiceLogger.java
package com.r.aop;

import org.aspectj.lang.JoinPoint;
import org.aspectj.lang.ProceedingJoinPoint;
import org.aspectj.lang.annotation.*;
import org.springframework.stereotype.Component;

import java.util.Arrays;

/**
 * aop切面增强类
 * @Author Tuerlechat,
 * @Date 2022/10/31
 */
@Aspect //切面注解
@Component  //创建bean实例
public class UserServiceLogger {

    @Pointcut("execution(* com.r.service..*.*(..))")   //定义切入点(规则),切入点的id就是自己定义的这个方法名pointcut
    public void pointcut() {}

    /**
     * 前置增强方法
     */
    @Before("pointcut()")   //设置切入点
    public void beforeLogger(JoinPoint jp) {
        System.out.println("我是前置增强方法,正在打印日志。。。。");
        System.out.println("调用 " + jp.getTarget() + " 的 " + jp.getSignature().
                getName() + " 方法。方法入参:" + Arrays.toString(jp.getArgs()));
    }

    /**
     * 后置增强方法
     */
    @AfterReturning(pointcut = "pointcut()", returning = "result")  //设置切入点和返回值
    public void afterReturning(JoinPoint jp,Object result) {
        System.out.println("我是后置增强方法,正在打印日志。。。。" + result);
        System.out.println("调用 " + jp.getTarget() + " 的 " +  jp.getSignature().
                getName() + " 方法。方法返回值:" + result);
    }

    /**
     * 最终增强
     */
    @After("pointcut()")    //设置切入点
    public void afterLogger() {
        System.out.println("这是最终增强。");
    }

    /**
     * 异常增强
     */
    @AfterThrowing(pointcut = "pointcut()", throwing = "e") //设置切入点和异常
    public void afterThrowing(RuntimeException e) {
        System.out.println("程序发生异常:" + e);
    }

    /**
     * 环绕增强
     */
    @Around("pointcut()")   //设置切入点
    public Object aroundLogger(ProceedingJoinPoint jp) {
        System.out.println("环绕增强开始");
        Object obj = null;  //调用目标方法
        try {
            obj = jp.proceed();
        } catch (Throwable throwable) {
            throwable.printStackTrace();
        }
        System.out.println("环绕增强结束...");
        return obj;
    }
}
然后测试类试一下方法就可以了
可以看到结果:
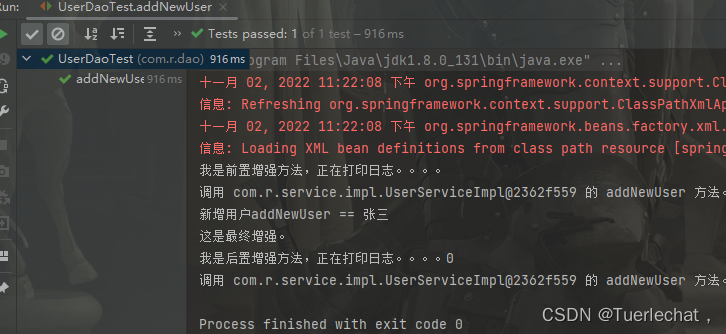
看一下异常增强的:
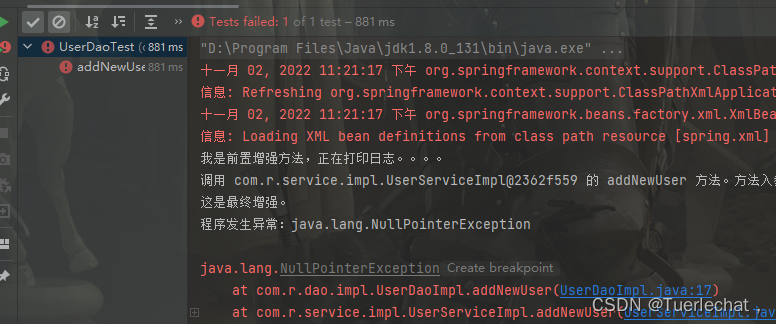
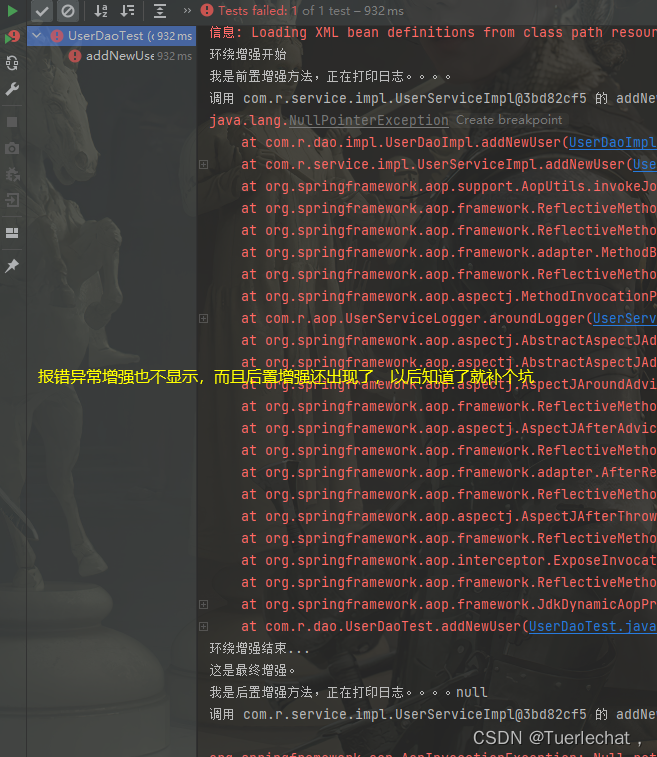
tips:测试的时候不要把围绕增强和其它增强同时用,会乱掉(报错的时候后置增强还会出现。。。),具体原因暂时未知(也可能是控制台抽风😑),在这挖个坑
就像这样:
AOP事务处理
配置文件
定义事务管理器DataSourceTransactionManager并为其注入数据源Bean
<!--定义事务采用JDBC管理事务-->
<bean id="transactionManager" class="org.springframework.jdbc.datasource.DataSourceTransactionManager">
    <property name="dataSource" ref="dataSource" />
</bean>
<tx:advice id="txAdvice">
    <tx:attributes>
        <tx:method name="find*" propagation="SUPPORTS" />
        <tx:method name="add*" propagation="REQUIRED" />
        <tx:method name="del*" propagation="REQUIRED" />
        <tx:method name="update*" propagation="REQUIRED" />
        <tx:method name="*" propagation="REQUIRED" />
    </tx:attributes>
</tx:advice> -->
<!-- 定义切面 -->
<!-- <aop:config>
        <aop:pointcut id="serviceMethod"
            expression="execution(* com.r.service..*.*(..))" />
        <aop:advisor advice-ref="txAdvice" pointcut-ref="serviceMethod" />
</aop:config>
tx:method其他属性
timeout:事务超时时间,允许事务运行的最长时间,以秒为单位。默认值为-1,表示不超时
read-only:事务是否为只读,默认值为false
rollback-for:设定能够触发回滚的异常类型Spring默认只在抛出runtime exception时才标识事务回滚
可以通过全限定类名指定需要回滚事务的异常,多个类名用逗号隔开
no-rollback-for:设定不触发回滚的异常类型
Spring默认checked Exception不会触发事务回滚
可以通过全限定类名指定不需回滚事务的异常,多个类名用英文逗号隔开
propagation事务传播机制
propagation_requierd(默认):如果当前没有事务,就新建一个事务,如果已存在一个事务中,加入到这个事务中,这是最常见的选择。
propagation_supports:支持当前事务,如果没有当前事务,就以非事务方法执行。
propagation_mandatory:使用当前事务,如果没有当前事务,就抛出异常。
propagation_required_new:新建事务,如果当前存在事务,把当前事务挂起。
propagation_not_supported:以非事务方式执行操作,如果当前存在事务,就把当前事务挂起。
propagation_never:以非事务方式执行操作,如果当前事务存在则抛出异常。
propagation_nested:如果当前存在事务,则在嵌套事务内执行。如果当前没有事务,则执行与propagation_required类似的操作
测试例子
按id修改用户密码
配置文件
<!-- 开启事务 -->
<bean id="transactionManager" class="org.springframework.jdbc.datasource.DataSourceTransactionManager">
    <property name="dataSource" ref="dataSource"/>
</bean>

<!-- 配置事务规则 -->
<tx:advice id="txAdvice" transaction-manager="transactionManager">
    <tx:attributes>
        <!-- read-only="true" 只读   只能查询,不然会报错 -->
        <tx:method name="find*" read-only="true" timeout="1000" propagation="SUPPORTS"/>
        <tx:method name="add*" propagation="REQUIRED"/>
        <tx:method name="update*" propagation="REQUIRED"/>
        <!-- 对其他方法  使用默认的事务管理机制 -->
        <tx:method name="*" propagation="REQUIRED"/>
    </tx:attributes>
</tx:advice>

<!-- AOP切面 -->
<aop:config>
    <aop:pointcut id="serviceMethod"  expression="execution(* com.r.service..*.*(..))" />
    <aop:advisor advice-ref="txAdvice" pointcut-ref="serviceMethod" />
</aop:config>
dao层接口UserDao
/**
     * 修改用户密码
     * @param id
     * @param pwd
     * @return
     */
public int updateUser(@Param("id") Integer id,
                      @Param("pwd") String pwd);

}
dao层映射文件UserDao.xml
<update id="updateUser">
    update smbms_user set userPassword = #{pwd} where id = #{id}
</update>
UserService.java
/**
     * 修改用户密码
     * @return
     */
public int updateUser();
Service实现UserServiceImpl.java
@Override
public int updateUser() {
    userDao.updateUser(16,"2222");
    userDao.updateUser(17,null);	//密码不能为空,但改成null让其报错,看数据库是否改变,以此来测试设置的事务是否成功失效
    return 0;
}
测试类
@Test
public void updateUser() {
    //读取配置文件
    ApplicationContext applicationContext =  new ClassPathXmlApplicationContext("spring-mybatis.xml");
    //获取Service实现bean
    UserService userService = (UserService) applicationContext.getBean("userServiceImpl");
    userService.updateUser();
}
运行可以看到控制台显示报错,然后回到数据库会发现两个值都没有改变,就说明事务成功生效了,如果第一个值被正常修改了则说明未生效
使用注解实现AOP事务处理
配置文件只有一行
<!-- 开启事务注解 -->
<tx:annotation-driven/>
也就是相当于
<!-- 开启事务注解 -->
<tx:annotation-driven/>
<!--开启注解下面就可以注释掉了,但是上面的事务还是要开启的(要不然怎么用事务)-->
<!-- <!– 配置事务规则 –>-->
<!-- <tx:advice id="txAdvice" transaction-manager="transactionManager">-->
<!-- <tx:attributes>-->
<!-- <!– read-only="true" 只读 只能查询,不然会报错 –>-->
<!-- <tx:method name="find*" read-only="true" timeout="1000" propagation="SUPPORTS"/>-->
<!-- <tx:method name="add*" propagation="REQUIRED"/>-->
<!-- <tx:method name="update*" propagation="REQUIRED"/>-->
<!-- <!– 对其他方法 使用默认的事务管理机制 –>-->
<!-- <tx:method name="*" propagation="REQUIRED"/>-->
<!-- </tx:attributes>-->
<!-- </tx:advice>-->
<!-- <!– AOP切面 –>-->
<!-- <aop:config>-->
<!-- <aop:pointcut id="serviceMethod" expression="execution(* com.r.service..*.*(..))" />-->
<!-- <aop:advisor advice-ref="txAdvice" pointcut-ref="serviceMethod" />-->
<!-- </aop:config>-->
这些代码都不需要配置了
然后再次实现刚才的例子
dao层不用动
Service接口写个新的吧(方便区分嘛)
/**
     * 修改用户密码(使用注解)
     * @return
     */
public int updateUser1();
UserServiceImpl.java(注解在这里哦,没错就这一个)
@Override
@Transactional(timeout = 1000)    //事务注解,里面可以写配置里面的参数(传播机制...),写到类上代表整个类都开启事务,但一般都是用哪个方法注解哪个即可
public int updateUser1() {
    userDao.updateUser(16,null);
    userDao.updateUser(17,"0211");
    return 0;
}
测试类
@Test
public void updateUser1() {
    //读取配置文件
    ApplicationContext applicationContext =  new ClassPathXmlApplicationContext("spring-mybatis.xml");
    //获取Service实现bean
    UserService userService = (UserService) applicationContext.getBean("userServiceImpl");
    userService.updateUser1();
}
运行结果是一样的,看一看就知道了
Spring应用扩展
使用注解指定Bean的作用域
使用@Scope注解指定Bean的作用域(和maven的差不多)
@Scope("prototype")
@Service("userService")
public class UserServiceImpl implements UserService {
	// 省略其他代码
}
bean的作用域
| 作用域 | 说 明 |
|---|---|
| 单例(Singleton) | 默认值。Spring以单例模式创建Bean的实例,即在整个应用中,容器中该Bean的实例只有一个 |
| 原型(Prototype) | 每次从容器中获取Bean时,都会创建一个新的实例 |
| 请求(Request) | 用于Web应用环境,针对每次HTTP请求都会创建一个实例 |
| 会话(Session) | 用于Web应用环境,同一个会话共享同一个实例,不同的会话使用不同的实例 |
| 全局会话(global session) | 仅在Portlet的Web应用中使用,同一个全局会话共享一个实例。对于非Portlet环境,等同于session |
Spring自动装配
自动装配:Spring可以根据属性类型、名称等自动进行注入
使用
设置<bean>元素的autowire属性
<!-- 配置业务Bean,根据属性名称自动装配 -->
<bean id="userService" class="cn.r.service.user.UserServiceImpl"
      autowire="byName" />
Spring提供的4种自动装配类型
| 取值 | 说明 |
|---|---|
| no | 默认值。Spring 默认不进行自动装配,必须显式指定依赖对象 |
| byName | 根据属性名自动装配。Spring 自动查找与属性名相同的id,如果找到,则自动注入,否则什么都不做 |
| byType | 根据属性的类型自动装配。Spring 自动查找与属性类型相同的Bean,如果刚好找到唯一的那个,则自动注入;如果找到多个与属性类型相同的Bean,则抛出异常;如果没找到,就什么也不做 |
| constructor | 和byType 类似,不过它针对构造方法。如果 Spring 找到一个Bean和构造方法的参数类型相匹配,则通过构造注入该依赖对象;如果找不到,将抛出异常 |
设置全局自动装配(可以但不推荐)
可以为<beans>元素设置default-autowire属性,影响全局
<beans …… default-autowire="byName">	<!--写入装配类型-->
    <!--省略其他代码-->
</beans>
tips:自动装配使得配置文件可以非常简洁,但同时也造成组件之间的依赖关系不明确,容易引发一些潜在的错误,在实际项目中要谨慎使用
拆分策略—拆分配置文件
1、
公用配置+每个系统模块一个单独配置文件(包含DAO、Service、Web控制器)
2、公用配置+DAO Bean配置+业务逻辑Bean配置+Web控制器配置
两种策略各有特色,适用于不同场合
引入拆分后的配置文件
利用ClassPathXmlApplicationContext 的重载方法可以配置多个配置文件,用逗号隔开或者使用通配符(*)
1、用逗号隔开
ApplicationContext ac = new ClassPathXmlApplicationContext("application.xml", "application-dao.xml", "application-service.xml");
2、用String[]数组传入
//定义一个String[]数组
String[] str = {"application.xml", "application-dao.xml", "application-service.xml"};
//传入这个数组
ApplicationContext ac = new ClassPathXmlApplicationContext(str);
3、使用通配符(*)
ApplicationContext ac = new ClassPathXmlApplicationContext("application*.xml");
tips:使用这种方式配置的时候注意命名要有较统一的格式
4、可以在Spring的配置文件中通过<beans>标签下的import来进行导入其他配置文件,来把他们都整合到一起,以此来形成一个完整的Spring配置文件
<?xml version="1.0" encoding="UTF-8"?>
<beans xmlns="http://www.springframework.org/schema/beans"
       xmlns:xsi="http://www.w3.org/2001/XMLSchema-instance"
       xmlns:context="http://www.springframework.org/schema/context"
       xmlns:tx="http://www.springframework.org/schema/tx" xmlns:aop="http://www.springframework.org/schema/aop"
       xsi:schemaLocation="http://www.springframework.org/schema/beans http://www.springframework.org/schema/beans/spring-beans.xsd
                           http://www.springframework.org/schema/context http://www.springframework.org/schema/context/spring-context.xsd
                           http://www.springframework.org/schema/tx http://www.springframework.org/schema/tx/spring-tx.xsd http://www.springframework.org/schema/aop http://www.springframework.org/schema/aop/spring-aop.xsd">


	<!-- 引入所需要的配置文件 -->
    <import resource="classpath:application-dao.xml"/>
    <import resource="classpath:application-service.xml"/>


</beans>
Spring 能帮我们做什么
①.Spring 能帮我们根据配置文件创建及组装对象之间的依赖关系。
②.Spring 面向切面编程能帮助我们无耦合的实现日志记录,性能统计,安全控制。
③.Spring 能非常简单的帮我们管理数据库事务。
④.Spring 还提供了与第三方数据访问框架(如Hibernate、JPA)无缝集成,而且自己也提供了一套JDBC访问模板来方便数据库访问。
⑤.Spring 还提供与第三方Web(如Struts1/2、JSF)框架无缝集成,而且自己也提供了一套Spring MVC框架,来方便web层搭建。
⑥.Spring 能方便的与Java EE(如Java Mail、任务调度)整合,与更多技术整合(比如缓存框架)。






![[附源码]Nodejs计算机毕业设计基于的民宿租赁系统Express(程序+LW)](https://img-blog.csdnimg.cn/63d7a33c988748b5b73e73c5b875c80b.png)


