目录
一、设备树下的 platform 驱动简介
二、修改设备树文件
2.1 添加 LED 设备节点
2.2 添加 pinctrl 节点
2.3 检查 PIN 是否被其他外设使用
三、platform 驱动程序编写
四、测试 APP 编写
五、运行测试
5.1 编译
5.2 运行测试
前面一篇我们讲解了传统的、未采用设备树的 platform 设备和驱动编写方法。最新的 Linux 内核已经支持了设备树,因此在设备树下如何编写 platform驱动就显得尤为重要,本章我们就来学习一下如何在设备树下编写 platform 驱动。
一、设备树下的 platform 驱动简介
platform 驱动框架分为总线、设备和驱动,其中总线不需要我们这些驱动程序员去管理,这个是 Linux 内核提供的,我们在编写驱动的时候只要关注于设备和驱动的具体实现即可。
在没有设备树的 Linux 内核下,我们需要分别编写并注册 platform_device 和 platform_driver,分别代表设备和驱动。
在使用设备树的时候,设备的描述被放到了设备树中,因此 platform_device 就不需要我们去编写了,我们只需要实现 platform_driver 即可。
在编写基于设备树的 platform 驱动的时候我们需要注意一下几点:
-
1、在设备树中创建设备节点
毫无疑问,肯定要先在设备树中创建设备节点来描述设备信息,重点是要设置好 compatible属性的值,因为 platform 总线需要通过设备节点的 compatible 属性值来匹配驱动!这点要切记。
-
2、编写 platform 驱动的时候要注意兼容属性
在使用设备树的时候 platform 驱动会通过 of_match_table 来保存兼容性值,也就是表明此驱动兼容哪些设备。所以, of_match_table 将会尤为重要
-
3、编写 platform 驱动
基于设备树的 platform 驱动和上一章无设备树的 platform 驱动基本一样,都是当驱动和设备匹配成功以后就会执行 probe 函数。我们需要在 probe 函数里面执行字符设备驱动那一套,当注销驱动模块的时候 remove 函数就会执行,都是大同小异的。
二、修改设备树文件
修改设备树文件,加上我们需要的设备信息,本章我们就使用到一个 LED 灯。
2.1 添加 LED 设备节点
在根节点“/”下创建 LED 灯节点,节点名为“gpioled”,节点内容如下:
gpioled {
    #address-cells = <1>;
    #size-cells = <1>;
    compatible = "imx6ull-gpioled";
    pinctrl-name = "default";
    pinctrl-0 = <&pinctrl_led>;
    led-gpio = <&gpio1 3 GPIO_ACTIVE_LOW>;

    status = "okay";
};
2.2 添加 pinctrl 节点
I.MX6U-ALPHA开发板上的 LED 灯使用了 GPIO1_IO03 这个 PIN,打开 imx6ul-14x14-evk.dtsi ,在 iomuxc 节点的 imx6ul-evk 子节点下创建一个名为“pinctrl_led”的子节点,节点内容如下所示:
pinctrl_led: ledgrp {
    fsl,pins = <
        MX6UL_PAD_GPIO1_IO03__GPIO1_IO03 0x10B0 /* LED0 */
    >;
};
2.3 检查 PIN 是否被其他外设使用
三、platform 驱动程序编写
新建名为 dtsplatform_driver.c 的驱动文件,在 dtsplatform_driver.c 中输入如下所示内容:
/***********************************************************
 * Copyright © toto Co., Ltd. 1998-2029. All rights reserved.
 * Description:
 * Version: 1.0
 * Autor: toto
 * Date: Do not edit
 * LastEditors: Seven
 * LastEditTime: Do not edit
***********************************************************/
#include <linux/types.h>
#include <linux/kernel.h>
#include <linux/delay.h>
#include <linux/module.h>
#include <linux/cdev.h>
#include <linux/device.h>
#include <linux/of_gpio.h>
#include <linux/semaphore.h>
#include <linux/irq.h>
#include <linux/fcntl.h>
#include <linux/fs.h>
#include <linux/platform_device.h>
#include <asm/mach/map.h>
#include <asm/uaccess.h>

#define LEDDEV_CNT  1               /* 设备号数量 */
#define LEDDEV_NAME "dts_platform_led"  /* 设备名字 */
#define LED_ON      1
#define LED_OFF     0

/* led_dev 设备结构体 */
struct led_dev {
    dev_t devid;                /* 设备号 */
    struct cdev cdev;           /* cdev */
    struct class *class;        /* 类 */
    struct device *device;      /* 设备 */
    int major;                  /* 主设备号 */
    struct device_node *node;   /* 设备节点 */
    int led_gpio;               /* led gpio号 */
};

struct led_dev leddev; /* led 设备 */

/*
 * @Brief   led 打开、关闭接口
 * @Param   sta:1打开,0关闭
 * @Note    NOne
 * @RetVal  NOne
 */
void led_switch(u8 sta)
{
    if (sta == LED_ON) {
        gpio_set_value(leddev.led_gpio, 0);
    } else if (sta == LED_OFF) {
        gpio_set_value(leddev.led_gpio, 1);
    }
}

/*
 * @Brief   打开设备
 * @Param   inode:传递给驱动的inode
 * @Param   filp:设备文件
 * @Note    NOne
 * @RetVal  NOne
 */
static int led_open(struct inode *inode, struct file *filp)
{
    /* 设置私有数据 */
    filp->private_data = &leddev;

    return 0;
}

/*
 * @Brief   向设备写数据
 * @Param   filp:设备文件
 * @Param   buf:要写入设备的数据
 * @Param   cnt:要写入的数据长度
 * @Param   offt:相对于文件首地址的偏移
 * @Note    NOne
 * @RetVal  写入的字节数,如果为负值,表示写入失败
 */
static ssize_t led_write(struct file *filp, const char __user *buf,
                        size_t cnt, loff_t *offt)
{
    int ret;
    unsigned char databuf[1];
    unsigned char ledstat;

    ret = copy_from_user(databuf, buf, cnt);
    if (ret < 0) {
        return -EFAULT;
    }

    ledstat = databuf[0];
    led_switch(ledstat);

    return 0;
}

/* 设备操作函数 */
static struct file_operations led_fops = {
    .owner = THIS_MODULE,
    .open  = led_open,
    .write = led_write,
};

/*
 * @Brief
 * @Param   None
 * @Note    NOne
 * @RetVal  NOne
 */
static int led_probe(struct platform_device *dev)
{
    printk(KERN_INFO "led driver and device has matched\n");

    /* 注册字符设备驱动 */
    /* 1.创建设备号 */
    if (leddev.major) {
        leddev.devid = MKDEV(leddev.major, 0);
        register_chrdev_region(leddev.devid, LEDDEV_CNT, LEDDEV_NAME);
    } else {
        alloc_chrdev_region(&leddev.devid, 0, LEDDEV_CNT, LEDDEV_NAME);
        leddev.major = MAJOR(leddev.devid);
    }

    /* 2.注册设备 */
    cdev_init(&leddev.cdev, &led_fops);
    cdev_add(&leddev.cdev, leddev.devid, LEDDEV_CNT);

    /* 3.创建类 */
    leddev.class = class_create(THIS_MODULE, LEDDEV_NAME);
    if (IS_ERR(leddev.class)) {
        return PTR_ERR(leddev.class);
    }

    /* 4.创建设备 */
    leddev.device = device_create(leddev.class, NULL, leddev.devid,
                                    NULL, LEDDEV_NAME);
    if (IS_ERR(leddev.device)) {
        return PTR_ERR(leddev.device);
    }

    /* 5.初始化IO */
    leddev.node = of_find_node_by_path("/gpioled");
    if (leddev.node == NULL) {
        printk("gpioled node not found\n");
        return -EINVAL;
    }

    leddev.led_gpio = of_get_named_gpio(leddev.node, "led-gpio", 0);
    if (leddev.led_gpio < 0) {
        printk("can't get led-gpio\n");
        return -EINVAL;
    }

    gpio_request(leddev.led_gpio, "my_led");
    /* 设置输出模式,默认高电平 */
    gpio_direction_output(leddev.led_gpio, 1);

    return 0;
}

/*
 * @Brief   移除 platform 驱动函数
 * @Param   dev:platform设备
 * @Note    NOne
 * @RetVal  NOne
 */
static int led_remove(struct platform_device *dev)
{
    gpio_set_value(leddev.led_gpio, 1);

    cdev_del(&leddev.cdev);
    unregister_chrdev_region(leddev.devid, LEDDEV_CNT);
    device_destroy(leddev.class, leddev.devid);
    class_destroy(leddev.class);

    return 0;
}

/* 匹配列表 */
static const struct of_device_id led_of_match[] = {
    { .compatible = "imx6ull-gpioled"},
    { /* sentinel */}
};

/* platform 驱动结构体 */
static struct platform_driver led_driver = {
    .driver = {
        .name = "imx6ull-led",          /* 驱动名字,用于和设备匹配 */
        .of_match_table = led_of_match, /* 设备树匹配表 */
    },
    .probe = led_probe,
    .remove = led_remove,
};

/*
 * @Brief   驱动模块加载函数
 * @Param   None
 * @Note    NOne
 * @RetVal  NOne
 */
static int __init leddriver_init(void)
{
    return platform_driver_register(&led_driver);
}

/*
 * @Brief   驱动模块卸载函数
 * @Param   None
 * @Note    NOne
 * @RetVal  NOne
 */
static void __exit leddriver_exit(void)
{
    platform_driver_unregister(&led_driver);
}

module_init(leddriver_init);
module_exit(leddriver_exit);

MODULE_LICENSE("GPL");
MODULE_AUTHOR("toto");
-
第 33~112 行,传统的字符设备驱动,没什么要说的。
-
第 120~164 行, platform 驱动的 probe 函数,当设备树中的设备节点与驱动之间匹配成功以后此函数就会执行,原来在驱动加载函数里面做的工作现在全部放到 probe 函数里面完成。
-
第 171~180 行, remobe 函数,当卸载 platform 驱动的时候此函数就会执行。在此函数里面释放内存、注销字符设备等,也就是将原来驱动卸载函数里面的工作全部都放到 remove 函数中完成。
-
第 183~186 行,匹配表,描述了此驱动都和什么样的设备匹配,
-
第 184 行添加了一条值为"atkalpha-gpioled"的 compatible 属性值,当设备树中某个设备节点的 compatible 属性值也为“atkalpha-gpioled”的时候就会与此驱动匹配。
-
第 189~196 行,platform_driver 驱动结构体, 191 行设置这个 platform 驱动的名字为“imx6ulled”,因此,当驱动加载成功以后就会在/sys/bus/platform/drivers/目录下存在一个名为“imx6uled”的文件。
-
第 192 行设置 of_match_table 为上面的 led_of_match。
-
第 203~206 行,驱动模块加载函数,在此函数里面通过 platform_driver_register 向 Linux 内核注册 led_driver 驱动。
-
第 213~216 行,驱动模块卸载函数,在此函数里面通过 platform_driver_unregister 从 Linux内核卸载 led_driver 驱动。
四、测试 APP 编写
新建名为 dtsplatform_app.c 的测试程序文件,在 dtsplatform_app.c 中输入如下所示内容:
/***********************************************************
 * Copyright © toto Co., Ltd. 1998-2029. All rights reserved.
 * Description:
 * Version: 1.0
 * Autor: toto
 * Date: Do not edit
 * LastEditors: Seven
 * LastEditTime: Do not edit
***********************************************************/
#include "stdio.h"
#include "unistd.h"
#include "sys/types.h"
#include "sys/stat.h"
#include "fcntl.h"
#include "stdlib.h"
#include "string.h"

#define LEDON   1
#define LEDOFF  0

/*
 * @Brief
 * @Param   None
 * @Note    NOne
 * @RetVal  NOne
 */
int main(int argc, char *argv[])
{
    int fd, retval;
    char *filename;
    unsigned char databuf[1];

    if (argc != 3) {
        printf("Error argc par cnt\n");
        return -1;
    }

    filename = argv[1];

    fd = open(filename, O_RDWR);
    if (fd < 0) {
        printf("file %s open failed\n", filename);
        return -1;
    }

    databuf[0] = atoi(argv[2]);
    retval = write(fd, databuf, sizeof(databuf));
    if (retval < 0) {
        printf("led control failed\n");
        close(fd);
        return -1;
    }

    close(fd);

    return 0;
}
五、运行测试
5.1 编译
1.编译驱动程序 编写 Makefile 文件,Makefile 内容如下所示:
KERNELDIR := /home/toto/workspace/linux/linux-5.19
CURRENT_PATH := $(shell pwd)
obj-m := dtsplatform_driver.o

build: kernel_modules

kernel_modules:
    $(MAKE) -C $(KERNELDIR) M=$(CURRENT_PATH) modules
clean:
    $(MAKE) -C $(KERNELDIR) M=$(CURRENT_PATH) clean
编译命令:
make -j8
编译成功以后就会生成一个名为“dtsplatform_driver.ko”的驱动模块文件。
2.编译测试app 编译命令:
arm-linux-gnueabihf-gcc dtsplatform_app.c -o dtsplatform_app
编译成功以后就会生成 platform_app 这个应用程序。
5.2 运行测试
开发板上电,将 dtsplatform_driver.ko 和 dtsplatform_app 这两个文件拷贝到 /lib/modules/5.19.0-g794a2f7be62d-dirty/ 目录中,输入如下命令加载 dtsplatform_driver.ko 这个驱动模块:
insmod dtsplatform_driver.ko
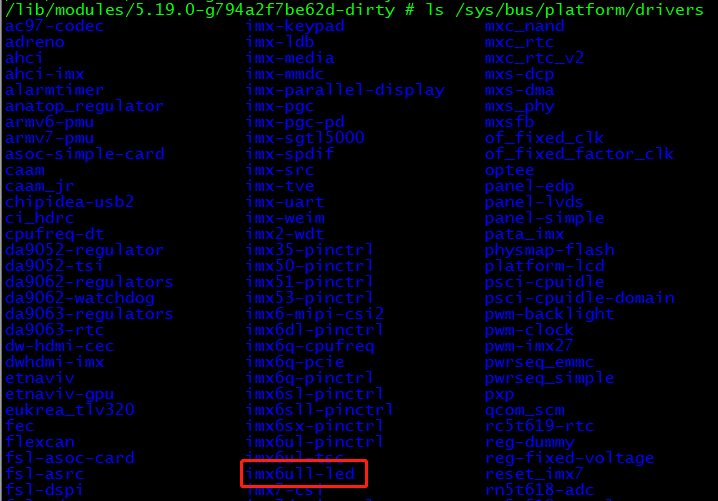
驱动模块加载完成以后到 /sys/bus/platform/drivers/目录下查看驱动是否存在,我们在dtsplatform_driver.c 中设置 led_driver (platform_driver 类型)的 name 字段为“imx6ull-led”,因此会在/sys/bus/platform/drivers/目录下存在名为“imx6ull-led”这个文件,结果如下图所示:
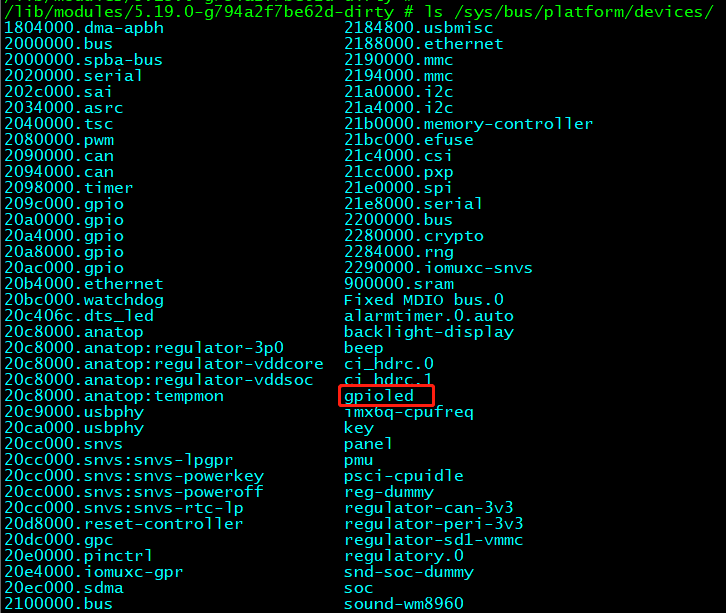
同理,在/sys/bus/platform/devices/目录下也存在 led 的设备文件,也就是设备树中 gpioled 这个节点,结果如下所示:
驱动模块和设备模块加载成功以后 platform 总线就会进行匹配,当驱动和设备匹配成功以后就会输出如下所示一行语句:
/lib/modules/5.19.0-g794a2f7be62d-dirty # insmod dtsplatform_driver.ko
[   45.657342] led driver and device has matched
驱动和设备匹配成功以后就可以测试 LED 灯驱动了,输入如下命令打开 LED 灯:
./dtsplatform_app /dev/dts_platform_app 1
在输入如下命令关闭 LED 灯:
./dtsplatform_app /dev/dts_platform_led 0
卸载驱动命令如下:
rmmod dtsplatform_driver.ko
关于更多嵌入式C语言、FreeRTOS、RT-Thread、Linux应用编程、linux驱动等相关知识,关注公众号【嵌入式Linux知识共享】,后续精彩内容及时收看了解。


