一。问题引入
使用sentinle-dashboard控制台 项目整体升级后,发现控制台上无法看到流控规则了
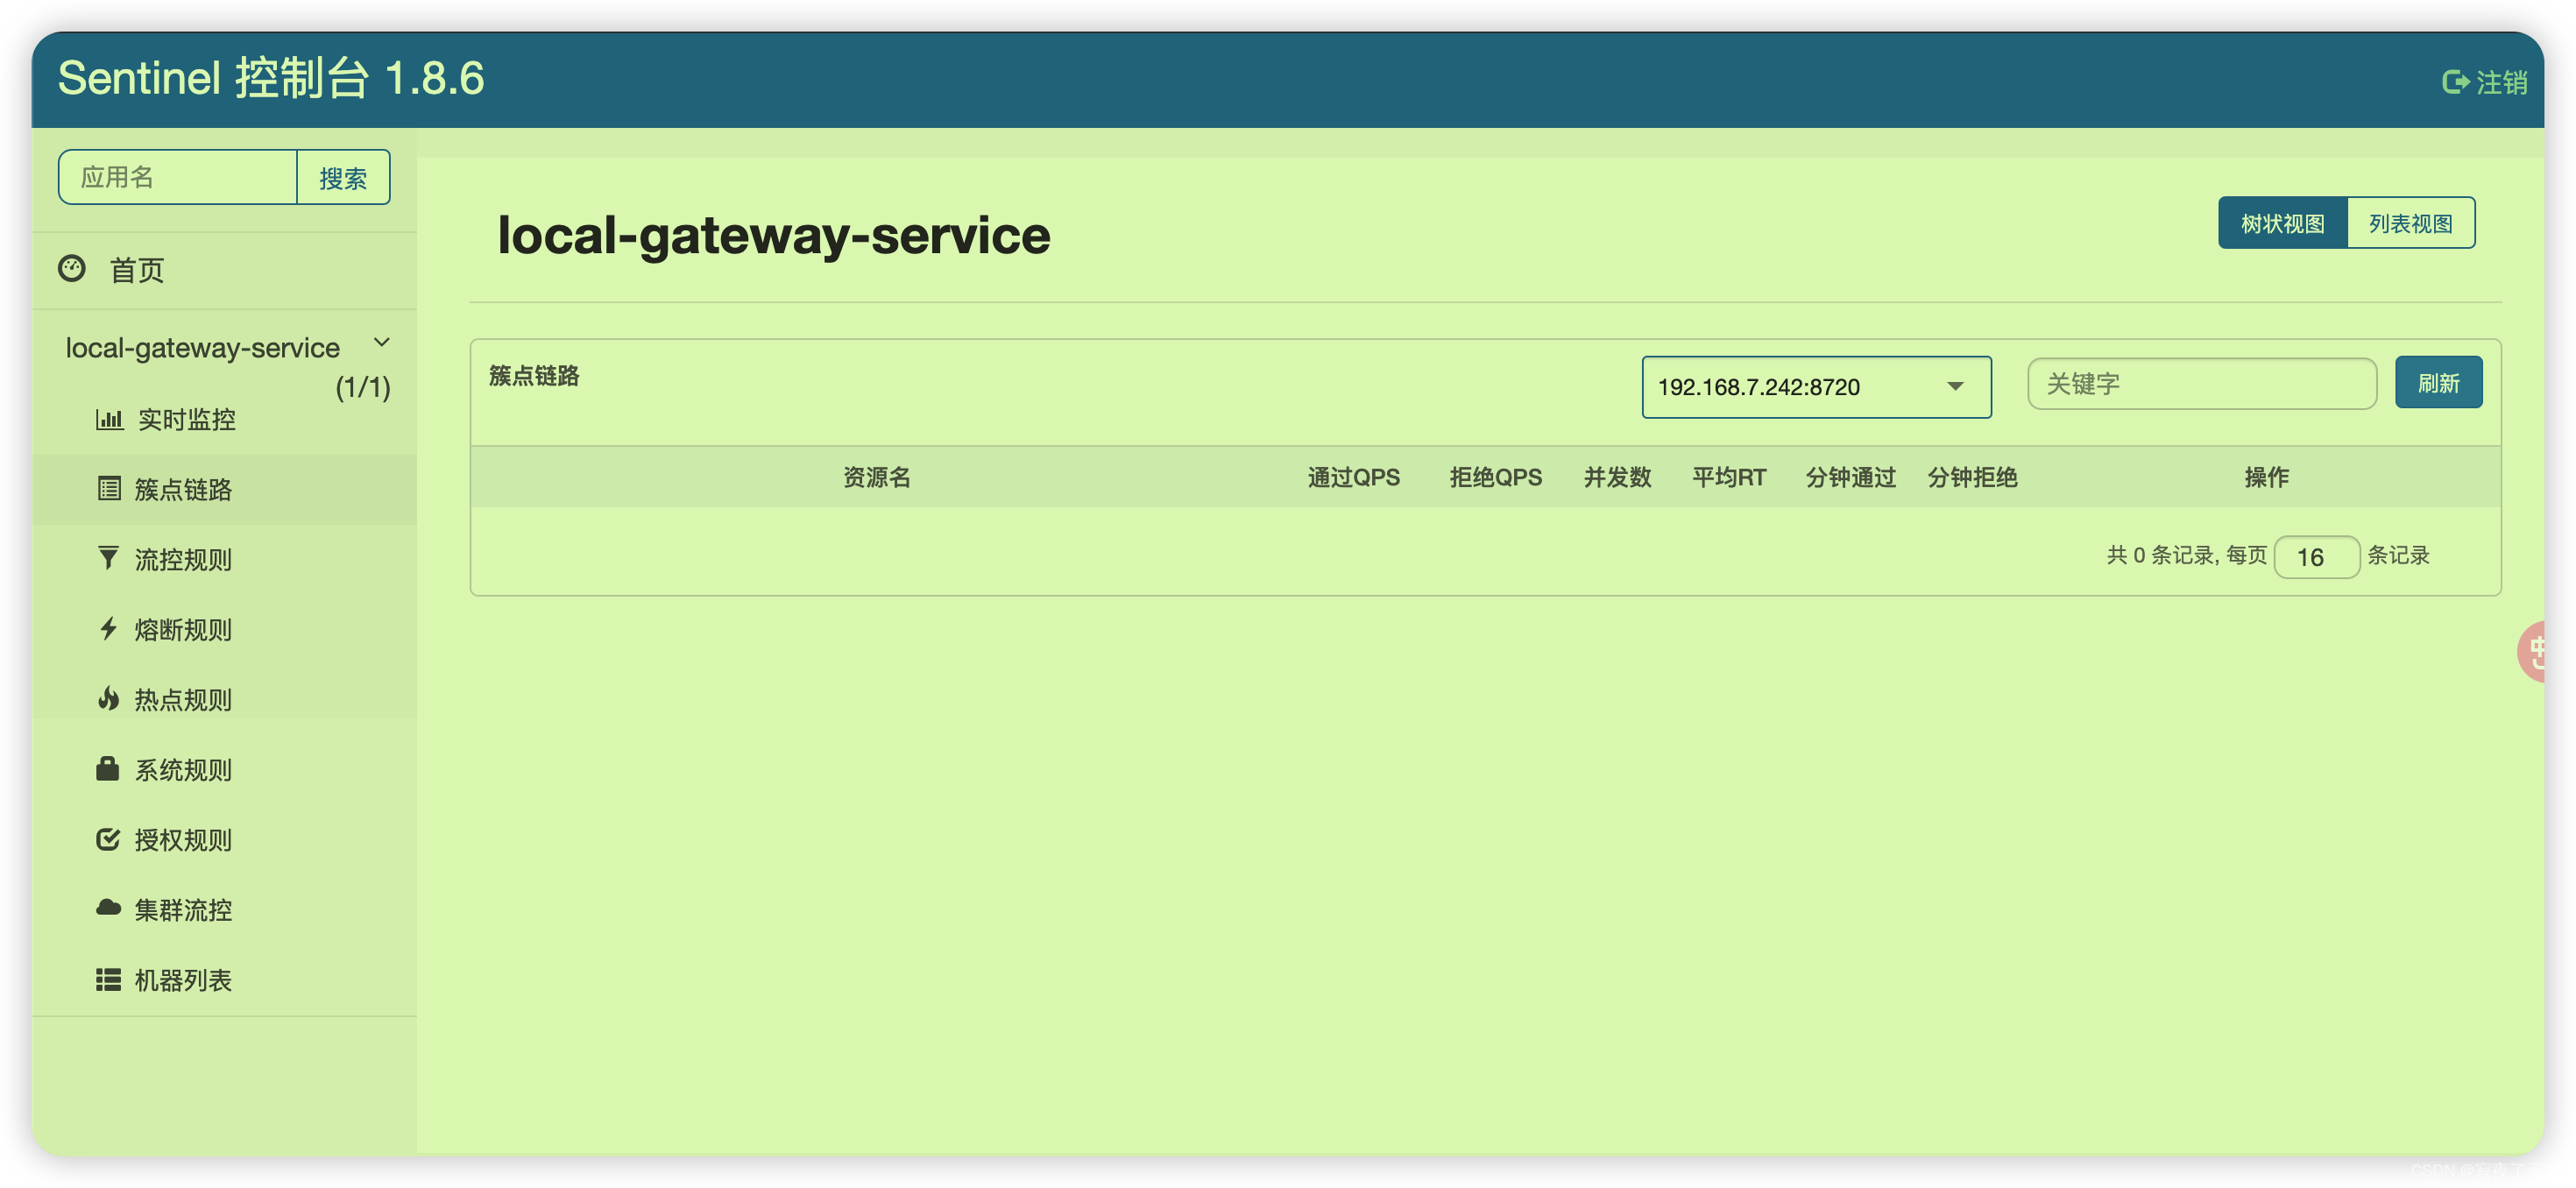
之前的问题是无法注册上来 现在是注册上来了。结果看不到流控规则配置了。 关于注册不上来的问题,可以看另一篇文章
https://blog.csdn.net/a15835774652/article/details/132234943
项目的组件版本如下
spring cloud 2021.0.5
spring cloud alibaba 2021.0.5.0
spring boot 2.6.13
二。问题分析
- 配置检查 无误
- 控制台服务应用 检查 确认已经启动
- 网络连接检查无误
- 源码分析
首先我们打开检查- 网络 看下调用的接口
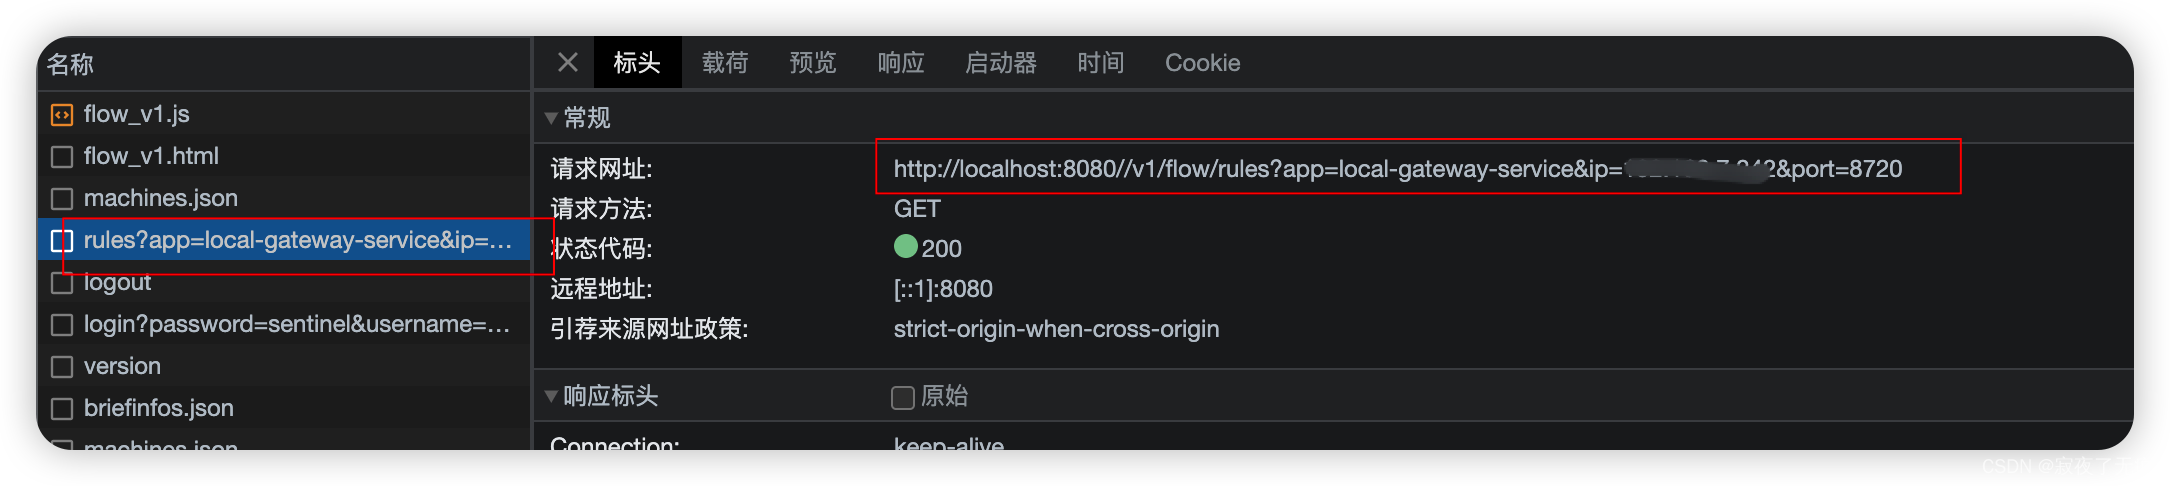
可以看到 接口地址为 http://localhost:8080//v1/flow/rules?app=local-gateway-service&ip=xxx&port=8720
然后打开源码 注意分支为release-1.8
业务代码 主要在 sentinel-dashboard module 中 控制类在 FlowControllerV1 中
com.alibaba.csp.sentinel.dashboard.controller.FlowControllerV1#apiQueryMachineRules
@GetMapping("/rules")
@AuthAction(PrivilegeType.READ_RULE)
public Result<List<FlowRuleEntity>> apiQueryMachineRules(@RequestParam String app,
                                                         @RequestParam String ip,
                                                         @RequestParam Integer port) {
    if (StringUtil.isEmpty(app)) {
      return Result.ofFail(-1, "app can't be null or empty");
    }
    if (StringUtil.isEmpty(ip)) {
      return Result.ofFail(-1, "ip can't be null or empty");
    }
    if (port == null) {
      return Result.ofFail(-1, "port can't be null");
    }
    if (!appManagement.isValidMachineOfApp(app, ip)) {
      return Result.ofFail(-1, "given ip does not belong to given app");
    }
    try {
      List<FlowRuleEntity> rules = sentinelApiClient.fetchFlowRuleOfMachine(app, ip, port);
      rules = repository.saveAll(rules);
      return Result.ofSuccess(rules);
    } catch (Throwable throwable) {
      logger.error("Error when querying flow rules", throwable);
      return Result.ofThrowable(-1, throwable);
    }
}
重点来看下 sentinelApiClient.fetchFlowRuleOfMachine的调用
com.alibaba.csp.sentinel.dashboard.client.SentinelApiClient#fetchFlowRuleOfMachine
public List<FlowRuleEntity> fetchFlowRuleOfMachine(String app, String ip, int port) {
    List<FlowRule> rules = fetchRules(ip, port, FLOW_RULE_TYPE, FlowRule.class);
    if (rules != null) {
      return rules.stream().map(rule -> FlowRuleEntity.fromFlowRule(app, ip, port, rule))
        .collect(Collectors.toList());
    } else {
      return null;
    }
}
接着调用 fetchRules 方法
com.alibaba.csp.sentinel.dashboard.client.SentinelApiClient#fetchRules
private <T extends Rule> List<T> fetchRules(String ip, int port, String type, Class<T> ruleType) {
  	return fetchItems(ip, port, GET_RULES_PATH, type, ruleType);
}
com.alibaba.csp.sentinel.dashboard.client.SentinelApiClient#fetchItems
private <T> List<T> fetchItems(String ip, int port, String api, String type, Class<T> ruleType) {
    try {
      AssertUtil.notEmpty(ip, "Bad machine IP");
      AssertUtil.isTrue(port > 0, "Bad machine port");
      Map<String, String> params = null;
      if (StringUtil.isNotEmpty(type)) {
        params = new HashMap<>(1);
        params.put("type", type);
      }
      return fetchItemsAsync(ip, port, api, type, ruleType).get();
    } catch (InterruptedException | ExecutionException e) {
      logger.error("Error when fetching items from api: {} -> {}", api, type, e);
      return null;
    } catch (Exception e) {
      logger.error("Error when fetching items: {} -> {}", api, type, e);
      return null;
    }
}
private <T> CompletableFuture<List<T>> fetchItemsAsync(String ip, int port, String api,
                                                       String type, Class<T> ruleType) {
  AssertUtil.notEmpty(ip, "Bad machine IP");
  AssertUtil.isTrue(port > 0, "Bad machine port");
  Map<String, String> params = null;
  if (StringUtil.isNotEmpty(type)) {
    params = new HashMap<>(1);
    params.put("type", type);
  }
  return executeCommand(ip, port, api, params, false)
    .thenApply(json -> JSON.parseArray(json, ruleType));
}
看到这里基本明白这个逻辑了 本质上就是发起http请求 同时指定api 以及type参数 这里的api名称是getRules type为 flow
请求的地址 为localhost: 8719
接下来我们来看到客户端对该接口的处理
Client命令的处理主要在CommandCenterInitFunc 中
public class CommandCenterInitFunc implements InitFunc {

    @Override
    public void init() throws Exception {
      CommandCenter commandCenter = CommandCenterProvider.getCommandCenter();

      if (commandCenter == null) {
        RecordLog.warn("[CommandCenterInitFunc] Cannot resolve CommandCenter");
        return;
      }

      commandCenter.beforeStart();
      commandCenter.start();
      RecordLog.info("[CommandCenterInit] Starting command center: "
                     + commandCenter.getClass().getCanonicalName());
    }
}
重点关注start方法 来看实现类 com.alibaba.csp.sentinel.transport.command.SimpleHttpCommandCenter#start
@Override
public void start() throws Exception {
    //cpu核心数
    int nThreads = Runtime.getRuntime().availableProcessors();
    this.bizExecutor = new ThreadPoolExecutor(nThreads, nThreads, 0L, TimeUnit.MILLISECONDS,
                                              new ArrayBlockingQueue<Runnable>(10),
                                 new NamedThreadFactory("sentinel-command-center-service-executor", true),
                                              new RejectedExecutionHandler() {
                                                @Override
                                                public void rejectedExecution(Runnable r,
                                                                              ThreadPoolExecutor executor) {
                                                  CommandCenterLog.info("EventTask rejected");
                                                  throw new RejectedExecutionException();
                                                }
                                              });
		//初始化任务
    Runnable serverInitTask = new Runnable() {
      int port;

      {
        try {
          port = Integer.parseInt(TransportConfig.getPort());
        } catch (Exception e) {
          port = DEFAULT_PORT;
        }
      }

      @Override
      public void run() {
          boolean success = false;
          //获取serverSocket
          ServerSocket serverSocket = getServerSocketFromBasePort(port);

          if (serverSocket != null) {
            CommandCenterLog.info("[CommandCenter] Begin listening at port " + serverSocket.getLocalPort());
            socketReference = serverSocket;
            executor.submit(new ServerThread(serverSocket));
            success = true;
            port = serverSocket.getLocalPort();
          } else {
            CommandCenterLog.info("[CommandCenter] chooses port fail, http command center will not work");
          }

          if (!success) {
            port = PORT_UNINITIALIZED;
          }

          TransportConfig.setRuntimePort(port);
          executor.shutdown();
      }

    };

    new Thread(serverInitTask).start();
}
存在个server初始化任务
任务中主要有几个步骤
1。创建socket连接
2。向executor线程池中提交任务 ServerThread
3。更新port 以及成功标识 success
4。关闭 executor
核心来看ServerThread的run方法
com.alibaba.csp.sentinel.transport.command.SimpleHttpCommandCenter.ServerThread#run
@Override
public void run() {
    while (true) {
      Socket socket = null;
      try {
        socket = this.serverSocket.accept();
        setSocketSoTimeout(socket);
        HttpEventTask eventTask = new HttpEventTask(socket);
        bizExecutor.submit(eventTask);
      } catch (Exception e) {
        CommandCenterLog.info("Server error", e);
        if (socket != null) {
          try {
            socket.close();
          } catch (Exception e1) {
            CommandCenterLog.info("Error when closing an opened socket", e1);
          }
        }
        try {
          // In case of infinite log.
          Thread.sleep(10);
        } catch (InterruptedException e1) {
          // Indicates the task should stop.
          break;
        }
      }
    }
  }
}
run方法中的核心逻辑
1。接收socket连接
2。提交HttpEventTask 任务
再来看HttpEventTask 任务的逻辑
com.alibaba.csp.sentinel.transport.command.http.HttpEventTask#run
@Override
public void run() {
    if (socket == null) {
      return;
    }

    PrintWriter printWriter = null;
    InputStream inputStream = null;
    try {
      long start = System.currentTimeMillis();
      inputStream = new BufferedInputStream(socket.getInputStream());
      OutputStream outputStream = socket.getOutputStream();

      printWriter = new PrintWriter(
        new OutputStreamWriter(outputStream, Charset.forName(SentinelConfig.charset())));

      String firstLine = readLine(inputStream);
      CommandCenterLog.info("[SimpleHttpCommandCenter] Socket income: " + firstLine
                            + ", addr: " + socket.getInetAddress());
      CommandRequest request = processQueryString(firstLine);

      if (firstLine.length() > 4 && StringUtil.equalsIgnoreCase("POST", firstLine.substring(0, 4))) {
        // Deal with post method
        processPostRequest(inputStream, request);
      }

      // Validate the target command.
      String commandName = HttpCommandUtils.getTarget(request);
      if (StringUtil.isBlank(commandName)) {
        writeResponse(printWriter, StatusCode.BAD_REQUEST, INVALID_COMMAND_MESSAGE);
        return;
      }

      // Find the matching command handler.
      CommandHandler<?> commandHandler = SimpleHttpCommandCenter.getHandler(commandName);
      if (commandHandler != null) {
        CommandResponse<?> response = commandHandler.handle(request);
        handleResponse(response, printWriter);
      } else {
        // No matching command handler.
        writeResponse(printWriter, StatusCode.BAD_REQUEST, "Unknown command `" + commandName + '`');
      }

      long cost = System.currentTimeMillis() - start;
      CommandCenterLog.info("[SimpleHttpCommandCenter] Deal a socket task: " + firstLine
                            + ", address: " + socket.getInetAddress() + ", time cost: " + cost + " ms");
    } catch (RequestException e) {
      writeResponse(printWriter, e.getStatusCode(), e.getMessage());
    } catch (Throwable e) {
      CommandCenterLog.warn("[SimpleHttpCommandCenter] CommandCenter error", e);
      try {
        if (printWriter != null) {
          String errorMessage = SERVER_ERROR_MESSAGE;
          e.printStackTrace();
          if (!writtenHead) {
            writeResponse(printWriter, StatusCode.INTERNAL_SERVER_ERROR, errorMessage);
          } else {
            printWriter.println(errorMessage);
          }
          printWriter.flush();
        }
      } catch (Exception e1) {
        CommandCenterLog.warn("Failed to write error response", e1);
      }
    } finally {
      closeResource(inputStream);
      closeResource(printWriter);
      closeResource(socket);
    }
}
核心处理逻辑
1。读取socket 输入流 解析转化为CommandRequest
2。校验命令commandName
3。获取与命令匹配的处理器 CommandHandler
4。处理器处理该命令并写入响应
我们再来看下具体的命令处理器的匹配逻辑
首先是一个map结构 key是命令名称 值是CommandHandler 具体的命令处理器
private static final Map<String, CommandHandler> handlerMap =
  																										new ConcurrentHashMap<String, CommandHandler>();
因为我们需要排查流控为啥没有显示到控制台,dashboard console上调用请求的是getRules 的api, 所以我们来看下 getRules 对应的处理器
@CommandMapping(name = "getRules", desc = "get all active rules by type, request param: type={ruleType}")
public class FetchActiveRuleCommandHandler implements CommandHandler<String> {

    @Override
    public CommandResponse<String> handle(CommandRequest request) {
      String type = request.getParam("type");
      if ("flow".equalsIgnoreCase(type)) {
        return CommandResponse.ofSuccess(JSON.toJSONString(FlowRuleManager.getRules()));
      } else if ("degrade".equalsIgnoreCase(type)) {
        return CommandResponse.ofSuccess(JSON.toJSONString(DegradeRuleManager.getRules()));
      } else if ("authority".equalsIgnoreCase(type)) {
        return CommandResponse.ofSuccess(JSON.toJSONString(AuthorityRuleManager.getRules()));
      } else if ("system".equalsIgnoreCase(type)) {
        return CommandResponse.ofSuccess(JSON.toJSONString(SystemRuleManager.getRules()));
      } else {
        return CommandResponse.ofFailure(new IllegalArgumentException("invalid type"));
      }
    }
}
dashboard中传入的类型 为flow 所以执行的逻辑如下
CommandResponse.ofSuccess(JSON.toJSONString(FlowRuleManager.getRules()));
由于我们使用的网关限流 使用是用 GatewayRuleManager.loadRules(rules); 进行加载规则 而不是使用的
FlowRuleManager.loadRules(rules); 那使用FlowRuleManager.getRules() 获取到的规则就是空的
所以控制台无法显示我们的规则
备注:sentinel整合gateway 中也存在一个个 获取规则的命令处理器 com.alibaba.csp.sentinel.adapter.gateway.common.command.GetGatewayRuleCommandHandler 类代码如下
@CommandMapping(name = "gateway/getRules", desc = "Fetch all gateway rules")
public class GetGatewayRuleCommandHandler implements CommandHandler<String> {

    @Override
    public CommandResponse<String> handle(CommandRequest request) {
      return CommandResponse.ofSuccess(JSON.toJSONString(GatewayRuleManager.getRules()));
    }
}
所以我们使用这个命令名称即可加载我们网关中的规则
改动方案
- 网关加载流控规则使用FlowRuleManager.loadRules(rules);
- dashboard请求接口 使用gateway/getRules 而不是 getRules
第一个方案无法满足我们的需求,所以我们需要基本源码来改造 sentinel-dashboard 修改请求的API
本来以为到这里结束了,结果后面前端的源码中发现了问题
源码路径
sentinel-dashboard/src/main/webapp/resources/app/scripts/directives/sidebar/sidebar.js
其中有段获取APP列表的方法 ,方法中会进行判断该应用是否是网关
// app
        AppService.getApps().success(
          function (data) {
            if (data.code === 0) {
              console.log(`data: ${data}`);
              let path = $location.path().split('/');
              let initHashApp = path[path.length - 1];
              $scope.apps = data.data;
              $scope.apps = $scope.apps.map(function (item) {
                if (item.app === initHashApp) {
                  item.active = true;
                }
                let healthyCount = 0;
                for (let i in item.machines) {
                  if (item.machines[i].healthy) {
                      healthyCount++;
                  }
                }
                item.healthyCount = healthyCount;
                // 重点在这里  处理appType Handle appType
                item.isGateway = item.appType === 1 || item.appType === 11 || item.appType === 12;
                if (item.shown) {
                  return item;
                }
              });
            }
          }
        );
而这个是否为网关字段在 左边的菜单又会用到
业务代码位置
sentinel-dashboard/src/main/webapp/resources/app/scripts/directives/sidebar/sidebar.html
<li ui-sref-active="active" ng-if="entry.isGateway">
<a ui-sref="dashboard.gatewayFlow({app: entry.app})">
<i class="glyphicon glyphicon-filter"></i> 流控规则</a>
</li>
<li ui-sref-active="active" ng-if="!entry.isGateway">
<a ui-sref="dashboard.flow({app: entry.app})">
<i class="glyphicon glyphicon-filter"></i> 流控规则</a>
</li>
可以看到如果是网关的话 那么就会触发dashboard.gatewayFlow路由页面 最后会跳转到
app/views/gateway/flow.html 其中会触发 flow.js 加载规则列表 方法如下
 this.queryRules = function (app, ip, port) {
    var param = {
      app: app,
      ip: ip,
      port: port
    };

    return $http({
      url: '/gateway/flow/list.json',
      params: param,
      method: 'GET'
    });
  };
最终调用的接口在 GatewayFlowRuleController里
com.alibaba.csp.sentinel.dashboard.controller.gateway.GatewayFlowRuleController
接口详细代码如下
@GetMapping("/list.json")
@AuthAction(AuthService.PrivilegeType.READ_RULE)
public Result<List<GatewayFlowRuleEntity>> queryFlowRules(String app, String ip, Integer port) {

  if (StringUtil.isEmpty(app)) {
      return Result.ofFail(-1, "app can't be null or empty");
  }
  if (StringUtil.isEmpty(ip)) {
      return Result.ofFail(-1, "ip can't be null or empty");
  }
  if (port == null) {
      return Result.ofFail(-1, "port can't be null");
  }

  try {
      List<GatewayFlowRuleEntity> rules = sentinelApiClient.fetchGatewayFlowRules(app, ip, port).get();
      repository.saveAll(rules);
      return Result.ofSuccess(rules);
  } catch (Throwable throwable) {
      logger.error("query gateway flow rules error:", throwable);
      return Result.ofThrowable(-1, throwable);
  }
}

public CompletableFuture<List<GatewayFlowRuleEntity>> fetchGatewayFlowRules(String app, String ip, int port) {
   if (StringUtil.isBlank(ip) || port <= 0) {
       return AsyncUtils.newFailedFuture(new IllegalArgumentException("Invalid parameter"));
   }

   try {
       return executeCommand(ip, port, FETCH_GATEWAY_FLOW_RULE_PATH, false)
               .thenApply(r -> {
                   List<GatewayFlowRule> gatewayFlowRules = JSON.parseArray(r, GatewayFlowRule.class);
                   List<GatewayFlowRuleEntity> entities = gatewayFlowRules.stream().map(rule -> GatewayFlowRuleEntity.fromGatewayFlowRule(app, ip, port, rule)).collect(Collectors.toList());
                   return entities;
               });
   } catch (Exception ex) {
       logger.warn("Error when fetching gateway flow rules", ex);
       return AsyncUtils.newFailedFuture(ex);
   }
}
最终调用发起调用的地址就是 gateway/getRules
到这里就明白两个东西
- 如果应用是网关的话 调用的获取规则列表地址接口是正确的
- 我们这应该使用gateway应该属于网关才对。那目前来看 这个appType 应该不正确,或者是没正确被赋值
那我们接着来看这个 appType 为什么没有有被正确赋值
首先这个 appType是从接口中获取的 接口类为 app/briefinfos.json
接口地址在sentinel-dashboard项目 com.alibaba.csp.sentinel.dashboard.controller.AppController#queryAppInfos
@GetMapping("/briefinfos.json")
public Result<List<AppInfo>> queryAppInfos(HttpServletRequest request) {
    List<AppInfo> list = new ArrayList<>(appManagement.getBriefApps());
    Collections.sort(list, Comparator.comparing(AppInfo::getApp));
    return Result.ofSuccess(list);
}
重点是从appManagement.getBriefApps() 方法获取的 我们在看来下
com.alibaba.csp.sentinel.dashboard.discovery.AppManagement#getBriefApps
@Override
public Set<AppInfo> getBriefApps() {
  	return machineDiscovery.getBriefApps();
}
具体的实现类是在SimpleMachineDiscovery
com.alibaba.csp.sentinel.dashboard.discovery.SimpleMachineDiscovery#getBriefApps
@Override
public Set<AppInfo> getBriefApps() {
    return new HashSet<>(apps.values());
}
apps 是一个成员变量 那这个值又是从哪里赋值的呢 发现只有一个地方在进行赋值
就是添加的机器的方法
com.alibaba.csp.sentinel.dashboard.discovery.SimpleMachineDiscovery#addMachine
@Override
public long addMachine(MachineInfo machineInfo) {
    AssertUtil.notNull(machineInfo, "machineInfo cannot be null");
  	//不存在才进行加入
    AppInfo appInfo = apps.computeIfAbsent(machineInfo.getApp(), o -> new AppInfo(machineInfo.getApp(), machineInfo.getAppType()));
    appInfo.addMachine(machineInfo);
    return 1;
}
在看下具体在哪里被调用
代码如下 com.alibaba.csp.sentinel.dashboard.controller.MachineRegistryController#receiveHeartBeat
@ResponseBody
@RequestMapping("/machine")
public Result<?> receiveHeartBeat(String app,
                                  @RequestParam(value = "app_type", required = false, defaultValue = "0")
                                      Integer appType, Long version, String v, String hostname, String ip,
                                  Integer port) {
    if (StringUtil.isBlank(app) || app.length() > 256) {
        return Result.ofFail(-1, "invalid appName");
    }
    if (StringUtil.isBlank(ip) || ip.length() > 128) {
        return Result.ofFail(-1, "invalid ip: " + ip);
    }
    if (!InetAddressUtils.isIPv4Address(ip) && !InetAddressUtils.isIPv6Address(ip)) {
        return Result.ofFail(-1, "invalid ip: " + ip);
    }
    if (port == null || port < -1) {
        return Result.ofFail(-1, "invalid port");
    }
    if (hostname != null && hostname.length() > 256) {
        return Result.ofFail(-1, "hostname too long");
    }
    if (port == -1) {
        logger.warn("Receive heartbeat from " + ip + " but port not set yet");
        return Result.ofFail(-1, "your port not set yet");
    }
    String sentinelVersion = StringUtil.isBlank(v) ? "unknown" : v;

    version = version == null ? System.currentTimeMillis() : version;
    try {
        MachineInfo machineInfo = new MachineInfo();
        machineInfo.setApp(app);
        machineInfo.setAppType(appType);
        machineInfo.setHostname(hostname);
        machineInfo.setIp(ip);
        machineInfo.setPort(port);
        machineInfo.setHeartbeatVersion(version);
        machineInfo.setLastHeartbeat(System.currentTimeMillis());
        machineInfo.setVersion(sentinelVersion);
        appManagement.addMachine(machineInfo);
        return Result.ofSuccessMsg("success");
    } catch (Exception e) {
        logger.error("Receive heartbeat error", e);
        return Result.ofFail(-1, e.getMessage());
    }
}
那这个接口又是什么时候被调用的呢
在客户端中 维护心跳的类是 HeartbeatSenderInitFunc
其中有个 定时发送心跳的方法
@Override
public void init() {
    HeartbeatSender sender = HeartbeatSenderProvider.getHeartbeatSender();
    if (sender == null) {
      RecordLog.warn("[HeartbeatSenderInitFunc] WARN: No HeartbeatSender loaded");
      return;
    }

    initSchedulerIfNeeded();
    long interval = retrieveInterval(sender);
    setIntervalIfNotExists(interval);
  	//定时发送心跳任务
    scheduleHeartbeatTask(sender, interval);
}

private void scheduleHeartbeatTask(/*@NonNull*/ final HeartbeatSender sender, /*@Valid*/ long interval) {
    pool.scheduleAtFixedRate(new Runnable() {
      @Override
      public void run() {
        try {
          //发送具体的心跳
          sender.sendHeartbeat();
        } catch (Throwable e) {
          RecordLog.warn("[HeartbeatSender] Send heartbeat error", e);
        }
      }
    }, 5000, interval, TimeUnit.MILLISECONDS);
    RecordLog.info("[HeartbeatSenderInit] HeartbeatSender started: "
                   + sender.getClass().getCanonicalName());
}
其中发送心跳的调用是sender.sendHeartbeat();
com.alibaba.csp.sentinel.transport.heartbeat.SimpleHttpHeartbeatSender#sendHeartbeat
@Override
public boolean sendHeartbeat() throws Exception {
    if (TransportConfig.getRuntimePort() <= 0) {
        RecordLog.info("[SimpleHttpHeartbeatSender] Command server port not initialized, won't send heartbeat");
        return false;
    }
    Endpoint addrInfo = getAvailableAddress();
    if (addrInfo == null) {
        return false;
    }

    SimpleHttpRequest request = new SimpleHttpRequest(addrInfo, TransportConfig.getHeartbeatApiPath());
    request.setParams(heartBeat.generateCurrentMessage());
    try {
        SimpleHttpResponse response = httpClient.post(request);
        if (response.getStatusCode() == OK_STATUS) {
            return true;
        } else if (clientErrorCode(response.getStatusCode()) || serverErrorCode(response.getStatusCode())) {
            RecordLog.warn("[SimpleHttpHeartbeatSender] Failed to send heartbeat to " + addrInfo
                + ", http status code: " + response.getStatusCode());
        }
    } catch (Exception e) {
        RecordLog.warn("[SimpleHttpHeartbeatSender] Failed to send heartbeat to " + addrInfo, e);
    }
    return false;
}
请求地址从配置csp.sentinel.heartbeat.api.path 没有配置的话 则使用 /registry/machine
那就这个流程就通了 断点来看下具体的参数
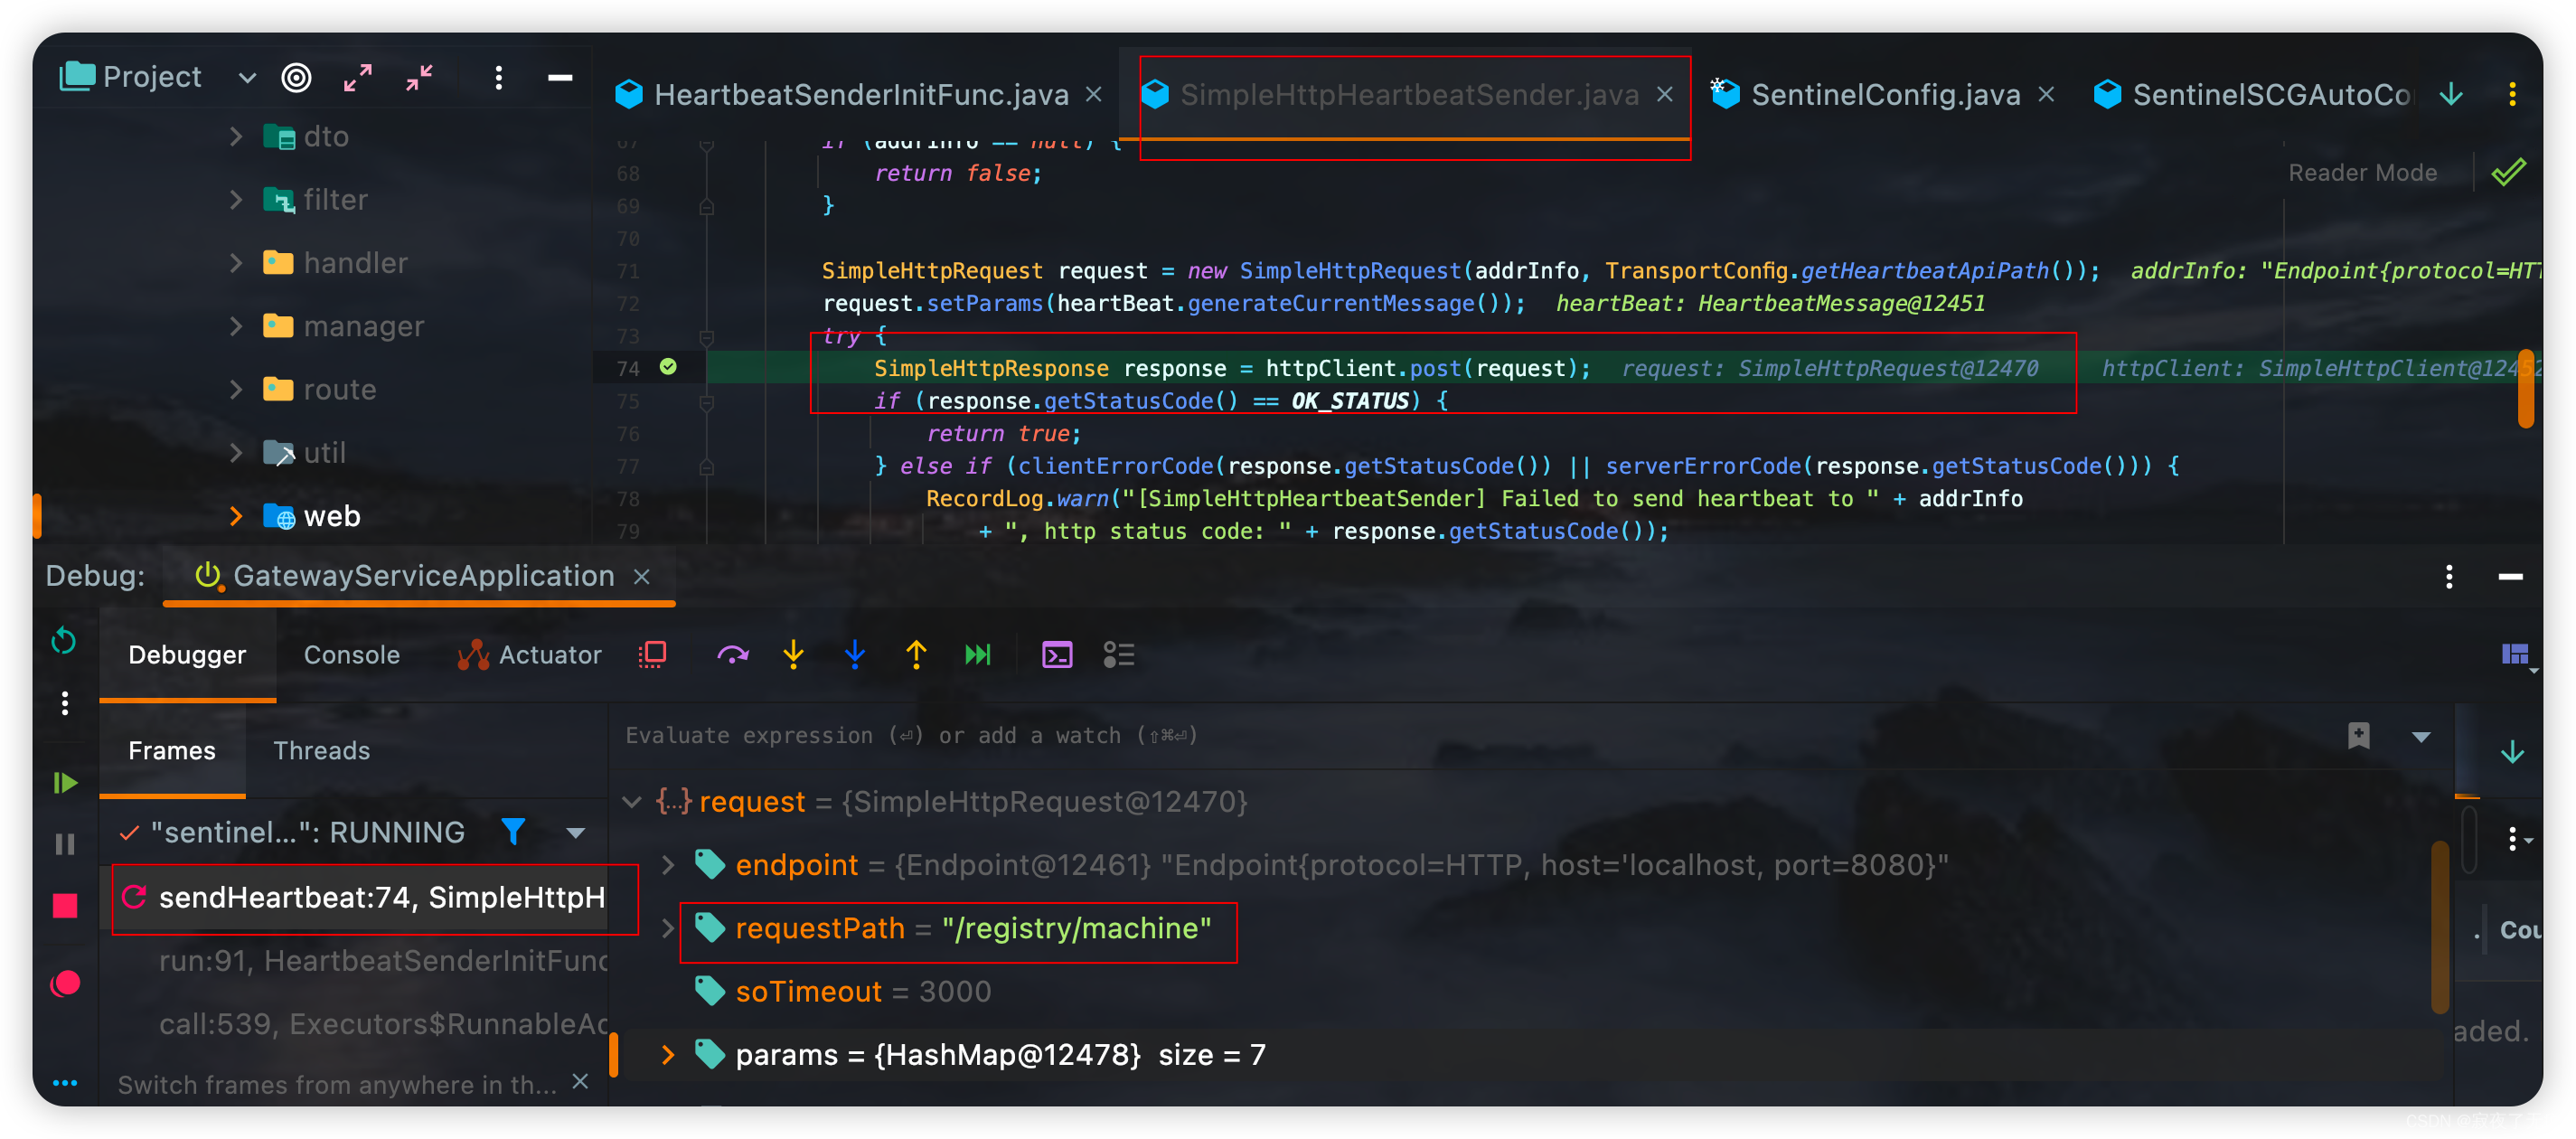
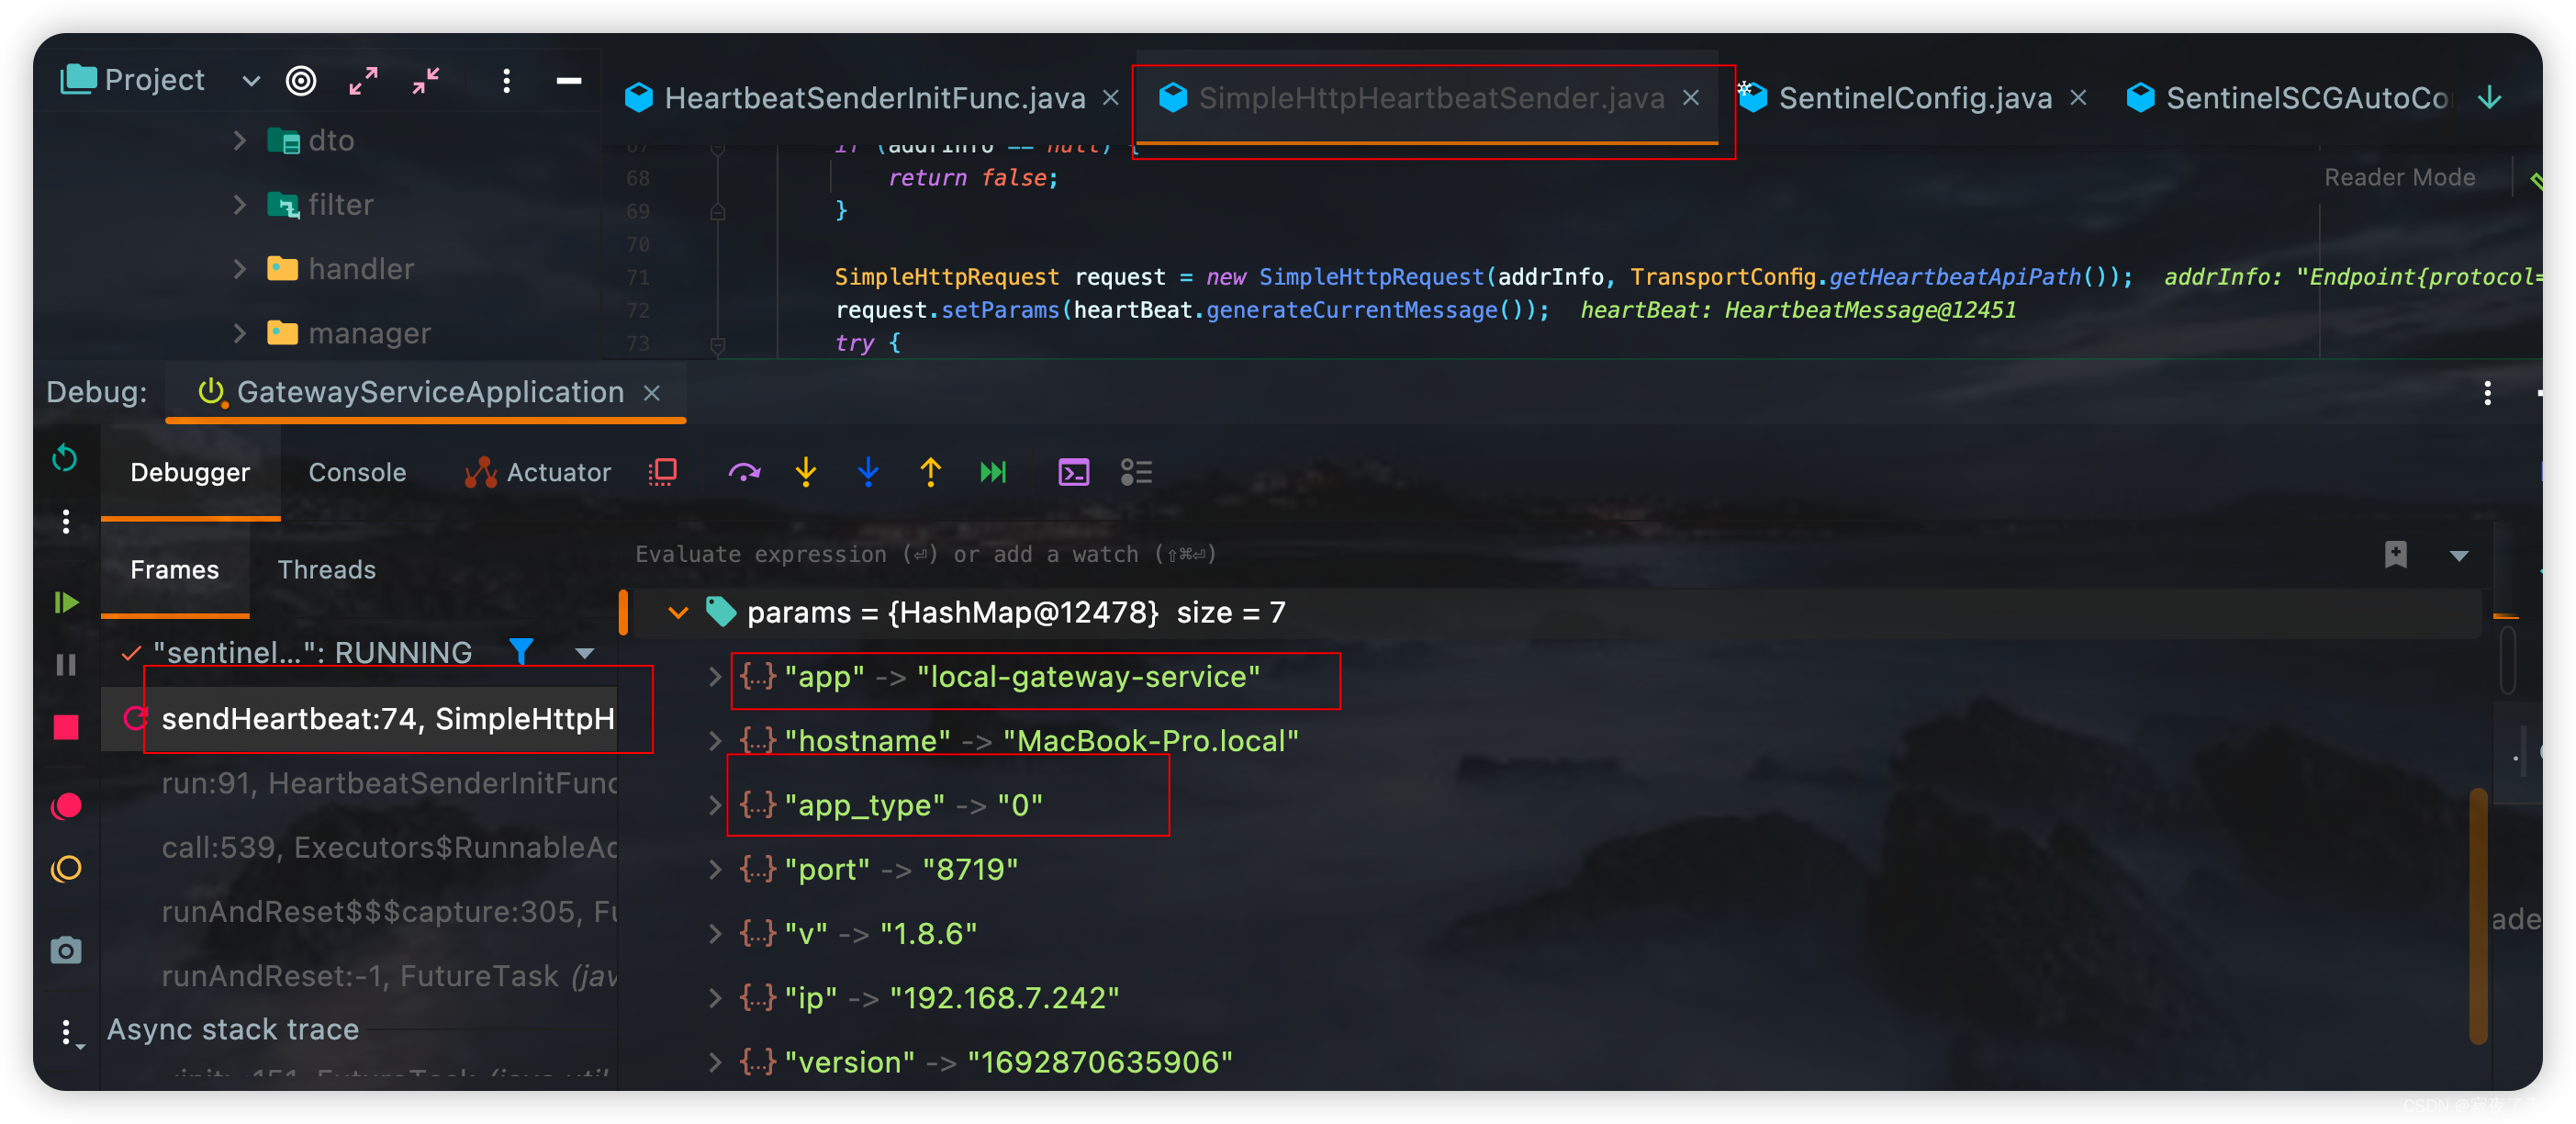
看看这个参数哪里配置
app_type为0的话 那这个就表示是非网关应用 那还是调用接口路径为getRules 加载规则 因为我们这个属于网关环境这个肯定获取不到
在HeartbeatMessage 构造中设置了 基础的配置 ip app_type app 等
public HeartbeatMessage() {
    message.put("hostname", HostNameUtil.getHostName());
    message.put("ip", TransportConfig.getHeartbeatClientIp());
    message.put("app", AppNameUtil.getAppName());
    // Put application type (since 1.6.0).
    message.put("app_type", String.valueOf(SentinelConfig.getAppType()));
    message.put("port", String.valueOf(TransportConfig.getPort()));
}
这里重点关注 SentinelConfig.getAppType()
com.alibaba.csp.sentinel.config.SentinelConfig#getAppType
public static int getAppType() {
  	return appType;
}
发现appType 是个成员变量 默认值为0 另外 SentinelConfig 在初始化的时候 会对这个值 进行修改
com.alibaba.csp.sentinel.config.SentinelConfig#72
static {
    try {
      initialize();
      loadProps();
      //解析appName
      resolveAppName();
      //解析appType
      resolveAppType();
      RecordLog.info("[SentinelConfig] Application type resolved: {}", appType);
    } catch (Throwable ex) {
      RecordLog.warn("[SentinelConfig] Failed to initialize", ex);
      ex.printStackTrace();
    }
}
com.alibaba.csp.sentinel.config.SentinelConfig#resolveAppType
private static void resolveAppType() {
    try {
      //配置中获取  csp.sentinel.app.type
      String type = getConfig(APP_TYPE_PROP_KEY);
      if (type == null) {
        appType = APP_TYPE_COMMON;
        return;
      }
      appType = Integer.parseInt(type);
      if (appType < 0) {
        appType = APP_TYPE_COMMON;
      }
    } catch (Exception ex) {
      appType = APP_TYPE_COMMON;
    }
}
首先从 csp.sentinel.app.type 配置中获取 如果为空 那就用默认值- 并返回
如果不为空 直接赋值 如果小于0 则赋值给0
异常情况 使用默认值
那我们再来看下 这个配置 csp.sentinel.app.type 是在哪里进行赋值的
发现只有一个地方 是在 网关的自动配置中
com.alibaba.cloud.sentinel.gateway.scg.SentinelSCGAutoConfiguration#initAppType
private void initAppType() {
		System.setProperty(SentinelConfig.APP_TYPE_PROP_KEY,
				ConfigConstants.APP_TYPE_SCG_GATEWAY);
}
那为什么设置到System中 会生效到SentinelConfig的属性中
那是因为 在 解析APPType之前还会调用 loadProps();
private static void loadProps() {
    Properties properties = SentinelConfigLoader.getProperties();
    for (Object key : properties.keySet()) {
      setConfig((String) key, (String) properties.get(key));
    }
}
方法中 SentinelConfigLoader.getProperties(); 触发SentinelConfigLoader构造
static {
    try {
      load();
    } catch (Throwable t) {
      RecordLog.warn("[SentinelConfigLoader] Failed to initialize configuration items", t);
    }
}

private static void load() {
    // Order: system property -> system env -> default file (classpath:sentinel.properties) -> legacy path
    String fileName = System.getProperty(SENTINEL_CONFIG_PROPERTY_KEY);
    if (StringUtil.isBlank(fileName)) {
      fileName = System.getenv(SENTINEL_CONFIG_ENV_KEY);
      if (StringUtil.isBlank(fileName)) {
        fileName = DEFAULT_SENTINEL_CONFIG_FILE;
      }
    }

    Properties p = ConfigUtil.loadProperties(fileName);
    if (p != null && !p.isEmpty()) {
      RecordLog.info("[SentinelConfigLoader] Loading Sentinel config from {}", fileName);
      properties.putAll(p);
    }

    for (Map.Entry<Object, Object> entry : new CopyOnWriteArraySet<>(System.getProperties().entrySet())) {
      String configKey = entry.getKey().toString();
      String newConfigValue = entry.getValue().toString();
      String oldConfigValue = properties.getProperty(configKey);
      properties.put(configKey, newConfigValue);
      if (oldConfigValue != null) {
        RecordLog.info("[SentinelConfigLoader] JVM parameter overrides {}: {} -> {}",
                       configKey, oldConfigValue, newConfigValue);
      }
    }
}
会加载到所有的System配置 会存入到SentinelConfigLoader的 properties成员变量中
分析到这里 感觉没啥问题
断点查看 发现了问题
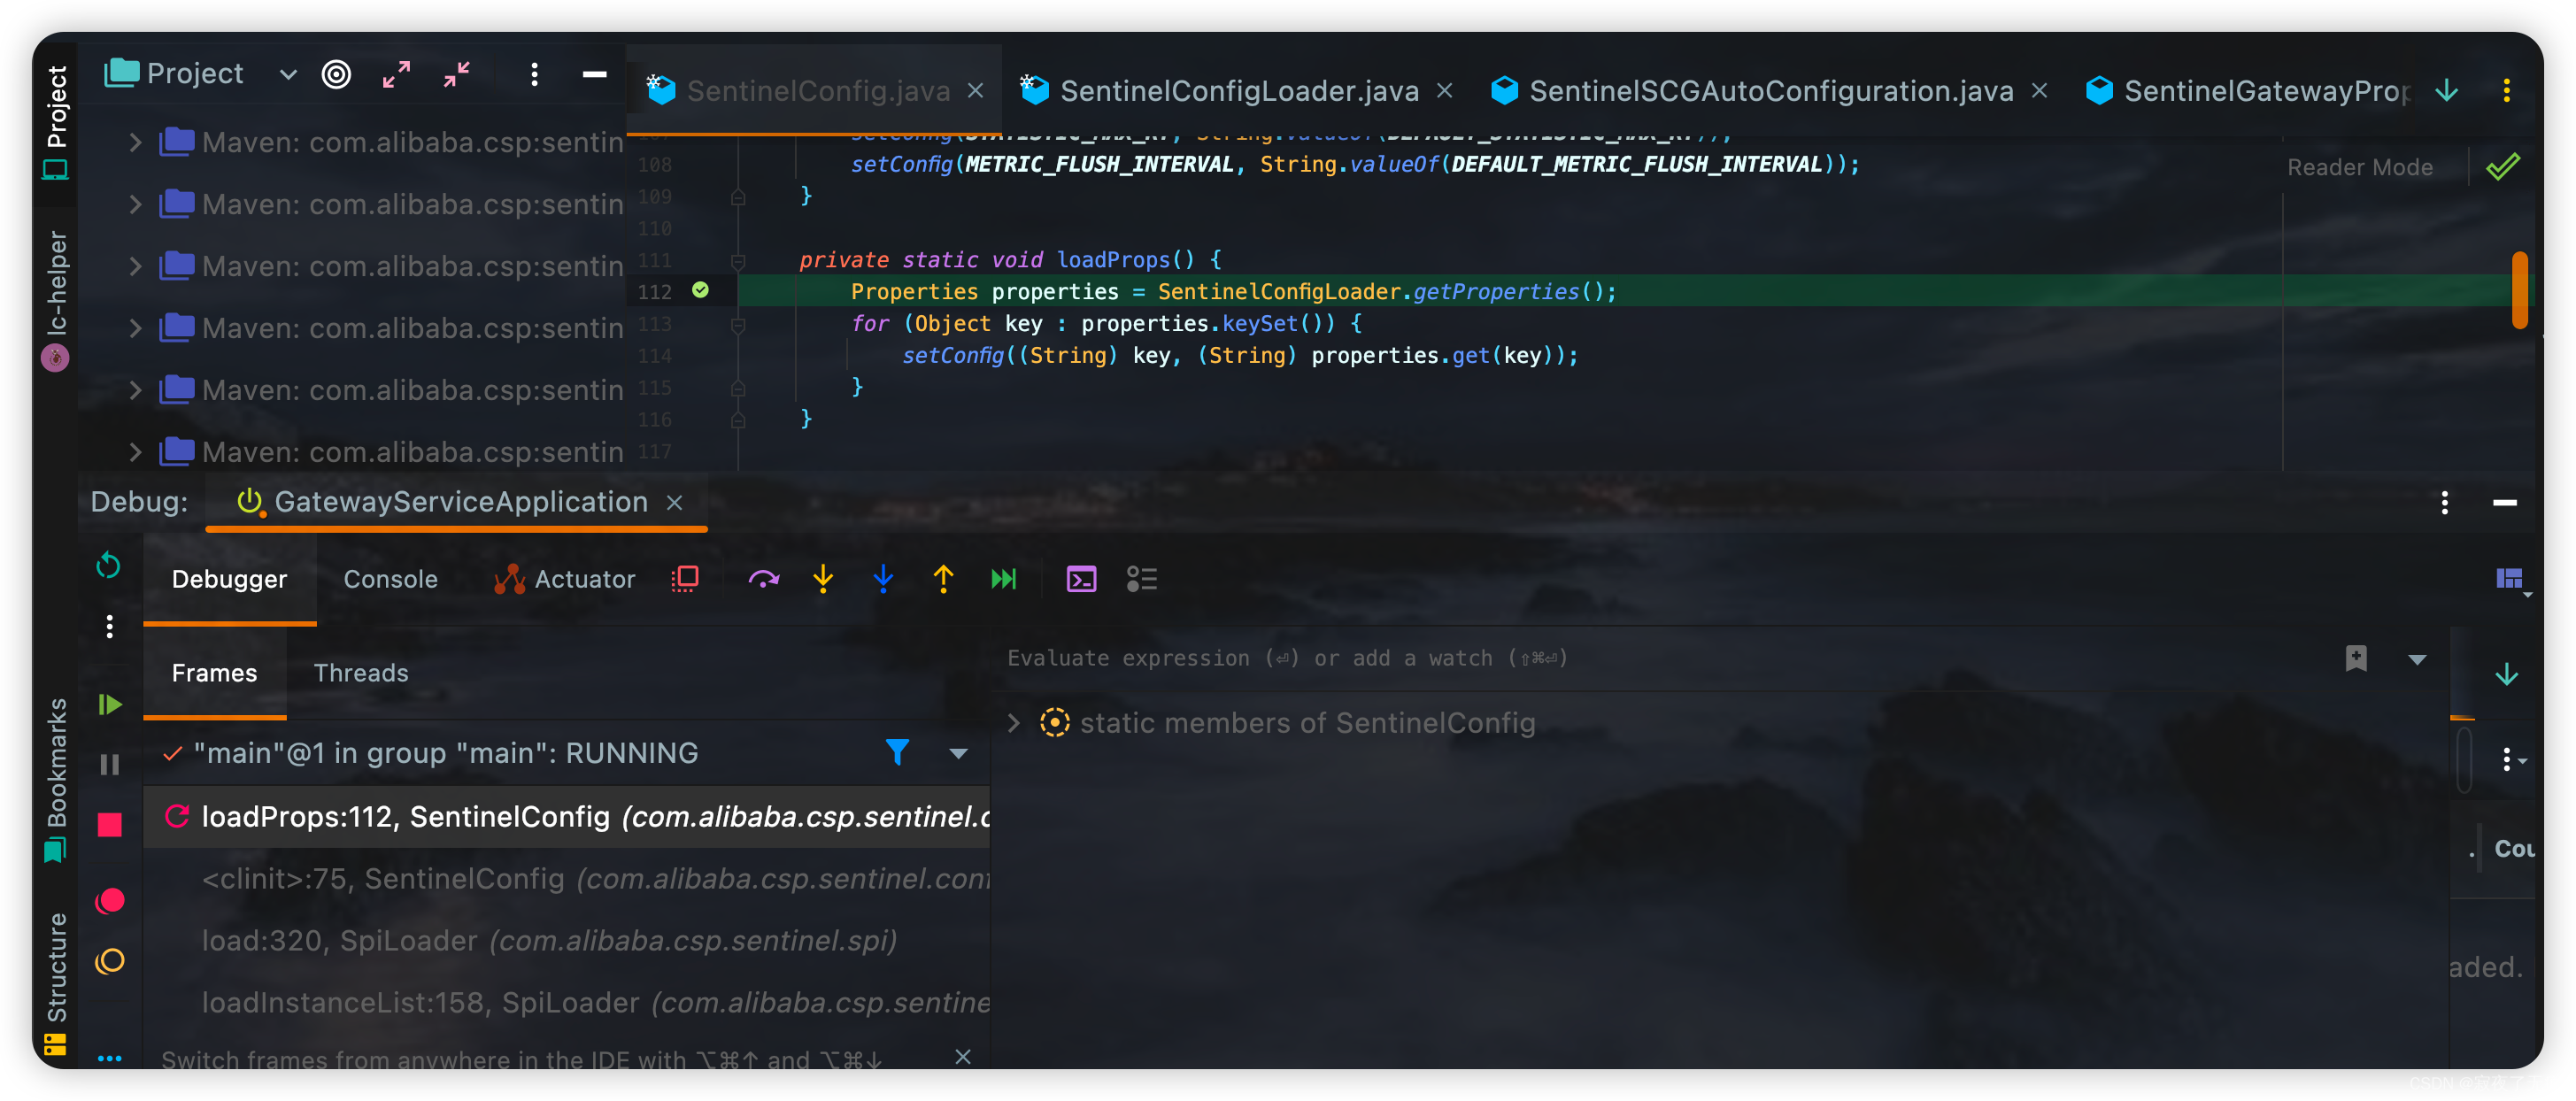
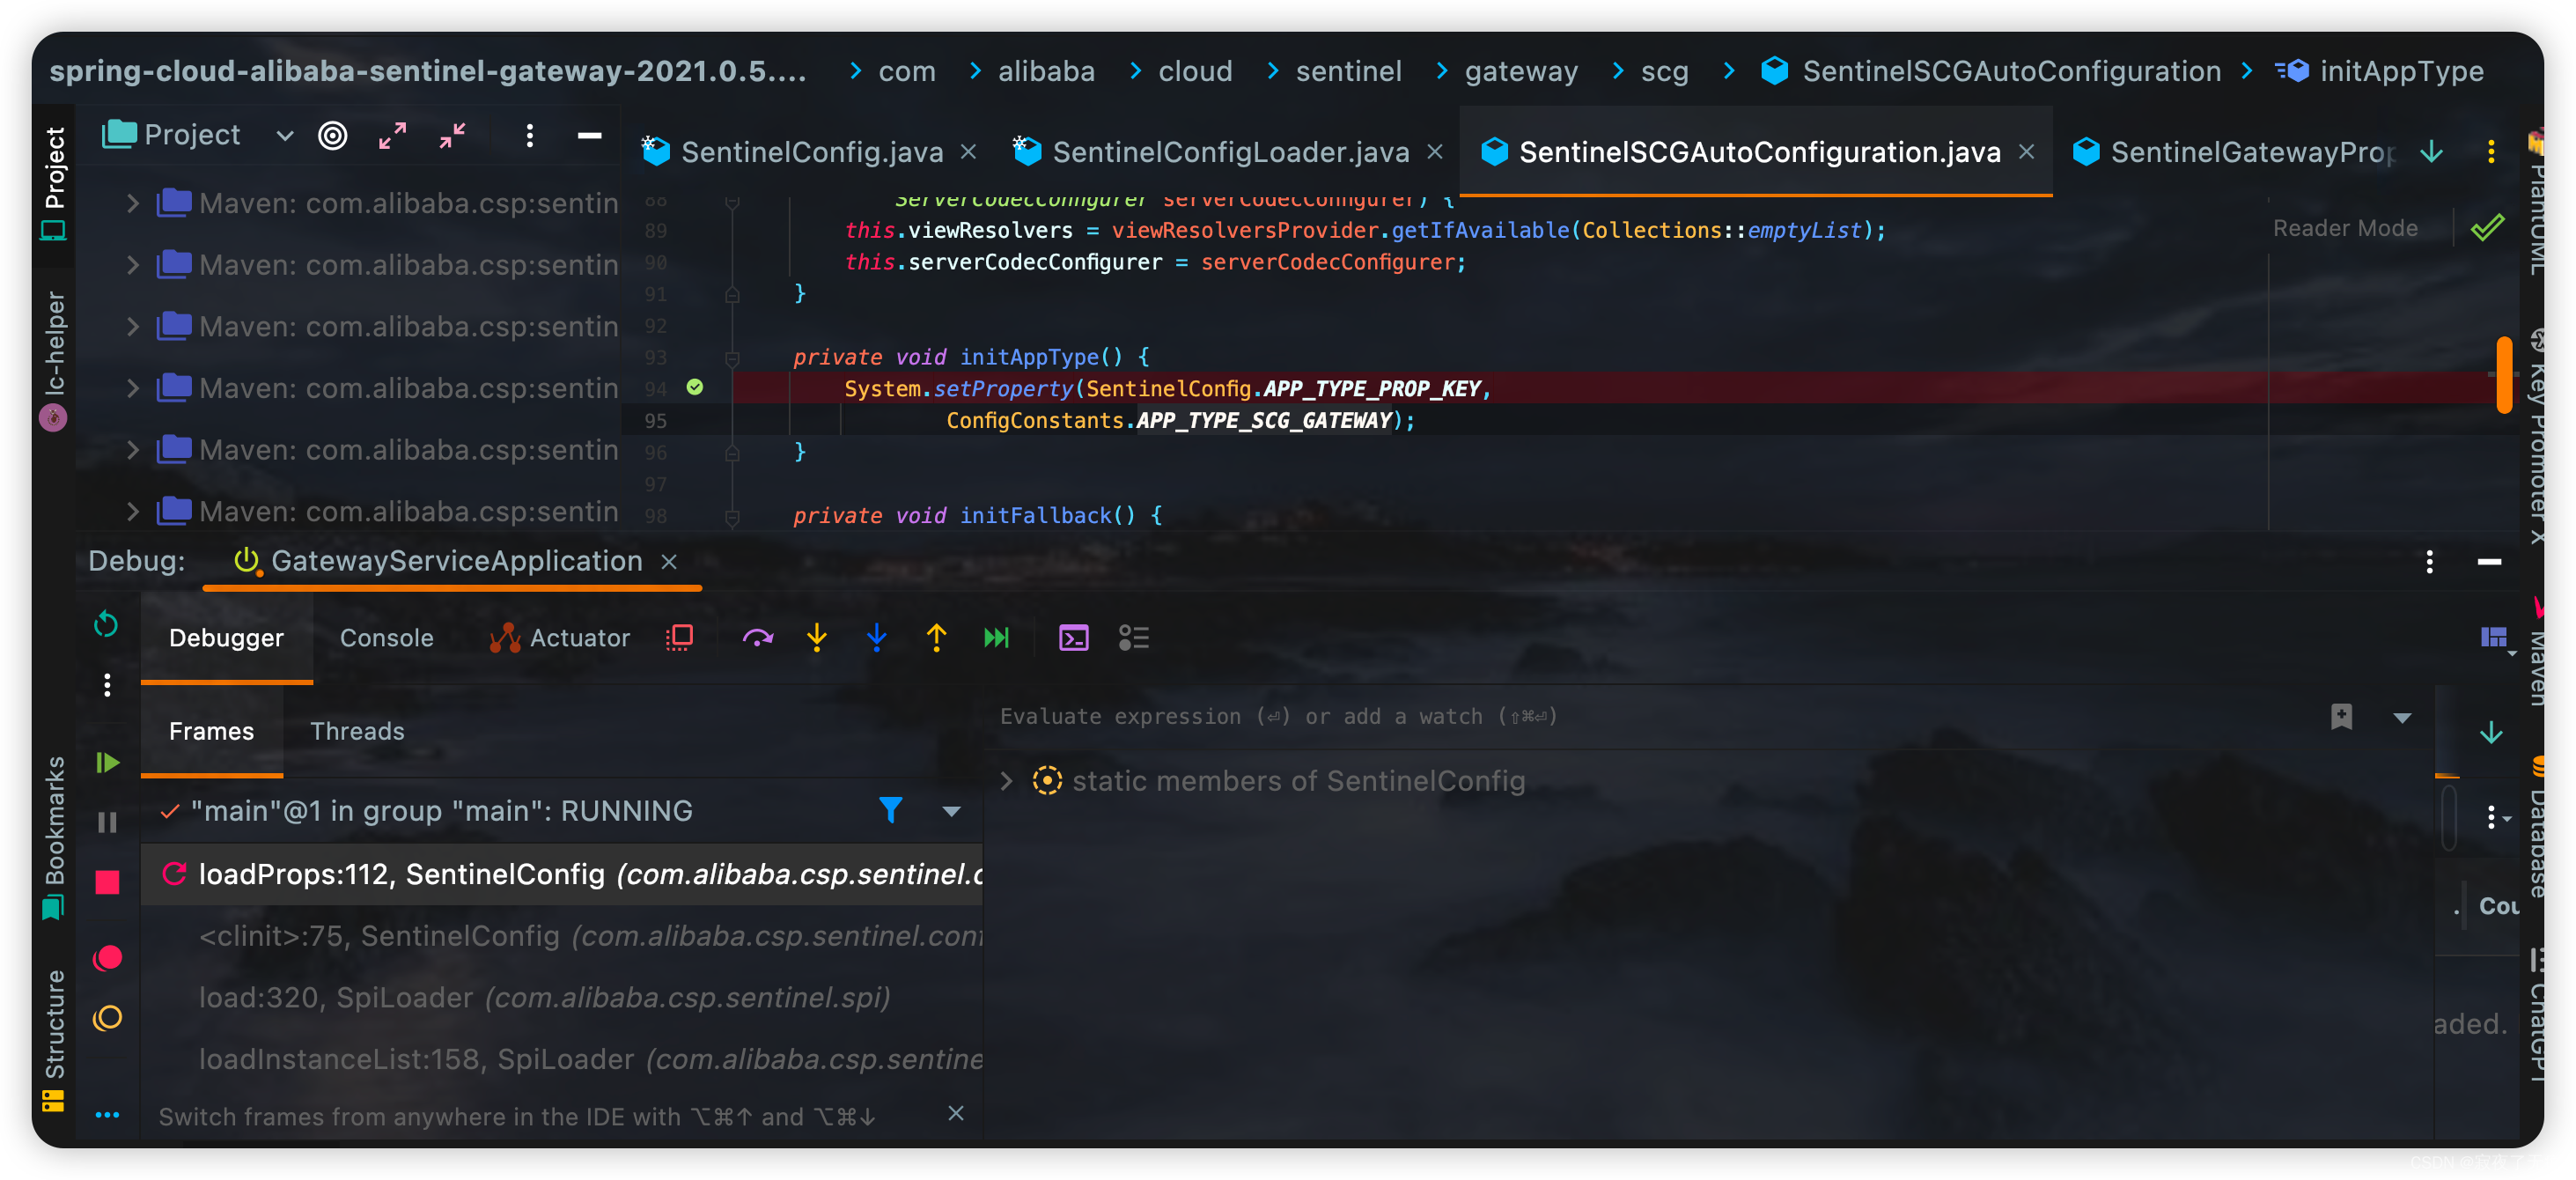
可以看当网关还没设置app_type时 这个sentinelConfig已经被加载,对应的SentinelConfigLoader的properties 已经被加载 这时候System中属性还未设置。所以后面网关在设置app_type后,也无法生效了。因为配置已经初始化完成。
那这个解决的办法也就明朗了
-
项目启动前手动设置 app_type 对应的配置项为 csp.sentinel.app.type
-
可以在项目启动类设置
public class GatewayServiceApplication { public static void main(String[] args) { System.setProperty("csp.sentinel.dashboard.server","localhost:8080"); System.setProperty("csp.sentinel.app.name","local-gateway-service"); System.setProperty("csp.sentinel.app.type","11"); SpringApplication.run(GatewayServiceApplication.class, args); } } -
jvm参数中添加 -Dcsp.sentinel.app.type=11 启动参数
-
同样这个问题本质还是sentinelConfig被提前初始化,导致后面设置的配置项都无法生效了
至于为什么升级了版本后 sentinelConfig会被提前初始化。一方面等待官方的回答,另一方面我们也自行寻找。
https://github.com/alibaba/Sentinel/issues/3201
good day