文章目录
- 一、引言
- 1.1 初始化配置
- 1.2 整合第三方框架
- 1.3 后期维护
- 1.4 部署工程
- 1.5 敏捷式开发
- 二、SpringBoot介绍
- 三、SpringBoot快速入门【`重点`】
- 3.1 快速构建SpringBoot
- 3.1.1 选择构建项目的类型
- 3.1.2 项目的描述
- 3.1.3 指定SpringBoot版本和需要的依赖
- 3.1.4 导入依赖
- 3.1.5 编写了Controller
- 3.1.6 测试
- 3.2 SpringBoot的目录结构
- 3.2.1 pom.xml文件
- 3.2.2 .gitignore文件
- 3.2.3 src目录
- 3.3 SpringBoot三种启动方式
- 3.3.1 运行启动类的main方法
- 3.3.2 maven命令
- 3.3.3 采用jar包的方式运行
- 四、SpringBoot常用注解【`重点`】
- 4.1 @Configuration和@Bean
- 4.2 @SpringBootApplication
- 五、SpringBoot常用配置【`重点`】
- 5.1 SpringBoot的配置文件格式
- 5.2 多环境配置
- 5.3 引入外部配置文件信息
- 5.4 热加载
- 5.4.1 导入依赖
- 5.4.2 settings配置
- 5.4.3 重新构建工程
- 六、SpringBoot整合Mybatis【`重点`】
- 6.1 xml方式整合Mybatis
- 6.1.1 导入依赖。
- 6.1.2 编写配置文件
- 6.1.3 准备Mybatis
- 6.1.4 测试。
- 6.2 注解方式整合Mybatis
- 6.2.1 创建District的Mapper接口
- 6.2.2 添加Mybatis注解
- 6.2.3 添加配置
- 6.2.4 测试,查看日志
- 6.3 SpringBoot整合分页助手
- 6.3.1 导入依赖
- 6.3.2 测试使用
- 七、SpringBoot整合JSP
- 7.1 需要导入依赖
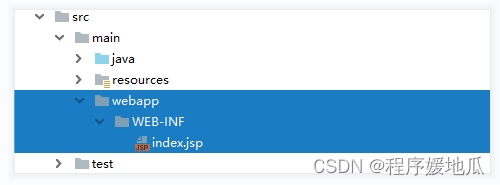
- 7.2 创建JSP页面
- 7.3 创建Contorller
- 7.4 配置前缀和后缀
- 八、SpringBoot练习
- 九 静态资源
- 十 @ControllerAdvice
- 十一、异常处理
- 十二、跨域的三种解决方案
- 十三、过滤器的三种配置方式
- 十四、构建 RESTful
一、引言
1.1 初始化配置
为了使用SSM框架去开发,准备SSM框架的模板配置。
1.2 整合第三方框架
为了Spring整合第三方框架,单独的去编写xml文件。
1.3 后期维护
后期SSM项目后期xml文件特别多,维护xml文件的成本是很高的
1.4 部署工程
SSM工程部署也是很麻烦,依赖第三方的容器
1.5 敏捷式开发
基于Java的SSM开发方式是很笨重,而现在的python,php,NodeJS的敏捷式开发已经盖过Java一头
二、SpringBoot介绍
SpringBoot是由Pivotal团队研发的,SpringBoot并不是一门新技术,只是将之前常用的Spring,SpringMVC,data-jpa等常用的框架封装到了一起,帮助你隐藏这些框架的整合细节,实现敏捷开发。
SpringBoot就是一个工具集。
SpringBoot特点:
- SpringBoot项目不需要模板化的配置。
- SpringBoot中整合第三方框架时,只需要导入相应的starter依赖包,就自动整合了。
- SpringBoot默认只有一个.properties的配置文件,不推荐使用xml,后期会采用.java的文件去编写配置信息。
- SpringBoot工程在部署时,采用的是jar包的方式,内部自动依赖Tomcat容器,提供了多环境的配置。
- 后期要学习的微服务框架SpringCloud需要建立在SpringBoot的基础上。
三、SpringBoot快速入门【重点】
3.1 快速构建SpringBoot
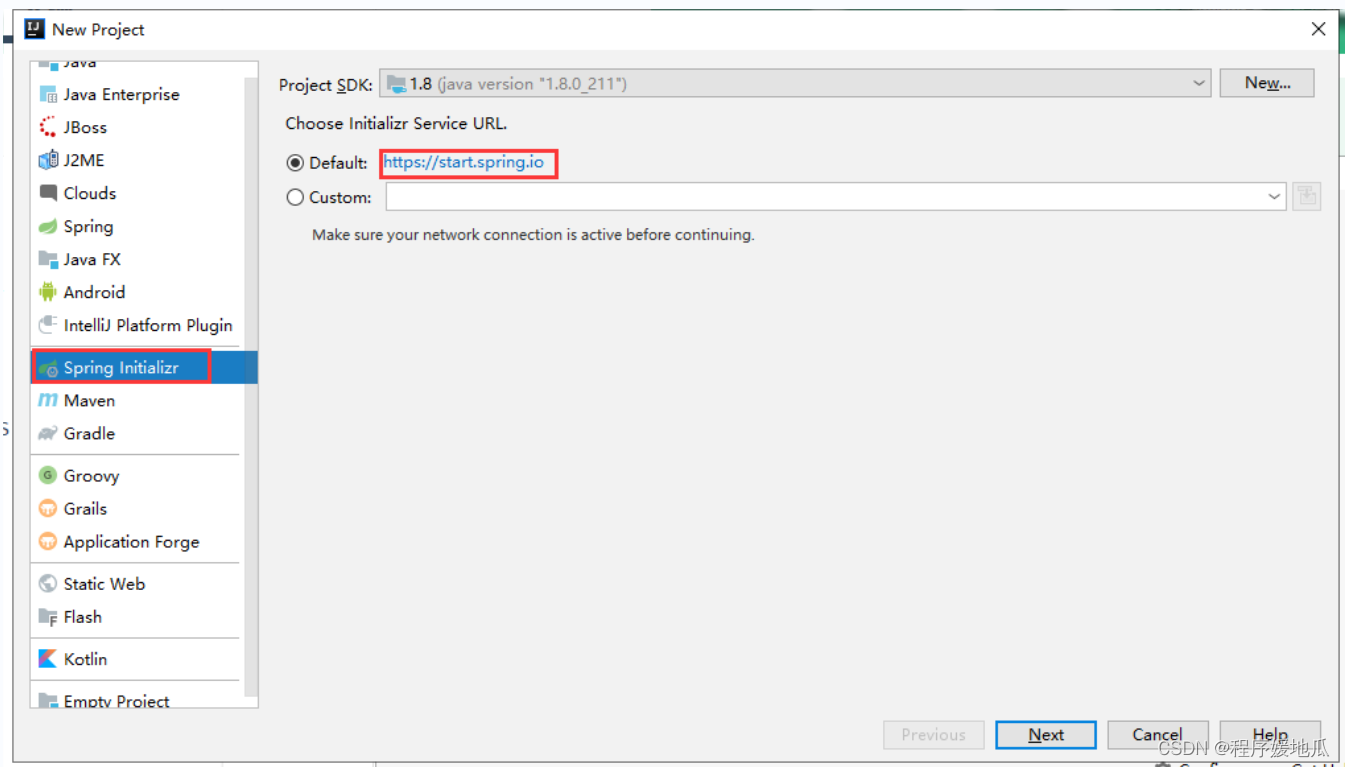
3.1.1 选择构建项目的类型
| 选择构建项目的类型 |
|---|
 |
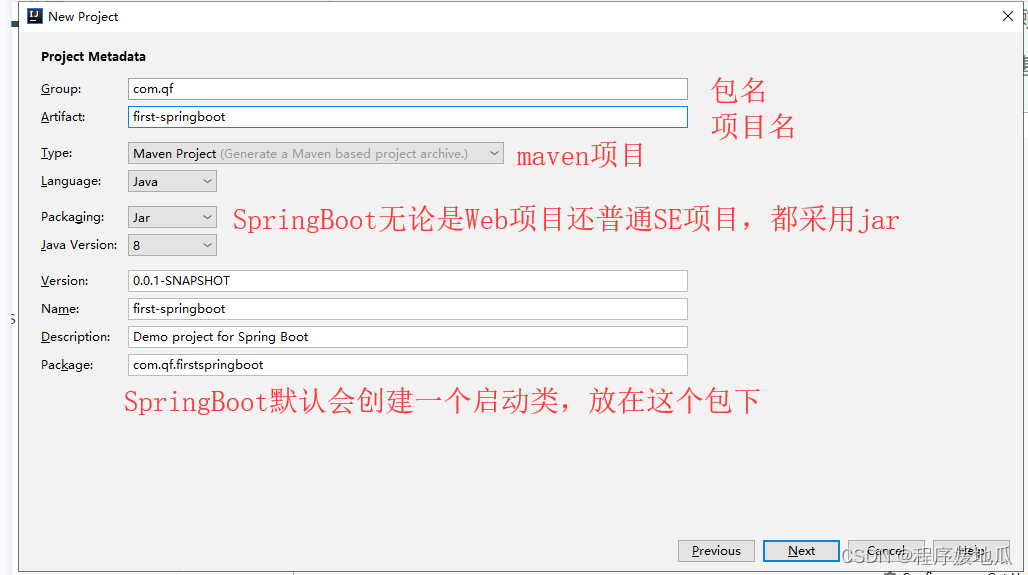
3.1.2 项目的描述
| 项目的描述 |
|---|
 |
3.1.3 指定SpringBoot版本和需要的依赖
| 指定SpringBoot版本和需要的依赖 |
|---|
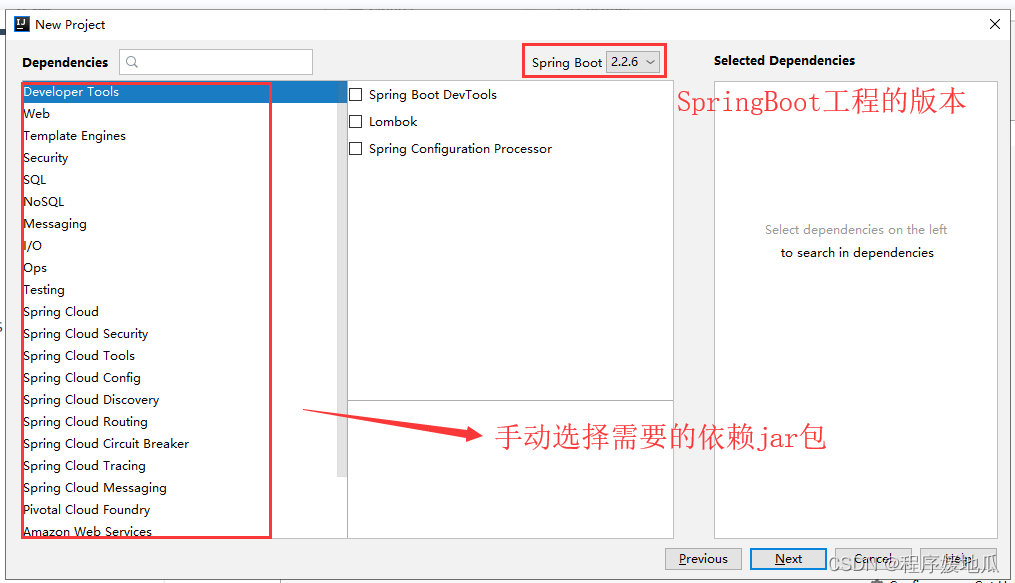 |
3.1.4 导入依赖
<dependency>
    <groupId>org.springframework.boot</groupId>
    <artifactId>spring-boot-starter</artifactId>
</dependency>
<!-- 将上述内容修改为下面的效果 -->
<dependency>
    <groupId>org.springframework.boot</groupId>
    <artifactId>spring-boot-starter-web</artifactId>
</dependency>
3.1.5 编写了Controller
@RestController
public class TestController {

    @GetMapping("/test")
    public String test(){
        return "Hello SpringBoot!";
    }

}
3.1.6 测试
| 效果 |
|---|
 |
3.2 SpringBoot的目录结构
3.2.1 pom.xml文件
- 指定了一个父工程: 指定当前工程为SpringBoot,帮助我们声明了starter依赖的版本。
- 项目的元数据:包名,项目名,版本号。
- 指定了properties信息:指定了java的版本为1.8
- 导入依赖:默认情况导入spring-boot-starter,spring-boot-starter-test
- 插件:spring-boot-maven-plugin
3.2.2 .gitignore文件
默认帮我们忽略了一些文件和目录,避免提交到Git仓库中
3.2.3 src目录
-src
  -main
    -java
      -包名
        启动类.java			# 需要将controller类,放在启动类的子包中或者同级包下
    -resources
      -static				  # 存放静态资源的
      -templates			   # 存储模板页面的
      application.properties	 # SpringBoot提供的唯一的配置文件
  -test   				      # 只是为了测试用的
3.3 SpringBoot三种启动方式
3.3.1 运行启动类的main方法
运行main方法即可
3.3.2 maven命令
mvn spring-boot:run
3.3.3 采用jar包的方式运行
将当前项目打包成一个jar文件,并通过java -jar jar文件
四、SpringBoot常用注解【重点】
4.1 @Configuration和@Bean
之前使用SSM去开发时,在xml文件中编写bean标签,但是SpringBoot不推荐使用xml文件。
@Configuration注解相当于beans标签
@Bean注解相当于bean标签
id=“方法名 | 注解中的name属性(优先级更高)”
class=“方法的返回结果”
@Configuration   // 代表当前类是一个配置类
public class UserConfig {


    @Bean(name = "user1")       // 构建一个实例,放到spring容器中
    public User user(){
        User user = new User();
        user.setId(1);
        user.setName("张三");
        return user;
    }

    /*
    <beans ....>            @Configuration
        <bean id="user1" class="com.qf.firstspringboot.entity.User" />
    </beans>
     */
}
4.2 @SpringBootApplication
@SpringBootApplication就是一个组合注解:
- @SpringBootConfiguration就是@Configuration注解,代表启动类就是一个配置类。
- @EnableAutoConfiguration帮你实现自动装配的,SpringBoot工程启动时,运行一个SpringFactoriesLoader的类,加载META-INF/spring.factories配置类(已经开启的),通过SpringFactoriesLoader中的load方法,以for循环的方式,一个一个加载。
- 好处:无需编写大量的整合配置信息,只需要按照SpringBoot提供好了约定去整合即可。
- 坏处:如果说你导入了一个starter依赖,那么你就需要填写他必要的配置信息。
- 手动关闭自动装配指定内容:@SpringBootApplication(exclude = QuartzAutoConfiguration.class)
- @ComponentScan就相当于<context:component-scan basePackage=“包名” />,帮助扫描注解的。
五、SpringBoot常用配置【重点】
5.1 SpringBoot的配置文件格式
SpringBoot的配置文件支持properties和yml,甚至他还支持json。
更推荐使用yml文件格式:
yml文件,会根据换行和缩进帮助咱们管理配置文件所在位置
yml文件,相比properties更轻量级一些
yml文件的劣势:
严格遵循换行和缩进
在填写value时,一定要在: 后面跟上空格
类型安全的属性注入。
传统 Spring 中的属性注入有两种:
- xml
<context:property-placeholder location="classpath:userinfo.properties"/>
2.java
@Component
//@PropertySource 注解的作用等价于 <context:property-placeholder location=""/>
@PropertySource("classpath:book.properties")
public class Book {
    @Value("${book.name}")
    private String name;
    @Value("${book.author}")
    private String author;
两种方式都是通过 @Value 注解将值注入到具体的属性上。
这种方式有一个缺陷:属性名千万不能写错。要是属性很多,就容易写错。
Spring Boot 中推出了类型安全的属性注入,这种方式可以自动识别属性名称然后自动注入。
容器配置
5.2 多环境配置
在application.yml文件中添加一个配置项:
spring:
  profiles:
    active: 环境名
在resource目录下,创建多个application-环境名.yml文件即可
在部署工程时,通过 java -jar jar文件 --spring.profiles.active=环境
5.3 引入外部配置文件信息
和传统的SSM方式一样,通过@Value的注解去获取properties/yml文件中的内容。
如果在yml文件中需要编写大量的自定义配置,并且具有统一的前缀时,采用如下方式
// Java程序
@ConfigurationProperties(prefix = "aliyun")
@Component
@Data
public class AliyunProperties {

   private String xxxx;

   private ... ...;
}

// 配置文件
aliyun:
  xxxx: xxxxxxxxx
  ...
5.4 热加载
5.4.1 导入依赖
<dependency>
    <groupId>org.springframework.boot</groupId>
    <artifactId>spring-boot-devtools</artifactId>
    <optional>true</optional>
</dependency>
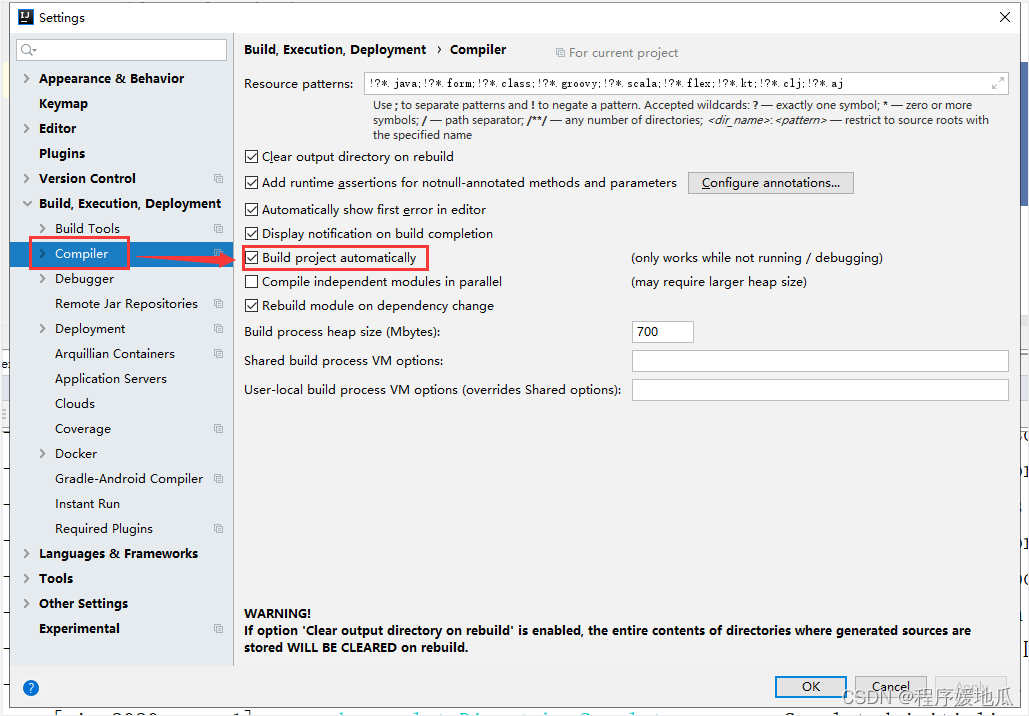
5.4.2 settings配置
| 修改settings中的配置 |
|---|
 |
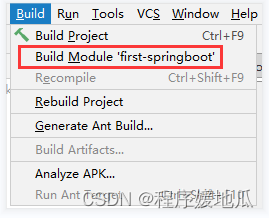
5.4.3 重新构建工程
| build |
|---|
 |
六、SpringBoot整合Mybatis【重点】
6.1 xml方式整合Mybatis
xml方式在编写复杂SQL时,更适合
6.1.1 导入依赖。
<!--        mysql驱动-->
<dependency>
    <groupId>mysql</groupId>
    <artifactId>mysql-connector-java</artifactId>
</dependency>

<!--        druid连接-->
<dependency>
    <groupId>com.alibaba</groupId>
    <artifactId>druid-spring-boot-starter</artifactId>
    <version>1.1.10</version>
</dependency>

<!--        mybatis-->
<dependency>
    <groupId>org.mybatis.spring.boot</groupId>
    <artifactId>mybatis-spring-boot-starter</artifactId>
    <version>1.3.2</version>
</dependency>
6.1.2 编写配置文件
// 准备实体类
@Data
public class Air  implements Serializable {

	private Integer id;

	private Integer districtId;

	private java.util.Date monitorTime;

	private Integer pm10;

	private Integer pm25;

	private String monitoringStation;

	private java.util.Date lastModifyTime;

}
// ================================================
@Data
public class District  implements Serializable {

	private Integer id;

	private String name;

}
6.1.3 准备Mybatis
// 1. 接口
public interface AirMapper {

    List<Air> findAll();

}

// 2. 在启动类中添加直接,扫描Mapper接口所在的包
@MapperScan(basePackages = "com.qf.firstspringboot.mapper")

// 3. 准备映射文件
<?xml version="1.0" encoding="UTF-8" ?>
<!DOCTYPE mapper
        PUBLIC "-//mybatis.org//DTD Mapper 3.0//EN"
        "http://mybatis.org/dtd/mybatis-3-mapper.dtd">
<mapper namespace="com.qf.firstspringboot.mapper.AirMapper">

<!--    List<Air> findAll();-->
    <select id="findAll" resultType="Air">
        select * from air
    </select>

</mapper>


//4. yml文件
<!-- 添加yml文件配置信息 -->
# mybatis配置
mybatis:
  # 扫描映射文件
  mapper-locations: classpath:mapper/*.xml
  # 配置别名扫描的包
  type-aliases-package: com.qf.firstspringboot.entity
  configuration:
    # 开启驼峰映射配置
    map-underscore-to-camel-case: true
# 连接数据库的信息
spring:
  datasource:
    driver-class-name: com.mysql.cj.jdbc.Driver
    url: jdbc:mysql:///air?serverTimezone=UTC
    username: root
    password: root
    type: com.alibaba.druid.pool.DruidDataSource
6.1.4 测试。
class AirMapperTest extends FirstSpringbootApplicationTests {

    @Autowired
    private AirMapper airMapper;

    @Test
    void findAll() {
        List<Air> list = airMapper.findAll();
        for (Air air : list) {
            System.out.println(air);
        }
    }
}
6.2 注解方式整合Mybatis
注解方式在编写配置简单,简单SQL推荐使用
6.2.1 创建District的Mapper接口
public interface DistrictMapper {

    List<District> findAll();
}
6.2.2 添加Mybatis注解
针对增删改查:@Insert,@Delete,@Update,@Select
还是需要在启动类中添加@MapperScan注解
@Select("select * from district")
List<District> findAll();


@Select("select * from district where id = #{id}")
District findOneById(@Param("id") Integer id);
6.2.3 添加配置
// yml文件
logging:
  level:
    com.qf.firstspringboot.mapper: DEBUG
6.2.4 测试,查看日志
class DistrictMapperTest extends FirstSpringbootApplicationTests {

    @Autowired
    private DistrictMapper mapper;

    @Test
    void findAll() {
        List<District> list = mapper.findAll();
        for (District district : list) {
            System.out.println(district);
        }
    }

    @Test
    void findOneById() {
        District district = mapper.findOneById(5);
        System.out.println(district);
    }
}
6.3 SpringBoot整合分页助手
6.3.1 导入依赖
<!--        pageHelper依赖-->
<dependency>
    <groupId>com.github.pagehelper</groupId>
    <artifactId>pagehelper-spring-boot-starter</artifactId>
    <version>1.2.5</version>
</dependency>
6.3.2 测试使用
@Test
public void findByPage(){
    //1. 执行分页
    PageHelper.startPage(1,5);

    //2. 执行查询
    List<Air> list = airMapper.findAll();

    //3. 封装PageInfo对象
    PageInfo<Air> pageInfo = new PageInfo<>(list);

    //4. 输出
    for (Air air : pageInfo.getList()) {
        System.out.println(air);
    }
}
七、SpringBoot整合JSP
jsp、freemarker、thymeleaf
7.1 需要导入依赖
<!--        JSP核心引擎依赖-->
<dependency>
    <groupId>org.apache.tomcat.embed</groupId>
    <artifactId>tomcat-embed-jasper</artifactId>
</dependency>
<!--        JSTL-->
<dependency>
    <groupId>javax.servlet</groupId>
    <artifactId>jstl</artifactId>
</dependency>
7.2 创建JSP页面
| 创建webapp以及WEB-INF去存放JSP页面 |
|---|
 |
7.3 创建Contorller
// Controller
@Controller
public class JspController {

    @GetMapping("/index")
    public String index(Model model){
        model.addAttribute("name","张三");
        return "index";
    }
}
7.4 配置前缀和后缀
spring:
  mvc:
    # 视图的前缀和后缀
    view:
      prefix: /WEB-INF/
      suffix: .jsp
八、SpringBoot练习
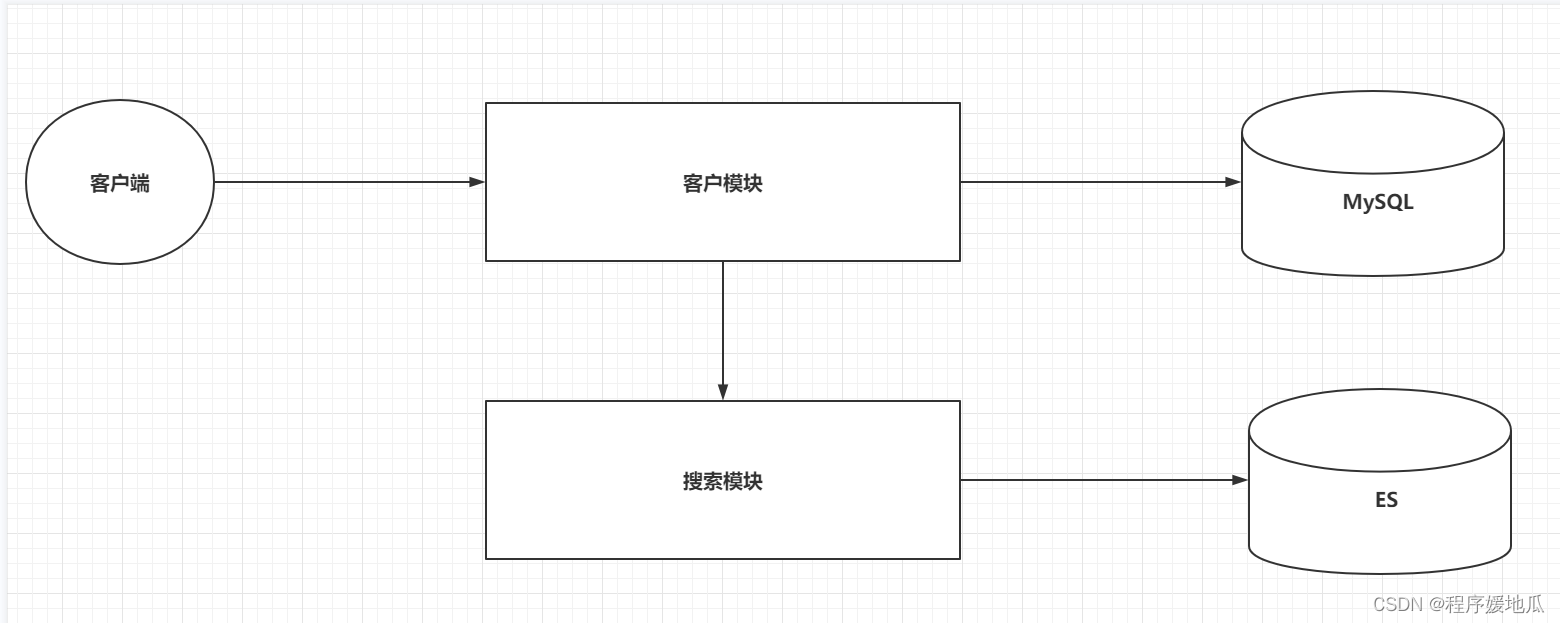
页面查询客户信息从ES中查询
完成客户模块的增删改,并且同步到ES中。
| 练习业务图 |
|---|
 |
九 静态资源
Spring Boot 中默认提供了五个静态资源存储路径:
- classpath:/META-INF/resources/
- classpath:/resources/
- classpath:/static/
- classpath:/public/
- /(webapp)
五个位置,优先级依次降低。
如果需要自定义静态资源位置,有两种方式:
-
application.properties 中进行配置
spring.mvc.static-path-pattern=/static/** spring.web.resources.static-locations=classpath:static/ -
写代码配置
@Configuration
public class WebMvcConfig implements WebMvcConfigurer {
    @Override
    public void addResourceHandlers(ResourceHandlerRegistry registry) {
        registry.addResourceHandler("/static/**")
                .addResourceLocations("classpath:static/");
    }
}
十 @ControllerAdvice
三种用法:
- 全局异常处理
- 定义全局数据
- 请求参数预处理
十一、异常处理
整体来说两种方式:
- 静态页面展示异常
- 明确展示(推荐)
- 模糊展示
- 动态页面展示异常
- 明确展示
- 模糊展示(推荐)
具体查找方式:
- 先找明确的,再找模糊的
- 先找动态的,再找静态的
十二、跨域的三种解决方案
- @CrossOrigin 注解
- 全局配置
- 配置过滤器
十三、过滤器的三种配置方式
- 通过 @Component 注解注入到 Spring 容器中。这种方式有一个缺陷,无法配置拦截地址。但是这种方式可以通过 @Order 注解配置优先级。
- 使用 @WebFilter+@ServletComponentScan 注解的方式,这种方式可以配置拦截路径,但是无法配置优先级。
- FilterRegistrationBean:这种方式既可以配置拦截路径,也可以配置优先级。
十四、构建 RESTful
Spring Boot 中提供了一个快速构建 RESTful 服务的工具,就是
<dependency>
    <groupId>org.springframework.boot</groupId>
    <artifactId>spring-boot-starter-data-rest</artifactId>
</dependency>
该工具可以配合 Jpa、MongoDB 以及 ElasticSearch 一起使用。
以 Jpa 为例,使用时,只需要三步:
- 在 application.properties 文件中配置数据库和 JPA的基本信息。
- 提供一个实体类。
- 提供一个空接口。
然后启动项目,系统会自动生成如下接口。
- GET http://localhost:8080/users ,这是一个分页查询接口,默认查询第一页,每页20条数据。users 是实体类名首字母小写后面加上 s。可以自行添加分页参数:http://localhost:8080/users?size=3&page=0
- GET http://localhost:8080/users/1,这个是根据id查询数据的接口
- POST http://localhost:8080/users,这个是添加数据的接口,添加的参数形式是 JSON。
- PUT http://localhost:8080/users/6,这个是根据 id 修改数据的接口,参数的提交方式也是 JSON。
- DELETE http://localhost:8080/users/6,这个是根据 id 删除数据。
-
定制请求路径。
- exported:是否暴露当前接口。
- collectionResourceRel:生成的数据集合的名字,默认是 users。
- itemResourceRel:生成的每一项数据的名字,默认是 user。
@RepositoryRestResource(exported = true,path = "us",collectionResourceRel = "us",itemResourceRel = "u") public interface UserDao extends JpaRepository<User, Long> { } -
定制请求方法。
@RepositoryRestResource(exported = true,path = "us",collectionResourceRel = "us",itemResourceRel = "u")
public interface UserDao extends JpaRepository<User, Long> {
    List<User> findUserByUsernameStartingWith(@Param("username") String username);
}
此时,可以通过如下地址查看所有的查询接口。http://localhost:8080/us/search。
可以看到,自定义的接口,调用方式如下:http://localhost:8080/us/search/findUserByUsernameStartingWith?username=王
还可以定制方法名:
@RepositoryRestResource(exported = true,path = "us",collectionResourceRel = "us",itemResourceRel = "u")
public interface UserDao extends JpaRepository<User, Long> {
    @RestResource(path = "byname")
    List<User> findUserByUsernameStartingWith(@Param("username") String username);
}
此时的查询路径:http://localhost:8080/us/search/byname?username=王
-
其他配置
# 配置统一前缀
spring.data.rest.base-path=/api
# 配置默认的页数
spring.data.rest.default-page-size=0
# 每页查询的记录数
spring.data.rest.max-page-size=20
# 分页参数的 key
spring.data.rest.page-param-name=page
# 分页参数 size 的key
spring.data.rest.limit-param-name=size
# 排序的参数的 key
spring.data.web.sort.sort-parameter=sort
# 创建成功时是否返回数据
spring.data.rest.return-body-on-create=true
# 更新成功时是否返回数据
spring.data.rest.return-body-on-update=true
页面模板技术:
- Jsp
- Freemarker(SpringBoot2.2之前 .ftl,之后是 .ftlh)
- Thymeleaf
JPA:Java Persistence API
Hibernate/OpenLink/EclipseLink。。。
JPA

