Redis 7.2.0 搭建和集群配置
- 一.Redis 下载与单机部署
- 1.Redis 下载
- 2.虚拟机配置
- 3.Redis 单机源码安装和测试
- 4.Java 单机连接测试
- 1.Pom 依赖
- 2.配置文件
- 3.启动类
- 4.配置类
- 5.单元测试
- 6.测试结果
- 二.Redis 集群部署
- 1.主从
- 1.从节点配置
- 2.Java 测试
- 2.哨兵
- 1.哨兵节点配置
- 2.复制一个哨兵节点(双哨兵)
- 3.Java 测试访问哨兵
- 3.集群
- 1.集群配置文件修改
- 2.Java 访问 Redis 集群测试
一.Redis 下载与单机部署
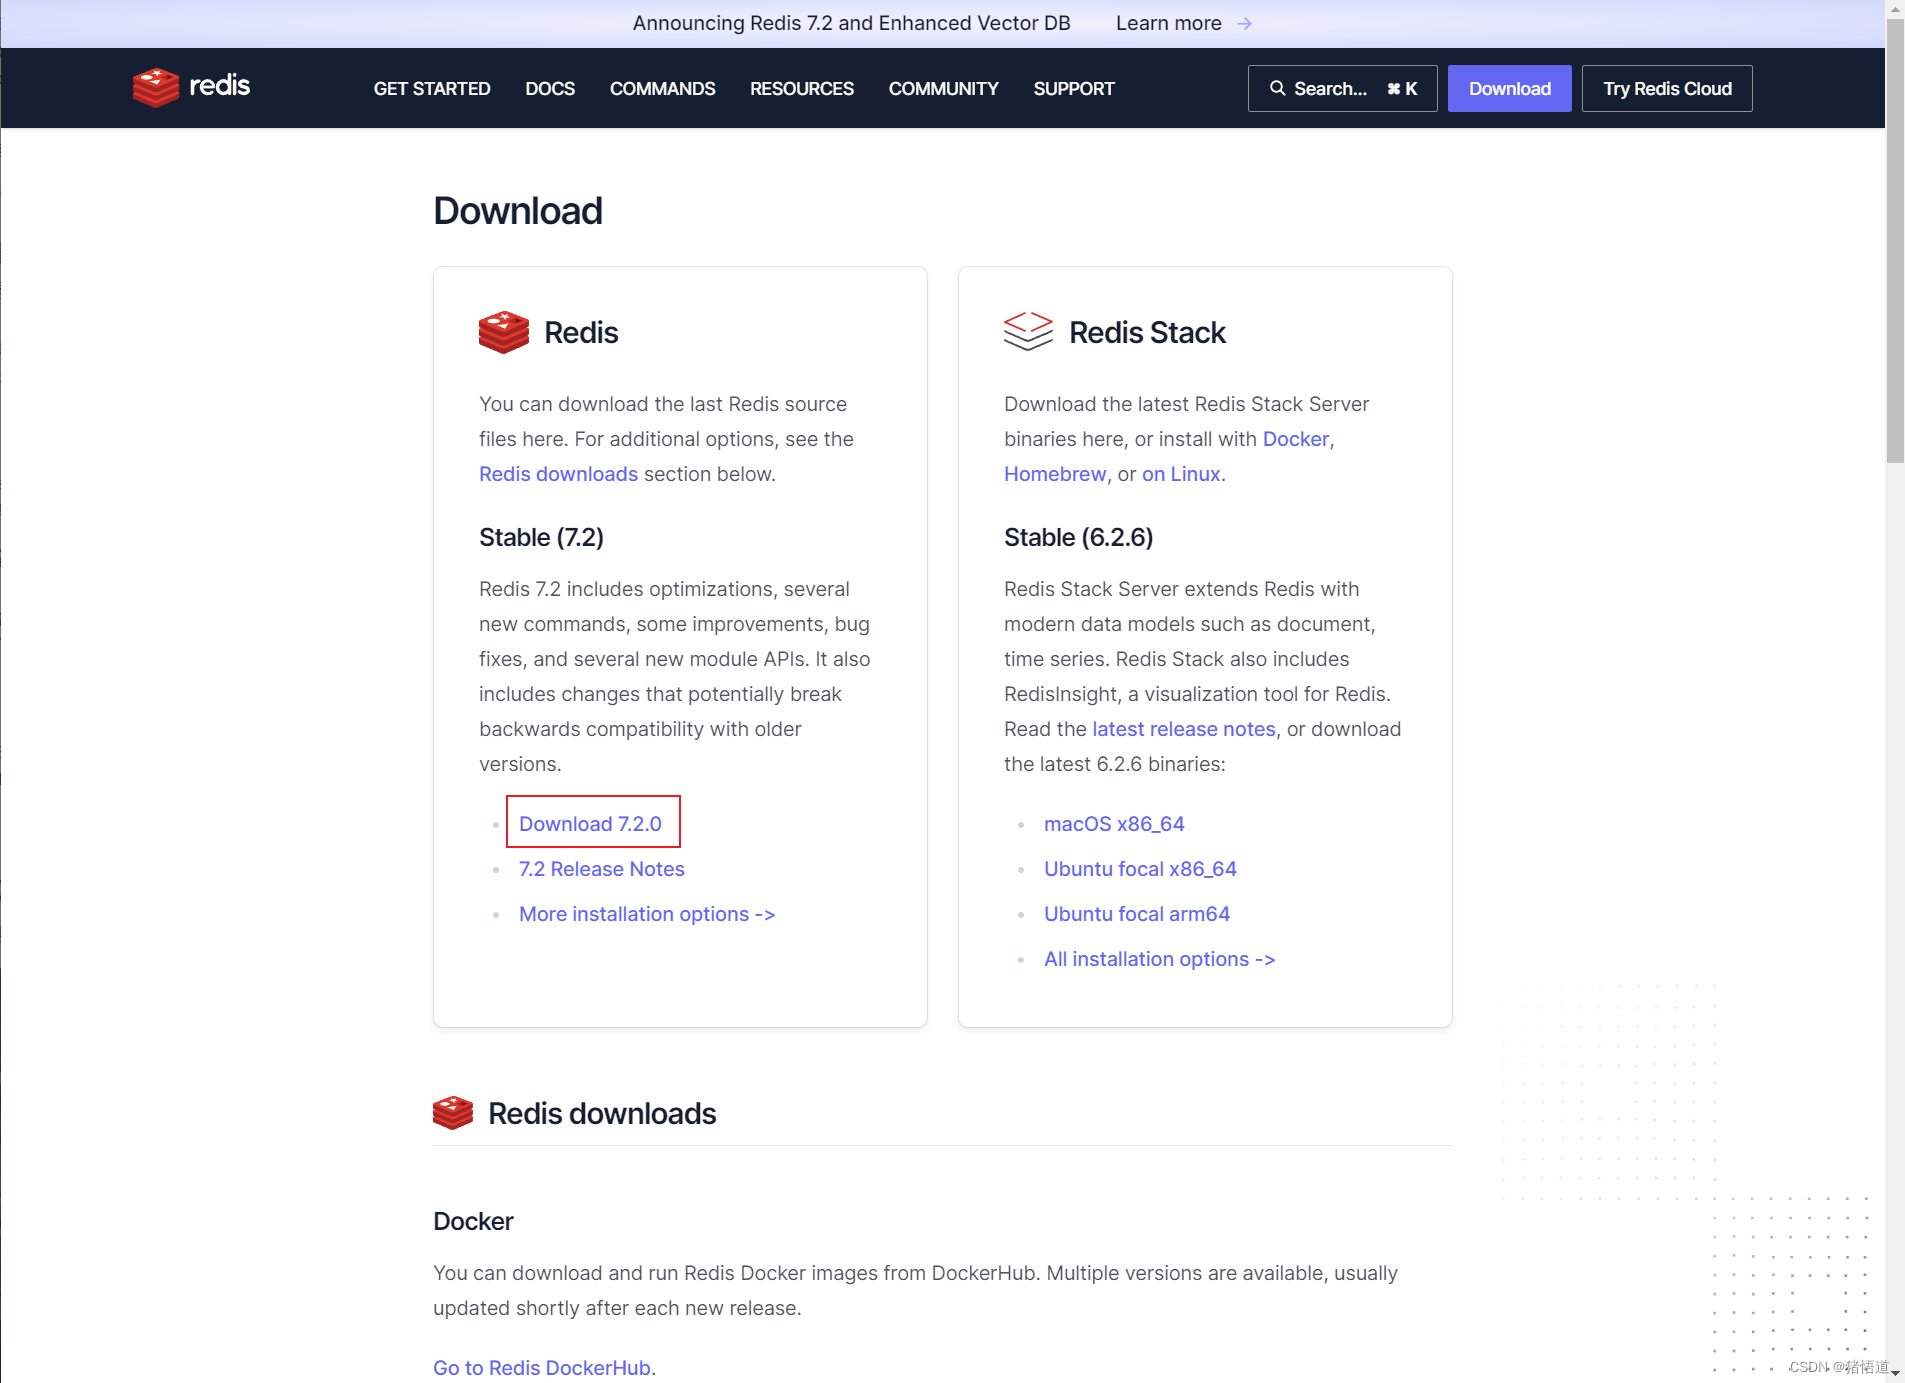
1.Redis 下载
Redis 官网
2.虚拟机配置
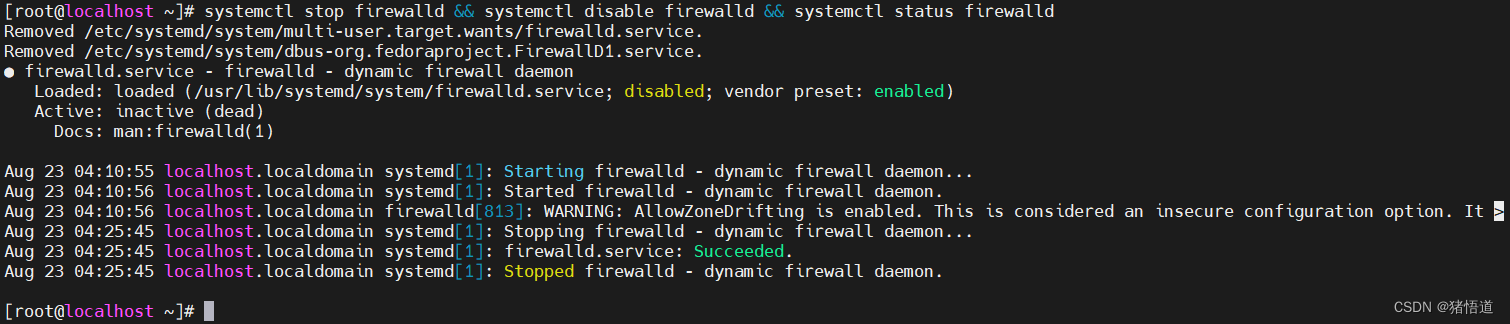
## 1.关闭防火墙
systemctl stop firewalld && systemctl disable firewalld && systemctl status firewalld
## 2.配置域名解析
echo '192.168.1.103 rd1' >> /etc/hosts
echo '192.168.1.104 rd2' >> /etc/hosts
echo '192.168.1.105 rd3' >> /etc/hosts
echo '192.168.1.106 rd4' >> /etc/hosts
echo '192.168.1.107 rd5' >> /etc/hosts
echo '192.168.1.108 rd6' >> /etc/hosts
关闭并禁用防火墙
3.Redis 单机源码安装和测试
## 1.解压缩
tar zxvf redis-7.2.0.tar.gz
## 2.进入源码安装目录
cd /home/redis-7.2.0/src/
## 3.编译和安装
make && make install PREFIX=/usr/local/redis
## 4.进入Redis解压目录
cd /home/redis-7.2.0/
## 5.修改配置
vim redis.conf
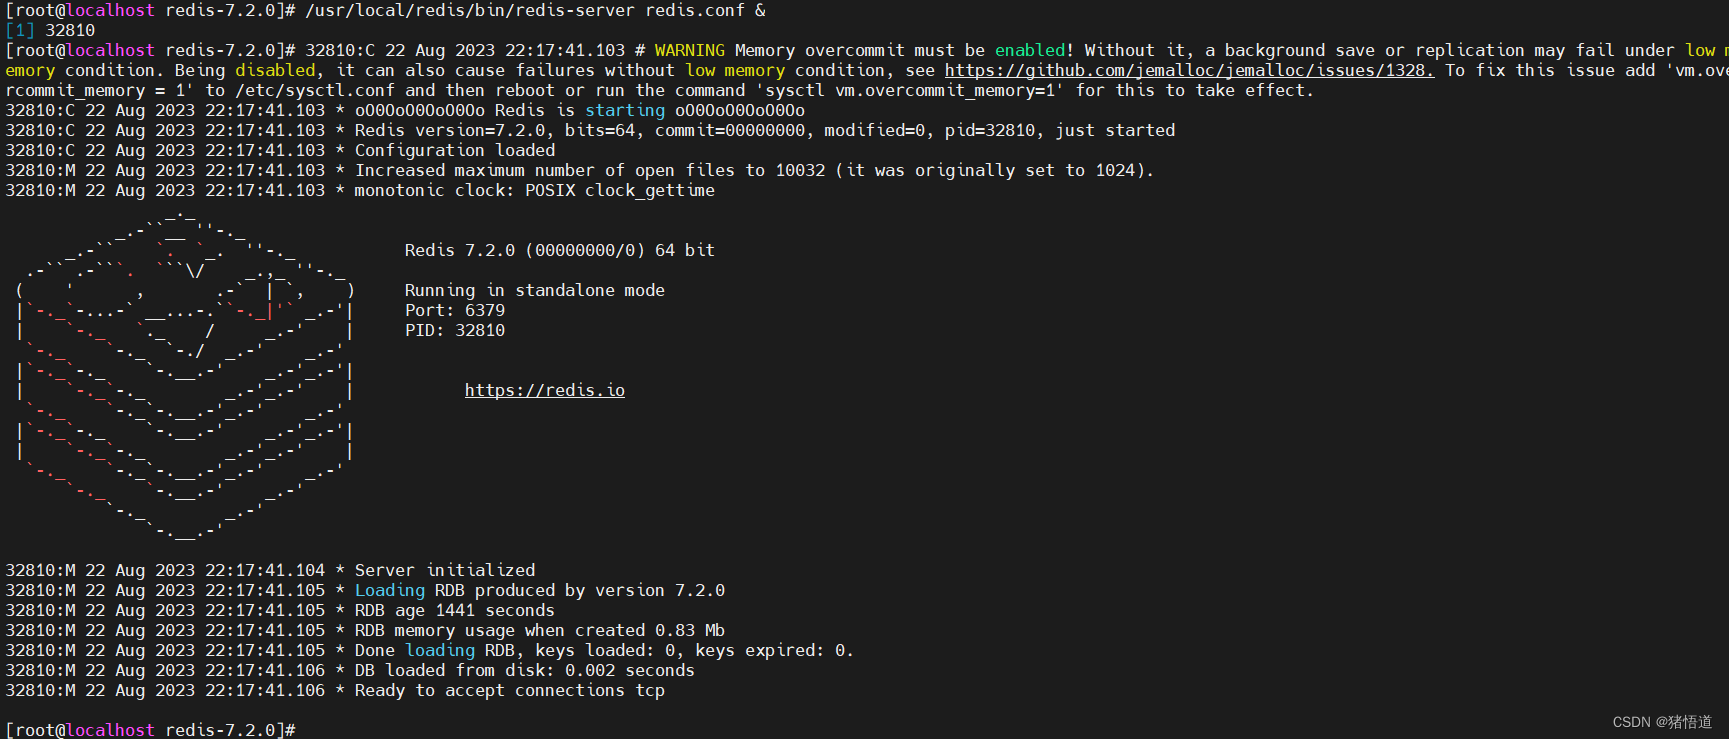
## 6.启动服务
/usr/local/redis/bin/redis-server redis.conf &
## 7.停止服务
kill -9 `ps aux |grep redis|grep -v grep | awk '{print $2}'`
以下行号仅供参考,增加配置后会有微小变动
| 行号 | 原值 | 新值 | 含义 |
|---|---|---|---|
| 87 | bind 127.0.0.1 -::1 | bind 0.0.0.0 -::1 | 绑定地址 |
| 111 | protected-mode yes | #protected-mode no | 防火墙保护 |
| 533 | replicaof | replicaof rd1 6379 | 配置主节点(主从同步) |
| 541 | masterauth | masterauth 123456 | 配置主节点密码(主从同步) |
| 535 | requirepass 123456 | 密码(在空行添加) |
哨兵配置(可在配置哨兵模式时参考)
| 行号 | 原值 | 新值 | 含义 |
|---|---|---|---|
| 92 | sentinel monitor | sentinel monitor mymaster 192.168.1.103 6379 1 | 哨兵初始监控的主机地址 |
| 112 | sentinel auth-pass mymaster MySUPER–secret-0123passw0rd | sentinel auth-pass mymaster 123456 | 哨兵配置主节点密码(保持所有节点密码一致,避免重新选取主节点后连接失败) |
| 170 | requirepass | requirepass 456789 | 哨兵密码 |
服务启动
连接测试
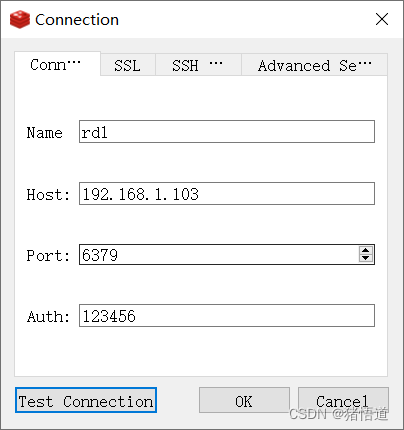
连接
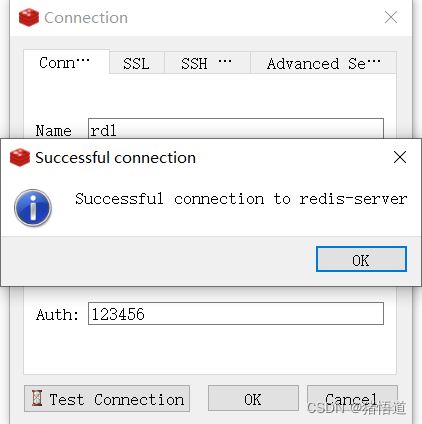
4.Java 单机连接测试
1.Pom 依赖
<?xml version="1.0" encoding="UTF-8"?>
<project xmlns="http://maven.apache.org/POM/4.0.0"
         xmlns:xsi="http://www.w3.org/2001/XMLSchema-instance"
         xsi:schemaLocation="http://maven.apache.org/POM/4.0.0 http://maven.apache.org/xsd/maven-4.0.0.xsd">
    <modelVersion>4.0.0</modelVersion>

    <groupId>org.example</groupId>
    <artifactId>redis-demo</artifactId>
    <version>1.0-SNAPSHOT</version>

    <properties>
        <maven.compiler.source>20</maven.compiler.source>
        <maven.compiler.target>20</maven.compiler.target>
        <project.build.sourceEncoding>UTF-8</project.build.sourceEncoding>
    </properties>

    <dependencies>
        <dependency>
            <groupId>org.springframework.boot</groupId>
            <artifactId>spring-boot-starter-web</artifactId>
            <version>3.1.2</version>
        </dependency>
        <dependency>
            <groupId>org.springframework.boot</groupId>
            <artifactId>spring-boot-starter-data-redis</artifactId>
            <version>3.1.2</version>
        </dependency>
        <dependency>
            <groupId>org.apache.commons</groupId>
            <artifactId>commons-pool2</artifactId>
            <version>2.11.1</version>
        </dependency>

        <!-- 测试类 -->

        <dependency>
            <groupId>junit</groupId>
            <artifactId>junit</artifactId>
            <version>4.13.2</version>
        </dependency>
        <dependency>
            <groupId>org.springframework.boot</groupId>
            <artifactId>spring-boot-starter-test</artifactId>
            <version>3.1.2</version>
        </dependency>
    </dependencies>
</project>
2.配置文件
spring:
  data:
    redis:
      host: 192.168.1.103
      port: 6379
      password: 123456
3.启动类
package org.example;

import org.springframework.boot.SpringApplication;
import org.springframework.boot.autoconfigure.SpringBootApplication;

/**
 * @author zhuwd && moon
 * @Description
 * @create 2023-08-22 22:28
 */
@SpringBootApplication
public class RedisApp {
    public static void main(String[] args) {
        SpringApplication.run(RedisApp.class,args);
    }
}
4.配置类
package org.example.config;

import org.springframework.beans.factory.annotation.Autowired;
import org.springframework.context.annotation.Bean;
import org.springframework.data.redis.connection.RedisConnectionFactory;
import org.springframework.data.redis.core.RedisTemplate;
import org.springframework.data.redis.serializer.StringRedisSerializer;
import org.springframework.stereotype.Component;

/**
 * @author zhuwd && moon
 * @Description
 * @create 2023-08-22 22:29
 */
@Component
public class RedisConfig {

    private RedisConnectionFactory redisConnectionFactory;

    @Autowired
    public void setRedisConnectionFactory(RedisConnectionFactory redisConnectionFactory) {
        this.redisConnectionFactory = redisConnectionFactory;
    }

    @Bean(name = "redisTemplate")
    public RedisTemplate<String, Object> redisTemplate(){
        RedisTemplate<String, Object> redisTemplate = new RedisTemplate<>();
        // 序列化key
        redisTemplate.setKeySerializer(new StringRedisSerializer());
        redisTemplate.setValueSerializer(new StringRedisSerializer());
        // 序列化hash
        redisTemplate.setHashKeySerializer(new StringRedisSerializer());
        redisTemplate.setHashValueSerializer(new StringRedisSerializer());
        // 连接redis数据库
        redisTemplate.setConnectionFactory(redisConnectionFactory);
        return redisTemplate;
    }
}
5.单元测试
import org.example.RedisApp;
import org.junit.Test;
import org.junit.runner.RunWith;
import org.springframework.beans.factory.annotation.Autowired;
import org.springframework.boot.test.context.SpringBootTest;
import org.springframework.data.redis.core.RedisTemplate;
import org.springframework.test.context.junit4.SpringRunner;
/**
* @author zhuwd && moon
* @Description
* @create 2023-08-22 22:29
*/
@RunWith(SpringRunner.class)
@SpringBootTest(classes = RedisApp.class)
public class TestApp {
@Autowired
RedisTemplate<String, Object> redisTemplate;
@Test
public void test(){
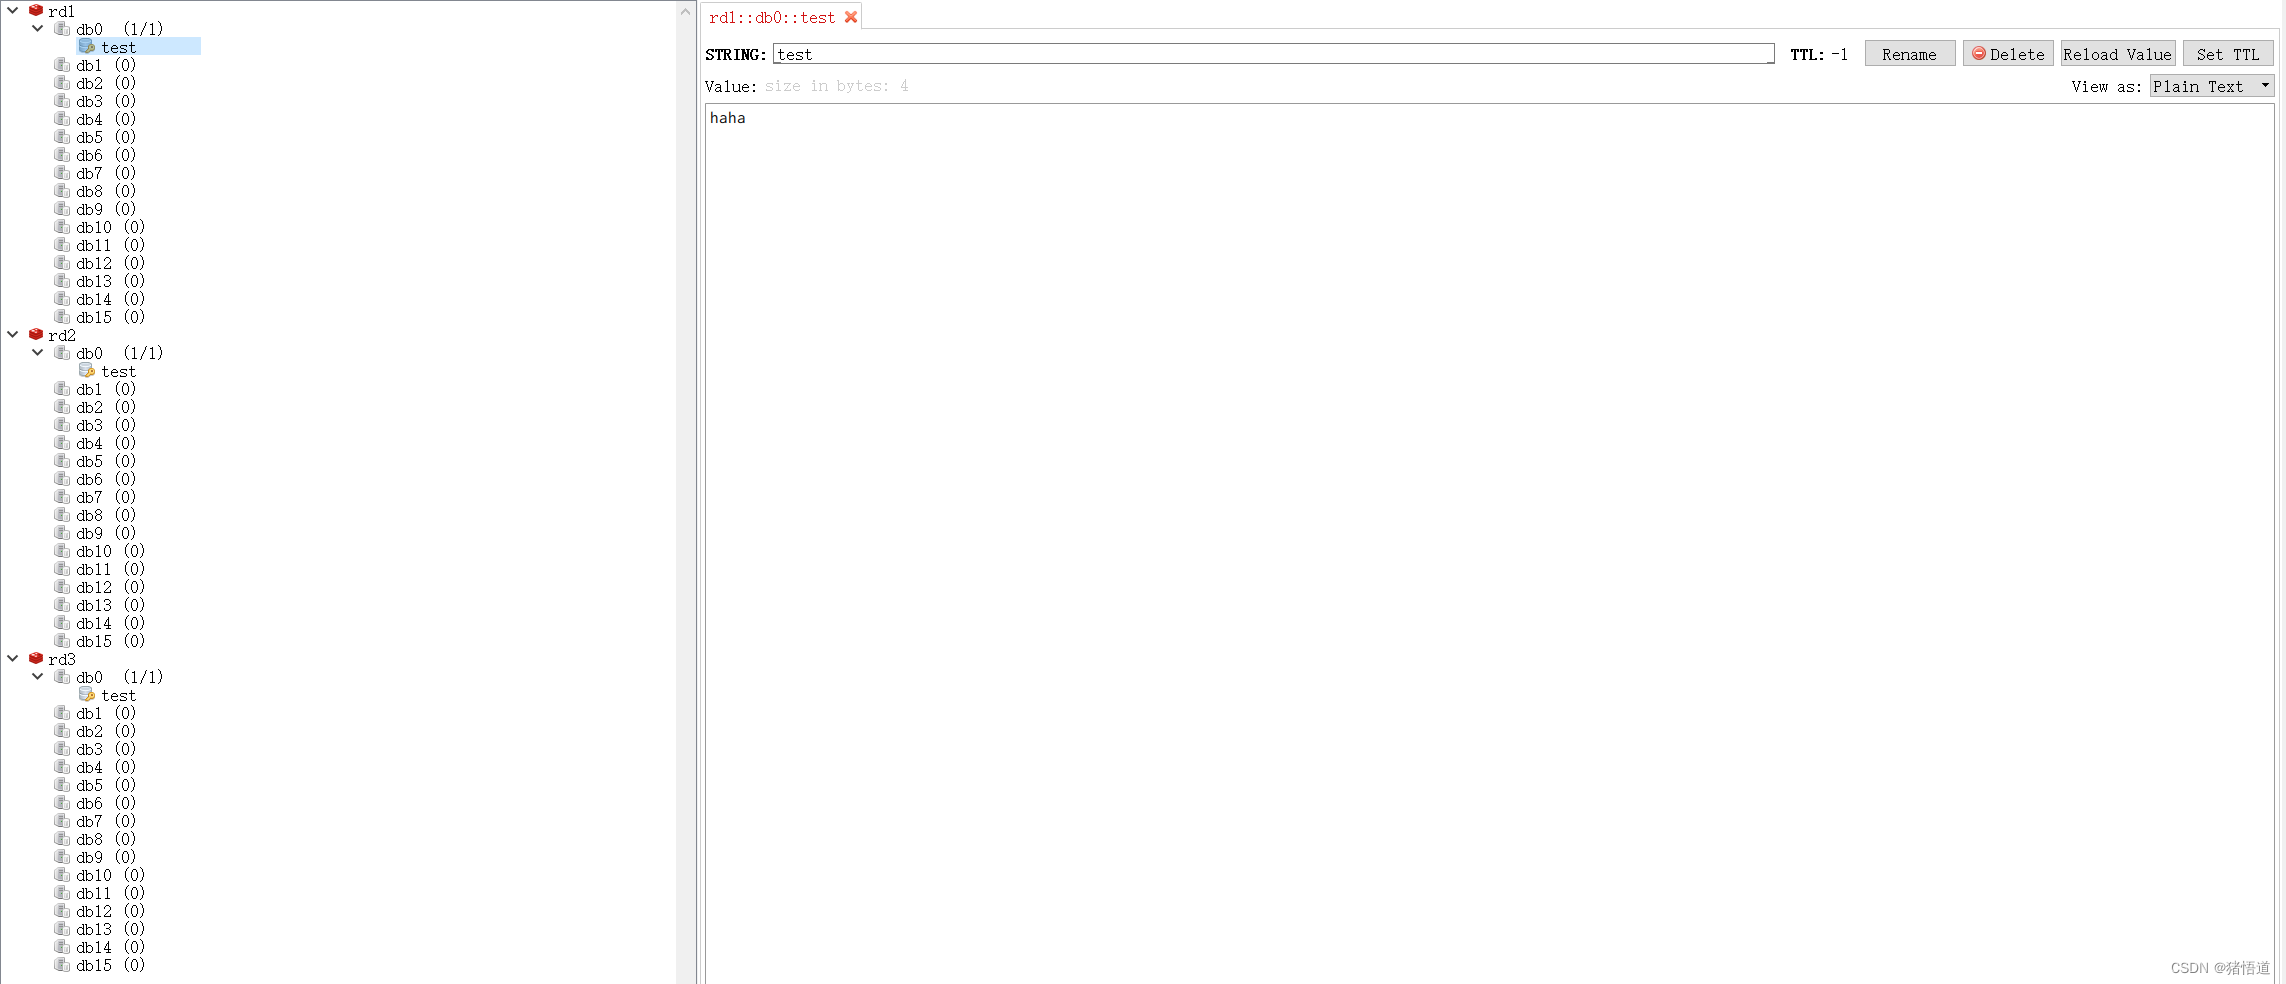
redisTemplate.opsForValue().set("test","haha");
}
}
6.测试结果
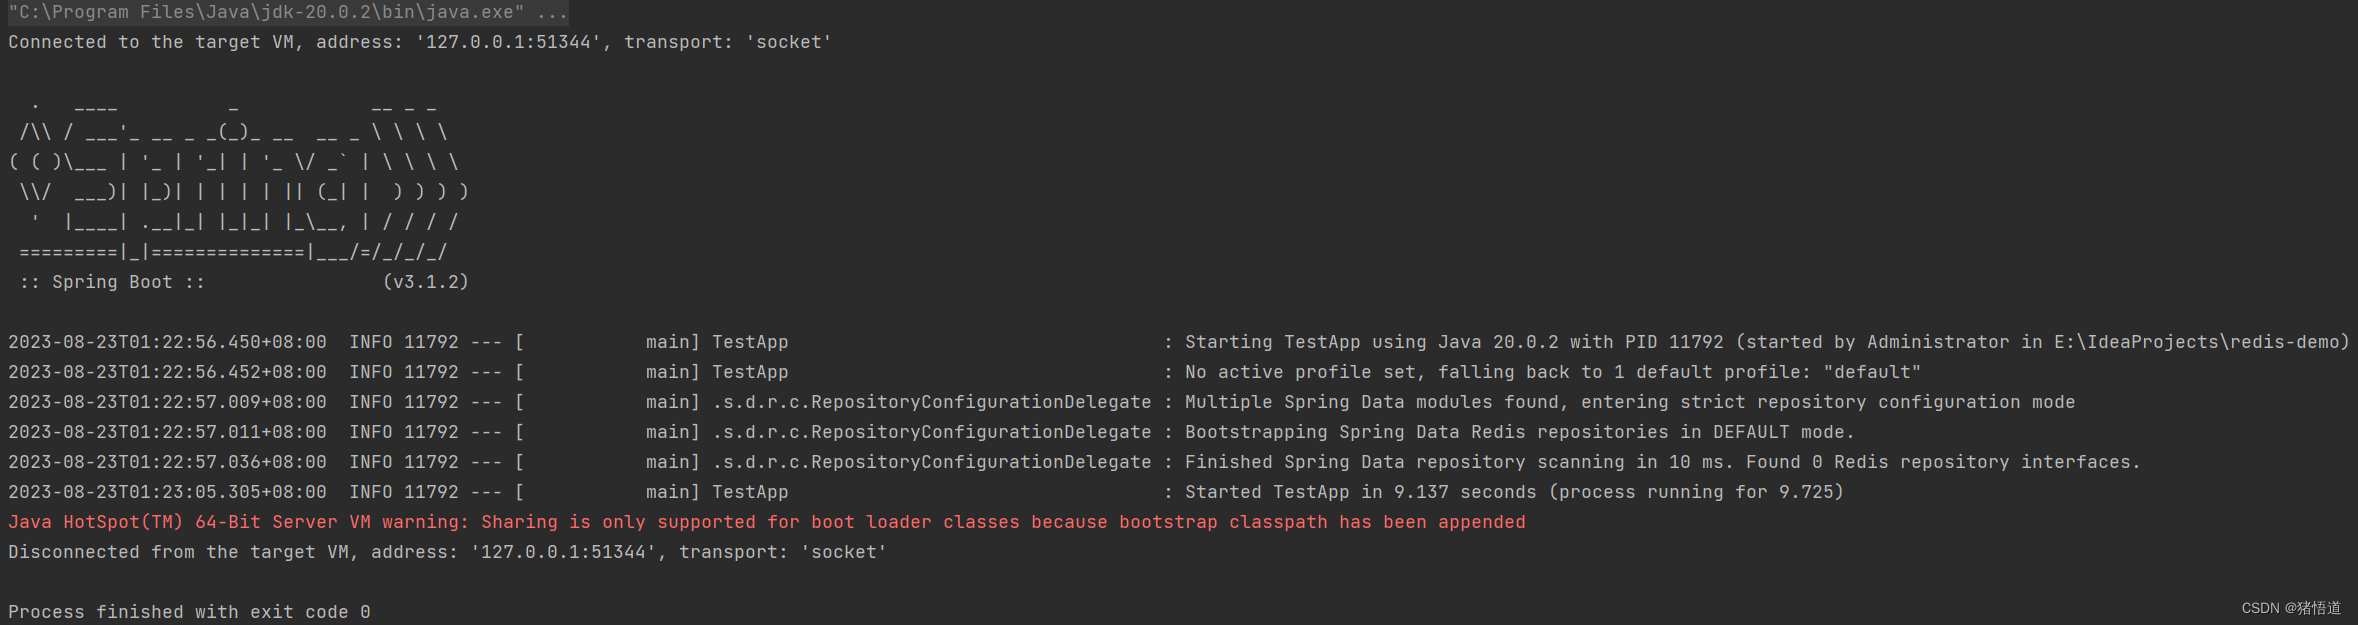
查看值

二.Redis 集群部署
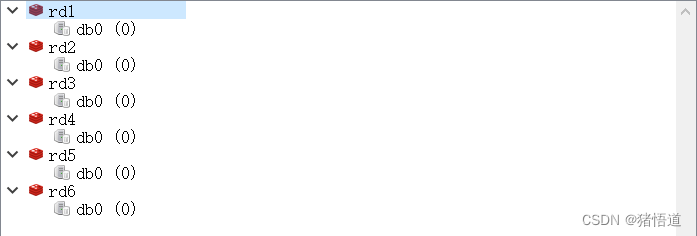
集群信息
| Host | IP |
|---|---|
| rd1 | 192.168.1.103 |
| rd2 | 192.168.1.104 |
| rd3 | 192.168.1.105 |
| rd4 | 192.168.1.106 |
| rd5 | 192.168.1.107 |
| rd6 | 192.168.1.108 |
## 1.将修改后的配置文件复制到安装目录
cp /home/redis-7.2.0/redis.conf /usr/local/redis/
1.主从
1.从节点配置
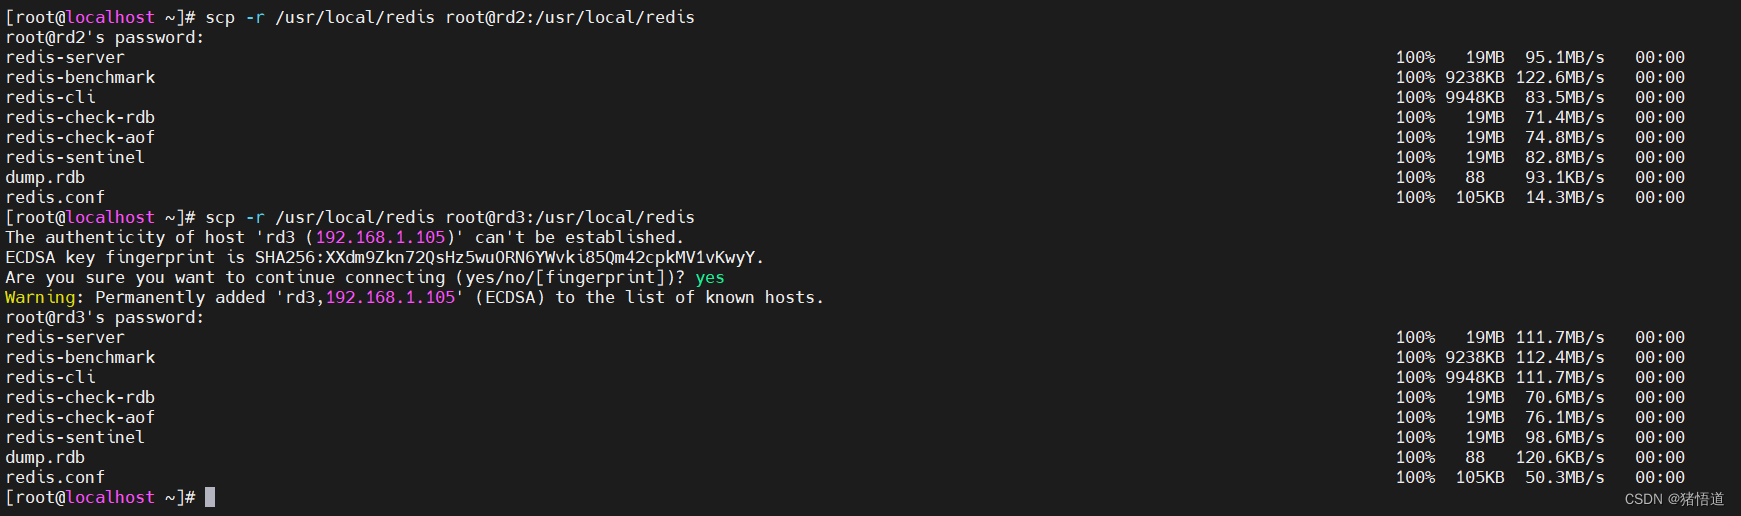
## 1.将 Redis 包拷贝到 rd2 / rd3
scp -r /usr/local/redis root@rd2:/usr/local/redis
scp -r /usr/local/redis root@rd3:/usr/local/redis
## 2.修改 rd2 / rd3 上 redis.conf 配置增加主节点信息 replicaof rd1 6379 / masterauth 123456
vi /usr/local/redis/redis.conf
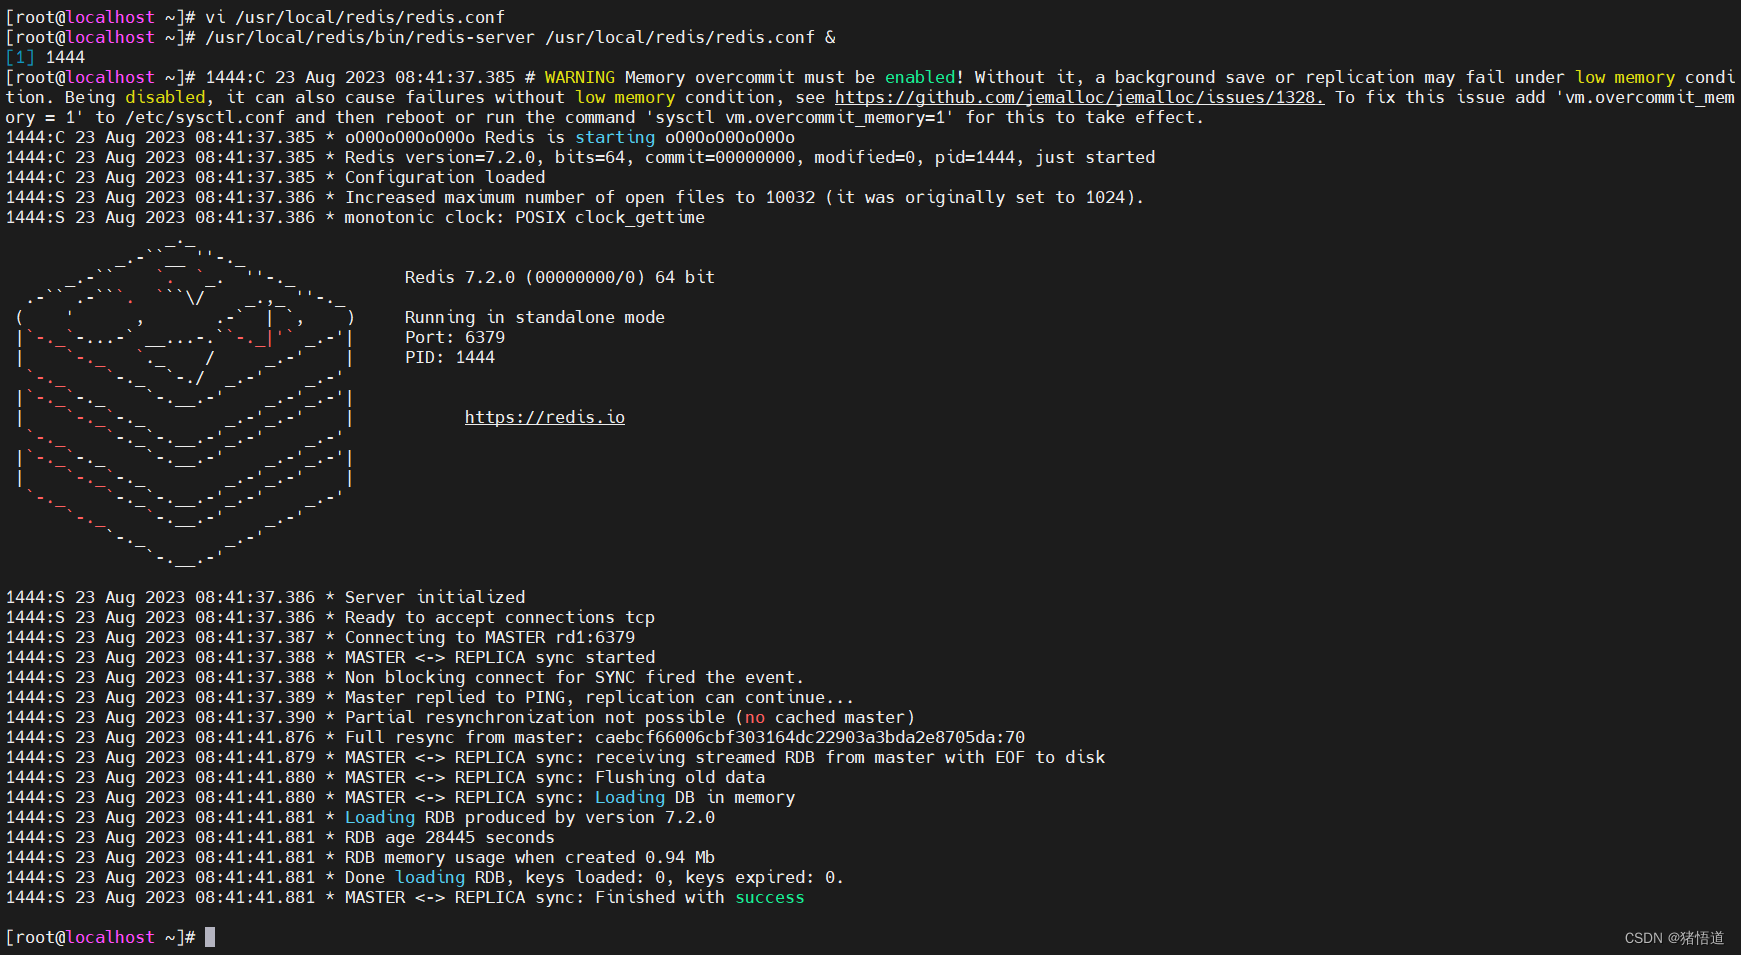
## 3.依次启动 rd1 rd2 rd3
/usr/local/redis/bin/redis-server /usr/local/redis/redis.conf &
## 4.客户端连接
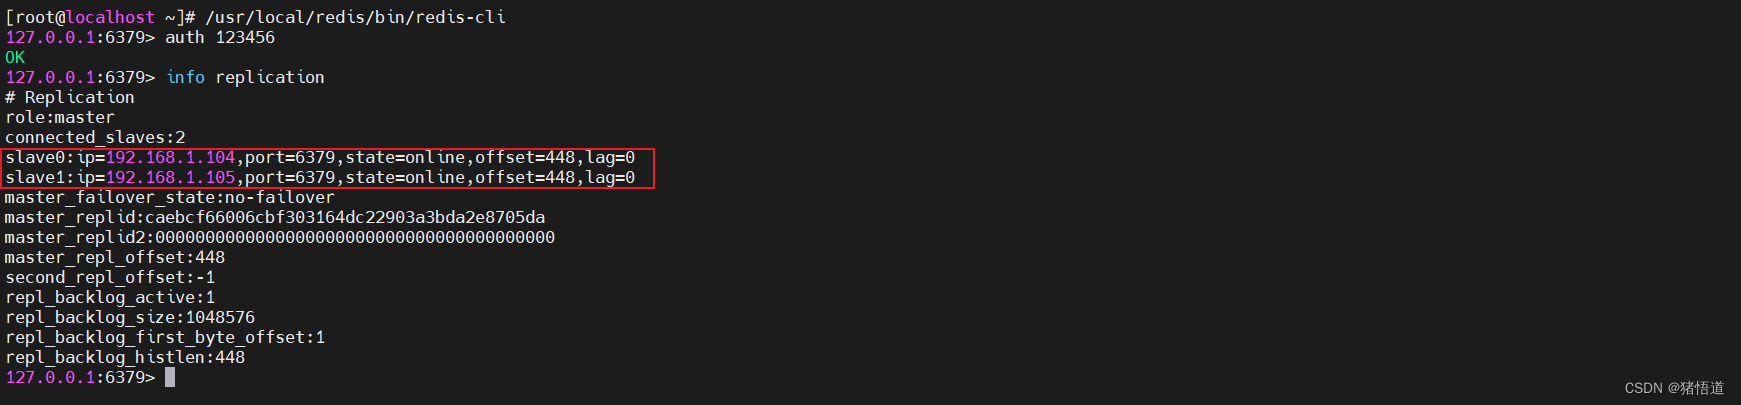
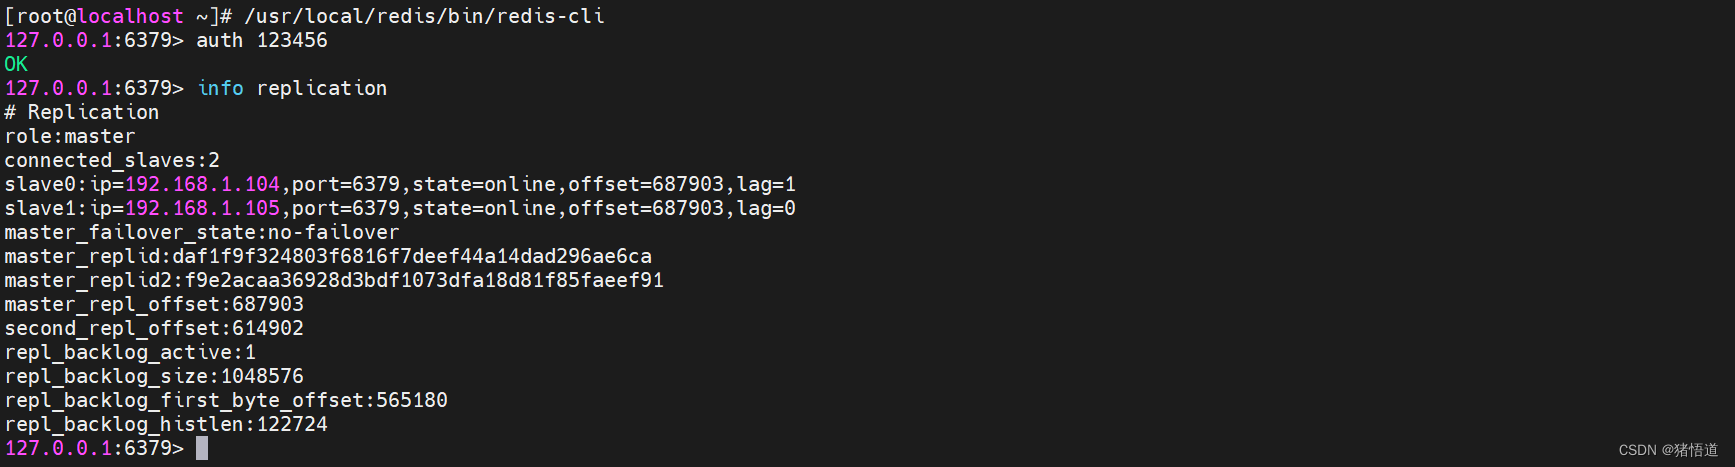
/usr/local/redis/bin/redis-cli
## 5.认证
auth 123456
Redis 安装包复制
增加主节点配置

主节点启动信息
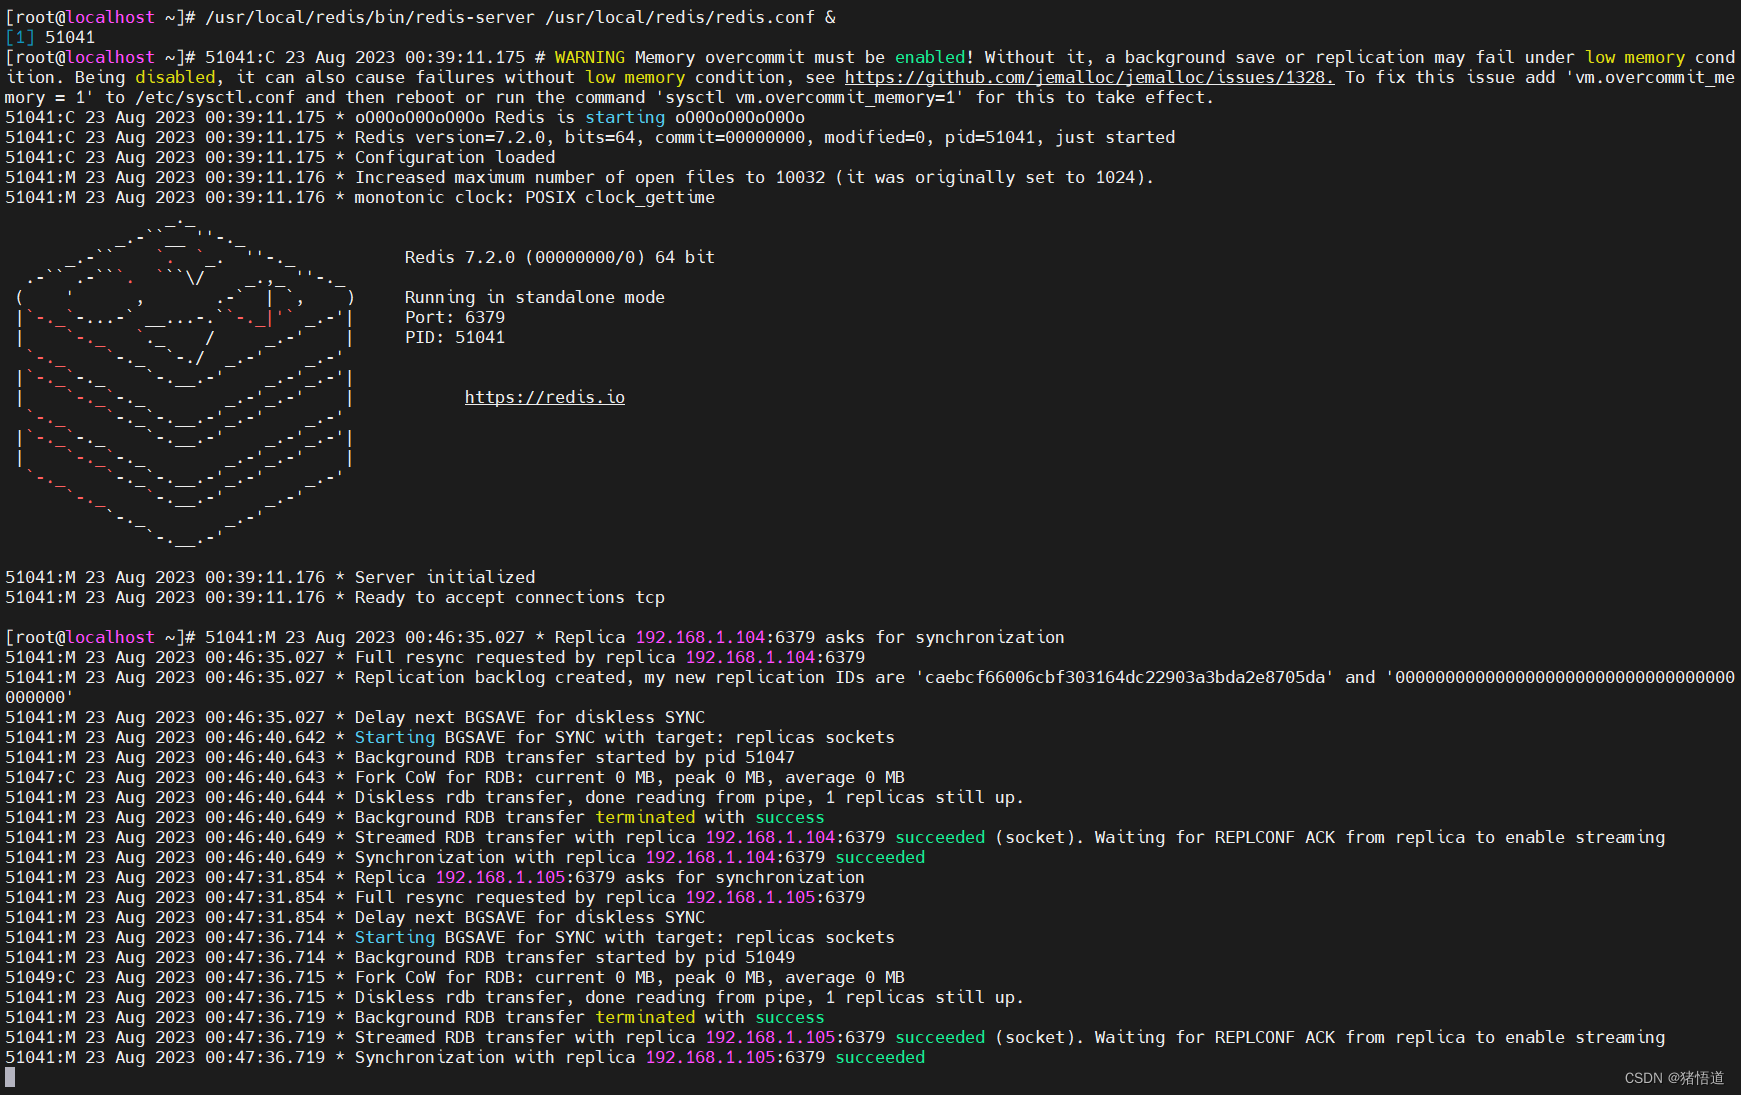
从节点启动信息
查看主从信息
2.Java 测试
通过上面测试代码写入主节点
主从模式故障不支持自动恢复,需要人为处理,从节点读需要手动写读取代码
2.哨兵
1.哨兵节点配置
## 1.复制 redis 包到 rd4
scp -r /usr/local/redis root@rd4:/usr/local/redis
## 2.拷贝 sentinel 配置文件
scp -r /home/redis-7.2.0/sentinel.conf root@rd4:/usr/local/redis/
## 3.修改哨兵配置
# sentinel monitor <master-redis-name> <master-redis-ip> <master-redis-port> <quorum>
# quorum 表示当有多少个 sentinel 认为一个 master 失效时才算真正失效(取值参考 sentinels/2 + 1)
vi /usr/local/redis/sentinel.conf
## 将 92 行修改为 sentinel monitor mymaster 192.168.1.103 6379 1
## 在 112 行增加 sentinel auth-pass mymaster 123456
## 在 170 行增加 requirepass 123456
## 4.启动哨兵
/usr/local/redis/bin/redis-sentinel /usr/local/redis/sentinel.conf &
## 5.查看信息
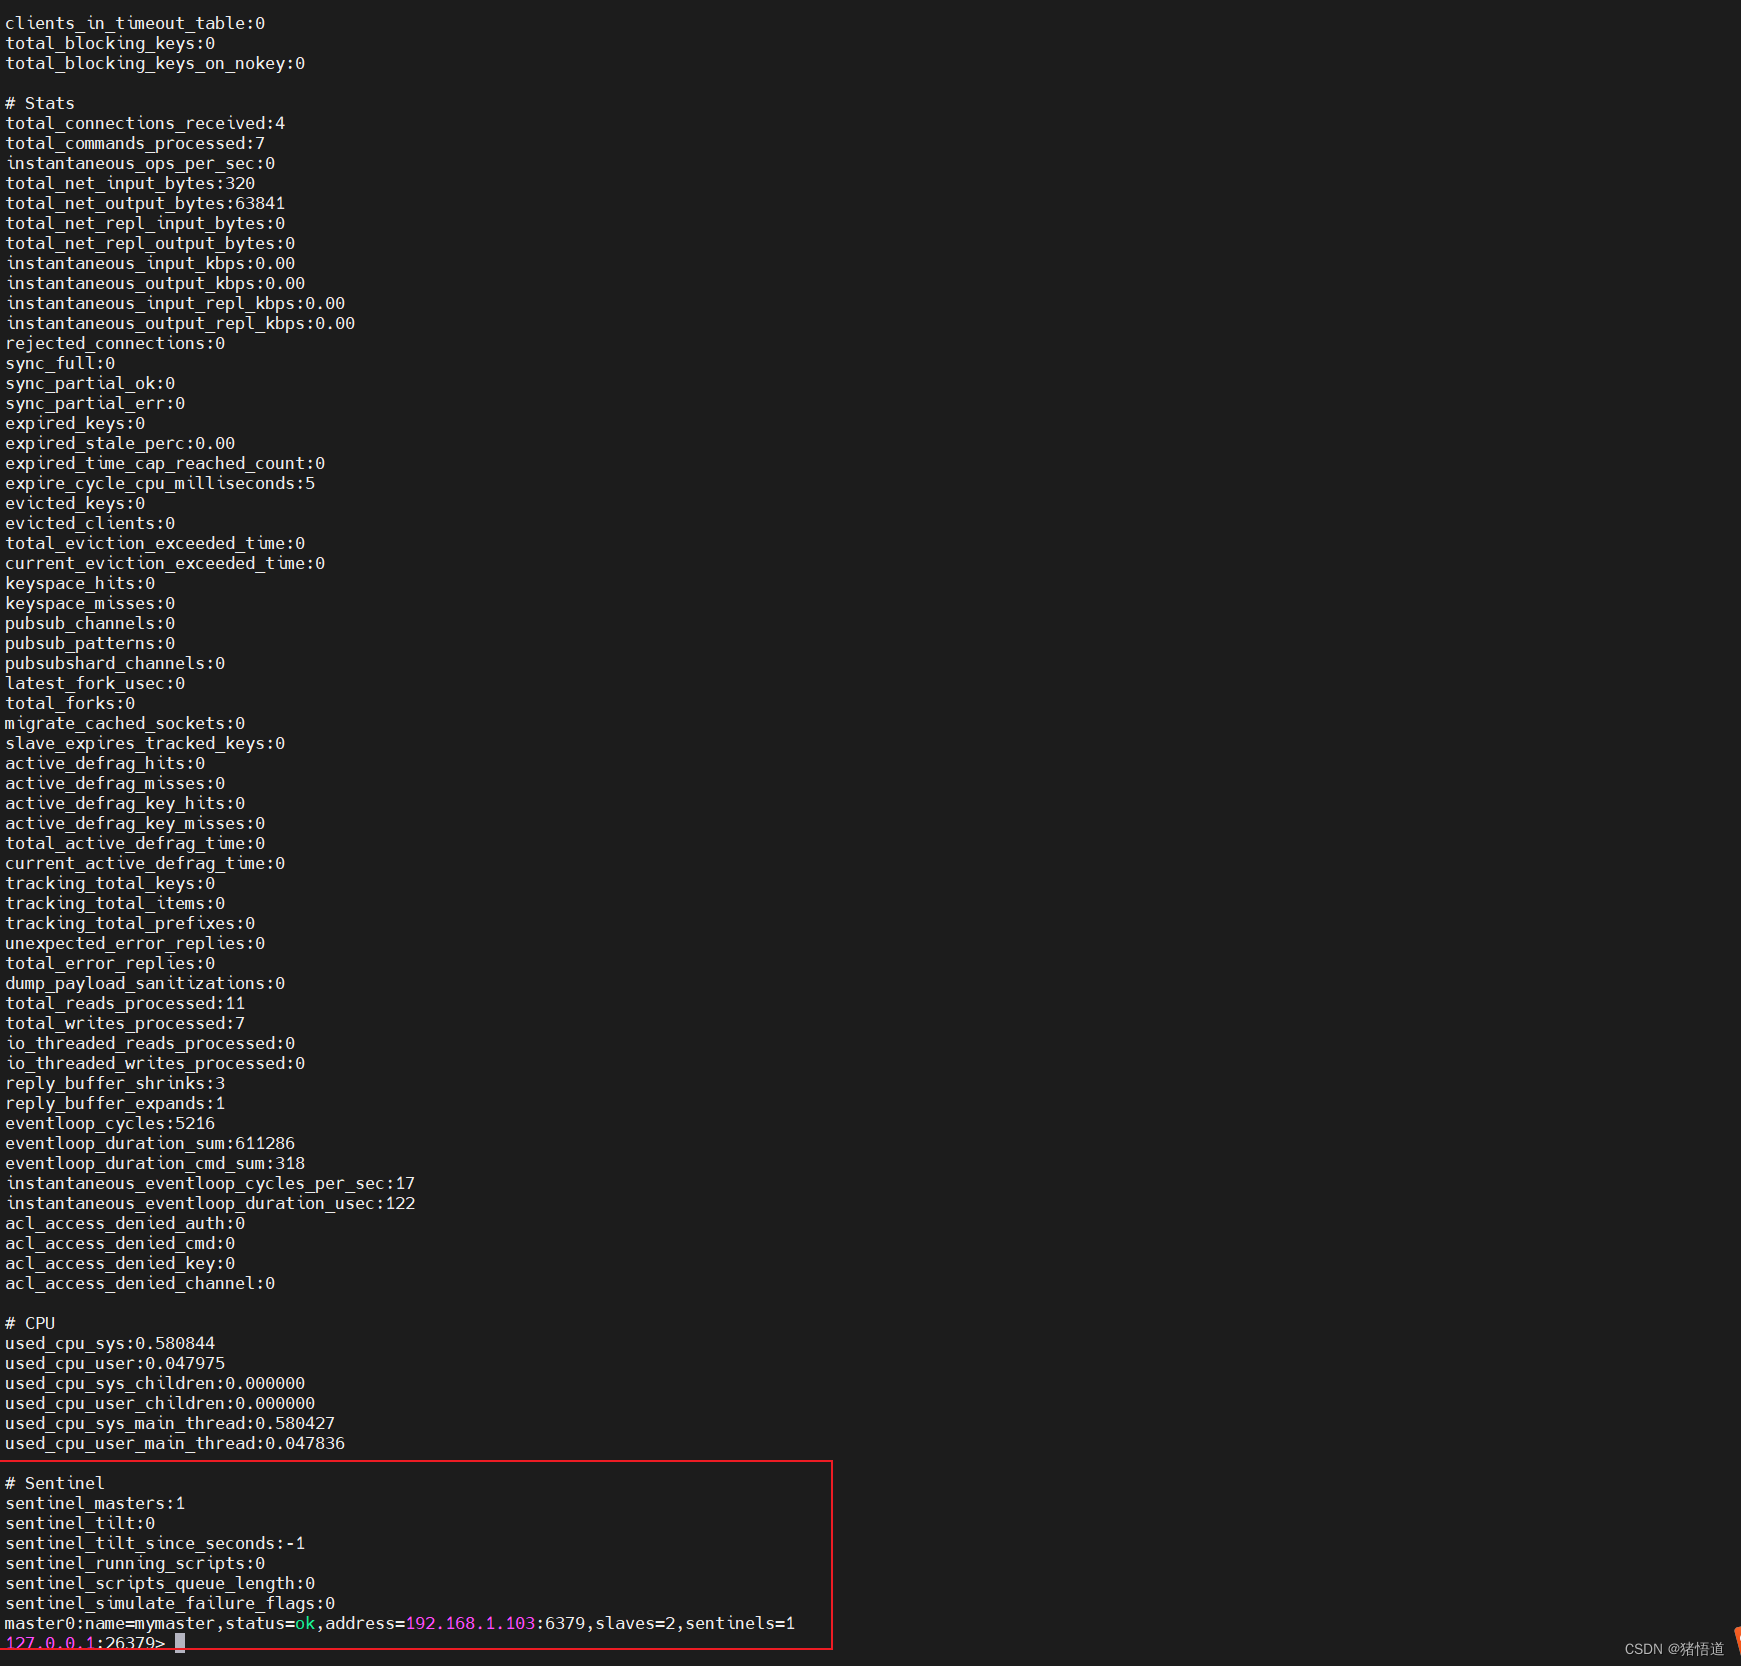
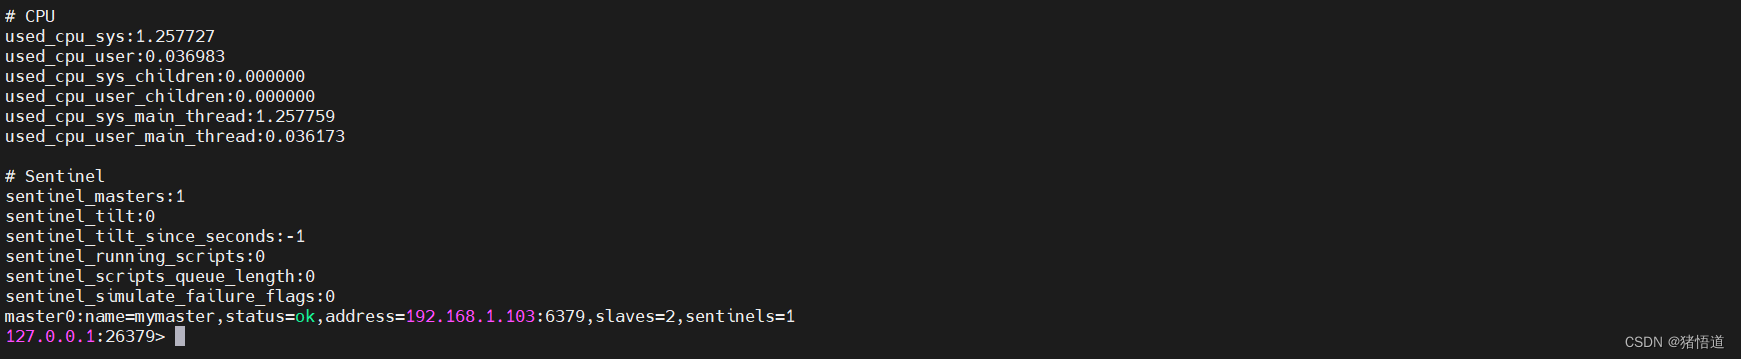
/usr/local/redis/bin/redis-cli -p 26379
127.0.0.1:26379> info
修改配置

哨兵启动信息,注意端口为 26379

查看哨兵信息
2.复制一个哨兵节点(双哨兵)
## 1.停止所有节点
kill -9 `ps aux |grep redis|grep -v grep | awk '{print $2}'`
## 2.创建日志目录
mkdir -p logfile /var/log/redis
## 3.修改配置文件 增加日志输出 大概 355 行
vi /usr/local/redis/redis.conf
vi /usr/local/redis/sentinel.conf
## 增加 logfile /var/log/redis/redis.log
## 增加 logfile /var/log/redis/sentinel.log
## 4.复制配置好的哨兵文件到 rd5
scp -r /usr/local/redis root@rd5:/usr/local/redis
## 5.启动 rd1 / rd2 / rd3
/usr/local/redis/bin/redis-server /usr/local/redis/redis.conf &
## 6.启动 rd4 / rd5 的哨兵
/usr/local/redis/bin/redis-sentinel /usr/local/redis/sentinel.conf &
3.Java 测试访问哨兵
配置文件
spring:
  data:
    redis:
      password: 123456 # 访问主从节点的密码
      sentinel:
        master: mymaster
        nodes: 192.168.1.106:26379,192.168.1.107:26379
        password: 123456 # 访问哨兵的密码
      lettuce:
        pool:
          max-idle: 50
          min-idle: 10
          max-active: 100
          max-wait: 1000

logging:
  level:
    root: info
    io.lettuce.core: debug
    org.springframework.data.redis: debug
配置类
package org.example.config;

import io.lettuce.core.ReadFrom;
import org.springframework.beans.factory.annotation.Qualifier;
import org.springframework.boot.autoconfigure.data.redis.RedisProperties;
import org.springframework.context.annotation.Bean;
import org.springframework.data.redis.connection.RedisClusterConfiguration;
import org.springframework.data.redis.connection.RedisConnectionFactory;
import org.springframework.data.redis.connection.RedisSentinelConfiguration;
import org.springframework.data.redis.connection.RedisStandaloneConfiguration;
import org.springframework.data.redis.connection.lettuce.LettuceConnectionFactory;
import org.springframework.data.redis.connection.lettuce.LettucePoolingClientConfiguration;
import org.springframework.data.redis.core.RedisTemplate;
import org.springframework.data.redis.serializer.StringRedisSerializer;
import org.springframework.stereotype.Component;

import java.time.Duration;
import java.util.HashSet;

/**
 * @author zhuwd && moon
 * @Description
 * @create 2023-08-22 22:29
 */
@Component
public class RedisConfig {

    /**
     * 配置 Redis 工厂
     * @param properties
     * @return
     */
    @Bean(name = "redisConnectionFactory")
    public RedisConnectionFactory redisConnectionFactory(RedisProperties properties) {

        //取配置
        RedisProperties.Cluster cluster = properties.getCluster();
        RedisProperties.Sentinel sentinel = properties.getSentinel();
        RedisProperties.Pool pool = properties.getLettuce().getPool();
        //池化配置
        LettucePoolingClientConfiguration poolingClientConfiguration = LettucePoolingClientConfiguration.builder().readFrom(ReadFrom.ANY_REPLICA).build();
        if (null != pool){
            if (pool.getMaxIdle() > 0){
                poolingClientConfiguration.getPoolConfig().setMaxIdle(pool.getMaxIdle());
            }
            if (pool.getMinIdle() > 0){
                poolingClientConfiguration.getPoolConfig().setMinIdle(pool.getMinIdle());
            }
            if (pool.getMaxActive() > 0){
                poolingClientConfiguration.getPoolConfig().setMaxTotal(pool.getMaxActive());
            }
            if (pool.getMaxWait().compareTo(Duration.ZERO) > 0){
                poolingClientConfiguration.getPoolConfig().setMaxWait(pool.getMaxWait());
            }
        }
        //Redis 配置
        if (null != cluster){
            //集群
            RedisClusterConfiguration clusterConfiguration = new RedisClusterConfiguration(cluster.getNodes());
            if (null != properties.getPassword()){
                clusterConfiguration.setPassword(properties.getPassword());
            }
            if (null != cluster.getMaxRedirects()){
                clusterConfiguration.setMaxRedirects(cluster.getMaxRedirects());
            }
            return new LettuceConnectionFactory(clusterConfiguration,poolingClientConfiguration);
        } else if (null != sentinel){
            //哨兵
            RedisSentinelConfiguration sentinelConfiguration = new RedisSentinelConfiguration(sentinel.getMaster(),new HashSet<>(sentinel.getNodes()));
            sentinelConfiguration.setSentinelPassword(sentinel.getPassword());
            sentinelConfiguration.setPassword(properties.getPassword());
            //设置从节点读
            return new LettuceConnectionFactory(sentinelConfiguration,poolingClientConfiguration);
        } else {
            //单机
            RedisStandaloneConfiguration config = new RedisStandaloneConfiguration();
            config.setHostName(properties.getHost());
            config.setPort(properties.getPort());
            config.setPassword(properties.getPassword());
            return new LettuceConnectionFactory(config);
        }
    }

    /**
     * redis 配置
     * @param redisConnectionFactory
     * @return
     */
    @Bean(name = "redisTemplate")
    public RedisTemplate<String, Object> redisTemplate(@Qualifier("redisConnectionFactory") RedisConnectionFactory redisConnectionFactory){
        RedisTemplate<String, Object> redisTemplate = new RedisTemplate<>();
        // 序列化key
        redisTemplate.setKeySerializer(new StringRedisSerializer());
        redisTemplate.setValueSerializer(new StringRedisSerializer());
        // 序列化hash
        redisTemplate.setHashKeySerializer(new StringRedisSerializer());
        redisTemplate.setHashValueSerializer(new StringRedisSerializer());
        // 连接redis数据库
        redisTemplate.setConnectionFactory(redisConnectionFactory);
        return redisTemplate;
    }

}
启动类
package org.example;

import org.springframework.boot.SpringApplication;
import org.springframework.boot.autoconfigure.SpringBootApplication;

/**
 * @author zhuwd && moon
 * @Description
 * @create 2023-08-22 22:28
 */
@SpringBootApplication
public class RedisApp {

    public static void main(String[] args) {
        SpringApplication.run(RedisApp.class,args);
    }
}
测试类
package org.example.controller;

import org.springframework.beans.factory.annotation.Autowired;
import org.springframework.data.redis.core.RedisTemplate;
import org.springframework.web.bind.annotation.GetMapping;
import org.springframework.web.bind.annotation.RequestMapping;
import org.springframework.web.bind.annotation.RestController;

/**
 * @author zhuwd && moon
 * @Description
 * @create 2023-08-23 20:13
 */
@RequestMapping("/redis")
@RestController
public class RedisTest {

    @Autowired
    RedisTemplate<String, Object> redisTemplate;

    @GetMapping("/write")
    public void write(String key,String val){
        redisTemplate.opsForValue().set(key,val);
    }

    @GetMapping("/read")
    public void read(String key){
        System.out.println(redisTemplate.opsForValue().get(key));
    }
}
查看主节点:/usr/local/redis/bin/redis-cli -p 26379
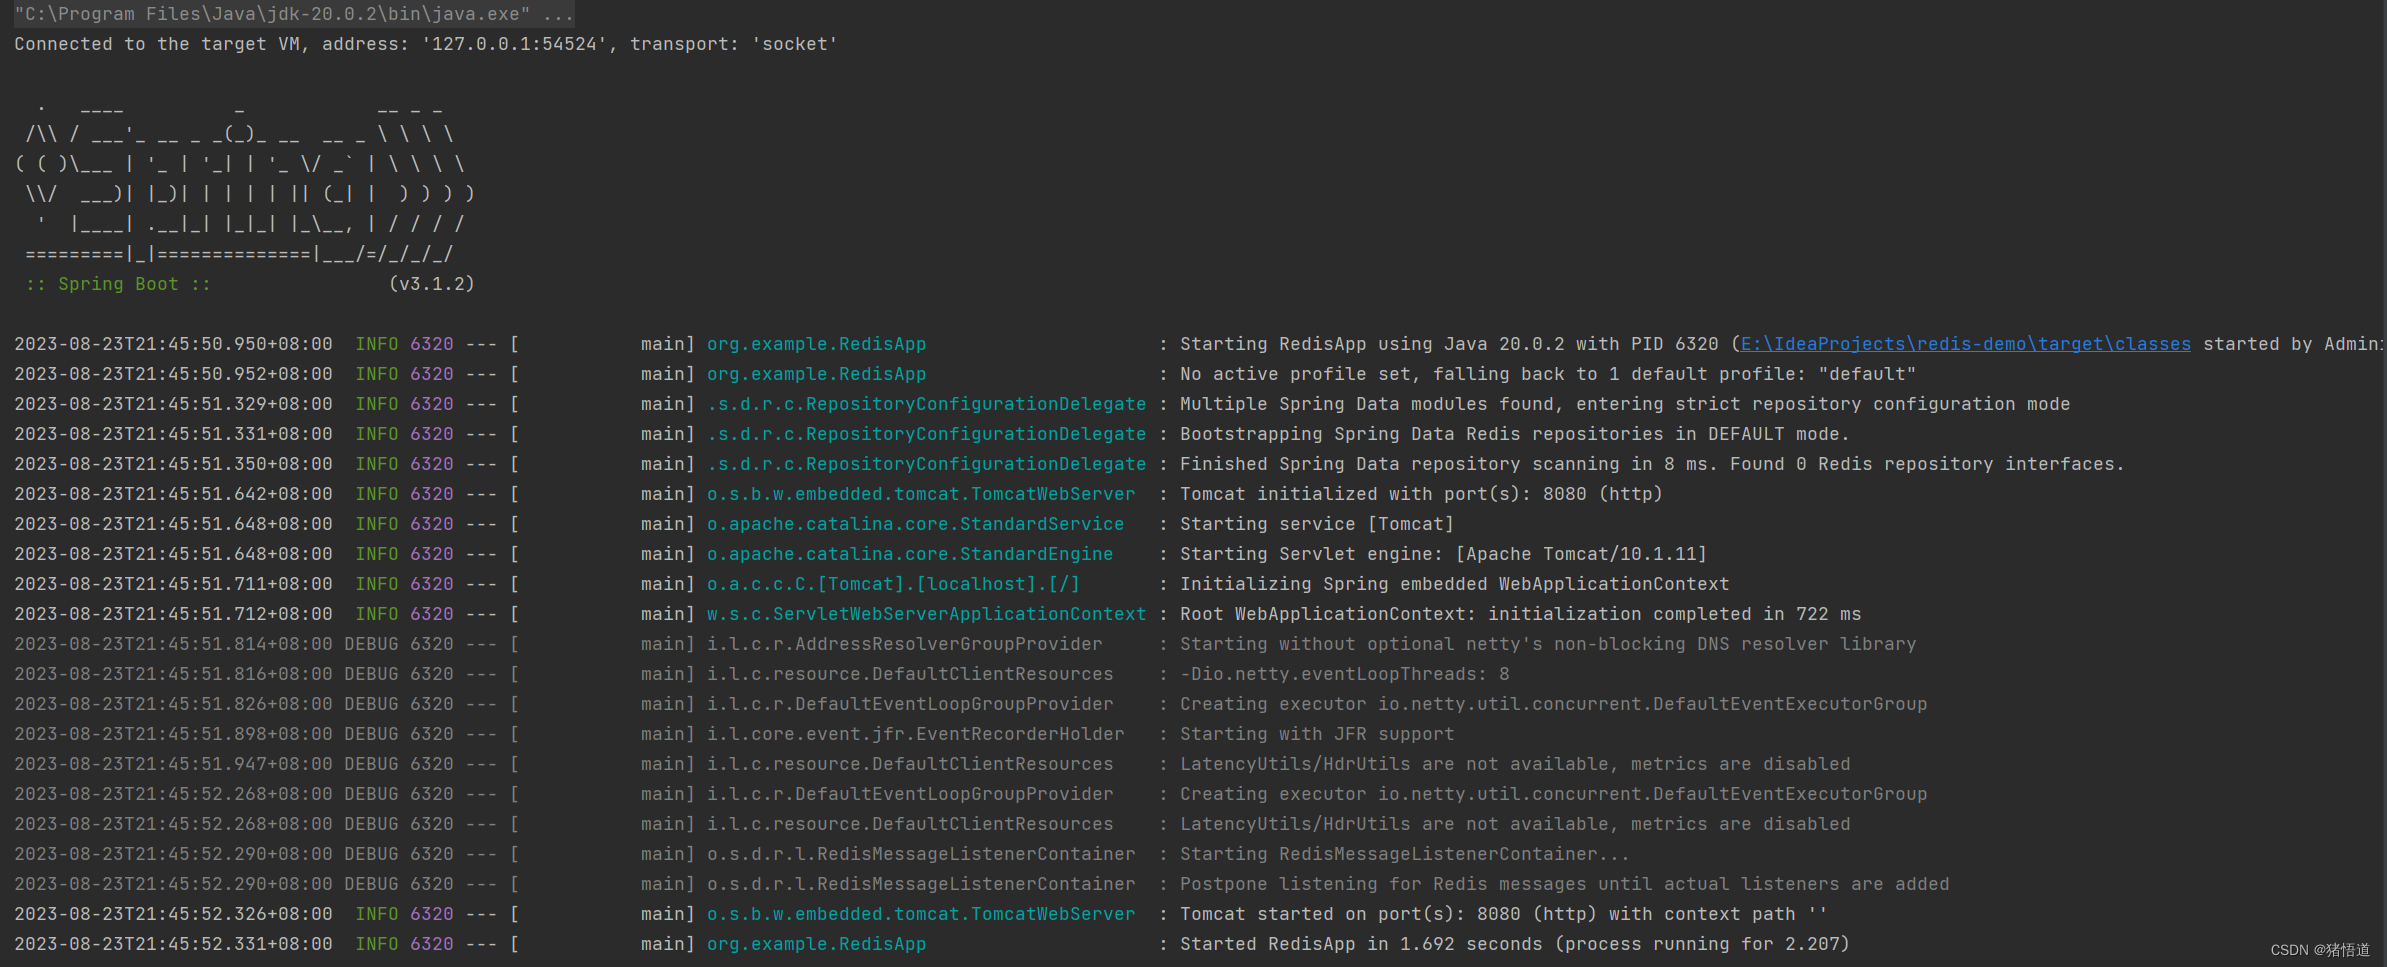
启动服务
测试写集群:127.0.0.1:8080/redis/write?key=test&val=hello
写节点:rd3

读数据:rd2

杀掉主节点并等待:kill -9 ps aux |grep redis|grep -v grep | awk '{print $2}'

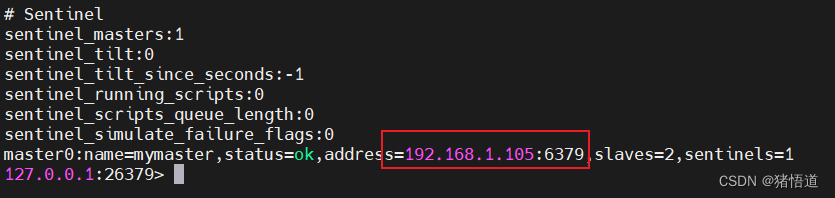
查看 rd4 哨兵,主节点切为 rd2

查看 rd5 哨兵,主节点
写测试:127.0.0.1:8080/redis/write?key=test&val=reHello

读测试:127.0.0.1:8080/redis/read?key=test

恢复 rd5 服务:/usr/local/redis/bin/redis-server /usr/local/redis/redis.conf &

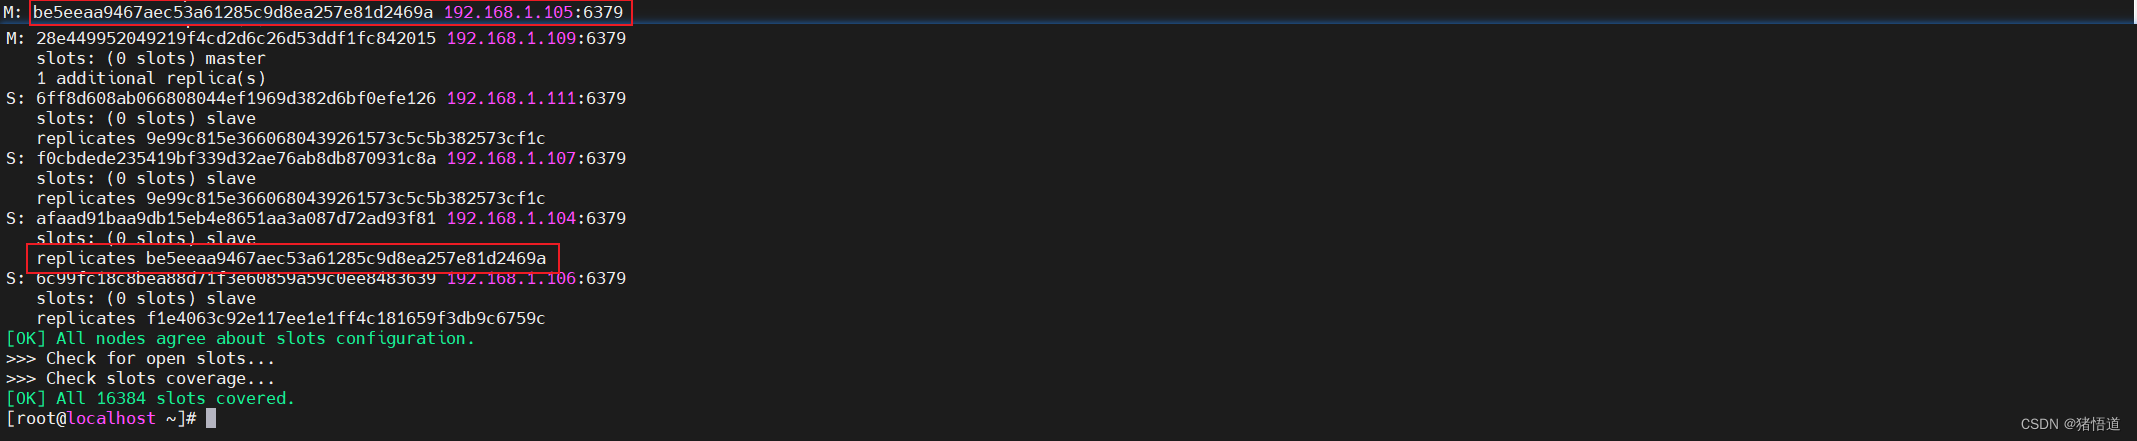
通过 rd1 查看从节点信息
3.集群
清除之前测试写入的数据
查找持久化文件:find / -type f -name dump.rdb 如果存在也删掉
1.集群配置文件修改
## 1.在 rd1 复制配置文件
cp /home/redis-7.2.0/redis.conf /usr/local/redis/redis-cluster.conf
## 2.编辑
vim /usr/local/redis/redis-cluster.conf
## 设置密码 requirepass 123456
## 关闭保护模式 protected-mode no
## 开启集群 cluster-enabled yes 约1586行
## 设置配置文件 cluster-config-file redis-cluster.conf 约1594行
## 设置超时 cluster-node-timeout 15000 约1600行
## 设置主节点密码 masterauth 123456
## 设置日志 logfile /var/log/redis/redis-cluster.log
## 3.将 redis-cluster.conf 分发到 rd2 / rd3 / rd4 / rd5 / rd6
scp /usr/local/redis/redis-cluster.conf root@rd2:/usr/local/redis/
scp /usr/local/redis/redis-cluster.conf root@rd3:/usr/local/redis/
scp /usr/local/redis/redis-cluster.conf root@rd4:/usr/local/redis/
scp /usr/local/redis/redis-cluster.conf root@rd5:/usr/local/redis/
scp /usr/local/redis/redis-cluster.conf root@rd6:/usr/local/redis/
## 4.依次启动 rd1 / rd2 /rd3 /rd4 /rd5 / rd6
/usr/local/redis/bin/redis-server /usr/local/redis/redis-cluster.conf &
## 5.清空已有数据
## 5.创建集群 在任一节点执行
## -a 密码认证,若没写密码无效带这个参数
## --cluster create 创建集群实例列表 IP:PORT IP:PORT IP:PORT IP:PORT IP:PORT IP:PORT
## --cluster-replicas 复制因子1(即每个主节点需2个从节点)
/usr/local/redis/bin/redis-cli -a 123456 --cluster create --cluster-replicas 1 192.168.1.103:6379 192.168.1.104:6379 192.168.1.105:6379 192.168.1.106:6379 192.168.1.107:6379 192.168.1.108:6379
启动所有节点服务
创建集群:集群至少要三个主节点,
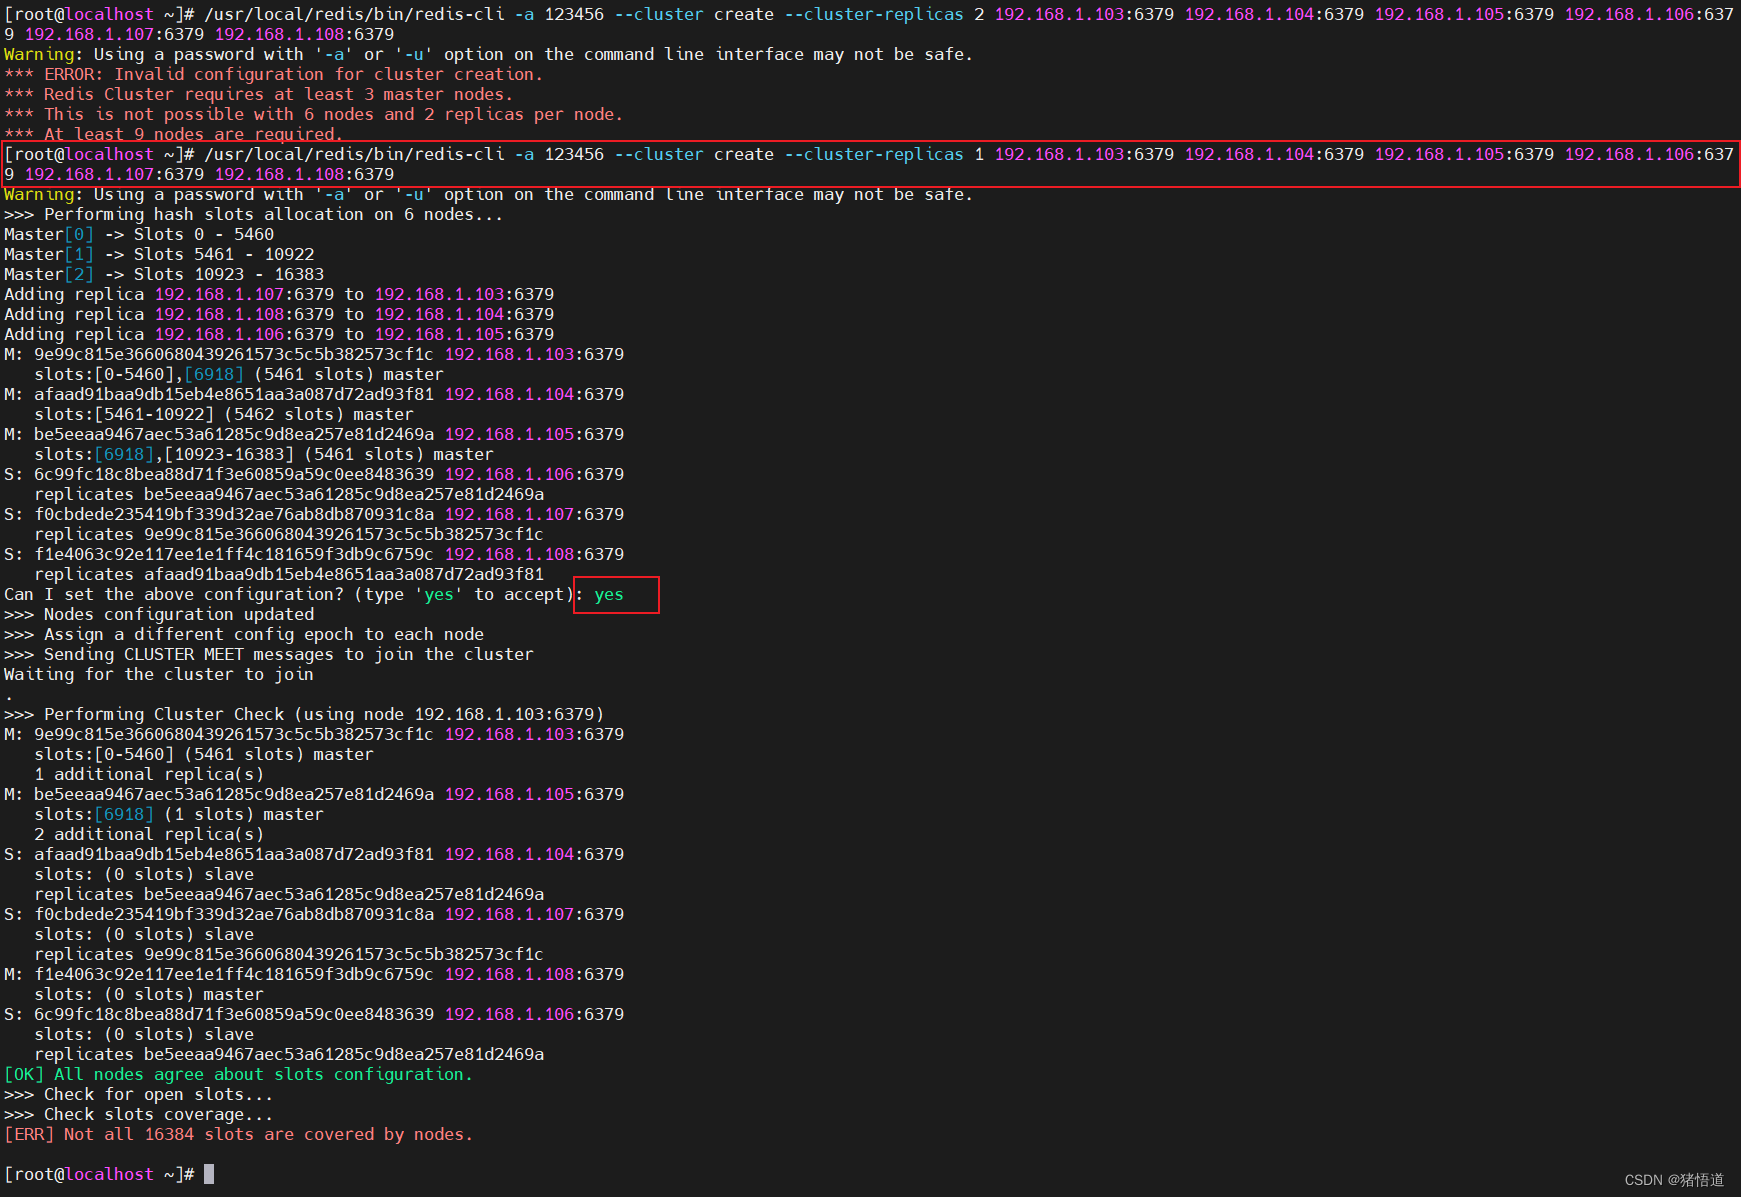
查看集群信息和集群节点

新建三台虚拟机
| Host | IP |
|---|---|
| rd7 | 192.168.1.109 |
| rd8 | 192.168.1.110 |
| rd9 | 192.168.1.111 |
## 1.新建三台虚拟机并分发配置 rd7 / rd8 /rd9
scp -r /usr/local/redis root@192.168.1.109:/usr/local/
scp -r /usr/local/redis root@192.168.1.110:/usr/local/
scp -r /usr/local/redis root@192.168.1.111:/usr/local/
## 2.创建日志目录 / 关闭防火墙并禁用
mkdir -p /var/log/redis
systemctl stop firewalld && systemctl disable firewalld
## 3.启动 rd7 / rd8 /rd9
/usr/local/redis/bin/redis-server /usr/local/redis/redis-cluster.conf &
## 4.将新节点添加到当前集群 在 rd1 执行
## -a 密码认证,若没写密码无效带这个参数
## --cluster add-node 创建集群实例列表 IP:PORT IP:PORT IP:PORT IP:PORT IP:PORT IP:PORT
## 要有一个节点为当前集群的节点
## /usr/local/redis/bin/redis-cli -a 123456 --cluster add-node 192.168.1.109:6379 192.168.1.110:6379 192.168.1.111:6379 192.168.1.103:6379
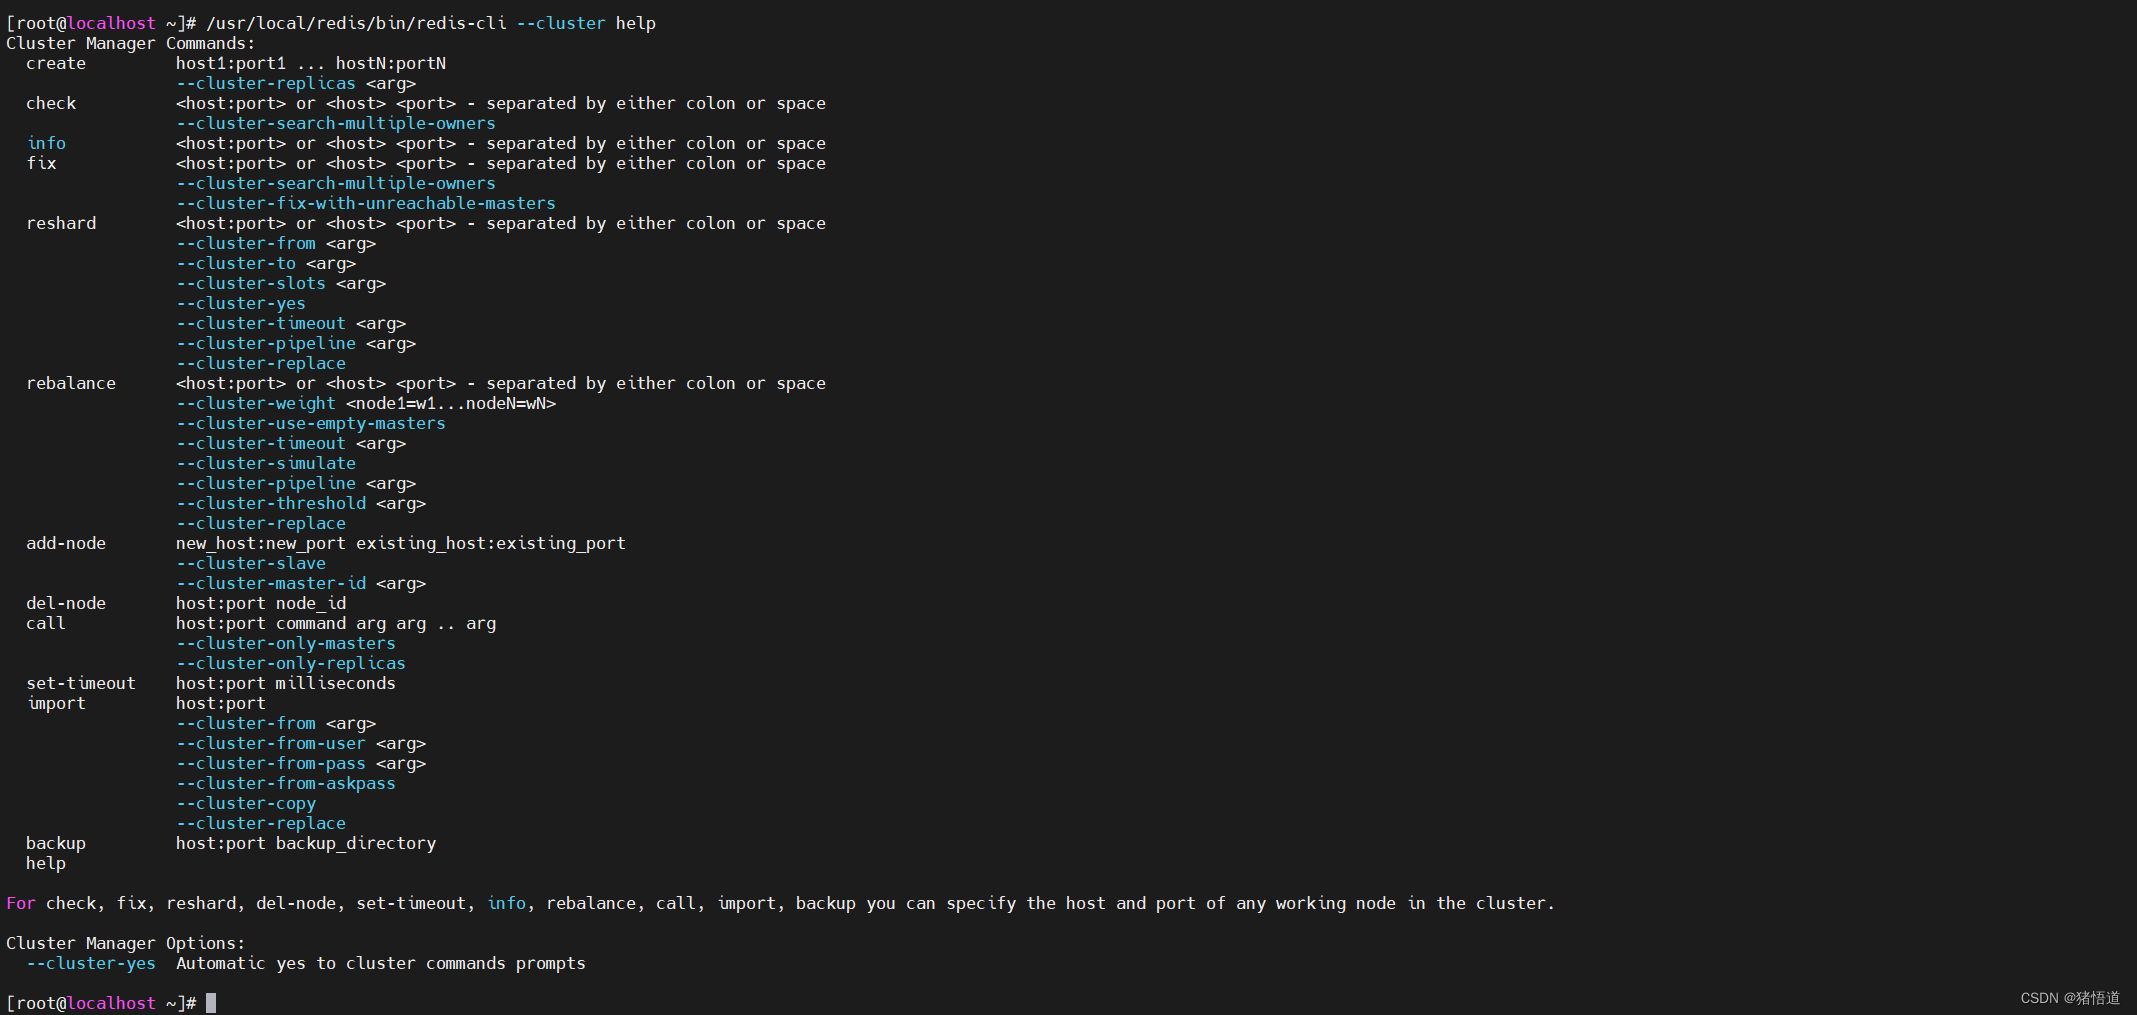
查看集群命令说明:/usr/local/redis/bin/redis-cli --cluster help
## 添加主节点
/usr/local/redis/bin/redis-cli -a 123456 --cluster add-node 192.168.1.109:6379 192.168.1.103:6379
## 如果 slot 分配不均,可以用如下命令修复集群
## 分配不均报错如下 [ERR] Not all 16384 slots are covered by nodes.
/usr/local/redis/bin/redis-cli -a 123456 --cluster fix 192.168.1.103:6379
## 执行 resharding 指令来为它分配 hash slots
## 执行下面命令后要依次设置移动 slot 的节点 ID 源节点列表,可直接用 all
/usr/local/redis/bin/redis-cli -a 123456 --cluster reshard 192.168.1.103:6379
添加主节点并查看结果(部分截图)

查看主从节点状态:/usr/local/redis/bin/redis-cli -a 123456 --cluster check 192.168.1.103:6379 | grep ‘M|S’

## 随机添加从节点,优先添加到从节点少的节点下
/usr/local/redis/bin/redis-cli -a 123456 --cluster add-node 192.168.1.110:6379 192.168.1.103:6379 --cluster-slave
## 添加到指定主节点下(添加到 103 即 rd1 下面)
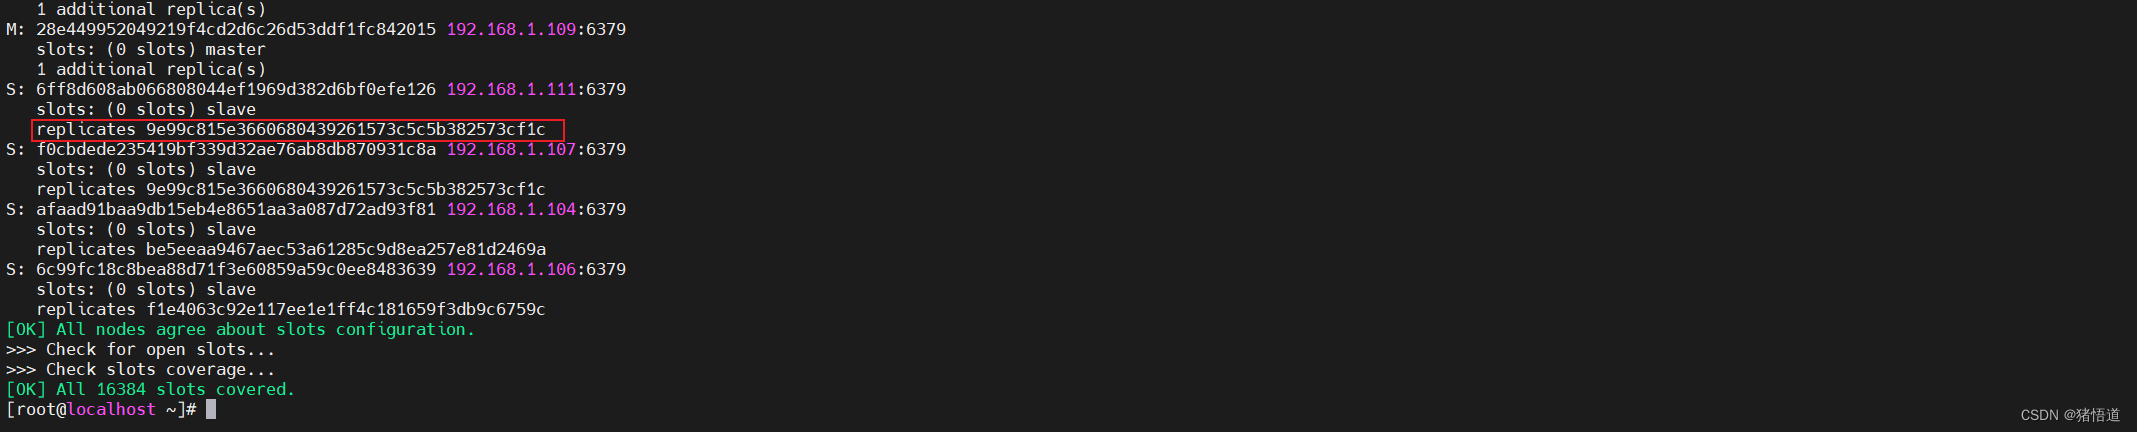
/usr/local/redis/bin/redis-cli -a 123456 --cluster add-node 192.168.1.111:6379 192.168.1.103:6379 --cluster-slave --cluster-master-id 9e99c815e3660680439261573c5c5b382573cf1c
随机添加

查看主从节点状态:/usr/local/redis/bin/redis-cli -a 123456 --cluster check 192.168.1.103:6379
2.Java 访问 Redis 集群测试
配置集群主节点
spring:
  data:
    redis:
      password: 123456 # 访问主从节点的密码
      cluster:
        max-redirects: 10
        nodes: 192.168.1.103:6379,192.168.1.105:6379,192.168.1.108:6379,192.168.1.109:6379
      lettuce:
        pool:
          max-idle: 50
          min-idle: 10
          max-active: 100
          max-wait: 1000
          enabled: true

logging:
  level:
    root: info
    io.lettuce.core: debug
    org.springframework.data.redis: debug
修改插入方法计算 SLOT
package org.example.controller;

import io.lettuce.core.codec.CRC16;
import org.springframework.beans.factory.annotation.Autowired;
import org.springframework.data.redis.core.RedisTemplate;
import org.springframework.web.bind.annotation.GetMapping;
import org.springframework.web.bind.annotation.RequestMapping;
import org.springframework.web.bind.annotation.RestController;

/**
 * @author zhuwd && moon
 * @Description
 * @create 2023-08-23 20:13
 */
@RestController
@RequestMapping("/redis")
public class RedisTest {

    @Autowired
    RedisTemplate<String, Object> redisTemplate;

    private static final int SLOT_S = 16384;

    @GetMapping("/write")
    public void write(String key,String val){
        int slot = CRC16.crc16(key.getBytes())%SLOT_S;
        redisTemplate.opsForValue().set(key,val);
        System.out.println("slot " + slot + " key " + key + " val " + val);
    }

    @GetMapping("/read")
    public void read(String key){
        System.out.println(redisTemplate.opsForValue().get(key));
    }
}
测试插入数据:127.0.0.1:8080/redis/write?key=test&val=reHello
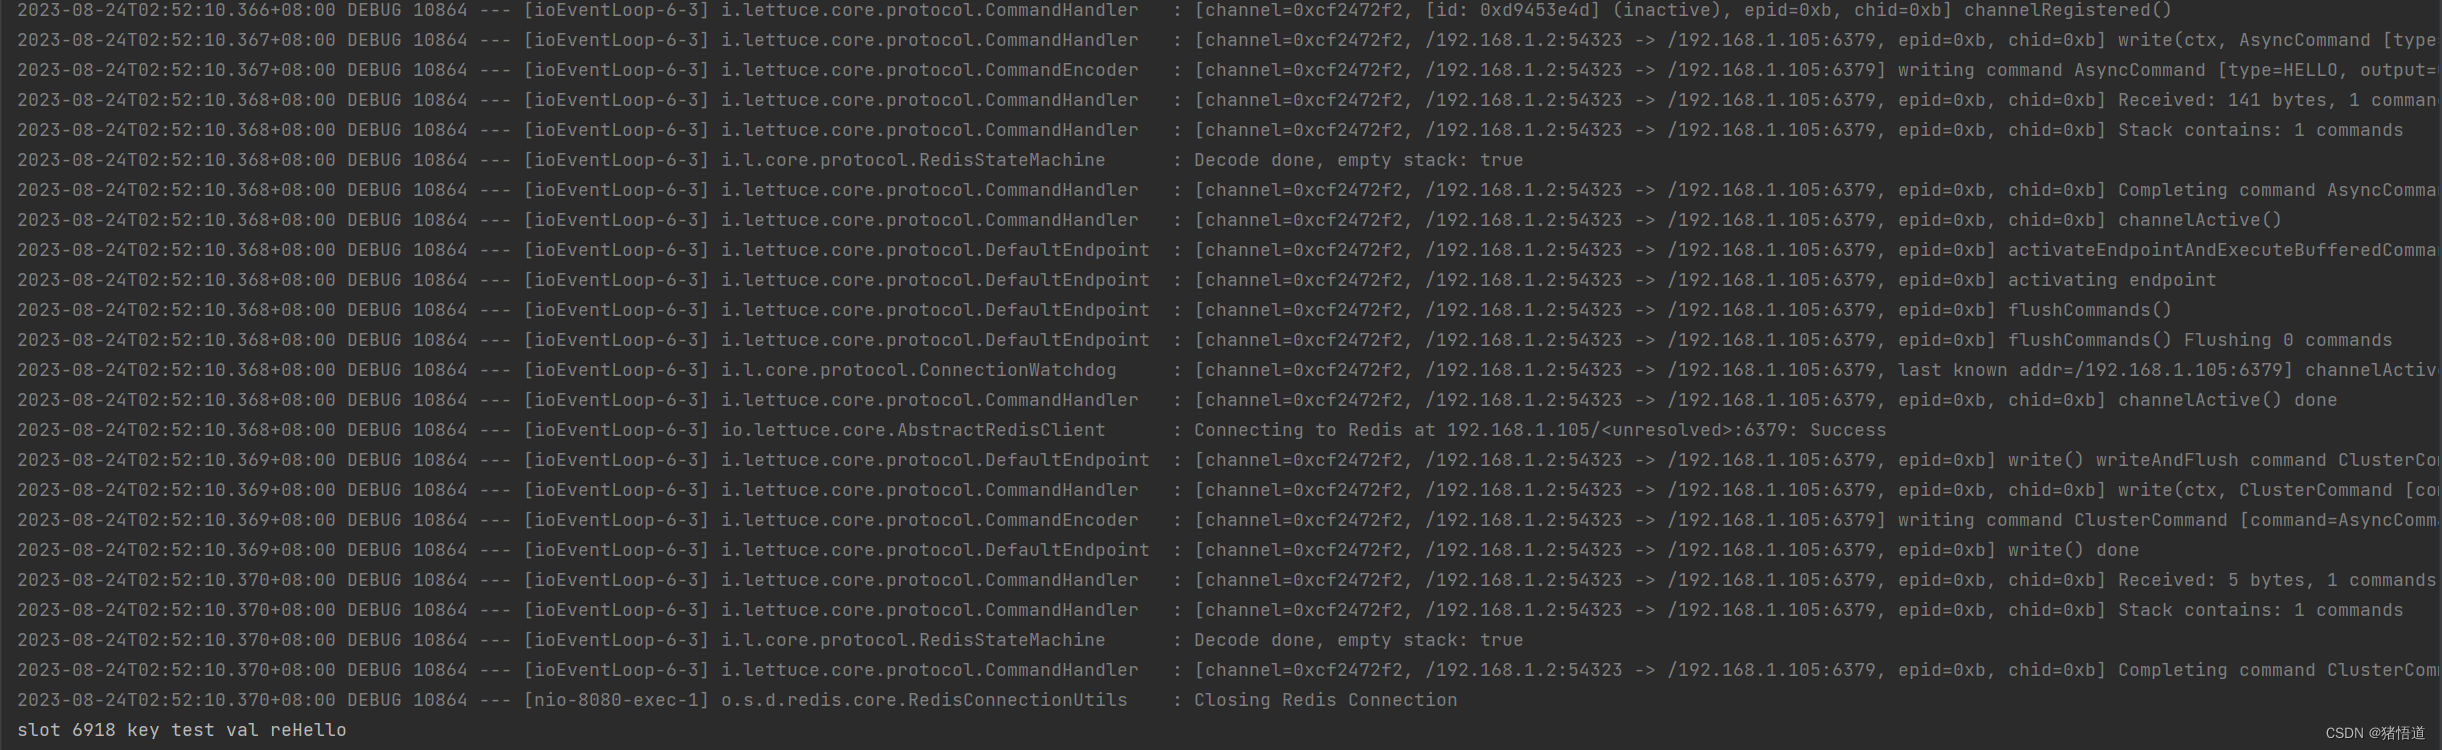
查看日志插入主节点为 rd3【192.168.1.105】,槽号为 6918
读数据:127.0.0.1:8080/redis/read?key=test
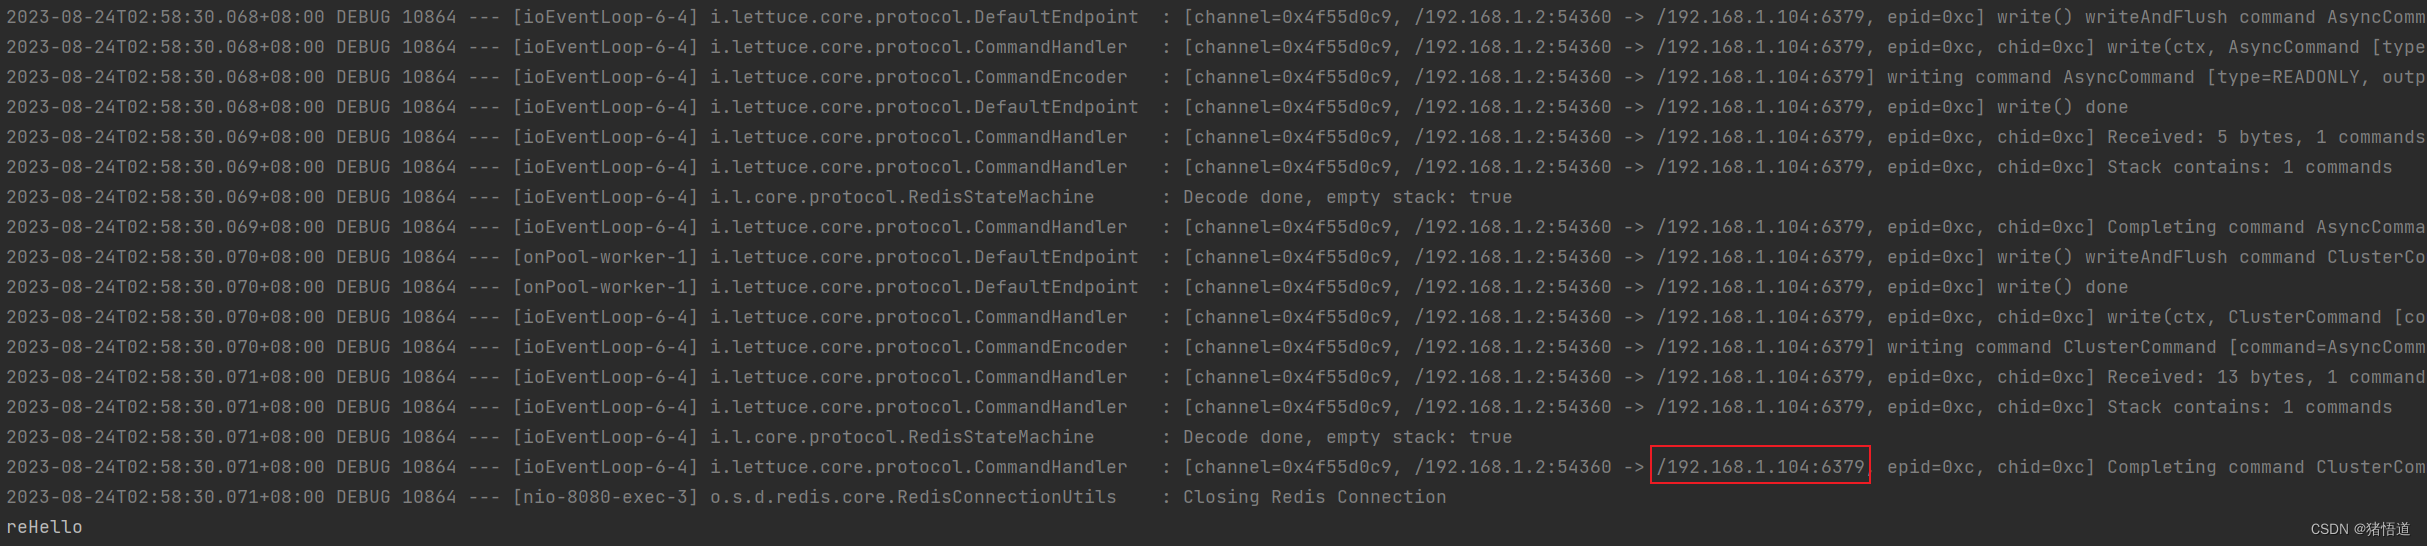
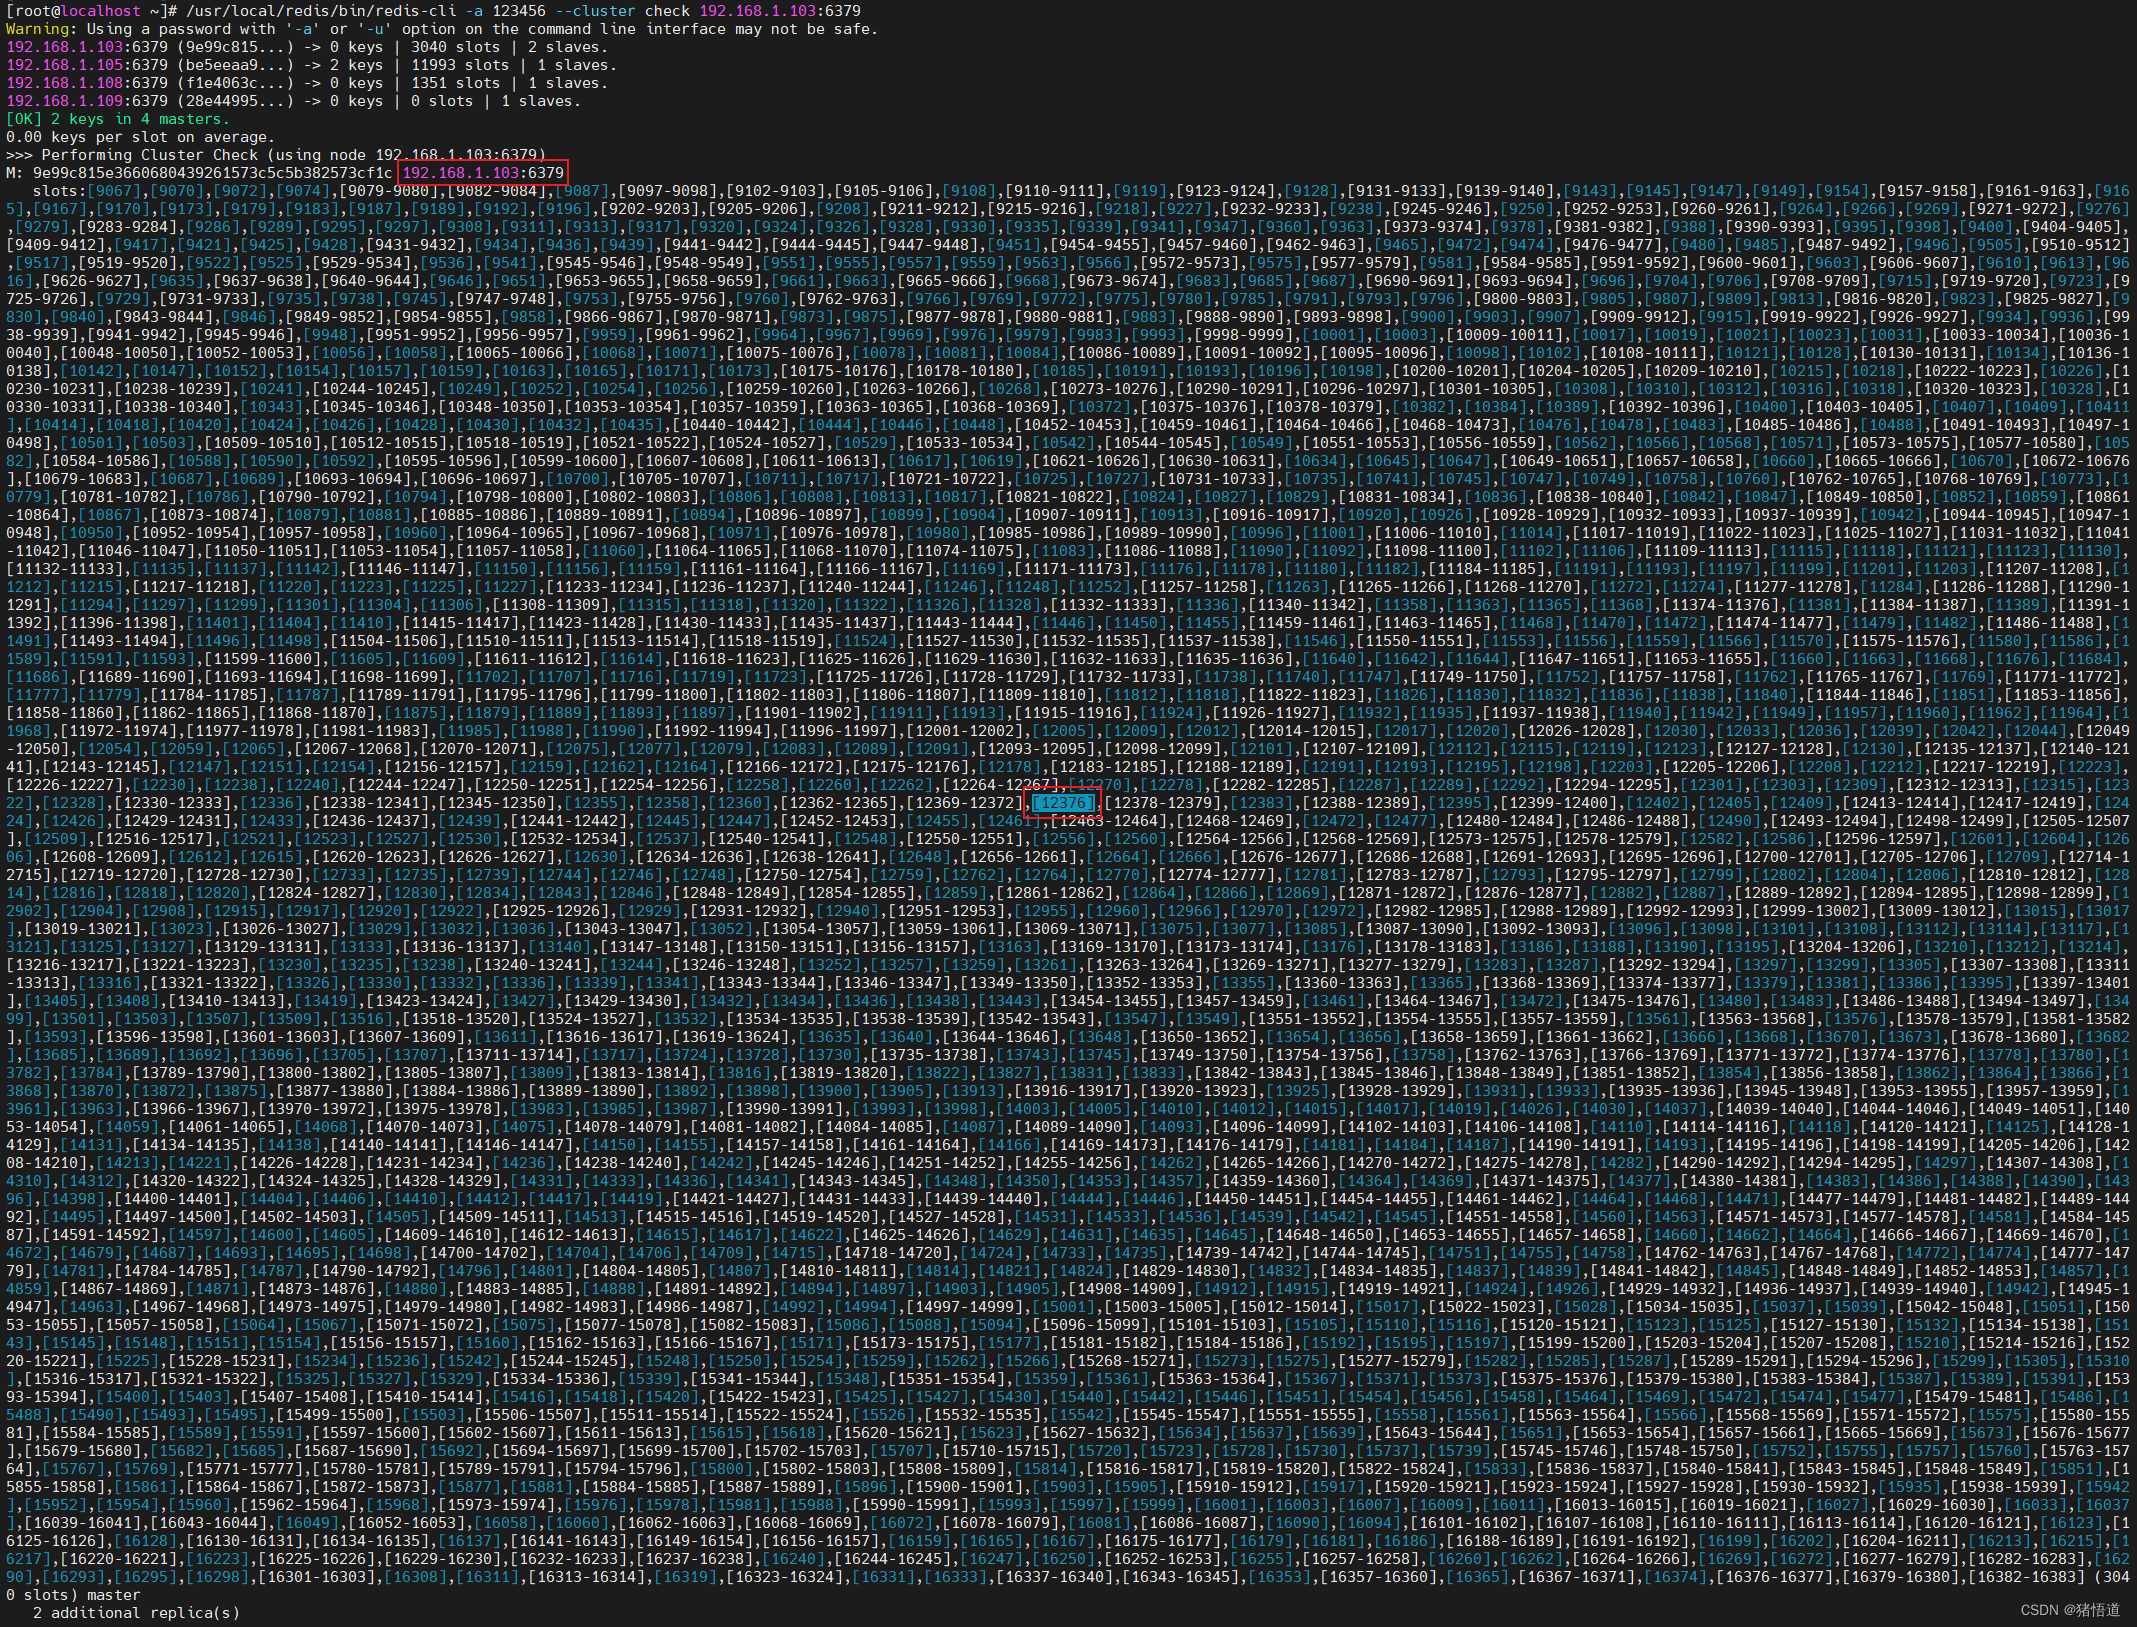
从节点 192.168.1.104 为 rd2,查看其是否为 rd3 从节点:/usr/local/redis/bin/redis-cli -a 123456 --cluster check 192.168.1.103:6379
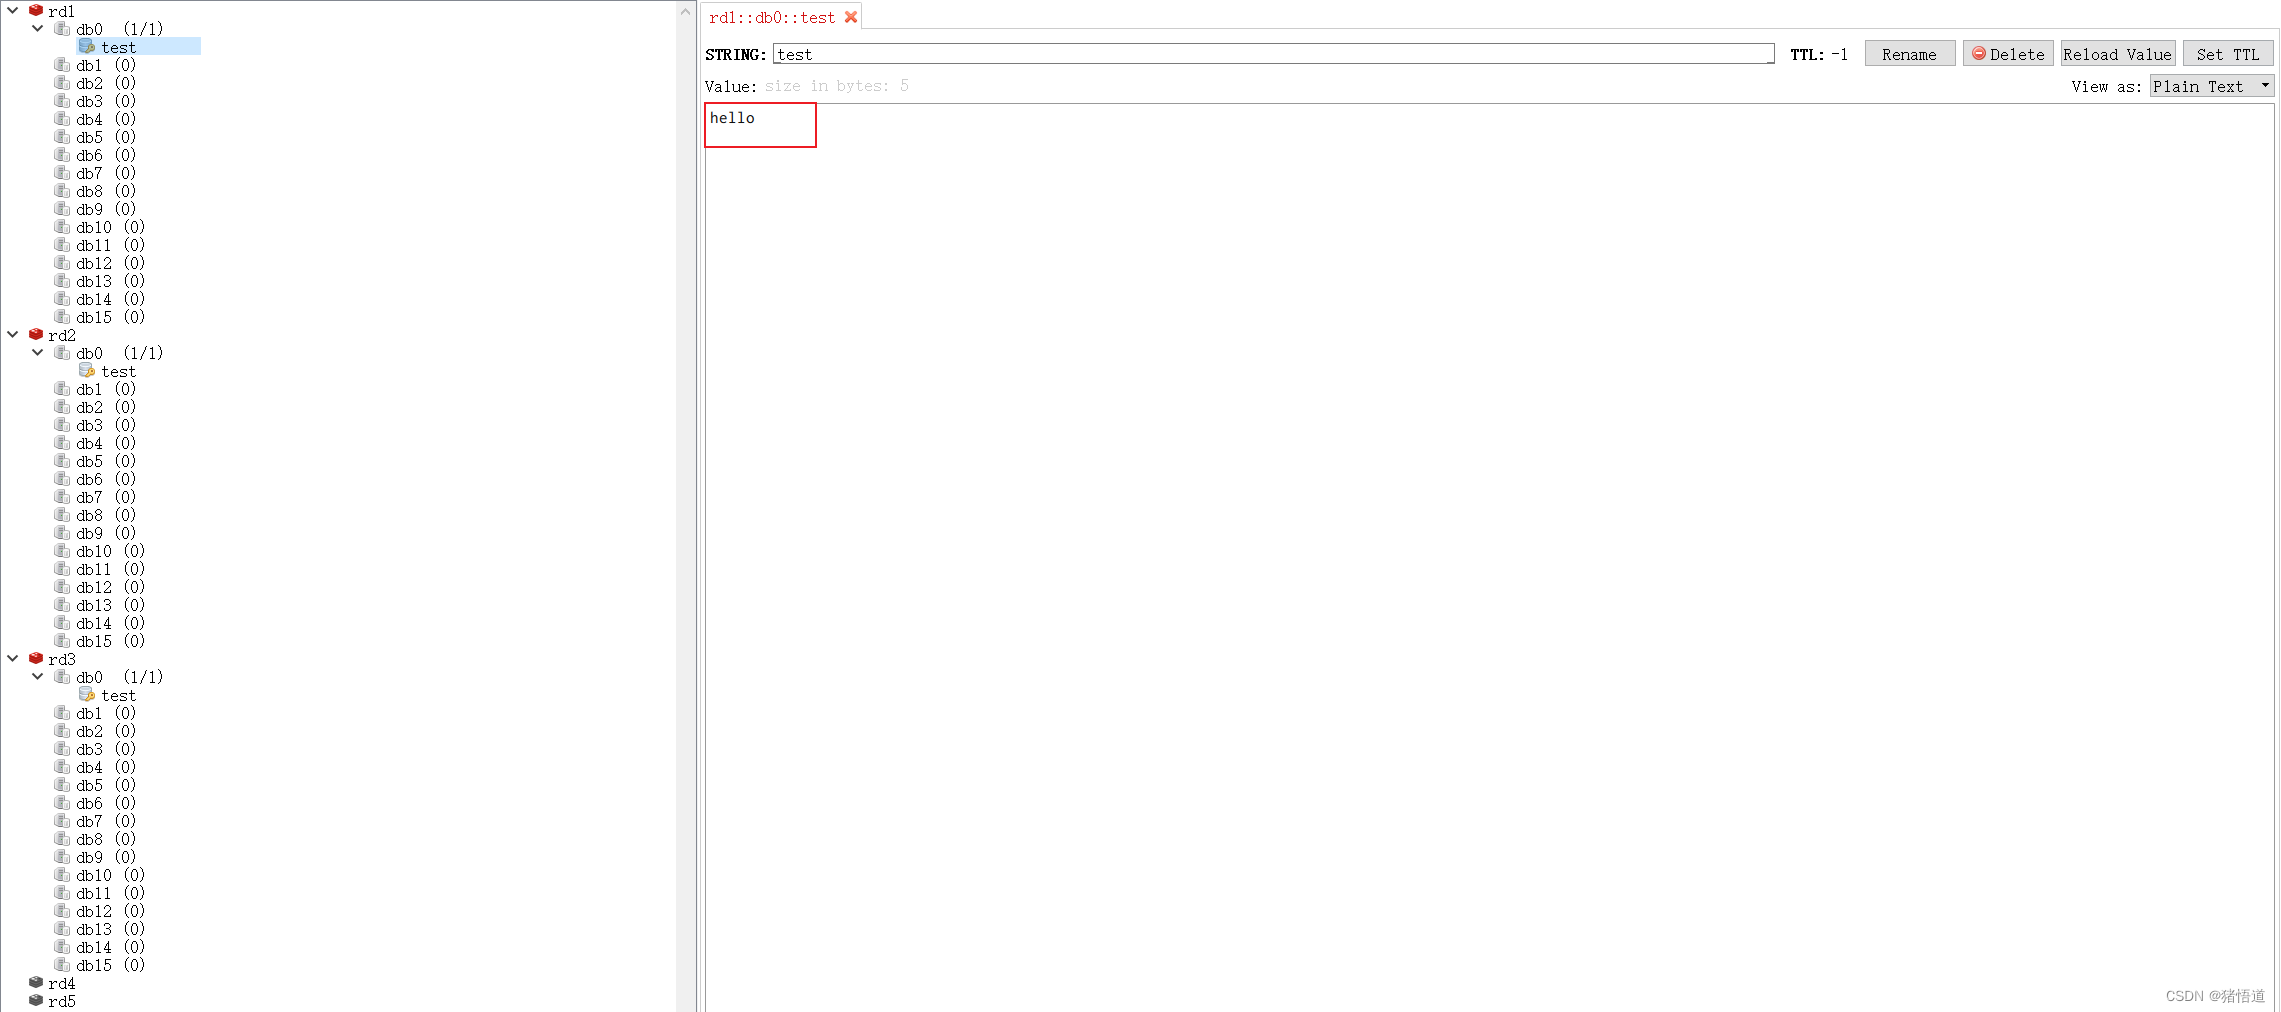
客户端查看数据

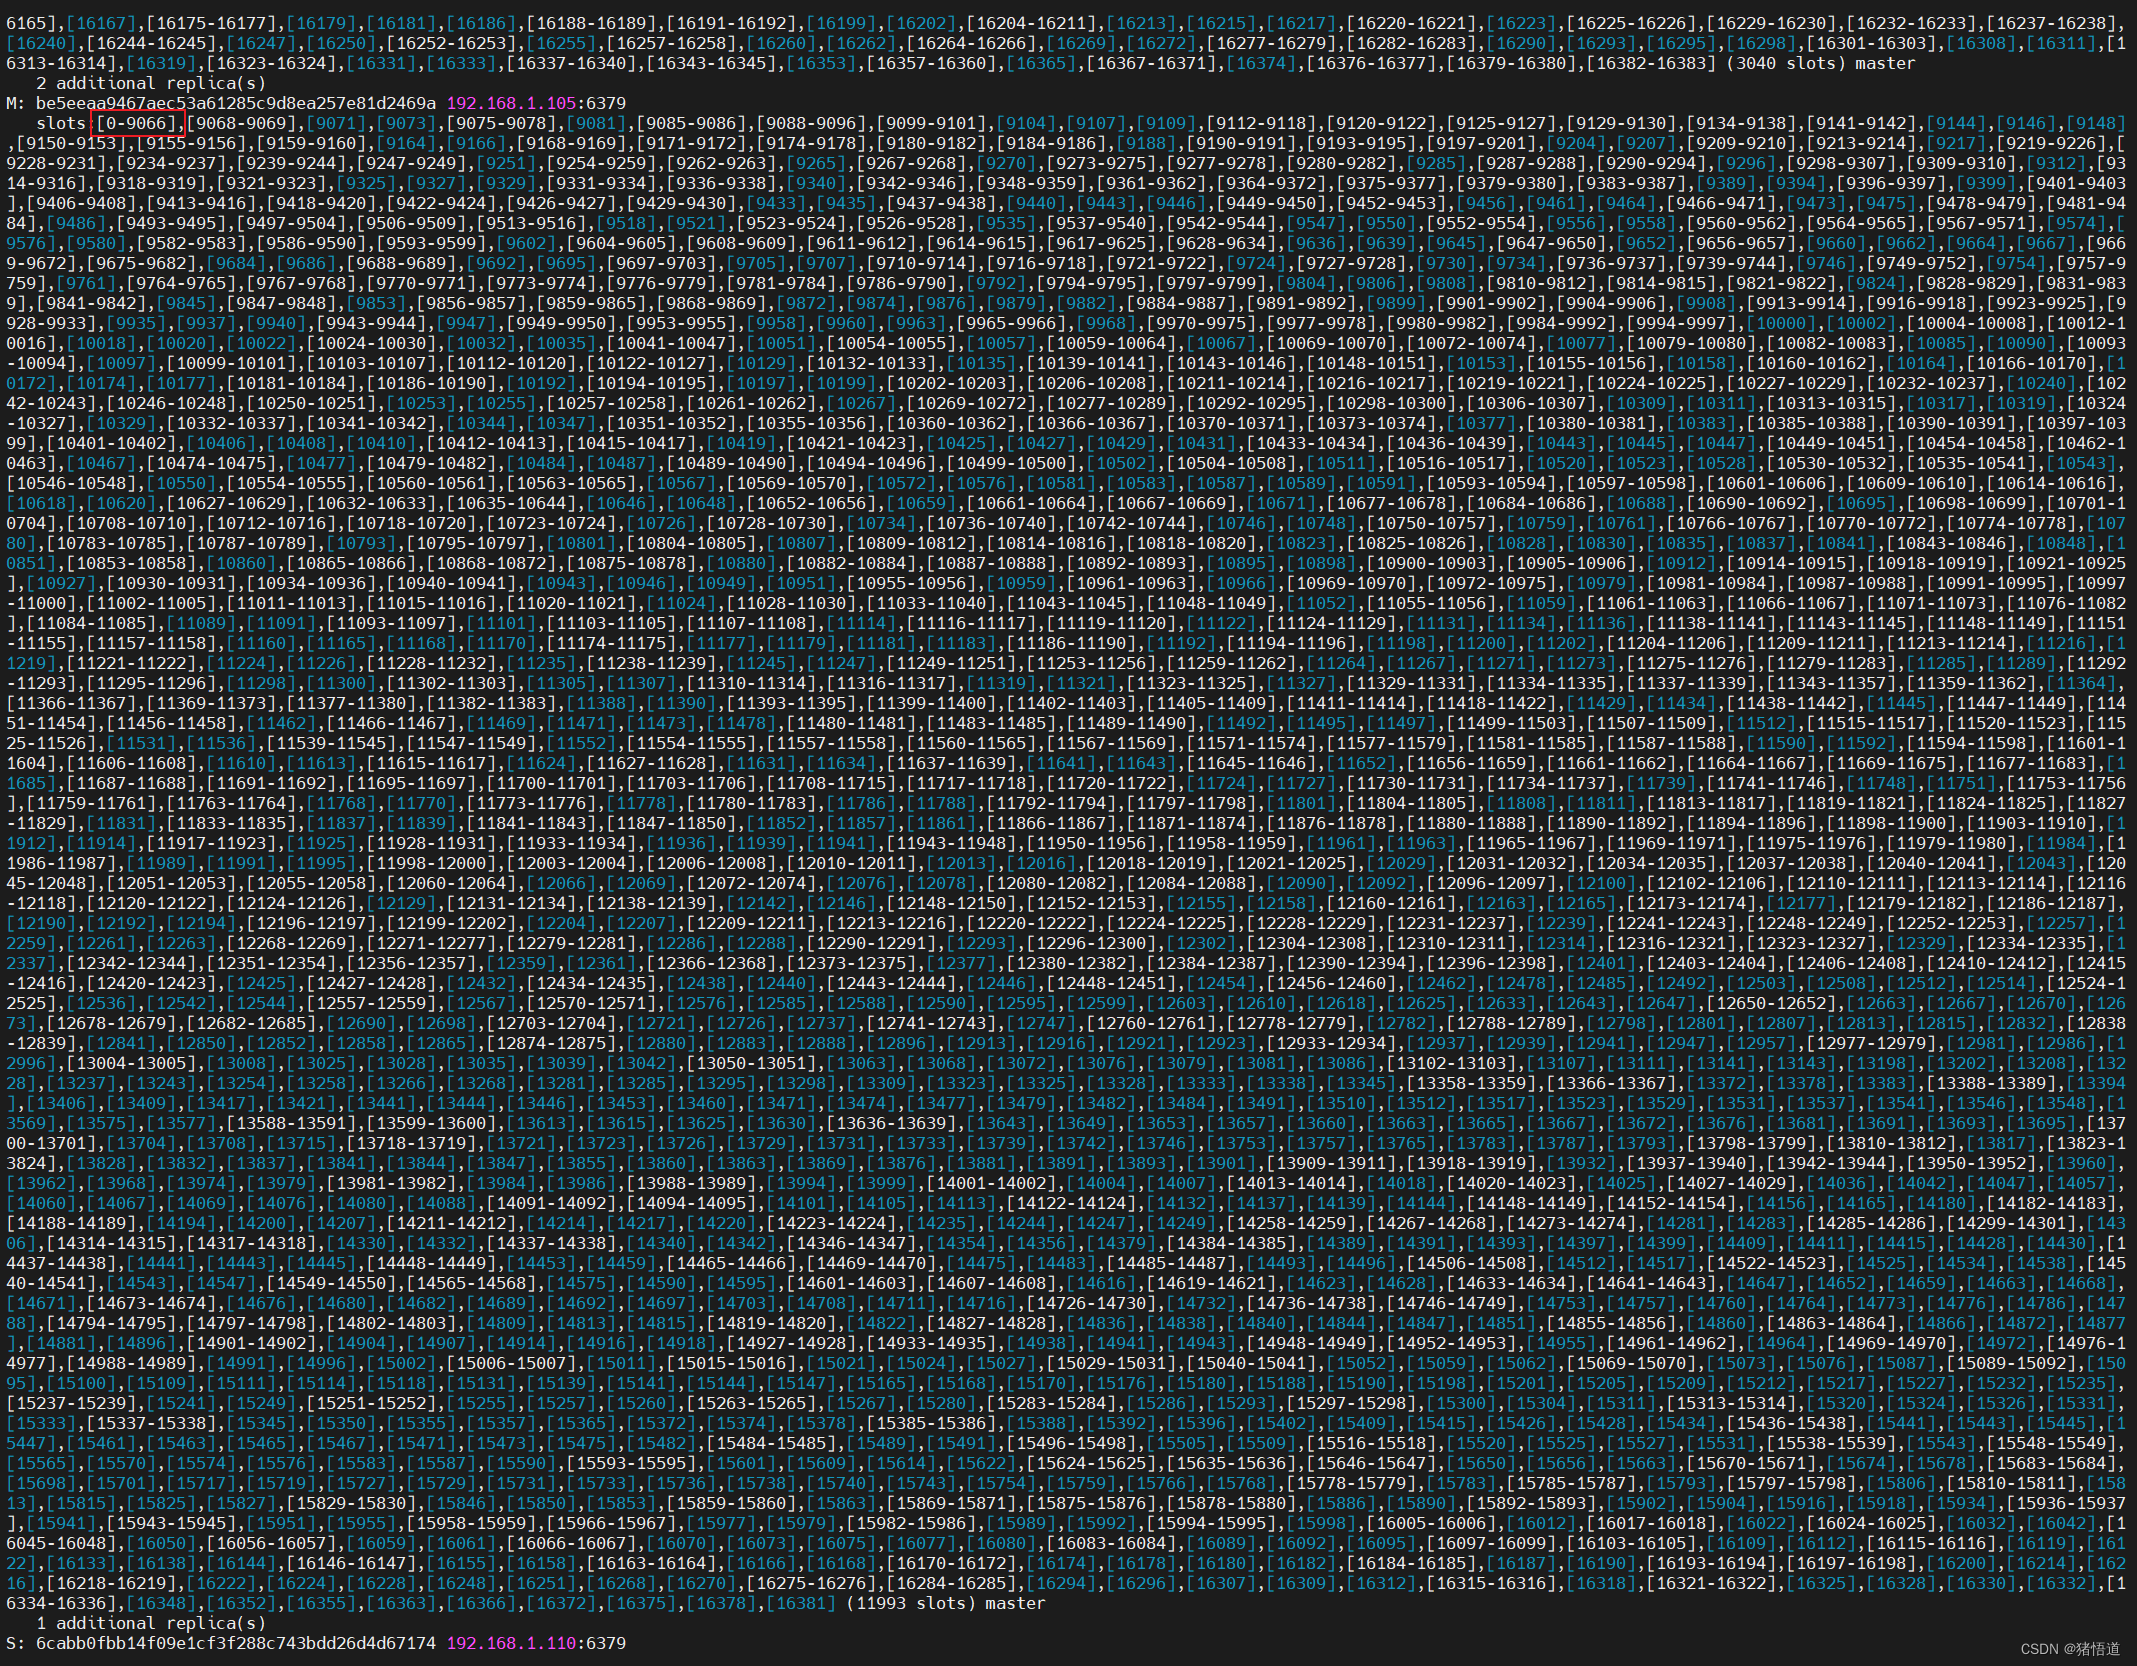
查看集群槽号 12376 属于 103 节点 rd1
插入 Key 测试其节点:127.0.0.1:8080/redis/write?key=RedisTJXY&val=12376

查看客户端数据