IOC 注解开发
- 版本了解
- 2.0版本时开始支持注解开发(2.0之前就是昨天学习的纯 xml 操作)
- 2.5版本才完善
- 3.0版本支持纯注解开发
1.注解&xml配置Bean
1.1配置用户mapper
-
配置 mapper
public interface UserMapper { void save(); } -
配置 mapper 实现类(还没有交给 spring 管理)
public class UserMapperImpl implements UserMapper {
    public void save() {
        System.out.println("保存用户成功");
    }
}
1.2将mapper交给spring管理
-
使用 @Component 注解
-
配置 mapper 实现类
@Component public class UserMapperImpl implements UserMapper { public void save() { System.out.println("保存用户成功"); } } -
配置 xml 包扫描路径
<context:component-scan base-package="cn.sycoder.xmlAnnotationBean.mapper"/><?xml version="1.0" encoding="UTF-8"?> <beans xmlns="http://www.springframework.org/schema/beans" xmlns:xsi="http://www.w3.org/2001/XMLSchema-instance" xmlns:context="http://www.springframework.org/schema/context" xsi:schemaLocation="http://www.springframework.org/schema/beans http://www.springframework.org/schema/beans/spring-beans.xsd http://www.springframework.org/schema/context https://www.springframework.org/schema/context/spring-context.xsd"> <context:component-scan base-package="cn.sycoder.xmlAnnotationBean.mapper"/> </beans>
1.3通过容器获取bean
-
获取 applicationContext
ApplicationContext context = new ClassPathXmlApplicationContext("xmlAndAnnotation.xml"); -
获取bean
@Test
public void testComponent(){
    ApplicationContext context = new ClassPathXmlApplicationContext("xmlAndAnnotation.xml");
    final UserMapper bean = context.getBean(UserMapper.class);
    bean.save();
}
1.4Component详解
-
默认不传参,bean 的名称是首字母小写其余不变
正规命名的时候:UserMapperImpl --- userMapperImpl 不正规命名时候:UUserMapperImpl--- UUserMapperImpl -
给bean 指定名称
@Component("u") 参数就是你bean的名称 -
使用位置:具体类的上方,不要使用到接口上
-
作用:将bean 交给spring管理
-
延伸的注解,注意,和Component一模一样的,只不过是用于给程序员区分业务组件的
-
Controller
-
用于控制层
@Controller
public class UserController {
    //写接口
}
-
-
Service
-
用于业务层
@Service
public class UserServiceImpl implements IUserService {
    public void save() {
    }
}
-
-
Repository
-
用于持久层
@Repository
public class UserMapperImpl implements UserMapper {
    public void save() {
        System.out.println("保存用户成功");
    }
}
![[外链图片转存中...(img-HJfzAbPB-1692668223585)]](https://img-blog.csdnimg.cn/bb7aecab0fd349a0a8d04c4f4cabc3a3.png)
-
-
2.纯注解配置Bean
2.1配置学生Mapper
-
mapper 接口
public interface StudentMapper { void save(); } -
mapper 接口实现类
@Repository
public class StudentMapperImpl implements StudentMapper {
    public void save() {
        System.out.println("保存学生成功");
    }
}
2.2添加配置类
2.2.1@Configuration详解
-
使用 @Configuration
@Configuration public class SpringConfig { }- 将 SpringConfig 类变成spring 的配置类,替换 xml 配置文件
-
作用:标识该类是spring的配置类
-
配置名称,默认首字母小写
-
使用在类上
2.2.2@ComponentScan详解
-
配置包扫描 @ComponentScan
@Configuration @ComponentScan("cn.sycoder.annotationBean.mapper") public class SpringConfig { } -
作用:配置包扫描路径,当前包及其子包都会扫描
-
value:指定包的路径,用于扫描并且注册bean
2.3获取bean
-
获取 applicationContext
ApplicationContext context = new AnnotationConfigApplicationContext(SpringConfig.class); -
获取 bean
@Test
    public void testAnnotation(){
        ApplicationContext context = new AnnotationConfigApplicationContext(SpringConfig.class);
        System.out.println(context);

        final StudentMapper bean = context.getBean(StudentMapper.class);
        System.out.println(bean);
    }
3.注解开发与xml 的梳理
-
使用@Component 替代 xml 的过程梳理
![[外链图片转存失败,源站可能有防盗链机制,建议将图片保存下来直接上传(img-CJaxCWAx-1692669355261)(picture/image-20221028144719953.png)]](https://img-blog.csdnimg.cn/ed1348679e6f44ba967379868f429f48.png)
-
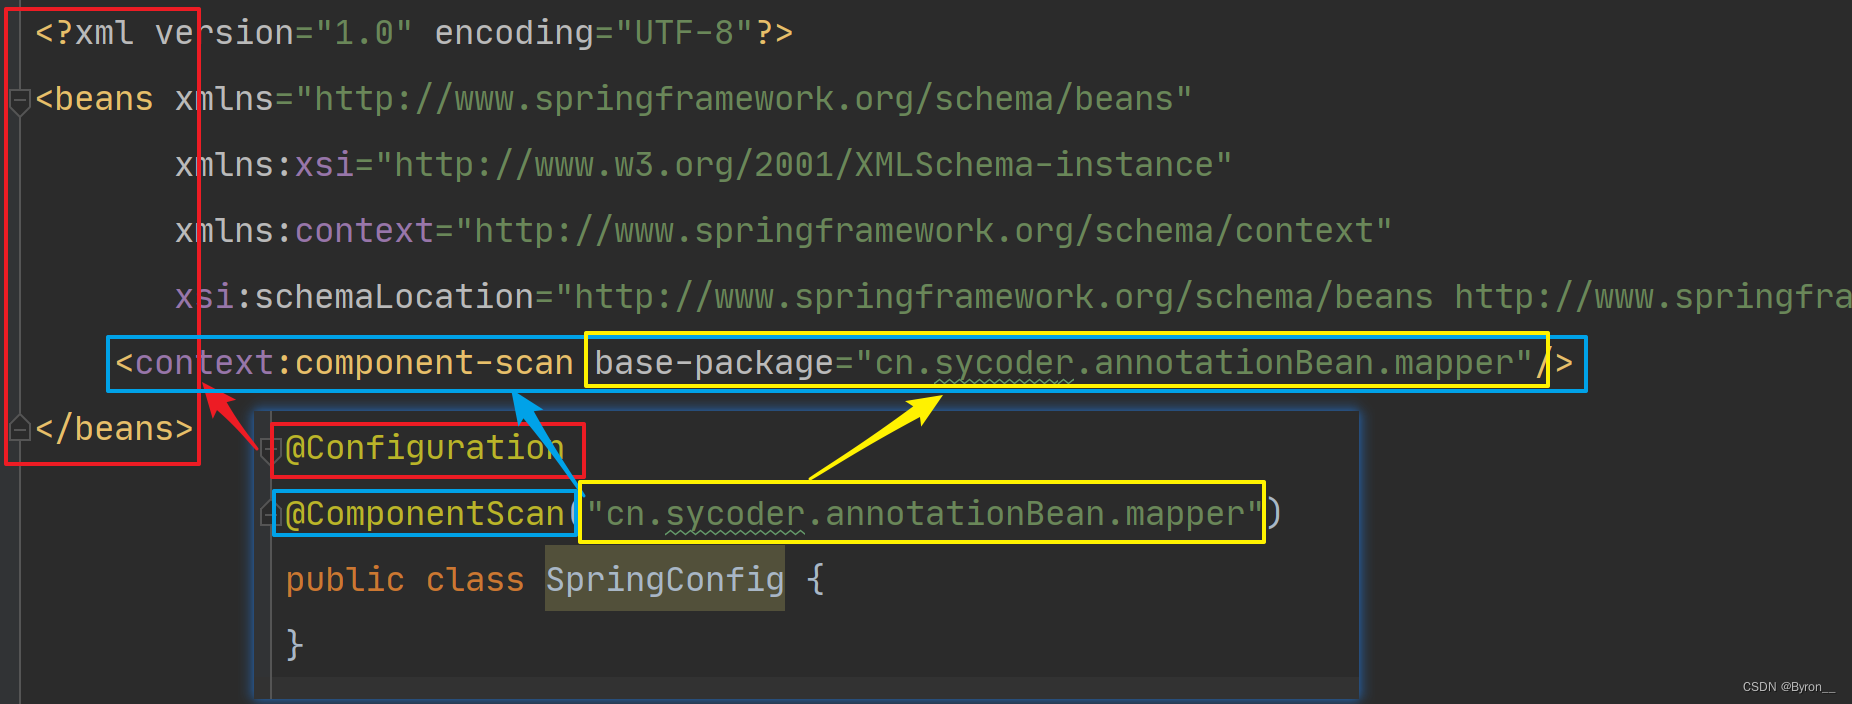
使用 @Configuration @ComponentScan 与 xml 配置过程的梳理
4.bean scops
-
配置类
@Configuration @ComponentScan({"cn.sycoder.scopes"}) public class ScopesConfig { } -
配置 bean
@Component public class ScopeBean { } -
获取 bean 执行发现bean 单例的
@Test
    public void testScope(){
        ApplicationContext context = new AnnotationConfigApplicationContext(ScopesConfig.class);
        final ScopeBean bean = context.getBean(ScopeBean.class);
        final ScopeBean bean1 = context.getBean(ScopeBean.class);
        System.out.println(bean);
        System.out.println(bean1);
    }
4.1通过注解修改 scope
-
@Scope
@Component
@Scope("prototype")
public class ScopeBean {
}
4.2@Scope 详解
- 位置:定义到类上方
- 作用:修改对象创建的作用域
- 属性:默认是singleton(单例的),可以修改成 prototype(原型)
5.bean 生命周期常用注解
-
建立 bean 与使用
@Component
public class LifeBean {

    public LifeBean(){
        System.out.println("构造器执行了");
    }
    @PostConstruct
    public void init(){
        System.out.println("初始化bean");
    }
    @PreDestroy
    public void destroy(){
        System.out.println("销毁bean");
    }
}
5.1@PostConstruct详解
- 位置:方法上
- 作用:设置该方法为初始化方法
5.2@PreDestroy
- 位置:方法上
- 作用:设置该方法为销毁方法
5.3注解与 xml 的梳理
![[外链图片转存失败,源站可能有防盗链机制,建议将图片保存下来直接上传(img-9dzfpO3Y-1692670663301)(picture/image-20221028151810265.png)]](https://img-blog.csdnimg.cn/774112fdd2784a8ab94d88d3b30da2fb.png)
