服务端实现 package com.bierce.io;
import java.io.IOException;
import java.net.InetSocketAddress;
import java.nio.ByteBuffer;
import java.nio.channels.*;
import java.nio.charset.Charset;
import java.util.Iterator;
import java.util.Set;
//服务器端
public class NIOChatServer {
public static void main(String[] args) {
try {
new NIOChatServer().startServer(); //启动服务器
} catch (IOException e) {
throw new RuntimeException(e);
}
}
//服务端启动方法
public void startServer() throws IOException {
//1. 创建Selector选择器
Selector selector = Selector.open();
//2.创建ServerSocketChannel通道
ServerSocketChannel serverSocketChannel = ServerSocketChannel.open();
//3.channel通道绑定监听端口,并设置为非阻塞模式
serverSocketChannel.bind(new InetSocketAddress(8000));
serverSocketChannel.configureBlocking(false);
//4.channel注册到selector上,设置为就绪接收状态
serverSocketChannel.register(selector, SelectionKey.OP_ACCEPT);
System.out.println("Server starts Successfully!");
//5.自旋,实时监听客户端状态
for (;;) {
//获取所有就绪的Channel
int readChannels = selector.select();
if (readChannels == 0){ //没有接入的客户端
continue;
}
Set<SelectionKey> selectionKeys = selector.selectedKeys();
//遍历可用的Channel
Iterator<SelectionKey> iterator = selectionKeys.iterator();
while (iterator.hasNext()){
SelectionKey selectionKey = iterator.next();
//6.根据就绪状态,调用对应方法实现具体业务操作
//6.1 accept状态
if (selectionKey.isAcceptable()){
acceptOperator(serverSocketChannel,selector);
}
//6.2 readable状态
if (selectionKey.isReadable()){
readOperator(selector,selectionKey);
}
iterator.remove(); //获取成功后没有必要保留需要移除
}
}
}
//处理可读状态的方法实现
private void readOperator(Selector selector, SelectionKey selectionKey) throws IOException {
//从SelectionKey获取到已经就绪的通道
SocketChannel socketChannel = (SocketChannel)selectionKey.channel();
ByteBuffer byteBuffer = ByteBuffer.allocate(1024);
//自旋读取客户端信息
int readLength = socketChannel.read(byteBuffer);
String message = "";
if (readLength > 0){
byteBuffer.flip(); //切换读模式
message += Charset.forName("UTF-8").decode(byteBuffer);
}
//注册channel到selector,监听可读状态
socketChannel.register(selector, SelectionKey.OP_READ);
if (message.length() > 0){
//把客户端发送过来的信息广播到其他客户端
System.out.println(message);
castOtherClients(message,selector,socketChannel);
}
}
//把客户端发送的消息广播给其他客户端
private void castOtherClients(String message, Selector selector, SocketChannel socketChannel) throws IOException {
//获取所有已经接入的Channel
Set<SelectionKey> selectionKeys = selector.keys();
//对除自己以外的channel进行广播
for (SelectionKey selectionKey:selectionKeys) {
//获取每个Channel
Channel targetChannel = selectionKey.channel();
if (targetChannel instanceof SocketChannel && targetChannel != socketChannel){ //排除服务器以及发送方客户端自己
((SocketChannel) targetChannel).write(Charset.forName("UTF-8").encode(message));
}
}
}
//处理可接收状态的方法实现
private void acceptOperator(ServerSocketChannel serverSocketChannel, Selector selector) throws IOException {
//接入状态:创建socketChannel
SocketChannel socketChannel = serverSocketChannel.accept();
//socketChannel设置为非阻塞并注册到selector上
socketChannel.configureBlocking(false);
socketChannel.register(selector,SelectionKey.OP_READ);
//回复给客户端信息
socketChannel.write(Charset.forName("UTF-8")
.encode("Welcome to MyChatRoom, Please notice your Info!")); //UTF-8编码
}
}
客户端实现 package com.bierce.io;
import java.io.IOException;
import java.net.InetSocketAddress;
import java.nio.channels.SelectionKey;
import java.nio.channels.Selector;
import java.nio.channels.SocketChannel;
import java.nio.charset.Charset;
import java.util.Scanner;
//客户端实现
public class NIOChatClient {
public void startClient(String name) throws IOException {
//客户端连接服务器端
SocketChannel socketChannel =
SocketChannel.open(new InetSocketAddress("127.0.0.1",8000));
//接收服务器端响应数据
Selector selector = Selector.open();
socketChannel.configureBlocking(false);
socketChannel.register(selector, SelectionKey.OP_READ);
//创建客户端线程
new Thread(new ClientThread(selector)).start();
//模拟向服务器发送消息
Scanner sc = new Scanner(System.in);
while (sc.hasNextLine()){
String msg = sc.nextLine();
if (msg.length() >0){
socketChannel.write(Charset.forName("UTF-8").encode(name + ":" + msg));
}
}
}
}
class ClientThread implements Runnable{
private Selector selector;
public ClientThread(Selector selector) {
this.selector = selector;
}
@Override
public void run() {
try {
for (;;) {
//获取所有就绪的Channel
int readChannels = selector.select();
if (readChannels == 0){ //没有接入的客户端
continue;
}
Set<SelectionKey> selectionKeys = selector.selectedKeys();
//遍历可用的Channel
Iterator<SelectionKey> iterator = selectionKeys.iterator();
while (iterator.hasNext()){
SelectionKey selectionKey = iterator.next();
iterator.remove(); //获取成功后没有必要保留需要移除
//readable状态
if (selectionKey.isReadable()){
readOperator(selector,selectionKey);
}
}
}
}catch (Exception e){
e.printStackTrace();
}
}
//处理可读状态的方法实现
private void readOperator(Selector selector, SelectionKey selectionKey) throws IOException {
//从SelectionKey获取到已经就绪的通道
SocketChannel socketChannel = (SocketChannel)selectionKey.channel();
ByteBuffer byteBuffer = ByteBuffer.allocate(1024);
//自旋读取客户端信息
int readLength = socketChannel.read(byteBuffer);
String message = "";
if (readLength > 0){
byteBuffer.flip(); //切换读模式
message += Charset.forName("UTF-8").decode(byteBuffer);
}
//注册channel到selector,监听可读状态
socketChannel.register(selector, SelectionKey.OP_READ);
if (message.length() > 0){
System.out.println(message); //该客户端控制台输出服务端发送过来的信息
}
}
}//客户端A
package com.bierce.io;
import java.io.IOException;
public class TestAClient {
public static void main(String[] args) {
try {
new NIOChatClient().startClient("A");
} catch (IOException e) {
throw new RuntimeException(e);
}
}
}
//客户端B
package com.bierce.io;
import java.io.IOException;
public class TestBClient {
public static void main(String[] args) {
try {
new NIOChatClient().startClient("B");
} catch (IOException e) {
throw new RuntimeException(e);
}
}
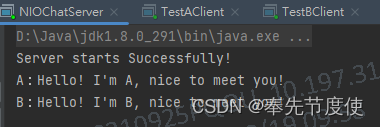
}效果图
