『SpringBoot 源码分析』run() 方法执行流程:(1)初始化 SpringApplication 、上下文环境、应用上下文
- 基于 2.2.9.RELEASE
- 问题:当方法进行了注释标记之后,springboot 又是怎么注入到容器中并创建类呢?
- 首先创建测试主程序
package com.lagou;

@SpringBootApplication//标注在类上说明这个类是`SpringBoot`的主配置类
public class SpringBootMytestApplication{

	public static void main(String[] args) {
		SpringApplication.run(SpringBootMytestApplication.class, args);
	}
}
- 创建测试 Controller
package com.lagou.controller;

@RestController
public class TestController {

	@RequestMapping("/test")
	public String test(){
		System.out.println("源码环境构建成功...");
		return "源码环境构建成功";
	}
}
SpringApplication 初始化过程
- SpringApplication 的初始化过程就是从 run() 开始的
public class SpringBootMytestApplication{

	public static void main(String[] args) {
		// 1. 调用 SpringApplication 的 run() 方法
		SpringApplication.run(SpringBootMytestApplication.class, args);
	}
}
- 在真正执行 run() 方法之前,首先需要初始化 SpringApplication()
public class SpringApplication {
	...
	public SpringApplication(Class<?>... primarySources) {
		//
		this(null, primarySources);
	}

	public static ConfigurableApplicationContext run(Class<?>[] primarySources, String[] args) {
		// 2. 初始化 SpringApplication()
		return new SpringApplication(primarySources).run(args);
	}

	public static ConfigurableApplicationContext run(Class<?> primarySource, String... args) {
		// 1. 调用重载方法。其中 primarySource = SpringBootMytestApplication.class
		return run(new Class<?>[] { primarySource }, args);
	}
}
- 执行 SpringApplication() 初始化时,首先设置资源加载器为 null,同时将 primarySources 转换为 List 存到属性中,然后开始推断应用启动的类型
public class SpringApplication {
	...
	public SpringApplication(ResourceLoader resourceLoader, Class<?>... primarySources) {
		// 设置资源加载器为 null
		this.resourceLoader = resourceLoader;
		// 断言加载资源类不能为 null
		Assert.notNull(primarySources, "PrimarySources must not be null");
		// 将 primarySources 数组转换为 List,最后放到 LinkedHashSet 集合中
		this.primarySources = new LinkedHashSet<>(Arrays.asList(primarySources));

		// 1. 推断应用类型,后面会根据类型初始化对应的环境。常用的一般都是 servlet 环境
		this.webApplicationType = WebApplicationType.deduceFromClasspath();
		...
	}
}
- 推断应用启动类型的时候,首先判断 classpath 下面是否存在 org.springframework.web.reactive.DispatcherHandler,如果存在,则把应用设置为 REACTIVE 类型。如果不存在,则继续判断 classpath 下面是否存在 javax.servlet.Servlet 或者 org.springframework.web.context.ConfigurableWebApplicationContext,不存在就设置应用类型为 None,否则默认是 SERVLET
public enum WebApplicationType {

	NONE,
	SERVLET,
	REACTIVE;
	private static final String WEBFLUX_INDICATOR_CLASS = "org.springframework.web.reactive.DispatcherHandler";
	private static final String[] SERVLET_INDICATOR_CLASSES = { "javax.servlet.Servlet",
			"org.springframework.web.context.ConfigurableWebApplicationContext" };
	...
	static WebApplicationType deduceFromClasspath() {
		// 1. classpath 下必须存在 org.springframework.web.reactive.DispatcherHandler
		if (ClassUtils.isPresent(WEBFLUX_INDICATOR_CLASS, null) && !ClassUtils.isPresent(WEBMVC_INDICATOR_CLASS, null)
				&& !ClassUtils.isPresent(JERSEY_INDICATOR_CLASS, null)) {
			return WebApplicationType.REACTIVE;
		}

		for (String className : SERVLET_INDICATOR_CLASSES) {
			// 2. classpath 环境下不存在 javax.servlet.Servlet 或者 org.springframework.web.context.ConfigurableWebApplicationContext
			if (!ClassUtils.isPresent(className, null)) {
				return WebApplicationType.NONE;
			}
		}
		return WebApplicationType.SERVLET;
	}
}
- 推断完程序的应用类型之后吗,就开始设置初始化器
public class SpringApplication {
...
public SpringApplication(ResourceLoader resourceLoader, Class<?>... primarySources) {
...
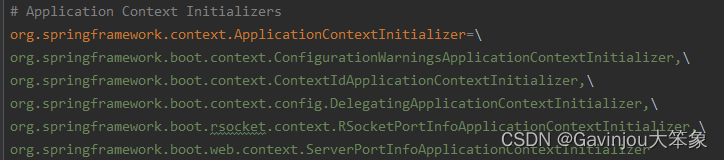
// 1. 初始化 classpath 下 META-INF/spring.factories 中已配置的 ApplicationContextInitializer
setInitializers((Collection) getSpringFactoriesInstances(ApplicationContextInitializer.class));
...
}
public void setInitializers(Collection<? extends ApplicationContextInitializer<?>> initializers) {
// 2. 设置参数
this.initializers = new ArrayList<>(initializers);
}
}
- 其中,初始化器的设置主要思路是从 META-INF/spring.factories 找到所有 key 为 org.springframework.context.ApplicationContextInitializer 的实现类,然后逐一初始化,并按照 org.springframework.core.annotation.Order 注解排序
public class SpringApplication {
	...
	private <T> Collection<T> getSpringFactoriesInstances(Class<T> type) {
		return getSpringFactoriesInstances(type, new Class<?>[] {});
	}

	/**
	 * 通过指定的 classloader 从 META-INF/spring.factories 获取指定的 Spring 的工厂实例
	 */
	private <T> Collection<T> getSpringFactoriesInstances(Class<T> type, Class<?>[] parameterTypes, Object... args) {
		ClassLoader classLoader = getClassLoader();
		// 1. 通过指定的 classLoader 从 META-INF/spring.factories 的资源文件中,
		// 读取 key 为 type.getName() 的 value
		Set<String> names = new LinkedHashSet<>(SpringFactoriesLoader.loadFactoryNames(type, classLoader));
		// 2. 创建工厂实例
		List<T> instances = createSpringFactoriesInstances(type, parameterTypes, classLoader, args, names);
		// 4. 对 Spring 工厂实例排序(org.springframework.core.annotation.Order 注解指定的顺序)
		AnnotationAwareOrderComparator.sort(instances);
		return instances;
	}

	private <T> List<T> createSpringFactoriesInstances(Class<T> type, Class<?>[] parameterTypes,
			ClassLoader classLoader, Object[] args, Set<String> names) {// 反射创建对象
		List<T> instances = new ArrayList<>(names.size());
		for (String name : names) {
			try {
				Class<?> instanceClass = ClassUtils.forName(name, classLoader);
				Assert.isAssignable(type, instanceClass);
				Constructor<?> constructor = instanceClass.getDeclaredConstructor(parameterTypes);
				// 3. 对象实例化
				T instance = (T) BeanUtils.instantiateClass(constructor, args);
				instances.add(instance);
			}
			catch (Throwable ex) {
				throw new IllegalArgumentException("Cannot instantiate " + type + " : " + name, ex);
			}
		}
		return instances;
	}
}
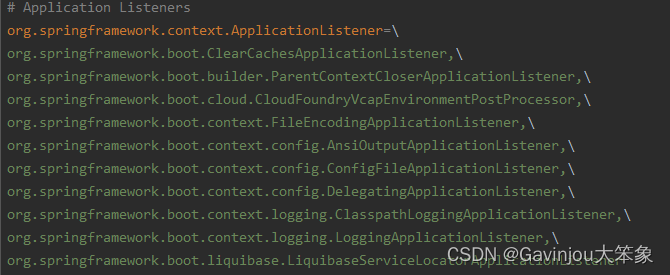
5. 设置完初始化器之后,开始设置监听器。同样是调用 getSpringFactoriesInstances() 的工作流程,首先去 META-INF/spring.factories 找到所有 key 为 org.springframework.context.ApplicationListener 的实现类,逐一初始化,并按照 org.springframework.core.annotation.Order 注解排序
public class SpringApplication {
	...
	public SpringApplication(ResourceLoader resourceLoader, Class<?>... primarySources) {
		...
		// 1. 初始化 classpath 下 META-INF/spring.factories 中已配置的 ApplicationListener
		setListeners((Collection) getSpringFactoriesInstances(ApplicationListener.class));
		...
	}

	public void setListeners(Collection<? extends ApplicationListener<?>> listeners) {
		// 2. 设置参数
		this.listeners = new ArrayList<>(listeners);
	}
}
6. 然后根据调用栈,找到 main 入口,获取到主程序类,设置到 mainApplicationClass 属性中,并返回
public class SpringApplication {
	...
	public SpringApplication(ResourceLoader resourceLoader, Class<?>... primarySources) {
		...
		// 1. 根据调用栈,推断出 main 方法的类名
		this.mainApplicationClass = deduceMainApplicationClass();
		...
	}

	private Class<?> deduceMainApplicationClass() {
		try {
			StackTraceElement[] stackTrace = new RuntimeException().getStackTrace();
			for (StackTraceElement stackTraceElement : stackTrace) {
				if ("main".equals(stackTraceElement.getMethodName())) {
					return Class.forName(stackTraceElement.getClassName());
				}
			}
		}
		catch (ClassNotFoundException ex) {
			// Swallow and continue
		}
		return null;
	}
}
- 总结

获取启动监听器
- 当完成初始化 SpringApplication 后,开始真正执行 run() 方法
public class SpringApplication {
	...
	public static ConfigurableApplicationContext run(Class<?>[] primarySources, String[] args) {
		// 两件事:
		// 初始化 SpringApplication
		// 1. 执行 run() 方法
		return new SpringApplication(primarySources).run(args);
	}
}
- 首先初始化 StopWatch 监控程序运行时间,然后开始获取运行时监听器
public class SpringApplication {
	...
	public ConfigurableApplicationContext run(String... args) {
		// 记录程序运行时间
		StopWatch stopWatch = new StopWatch();
		stopWatch.start();
		// ConfigurableApplicationContext Spring 的上下文
		ConfigurableApplicationContext context = null;
		Collection<SpringBootExceptionReporter> exceptionReporters = new ArrayList<>();
		configureHeadlessProperty();
		// 1. 获取并动监听器
		SpringApplicationRunListeners listeners = getRunListeners(args);
		...
	}
}
- 在执行 getRunListeners() 时,首先同样需要先从 META-INF/spring.factories 获取 key 为 org.springframework.boot.SpringApplicationRunListener 的实现类,然后存到属性中。其中 getSpringFactoriesInstances() 已经说明过了,就不再叙述,同时 SpringApplicationRunListener.class 和 org.springframework.context.ApplicationListener 不一样,这个是个发布器,主要是将在 SpringBoot 不同阶段广播出来的消息传递给 ApplicationListener 实现类
public class SpringApplication {

	private final Log log;
	private final List<SpringApplicationRunListener> listeners;
	...
	private SpringApplicationRunListeners getRunListeners(String[] args) {
		Class<?>[] types = new Class<?>[] { SpringApplication.class, String[].class };
		// 1. SpringApplicationRunListeners 负责在 SpringBoot 启动的不同阶段,
		// 广播出不同的消息,传递给 ApplicationListener 监听器实现类
		return new SpringApplicationRunListeners(logger,
				getSpringFactoriesInstances(SpringApplicationRunListener.class, types, this, args));
	}
}

- 其中,SpringApplicationRunListeners 对所有 SpringApplicationRunListener.class 的实现类进行了封装
class SpringApplicationRunListeners {

	private final Log log;
	private final List<SpringApplicationRunListener> listeners;
	...
	SpringApplicationRunListeners(Log log, Collection<? extends SpringApplicationRunListener> listeners) {
		this.log = log;
		this.listeners = new ArrayList<>(listeners);
	}
}
- 其实实现了 SpringApplicationRunListener.class 接口的,也就只有 org.springframework.boot.context.event.EventPublishingRunListener,它初始化的时候,会把所有 org.springframework.context.ApplicationListener 存入到属性中,用于后面的广播事件给这些监听器
public class EventPublishingRunListener implements SpringApplicationRunListener, Ordered {

	private final SpringApplication application;
	private final String[] args;
	private final SimpleApplicationEventMulticaster initialMulticaster;

	public EventPublishingRunListener(SpringApplication application, String[] args) {
		this.application = application;
		this.args = args;
		this.initialMulticaster = new SimpleApplicationEventMulticaster();
		for (ApplicationListener<?> listener : application.getListeners()) {
			this.initialMulticaster.addApplicationListener(listener);
		}
	}
	...
}
- 当拿到运行时监听器之后,就开始对每个运行时监听器执行监听
public class SpringApplication {
	...
	public ConfigurableApplicationContext run(String... args) {
		...
		// 获取并启动监听器
		SpringApplicationRunListeners listeners = getRunListeners(args);
		// 1. 给 listener 发送 starting 事件回调
		listeners.starting();
		...
	}
}
- 其中,所有的运行时监听器都封装在 SpringApplicationRunListeners,实际也就只有一个运行时监听器 org.springframework.boot.context.event.EventPublishingRunListener
class SpringApplicationRunListeners {

	private final Log log;
	private final List<SpringApplicationRunListener> listeners;
	...
	// 1. 在 run() 方法开始执行时,该方法就立即被调用,可用于在初始化最早期时做一些工作
	void starting() {
		for (SpringApplicationRunListener listener : this.listeners) {
			listener.starting();
		}
	}
}
- 在执行 starting() 的时候,实际上就是给所有 org.springframework.context.ApplicationListener 发布一个 ApplicationStartingEvent 事件
public class EventPublishingRunListener implements SpringApplicationRunListener, Ordered {
	...
	@Override
	public void starting() {
		this.initialMulticaster.multicastEvent(new ApplicationStartingEvent(this.application, this.args));
	}
}
- 总结

构建应用上下文环境(上)
- 首先在程序启动前配置两个文件,并且启动时添加运行时参数
- 设置 application.properties
server.port=8080
- 设置 application-prod.properties
server.port=2222
- 运行时参数设置
--spring.profiles.active=prod
- 当完成监听器配置,并启动监听后,就需要设置应用环境上下文,从而为其他配置提供一个统一配置环境
public class SpringApplication {
	...
	public ConfigurableApplicationContext run(String... args) {
		...
		try {
			// 将运行时参数封装
			ApplicationArguments applicationArguments = new DefaultApplicationArguments(args);
			// 1. 构造应用上下文环境
			ConfigurableEnvironment environment = prepareEnvironment(listeners, applicationArguments);
			// 2. 处理需要忽略的 Bean
			configureIgnoreBeanInfo(environment);
			// 3. 打印 banner
			Banner printedBanner = printBanner(environment);
			...
		}
		catch (Throwable ex) {
			...
		}
		...
	}
}
- 首先执行 prepareEnvironment(),调用 getOrCreateEnvironment() 配置相应的运行时环境
public class SpringApplication {
	...
	private ConfigurableEnvironment prepareEnvironment(SpringApplicationRunListeners listeners,
			ApplicationArguments applicationArguments) {// 构建整个环境上下文(用户配置,profile)
		// 1. 创建并配置相应的环境
		ConfigurableEnvironment environment = getOrCreateEnvironment();
		...
	}
}
- 其中 getOrCreateEnvironment() 是根据之前创建 SpringApplication 时推断出来的 webApplicationType 来决定创建哪个环境,这里肯定创建的是 StandardServletEnvironment
public class SpringApplication {

	private WebApplicationType webApplicationType;
	...
	private Class<? extends StandardEnvironment> deduceEnvironmentClass() {
		switch (this.webApplicationType) {
		case SERVLET:
			return StandardServletEnvironment.class;
		case REACTIVE:
			return StandardReactiveWebEnvironment.class;
		default:
			return StandardEnvironment.class;
		}
	}
}
- 完成创建 StandardServletEnvironment 之后,需要根据用户配置配置 environment 系统环境
public class SpringApplication {
	...
	private ConfigurableEnvironment prepareEnvironment(SpringApplicationRunListeners listeners,
			ApplicationArguments applicationArguments) {// 构建整个环境上下文(用户配置,profile)
		// 创建并配置相应的环境
		ConfigurableEnvironment environment = getOrCreateEnvironment();
		// 1. 根据用户配置,配置 environment 系统环境
		configureEnvironment(environment, applicationArguments.getSourceArgs());
		...
	}
}
- 配置 environment 系统环境时,首先把刚刚加的
--spring.profiles.active=prod运行时参数封装成 SimpleCommandLinePropertySource 加入环境中
public class SpringApplication {
	...
	protected void configureEnvironment(ConfigurableEnvironment environment, String[] args) {
		if (this.addConversionService) {
			ConversionService conversionService = ApplicationConversionService.getSharedInstance();
			environment.setConversionService((ConfigurableConversionService) conversionService);
		}
		// 1. 将 main() 的 args(即 --spring.profiles.active=prod)封装成 SimpleCommandLinePropertySource 加入环境中
		configurePropertySources(environment, args);
		...
	}
}
- 其中加入参数时,先从 environment 中获取 MutablePropertySources 源,然后判断是否包含名为 commandLineArgs 的属性,不包含的话,就把运行时参数封装成 SimpleCommandLinePropertySource 添加到源中
public class SpringApplication {
	...
	protected void configurePropertySources(ConfigurableEnvironment environment, String[] args) {
		// 1. 先获取 MutablePropertySources
		MutablePropertySources sources = environment.getPropertySources();
		if (this.defaultProperties != null && !this.defaultProperties.isEmpty()) {
			sources.addLast(new MapPropertySource("defaultProperties", this.defaultProperties));
		}
		if (this.addCommandLineProperties && args.length > 0) {
			// 2. 判断是否包含名为 commandLineArgs 的属性
			String name = CommandLinePropertySource.COMMAND_LINE_PROPERTY_SOURCE_NAME;
			if (sources.contains(name)) {
				...
			}
			else {
				// 3. 把运行时参数(即 --spring.profiles.active=prod)封装成 SimpleCommandLinePropertySource 添加到源中
				sources.addFirst(new SimpleCommandLinePropertySource(args));
			}
		}
	}
}
- 配置完 environment 系统环境后,就开始激活环境
public class SpringApplication {
	...
	protected void configureEnvironment(ConfigurableEnvironment environment, String[] args) {
		if (this.addConversionService) {
			ConversionService conversionService = ApplicationConversionService.getSharedInstance();
			environment.setConversionService((ConfigurableConversionService) conversionService);
		}
		// 将 main() 的 args(即 --spring.profiles.active=prod)封装成 SimpleCommandLinePropertySource 加入环境中
		configurePropertySources(environment, args);
		// 1. 激活相应的配置文件
		configureProfiles(environment, args);
	}
}
- 激活的时候,就是把 environment 的属性开启为对应激活的配置,这里就是 prod
public class SpringApplication {
	private Set<String> additionalProfiles = new HashSet<>();
	...
	protected void configureProfiles(ConfigurableEnvironment environment, String[] args) {// 设置激活的profile信息
		Set<String> profiles = new LinkedHashSet<>(this.additionalProfiles);
		// 1. 获取到的 activeProfiles 就是 prod
		profiles.addAll(Arrays.asList(environment.getActiveProfiles()));
		// 2. 把对应属性设置为 prod
		environment.setActiveProfiles(StringUtils.toStringArray(profiles));
	}
}
- 配置环境并激活后,就需要使用监听器发布对应的环境给对应的监听器
public class SpringApplication {
	...
	private ConfigurableEnvironment prepareEnvironment(SpringApplicationRunListeners listeners,
			ApplicationArguments applicationArguments) {// 构建整个环境上下文(用户配置,profile)
		// 创建并配置相应的环境
		ConfigurableEnvironment environment = getOrCreateEnvironment();
		// 根据用户配置,配置 environment系统环境
		configureEnvironment(environment, applicationArguments.getSourceArgs());
		ConfigurationPropertySources.attach(environment);
		// 1. 启动相应的监听器,其中一个重要的监听器 ConfigFileApplicationListener 就是加载项目配置文件的监听器。
		listeners.environmentPrepared(environment);
		...
	}
}
- 其中,监听器的发布,交由 org.springframework.boot.context.event.EventPublishingRunListener 广播给所有的 org.springframework.context.ApplicationListener,其中,EventPublishingRunListener 会把 environment 封装成 ApplicationEnvironmentPreparedEvent,然后调用广播器广播
public class EventPublishingRunListener implements SpringApplicationRunListener, Ordered {

	private final SpringApplication application;
	private final String[] args;
	private final SimpleApplicationEventMulticaster initialMulticaster;
	...
	@Override
	public void environmentPrepared(ConfigurableEnvironment environment) {
		// 1. 通过广播器进行广播发布
		this.initialMulticaster
				.multicastEvent(new ApplicationEnvironmentPreparedEvent(this.application, this.args, environment));
	}
}
- 广播器实际上就是先解析 ApplicationEvent 的类型,然后获取对应的 ApplicationListener 来执行监听任务
public class SimpleApplicationEventMulticaster extends AbstractApplicationEventMulticaster {

	@Nullable
	private Executor taskExecutor;
	...
	@Override
	public void multicastEvent(ApplicationEvent event) {
		multicastEvent(event, resolveDefaultEventType(event));
	}
	...
	@Override
	public void multicastEvent(final ApplicationEvent event, @Nullable ResolvableType eventType) {
		// 1. 解析 ApplicationEvent 类型,这里是 org.springframework.boot.context.event.ApplicationEnvironmentPreparedEvent
		ResolvableType type = (eventType != null ? eventType : resolveDefaultEventType(event));
		// 2. 线程池为空,所以不会调用线程池来执行
		Executor executor = getTaskExecutor();
		for (ApplicationListener<?> listener : getApplicationListeners(event, type)) {
			if (executor != null) {
				executor.execute(() -> invokeListener(listener, event));
			}
			else {
				// 3. 对 ApplicationListener 执行监听任务
				invokeListener(listener, event);
			}
		}
	}
}
- 其中,最重要的是 ConfigFileApplicationListener 监听器,主要是用来加载项目配置文件
public class ConfigFileApplicationListener implements EnvironmentPostProcessor, SmartApplicationListener, Ordered {
	...
	@Override
	public void onApplicationEvent(ApplicationEvent event) {
		if (event instanceof ApplicationEnvironmentPreparedEvent) {
				// 1. 加载项目配置文件
				onApplicationEnvironmentPreparedEvent((ApplicationEnvironmentPreparedEvent) event);
		}
		if (event instanceof ApplicationPreparedEvent) {
			onApplicationPreparedEvent(event);
		}
	}
}
- 完成系统环境预处理之后,就将环境配置返回给上文使用
public class SpringApplication {
	...
	private ConfigurableEnvironment prepareEnvironment(SpringApplicationRunListeners listeners,
			ApplicationArguments applicationArguments) {// 构建整个环境上下文(用户配置,profile)
		// 创建并配置相应的环境
		ConfigurableEnvironment environment = getOrCreateEnvironment();
		// 根据用户配置,配置 environment系统环境
		configureEnvironment(environment, applicationArguments.getSourceArgs());
		ConfigurationPropertySources.attach(environment);
		// 启动相应的监听器,其中一个重要的监听器 ConfigFileApplicationListener 就是加载项目配置文件的监听器。
		listeners.environmentPrepared(environment);
		bindToSpringApplication(environment);
		if (!this.isCustomEnvironment) {
			environment = new EnvironmentConverter(getClassLoader()).convertEnvironmentIfNecessary(environment,
					deduceEnvironmentClass());
		}
		ConfigurationPropertySources.attach(environment);
		// 1. 返回环境
		return environment;
	}
}
- 总结

构建应用上下文环境(下)
- 完成上下文环境初始化后,第一步开始构建应用上下文
public class SpringApplication {
	...
	public ConfigurableApplicationContext run(String... args) {
		...
		try {
			// 将运行时参数封装
			ApplicationArguments applicationArguments = new DefaultApplicationArguments(args);
			// 构造应用上下文环境
			ConfigurableEnvironment environment = prepareEnvironment(listeners, applicationArguments);
			// 处理需要忽略的 Bean
			configureIgnoreBeanInfo(environment);
			// 打印 banner
			Banner printedBanner = printBanner(environment);
			// 1. 刷新应用上下文前的准备阶段
			context = createApplicationContext();
			...
		}
		catch (Throwable ex) {
			...
		}
		...
	}
}
- 创建上下文也是根据 SpringApplication 初始化时的应用类型来初始化对应应用上下文,这次的类型是 SERVLET,所以创建的时候会初始化 org.springframework.boot.web.servlet.context.AnnotationConfigServletWebServerApplicationContext。创建是交由 BeanUtils.instantiateClass 创建
public class SpringApplication {

	private WebApplicationType webApplicationType;
	private Class<? extends ConfigurableApplicationContext> applicationContextClass;
	public static final String DEFAULT_CONTEXT_CLASS = "org.springframework.context."
			+ "annotation.AnnotationConfigApplicationContext";
	public static final String DEFAULT_SERVLET_WEB_CONTEXT_CLASS = "org.springframework.boot."
			+ "web.servlet.context.AnnotationConfigServletWebServerApplicationContext";
	public static final String DEFAULT_REACTIVE_WEB_CONTEXT_CLASS = "org.springframework."
			+ "boot.web.reactive.context.AnnotationConfigReactiveWebServerApplicationContext";
	...
	protected ConfigurableApplicationContext createApplicationContext() {
		Class<?> contextClass = this.applicationContextClass;
		if (contextClass == null) {
			try {
				switch (this.webApplicationType) {
				case SERVLET:
					contextClass = Class.forName(DEFAULT_SERVLET_WEB_CONTEXT_CLASS);
					break;
				case REACTIVE:
					contextClass = Class.forName(DEFAULT_REACTIVE_WEB_CONTEXT_CLASS);
					break;
				default:
					contextClass = Class.forName(DEFAULT_CONTEXT_CLASS);
				}
			}
			catch (ClassNotFoundException ex) {
				throw new IllegalStateException(
						"Unable create a default ApplicationContext, please specify an ApplicationContextClass", ex);
			}
		}
		return (ConfigurableApplicationContext) BeanUtils.instantiateClass(contextClass);
	}
}
- 其中,AnnotationConfigServletWebServerApplicationContext 实现了 ConfigurableWebServerApplicationContext 接口,所以返回的时候,能够强转返回。同时,也继承了 GenericWebApplicationContext,后面的代码中会经常看到这个类
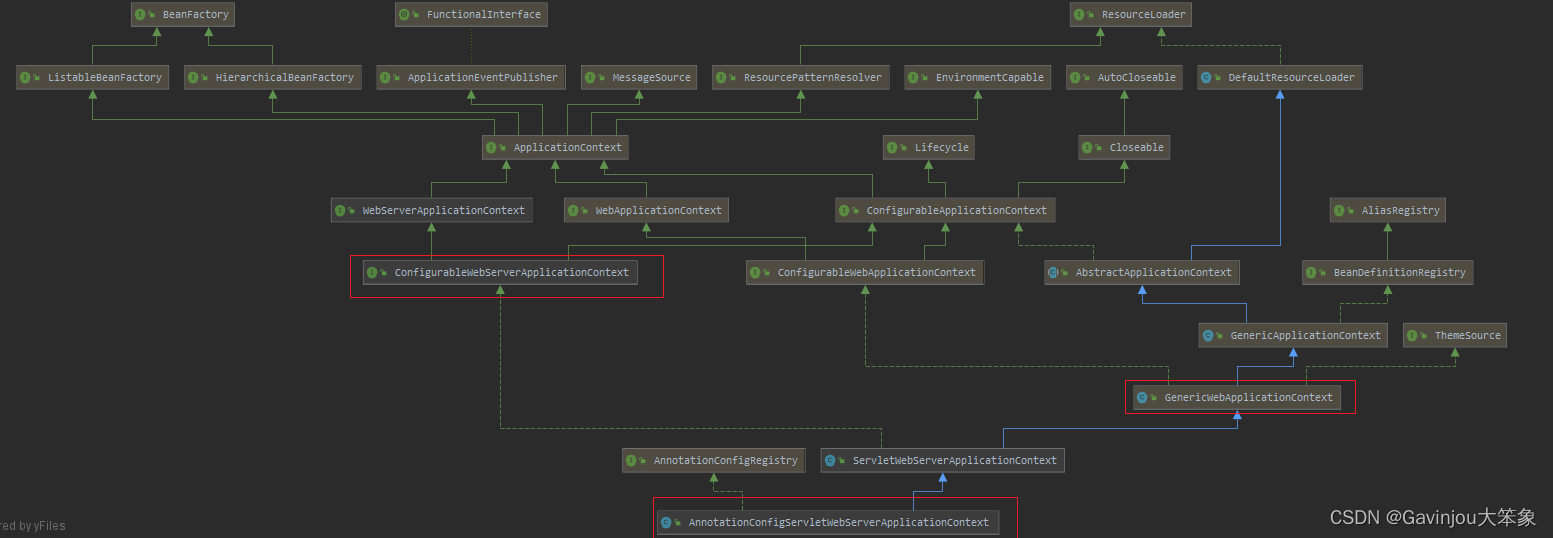
- beanFactory 正是 GenericWebApplicationContext 中定义的,在 BeanUtils.instantiateClass 时,不但初始化了我们的上下文(AnnotationConfigServletWebServerApplicationContext),而且触发了 GenericWebApplicationContext 的构造函数,所以 IOC 容器也创建了

- beanFactory 正是 GenericWebApplicationContext 中定义的,在 BeanUtils.instantiateClass 时,不但初始化了我们的上下文(AnnotationConfigServletWebServerApplicationContext),而且触发了 GenericWebApplicationContext 的构造函数,所以 IOC 容器也创建了
- 创建完 AnnotationConfigServletWebServerApplicationContext 上下文之后,再从 META-INF/spring.factories 找到所有 key 为 org.springframework.boot.SpringBootExceptionReporter 实现类,用于报告启动的错误
public class SpringApplication {
	...
	public ConfigurableApplicationContext run(String... args) {
		...
		try {
			// 将运行时参数封装
			ApplicationArguments applicationArguments = new DefaultApplicationArguments(args);
			// 构造应用上下文环境
			ConfigurableEnvironment environment = prepareEnvironment(listeners, applicationArguments);
			// 处理需要忽略的 Bean
			configureIgnoreBeanInfo(environment);
			// 打印 banner
			Banner printedBanner = printBanner(environment);
			// 刷新应用上下文前的准备阶段
			context = createApplicationContext();
			// 1. 实例化 SpringBootExceptionReporter.class,用来支持报告关于启动的错误
			exceptionReporters = getSpringFactoriesInstances(SpringBootExceptionReporter.class,
					new Class[] { ConfigurableApplicationContext.class }, context);
			...
		}
		catch (Throwable ex) {
			...
		}
		...
	}
}
- 总结