MongoDB Node 驱动介绍
1. MongoDB数据库连接指南
使用原生的mongodb Node驱动连接MongoDB数据库。
1.1 数据库连接URI
数据库连接URI是一个指明了数据库地址、名称、用户名、密码的字符串,类似于网页链接。

1.2 Node驱动安装
使用Npm或者Yarn安装数据库驱动程序:
npm install mongodb
# or
yarn install mongodb
如果使用的是Typescript语言,需要额外的安装Node类型定义:
npm install @types/node
1.3 连接到MongoDB
注意:在执行此步骤之前,需要你已经安装了MongoDB数据库,并确保服务开启。
为了避免像迷宫一样的官网带来困扰,可以看这里:MongoDB数据库简介、安装和基本使用
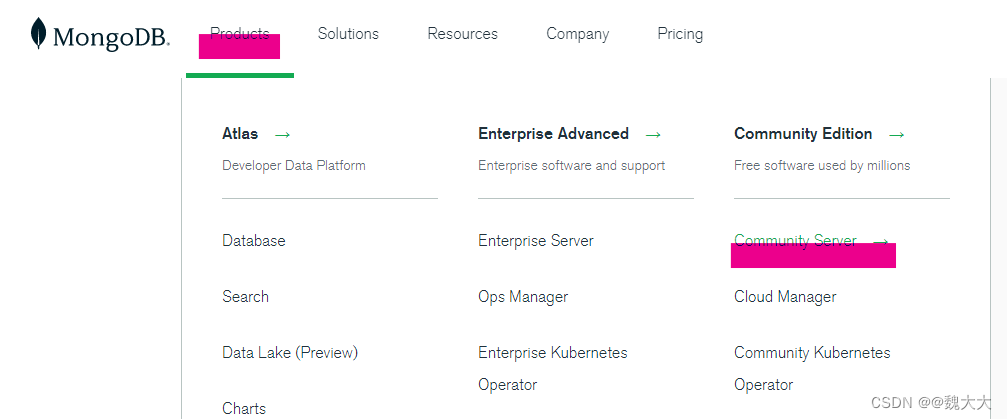
如果你希望自己下载最新版本的数据库,请访问官网:MongoDB: The Developer Data Platform | MongoDB,并按照以下图片指引找到最新版本链接。
创建js文件,并编辑如下:
import { MongoClient } from 'mongodb';

const uri = 'mongodb://ahohAdmin:123456@127.0.0.1:27017/db_ahoh'


const client = new MongoClient(uri)

async function run() {
    try {
        const database = client.db('db_ahoh')
        const movies = database.collection('movies')
        await movies.insertOne({ name: '我的36个老婆' }) //插入数据

        const query = { name: '我的36个老婆' } //查询条件
        const movie = await movies.findOne(query)   //执行查询
        console.log(movie)
    } catch (error) {
        console.log(error)
    } finally {
        await client.close()
    }
}

run().catch(console.dir)
以上代码首先插入了一条数据,然后又通过findOne查询了插入的数据。
2. MongoDB数据插入指南
向集合(表)中插入一条或多条数据,MongoDB常用的插入操作有三种:insertOne()、insertMany和bulkWrite()。
2.1 默认的数据标识(主键)_id
当我们插入一条文档(数据)时,MongoDB默认的会强制给这条数据插入一个唯一的_id属性。如果我们插入数据的时候,数据中已经有了此属性(id属性也行),MongoDB不会再生成这个属性。
我们可以直接维护这个属性,但是必须保证属性值唯一,也可以使用驱动产生一个唯一表示作为_id的值。
注意:除非你有足够的理由不使用默认值,且保证其值唯一,否则我还是建议你维持现状,让驱动自动的帮你完成这一切。
2.2 插入一条数据
使用insertOne()方法插入一条数据,成功后返回一个InsertOneResult对象的实例展示插入数据的_id值,结构如下:
{
  acknowledged: true,
  insertedId: new ObjectId("639833c04b5b998bcaaaa2af")
}
举例:
import { MongoClient } from 'mongodb';

const uri = 'mongodb://ahohAdmin:123456@127.0.0.1:27017/db_ahoh'
const client = new MongoClient(uri)
async function run() {
    try {
        const database = client.db('db_ahoh')
        const movies = database.collection('movies')
        let res = await movies.insertOne({ name: '我的37个小妾' }) //插入数据
        console.log(`数据成功插入,插入数据的ID是:${res.insertedId}`)
    } catch (error) {
        console.log(error)
    } finally {
        await client.close()
    }
}

run().catch(console.dir)
代码输出结果:
数据成功插入,插入数据的ID是:639834783d714627b8e3ce06
2.3 插入多条数据
使用insertMany()方法插入多条数据,该方法会根据传入的数据依次插入,直到完成作业或发生异常。
insertMany()方法返回一个InsertManyResult对象实例,其结构如下:
{
  acknowledged: true,
  insertedCount: 4,
  insertedIds: {
    '0': new ObjectId("639836f7d9d870a7aa8a0138"),
    '1': new ObjectId("639836f7d9d870a7aa8a0139"),
    '2': new ObjectId("639836f7d9d870a7aa8a013a"),
    '3': new ObjectId("639836f7d9d870a7aa8a013b")
  }
}
例如,假设需要插入以下数据:
{ name: 'bingbing', desc: "The first wife i want." },
{ name: 'xishi', desc: "The second wife i want." },
{ name: 'diaochan', desc: "The third wife i want." },
{ name: 'chenyuanyuan', desc: "The forth wife i want." },
代码如下:
import { MongoClient } from 'mongodb';

const uri = 'mongodb://ahohAdmin:123456@127.0.0.1:27017/db_ahoh'
const client = new MongoClient(uri)
async function run() {
    try {
        const database = client.db('db_ahoh')
        const movies = database.collection('movies')
        let wifes = [
            { name: 'bingbing', desc: "The first wife i want." },
            { name: 'xishi', desc: "The second wife i want." },
            { name: 'diaochan', desc: "The third wife i want." },
            { name: 'chenyuanyuan', desc: "The forth wife i want." },
        ]
        let res = await movies.insertMany(wifes)
        let ids = res.insertedIds
        for (let id of Object.values(ids)) {
            console.log(`inserted wife ${id} successfully`)
        }
    } catch (error) {
        console.log(error)
    } finally {
        await client.close()
    }
}

run().catch(console.dir)
代码输出:
inserted wife 6398376ca83cd05c318c4fec successfully
inserted wife 6398376ca83cd05c318c4fed successfully
inserted wife 6398376ca83cd05c318c4fee successfully
inserted wife 6398376ca83cd05c318c4fef successfully
2.4 执行多个操作
bulkWrite()方法对单个集合一次性执行批量的写操作。这种方法减少了从应用程序到服务器的网络往返次数,从而提高了吞吐量和性能。只有在传递给方法的所有操作完成后,bulkWrite()才会返回所有操作的结果集合。
bulkWrite()返回一个BulkWriteResult对象实例,结构如下:
BulkWriteResult {
  result: {
    ok: 1,
    writeErrors: [],
    writeConcernErrors: [],
    insertedIds: [ [Object], [Object] ],
    nInserted: 2,
    nUpserted: 1,
    nMatched: 0,
    nModified: 0,
    nRemoved: 0,
    upserted: [ [Object] ]
  }
}
我们可以将以下的一个或多个操作放在bulkWrite()中,一次性执行。
insertOneupdateOneupdateManydeleteOnedeleteManyreplaceOne
举例如下:
import { MongoClient } from 'mongodb';

const uri = 'mongodb://ahohAdmin:123456@127.0.0.1:27017/db_ahoh'
const client = new MongoClient(uri)
async function run() {
    try {
        const database = client.db('db_ahoh')
        const movies = database.collection('movies')
        const result = await movies.bulkWrite([
            {
                insertOne: {//插入一个
                    document: {//文档
                        name: '我的第38个暖床丫头',
                    },
                },
            },
            {
                insertOne: {
                    document: {
                        name: '我的第39个暖床丫头',
                    },
                },
            },
            {
                updateMany: {
                    // Important: You lose type safety when you use dot notation in queries
                    filter: { "name": "xishi" },
                    update: { $set: { name: '吕布' } },
                    upsert: true,
                },
            },
            {
                deleteOne: {
                    filter: { "name": "diaochan" },
                },
            },
        ]);
        console.log(result);
    } catch (error) {
        console.log(error)
    } finally {
        await client.close()
    }
}

run().catch(console.dir)
以上代码执行了两个插入、一个更新、一个删除操作。
代码执行结果:
BulkWriteResult {
  result: {
    ok: 1,
    writeErrors: [],
    writeConcernErrors: [],
    insertedIds: [ [Object], [Object] ],
    nInserted: 2,
    nUpserted: 0,
    nMatched: 3,
    nModified: 3,
    nRemoved: 1,
    upserted: []
  }
}
3. 生成自定义的_id值
使用MongoDB Node驱动Primary Key Factory生成_id值。
在创建MongoClient实例时使用pkFactory配置项指明要使用的_id值生成方法。
使用案例:
import { MongoClient } from 'mongodb';
import { UUID } from 'bson';

const uri = 'mongodb://ahohAdmin:123456@127.0.0.1:27017/db_ahoh'
const client = new MongoClient(uri, {
    pkFactory: { createPk: () => new UUID().toBinary() }
})
async function run() {
    try {
        const database = client.db('db_ahoh')
        const movies = database.collection('movies')
        const result = await movies.insertOne({ name: '我的老婆们' })
        console.log(result);
    } catch (error) {
        console.log(error)
    } finally {
        await client.close()
    }
}


run().catch(console.dir)
代码执行结果:
{
  acknowledged: true,
  insertedId: new Binary(Buffer.from("45ea4ddebf4b48be890f0b8a507fc9f2", "hex"), 4)
}
可以看出,代码执行结果中的insertedId值和默认的_id生成值有明显区别。
4. MongoDB数据删除指南
使用deleteOne()或deleteMany()方法,从集合中删除一条或多条数据。
deleteOne()方法删除第一条符合条件的数据,deleteMany()会删除所有匹配的数据。
4.1 删除一条数据
使用deleteOne()方法删除一条数据,该方法会删除第一条符合条件的数据。
deleteOne()方法返回一个DeleteResult对象实例,结构如下:
{ acknowledged: true, deletedCount: 1 }
举例:
import { MongoClient } from 'mongodb';

const uri = 'mongodb://ahohAdmin:123456@127.0.0.1:27017/db_ahoh'
const client = new MongoClient(uri)
async function run() {
    try {
        const database = client.db('db_ahoh')
        const users = database.collection('tb_users')
        const data = [
            {
                username: '如花',
                age: 18
            },
            {
                username: '棒槌',
                age: 34
            },
            {
                username: '吕小布',
                age: 10
            }
        ]
        await users.insertMany(data)
        let result = await users.deleteOne({
            age: {
                $gt: 10
            }
        })
        console.log(result);
    } catch (error) {
        console.log(error)
    } finally {
        await client.close()
    }
}


run().catch(console.dir)
以上代码先插入三条数据,再删除一条数据,虽然符合条件的数据有两条,但是deleteOne()方法仅删除第一条。
代码执行结果:
{ acknowledged: true, deletedCount: 1 }
4.2 删除多条数据
使用deleteMany()方法从集合中删除所有符合条件的数据。
deleteMany()方法返回值类型和deleteOne()相同,请看上文deleteOne()方法介绍。
举例:
import { MongoClient } from 'mongodb';
import { UUID } from 'bson';

const uri = 'mongodb://ahohAdmin:123456@127.0.0.1:27017/db_ahoh'
const client = new MongoClient(uri)
async function run() {
    try {
        const database = client.db('db_ahoh')
        const users = database.collection('tb_users')
        const data = [
            {
                username: '如花',
                age: 18
            },
            {
                username: '棒槌',
                age: 34
            },
            {
                username: '吕小布',
                age: 10
            }
        ]
        await users.insertMany(data)
        let result = await users.deleteMany({//deleteMany
            age: {
                $gt: 10
            }
        })
        console.log(result);
    } catch (error) {
        console.log(error)
    } finally {
        await client.close()
    }
}


run().catch(console.dir)
以上代码插入三条数据,并删除两条符合条件的数据。
代码执行结果:
{ acknowledged: true, deletedCount: 2 }
注意:执行代码前需要保证数据库中没有其他数据影响结果。
4. MongoDB更新、替换数据
使用update()或replace()方法更新或替换数据。
update()相关方法更新一条或多条数据中的指定属性,并保持无关属性不变。
replace()相关方法使用指定的数据替换现有数据的全部内容。
4.1 更新文档中的一条或多条数据
使用update()更新数据时,需要配合更新操作符(更新的类型) 和描述属性值的数据。
| Name | Description |
|---|---|
$currentDate | 将字段的值设置为当前日期,作为日期或时间戳。 |
$inc | 将字段值增加指定的值。 |
$min | 仅当指定值小于现有字段值时更新字段。 |
$max | 仅当指定值大于现有字段值时才更新字段。 |
$mul | 将字段的值乘以指定的值。 |
$rename | 重命名字段。 |
$set | 设置文档中字段的值。 |
$setOnInsert | 如果更新导致插入文档,则设置字段的值。对修改现有文档的更新操作无效。 |
$unset | 从文档中删除指定的字段。 |
1. $currentDate 使用方法
将指定字段更新为当前日期:
- 如果字段存在,更新为当前日期
- 如果字段不存在,添加后更新为当前日期
- 如果字段类型为
timestamp,更新为时间戳格式
举例:
import { MongoClient } from 'mongodb';
import { UUID } from 'bson';

const uri = 'mongodb://ahohAdmin:123456@127.0.0.1:27017/db_ahoh'
const client = new MongoClient(uri)
async function run() {
    try {
        const database = client.db('db_ahoh')
        const users = database.collection('tb_users')
        const inserted = await users.insertOne(
            { name: "a", birthday: new Date("2013-10-02T01:11:18.965Z") }
        )
        const result = await users.updateOne(
            { _id: inserted.insertedId }, {
            $currentDate: {
                birthday: true, //更新为当前日期
                today: true,    //添加新字段为当前日期
                //添加时间戳字段
                today_timestamp: { $type: "timestamp" }
            }
        })
        console.log(result);
    } catch (error) {
        console.log(error)
    } finally {
        await client.close()
    }
}

run().catch(console.dir)
代码执行结果:
{
  acknowledged: true,
  modifiedCount: 1,
  upsertedId: null,
  upsertedCount: 0,
  matchedCount: 1
}
更新后的数据结果:
{
  "_id": {
    "$oid": "6398648608232b5c01ac4681"
  },
  "name": "a",
  "birthday": {
    "$date": {
      "$numberLong": "1670931590238"
    }
  },
  "today": {
    "$date": {
      "$numberLong": "1670931590238"
    }
  },
  "today_timestamp": {
    "$timestamp": {
      "t": 1670931590,
      "i": 1
    }
  }
}

2. $inc 使用方法
$inc操作符可以将指定属性增加或减少指定的值。
举例:
import { MongoClient } from 'mongodb';
import { UUID } from 'bson';

const uri = 'mongodb://ahohAdmin:123456@127.0.0.1:27017/db_ahoh'
const client = new MongoClient(uri)
async function run() {
    try {
        const database = client.db('db_ahoh')
        const users = database.collection('tb_users')
        const inserted = await users.insertOne(
            { name: "小红", age: 18, height: 180 }
        )
        const result = await users.updateOne(
            { _id: inserted.insertedId }, {
            $inc: {
                age: 1,
                height: -20
            }
        })
        console.log(result);
    } catch (error) {
        console.log(error)
    } finally {
        await client.close()
    }
}

run().catch(console.dir)
以上案例将age属性增加1,height属性减少20。
代码执行结果:
{
  acknowledged: true,
  modifiedCount: 1,
  upsertedId: null,
  upsertedCount: 0,
  matchedCount: 1
}
数据执行结果:
{
  "_id": {
    "$oid": "63988eda0b60c398230afeac"
  },
  "name": "小红",
  "age": 19,
  "height": 160
}

3. $min、$max 使用方法
$min操作符会将数据原有值和更新值进行比较,取较小的值更新数据;
$max操作符会将数据原有值和更新值进行比较,取较大的值更新数据;
举例:
import { MongoClient } from 'mongodb';
import { UUID } from 'bson';

const uri = 'mongodb://ahohAdmin:123456@127.0.0.1:27017/db_ahoh'
const client = new MongoClient(uri)
async function run() {
    try {
        const database = client.db('db_ahoh')
        const users = database.collection('tb_users')
        const inserted = await users.insertOne(
            { name: "小红", age: 18, height: 180 }
        )
        const result = await users.updateOne(
            { _id: inserted.insertedId }, {
            $min: {
                age: 17,
            },
            $max: {
                height: 170,
            }
        })
        console.log(result);
    } catch (error) {
        console.log(error)
    } finally {
        await client.close()
    }
}

run().catch(console.dir)
以上代码中:
$min操作符将17和18比较,将较小的17更新到数据库;
$max操作符将170和180比较,由于原有值180更大,所以不更新原有值。
以上代码执行结果:
{
  acknowledged: true,
  modifiedCount: 1,
  upsertedId: null,
  upsertedCount: 0,
  matchedCount: 1
}
数据执行结果:
{
  "_id": {
    "$oid": "639890ddf0b0a837ff5ced49"
  },
  "name": "小红",
  "age": 17,
  "height": 180
}

4. $mul使用方法
$mul将指定字段的值乘以指定的数字,针对不存在的属性,会将其置为0。
举例:
import { MongoClient } from 'mongodb';


const uri = 'mongodb://ahohAdmin:123456@127.0.0.1:27017/db_ahoh'
const client = new MongoClient(uri)
async function run() {
    try {
        const database = client.db('db_ahoh')
        const users = database.collection('tb_users')
        const inserted = await users.insertOne(
            { name: "小红", age: 18, height: 180, price: 1.234 }
        )
        const result = await users.updateOne(
            { _id: inserted.insertedId }, {
            $mul: {
                age: 2,//age属性乘以2
                price: 3.4,//price属性乘以3.4
            }
        })
        console.log(result);
    } catch (error) {
        console.log(error)
    } finally {
        await client.close()
    }
}

run().catch(console.dir)
以上代码中,由于weight原本不存,所以会被置为0。
代码执行结果:
{
  acknowledged: true,
  modifiedCount: 1,
  upsertedId: null,
  upsertedCount: 0,
  matchedCount: 1
}

5. $rename 使用方法
$rename 操作符能够更新属性的名称,也就是更新列名。
举例:
import { MongoClient } from 'mongodb';

const uri = 'mongodb://ahohAdmin:123456@127.0.0.1:27017/db_ahoh'
const client = new MongoClient(uri)
async function run() {
    try {
        const database = client.db('db_ahoh')
        const users = database.collection('tb_users')
        const inserted = await users.insertOne(
            { name: "小红", age: 18, height: 180, price: 1.234 }
        )
        const result = await users.updateMany(
            {}, {
            $rename: {
                name: 'nickname',
            }
        })
        console.log(result);
    } catch (error) {
        console.log(error)
    } finally {
        await client.close()
    }
}

run().catch(console.dir)
以上代码将对象的属性值name名称修改为nickname。
代码执行结果(这个结果和当前数据库中数据量有关):
{
  acknowledged: true,
  modifiedCount: 7,
  upsertedId: null,
  upsertedCount: 0,
  matchedCount: 13
}

6. $set 使用方法
$set操作符将使用指定的值替换指定属性的值,也就是常规意义上的更新。
举例:
import { MongoClient } from 'mongodb';

const uri = 'mongodb://ahohAdmin:123456@127.0.0.1:27017/db_ahoh'
const client = new MongoClient(uri)
async function run() {
    try {
        const database = client.db('db_ahoh')
        const users = database.collection('tb_users')
        const inserted = await users.insertOne(
            { name: "小红", age: 18, height: 180, price: 1.234 }
        )
        const result = await users.updateMany(
            { _id: inserted.insertedId }, {
            $set: {
                name: '猪会飞',
                age: '999',
                'family.father': '熊大',
                'family.mather': '熊二'
            }
        })
        console.log(result);
    } catch (error) {
        console.log(error)
    } finally {
        await client.close()
    }
}

run().catch(console.dir)
以上代码更新了name和age属性,同时对两个不存在的深层次属性进行了值更新,此操作会再对象中插入新的值。
代码执行结果:
{
  acknowledged: true,
  modifiedCount: 1,
  upsertedId: null,
  upsertedCount: 0,
  matchedCount: 1
}
数据执行结果:
{
  "_id": {
    "$oid": "63992092c03bbf3fd49c8e3e"
  },
  "name": "猪会飞",
  "age": "999",
  "height": 180,
  "price": 1.234,
  "family": {
    "father": "熊大",
    "mather": "熊二"
  }
}

7. $setOnInsert 使用方法
$setOnInsert只会在设置了upsert:true的写操作中产生作用。
upsert选项指的是update + insert,即指定的对象如果存在就更新该对象。如果指定的对象不存在,就插入一个新的对象。
如果一个更新操作由于设置了upsert:true导致要插入一条新数据,此时$setOnInsert操作符就会对新插入的这条数据起作用,否则,不起作用。
举例:
import { MongoClient } from 'mongodb';


const uri = 'mongodb://ahohAdmin:123456@127.0.0.1:27017/db_ahoh'
const client = new MongoClient(uri)
async function run() {
    try {
        const database = client.db('db_ahoh')
        const users = database.collection('tb_users')

        const result = await users.updateOne(
            { _id: 'xxx' },
            { $set: { name: '999' }, $setOnInsert: { xxx: 'xxx' } },
            { upsert: true })

        console.log(result);
    } catch (error) {
        console.log(error)
    } finally {
        await client.close()
    }
}

run().catch(console.dir)
以上代码针对_id = 'xxxx'的数据执行更新操作,存在两种结果:
- 如果该数据并不存在,所以
upsert:true设置允许更新操作插入一条新数据,此时,$setOnInsert指定的内容就会被写入新插入的数据中; - 如果该数据存在,不会有新的数据产生,更新操作只执行
$set指定的更新内容,而不会执行$setOnInsert指定的内容。
以下是目标数据不存在时的执行结果:
{
  acknowledged: true,
  modifiedCount: 0,
  upsertedId: 'xxx',
  upsertedCount: 1,  # 有新数据插入
  matchedCount: 0
}

8. $unset 使用方法
$unset 操作符删除指定的属性,也就是删除表中的列元素。
举例:
import { MongoClient } from 'mongodb';


const uri = 'mongodb://ahohAdmin:123456@127.0.0.1:27017/db_ahoh'
const client = new MongoClient(uri)
async function run() {
    try {
        const database = client.db('db_ahoh')
        const users = database.collection('tb_users')

        const result = await users.updateMany(
            {},
            { $unset: { name: '' } })

        console.log(result);
    } catch (error) {
        console.log(error)
    } finally {
        await client.close()
    }
}

run().catch(console.dir)
以上代码删除表中所有数据的name属性。
未完待续,催更请踢我。。。

![[附源码]计算机毕业设计的剧本杀管理系统Springboot程序](https://img-blog.csdnimg.cn/5a9bc17820474a93872947c9444d5a30.png)
