目录
前言
改进过程一
增加提示信息
原版帮助摘要
pygame.draw
pygame.font
class Rect
class Surface
改进过程二
增加显示得分
改进过程三
增加背景景乐
增加提示音效
音乐切换
静音切换
mixer.music.play 注意事项
原版帮助摘要
pygame.mixer
pygame.mixer.Sound
小结
pygame编程框架
前言
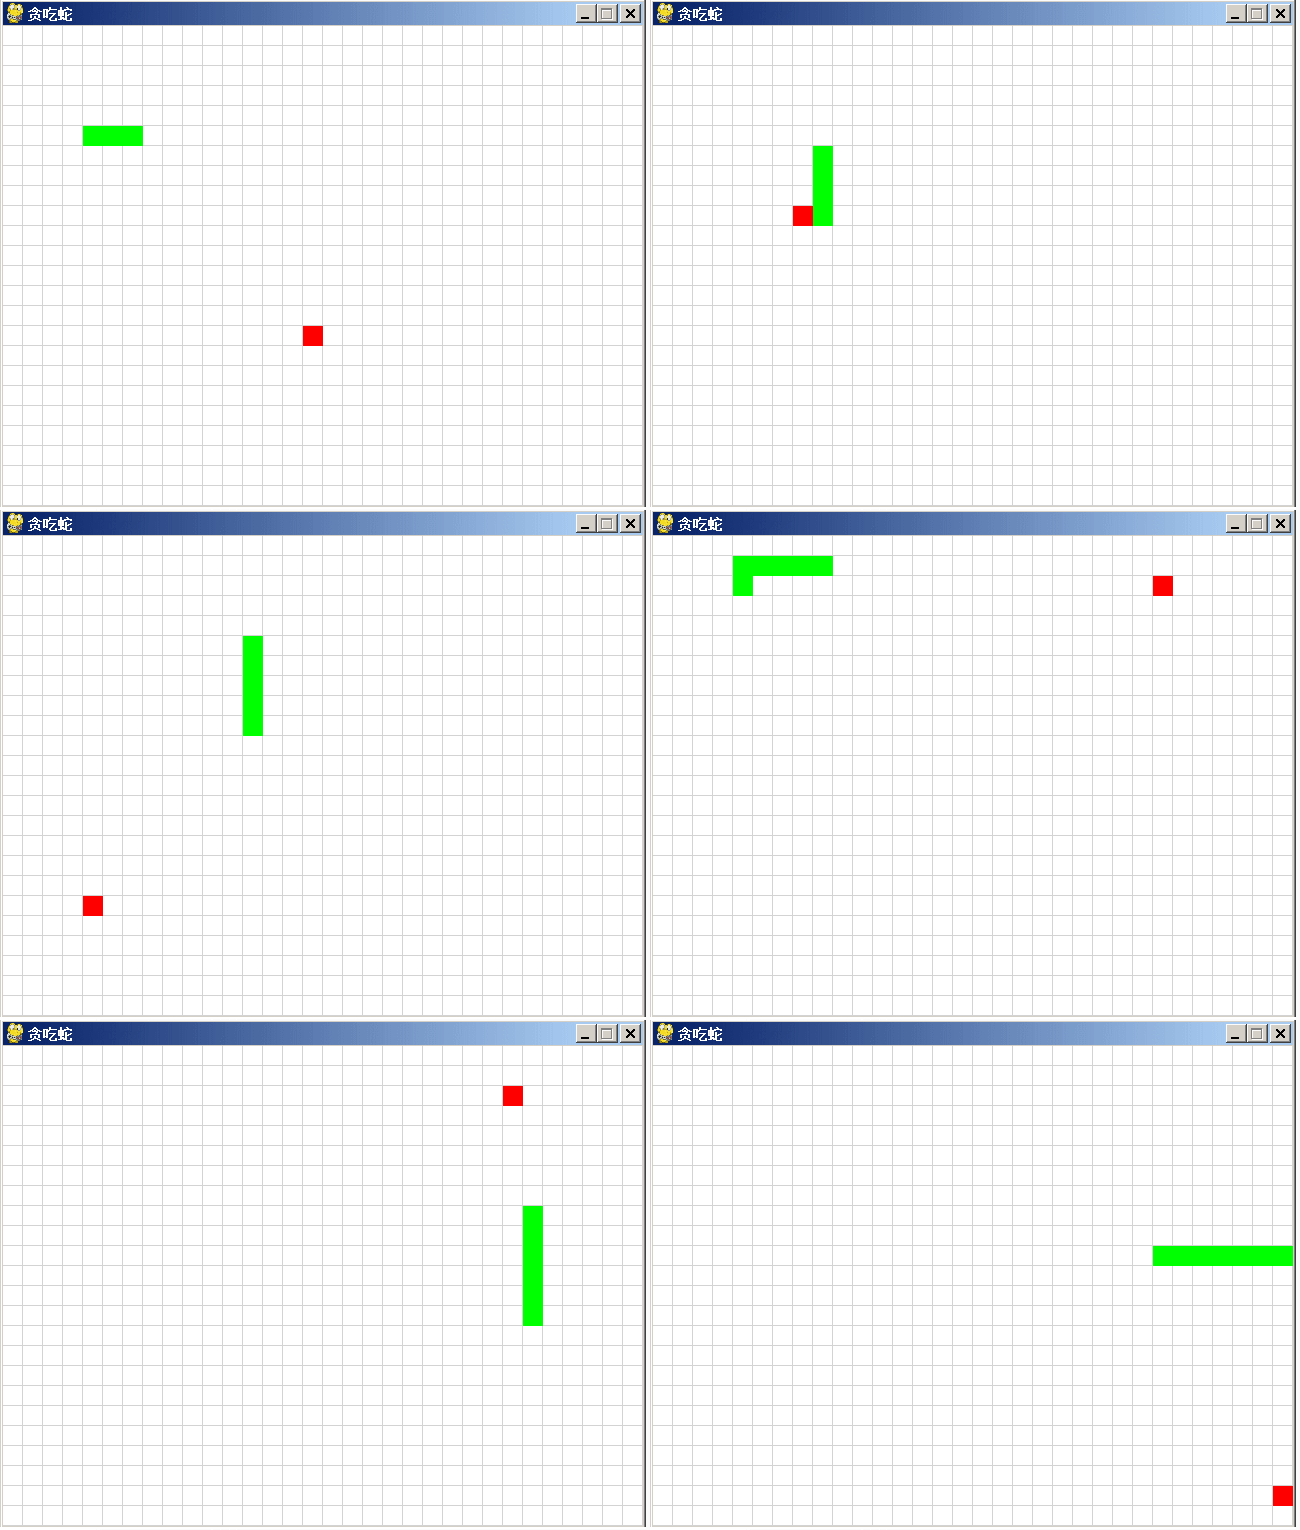
在上一篇博文里,从讯飞星火中获取到游戏“贪吃蛇”的代码,运行效果如上图。代码并不完整,当蛇死了就退出游戏,不能多次玩这个游戏。
前文链接:
讯飞星火、文心一言和通义千问同时编“贪吃蛇”游戏,谁会胜出?
代码如下:
import pygame
import sys
import random

# 定义颜色
WHITE = (255, 255, 255)
GREEN = (0, 255, 0)
RED  = (255, 0, 0)
GREY = (211, 211, 211)  # 淡灰色

def init():
    global screen, screen_size
    global snake_pos, food_pos, snake_speed

    # 初始化pygame
    pygame.init()

    # 设置屏幕大小
    screen_size = (640, 480)
    screen = pygame.display.set_mode(screen_size)

    # 设置游戏标题
    pygame.display.set_caption("贪吃蛇")

    # 蛇的初始位置
    snake_pos = [[100, 100], [80, 100], [60, 100]]

    # 食物的初始位置
    food_pos = [300, 300]

    # 蛇的初始速度
    snake_speed = [20, 0]

def repaint():
    # 绘制游戏界面
    screen.fill(WHITE)

    # 定义线段的端点坐标
    x,y = (-1,640,640,-1)*16, []
    for i in range(36):
        for _ in range(2):
            y.append(19+i*20)

    # 使用pygame.draw.lines()函数绘制线段
    points = list(zip(x,y))
    pygame.draw.lines(screen, GREY, False, points, 1) # 线宽为1
    points = list(zip(y,x))
    pygame.draw.lines(screen, GREY, False, points, 1)

    # 重画蛇和食物
    for pos in snake_pos:
        pygame.draw.rect(screen, GREEN, pygame.Rect(pos[0], pos[1], 20, 20))
    pygame.draw.rect(screen, RED, pygame.Rect(food_pos[0], food_pos[1], 20, 20))
    pygame.display.flip()

def game_quit():
    pygame.quit()
    sys.exit()

def main():
    global screen, screen_size
    global snake_pos, food_pos, snake_speed

    # 主循环
    while True:
        # 处理游戏事件
        for event in pygame.event.get():
            if event.type == pygame.QUIT:
                game_quit()
            elif event.type == pygame.KEYDOWN:
                if event.key == pygame.K_UP:
                    snake_speed = [0, -20]
                elif event.key == pygame.K_DOWN:
                    snake_speed = [0, 20]
                elif event.key == pygame.K_LEFT:
                    snake_speed = [-20, 0]
                elif event.key == pygame.K_RIGHT:
                    snake_speed = [20, 0]

        # 更新蛇的位置
        snake_pos.insert(0, [snake_pos[0][0] + snake_speed[0], snake_pos[0][1] + snake_speed[1]])

        # 检查蛇头是否碰到食物
        if snake_pos[0] == food_pos:
            food_pos = [random.randrange(1, screen_size[0] // 20) * 20, random.randrange(1, screen_size[1] // 20) * 20]
        else:
            snake_pos.pop()

        # 检查蛇头是否碰到墙壁或者蛇身
        if snake_pos[0][0] < 0 or snake_pos[0][0] >= screen_size[0] or snake_pos[0][1] < 0 or snake_pos[0][1] >= screen_size[1] or snake_pos[0] in snake_pos[1:]:
            game_quit()
            '''
            此处可增加与用户的交互,如:
            if askyesno('title','again?'):
                init() # Yes to Play again
            else:
                game_quit() # No to Exit
            '''

        # 重画界面及蛇和食物
        repaint()

        # 控制游戏速度
        pygame.time.Clock().tick(10)

if __name__ == "__main__":

    init()
    main()
改进过程一
增加提示信息
之前没有仔细学过pygame的编程,刚好拿这例程练练手,在不断改进中学习pygame编程。
原代码一执行,蛇就开始游动了,就从这里入手。开始前,增加显示“按任意键开始...”的提示。
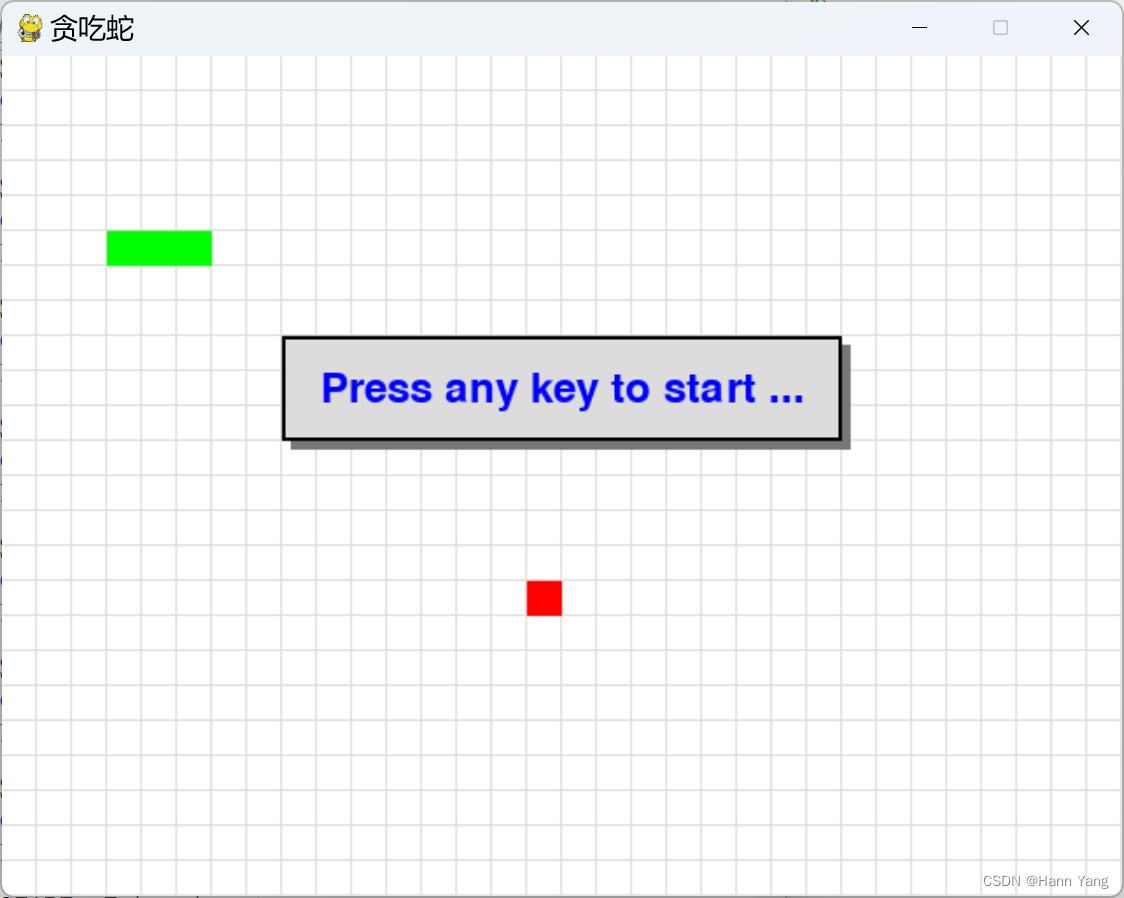
蛇死后,提醒是否重来?Yes to play again, No to quit game.

同时,在游戏中允许按ESC键暂停游戏,再按一次继续。
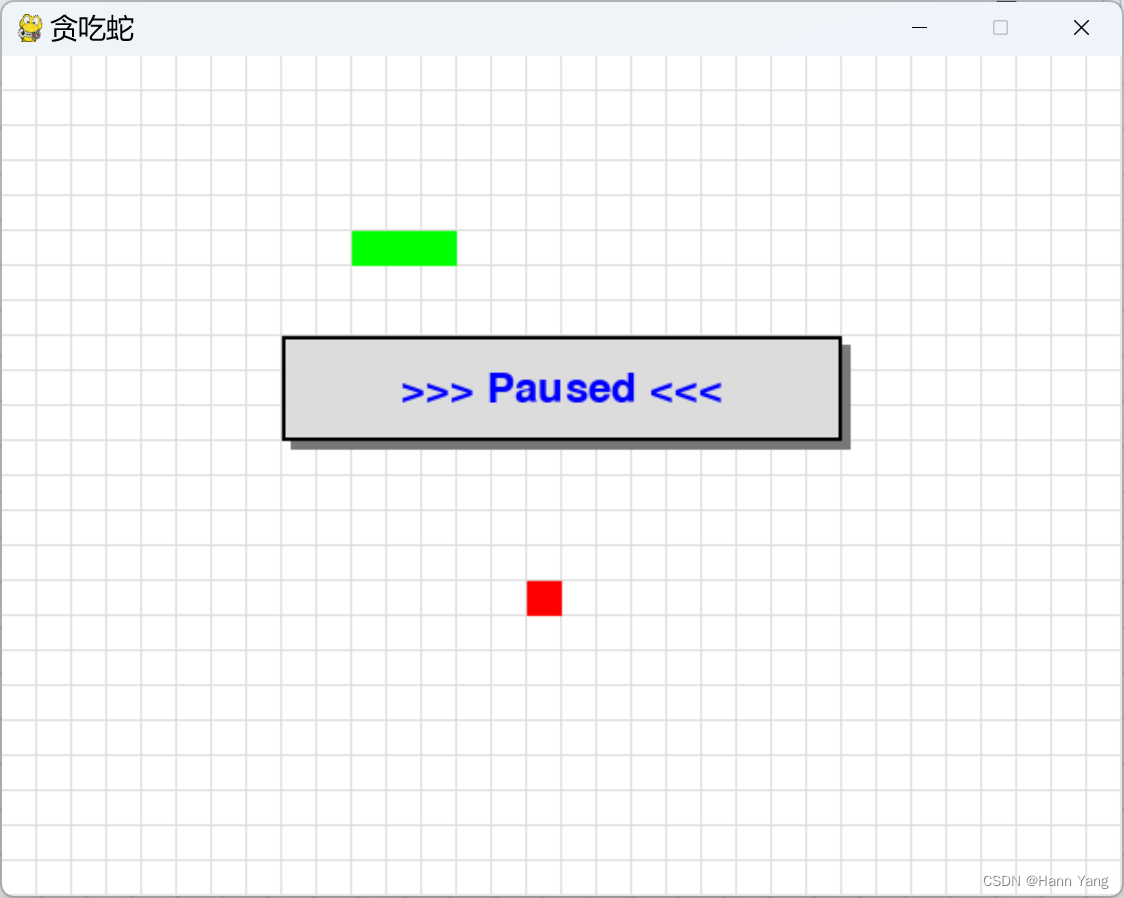
由于没查到 pygame 有弹出信息窗口的方法(函数),于是用了DOS时代显示信息窗口的办法,画多个矩形窗口来模拟窗口,最后在矩形框上写上提示文字。代码如下:
def show_msg(msg, color = BLUE):
x = screen.get_rect().centerx
y = screen.get_rect().centery - 50
font = pygame.font.Font(None, 36)
text = font.render(msg, True, color)
text_rect = text.get_rect()
text_rect.centerx = x
text_rect.centery = y
rectangle1 = pygame.Rect(x-155, y-25, 320, 60)
rectangle2 = pygame.Rect(x-160, y-30, 320, 60)
pygame.draw.rect(screen, DARK, rectangle1)
pygame.draw.rect(screen, GREY, rectangle2)
pygame.draw.rect(screen, BLACK, rectangle2, 2) # 边框宽为2
screen.blit(text, text_rect)
pygame.display.flip()
原版帮助摘要
pygame.draw
NAME
pygame.draw - pygame module for drawing shapes
FUNCTIONS
aaline(...)
aaline(surface, color, start_pos, end_pos) -> Rect
aaline(surface, color, start_pos, end_pos, blend=1) -> Rect
draw a straight antialiased line
aalines(...)
aalines(surface, color, closed, points) -> Rect
aalines(surface, color, closed, points, blend=1) -> Rect
draw multiple contiguous straight antialiased line segments
arc(...)
arc(surface, color, rect, start_angle, stop_angle) -> Rect
arc(surface, color, rect, start_angle, stop_angle, width=1) -> Rect
draw an elliptical arc
circle(...)
circle(surface, color, center, radius) -> Rect
circle(surface, color, center, radius, width=0, draw_top_right=None, draw_top_left=None, draw_bottom_left=None, draw_bottom_right=None) -> Rect
draw a circle
ellipse(...)
ellipse(surface, color, rect) -> Rect
ellipse(surface, color, rect, width=0) -> Rect
draw an ellipse
line(...)
line(surface, color, start_pos, end_pos) -> Rect
line(surface, color, start_pos, end_pos, width=1) -> Rect
draw a straight line
lines(...)
lines(surface, color, closed, points) -> Rect
lines(surface, color, closed, points, width=1) -> Rect
draw multiple contiguous straight line segments
polygon(...)
polygon(surface, color, points) -> Rect
polygon(surface, color, points, width=0) -> Rect
draw a polygon
rect(...)
rect(surface, color, rect) -> Rect
rect(surface, color, rect, width=0, border_radius=0, border_top_left_radius=-1, border_top_right_radius=-1, border_bottom_left_radius=-1, border_bottom_right_radius=-1) -> Rect
draw a rectangle
pygame.font
NAME
pygame.font - pygame module for loading and rendering fonts
CLASSES
builtins.object
Font
class Font(builtins.object)
| Font(file_path=None, size=12) -> Font
| Font(file_path, size) -> Font
| Font(pathlib.Path, size) -> Font
| Font(object, size) -> Font
| create a new Font object from a file
|
| Methods defined here:
|
| __init__(self, /, *args, **kwargs)
| Initialize self. See help(type(self)) for accurate signature.
|
| get_ascent(...)
| get_ascent() -> int
| get the ascent of the font
|
| get_bold(...)
| get_bold() -> bool
| check if text will be rendered bold
|
| get_descent(...)
| get_descent() -> int
| get the descent of the font
|
| get_height(...)
| get_height() -> int
| get the height of the font
|
| get_italic(...)
| get_italic() -> bool
| check if the text will be rendered italic
|
| get_linesize(...)
| get_linesize() -> int
| get the line space of the font text
|
| get_strikethrough(...)
| get_strikethrough() -> bool
| check if text will be rendered with a strikethrough
|
| get_underline(...)
| get_underline() -> bool
| check if text will be rendered with an underline
|
| metrics(...)
| metrics(text) -> list
| gets the metrics for each character in the passed string
|
| render(...)
| render(text, antialias, color, background=None) -> Surface
| draw text on a new Surface
|
| set_bold(...)
| set_bold(bool) -> None
| enable fake rendering of bold text
|
| set_italic(...)
| set_italic(bool) -> None
| enable fake rendering of italic text
|
| set_script(...)
| set_script(str) -> None
| set the script code for text shaping
|
| set_strikethrough(...)
| set_strikethrough(bool) -> None
| control if text is rendered with a strikethrough
|
| set_underline(...)
| set_underline(bool) -> None
| control if text is rendered with an underline
|
| size(...)
| size(text) -> (width, height)
| determine the amount of space needed to render text
|
| ----------------------------------------------------------------------
| Data descriptors defined here:
|
| bold
| bold -> bool
| Gets or sets whether the font should be rendered in (faked) bold.
|
| italic
| italic -> bool
| Gets or sets whether the font should be rendered in (faked) italics.
|
| strikethrough
| strikethrough -> bool
| Gets or sets whether the font should be rendered with a strikethrough.
|
| underline
| underline -> bool
| Gets or sets whether the font should be rendered with an underline.
class Rect
Help on class Rect in module pygame.rect:
class Rect(builtins.object)
| Rect(left, top, width, height) -> Rect
| Rect((left, top), (width, height)) -> Rect
| Rect(object) -> Rect
| pygame object for storing rectangular coordinates
|
| Methods defined here:
|
| clamp(...)
| clamp(Rect) -> Rect
| moves the rectangle inside another
|
| clamp_ip(...)
| clamp_ip(Rect) -> None
| moves the rectangle inside another, in place
|
| clip(...)
| clip(Rect) -> Rect
| crops a rectangle inside another
|
| clipline(...)
| clipline(x1, y1, x2, y2) -> ((cx1, cy1), (cx2, cy2))
| clipline(x1, y1, x2, y2) -> ()
| clipline((x1, y1), (x2, y2)) -> ((cx1, cy1), (cx2, cy2))
| clipline((x1, y1), (x2, y2)) -> ()
| clipline((x1, y1, x2, y2)) -> ((cx1, cy1), (cx2, cy2))
| clipline((x1, y1, x2, y2)) -> ()
| clipline(((x1, y1), (x2, y2))) -> ((cx1, cy1), (cx2, cy2))
| clipline(((x1, y1), (x2, y2))) -> ()
| crops a line inside a rectangle
|
| collidedict(...)
| collidedict(dict) -> (key, value)
| collidedict(dict) -> None
| collidedict(dict, use_values=0) -> (key, value)
| collidedict(dict, use_values=0) -> None
| test if one rectangle in a dictionary intersects
|
| collidedictall(...)
| collidedictall(dict) -> [(key, value), ...]
| collidedictall(dict, use_values=0) -> [(key, value), ...]
| test if all rectangles in a dictionary intersect
|
| collidelist(...)
| collidelist(list) -> index
| test if one rectangle in a list intersects
|
| collidelistall(...)
| collidelistall(list) -> indices
| test if all rectangles in a list intersect
|
| collideobjects(...)
| collideobjects(rect_list) -> object
| collideobjects(obj_list, key=func) -> object
| test if any object in a list intersects
|
| collideobjectsall(...)
| collideobjectsall(rect_list) -> objects
| collideobjectsall(obj_list, key=func) -> objects
| test if all objects in a list intersect
|
| collidepoint(...)
| collidepoint(x, y) -> bool
| collidepoint((x,y)) -> bool
| test if a point is inside a rectangle
|
| colliderect(...)
| colliderect(Rect) -> bool
| test if two rectangles overlap
|
| contains(...)
| contains(Rect) -> bool
| test if one rectangle is inside another
|
| copy(...)
| copy() -> Rect
| copy the rectangle
|
| fit(...)
| fit(Rect) -> Rect
| resize and move a rectangle with aspect ratio
|
| inflate(...)
| inflate(x, y) -> Rect
| grow or shrink the rectangle size
|
| inflate_ip(...)
| inflate_ip(x, y) -> None
| grow or shrink the rectangle size, in place
|
| move(...)
| move(x, y) -> Rect
| moves the rectangle
|
| move_ip(...)
| move_ip(x, y) -> None
| moves the rectangle, in place
|
| normalize(...)
| normalize() -> None
| correct negative sizes
|
| scale_by(...)
| scale_by(scalar) -> Rect
| scale_by(scalex, scaley) -> Rect
| scale the rectangle by given a multiplier
|
| scale_by_ip(...)
| scale_by_ip(scalar) -> None
| scale_by_ip(scalex, scaley) -> None
| grow or shrink the rectangle size, in place
|
| union(...)
| union(Rect) -> Rect
| joins two rectangles into one
|
| union_ip(...)
| union_ip(Rect) -> None
| joins two rectangles into one, in place
|
| unionall(...)
| unionall(Rect_sequence) -> Rect
| the union of many rectangles
|
| unionall_ip(...)
| unionall_ip(Rect_sequence) -> None
| the union of many rectangles, in place
|
| update(...)
| update(left, top, width, height) -> None
| update((left, top), (width, height)) -> None
| update(object) -> None
| sets the position and size of the rectangle
class Surface
class Surface(builtins.object)
| Surface((width, height), flags=0, depth=0, masks=None) -> Surface
| Surface((width, height), flags=0, Surface) -> Surface
| pygame object for representing images
|
| Methods defined here:
|
| blit(...)
| blit(source, dest, area=None, special_flags=0) -> Rect
| draw one image onto another
|
| blits(...)
| blits(blit_sequence=((source, dest), ...), doreturn=1) -> [Rect, ...] or None
| blits(((source, dest, area), ...)) -> [Rect, ...]
| blits(((source, dest, area, special_flags), ...)) -> [Rect, ...]
| draw many images onto another
|
| convert(...)
| convert(Surface=None) -> Surface
| convert(depth, flags=0) -> Surface
| convert(masks, flags=0) -> Surface
| change the pixel format of an image
|
| convert_alpha(...)
| convert_alpha(Surface) -> Surface
| convert_alpha() -> Surface
| change the pixel format of an image including per pixel alphas
|
| copy(...)
| copy() -> Surface
| create a new copy of a Surface
|
| fill(...)
| fill(color, rect=None, special_flags=0) -> Rect
| fill Surface with a solid color
|
| get_abs_offset(...)
| get_abs_offset() -> (x, y)
| find the absolute position of a child subsurface inside its top level parent
|
| get_abs_parent(...)
| get_abs_parent() -> Surface
| find the top level parent of a subsurface
|
| get_alpha(...)
| get_alpha() -> int_value
| get the current Surface transparency value
|
| get_at(...)
| get_at((x, y)) -> Color
| get the color value at a single pixel
|
| get_at_mapped(...)
| get_at_mapped((x, y)) -> Color
| get the mapped color value at a single pixel
|
| get_bitsize(...)
| get_bitsize() -> int
| get the bit depth of the Surface pixel format
|
| get_blendmode(...)
| Return the surface's SDL 2 blend mode
|
| get_bounding_rect(...)
| get_bounding_rect(min_alpha = 1) -> Rect
| find the smallest rect containing data
|
| get_buffer(...)
| get_buffer() -> BufferProxy
| acquires a buffer object for the pixels of the Surface.
|
| get_bytesize(...)
| get_bytesize() -> int
| get the bytes used per Surface pixel
|
| get_clip(...)
| get_clip() -> Rect
| get the current clipping area of the Surface
|
| get_colorkey(...)
| get_colorkey() -> RGB or None
| Get the current transparent colorkey
|
| get_flags(...)
| get_flags() -> int
| get the additional flags used for the Surface
|
| get_height(...)
| get_height() -> height
| get the height of the Surface
|
| get_locked(...)
| get_locked() -> bool
| test if the Surface is current locked
|
| get_locks(...)
| get_locks() -> tuple
| Gets the locks for the Surface
|
| get_losses(...)
| get_losses() -> (R, G, B, A)
| the significant bits used to convert between a color and a mapped integer
|
| get_masks(...)
| get_masks() -> (R, G, B, A)
| the bitmasks needed to convert between a color and a mapped integer
|
| get_offset(...)
| get_offset() -> (x, y)
| find the position of a child subsurface inside a parent
|
| get_palette(...)
| get_palette() -> [RGB, RGB, RGB, ...]
| get the color index palette for an 8-bit Surface
|
| get_palette_at(...)
| get_palette_at(index) -> RGB
| get the color for a single entry in a palette
|
| get_parent(...)
| get_parent() -> Surface
| find the parent of a subsurface
|
| get_pitch(...)
| get_pitch() -> int
| get the number of bytes used per Surface row
|
| get_rect(...)
| get_rect(**kwargs) -> Rect
| get the rectangular area of the Surface
|
| get_shifts(...)
| get_shifts() -> (R, G, B, A)
| the bit shifts needed to convert between a color and a mapped integer
|
| get_size(...)
| get_size() -> (width, height)
| get the dimensions of the Surface
|
| get_view(...)
| get_view(<kind>='2') -> BufferProxy
| return a buffer view of the Surface's pixels.
|
| get_width(...)
| get_width() -> width
| get the width of the Surface
|
| lock(...)
| lock() -> None
| lock the Surface memory for pixel access
|
| map_rgb(...)
| map_rgb(Color) -> mapped_int
| convert a color into a mapped color value
|
| mustlock(...)
| mustlock() -> bool
| test if the Surface requires locking
|
| premul_alpha(...)
| premul_alpha() -> Surface
| returns a copy of the surface with the RGB channels pre-multiplied by the alpha channel.
|
| scroll(...)
| scroll(dx=0, dy=0) -> None
| Shift the surface image in place
|
| set_alpha(...)
| set_alpha(value, flags=0) -> None
| set_alpha(None) -> None
| set the alpha value for the full Surface image
|
| set_at(...)
| set_at((x, y), Color) -> None
| set the color value for a single pixel
|
| set_clip(...)
| set_clip(rect) -> None
| set_clip(None) -> None
| set the current clipping area of the Surface
|
| set_colorkey(...)
| set_colorkey(Color, flags=0) -> None
| set_colorkey(None) -> None
| Set the transparent colorkey
|
| set_masks(...)
| set_masks((r,g,b,a)) -> None
| set the bitmasks needed to convert between a color and a mapped integer
|
| set_palette(...)
| set_palette([RGB, RGB, RGB, ...]) -> None
| set the color palette for an 8-bit Surface
|
| set_palette_at(...)
| set_palette_at(index, RGB) -> None
| set the color for a single index in an 8-bit Surface palette
|
| set_shifts(...)
| set_shifts((r,g,b,a)) -> None
| sets the bit shifts needed to convert between a color and a mapped integer
|
| subsurface(...)
| subsurface(Rect) -> Surface
| create a new surface that references its parent
|
| unlock(...)
| unlock() -> None
| unlock the Surface memory from pixel access
|
| unmap_rgb(...)
| unmap_rgb(mapped_int) -> Color
| convert a mapped integer color value into a Color
另外增加了3个状态变量,初始状态为:
is_running = False
is_paused = False
is_dead = False
增加了4个按键判别:
is_dead时,判断重新开始还是退出游戏
pygame.K_y: 字母Y/y
pygame.K_n: 字母N/n
暂停和恢复
pygame.K_ESCAPE: Esc键
pygame.K_SPACE: 空格键
完整代码如下:
import pygame
import sys
import random

# 定义颜色
BLACK = (0, 0, 0)
WHITE = (255, 255, 255)
RED   = (255, 0, 0)
GREEN = (0, 255, 0)
BLUE  = (0, 0, 255)
GREY  = (220, 220, 220)  # 淡灰色
DARK  = (120, 120, 120)  # 深灰色

def init():
    global screen, screen_size
    global snake_pos, food_pos, snake_speed

    # 初始化pygame
    pygame.init()

    # 设置屏幕大小
    screen_size = (640, 480)
    screen = pygame.display.set_mode(screen_size)

    # 设置游戏标题
    pygame.display.set_caption("贪吃蛇")

    # 蛇的初始位置
    snake_pos = [[100, 100], [80, 100], [60, 100]]

    # 食物的初始位置
    food_pos = [300, 300]

    # 蛇的初始速度
    snake_speed = [20, 0]


def show_msg(msg, color = BLUE):
    x = screen.get_rect().centerx
    y = screen.get_rect().centery - 50
    font = pygame.font.Font(None, 36)
    text = font.render(msg, True, color)
    text_rect = text.get_rect()
    text_rect.centerx = x
    text_rect.centery = y
    rectangle1 = pygame.Rect(x-155, y-25, 320, 60)
    rectangle2 = pygame.Rect(x-160, y-30, 320, 60)
    pygame.draw.rect(screen, DARK, rectangle1)
    pygame.draw.rect(screen, GREY, rectangle2)
    pygame.draw.rect(screen, BLACK, rectangle2, 2) # 边框宽为2
    screen.blit(text, text_rect)
    pygame.display.flip()

def repaint():
    # 绘制游戏界面
    screen.fill(WHITE)

    # 定义线段的端点坐标
    x,y = (-1,640,640,-1)*16, []
    for i in range(36):
        for _ in range(2):
            y.append(19+i*20)

    # 使用pygame.draw.lines()函数绘制线段
    points = list(zip(x,y))
    pygame.draw.lines(screen, GREY, False, points, 1) # 线宽为1
    points = list(zip(y,x))
    pygame.draw.lines(screen, GREY, False, points, 1)

    # 重画蛇和食物
    for pos in snake_pos:
        pygame.draw.rect(screen, GREEN, pygame.Rect(pos[0], pos[1], 20, 20))
    pygame.draw.rect(screen, RED, pygame.Rect(food_pos[0], food_pos[1], 20, 20))
    pygame.display.flip()

def game_quit():
    pygame.quit()
    sys.exit()

def main():
    global screen, screen_size
    global snake_pos, food_pos, snake_speed

    is_running = False
    is_paused = False
    is_dead = False

    repaint()
    show_msg("Press any key to start ...")

    # 主循环
    while True:
        # 处理游戏事件
        for event in pygame.event.get():
            if event.type == pygame.QUIT:
                game_quit()
            elif event.type == pygame.KEYDOWN:
                if event.key == pygame.K_UP:
                    snake_speed = [0, -20]
                elif event.key == pygame.K_DOWN:
                    snake_speed = [0, 20]
                elif event.key == pygame.K_LEFT:
                    snake_speed = [-20, 0]
                elif event.key == pygame.K_RIGHT:
                    snake_speed = [20, 0]
                elif event.key == pygame.K_y:
                    if is_dead:
                        init()
                        is_dead = False
                    is_running = True
                elif event.key == pygame.K_n:
                    if is_dead: game_quit()
                    else: is_running = True
                elif event.key == pygame.K_ESCAPE:
                    if is_running:
                        show_msg(">>> Paused <<<")
                        is_paused = not is_paused
                else: # 任意键进入开始状态
                    is_running = True

        if not is_running: continue
        if is_paused and is_running: continue

        # 更新蛇的位置
        snake_pos.insert(0, [snake_pos[0][0] + snake_speed[0], snake_pos[0][1] + snake_speed[1]])

        # 检查蛇头是否碰到食物
        if snake_pos[0] == food_pos:
            food_pos = [random.randrange(1, screen_size[0] // 20) * 20, random.randrange(1, screen_size[1] // 20) * 20]
        else:
            snake_pos.pop()

        # 检查蛇头是否碰到墙壁或者蛇身
        if snake_pos[0][0] < 0 or snake_pos[0][0] >= screen_size[0] or snake_pos[0][1] < 0 or snake_pos[0][1] >= screen_size[1] or snake_pos[0] in snake_pos[1:]:
            show_msg("Dead! Again? (Y or N)")
            is_running = False
            is_dead = True
            continue

        # 重画界面及蛇和食物
        repaint()

        # 控制游戏速度
        pygame.time.Clock().tick(10)

if __name__ == "__main__":

    init()
    main()
改进过程二
增加显示得分
每吃到一个食物+10分,蛇长和食物靠近边界会有额外加分;顺带显示出蛇的坐标位置。
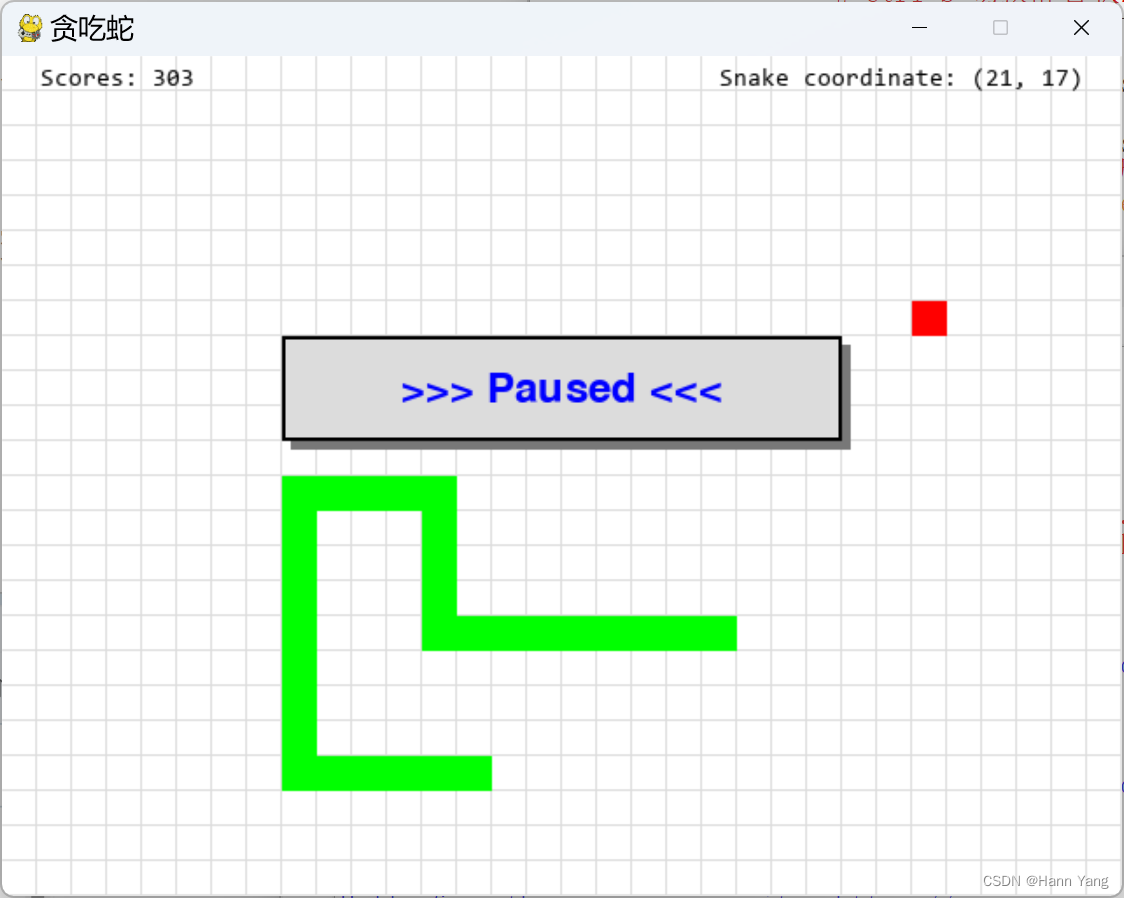
函数show_msg_at(),比show_msg增加x,y坐标,把信息显示到指定的位置:
def show_msg_at(x, y, msg):
font = pygame.font.SysFont('Consolas', 14) # 使用系统字库
text = font.render(msg, True, BLACK)
text_rect = text.get_rect()
text_rect.x, text_rect.y = x, y
screen.blit(text, text_rect)
pygame.display.flip()
另外新增一个全局变量 scores,当碰到食物时加10分,蛇长超过5以及食物靠近边界的距离小3会有额外加分,规则可以自己定,例如:
if snake_pos[0] == food_pos:
scores += 10 + len(snake_pos) // 5
if not 1 < snake_pos[0][0]//20 < 30 or not 1 < snake_pos[0][1]//20 < 22:
scores += 5
完整代码如下:
import pygame
import sys
import random
# 定义颜色
BLACK = (0, 0, 0)
WHITE = (255, 255, 255)
RED = (255, 0, 0)
GREEN = (0, 255, 0)
BLUE = (0, 0, 255)
GREY = (220, 220, 220) # 淡灰色
DARK = (120, 120, 120) # 深灰色
def init():
global screen, screen_size, scores
global snake_pos, food_pos, snake_speed
# 初始化pygame
scores = 0
pygame.init()
# 设置屏幕大小
screen_size = (640, 480)
screen = pygame.display.set_mode(screen_size)
# 设置游戏标题
pygame.display.set_caption("贪吃蛇")
# 蛇的初始位置
snake_pos = [[100, 100], [80, 100], [60, 100]]
# 食物的初始位置
food_pos = [300, 300]
# 蛇的初始速度
snake_speed = [20, 0]
def show_msg(msg, color = BLUE):
x = screen.get_rect().centerx
y = screen.get_rect().centery - 50
font = pygame.font.Font(None, 36)
text = font.render(msg, True, color)
text_rect = text.get_rect()
text_rect.centerx = x
text_rect.centery = y
rectangle1 = pygame.Rect(x-155, y-25, 320, 60)
rectangle2 = pygame.Rect(x-160, y-30, 320, 60)
pygame.draw.rect(screen, DARK, rectangle1)
pygame.draw.rect(screen, GREY, rectangle2)
pygame.draw.rect(screen, BLACK, rectangle2, 2) # 边框宽为2
screen.blit(text, text_rect)
pygame.display.flip()
def repaint():
# 绘制游戏界面
screen.fill(WHITE)
# 定义线段的端点坐标
x,y = (-1,640,640,-1)*16, []
for i in range(36):
for _ in range(2):
y.append(19+i*20)
# 使用pygame.draw.lines()函数绘制线段
points = list(zip(x,y))
pygame.draw.lines(screen, GREY, False, points, 1) # 线宽为1
points = list(zip(y,x))
pygame.draw.lines(screen, GREY, False, points, 1)
# 重画蛇和食物
for pos in snake_pos:
pygame.draw.rect(screen, GREEN, pygame.Rect(pos[0], pos[1], 20, 20))
pygame.draw.rect(screen, RED, pygame.Rect(food_pos[0], food_pos[1], 20, 20))
pygame.display.flip()
show_msg_at(22, 6, f'Scores: {scores}')
show_msg_at(410, 6, f'Snake coordinate: ({1+snake_pos[0][0]//20:2}, {1+snake_pos[0][1]//20:2})')
def show_msg_at(x, y, msg):
font = pygame.font.SysFont('Consolas', 14)
text = font.render(msg, True, BLACK)
text_rect = text.get_rect()
text_rect.x, text_rect.y = x, y
screen.blit(text, text_rect)
pygame.display.flip()
def game_quit():
pygame.quit()
sys.exit()
def main():
global screen, screen_size, scores
global snake_pos, food_pos, snake_speed
is_running = False
is_paused = False
is_dead = False
repaint()
show_msg("Press any key to start ...")
# 主循环
while True:
# 处理游戏事件
for event in pygame.event.get():
if event.type == pygame.QUIT:
game_quit()
elif event.type == pygame.KEYDOWN:
if event.key == pygame.K_UP:
snake_speed = [0, -20]
elif event.key == pygame.K_DOWN:
snake_speed = [0, 20]
elif event.key == pygame.K_LEFT:
snake_speed = [-20, 0]
elif event.key == pygame.K_RIGHT:
snake_speed = [20, 0]
elif event.key == pygame.K_y:
if is_dead:
init()
is_dead = False
is_running = True
elif event.key == pygame.K_n:
if is_dead: game_quit()
else: is_running = True
elif event.key == pygame.K_SPACE:
if is_dead: continue
if is_paused: is_paused = False
is_running = True
elif event.key == pygame.K_ESCAPE:
if is_running:
show_msg(">>> Paused <<<")
is_paused = not is_paused
else: # 任意键进入开始状态
if is_dead: continue
is_running = True
if not is_running: continue
if is_paused and is_running: continue
# 更新蛇的位置
snake_pos.insert(0, [snake_pos[0][0] + snake_speed[0], snake_pos[0][1] + snake_speed[1]])
# 检查蛇头是否碰到食物
if snake_pos[0] == food_pos:
scores += 10 + len(snake_pos) // 5
if not 1 < snake_pos[0][0]//20 < 30 or not 1 < snake_pos[0][1]//20 < 22:
scores += 5
food_pos = [random.randrange(1, screen_size[0] // 20) * 20, random.randrange(1, screen_size[1] // 20) * 20]
else:
snake_pos.pop()
# 检查蛇头是否碰到墙壁或者蛇身
if snake_pos[0][0] < 0 or snake_pos[0][0] >= screen_size[0] or snake_pos[0][1] < 0 or snake_pos[0][1] >= screen_size[1] or snake_pos[0] in snake_pos[1:]:
show_msg("Dead! Again? (Y or N)")
is_running = False
is_dead = True
continue
# 重画界面及蛇和食物
repaint()
# 控制游戏速度
pygame.time.Clock().tick(10)
if __name__ == "__main__":
init()
main()
改进过程三
增加背景景乐
def play_music(mp3, volume = 1, loops = -1):
# 初始化pygame的mixer模块
pygame.mixer.init()
# 加载音乐文件
pygame.mixer.music.load(mp3)
# 控制音量 volume = 0~1,1为最高音量
pygame.mixer.music.set_volume(volume)
# 播放音乐 loops = -1 为循环播放
pygame.mixer.music.play(loops)
增加提示音效
def play_sound(wav_no):
sound_fn = f'sound{wav_no}.wav'
if os.path.exists(sound_fn):
alert_sound = pygame.mixer.Sound(sound_fn)
alert_sound.play()
音乐切换
快捷键 Ctrl+M
elif event.key == pygame.K_m and event.mod & pygame.KMOD_CTRL:
# Ctrl+M 切换背景音乐
is_mute = False
music_no = 1 if music_no == 3 else music_no + 1
music_fn = f"voice{music_no}.mp3"
if os.path.exists(music_fn):
t = threading.Thread(target=play_music, args=(music_fn,0.8,))
t.start()
静音切换
快捷键 Ctrl+S
elif event.key == pygame.K_s and event.mod & pygame.KMOD_CTRL:
# Ctrl+S 切换静音状态
is_mute = not is_mute
if is_mute:
pygame.mixer.music.pause()
else:
pygame.mixer.music.unpause()
mixer.music.play 注意事项
1. pygame.mixer.music.play() 只能播放pygame支持的音频格式,包括WAV, MP3等。
2. 如果音频文件未找到或无法读取,pygame.mixer.music.play( ) 会抛出一个异常。使用需要确保音频文件的路径正确,且文件存在。导入os库,用os.path.exists(music_file) 判断文件是否存在。
3. pygame.mixer.music.play() 是一个阻塞函数,在音频播放期间程序将不会执行其他操作。如果需要在播放同时执行其他操作,需要在一个单独的线程中调用pygame.mixer.music.play()。
4. 多线程需要导入threading库,例如:
t = threading.Thread(target=play_music, args=(music_fn,0.8,))
t.start()
原版帮助摘要
pygame.mixer
NAME
pygame.mixer_music - pygame module for controlling streamed audio
FUNCTIONS
fadeout(...)
fadeout(time) -> None
stop music playback after fading out
get_busy(...)
get_busy() -> bool
check if the music stream is playing
get_endevent(...)
get_endevent() -> type
get the event a channel sends when playback stops
get_pos(...)
get_pos() -> time
get the music play time
get_volume(...)
get_volume() -> value
get the music volume
load(...)
load(filename) -> None
load(fileobj, namehint=) -> None
Load a music file for playback
pause(...)
pause() -> None
temporarily stop music playback
play(...)
play(loops=0, start=0.0, fade_ms=0) -> None
Start the playback of the music stream
queue(...)
queue(filename) -> None
queue(fileobj, namehint=, loops=0) -> None
queue a sound file to follow the current
rewind(...)
rewind() -> None
restart music
set_endevent(...)
set_endevent() -> None
set_endevent(type) -> None
have the music send an event when playback stops
set_pos(...)
set_pos(pos) -> None
set position to play from
set_volume(...)
set_volume(volume) -> None
set the music volume
stop(...)
stop() -> None
stop the music playback
unload(...)
unload() -> None
Unload the currently loaded music to free up resources
unpause(...)
unpause() -> None
resume paused music
pygame.mixer.Sound
class Sound(builtins.object)
| Sound(filename) -> Sound
| Sound(file=filename) -> Sound
| Sound(file=pathlib_path) -> Sound
| Sound(buffer) -> Sound
| Sound(buffer=buffer) -> Sound
| Sound(object) -> Sound
| Sound(file=object) -> Sound
| Sound(array=object) -> Sound
| Create a new Sound object from a file or buffer object
|
| Methods defined here:
|
| __init__(self, /, *args, **kwargs)
| Initialize self. See help(type(self)) for accurate signature.
|
| fadeout(...)
| fadeout(time) -> None
| stop sound playback after fading out
|
| get_length(...)
| get_length() -> seconds
| get the length of the Sound
|
| get_num_channels(...)
| get_num_channels() -> count
| count how many times this Sound is playing
|
| get_raw(...)
| get_raw() -> bytes
| return a bytestring copy of the Sound samples.
|
| get_volume(...)
| get_volume() -> value
| get the playback volume
|
| play(...)
| play(loops=0, maxtime=0, fade_ms=0) -> Channel
| begin sound playback
|
| set_volume(...)
| set_volume(value) -> None
| set the playback volume for this Sound
|
| stop(...)
| stop() -> None
| stop sound playback
完整代码:
import pygame
import sys, os
import random
import threading

# 定义颜色
BLACK = (0, 0, 0)
WHITE = (255, 255, 255)
RED   = (255, 0, 0)
GREEN = (0, 255, 0)
BLUE  = (0, 0, 255)
GREY  = (220, 220, 220)  # 淡灰色
DARK  = (120, 120, 120)  # 深灰色

def init():
    global screen, screen_size, scores
    global snake_pos, food_pos, snake_speed

    # 初始化pygame
    scores = 0
    pygame.init()

    # 设置屏幕大小
    screen_size = (640, 480)
    screen = pygame.display.set_mode(screen_size)

    # 设置游戏标题
    pygame.display.set_caption("贪吃蛇")

    # 蛇的初始位置
    snake_pos = [[100, 100], [80, 100], [60, 100]]

    # 食物的初始位置
    food_pos = [300, 300]

    # 蛇的初始速度
    snake_speed = [20, 0]

def play_music(mp3, volume = 1, loops = -1):
    # 初始化pygame的mixer模块
    pygame.mixer.init()
    # 加载音乐文件
    pygame.mixer.music.load(mp3)
    # 控制音量
    pygame.mixer.music.set_volume(volume)
    # 播放音乐
    pygame.mixer.music.play(loops)

def play_sound(wav_no):
    sound_fn = f'sound{wav_no}.wav'
    if os.path.exists(sound_fn):
        alert_sound = pygame.mixer.Sound(sound_fn)
        alert_sound.play()

def show_msg(msg, color = BLUE):
    x = screen.get_rect().centerx
    y = screen.get_rect().centery - 50
    font = pygame.font.Font(None, 36)
    text = font.render(msg, True, color)
    text_rect = text.get_rect()
    text_rect.centerx = x
    text_rect.centery = y
    rectangle1 = pygame.Rect(x-155, y-25, 320, 60)
    rectangle2 = pygame.Rect(x-160, y-30, 320, 60)
    pygame.draw.rect(screen, DARK, rectangle1)
    pygame.draw.rect(screen, GREY, rectangle2)
    pygame.draw.rect(screen, BLACK, rectangle2, 2) # 边框宽为2
    screen.blit(text, text_rect)
    pygame.display.flip()

def repaint():
    # 绘制游戏界面
    screen.fill(WHITE)

    # 定义线段的端点坐标
    x,y = (-1,640,640,-1)*16, []
    for i in range(36):
        for _ in range(2):
            y.append(19+i*20)

    # 使用pygame.draw.lines()函数绘制线段
    points = list(zip(x,y))
    pygame.draw.lines(screen, GREY, False, points, 1) # 线宽为1
    points = list(zip(y,x))
    pygame.draw.lines(screen, GREY, False, points, 1)

    # 重画蛇和食物
    for pos in snake_pos:
        pygame.draw.rect(screen, GREEN, pygame.Rect(pos[0], pos[1], 20, 20))
    pygame.draw.rect(screen, RED, pygame.Rect(food_pos[0], food_pos[1], 20, 20))
    pygame.display.flip()
    show_msg_at(22, 6, f'Scores: {scores}')
    show_msg_at(410, 6, f'Snake coordinate: ({1+snake_pos[0][0]//20:2}, {1+snake_pos[0][1]//20:2})')

def show_msg_at(x, y, msg):
    font = pygame.font.SysFont('Consolas', 14)
    text = font.render(msg, True, BLACK)
    text_rect = text.get_rect()
    text_rect.x, text_rect.y = x, y
    screen.blit(text, text_rect)
    pygame.display.flip()

def game_quit():
    pygame.quit()
    sys.exit()

def main():
    global screen, screen_size, scores
    global snake_pos, food_pos, snake_speed

    is_running = False
    is_paused = False
    is_dead = False
    is_mute = False

    repaint()
    show_msg("Press any key to start ...")

    # 创建一个线程来播放音乐
    music_no = 1
    music_fn = "voice1.mp3"
    if os.path.exists(music_fn):
        t = threading.Thread(target=play_music, args=(music_fn,0.8,))
        t.start()

    # 主循环
    while True:
        # 处理游戏事件
        for event in pygame.event.get():
            if event.type == pygame.QUIT:
                game_quit()
            elif event.type == pygame.KEYDOWN:
                if event.key == pygame.K_UP:
                    snake_speed = [0, -20]
                elif event.key == pygame.K_DOWN:
                    snake_speed = [0, 20]
                elif event.key == pygame.K_LEFT:
                    snake_speed = [-20, 0]
                elif event.key == pygame.K_RIGHT:
                    snake_speed = [20, 0]
                elif event.key == pygame.K_y:
                    if is_dead:
                        init()
                        is_dead = False
                    is_running = True
                elif event.key == pygame.K_n:
                    if is_dead: game_quit()
                    else: is_running = True
                elif event.key == pygame.K_SPACE:
                    if is_dead: continue
                    if is_paused: is_paused = False
                    is_running = True
                elif event.key == pygame.K_ESCAPE:
                    if is_running:
                        show_msg(">>> Paused <<<")
                        is_paused = not is_paused
                        if not is_mute and is_paused: play_sound(1)
                elif event.key == pygame.K_m and event.mod & pygame.KMOD_CTRL:
                    # Ctrl+M 切换背景音乐
                    is_mute = False
                    music_no = 1 if music_no == 3 else music_no + 1
                    music_fn = f"voice{music_no}.mp3"
                    if os.path.exists(music_fn):
                        t = threading.Thread(target=play_music, args=(music_fn,0.8,))
                        t.start()
                elif event.key == pygame.K_s and event.mod & pygame.KMOD_CTRL:
                    # Ctrl+S 切换静音状态
                    is_mute = not is_mute
                    if is_mute:
                        pygame.mixer.music.pause()
                    else:
                        pygame.mixer.music.unpause()
                    is_running = True
                else: # 任意键进入开始状态
                    if is_dead: continue
                    is_running = True

        if not is_running: continue
        if is_paused and is_running: continue

        # 更新蛇的位置
        snake_pos.insert(0, [snake_pos[0][0] + snake_speed[0], snake_pos[0][1] + snake_speed[1]])

        # 检查蛇头是否碰到食物
        if snake_pos[0] == food_pos:
            scores += 10 + len(snake_pos) // 5
            if not 1 < snake_pos[0][0]//20 < 30 or not 1 < snake_pos[0][1]//20 < 22:
                scores += 5
            if not is_mute: play_sound(2)
            food_pos = [random.randrange(1, screen_size[0] // 20) * 20, random.randrange(1, screen_size[1] // 20) * 20]
        else:
            snake_pos.pop()

        # 检查蛇头是否碰到墙壁或者蛇身
        if snake_pos[0][0] < 0 or snake_pos[0][0] >= screen_size[0] or snake_pos[0][1] < 0 or snake_pos[0][1] >= screen_size[1] or snake_pos[0] in snake_pos[1:]:
            show_msg("Dead! Again? (Y or N)")
            is_running = False
            is_dead = True
            if not is_mute: play_sound(3)
            continue

        # 重画界面及蛇和食物
        repaint()

        # 控制游戏速度
        pygame.time.Clock().tick(10)

if __name__ == "__main__":

    init()
    main()
小结
本文以贪吃蛇游戏为例,对pygame编程的一个简单框架进行了深入的学习,包括对画图、字体、音乐等各个方面操作的各种方法和函数,学习后在pygame这方面的编程能力有所长进提高。
pygame编程框架
import pygame
import sys

# 初始化Pygame
pygame.init()

# 设置窗口大小
screen_size = (800, 600)

# 创建窗口
screen = pygame.display.set_mode(screen_size)

# 设置窗口标题
pygame.display.set_caption("Pygame Example")

# 主循环
while True:
    # 处理事件
    for event in pygame.event.get():
        if event.type == pygame.QUIT:
            pygame.quit()
            sys.exit()
        elif event.type == ...
            ... // 处理按键事件

    # 填充背景色
    screen.fill((255, 255, 255))

    # 绘制矩形
    pygame.draw.rect(screen, (0, 0, 255), (400, 300, 100, 50))

    # 更新显示
    pygame.display.flip()
最终版的源代码及音乐文件列表如下:
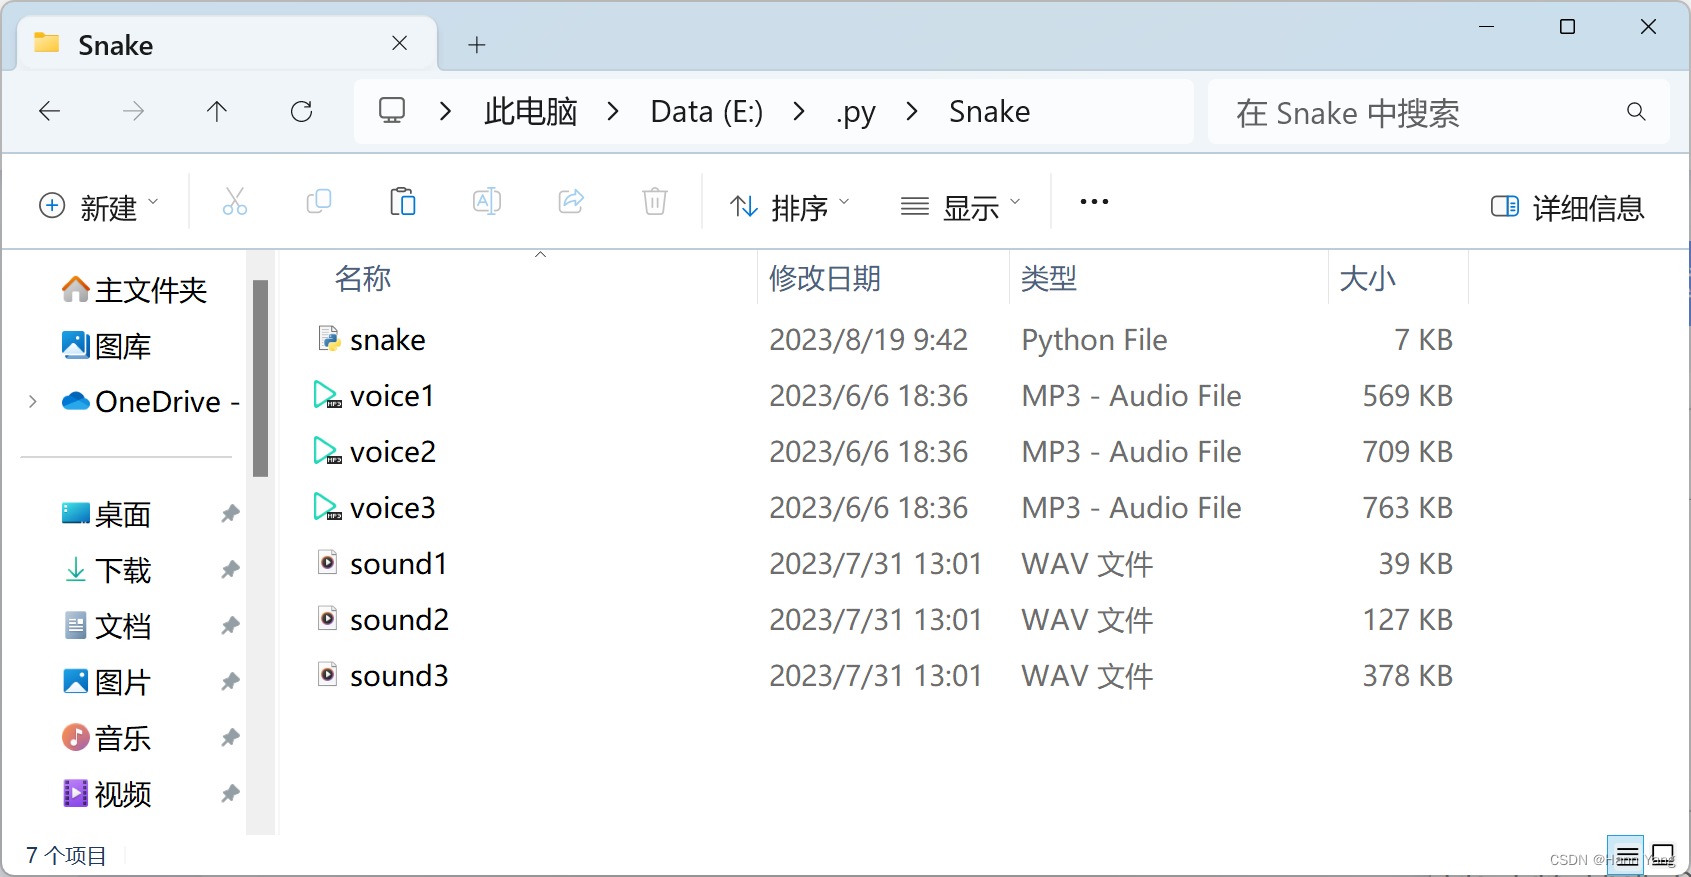
下载地址:
https://download.csdn.net/download/boysoft2002/88231961
