目录
- 一 环境搭建
- 二 配置文件初始化
- 2.1 ClassLoader
- 2.2 获取配置文件
官网:mybatis – MyBatis 3 | 简介
参考书籍:《通用源码阅读指导书:MyBatis源码详解》 易哥
参考文章:
- 一看你就懂,超详细java中的ClassLoader详解
- AppClassLoader/ExtClassLoader/BootstrapClassLoader
- Mybatis源码解析
上一篇文章我们介绍了Mybatis与SpringBoot的整合,我们可以掌握Mybatis的基本用法,到这我们需要来了解一条Sql的执行的基本处理过程
一 环境搭建
- 依赖
      <dependency>
            <groupId>mysql</groupId>
            <artifactId>mysql-connector-java</artifactId>
            <version>8.0.26</version>
        </dependency>


        <dependency>
            <groupId>org.mybatis</groupId>
            <artifactId>mybatis</artifactId>
            <version>3.5.9</version>
        </dependency>
- 编写Mapper
package com.shu;

import org.apache.ibatis.annotations.Mapper;
import org.apache.ibatis.annotations.Param;
import org.springframework.stereotype.Repository;

import java.awt.print.Pageable;
import java.util.List;

/**
 * @description:
 * @author: shu
 * @createDate: 2022/12/13 19:43
 * @version: 1.0
 */
@Mapper
@Repository
public interface UserMapper {
    /**
     * 通过ID查询单条数据
     *
     * @param id 主键
     * @return 实例对象
     */
    User queryById(Integer id);
    /**
     * 分页查询指定行数据
     *
     * @param user 查询条件
     * @param pageable 分页对象
     * @return 对象列表
     */
    List<User> queryAllByLimit(User user);
    /**
     * 统计总行数
     *
     * @param user 查询条件
     * @return 总行数
     */
    long count(User user);
    /**
     * 新增数据
     *
     * @param user 实例对象
     * @return 影响行数
     */
    int insert(User user);
    /**
     * 批量新增数据
     *
     * @param entities List<User> 实例对象列表
     * @return 影响行数
     */
    int insertBatch(@Param("entities") List<User> entities);
    /**
     * 批量新增或按主键更新数据
     *
     * @param entities List<User> 实例对象列表
     * @return 影响行数
     */
    int insertOrUpdateBatch(@Param("entities") List<User> entities);
    /**
     * 更新数据
     *
     * @param user 实例对象
     * @return 影响行数
     */
    int update(User user);
    /**
     * 通过主键删除数据
     *
     * @param id 主键
     * @return 影响行数
     */
    int deleteById(Integer id);
}
- 编写mapper.xml
<?xml version="1.0" encoding="UTF-8"?>
<!DOCTYPE mapper PUBLIC "-//mybatis.org//DTD Mapper 3.0//EN" "http://mybatis.org/dtd/mybatis-3-mapper.dtd">
<mapper namespace="com.shu.UserMapper">
    <resultMap type="com.shu.User" id="UserMap">
        <result property="id" column="id" jdbcType="INTEGER"/>
        <result property="name" column="name" jdbcType="VARCHAR"/>
        <result property="email" column="email" jdbcType="VARCHAR"/>
        <result property="age" column="age" jdbcType="INTEGER"/>
        <result property="sex" column="sex" jdbcType="INTEGER"/>
        <result property="schoolname" column="schoolName" jdbcType="VARCHAR"/>
    </resultMap>

    <!-- 通过ID查询单条数据 -->
    <select id="queryById" resultMap="UserMap">
        select
            id,name,email,age,sex,schoolName
        from user
        where id = #{id}
    </select>

    <!--分页查询指定行数据-->
    <select id="queryAllByLimit" resultMap="UserMap">
        select
        id,name,email,age,sex,schoolName
        from user
        <where>
            <if test="id != null and id != ''">
                and id = #{id}
            </if>
            <if test="name != null and name != ''">
                and name = #{name}
            </if>
            <if test="email != null and email != ''">
                and email = #{email}
            </if>
            <if test="age != null and age != ''">
                and age = #{age}
            </if>
            <if test="sex != null and sex != ''">
                and sex = #{sex}
            </if>
            <if test="schoolname != null and schoolname != ''">
                and schoolName = #{schoolname}
            </if>
        </where>
    </select>

    <!--统计总行数-->
    <select id="count" resultType="java.lang.Long">
        select count(1)
        from user
        <where>
            <if test="id != null and id != ''">
                and id = #{id}
            </if>
            <if test="name != null and name != ''">
                and name = #{name}
            </if>
            <if test="email != null and email != ''">
                and email = #{email}
            </if>
            <if test="age != null and age != ''">
                and age = #{age}
            </if>
            <if test="sex != null and sex != ''">
                and sex = #{sex}
            </if>
            <if test="schoolname != null and schoolname != ''">
                and schoolName = #{schoolname}
            </if>
        </where>
    </select>

    <!--新增数据-->
    <insert id="insert" keyProperty="id" useGeneratedKeys="true">
        insert into user(id,name,email,age,sex,schoolName)
        values (#{id},#{name},#{email},#{age},#{sex},#{schoolname})
    </insert>

    <!-- 批量新增数据 -->
    <insert id="insertBatch" keyProperty="id" useGeneratedKeys="true">
        insert into user(id,name,email,age,sex,schoolName)
        values
        <foreach collection="entities" item="entity" separator=",">
            (#{entity.id},#{entity.name},#{entity.email},#{entity.age},#{entity.sex},#{entity.schoolname})
        </foreach>
    </insert>

    <!-- 批量新增或按主键更新数据 -->
    <insert id="insertOrUpdateBatch" keyProperty="id" useGeneratedKeys="true">
        insert into user(id,name,email,age,sex,schoolName)
        values
        <foreach collection="entities" item="entity" separator=",">
            (#{entity.id},#{entity.name},#{entity.email},#{entity.age},#{entity.sex},#{entity.schoolname})
        </foreach>
        on duplicate key update
        id=values(id),
        name=values(name),
        email=values(email),
        age=values(age),
        sex=values(sex),
        schoolName=values(schoolName)
    </insert>

    <!-- 更新数据 -->
    <update id="update">
        update user
        <set>
            <if test="id != null and id != ''">
                id = #{id},
            </if>
            <if test="name != null and name != ''">
                name = #{name},
            </if>
            <if test="email != null and email != ''">
                email = #{email},
            </if>
            <if test="age != null and age != ''">
                age = #{age},
            </if>
            <if test="sex != null and sex != ''">
                sex = #{sex},
            </if>
            <if test="schoolname != null and schoolname != ''">
                schoolName = #{schoolname},
            </if>
        </set>
        where id = #{id}
    </update>

    <!--通过主键删除-->
    <delete id="deleteById">
        delete from user where id = #{id}
    </delete>
</mapper>
- 编写Mybatis-conf.xml
<?xml version="1.0" encoding="UTF-8" ?>
<!DOCTYPE configuration
PUBLIC "-//mybatis.org//DTD Config 3.0//EN"
"http://mybatis.org/dtd/mybatis-3-config.dtd">
<configuration>
  <!-- 别名-->
  <!-- 环境   -->
  <environments default="development">
    <environment id="development">
      <transactionManager type="JDBC"/>
      <dataSource type="POOLED">
        <property name="driver" value="com.mysql.cj.jdbc.Driver"/>
        <property name="url" value="jdbc:mysql://127.0.0.1:3306/mybatis?useUnicode=true"/>
        <property name="username" value="root"/>
        <property name="password" value="123456"/>
      </dataSource>
    </environment>
  </environments>
  <mappers>
    <mapper resource="mapper/UserMapper.xml"/>
  </mappers>

</configuration>
- 编写测试用例
package com.shu;

import org.apache.ibatis.io.Resources;
import org.apache.ibatis.session.SqlSession;
import org.apache.ibatis.session.SqlSessionFactory;
import org.apache.ibatis.session.SqlSessionFactoryBuilder;
import org.junit.jupiter.api.Test;
import org.springframework.boot.test.context.SpringBootTest;

import java.io.IOException;
import java.io.InputStream;
import java.util.List;

@SpringBootTest
class MybatisDemo02ApplicationTests {

  @Test
  void contextLoads() {
    // 第一阶段:MyBatis的初始化阶段
    String resource = "mybatis-config.xml";
    // 得到配置文件的输入流
    InputStream inputStream = null;
    try {
      inputStream = Resources.getResourceAsStream(resource);
    } catch (IOException e) {
      e.printStackTrace();
    }
    // 得到SqlSessionFactory
    SqlSessionFactory sqlSessionFactory = new SqlSessionFactoryBuilder().build(inputStream);

    // 第二阶段:数据读写阶段
    try (SqlSession session = sqlSessionFactory.openSession()) {
      // 找到接口对应的实现
      UserMapper userMapper = session.getMapper(UserMapper.class);
      // 组建查询参数
      User userParam = new User();
      userParam.setSchoolname("Sunny School");
      // 调用接口展开数据库操作
      List<User> userList =  userMapper.queryAllByLimit(userParam);
      // 打印查询结果
      for (User user : userList) {
        System.out.println("name : " + user.getName() + " ;  email : " + user.getEmail());
      }
    }
  }

}
到这我们的代码编写完毕,下一步我们来分析其执行过程
二 配置文件初始化
上面我们写了mybatis-config.xml文件,在代码开头我们可以看见进行配置文件的初始化
  	 // 第一阶段:MyBatis的初始化阶段
        String resource = "mybatis-config.xml";
        // 得到配置文件的输入流
        InputStream inputStream = null;
        try {
            inputStream = Resources.getResourceAsStream(resource);
        } catch (IOException e) {
            e.printStackTrace();
        }
2.1 ClassLoader
- 我们从字面上理解就是类加载器,下面但是Jvm的类加载过程,类的加载就是 Java虚拟机将描述类的数据从 Class文件加载到 JVM的过程,在这一过程中会对 Class文件进行数据加载、连接和初始化,最终形成可以被虚拟机直接使用的 Java类。
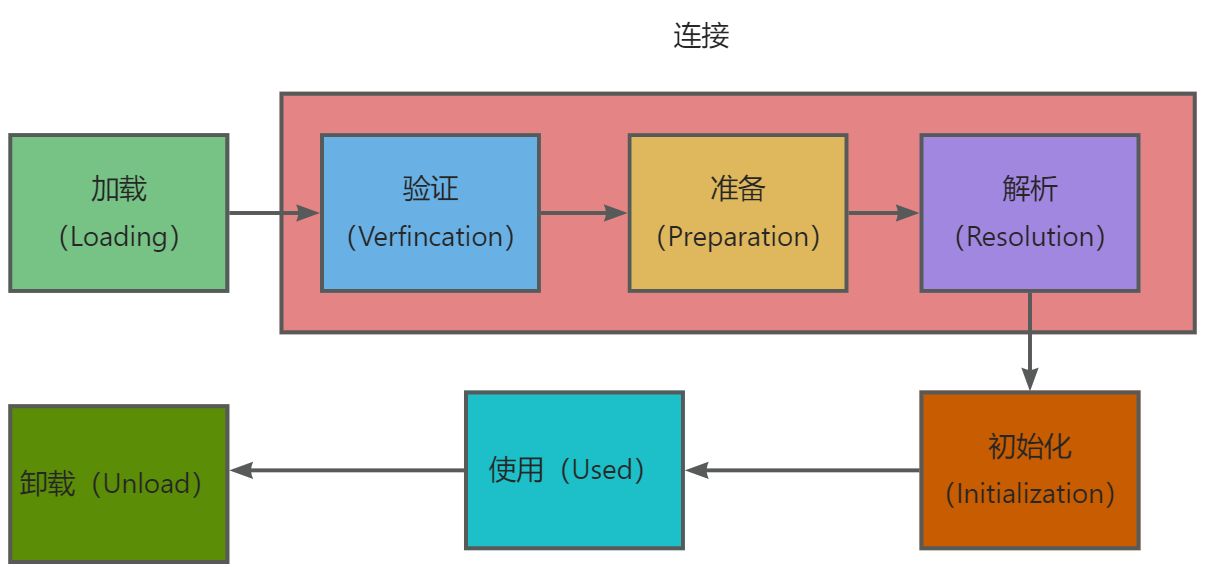
- 当然JVM 在一开始就可能把所有的类都加载,那么可能撑死,按需加载才是王道
Java 类加载器
1,引导类加载器 (BootstrapClassLoader)
负责加载系统类(通常从JAR的rt.jar中进行加载),它是虚拟机不可分割的一部分,通常使用C语言实现,引导类加载器没有对应的ClassLoader对象
2,扩展类加载器 (ExtClassLoader)
扩展类加载器用于从jre/lib/txt目标加载“标准的扩展”。可以将jar文件放入该目录,这样即使没有任何类路径,扩展类加载器也可以找到其中的各个类
3,系统类加载器 (AppClassLoader)
系统类加载器用于加载应用类,它在由ClASSPATH环境变量或者-classpath命令行选项设置的类路径的目录或者是jar/ZIP文件里查找这些类
加载顺序
- BootstrapClassLoader
- ExtClassLoader
- AppClassLoader
- 关于classLoader的详细信息请参考文章:一看你就懂,超详细java中的ClassLoader详解 博主讲得通俗易懂
- 关于JVM的的知识,推荐一本书《深入理解Java虚拟机:JVM高级特性与最佳实践(第3版)》 周志明,我后期也会整理相关知识,敬请期待
2.2 获取配置文件
// 第一阶段:MyBatis的初始化阶段
String resource = "mybatis-config.xml";
// 得到配置文件的输入流
InputStream inputStream = null;
try {
    inputStream = Resources.getResourceAsStream(resource);
} catch (IOException e) {
    e.printStackTrace();
}
- 我们可以看到调用了Resources.getResourceAsStream(resource)去获取配置文件的信息,调用getResourceAsStream()方法
  public static InputStream getResourceAsStream(ClassLoader loader, String resource) throws IOException {
    // 去加载我们写的mybatis-config.xml 文件
    InputStream in = classLoaderWrapper.getResourceAsStream(resource, loader);
	// 没有找到,资源不存在
    if (in == null) {
      throw new IOException("Could not find resource " + resource);
    }
    return in;
  }
- 到这我们可以看到他调用了classLoaderWrapper的方法,我们来看看这个类是啥?
public class ClassLoaderWrapper {

  ClassLoader defaultClassLoader;

  ClassLoader systemClassLoader;

  ClassLoaderWrapper() {
    try {
   	 // AppClassLoader
      systemClassLoader = ClassLoader.getSystemClassLoader();
    } catch (SecurityException ignored) {
      // AccessControlException on Google App Engine
    }
  }

到这我们需要注意一下getClassLoaders(classLoader))方法,打个断点,调试一手
public InputStream getResourceAsStream(String resource, ClassLoader classLoader) {
    return getResourceAsStream(resource, getClassLoaders(classLoader));
  }
/**
 * 获取多个ClassLoader,这一步是必须的,因为,我们就是从这个加载器中获取资源的流的
 *五种类加载器:自己传入的、默认的类加载器、当前线程的类加载器、本类的类加载器、系统类加载器
 * @param classLoader 我们定义的自己的类加载器
 * @return 类加载器的数组
 */
ClassLoader[] getClassLoaders(ClassLoader classLoader) {
    return new ClassLoader[]{
            classLoader,
            defaultClassLoader,
            Thread.currentThread().getContextClassLoader(),
            getClass().getClassLoader(),
            systemClassLoader};
}
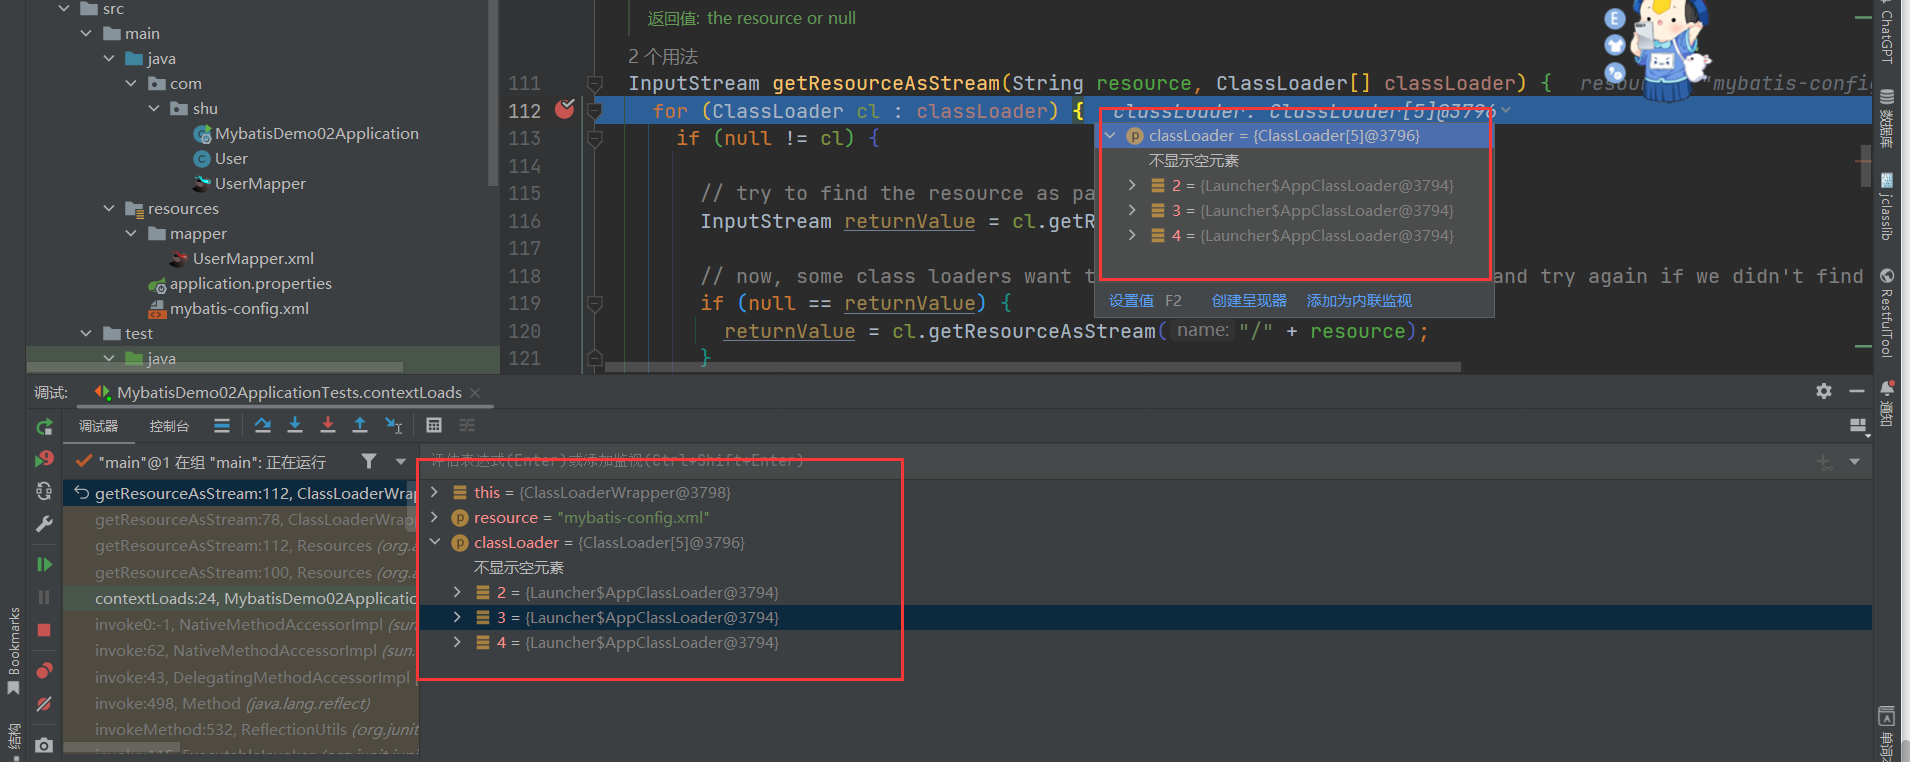
- 用一组 ClassLoader去找到我们写的mybatis-conf.xml文件,一般情况下,类加载器会将名称转换为文件名,然后从文件系统中读取该名称的类文件,因此,类加载器具有读取外部资源的能力,这里要借助的正是类加载器的这种能力。
/**
 * 从一个ClassLoader中获取资源的流,这就是我们的目的
 *
 * @param resource    资源的地址
 * @param classLoader 类加载器
 * @return 流
 */
InputStream getResourceAsStream(String resource, ClassLoader[] classLoader) {
    for (ClassLoader cl : classLoader) {
        if (null != cl) {

            // try to find the resource as passed
            InputStream returnValue = cl.getResourceAsStream(resource);

            // now, some class loaders want this leading "/", so we'll add it and try again if we didn't find the resource
            if (null == returnValue) {
                returnValue = cl.getResourceAsStream("/" + resource);
            }

            if (null != returnValue) {
                return returnValue;
            }
        }
    }
    return null;
}
- getResourceAsStream 方法会依次调用传入的每一个类加载器的getResourceAsStream方法来尝试获取配置文件的输入流
    public InputStream getResourceAsStream(String name) {
        // 找到文件
        URL url = getResource(name);
        try {
            if (url == null) {
                return null;
            }

            URLConnection urlc = url.openConnection();
            InputStream is = urlc.getInputStream();
            if (urlc instanceof JarURLConnection) {
                JarURLConnection juc = (JarURLConnection)urlc;
                JarFile jar = juc.getJarFile();
                synchronized (closeables) {
                    if (!closeables.containsKey(jar)) {
                        closeables.put(jar, null);
                    }
                }
            } else if (urlc instanceof sun.net.www.protocol.file.FileURLConnection) {
                synchronized (closeables) {
                    closeables.put(is, null);
                }
            }
            return is;
        } catch (IOException e) {
            return null;
        }
    }
- 我们来看看getResource方法吧,相信你刚才看了文章,接下来看你理解没有刚才的知识
    public URL getResource(String name) {
        URL url;
        // 父类加载器能够找到该文章,由前面我们知道AppClassLoader的父类加载器是ExtClassLoader
        if (parent != null) {
            url = parent.getResource(name);
        } else {
            // 通过双亲委派机制找到文件
            url = getBootstrapResource(name);
        }
    	// 没有的话
        if (url == null) {
            url = findResource(name);
        }
        return url;
    }
- 由前面我们知道AppClassLoader的父类加载器是ExtClassLoader
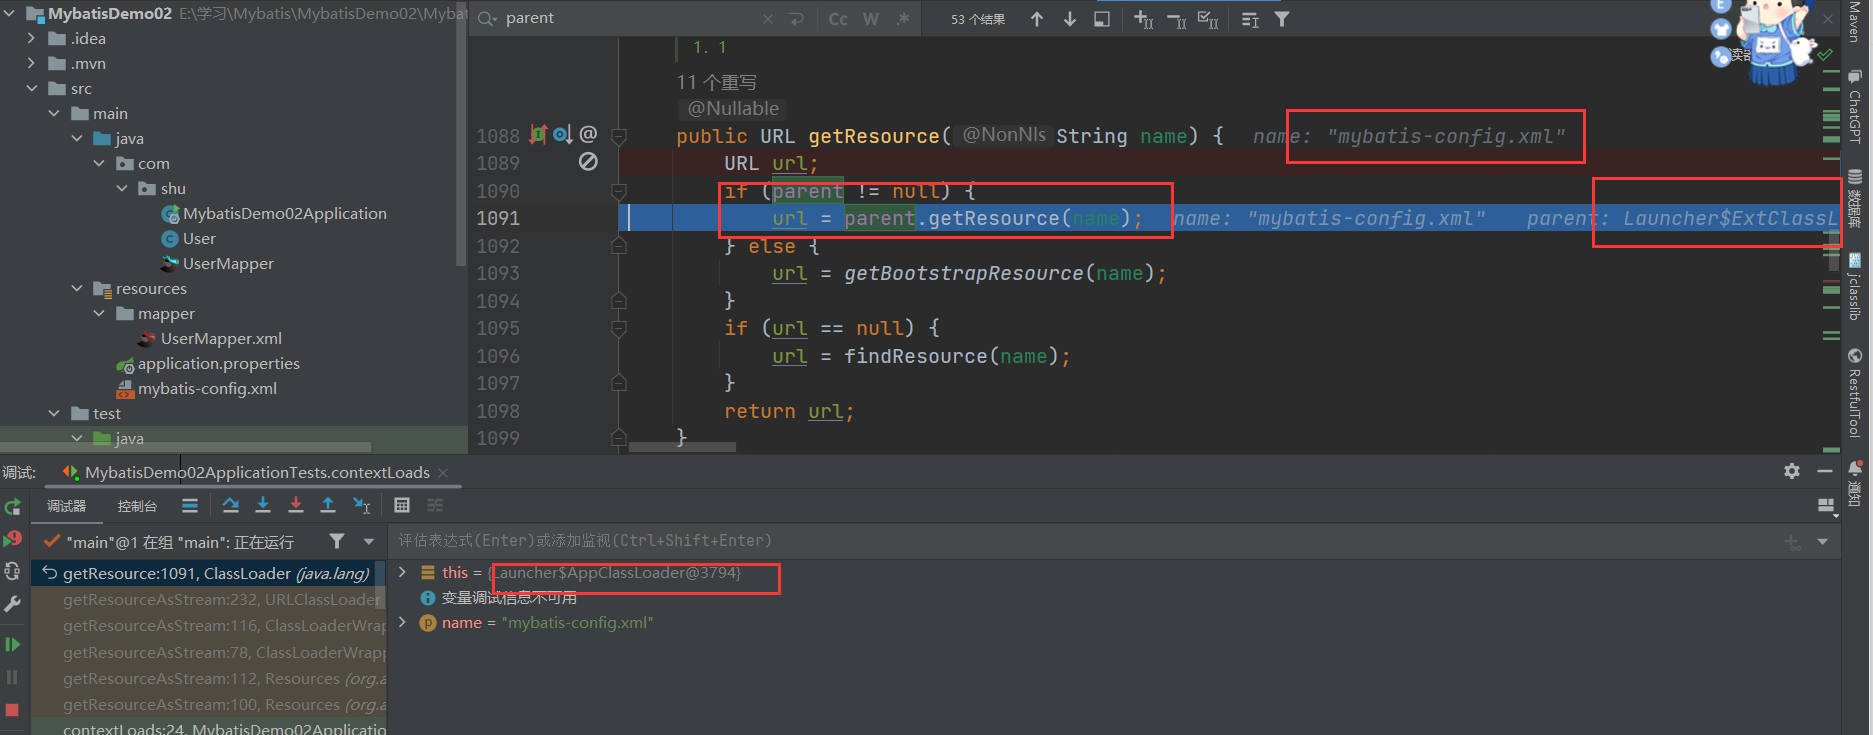
- ExtClassLoader的父类加载器为空,所以通过双亲委派机制去寻找该文件,相信我,后面你还会遇到的。
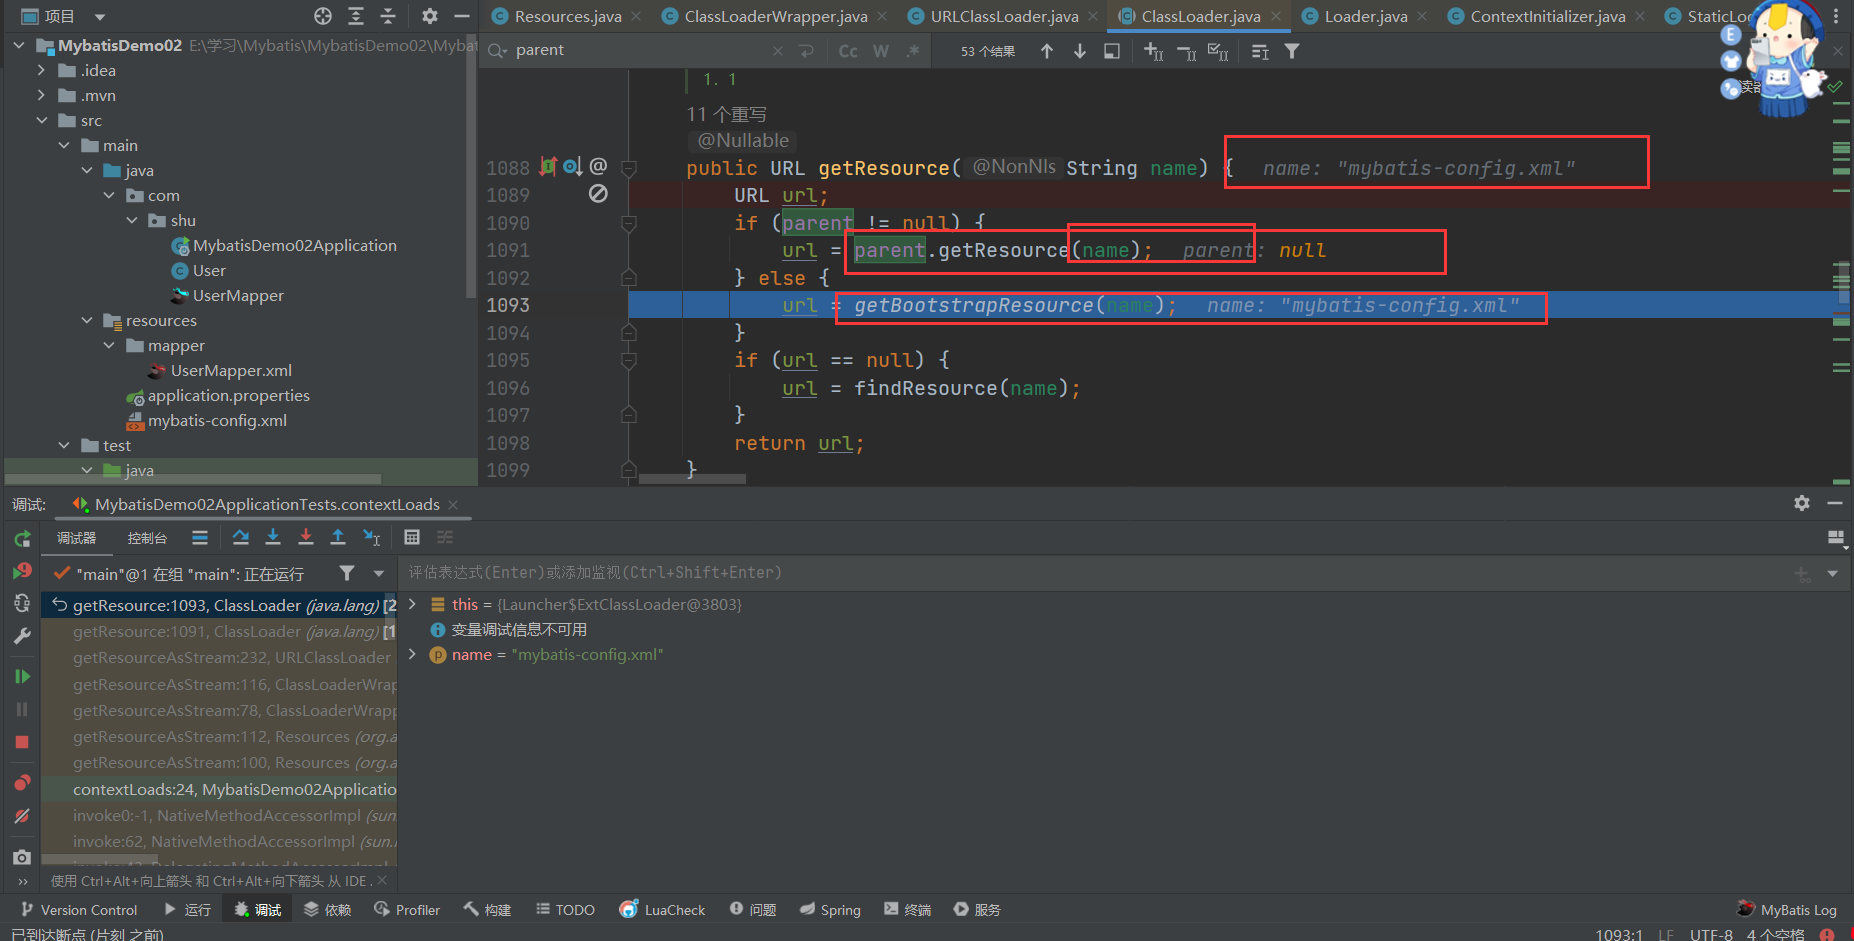
- 当前类加载器(一般是appclassloader)会让父类去加载,父类找不到再通过子类自身findResource(name)方法来找资源
- Java ClassLoader findResource() method with example
- AccessController.doPrivileged方法是一个native方法,无法通过IDE进去调试
 public URL findResource(String var1, boolean var2) {
         // 先去缓存查询一下
        int[] var4 = this.getLookupCache(var1);
        Loader var3;
         // 这里有点不懂,有大神可以讲解?
        for(int var5 = 0; (var3 = this.getNextLoader(var4, var5)) != null; ++var5) {
            URL var6 = var3.findResource(var1, var2);
            if (var6 != null) {
                return var6;
            }
        }

        return null;
    }
- 找到了文件的URL路径,返回
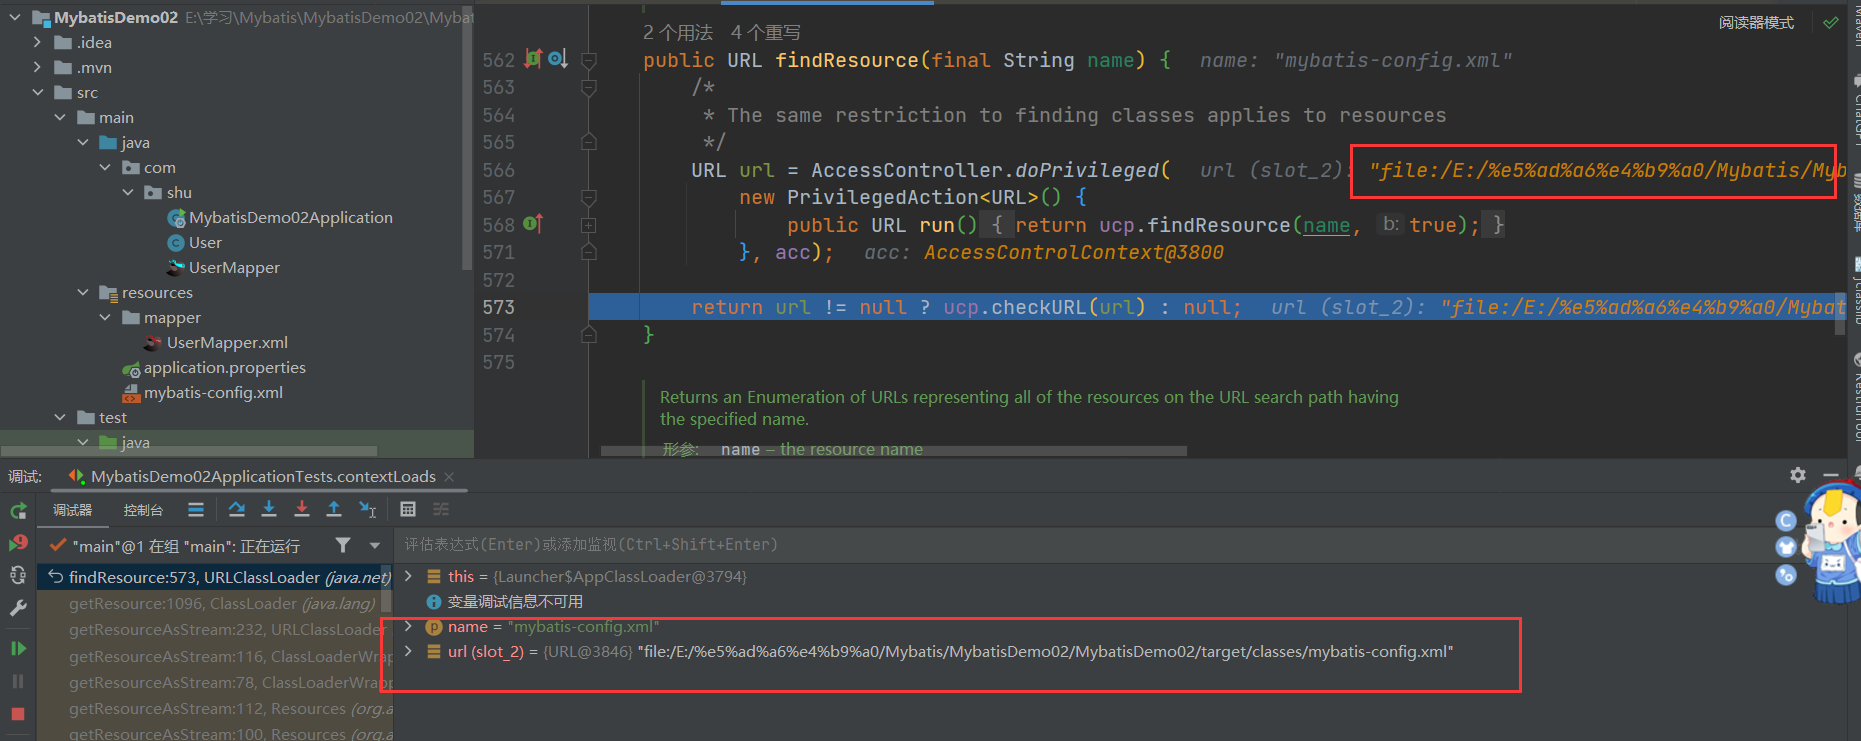
- 获取到了URL连接
    public InputStream getResourceAsStream(String name) {
        // 找到文件
        URL url = getResource(name);
        try {
            if (url == null) {
                return null;
            }
            // 打开连接
            URLConnection urlc = url.openConnection();
            // 获取流数据
            InputStream is = urlc.getInputStream();
            // jar包连接
            if (urlc instanceof JarURLConnection) {
                JarURLConnection juc = (JarURLConnection)urlc;
                JarFile jar = juc.getJarFile();
                synchronized (closeables) {
                    if (!closeables.containsKey(jar)) {
                        closeables.put(jar, null);
                    }
                }
            }
            // 文件连接
            else if (urlc instanceof sun.net.www.protocol.file.FileURLConnection) {
                synchronized (closeables) {
                    closeables.put(is, null);
                }
            }
            return is;
        } catch (IOException e) {
            return null;
        }
    }
到这我们文件的解析就完毕了









![[附源码]Nodejs计算机毕业设计基于Web企业客户管理系统Express(程序+LW)](https://img-blog.csdnimg.cn/b83fdd37924a4cac8e508a223fe0b1d0.png)
