目录
一、创建 Service:type 类型是 NodePort
1.1 创建一个 pod 资源
1.2 创建 service,代理 pod
在集群外访问 service:
数据转发流程:
二、创建 Service:type 类型是 ExternalName
2.1 创建 pod
2.2 创建 service
2.3 创建默认空间下的 service
2.4 访问名称解析
三、k8s 最佳实践:映射外部服务案例分享
3.1 k8s 集群引用外部的 mysql 数据库
在 node2 上安装 mysql 数据库:
创建 endpoint 资源
四、Service 服务发现:coredns 组件详解
DNS 是什么?
CoreDNS 是什么?
验证 coredns
一、创建 Service:type 类型是 NodePort
1.1 创建一个 pod 资源
[root@k8s-master01 ~]# vim pod_nodeport.yaml
apiVersion: apps/v1
kind: Deployment
metadata:
  name: my-nginx-nodeport
spec:
  selector:
    matchLabels:
      run: my-nginx-nodeport
  replicas: 2
  template:
    metadata:
      labels:
        run: my-nginx-nodeport
    spec:
      containers:
      - name: my-nginx-nodeport-container
        image: nginx:latest
        imagePullPolicy: IfNotPresent
        ports:
        - containerPort: 80

[root@k8s-master01 ~]# kubectl apply -f pod_nodeport.yaml
deployment.apps/my-nginx-nodeport created

# 删除上一篇文章创建的 pod
[root@k8s-master01 ~]# kubectl delete -f pod_test.yaml
deployment.apps "my-nginx" deleted

[root@k8s-master01 ~]# kubectl get pods -o wide
NAME                                 READY   STATUS    RESTARTS   AGE   IP               NODE        NOMINATED NODE   READINESS GATES
my-nginx-nodeport-7486c46445-4jldx   1/1     Running   0          56s   10.244.169.148   k8s-node2   <none>           <none>
my-nginx-nodeport-7486c46445-cbrjk   1/1     Running   0          56s   10.244.36.126    k8s-node1   <none>           <none>
1.2 创建 service,代理 pod
[root@k8s-master01 ~]# vim service_nodeport.yaml
apiVersion: v1
kind: Service
metadata:
  name: my-nginx-nodeport
  labels:
    run: my-nginx-nodeport
spec:
  type: NodePort
  ports:
  - port: 80
    protocol: TCP
    targetPort: 80    # 默认情况下,为了方便起见,`targetPort` 被设置为与 `port` 字段相同的值。
    nodePort: 30380   # 默认情况下,为了方便起见,Kubernetes 控制平面会从某个范围内分配一个端口号(默认:30000-32767)
  selector:
    run: my-nginx-nodeport

# 更新资源清单文件
[root@k8s-master01 ~]# kubectl apply -f service_nodeport.yaml
service/my-nginx-nodeport created

# 查看刚才创建的 service
[root@k8s-master01 ~]# kubectl get svc -l run=my-nginx-nodeport
NAME                TYPE       CLUSTER-IP    EXTERNAL-IP   PORT(S)        AGE
my-nginx-nodeport   NodePort   10.102.2.76   <none>        80:30380/TCP   81s

# 访问 service
[root@k8s-master01 ~]# curl 10.102.2.76
<!DOCTYPE html>
<html>
<head>
<title>Welcome to nginx!</title>
<style>
注意:10.102.2.76 是 k8s 集群内部的 service ip 地址,只能在 k8s 集群内部访问,在集群外无法访问。
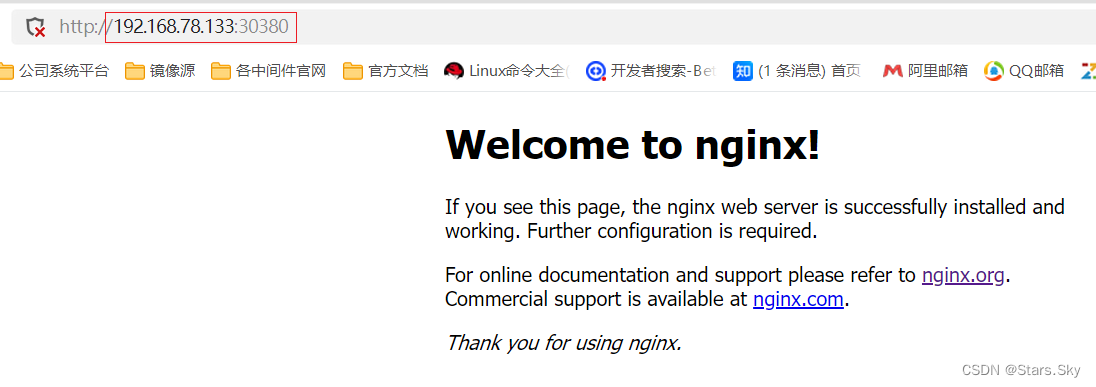
在集群外访问 service:
k8s 集群任意节点物理机 ip:端口
数据转发流程:
[root@k8s-master01 ~]# ipvsadm -Ln
IP Virtual Server version 1.2.1 (size=4096)
Prot LocalAddress:Port Scheduler Flags
  -> RemoteAddress:Port           Forward Weight ActiveConn InActConn
TCP  172.17.0.1:30380 rr
  -> 10.244.36.126:80             Masq    1      0          0
  -> 10.244.169.148:80            Masq    1      0          0
客户端请求 http://192.168.78.133:30380 -> docker0 虚拟网卡上:172.17.0.1:30380 -> 代理到两个pod ip:10.244.36.126:80,10.244.169.148:80
二、创建 Service:type 类型是 ExternalName
- 应用场景:跨名称空间访问
- 需求:如default 名称空间下的 client 服务想要访问 nginx-ns 名称空间下的 nginx-svc 服务
2.1 创建 pod
# 创建名称空间 nginx-ns
[root@k8s-master01 ~]# kubectl create ns nginx-ns
namespace/nginx-ns created

# 创建 nginx-ns 名称空间下的 pod
[root@k8s-master01 ~]# vim server_nginx.yaml
apiVersion: apps/v1
kind: Deployment
metadata:
  name: nginx
  namespace: nginx-ns
spec:
  replicas: 1
  selector:
    matchLabels:
      app: nginx
  template:
   metadata:
    labels:
      app: nginx
   spec:
     containers:
     - name: nginx
       image: nginx:latest
       imagePullPolicy: IfNotPresent

[root@k8s-master01 ~]# kubectl apply -f server_nginx.yaml
deployment.apps/nginx created

# 查看 pod 信息
[root@k8s-master01 ~]# kubectl get pods -n nginx-ns -o wide
NAME                    READY   STATUS    RESTARTS   AGE   IP               NODE        NOMINATED NODE   READINESS GATES
nginx-d5f959df4-8hprw   1/1     Running   0          18s   10.244.169.149   k8s-node2   <none>           <none>
2.2 创建 service
# 创建 nginx-ns 名称空间下的 service 资源
[root@k8s-master01 ~]# vim nginx_svc.yaml
apiVersion: v1
kind: Service
metadata:
  name: nginx-svc
  namespace: nginx-ns
spec:
  selector:
    app: nginx
  ports:
   - name: http
     protocol: TCP
     port: 80
     targetPort: 80

[root@k8s-master01 ~]# kubectl apply -f nginx_svc.yaml
service/nginx-svc created

[root@k8s-master01 ~]# kubectl get svc -n nginx-ns
NAME        TYPE        CLUSTER-IP      EXTERNAL-IP   PORT(S)   AGE
nginx-svc   ClusterIP   10.109.17.105   <none>        80/TCP    59s
2.3 创建默认空间下的 service
# 在默认空间下创建 pod
[root@k8s-master01 ~]# vim client.yaml
apiVersion: apps/v1
kind: Deployment
metadata:
  name: client
spec:
  replicas: 1
  selector:
    matchLabels:
      app: busybox
  template:
   metadata:
    labels:
      app: busybox
   spec:
     containers:
     - name: busybox
       image: busybox:latest
       imagePullPolicy: IfNotPresent
       command: ["/bin/sh","-c","sleep 36000"]

[root@k8s-master01 ~]# kubectl apply -f client.yaml
deployment.apps/client created

# 在默认空间下创建 service
[root@k8s-master01 ~]# vim client_svc.yaml
apiVersion: v1
kind: Service
metadata:
  name: client-svc
spec:
  type: ExternalName    # 将 默认名称空间中的 client-svc 服务映射到 nginx-svc.nginx-ns.svc.cluster.local
  externalName: nginx-svc.nginx-ns.svc.cluster.local
  ports:
  - name: http
    port: 80
    targetPort: 80

# 把前面创建的 pod 删除
[root@k8s-master01 ~]# kubectl delete -f pod_nodeport.yaml
deployment.apps "my-nginx-nodeport" deleted

[root@k8s-master01 ~]# kubectl apply -f client_svc.yaml
service/client-svc created

[root@k8s-master01 ~]# kubectl get pods
NAME                      READY   STATUS    RESTARTS   AGE
client-5d44754c5c-vh5kd   1/1     Running   0          49s

# 删除前面创建的 service
[root@k8s-master01 ~]# kubectl delete -f service_nodeport.yaml
service "my-nginx-nodeport" deleted
[root@k8s-master01 ~]# kubectl get svc
NAME         TYPE           CLUSTER-IP     EXTERNAL-IP                            PORT(S)   AGE
client-svc   ExternalName   <none>         nginx-svc.nginx-ns.svc.cluster.local   80/TCP    3m15s
kubernetes   ClusterIP      10.96.0.1      <none>                                 443/TCP   52d
my-nginx     ClusterIP      10.110.2.134   <none>                                 80/TCP    23h
2.4 访问名称解析
# 登录到 client pod
[root@k8s-master01 ~]# kubectl exec -it client-5d44754c5c-vh5kd -- sh
/ # wget -q -O - client-svc.default.svc.cluster.local
<!DOCTYPE html>
<html>
<head>
<title>Welcome to nginx!</title>
<style>

/ # wget -q -O - nginx-svc.nginx-ns.svc.cluster.local
<!DOCTYPE html>
<html>
<head>
<title>Welcome to nginx!</title>
<style>
上面两个请求的结果一样。
三、k8s 最佳实践:映射外部服务案例分享
3.1 k8s 集群引用外部的 mysql 数据库
在 node2 上安装 mysql 数据库:
[root@k8s-node2 ~]# yum install mariadb-server.x86_64 -y
[root@k8s-node2 ~]# systemctl start mariadb

[root@k8s-master01 ~]# vim mysql_service.yaml
apiVersion: v1
kind: Service
metadata:
  name: mysql
spec:
  type: ClusterIP
  ports:
  - port: 3306

[root@k8s-master01 ~]# kubectl apply -f mysql_service.yaml
service/mysql created

# 删除前面创建的 service
[root@k8s-master01 ~]# kubectl delete -f server_nginx.yaml
deployment.apps "nginx" deleted
[root@k8s-master01 ~]# kubectl delete -f service_test.yaml
service "my-nginx" deleted

[root@k8s-master01 ~]# kubectl get svc
NAME         TYPE           CLUSTER-IP      EXTERNAL-IP                            PORT(S)    AGE
client-svc   ExternalName   <none>          nginx-svc.nginx-ns.svc.cluster.local   80/TCP     21m
kubernetes   ClusterIP      10.96.0.1       <none>                                 443/TCP    52d
mysql        ClusterIP      10.101.57.164   <none>                                 3306/TCP   94s

# 关联不到任何 pod
[root@k8s-master01 ~]# kubectl describe svc mysql
Name:              mysql
Namespace:         default
Labels:            <none>
Annotations:       <none>
Selector:          <none>
Type:              ClusterIP
IP Family Policy:  SingleStack
IP Families:       IPv4
IP:                10.101.57.164
IPs:               10.101.57.164
Port:              <unset>  3306/TCP
TargetPort:        3306/TCP
Endpoints:         <none>        # 还没有 endpoint
Session Affinity:  None
Events:            <none>
创建 endpoint 资源
# 查看帮助命令
[root@k8s-master01 ~]# kubectl explain endpoints
[root@k8s-master01 ~]# kubectl explain endpoints.subsets
[root@k8s-master01 ~]# kubectl explain endpoints.subsets.addresses
[root@k8s-master01 ~]# kubectl explain endpoints.subsets.ports

[root@k8s-master01 ~]# vim mysql_endpoint.yaml
apiVersion: v1
kind: Endpoints
metadata:
  name: mysql             # 必须与前面创建的 service 名称一样
subsets:
- addresses:
  - ip: 192.168.78.132    # node 节点的物理 ip
  ports:
  - port: 3306

[root@k8s-master01 ~]# kubectl apply -f mysql_endpoint.yaml
endpoints/mysql created

[root@k8s-master01 ~]# kubectl describe svc mysql
Name:              mysql
Namespace:         default
Labels:            <none>
Annotations:       <none>
Selector:          <none>
Type:              ClusterIP
IP Family Policy:  SingleStack
IP Families:       IPv4
IP:                10.101.57.164
IPs:               10.101.57.164
Port:              <unset>  3306/TCP
TargetPort:        3306/TCP
Endpoints:         192.168.78.132:3306    # 这个就是定义的外部数据库
Session Affinity:  None
Events:            <none>
上面配置就是将外部 IP 地址和服务引入到 k8s 集群内部,由 service 作为一个代理来达到能够访问外部服务的目的。
参考官方文档:服务(Service) | Kubernetes
四、Service 服务发现:coredns 组件详解
DNS 是什么?
DNS 全称是 Domain Name System:域名系统,是整个互联网的电话簿,它能够将可被人理解的域名翻译成可被机器理解的 IP 地址,使得互联网的使用者不再需要直接接触很难阅读和理解的 IP 地址。域名系统在现在的互联网中非常重要,因为服务器的 IP 地址可能会经常变动,如果没有了 DNS,那么可能 IP 地址一旦发生了更改,当前服务器的客户端就没有办法连接到目标的服务器了,如果我们为 IP 地址提供一个『别名』并在其发生变动时修改别名和 IP 地址的关系,那么我们就可以保证集群对外提供的服务能够相对稳定地被其他客户端访问。DNS 其实就是一个分布式的树状命名系统,它就像一个去中心化的分布式数据库,存储着从域名到 IP 地址的映射。
CoreDNS 是什么?
CoreDNS 其实就是一个 DNS 服务,而 DNS 作为一种常见的服务发现手段,所以很多开源项目以及工程师都会使用 CoreDNS 为集群提供服务发现的功能,Kubernetes 就在集群中使用 CoreDNS 解决服务发现的问题。 作为一个加入 CNCF(Cloud Native Computing Foundation)的服务, CoreDNS 的实现非常简单。
验证 coredns
# 把 dig.tar.gz 上传到 node2 和 node1 机器上,手动解压:
[root@k8s-node1 ~]# ctr -n=k8s.io images import dig.tar.gz
[root@k8s-node2 ~]# ctr -n=k8s.io images import dig.tar.gz

[root@k8s-master01 ~]# vim coredns.yaml
apiVersion: v1
kind: Pod
metadata:
  name: dig
  namespace: default
spec:
  containers:
  - name: dig
    image: busybox:1.28
    imagePullPolicy: IfnotPresent
    command:
      - sleep
      - "3600"
    imagePullPolicy: IfNotPresent
  restartPolicy: Always

# 更新资源清单文件
[root@k8s-master01 ~]# kubectl apply -f coredns.yaml
pod/dig created

[root@k8s-master01 ~]# kubectl get pods
NAME                      READY   STATUS    RESTARTS   AGE
client-5d44754c5c-vh5kd   1/1     Running   0          46m
dig                       1/1     Running   0          112s

# 查看默认名称空间的 kubernetes 服务
[root@k8s-master01 ~]# kubectl get svc | grep kubernetes
kubernetes   ClusterIP      10.96.0.1       <none>                                 443/TCP    53d

# 解析 dns,如有以下返回说明 dns 安装成功
[root@k8s-master01 ~]# kubectl exec -it dig -- nslookup kubernetes
Server:		10.96.0.10
Address:	10.96.0.10#53

Name:	kubernetes.default.svc.cluster.local
Address: 10.96.0.1
在 k8s 中创建 service 之后,service 默认的 FQDN 是 <servicename>.<namespace>.svc.cluster.local,那么 k8s 集群内部的服务就可以通过 FQDN 访问。
参考官方文档:
服务(Service) | Kubernetes
Service 与 Pod 的 DNS | Kubernetes
上一篇文章: 【云原生 | Kubernetes 实战】12、K8s 四层代理 Service 入门到企业实战应用(上)_Stars.Sky的博客-CSDN博客


![[附源码]Nodejs计算机毕业设计基于web技术的米其林轮胎管理系统Express(程序+LW)](https://img-blog.csdnimg.cn/6efdff7c0e0940d0aac0f050ebd28860.png)
