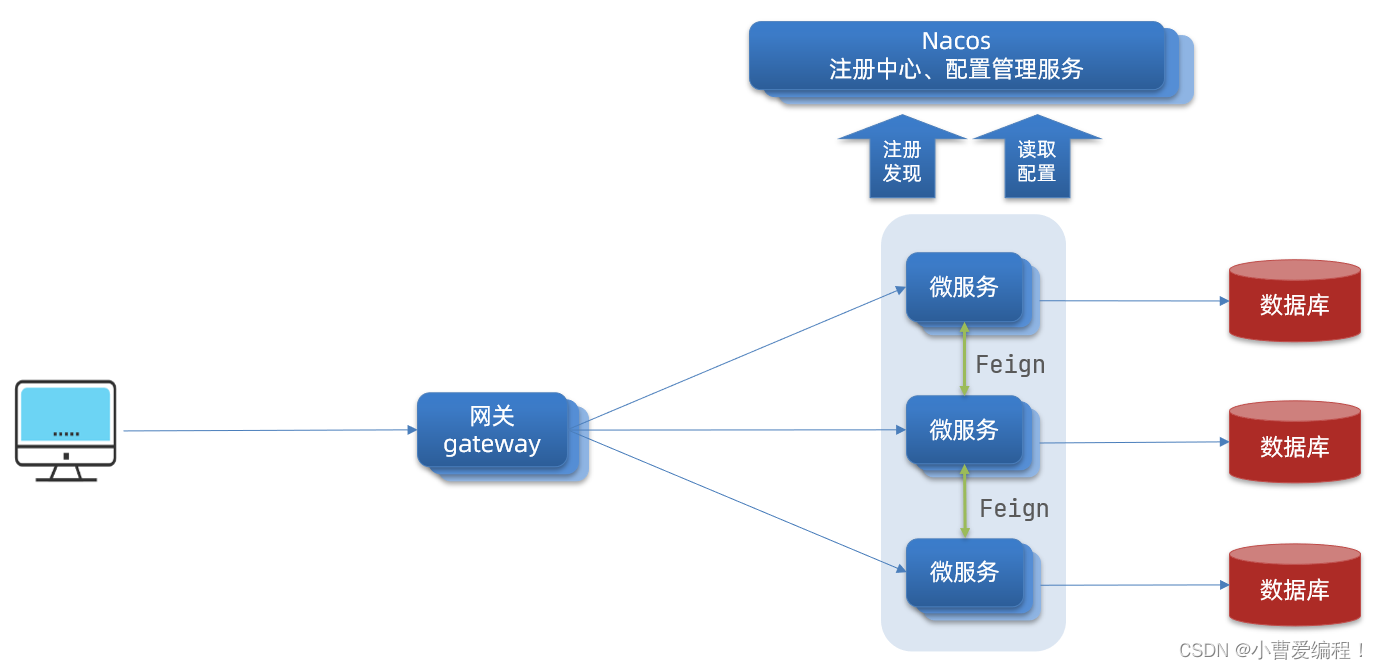
1.Nacos配置管理
Nacos除了可以做注册中心,同样可以做配置管理来使用。
1.1.统一配置管理
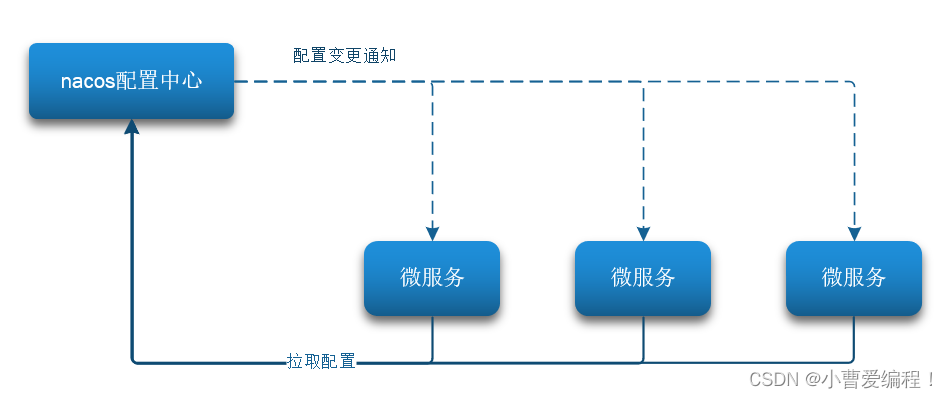
当微服务部署的实例越来越多,达到数十、数百时,逐个修改微服务配置就会让人抓狂,而且很容易出错。我们需要一种统一配置管理方案,可以集中管理所有实例的配置。
Nacos一方面可以将配置集中管理,另一方可以在配置变更时,及时通知微服务,实现配置的热更新。
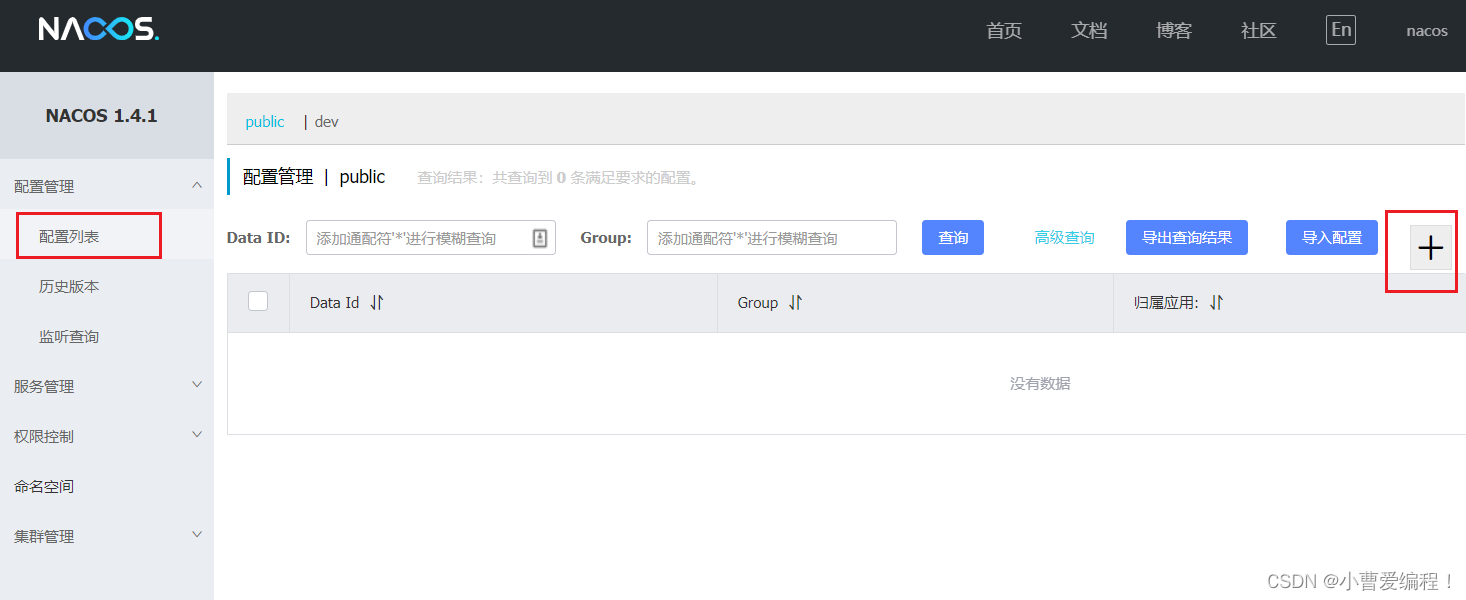
1.1.1.在nacos中添加配置文件
如何在nacos中管理配置呢?
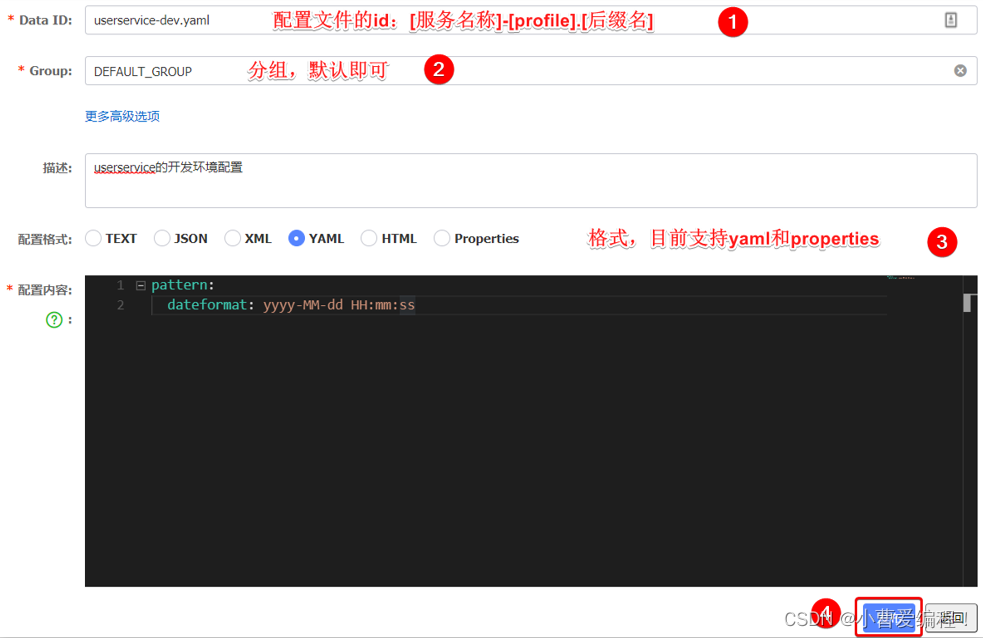
然后在弹出的表单中,填写配置信息:
注意:项目的核心配置,需要热更新的配置才有放到nacos管理的必要。基本不会变更的一些配置还是保存在微服务本地比较好。
1.1.2.从微服务拉取配置
微服务要拉取nacos中管理的配置,并且与本地的application.yml配置合并,才能完成项目启动。
但如果尚未读取application.yml,又如何得知nacos地址呢?
因此spring引入了一种新的配置文件:bootstrap.yaml文件,会在application.yml之前被读取,流程如下:
1)引入nacos-config依赖
首先,在user-service服务中,引入nacos-config的客户端依赖:
<!--nacos配置管理依赖-->
<dependency>
    <groupId>com.alibaba.cloud</groupId>
    <artifactId>spring-cloud-starter-alibaba-nacos-config</artifactId>
</dependency>
2)添加bootstrap.yaml
然后,在user-service中添加一个bootstrap.yaml文件,内容如下:
spring:
  application:
    name: userservice # 服务名称
  profiles:
    active: dev #开发环境,这里是dev
  cloud:
    nacos:
      server-addr: localhost:8848 # Nacos地址
      config:
        file-extension: yaml # 文件后缀名
这里会根据spring.cloud.nacos.server-addr获取nacos地址,再根据
${spring.application.name}-${spring.profiles.active}.${spring.cloud.nacos.config.file-extension}作为文件id,来读取配置。本例中,就是去读取
userservice-dev.yaml:
3)读取nacos配置
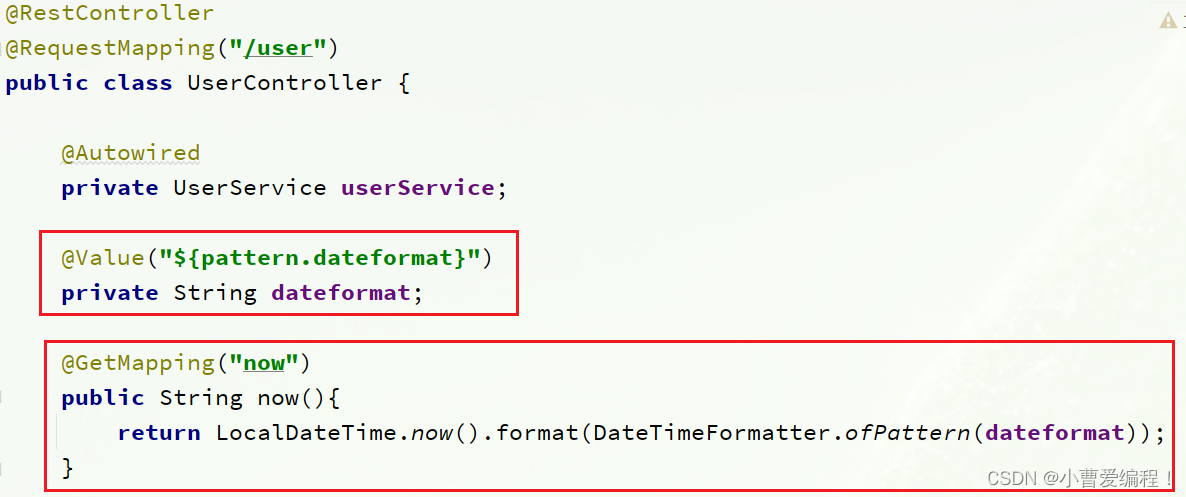
在user-service中的UserController中添加业务逻辑,读取pattern.dateformat配置:
完整代码:
package cn.itcast.user.web; import cn.itcast.user.pojo.User; import cn.itcast.user.service.UserService; import lombok.extern.slf4j.Slf4j; import org.springframework.beans.factory.annotation.Autowired; import org.springframework.beans.factory.annotation.Value; import org.springframework.web.bind.annotation.*; import java.time.LocalDateTime; import java.time.format.DateTimeFormatter; @Slf4j @RestController @RequestMapping("/user") public class UserController { @Autowired private UserService userService; @Value("${pattern.dateformat}") private String dateformat; @GetMapping("now") public String now(){ return LocalDateTime.now().format(DateTimeFormatter.ofPattern(dateformat)); } // ...略 }在页面访问,可以看到效果:
1.2.配置热更新
我们最终的目的,是修改nacos中的配置后,微服务中无需重启即可让配置生效,也就是配置热更新。
要实现配置热更新,可以使用两种方式:
1.2.1.方式一
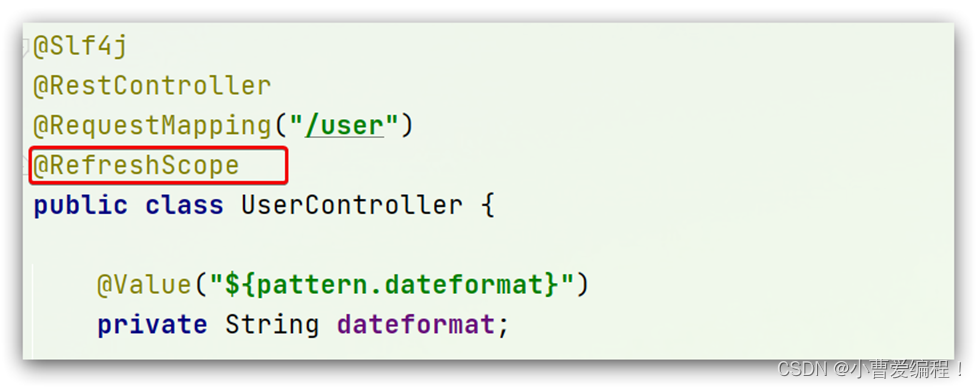
在@Value注入的变量所在类上添加注解@RefreshScope:
1.2.2.方式二
使用@ConfigurationProperties注解代替@Value注解。
在user-service服务中,添加一个类,读取patterrn.dateformat属性:
package cn.itcast.user.config; import lombok.Data; import org.springframework.boot.context.properties.ConfigurationProperties; import org.springframework.stereotype.Component; @Component @Data @ConfigurationProperties(prefix = "pattern") public class PatternProperties { private String dateformat; }在UserController中使用这个类代替@Value:
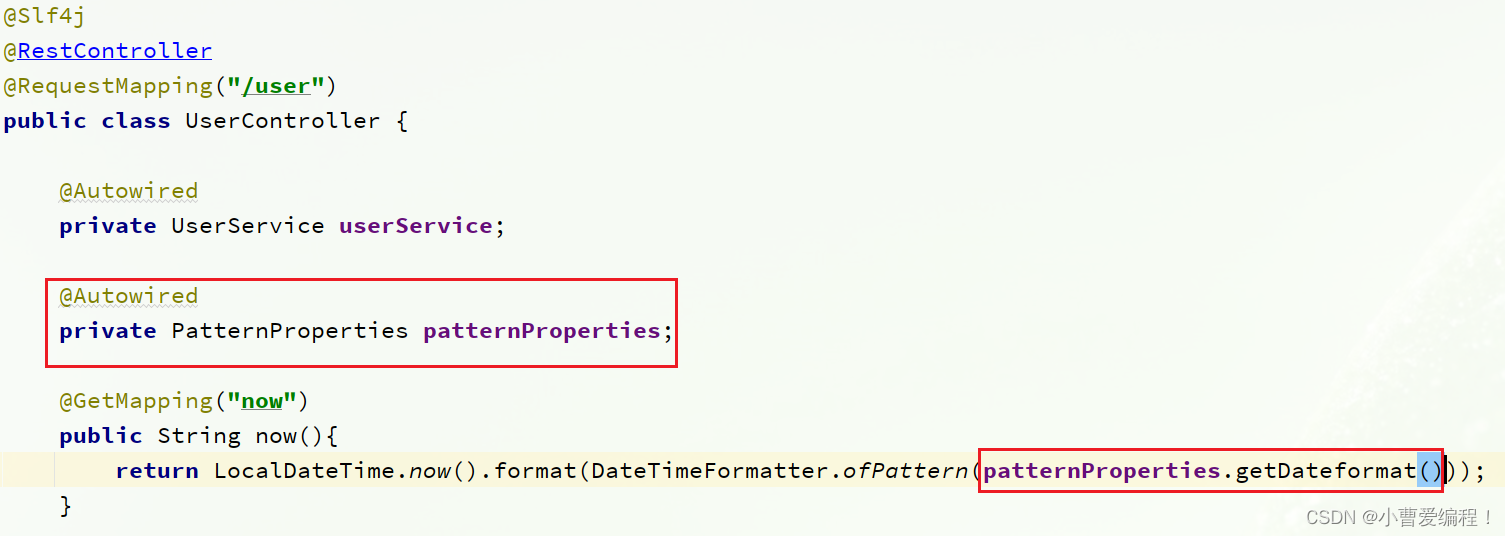
完整代码:
package cn.itcast.user.web; import cn.itcast.user.config.PatternProperties; import cn.itcast.user.pojo.User; import cn.itcast.user.service.UserService; import lombok.extern.slf4j.Slf4j; import org.springframework.beans.factory.annotation.Autowired; import org.springframework.web.bind.annotation.GetMapping; import org.springframework.web.bind.annotation.PathVariable; import org.springframework.web.bind.annotation.RequestMapping; import org.springframework.web.bind.annotation.RestController; import java.time.LocalDateTime; import java.time.format.DateTimeFormatter; @Slf4j @RestController @RequestMapping("/user") public class UserController { @Autowired private UserService userService; @Autowired private PatternProperties patternProperties; @GetMapping("now") public String now(){ return LocalDateTime.now().format(DateTimeFormatter.ofPattern(patternProperties.getDateformat())); } // 略 }1.3.配置共享
其实微服务启动时,会去nacos读取多个配置文件,例如:
[spring.application.name]-[spring.profiles.active].yaml,例如:userservice-dev.yaml
[spring.application.name].yaml,例如:userservice.yaml而
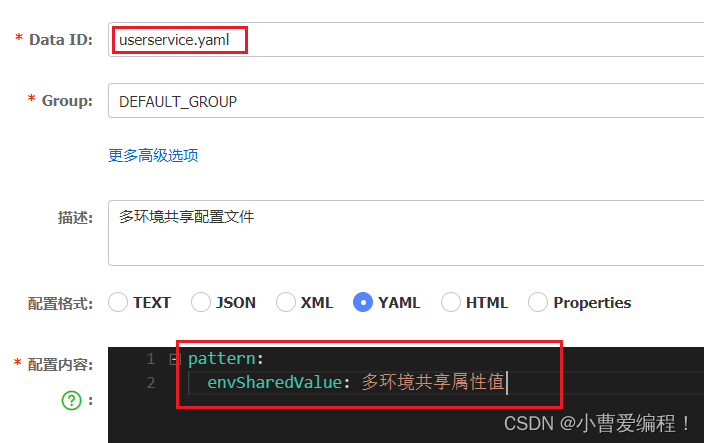
[spring.application.name].yaml不包含环境,因此可以被多个环境共享。下面我们通过案例来测试配置共享
1)添加一个环境共享配置
我们在nacos中添加一个userservice.yaml文件:
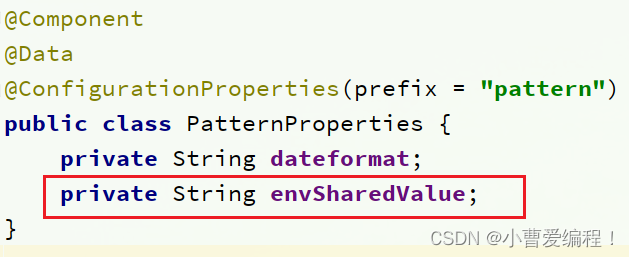
2)在user-service中读取共享配置
在user-service服务中,修改PatternProperties类,读取新添加的属性:
在user-service服务中,修改UserController,添加一个方法:
3)运行两个UserApplication,使用不同的profile
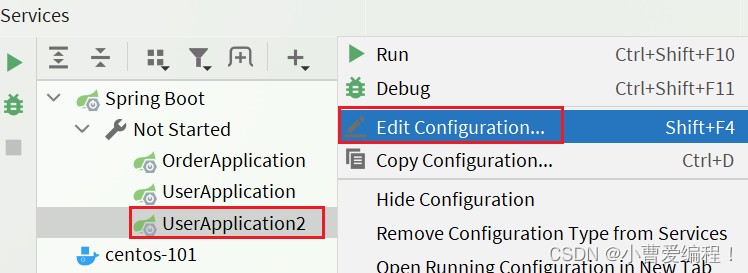
修改UserApplication2这个启动项,改变其profile值:
这样,UserApplication(8081)使用的profile是dev,UserApplication2(8082)使用的profile是test。
启动UserApplication和UserApplication2
访问http://localhost:8081/user/prop,结果:
访问http://localhost:8082/user/prop,结果:
可以看出来,不管是dev,还是test环境,都读取到了envSharedValue这个属性的值。
4)配置共享的优先级
当nacos、服务本地同时出现相同属性时,优先级有高低之分:
1.4.搭建Nacos集群
Nacos生产环境下一定要部署为集群状态,部署方式如附录:
2.Feign远程调用
先来看我们以前利用RestTemplate发起远程调用的代码:
存在下面的问题:
•代码可读性差,编程体验不统一
•参数复杂URL难以维护
Feign是一个声明式的http客户端,官方地址:https://github.com/OpenFeign/feign
其作用就是帮助我们优雅的实现http请求的发送,解决上面提到的问题。
2.1.Feign替代RestTemplate
Fegin的使用步骤如下:
1)引入依赖
我们在order-service服务的pom文件中引入feign的依赖:
<dependency>
    <groupId>org.springframework.cloud</groupId>
    <artifactId>spring-cloud-starter-openfeign</artifactId>
</dependency>
2)添加注解
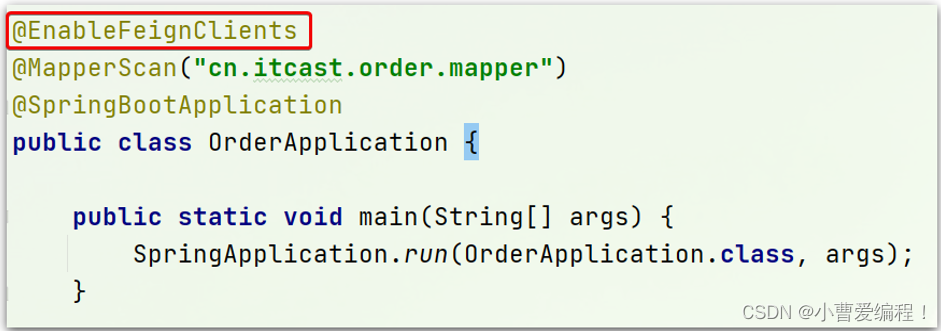
在order-service的启动类添加注解开启Feign的功能:
3)编写Feign的客户端
在order-service中新建一个接口,内容如下:
package cn.itcast.order.client; import cn.itcast.order.pojo.User; import org.springframework.cloud.openfeign.FeignClient; import org.springframework.web.bind.annotation.GetMapping; import org.springframework.web.bind.annotation.PathVariable; @FeignClient("userservice") public interface UserClient { @GetMapping("/user/{id}") User findById(@PathVariable("id") Long id); }这个客户端主要是基于SpringMVC的注解来声明远程调用的信息,比如:
服务名称:userservice
请求方式:GET
请求路径:/user/{id}
请求参数:Long id
返回值类型:User
这样,Feign就可以帮助我们发送http请求,无需自己使用RestTemplate来发送了。
4)测试
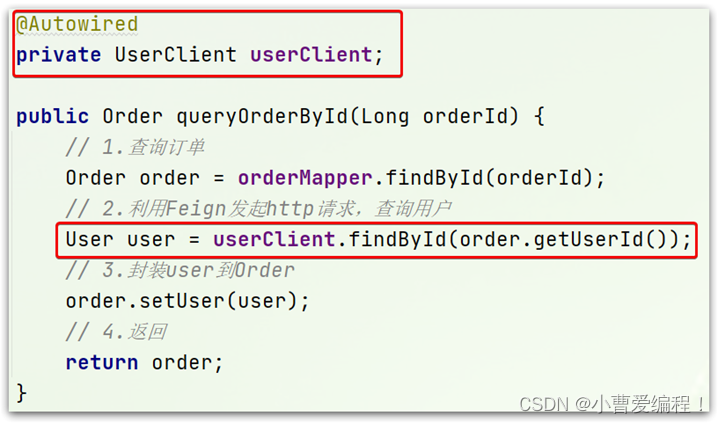
修改order-service中的OrderService类中的queryOrderById方法,使用Feign客户端代替RestTemplate:
是不是看起来优雅多了。
5)总结
使用Feign的步骤:
① 引入依赖
② 添加@EnableFeignClients注解
③ 编写FeignClient接口
④ 使用FeignClient中定义的方法代替RestTemplate
2.2.自定义配置
Feign可以支持很多的自定义配置,如下表所示:
类型 作用 说明 feign.Logger.Level 修改日志级别 包含四种不同的级别:NONE、BASIC、HEADERS、FULL feign.codec.Decoder 响应结果的解析器 http远程调用的结果做解析,例如解析json字符串为java对象 feign.codec.Encoder 请求参数编码 将请求参数编码,便于通过http请求发送 feign. Contract 支持的注解格式 默认是SpringMVC的注解 feign. Retryer 失败重试机制 请求失败的重试机制,默认是没有,不过会使用Ribbon的重试 一般情况下,默认值就能满足我们使用,如果要自定义时,只需要创建自定义的@Bean覆盖默认Bean即可。
下面以日志为例来演示如何自定义配置。
2.2.1.配置文件方式
基于配置文件修改feign的日志级别可以针对单个服务:
feign:
  client:
    config:
      userservice: # 针对某个微服务的配置
        loggerLevel: FULL #  日志级别
也可以针对所有服务:
feign:
  client:
    config:
      default: # 这里用default就是全局配置,如果是写服务名称,则是针对某个微服务的配置
        loggerLevel: FULL #  日志级别
而日志的级别分为四种:
NONE:不记录任何日志信息,这是默认值。
BASIC:仅记录请求的方法,URL以及响应状态码和执行时间
HEADERS:在BASIC的基础上,额外记录了请求和响应的头信息
FULL:记录所有请求和响应的明细,包括头信息、请求体、元数据。
2.2.2.Java代码方式
也可以基于Java代码来修改日志级别,先声明一个类,然后声明一个Logger.Level的对象:
public class DefaultFeignConfiguration { @Bean public Logger.Level feignLogLevel(){ return Logger.Level.BASIC; // 日志级别为BASIC } }如果要全局生效,将其放到启动类的@EnableFeignClients这个注解中:
@EnableFeignClients(defaultConfiguration = DefaultFeignConfiguration .class)如果是局部生效,则把它放到对应的@FeignClient这个注解中:
@FeignClient(value = "userservice", configuration = DefaultFeignConfiguration .class)2.3.Feign使用优化
Feign底层发起http请求,依赖于其它的框架。其底层客户端实现包括:
•URLConnection:默认实现,不支持连接池
•Apache HttpClient :支持连接池
•OKHttp:支持连接池
因此提高Feign的性能主要手段就是使用连接池代替默认的URLConnection。
这里我们用Apache的HttpClient来演示。
1)引入依赖
在order-service的pom文件中引入Apache的HttpClient依赖:
<!--httpClient的依赖 -->
<dependency>
    <groupId>io.github.openfeign</groupId>
    <artifactId>feign-httpclient</artifactId>
</dependency>
2)配置连接池
在order-service的application.yml中添加配置:
feign:
  client:
    config:
      default: # default全局的配置
        loggerLevel: BASIC # 日志级别,BASIC就是基本的请求和响应信息
  httpclient:
    enabled: true # 开启feign对HttpClient的支持
    max-connections: 200 # 最大的连接数
    max-connections-per-route: 50 # 每个路径的最大连接数
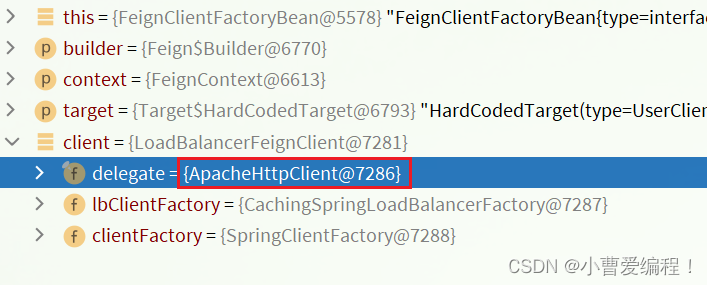
接下来,在FeignClientFactoryBean中的loadBalance方法中打断点:
Debug方式启动order-service服务,可以看到这里的client,底层就是Apache HttpClient:
总结,Feign的优化:
1.日志级别尽量用basic,最好使用basic和none
2.使用HttpClient或OKHttp代替URLConnection
① 引入feign-httpClient依赖
② 配置文件开启httpClient功能,设置连接池参数
2.4.最佳实践
所谓最近实践,就是使用过程中总结的经验,最好的一种使用方式。
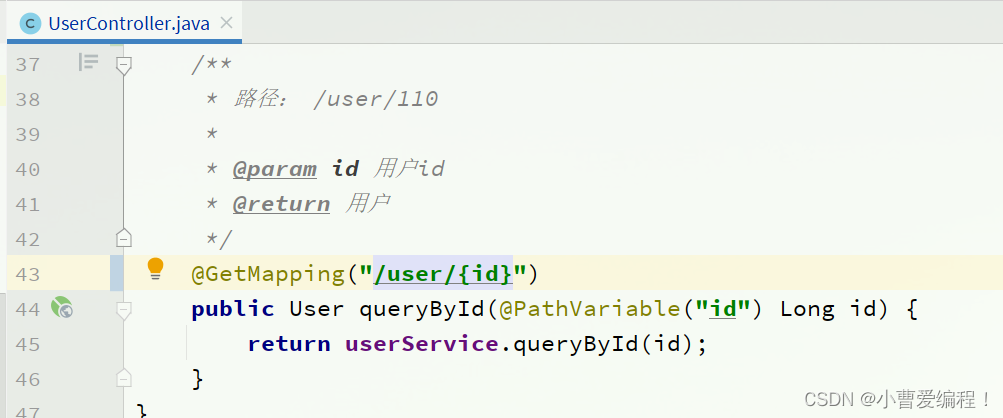
自习观察可以发现,Feign的客户端与服务提供者的controller代码非常相似:
feign客户端:
UserController:
有没有一种办法简化这种重复的代码编写呢?
2.4.1.继承方式
一样的代码可以通过继承来共享:
1)定义一个API接口,利用定义方法,并基于SpringMVC注解做声明。
2)Feign客户端和Controller都集成改接口
优点:
简单
实现了代码共享
缺点:
服务提供方、服务消费方紧耦合
参数列表中的注解映射并不会继承,因此Controller中必须再次声明方法、参数列表、注解
2.4.2.抽取方式
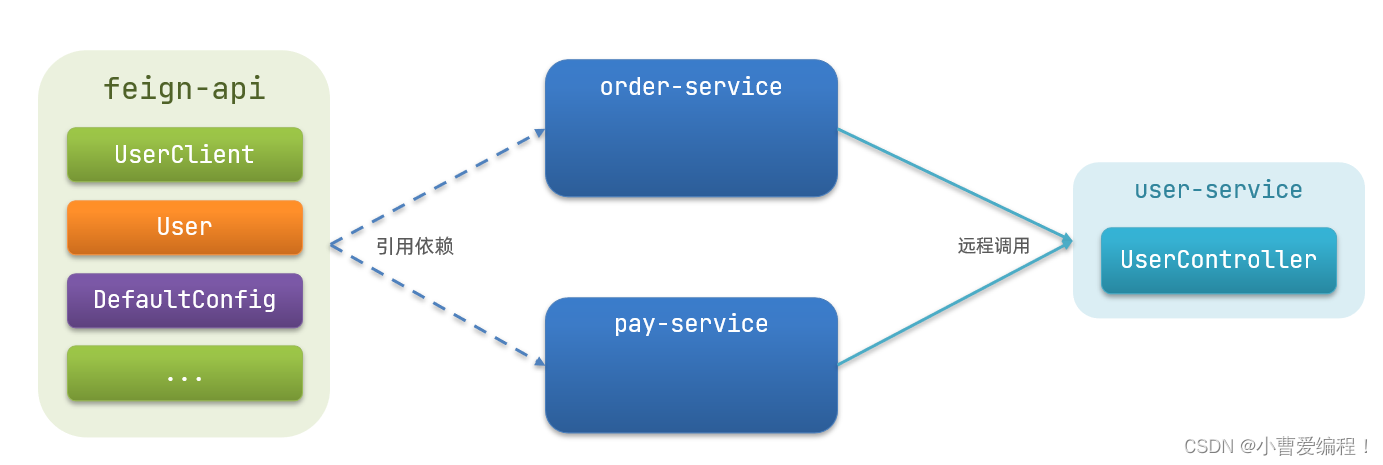
将Feign的Client抽取为独立模块,并且把接口有关的POJO、默认的Feign配置都放到这个模块中,提供给所有消费者使用。
例如,将UserClient、User、Feign的默认配置都抽取到一个feign-api包中,所有微服务引用该依赖包,即可直接使用。
2.4.3.实现基于抽取的最佳实践
1)抽取
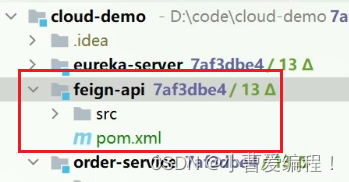
首先创建一个module,命名为feign-api:
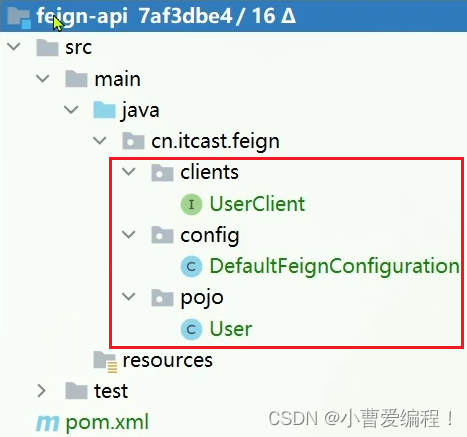
项目结构:
在feign-api中然后引入feign的starter依赖
<dependency>
    <groupId>org.springframework.cloud</groupId>
    <artifactId>spring-cloud-starter-openfeign</artifactId>
</dependency>
然后,order-service中编写的UserClient、User、DefaultFeignConfiguration都复制到feign-api项目中
2)在order-service中使用feign-api
首先,删除order-service中的UserClient、User、DefaultFeignConfiguration等类或接口。
在order-service的pom文件中中引入feign-api的依赖:
<dependency>
    <groupId>cn.itcast.demo</groupId>
    <artifactId>feign-api</artifactId>
    <version>1.0</version>
</dependency>
修改order-service中的所有与上述三个组件有关的导包部分,改成导入feign-api中的包
3)重启测试
重启后,发现服务报错了:
这是因为UserClient现在在cn.itcast.feign.clients包下,
而order-service的@EnableFeignClients注解是在cn.itcast.order包下,不在同一个包,无法扫描到UserClient。
4)解决扫描包问题
方式一:
指定Feign应该扫描的包:
@EnableFeignClients(basePackages = "cn.itcast.feign.clients")方式二:
指定需要加载的Client接口:
@EnableFeignClients(clients = {UserClient.class})
3.Gateway服务网关
Spring Cloud Gateway 是 Spring Cloud 的一个全新项目,该项目是基于 Spring 5.0,Spring Boot 2.0 和 Project Reactor 等响应式编程和事件流技术开发的网关,它旨在为微服务架构提供一种简单有效的统一的 API 路由管理方式。
3.1.为什么需要网关
Gateway网关是我们服务的守门神,所有微服务的统一入口。
网关的核心功能特性:
请求路由、负载均衡
身份认证、权限控制
限流
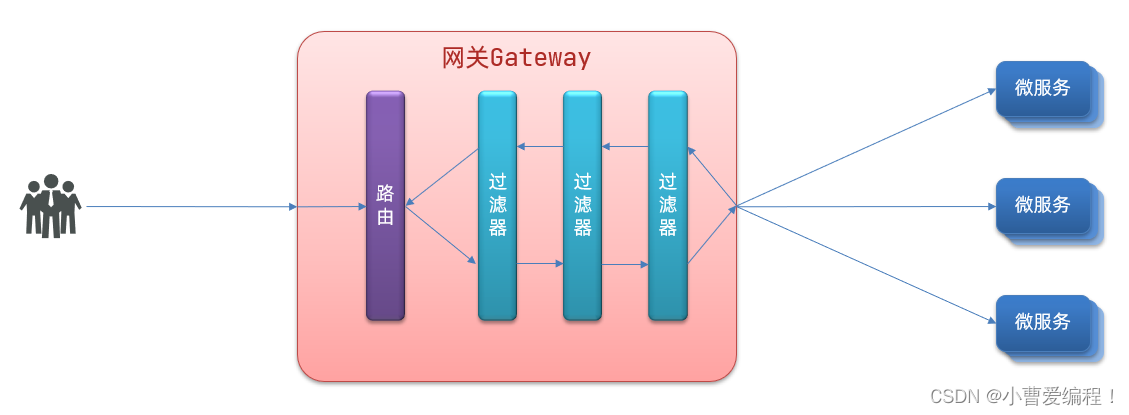
架构图:
权限控制:网关作为微服务入口,需要校验用户是是否有请求资格,如果没有则进行拦截。
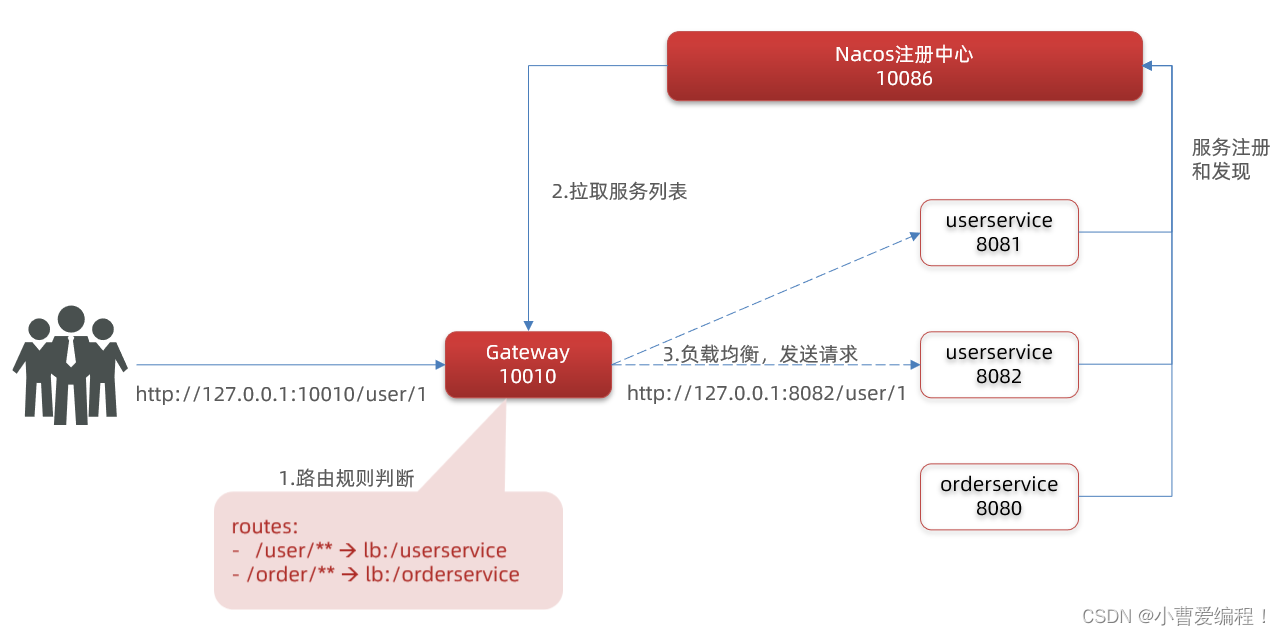
路由和负载均衡:一切请求都必须先经过gateway,但网关不处理业务,而是根据某种规则,把请求转发到某个微服务,这个过程叫做路由。当然路由的目标服务有多个时,还需要做负载均衡。
限流:当请求流量过高时,在网关中按照下流的微服务能够接受的速度来放行请求,避免服务压力过大。
在SpringCloud中网关的实现包括两种:
gateway
zuul
Zuul是基于Servlet的实现,属于阻塞式编程。而SpringCloudGateway则是基于Spring5中提供的WebFlux,属于响应式编程的实现,具备更好的性能。
3.2.gateway快速入门
下面,我们就演示下网关的基本路由功能。基本步骤如下:
创建SpringBoot工程gateway,引入网关依赖
编写启动类
编写基础配置和路由规则
启动网关服务进行测试
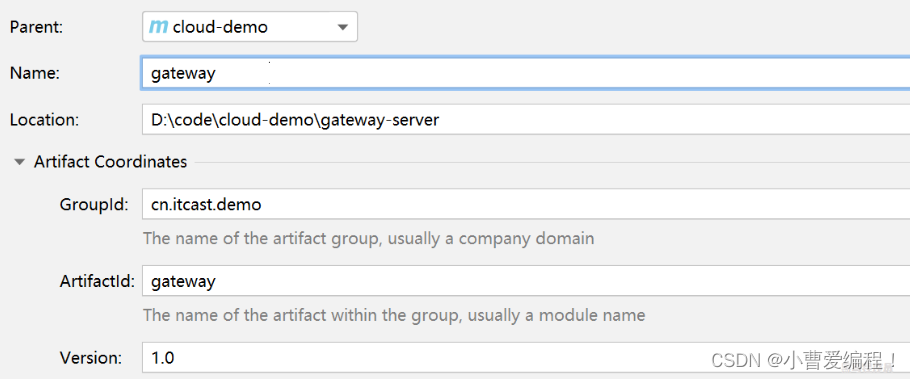
1)创建gateway服务,引入依赖
创建服务:
引入依赖:
<!--网关-->
<dependency>
    <groupId>org.springframework.cloud</groupId>
    <artifactId>spring-cloud-starter-gateway</artifactId>
</dependency>
<!--nacos服务发现依赖-->
<dependency>
    <groupId>com.alibaba.cloud</groupId>
    <artifactId>spring-cloud-starter-alibaba-nacos-discovery</artifactId>
</dependency>
2)编写启动类
package cn.itcast.gateway; import org.springframework.boot.SpringApplication; import org.springframework.boot.autoconfigure.SpringBootApplication; @SpringBootApplication public class GatewayApplication { public static void main(String[] args) { SpringApplication.run(GatewayApplication.class, args); } }3)编写基础配置和路由规则
创建application.yml文件,内容如下:
server:
  port: 10010 # 网关端口
spring:
  application:
    name: gateway # 服务名称
  cloud:
    nacos:
      server-addr: localhost:8848 # nacos地址
    gateway:
      routes: # 网关路由配置
        - id: user-service # 路由id,自定义,只要唯一即可
          # uri: http://127.0.0.1:8081 # 路由的目标地址 http就是固定地址
          uri: lb://userservice # 路由的目标地址 lb就是负载均衡,后面跟服务名称
          predicates: # 路由断言,也就是判断请求是否符合路由规则的条件
            - Path=/user/** # 这个是按照路径匹配,只要以/user/开头就符合要求
我们将符合
Path规则的一切请求,都代理到uri参数指定的地址。本例中,我们将
/user/**开头的请求,代理到lb://userservice,lb是负载均衡,根据服务名拉取服务列表,实现负载均衡。4)重启测试
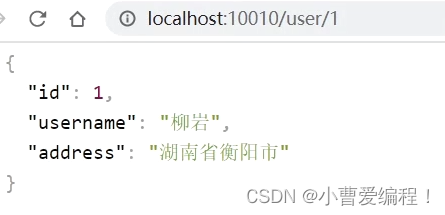
重启网关,访问http://localhost:10010/user/1时,符合
/user/**规则,请求转发到uri:http://userservice/user/1,得到了结果:
5)网关路由的流程图
整个访问的流程如下:
总结:
网关搭建步骤:
创建项目,引入nacos服务发现和gateway依赖
配置application.yml,包括服务基本信息、nacos地址、路由
路由配置包括:
路由id:路由的唯一标示
路由目标(uri):路由的目标地址,http代表固定地址,lb代表根据服务名负载均衡
路由断言(predicates):判断路由的规则,
路由过滤器(filters):对请求或响应做处理
接下来,就重点来学习路由断言和路由过滤器的详细知识
3.3.断言工厂
我们在配置文件中写的断言规则只是字符串,这些字符串会被Predicate Factory读取并处理,转变为路由判断的条件
例如Path=/user/**是按照路径匹配,这个规则是由
org.springframework.cloud.gateway.handler.predicate.PathRoutePredicateFactory类来处理的,像这样的断言工厂在SpringCloudGateway还有十几个:
名称 说明 示例 After 是某个时间点后的请求 - After=2037-01-20T17:42:47.789-07:00[America/Denver] Before 是某个时间点之前的请求 - Before=2031-04-13T15:14:47.433+08:00[Asia/Shanghai] Between 是某两个时间点之前的请求 - Between=2037-01-20T17:42:47.789-07:00[America/Denver], 2037-01-21T17:42:47.789-07:00[America/Denver] Cookie 请求必须包含某些cookie - Cookie=chocolate, ch.p Header 请求必须包含某些header - Header=X-Request-Id, \d+ Host 请求必须是访问某个host(域名) - Host=.somehost.org,.anotherhost.org Method 请求方式必须是指定方式 - Method=GET,POST Path 请求路径必须符合指定规则 - Path=/red/{segment},/blue/** Query 请求参数必须包含指定参数 - Query=name, Jack或者- Query=name RemoteAddr 请求者的ip必须是指定范围 - RemoteAddr=192.168.1.1/24 Weight 权重处理 我们只需要掌握Path这种路由工程就可以了。
路由工厂的作用:读取用户配置的断言规则,而后解析成对应的判断条件,用户请求进来后做判断。
3.4.过滤器工厂
GatewayFilter是网关中提供的一种过滤器,可以对进入网关的请求和微服务返回的响应做处理:
3.4.1.路由过滤器的种类
Spring提供了31种不同的路由过滤器工厂。例如:
名称 说明 AddRequestHeader 给当前请求添加一个请求头 RemoveRequestHeader 移除请求中的一个请求头 AddResponseHeader 给响应结果中添加一个响应头 RemoveResponseHeader 从响应结果中移除有一个响应头 RequestRateLimiter 限制请求的流量 3.4.2.请求头过滤器
下面我们以AddRequestHeader 为例来讲解。
需求:给所有进入userservice的请求添加一个请求头:Truth=itcast is freaking awesome!
只需要修改gateway服务的application.yml文件,添加路由过滤即可:
spring:
  cloud:
    gateway:
      routes:
      - id: user-service
        uri: lb://userservice
        predicates:
        - Path=/user/**
        filters: # 过滤器
        - AddRequestHeader=Truth, Itcast is freaking awesome! # 添加请求头
当前过滤器写在userservice路由下,因此仅仅对访问userservice的请求有效。
3.4.3.默认过滤器
如果要对所有的路由都生效,则可以将过滤器工厂写到default下。格式如下:
spring:
  cloud:
    gateway:
      routes:
      - id: user-service
        uri: lb://userservice
        predicates:
        - Path=/user/**
      default-filters: # 默认过滤项
      - AddRequestHeader=Truth, Itcast is freaking awesome!
3.4.4.总结
过滤器的作用是什么?
① 对路由的请求或响应做加工处理,比如添加请求头
② 配置在路由下的过滤器只对当前路由的请求生效
defaultFilters的作用是什么?
① 对所有路由都生效的过滤器
3.5.全局过滤器
上一节学习的过滤器,网关提供了31种,但每一种过滤器的作用都是固定的。如果我们希望拦截请求,做自己的业务逻辑则没办法实现。
3.5.1.全局过滤器作用
全局过滤器的作用也是处理一切进入网关的请求和微服务响应,与GatewayFilter的作用一样。区别在于GatewayFilter通过配置定义,处理逻辑是固定的;而GlobalFilter的逻辑需要自己写代码实现。
定义方式是实现GlobalFilter接口。
public interface GlobalFilter {
    /**
     *  处理当前请求,有必要的话通过{@link GatewayFilterChain}将请求交给下一个过滤器处理
     *
     * @param exchange 请求上下文,里面可以获取Request、Response等信息
     * @param chain 用来把请求委托给下一个过滤器
     * @return {@code Mono<Void>} 返回标示当前过滤器业务结束
     */
    Mono<Void> filter(ServerWebExchange exchange, GatewayFilterChain chain);
}
在filter中编写自定义逻辑,可以实现下列功能:
登录状态判断
权限校验
请求限流等
3.5.2.自定义全局过滤器
需求:定义全局过滤器,拦截请求,判断请求的参数是否满足下面条件:
参数中是否有authorization,
authorization参数值是否为admin
如果同时满足则放行,否则拦截
实现:
在gateway中定义一个过滤器:
package cn.itcast.gateway.filters; import org.springframework.cloud.gateway.filter.GatewayFilterChain; import org.springframework.cloud.gateway.filter.GlobalFilter; import org.springframework.core.annotation.Order; import org.springframework.http.HttpStatus; import org.springframework.stereotype.Component; import org.springframework.web.server.ServerWebExchange; import reactor.core.publisher.Mono; //@Order(-1) @Component public class AuthorizeFilter implements GlobalFilter,Ordered { @Override public Mono<Void> filter(ServerWebExchange exchange, GatewayFilterChain chain) { // 1.获取请求参数 MultiValueMap<String, String> params = exchange.getRequest().getQueryParams(); // 2.获取authorization参数 String auth = params.getFirst("authorization"); // 3.校验 if ("admin".equals(auth)) { // 放行 return chain.filter(exchange); } // 4.拦截 // 4.1.禁止访问,设置状态码 exchange.getResponse().setStatusCode(HttpStatus.FORBIDDEN); // 4.2.结束处理 return exchange.getResponse().setComplete(); } @Override public int getOrder() { return -1; } }3.5.3.过滤器执行顺序
请求进入网关会碰到三类过滤器:当前路由的过滤器、DefaultFilter、GlobalFilter
请求路由后,会将当前路由过滤器和DefaultFilter、GlobalFilter,合并到一个过滤器链(集合)中,排序后依次执行每个过滤器:
排序的规则是什么呢?
每一个过滤器都必须指定一个int类型的order值,order值越小,优先级越高,执行顺序越靠前。
GlobalFilter通过实现Ordered接口,或者添加@Order注解来指定order值,由我们自己指定
路由过滤器和defaultFilter的order由Spring指定,默认是按照声明顺序从1递增。
当过滤器的order值一样时,会按照 defaultFilter > 路由过滤器 > GlobalFilter的顺序执行。
详细内容,可以查看源码:
org.springframework.cloud.gateway.route.RouteDefinitionRouteLocator#getFilters()方法是先加载defaultFilters,然后再加载某个route的filters,然后合并。
org.springframework.cloud.gateway.handler.FilteringWebHandler#handle()方法会加载全局过滤器,与前面的过滤器合并后根据order排序,组织过滤器链3.6.跨域问题
3.6.1.什么是跨域问题
跨域:域名不一致就是跨域,主要包括:
域名不同: www.taobao.com 和 www.taobao.org 和 www.jd.com 和 miaosha.jd.com
域名相同,端口不同:localhost:8080和localhost8081
跨域问题:浏览器禁止请求的发起者与服务端发生跨域ajax请求,请求被浏览器拦截的问题
解决方案:CORS,这个以前应该学习过,这里不再赘述了。不知道的小伙伴可以查看跨域资源共享 CORS 详解 - 阮一峰的网络日志
3.6.2.模拟跨域问题
找到课前资料的页面文件:
放入tomcat或者nginx这样的web服务器中,启动并访问。

可以在浏览器控制台看到下面的错误:
从localhost:8090访问localhost:10010,端口不同,显然是跨域的请求。
3.6.3.解决跨域问题
在gateway服务的application.yml文件中,添加下面的配置:
spring:
  cloud:
    gateway:
      # 。。。
      globalcors: # 全局的跨域处理
        add-to-simple-url-handler-mapping: true # 解决options请求被拦截问题
        corsConfigurations:
          '[/**]':
            allowedOrigins: # 允许哪些网站的跨域请求
              - "http://localhost:8090"
            allowedMethods: # 允许的跨域ajax的请求方式
              - "GET"
              - "POST"
              - "DELETE"
              - "PUT"
              - "OPTIONS"
            allowedHeaders: "*" # 允许在请求中携带的头信息
            allowCredentials: true # 是否允许携带cookie
            maxAge: 360000 # 这次跨域检测的有效期
附录
1.集群结构图
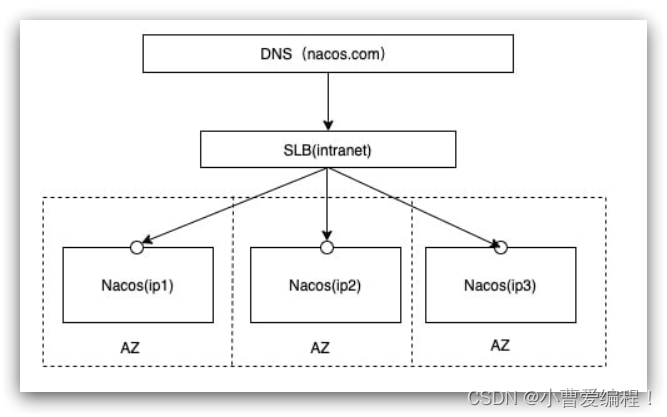
官方给出的Nacos集群图:
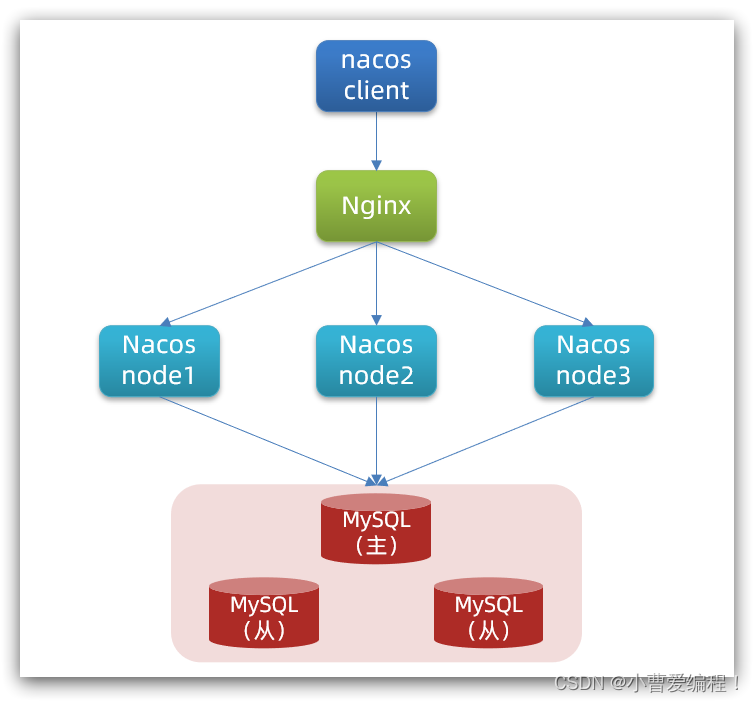
其中包含3个nacos节点,然后一个负载均衡器代理3个Nacos。这里负载均衡器可以使用nginx。
我们计划的集群结构:
三个nacos节点的地址:
节点 ip port nacos1 192.168.150.1 8845 nacos2 192.168.150.1 8846 nacos3 192.168.150.1 8847 2.搭建集群
搭建集群的基本步骤:
搭建数据库,初始化数据库表结构
下载nacos安装包
配置nacos
启动nacos集群
nginx反向代理
2.1.初始化数据库
Nacos默认数据存储在内嵌数据库Derby中,不属于生产可用的数据库。
官方推荐的最佳实践是使用带有主从的高可用数据库集群,主从模式的高可用数据库可以参考传智教育的后续高手课程。
这里我们以单点的数据库为例来讲解。
首先新建一个数据库,命名为nacos,而后导入下面的SQL:
CREATE TABLE `config_info` ( `id` bigint(20) NOT NULL AUTO_INCREMENT COMMENT 'id', `data_id` varchar(255) NOT NULL COMMENT 'data_id', `group_id` varchar(255) DEFAULT NULL, `content` longtext NOT NULL COMMENT 'content', `md5` varchar(32) DEFAULT NULL COMMENT 'md5', `gmt_create` datetime NOT NULL DEFAULT CURRENT_TIMESTAMP COMMENT '创建时间', `gmt_modified` datetime NOT NULL DEFAULT CURRENT_TIMESTAMP COMMENT '修改时间', `src_user` text COMMENT 'source user', `src_ip` varchar(50) DEFAULT NULL COMMENT 'source ip', `app_name` varchar(128) DEFAULT NULL, `tenant_id` varchar(128) DEFAULT '' COMMENT '租户字段', `c_desc` varchar(256) DEFAULT NULL, `c_use` varchar(64) DEFAULT NULL, `effect` varchar(64) DEFAULT NULL, `type` varchar(64) DEFAULT NULL, `c_schema` text, PRIMARY KEY (`id`), UNIQUE KEY `uk_configinfo_datagrouptenant` (`data_id`,`group_id`,`tenant_id`) ) ENGINE=InnoDB DEFAULT CHARSET=utf8 COLLATE=utf8_bin COMMENT='config_info'; /******************************************/ /* 数据库全名 = nacos_config */ /* 表名称 = config_info_aggr */ /******************************************/ CREATE TABLE `config_info_aggr` ( `id` bigint(20) NOT NULL AUTO_INCREMENT COMMENT 'id', `data_id` varchar(255) NOT NULL COMMENT 'data_id', `group_id` varchar(255) NOT NULL COMMENT 'group_id', `datum_id` varchar(255) NOT NULL COMMENT 'datum_id', `content` longtext NOT NULL COMMENT '内容', `gmt_modified` datetime NOT NULL COMMENT '修改时间', `app_name` varchar(128) DEFAULT NULL, `tenant_id` varchar(128) DEFAULT '' COMMENT '租户字段', PRIMARY KEY (`id`), UNIQUE KEY `uk_configinfoaggr_datagrouptenantdatum` (`data_id`,`group_id`,`tenant_id`,`datum_id`) ) ENGINE=InnoDB DEFAULT CHARSET=utf8 COLLATE=utf8_bin COMMENT='增加租户字段'; /******************************************/ /* 数据库全名 = nacos_config */ /* 表名称 = config_info_beta */ /******************************************/ CREATE TABLE `config_info_beta` ( `id` bigint(20) NOT NULL AUTO_INCREMENT COMMENT 'id', `data_id` varchar(255) NOT NULL COMMENT 'data_id', `group_id` varchar(128) NOT NULL COMMENT 'group_id', `app_name` varchar(128) DEFAULT NULL COMMENT 'app_name', `content` longtext NOT NULL COMMENT 'content', `beta_ips` varchar(1024) DEFAULT NULL COMMENT 'betaIps', `md5` varchar(32) DEFAULT NULL COMMENT 'md5', `gmt_create` datetime NOT NULL DEFAULT CURRENT_TIMESTAMP COMMENT '创建时间', `gmt_modified` datetime NOT NULL DEFAULT CURRENT_TIMESTAMP COMMENT '修改时间', `src_user` text COMMENT 'source user', `src_ip` varchar(50) DEFAULT NULL COMMENT 'source ip', `tenant_id` varchar(128) DEFAULT '' COMMENT '租户字段', PRIMARY KEY (`id`), UNIQUE KEY `uk_configinfobeta_datagrouptenant` (`data_id`,`group_id`,`tenant_id`) ) ENGINE=InnoDB DEFAULT CHARSET=utf8 COLLATE=utf8_bin COMMENT='config_info_beta'; /******************************************/ /* 数据库全名 = nacos_config */ /* 表名称 = config_info_tag */ /******************************************/ CREATE TABLE `config_info_tag` ( `id` bigint(20) NOT NULL AUTO_INCREMENT COMMENT 'id', `data_id` varchar(255) NOT NULL COMMENT 'data_id', `group_id` varchar(128) NOT NULL COMMENT 'group_id', `tenant_id` varchar(128) DEFAULT '' COMMENT 'tenant_id', `tag_id` varchar(128) NOT NULL COMMENT 'tag_id', `app_name` varchar(128) DEFAULT NULL COMMENT 'app_name', `content` longtext NOT NULL COMMENT 'content', `md5` varchar(32) DEFAULT NULL COMMENT 'md5', `gmt_create` datetime NOT NULL DEFAULT CURRENT_TIMESTAMP COMMENT '创建时间', `gmt_modified` datetime NOT NULL DEFAULT CURRENT_TIMESTAMP COMMENT '修改时间', `src_user` text COMMENT 'source user', `src_ip` varchar(50) DEFAULT NULL COMMENT 'source ip', PRIMARY KEY (`id`), UNIQUE KEY `uk_configinfotag_datagrouptenanttag` (`data_id`,`group_id`,`tenant_id`,`tag_id`) ) ENGINE=InnoDB DEFAULT CHARSET=utf8 COLLATE=utf8_bin COMMENT='config_info_tag'; /******************************************/ /* 数据库全名 = nacos_config */ /* 表名称 = config_tags_relation */ /******************************************/ CREATE TABLE `config_tags_relation` ( `id` bigint(20) NOT NULL COMMENT 'id', `tag_name` varchar(128) NOT NULL COMMENT 'tag_name', `tag_type` varchar(64) DEFAULT NULL COMMENT 'tag_type', `data_id` varchar(255) NOT NULL COMMENT 'data_id', `group_id` varchar(128) NOT NULL COMMENT 'group_id', `tenant_id` varchar(128) DEFAULT '' COMMENT 'tenant_id', `nid` bigint(20) NOT NULL AUTO_INCREMENT, PRIMARY KEY (`nid`), UNIQUE KEY `uk_configtagrelation_configidtag` (`id`,`tag_name`,`tag_type`), KEY `idx_tenant_id` (`tenant_id`) ) ENGINE=InnoDB DEFAULT CHARSET=utf8 COLLATE=utf8_bin COMMENT='config_tag_relation'; /******************************************/ /* 数据库全名 = nacos_config */ /* 表名称 = group_capacity */ /******************************************/ CREATE TABLE `group_capacity` ( `id` bigint(20) unsigned NOT NULL AUTO_INCREMENT COMMENT '主键ID', `group_id` varchar(128) NOT NULL DEFAULT '' COMMENT 'Group ID,空字符表示整个集群', `quota` int(10) unsigned NOT NULL DEFAULT '0' COMMENT '配额,0表示使用默认值', `usage` int(10) unsigned NOT NULL DEFAULT '0' COMMENT '使用量', `max_size` int(10) unsigned NOT NULL DEFAULT '0' COMMENT '单个配置大小上限,单位为字节,0表示使用默认值', `max_aggr_count` int(10) unsigned NOT NULL DEFAULT '0' COMMENT '聚合子配置最大个数,,0表示使用默认值', `max_aggr_size` int(10) unsigned NOT NULL DEFAULT '0' COMMENT '单个聚合数据的子配置大小上限,单位为字节,0表示使用默认值', `max_history_count` int(10) unsigned NOT NULL DEFAULT '0' COMMENT '最大变更历史数量', `gmt_create` datetime NOT NULL DEFAULT CURRENT_TIMESTAMP COMMENT '创建时间', `gmt_modified` datetime NOT NULL DEFAULT CURRENT_TIMESTAMP COMMENT '修改时间', PRIMARY KEY (`id`), UNIQUE KEY `uk_group_id` (`group_id`) ) ENGINE=InnoDB DEFAULT CHARSET=utf8 COLLATE=utf8_bin COMMENT='集群、各Group容量信息表'; /******************************************/ /* 数据库全名 = nacos_config */ /* 表名称 = his_config_info */ /******************************************/ CREATE TABLE `his_config_info` ( `id` bigint(64) unsigned NOT NULL, `nid` bigint(20) unsigned NOT NULL AUTO_INCREMENT, `data_id` varchar(255) NOT NULL, `group_id` varchar(128) NOT NULL, `app_name` varchar(128) DEFAULT NULL COMMENT 'app_name', `content` longtext NOT NULL, `md5` varchar(32) DEFAULT NULL, `gmt_create` datetime NOT NULL DEFAULT CURRENT_TIMESTAMP, `gmt_modified` datetime NOT NULL DEFAULT CURRENT_TIMESTAMP, `src_user` text, `src_ip` varchar(50) DEFAULT NULL, `op_type` char(10) DEFAULT NULL, `tenant_id` varchar(128) DEFAULT '' COMMENT '租户字段', PRIMARY KEY (`nid`), KEY `idx_gmt_create` (`gmt_create`), KEY `idx_gmt_modified` (`gmt_modified`), KEY `idx_did` (`data_id`) ) ENGINE=InnoDB DEFAULT CHARSET=utf8 COLLATE=utf8_bin COMMENT='多租户改造'; /******************************************/ /* 数据库全名 = nacos_config */ /* 表名称 = tenant_capacity */ /******************************************/ CREATE TABLE `tenant_capacity` ( `id` bigint(20) unsigned NOT NULL AUTO_INCREMENT COMMENT '主键ID', `tenant_id` varchar(128) NOT NULL DEFAULT '' COMMENT 'Tenant ID', `quota` int(10) unsigned NOT NULL DEFAULT '0' COMMENT '配额,0表示使用默认值', `usage` int(10) unsigned NOT NULL DEFAULT '0' COMMENT '使用量', `max_size` int(10) unsigned NOT NULL DEFAULT '0' COMMENT '单个配置大小上限,单位为字节,0表示使用默认值', `max_aggr_count` int(10) unsigned NOT NULL DEFAULT '0' COMMENT '聚合子配置最大个数', `max_aggr_size` int(10) unsigned NOT NULL DEFAULT '0' COMMENT '单个聚合数据的子配置大小上限,单位为字节,0表示使用默认值', `max_history_count` int(10) unsigned NOT NULL DEFAULT '0' COMMENT '最大变更历史数量', `gmt_create` datetime NOT NULL DEFAULT CURRENT_TIMESTAMP COMMENT '创建时间', `gmt_modified` datetime NOT NULL DEFAULT CURRENT_TIMESTAMP COMMENT '修改时间', PRIMARY KEY (`id`), UNIQUE KEY `uk_tenant_id` (`tenant_id`) ) ENGINE=InnoDB DEFAULT CHARSET=utf8 COLLATE=utf8_bin COMMENT='租户容量信息表'; CREATE TABLE `tenant_info` ( `id` bigint(20) NOT NULL AUTO_INCREMENT COMMENT 'id', `kp` varchar(128) NOT NULL COMMENT 'kp', `tenant_id` varchar(128) default '' COMMENT 'tenant_id', `tenant_name` varchar(128) default '' COMMENT 'tenant_name', `tenant_desc` varchar(256) DEFAULT NULL COMMENT 'tenant_desc', `create_source` varchar(32) DEFAULT NULL COMMENT 'create_source', `gmt_create` bigint(20) NOT NULL COMMENT '创建时间', `gmt_modified` bigint(20) NOT NULL COMMENT '修改时间', PRIMARY KEY (`id`), UNIQUE KEY `uk_tenant_info_kptenantid` (`kp`,`tenant_id`), KEY `idx_tenant_id` (`tenant_id`) ) ENGINE=InnoDB DEFAULT CHARSET=utf8 COLLATE=utf8_bin COMMENT='tenant_info'; CREATE TABLE `users` ( `username` varchar(50) NOT NULL PRIMARY KEY, `password` varchar(500) NOT NULL, `enabled` boolean NOT NULL ); CREATE TABLE `roles` ( `username` varchar(50) NOT NULL, `role` varchar(50) NOT NULL, UNIQUE INDEX `idx_user_role` (`username` ASC, `role` ASC) USING BTREE ); CREATE TABLE `permissions` ( `role` varchar(50) NOT NULL, `resource` varchar(255) NOT NULL, `action` varchar(8) NOT NULL, UNIQUE INDEX `uk_role_permission` (`role`,`resource`,`action`) USING BTREE ); INSERT INTO users (username, password, enabled) VALUES ('nacos', '$2a$10$EuWPZHzz32dJN7jexM34MOeYirDdFAZm2kuWj7VEOJhhZkDrxfvUu', TRUE); INSERT INTO roles (username, role) VALUES ('nacos', 'ROLE_ADMIN');2.2.下载nacos
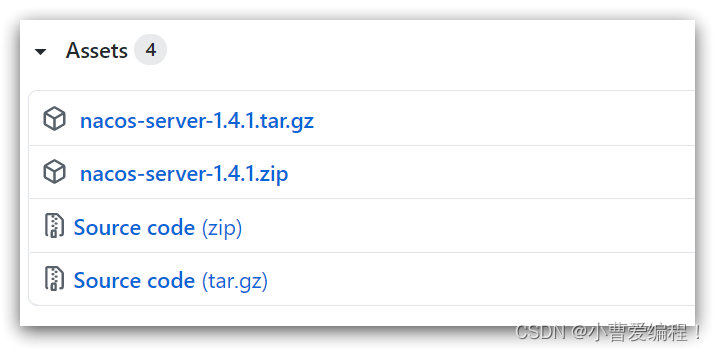
nacos在GitHub上有下载地址:Tags · alibaba/nacos · GitHub,可以选择任意版本下载。
本例中才用1.4.1版本:
2.3.配置Nacos
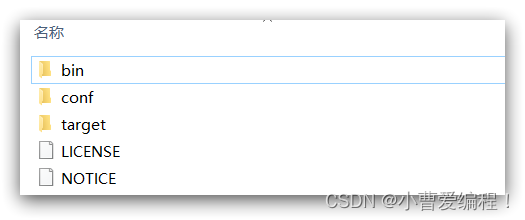
将这个包解压到任意非中文目录下,如图:
目录说明:
bin:启动脚本
conf:配置文件
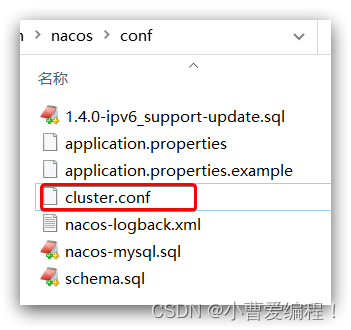
进入nacos的conf目录,修改配置文件cluster.conf.example,重命名为cluster.conf:
然后添加内容:
127.0.0.1:8845
127.0.0.1.8846
127.0.0.1.8847
然后修改application.properties文件,添加数据库配置
spring.datasource.platform=mysql db.num=1 db.url.0=jdbc:mysql://127.0.0.1:3306/nacos?characterEncoding=utf8&connectTimeout=1000&socketTimeout=3000&autoReconnect=true&useUnicode=true&useSSL=false&serverTimezone=UTC db.user.0=root db.password.0=1232.4.启动
将nacos文件夹复制三份,分别命名为:nacos1、nacos2、nacos3
然后分别修改三个文件夹中的application.properties,
nacos1:
server.port=8845nacos2:
server.port=8846nacos3:
server.port=8847然后分别启动三个nacos节点:
startup.cmd2.5.nginx反向代理
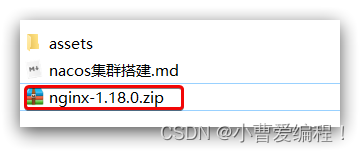
找到课前资料提供的nginx安装包:
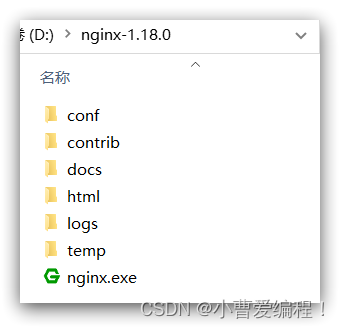
解压到任意非中文目录下:
修改conf/nginx.conf文件,配置如下:
upstream nacos-cluster { server 127.0.0.1:8845; server 127.0.0.1:8846; server 127.0.0.1:8847; } server { listen 80; server_name localhost; location /nacos { proxy_pass http://nacos-cluster; } }而后在浏览器访问:http://localhost/nacos即可。
代码中application.yml文件配置如下:
spring:
  cloud:
    nacos:
      server-addr: localhost:80 # Nacos地址
2.6.优化
实际部署时,需要给做反向代理的nginx服务器设置一个域名,这样后续如果有服务器迁移nacos的客户端也无需更改配置.
Nacos的各个节点应该部署到多个不同服务器,做好容灾和隔离
