vue-element-admin一站式后端 UI框架二次开发攻略指南
- 1.1 前言
- 1.2 修改 Logo 名称和图标
- 1.3 控制设置齿轮是否显示或隐藏
- 1.4 框架安装依赖优化脚本
- 1.5 定义多环境配置文件
- 1.6 优化打包流程
- 1.7 优化打包流程输出文件路径配置
- 1.8 nginx 配置
- 1.9 docker file 配置
- 2. 代码地址
1.1 前言
vue-element-admin 是一款非常强大和优秀的后端管理 UI 框架。
当我们基于此框架做一些二次开发的时候,往往需要对代码进行修改。
为了加快改造流程,我们来做一些优化方便二次开发。
1.2 修改 Logo 名称和图标

- 修改Logo组件路径:
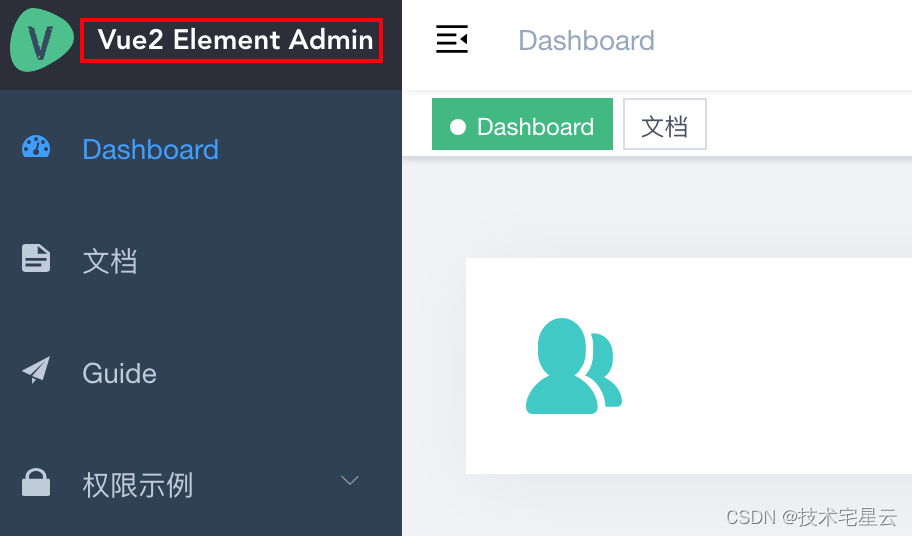
src/layout/components/Sidebar/Logo.vue中 title 和 logo 变量的值即可。
<script>
import defaultSettings from '@/settings'

export default {
  name: 'SidebarLogo',
  props: {
    collapse: {
      type: Boolean,
      required: true
    }
  },
  data() {
    return {
      title: defaultSettings.title,
      logo: defaultSettings.logoPictureUrl
    }
  }
}
</script>
这里建议将原来写死的title为defaultSettings.title
这里建议将原来写死的logo为defaultSettings.logoPictureUrl
- 然后以后这个 title就可以通过
src/settings.js中的常量来实现全局控制
module.exports = {
  title: 'Vue2 Element Admin',
  /**
   * @type {string} your log picture url
   * @description logo picture url path
   */
  logoPictureUrl: 'https://wpimg.wallstcn.com/69a1c46c-eb1c-4b46-8bd4-e9e686ef5251.png',
  /**
   * @type {boolean} true | false
   * @description Whether show the settings right-panel
   */
  showSettings: true,

  /**
   * @type {boolean} true | false
   * @description Whether need tagsView
   */
  tagsView: true,

  /**
   * @type {boolean} true | false
   * @description Whether fix the header
   */
  fixedHeader: true,

  /**
   * @type {boolean} true | false
   * @description Whether show the logo in sidebar
   */
  sidebarLogo: true,
  /**
   * @type {string | array} 'prod' | ['prod', 'dev']
   * @description Need show err logs component.
   * The default is only used in the prod env
   * If you want to also use it in dev, you can pass ['prod', 'dev']
   */
  errorLog: 'prod'
}
效果如下:
1.3 控制设置齿轮是否显示或隐藏
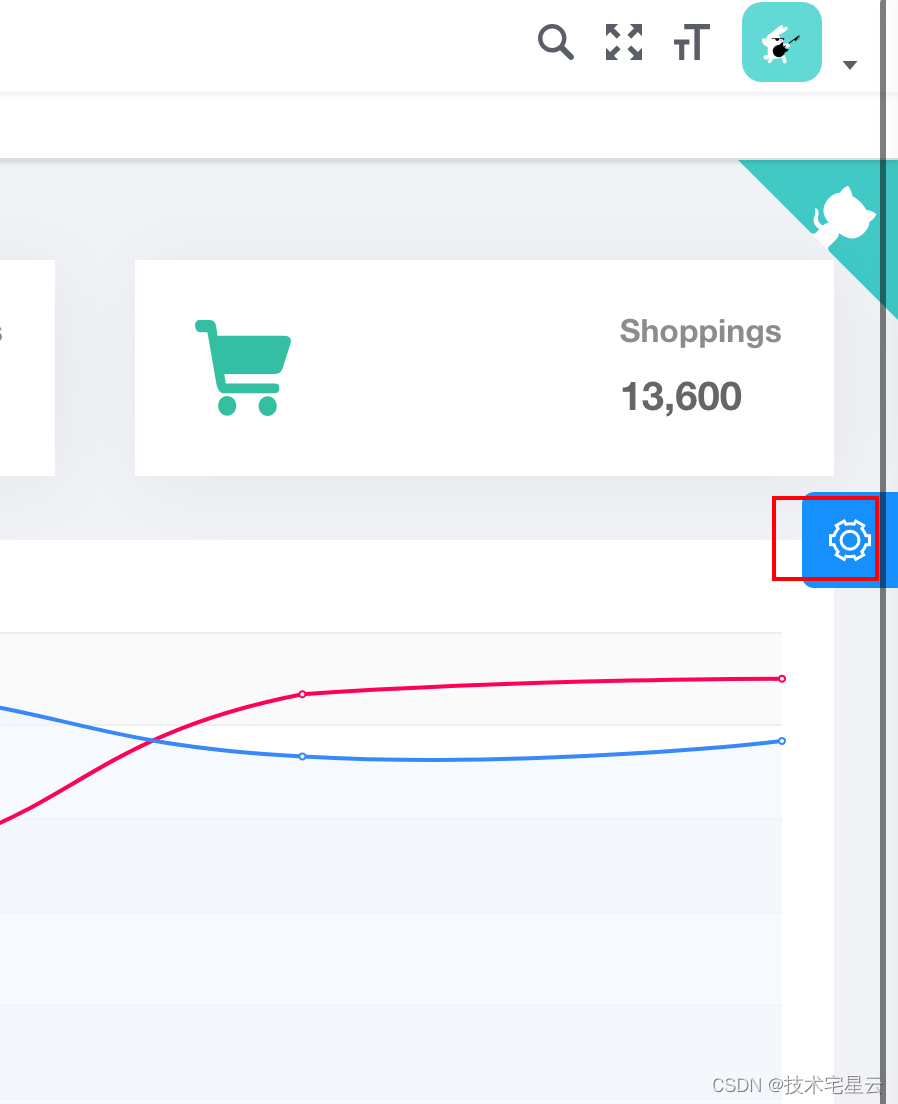
通过src/settings.js 中的常量showSettings 来实现控制设置齿轮是否显示, true 显示,false 隐藏。
module.exports = {
  title: 'Vue2 Element Admin',
  /**
   * @type {string} your log picture url
   * @description logo picture url path
   */
  logoPictureUrl: 'https://wpimg.wallstcn.com/69a1c46c-eb1c-4b46-8bd4-e9e686ef5251.png',
  /**
   * @type {boolean} true | false
   * @description Whether show the settings right-panel
   */
  showSettings: false,

  /**
   * @type {boolean} true | false
   * @description Whether need tagsView
   */
  tagsView: true,

  /**
   * @type {boolean} true | false
   * @description Whether fix the header
   */
  fixedHeader: true,

  /**
   * @type {boolean} true | false
   * @description Whether show the logo in sidebar
   */
  sidebarLogo: true,
  /**
   * @type {string | array} 'prod' | ['prod', 'dev']
   * @description Need show err logs component.
   * The default is only used in the prod env
   * If you want to also use it in dev, you can pass ['prod', 'dev']
   */
  errorLog: 'prod'
}
1.4 框架安装依赖优化脚本
项目根目录下新增如下几个脚本, 方便初始化项目,给项目安装依赖以及针对国内用户优化依赖安装速度。

- 一般用户:( Mac OSX 或 Linux 系统专用)
install-for-normal-user.sh
#!/bin/bash
npm install
- 一般用户( Windows 系统专用)
install-for-normal-user.bat
@echo off
npm install
@pause
- 国内用户优化依赖下载速度( Mac OSX 或 Linux 系统专用)
install-for-china-user.sh
#!/bin/bash
npm install --registry=https://registry.npm.taobao.org
- 国内用户优化依赖下载速度( Windows系统专用)
install-for-chian-user.bat
@echo off
npm install --registry=https://registry.npm.taobao.org
@pause
1.5 定义多环境配置文件
项目根目录下创建如下多环境配置,并依次配置前端的上下文路径

- 开发环境:开发环境是程序猿们专门用于开发的服务器,配置可以比较随意, 为了开发调试方便,一般打开全部错误报告。
- 测试环境:一般是克隆一份生产环境的配置,一个程序在测试环境工作不正常,那么肯定不能把它发布到生产机上。
- 仿真环境:顾名思义是和真正使用的环境一样的环境(即已经出售给客户的系统所在环境,也成为商用环境),所有的配置,页面展示等都应该和商家正在使用的一样,差别只在环境的性能方面。
- 生产环境:是指正式提供对外服务的,一般会关掉错误报告,打开错误日志。可以理解为包含所有的功能的环境,任何项目所使用的环境都以这个为基础,然后根据客户的个性化需求来做调整或者修改。
.env.dev
# 当前环境标识
NODE_ENV=dev
# ui context path
VUE_CONTEXT_PATH=/admin-dev-console
# base api
VUE_APP_BASE_API=/dev-api
# 仅本地需要
# 凡是匹配到/dev-api 开头的请求都反向代理给本地接口
VUE_APP_PROXY_API=http://127.0.0.1:8080/my-spring-cloud-gateway
.env.test
# 当前环境标识
NODE_ENV=test
# ui context path
VUE_CONTEXT_PATH=/admin-test-console
# base api
VUE_APP_BASE_API=/test-api
.env.sim
# 当前环境标识
NODE_ENV=sim
# ui context path
VUE_CONTEXT_PATH=/admin-sim-console
# base api
VUE_APP_BASE_API=/sim-api
.env.prod
# 当前环境标识
NODE_ENV=prod
# ui context path
VUE_CONTEXT_PATH=/admin-prod-console
# base api
VUE_APP_BASE_API=/prod-api
修改 项目根目录下的package.json 内容如下:
...
  "scripts": {
    "dev": "vue-cli-service serve --mode dev",
    "test": "vue-cli-service serve --mode test",
    "sim": "vue-cli-service serve --mode sim",
    "prod": "vue-cli-service serve --mode prod",

    "build:test": "vue-cli-service build --mode test",
    "build:sim": "vue-cli-service build --mode sim",
    "build:prod": "vue-cli-service build --mode prod",

    "lint": "eslint --ext .js,.vue src",
    "preview": "node build/index.js --preview",
    "new": "plop",
    "svgo": "svgo -f src/icons/svg --config=src/icons/svgo.yml",
    "test:unit": "jest --clearCache && vue-cli-service test:unit",
    "test:ci": "npm run lint && npm run test:unit"
  },
...
以后就可以做到:
- 运行 dev环境就执行
npm run dev- 运行test环境就执行
npm run test- 打包生产环境配置就执行
npm run build: prod
1.6 优化打包流程
我们可以用脚本简化打包过程:
Mac 用户或Linux 用户使用 package-all-env-ui.sh
#!/bin/bash
npm run build:test
npm run build:sim
npm run build:prod
Windows用户使用 package-all-env-ui.bat
@echo off
call build-test-ui.bat
call build-sim-ui.bat
call build-prod-ui.bat
@echo 'build all env ui finished!!! '
@pause
值得注意的是
- 这里我们不能直接执行命令,因为 windows shell环境由于某些原因无法同时执行多个命令。
- 如果我们想要打包完 test环境就打包sim环境,sim环境打包完就打包 prod环境。
- 那么需要通过使用 call 命令调用批处理来实现,这里踩过坑。
build-test-ui.bat 内容如下
@echo off
npm run build:test
@echo 'build test ui finished!!! '
build-sim-ui.bat 内容如下
@echo off
npm run build:sim
@echo 'build sim ui finished!!! '
build-prod-ui.bat 内容如下
@echo off
npm run build:prod
@echo 'build prod ui finished!!! '
1.7 优化打包流程输出文件路径配置
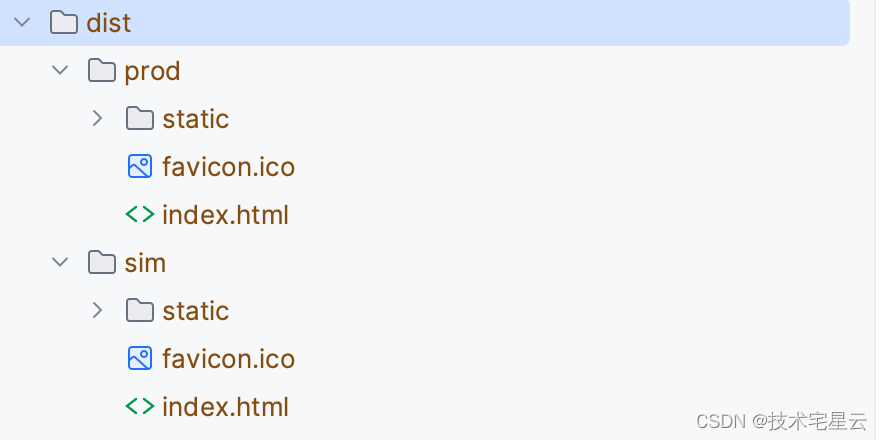
默认打包路径是/dist/xxx
如果我们打镜像时候需要打包多个环境,怎么办?总不能打包多次吧?
修改 vue.config.js 中 outputDir: 'dist/' + process.env.NODE_ENV, 详情如下:
...
  /**
   * You will need to set publicPath if you plan to deploy your site under a sub path,
   * for example GitHub Pages. If you plan to deploy your site to https://foo.github.io/bar/,
   * then publicPath should be set to "/bar/".
   * In most cases please use '/' !!!
   * Detail: https://cli.vuejs.org/config/#publicpath
   */
  publicPath: process.env.VUE_CONTEXT_PATH,
  outputDir: 'dist/' + process.env.NODE_ENV,
  assetsDir: 'static',
  lintOnSave: process.env.NODE_ENV === 'dev',
  productionSourceMap: false,
  // 本地服务器配置
  devServer: {
    port: port,
    open: true,
    overlay: {
      warnings: false,
      errors: true
    },
    // 1.本地反向代理解决跨域问题
    proxy: {
      // change xxx-api/login => mock/login
      // detail: https://cli.vuejs.org/config/#devserver-proxy
      [process.env.VUE_APP_BASE_API]: {
        target: process.env.VUE_APP_PROXY_API,
        changeOrigin: true,
        pathRewrite: {
          ['^' + process.env.VUE_APP_BASE_API]: ''
        }
      }
    },
    // 2. 禁用mock数据
    // before: require('./mock/mock-server.js')
  },
  ...
这样我们就可以打包出多个环境的配置了,输出效果如下:
1.8 nginx 配置
nginx-test.conf
events {
    worker_connections  1024;
}
daemon off;
http {
    include             mime.types;
    default_type        application/octet-stream;
    charset             utf-8;
    sendfile        on;
    keepalive_timeout  65;
    add_header Site NGINX-D;

    server {
        listen       80;
        server_name  localhost;
        access_log off;

        location / {
          add_header Access-Control-Allow-Origin *;
          root   /opt/app/html5/test;
          index  index.html index.htm;
          try_files $uri $uri/ /index.html;
          if ($request_uri ~* ^/index.html) {
            add_header Cache-Control 'no-cache, no-store';
          }
        }
    }
}
nignx-sim.conf
events {
    worker_connections  1024;
}
daemon off;
http {
    include             mime.types;
    default_type        application/octet-stream;
    charset             utf-8;
    sendfile        on;
    keepalive_timeout  65;
    add_header Site NGINX-D;

    server {
        listen       80;
        server_name  localhost;
        access_log off;

        location / {
          add_header Access-Control-Allow-Origin *;
          root   /opt/app/html5/sim;
          index  index.html index.htm;
          try_files $uri $uri/ /index.html;
          if ($request_uri ~* ^/index.html) {
            add_header Cache-Control 'no-cache, no-store';
          }
        }
    }
}
nignx-prod.conf
events {
    worker_connections  1024;
}
daemon off;
http {
    include             mime.types;
    default_type        application/octet-stream;
    charset             utf-8;
    sendfile        on;
    keepalive_timeout  65;
    add_header Site NGINX-D;

    server {
        listen       80;
        server_name  localhost;
        access_log off;

        location / {
          add_header Access-Control-Allow-Origin *;
          root   /opt/app/html5/prod;
          index  index.html index.htm;
          try_files $uri $uri/ /index.html;
          if ($request_uri ~* ^/index.html) {
            add_header Cache-Control 'no-cache, no-store';
          }
        }
    }
}
1.9 docker file 配置
FROM nginx
WORKDIR /opt/
# 复制当前项目的nginx-sim.conf配置到容器的/opt/app/nginx/conf/test/nginx.conf
# 复制当前项目的nginx-sim.conf配置到容器的/opt/app/nginx/conf/sim/nginx.conf
# 复制当前项目的nginx-prod.conf配置到容器的/opt/app/nginx/conf/prod/nginx.conf
COPY ./nginx-test.conf /opt/nginx/conf/nginx-test.conf
COPY ./nginx-sim.conf /opt/nginx/conf/nginx-sim.conf
COPY ./nginx-prod.conf /opt/nginx/conf/nginx-prod.conf
# 复制所有UI页面到容器的 /opt/html/
# /opt/app/html5/test/index.html
# /opt/app/html5/sim/index.html
# /opt/app/html5/prod/index.html
COPY dist/ /opt/app/html5/

# 复制脚本
COPY cloudserver.sh /opt/
# 当前不支持打镜像的时候打包,打包必须本地打包
RUN ['sh','check-build-nodejs-image.sh']
CMD ["sh","cloudserver.sh"]
为了避免打包失败,然后错误部署,我们增加一个检测脚本:
check-build-nodejs-images.sh
#!/bin/bash
# 检查test文件夹是否为空
dir_sim_path="/opt/app/html5/test/"
if [ ! -d $dir_test_path ]; then
    echo "前端项目-预发环境-未打包,[/opt/app/html5/test/]文件夹不存在"
    exit 0
fi

# 检查sim文件夹是否为空
dir_sim_path="/opt/app/html5/sim/"
if [ ! -d $dir_sim_path ]; then
    echo "前端项目-预发环境-未打包,[/opt/app/html5/sim/]文件夹不存在"
    exit 0
fi

# 检查prod文件夹是否为空
dir_prod_path="/opt/app/html5/prod/"
if [ ! -d $dir_prod_path ]; then
    echo "前端项目-生产环境-未打包,[/opt/app/html5/prod/]文件夹不存在"
    exit 0
fi

echo 'vue nodejs package checked pass !!!'
cloudserver.sh
#!/bin/bash
echo $*
echo 'options single-request-reopen' >> /etc/resolv.conf
# 启动nginx
/opt/nginx/sbin/nginx -c  /opt/nginx/conf/nginx-${CONF_ENV}.conf
2. 代码地址
- 后续更多改造维护内容见https://github.com/geekxingyun/smart-vue2-element-admin-ui





![LeetCode[164]最大间距](https://img-blog.csdnimg.cn/408503ed1e8d4850ae7bf9361ff37477.png)
