目录
一、驱动程序编写流程
二、代码编写
2.1 驱动程序hello_drv.c
2.2 测试程序
2.3 编写驱动程序的Makefile
三、上机实验
3.1 NFS 挂载
3.2 测试示例
一、驱动程序编写流程
-
构造file_operations结构体
-
在里面填充open/read/write/ioctl成员
-
注册file_operations结构体 int major = register_chrdev(0, "name", &fops);
-
入口函数:调用regiister_chrdev
-
出口函数:调用unregiister_chrdev
-
辅助信息: class_create/class_destroy device_create/device_destroy
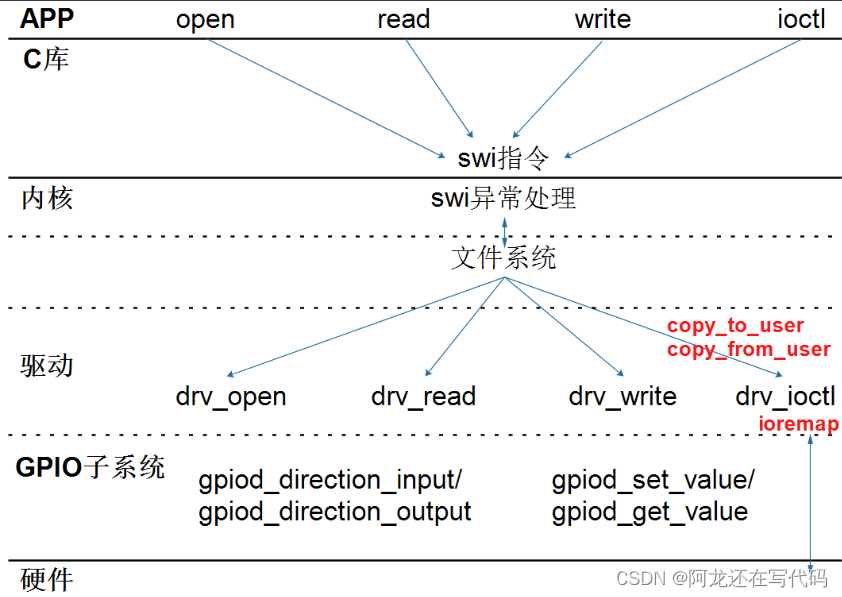
总结:应用程序调用open/read/write/ioctl,驱动程序就给你提供对应的open/read/write/ioctl,只不过驱动程序的这些函数为了便于管理,故把函数放在file_operations结构体里面,通过 register_chrdev函数把结构体告诉内核,并注册字符设备驱动程序。驱动程序里面有个入口函数,相当于main函数,是装载驱动程序时调用的函数,在入口函数中注册,把结构体放到chrdevs数组里面来,出口函数中反注册,就是把结构体拿掉,在卸载驱动程序时调用的函数。
二、代码编写
2.1 驱动程序hello_drv.c
参考 driver/char 中的程序,包含头文件,写框架,传输数据:
- 驱动中实现 open, read, write, release, APP 调用这些函数时,都打印内核信息
- APP 调用 write 函数时,传入的数据保存在驱动中
- APP 调用 read 函数时,把驱动中保存的数据返回给 APP
- 需要注意的是,驱动程序和应用程序之间数据传递要使用copy_from_user(hello_buf, buf, len)和copy_to_user(buf, hello_buf, len)
-
class_create和device_create这两个函数为我们创建了设备节点、主次设备号等辅助信息就不用手动创建设备节点了 mknod /dev/xyz c 245 0
-
class_create(THIS_MODULE, "hello_class"),创建类:为这个模块创建类,类名叫hello_class
-
device_create(hello_class, NULL, MKDEV(major, 0), NULL, "hello"),在类下面创建设备信息:在hello_class下创建设备,没有父亲NULL,主次设备号,无私有数据NULL,格式hello根据这些信息,系统会为我们创建设备节点,设备节点名字是/dev/hello,和上面的类名无关
-
device_destroy(hello_class, MKDEV(major, 0))销毁hello_class类下面的这个设备(由主次设备号确定)
-
class_destroy(hello_class)销毁hello_class类
#include "asm/cacheflush.h"
#include <linux/mm.h>
#include <linux/module.h>
#include <linux/miscdevice.h>
#include <linux/slab.h>
#include <linux/vmalloc.h>
#include <linux/mman.h>
#include <linux/random.h>
#include <linux/init.h>
#include <linux/raw.h>
#include <linux/tty.h>
#include <linux/capability.h>
#include <linux/ptrace.h>
#include <linux/device.h>
#include <linux/highmem.h>
#include <linux/backing-dev.h>
#include <linux/shmem_fs.h>
#include <linux/splice.h>
#include <linux/pfn.h>
#include <linux/export.h>
#include <linux/io.h>
#include <linux/uio.h>
#include <linux/uaccess.h>

static struct class *hello_class;
static int major;
static unsigned char hello_buf[100];

static int hello_open (struct inode *node, struct file *filp)
{
    printk("%s %s %d\n", __FILE__, __FUNCTION__, __LINE__);
    return 0;
}

static ssize_t hello_read (struct file *filp, char __user *buf, size_t size, loff_t *offset)
{
    unsigned long len = size > 100 ? 100 : size;
    printk("%s %s %d\n", __FILE__, __FUNCTION__, __LINE__);
    copy_to_user(buf, hello_buf, len);
    return len;
}

static ssize_t hello_write(struct file *filp, const char __user *buf, size_t size, loff_t *offset)
{
    unsigned long len = size > 100 ? 100 : size;
    printk("%s %s %d\n", __FILE__, __FUNCTION__, __LINE__);
    copy_from_user(hello_buf, buf, len);
    return len;
}

static int hello_release (struct inode *node, struct file *filp)
{
    printk("%s %s %d\n", __FILE__, __FUNCTION__, __LINE__);
    return 0;
}

/* 1. create file_operations */
static const struct file_operations hello_drv = {
    .owner      = THIS_MODULE,
	.read		= hello_read,
	.write		= hello_write,
	.open		= hello_open,
    .release    = hello_release,
};


/* 2. register_chrdev */

/* 3. entry function */
static int hello_init(void)
{
    major = register_chrdev(0, "100ask_hello", &hello_drv);

	hello_class = class_create(THIS_MODULE, "hello_class");
	if (IS_ERR(hello_class)) {
		printk("failed to allocate class\n");
		return PTR_ERR(hello_class);
	}

    device_create(hello_class, NULL, MKDEV(major, 0), NULL, "hello");  /* /dev/hello */

    return 0;
}


/* 4. exit function */
static void hello_exit(void)
{

    device_destroy(hello_class, MKDEV(major, 0));
    class_destroy(hello_class);

    unregister_chrdev(major, "100ask_hello");
}


module_init(hello_init);
module_exit(hello_exit);
MODULE_LICENSE("GPL");
2.2 测试程序
测试程序要实现读、写功能:
./hello_test /dev/xxx abcdef     // 把字符串“abcdeft”发给驱动程序
./hello_test /dev/xxx            // 把驱动中保存的字符串读回来
hello_drv_test.c源码如下
#include <sys/types.h>
#include <sys/stat.h>
#include <fcntl.h>
#include <unistd.h>
#include <stdio.h>
#include <string.h>

/* 写: ./hello_test /dev/xxx 100ask
 * 读: ./hello_test /dev/xxx
 */
int main(int argc, char **argv)
{
    int fd;
    int len;
    char buf[100];

    if (argc < 2)
    {
        printf("Usage: \n");
        printf("%s <dev> [string]\n", argv[0]);
        return -1;
    }

    // open
    fd = open(argv[1], O_RDWR);
    if (fd < 0)
    {
        printf("can not open file %s\n", argv[1]);
        return -1;
    }

    if (argc == 3)
    {
        // write
        len = write(fd, argv[2], strlen(argv[2])+1);
        printf("write ret = %d\n", len);
    }
    else
    {
        // read
        len = read(fd, buf, 100);
        buf[99] = '\0';
        printf("read str : %s\n", buf);
    }

    // close
    close(fd);
    return 0;
}
2.3 编写驱动程序的Makefile
驱动程序中包含了很多头文件,这些头文件来自内核,不同的 ARM 板它的某些头文件可能不同。所以编译驱动程序时,需要指定板子所用的内核的源码路径。要编译哪个文件?这也需要指定,设置 obj-m 变量即可怎么把.c 文件编译为驱动程序.ko?这要借助内核的顶层 Makefile。
本驱动程序的 Makefile 内容如下:

KERN_DIR = /home/me/Linux-4.9.88 :指定内核目录
先设置好交叉编译工具链,编译好你的板子所用的内核,然后修改 Makefile指定内核源码路径,最后即可执行make命令编译驱动程序和测试程序。 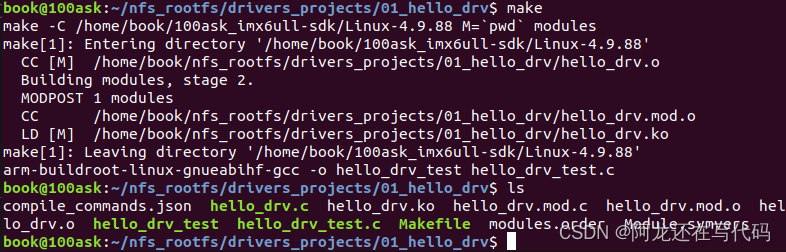
三、上机实验
3.1 NFS 挂载
我们是在 Ubuntu 中编译程序,但是需要在 ARM 板子上测试。所以需要把程序放到 ARM 板子上。启动单板后,可以通过 NFS 挂载 Ubuntu 的某个目录,访问该目录中的程序。
ifconfig eth0 192.168.5.9                    //静态配置开发板ip地址
mount -t nfs -o nolock,vers=3 192.168.5.11:/home/book/nfs_rootfs /mnt //挂载到开发板上的mnt目录下
echo "7 4 1 7" > /proc/sys/kernel/printk     //打开内核打印信息

3.2 测试示例
首先在开发板的mnt目录下查看文件是否挂载成功,当前目录下以及有了Ubuntu编译好的驱动程序和测试文件

insmod hello_drv.ko   // 安装驱动程序
ls /dev/hello -l      // 驱动程序会生成设备节点
./hello_drv_test      // 查看测试程序的用法
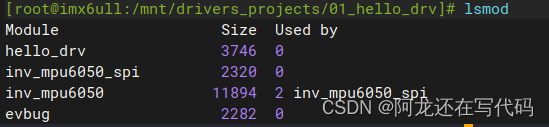
显示已载入系统的模块
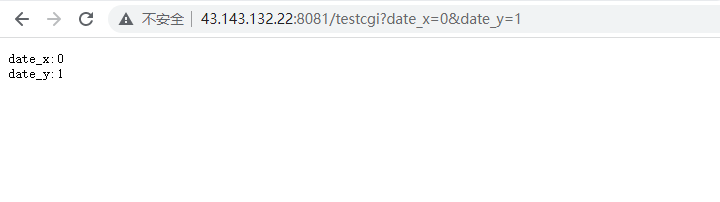
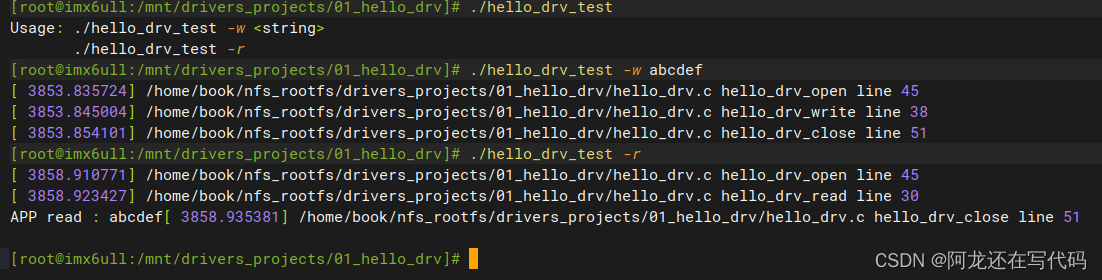
查看测试程序用法,并写入字符串"abcdef"后读出,测试结果如下:

![P1398 [NOI2013] 书法家](https://img-blog.csdnimg.cn/ddbd2ef3710e453488bce5295e6c0675.png)