文章目录
- 🐒个人主页
- 🏅JavaEE系列专栏
- 📖前言:
- 【🎇前端】先创建Vue-cli项目(版本2.6.10,仅包含babel),请选择此项目并创建
- 【整理简化项目模板】
- 【🎀创建路由】
- 打开命令行工具,进入你的项目目录,输入下面命令。并回车下载
- 1.在src路径下创建 router 目录~创建 index.js 文件,在其中配置路由
- 2.在🧸APP.vue中添加路由视图
- 3.在🧸 main.js 中配置路由
- 【🎀配置Element UI】
- 【🏨创建组件并利用 Element UI修饰】
- 【🎀如何使背景图片最大自适应】
- 【🎀登录组件模板】
- 【🎀注册组件模板】
- 【🎇前端配置】
- 安装ajax(异步请求)之axios---网络请求库.
- 🎀在main.js中导入
- 【🎀创建后端项目+数据库,先完成注册与登陆功能】
- 1.在idea中创建一个项目,然后右键单击
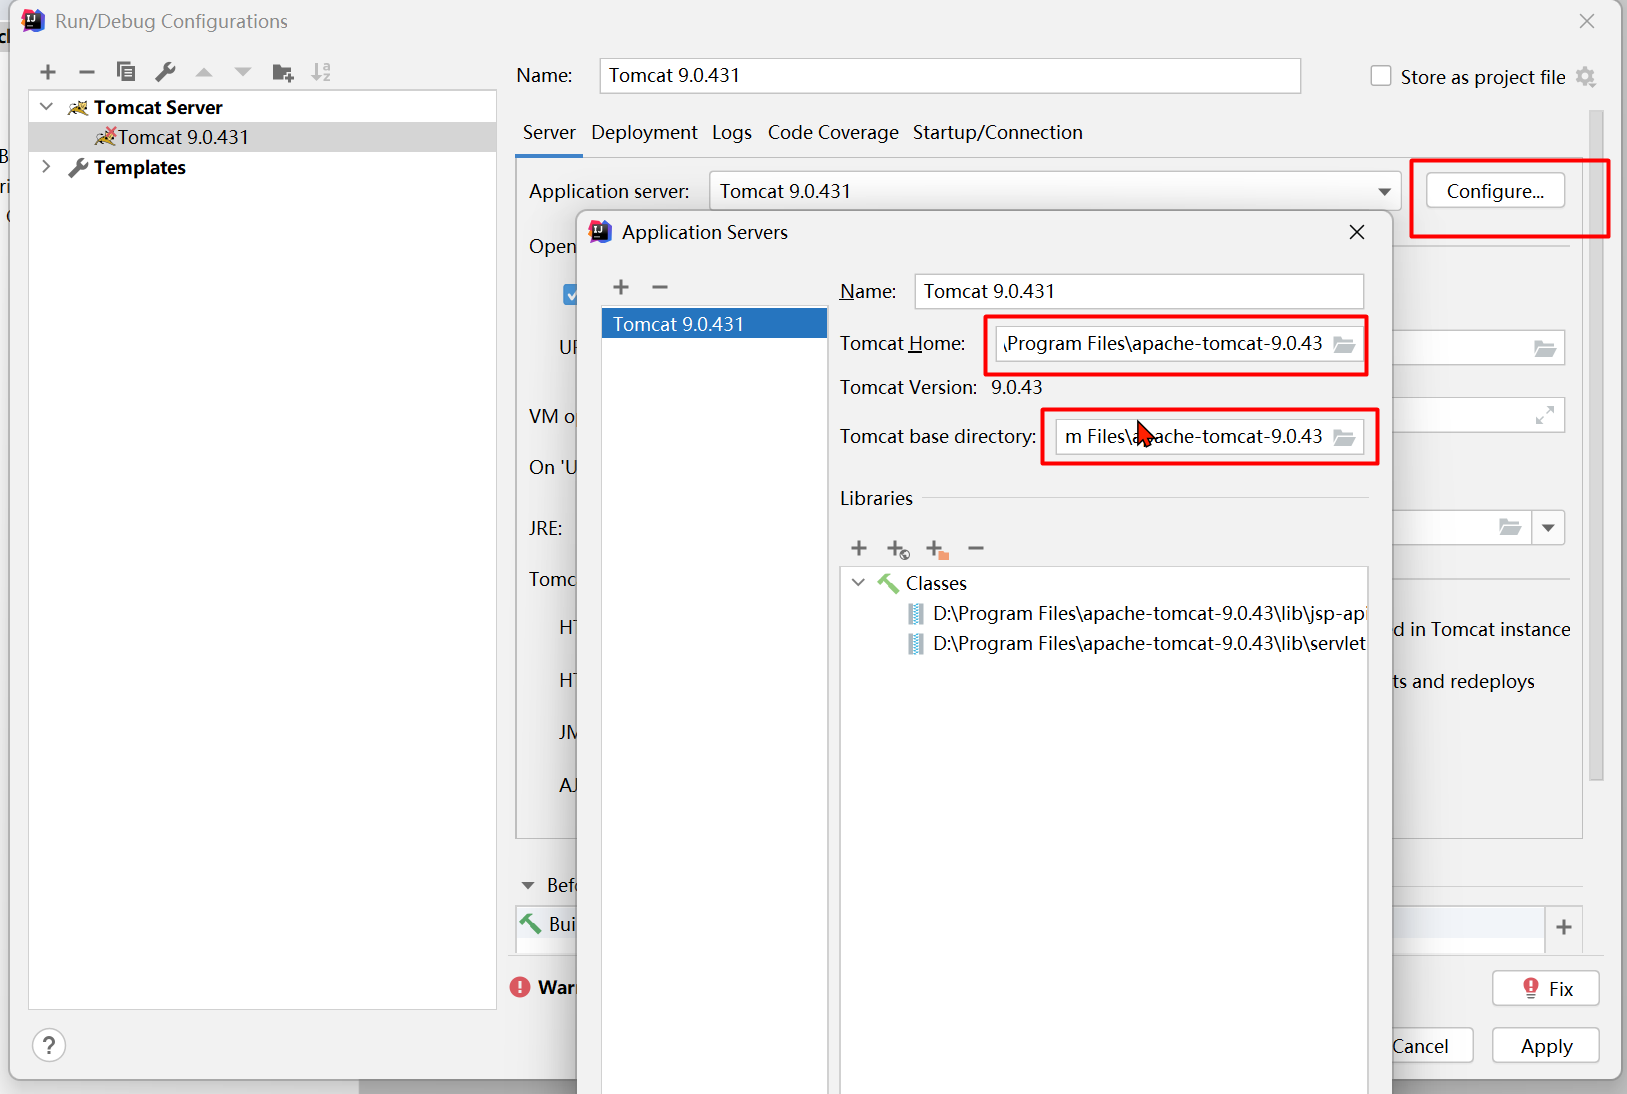
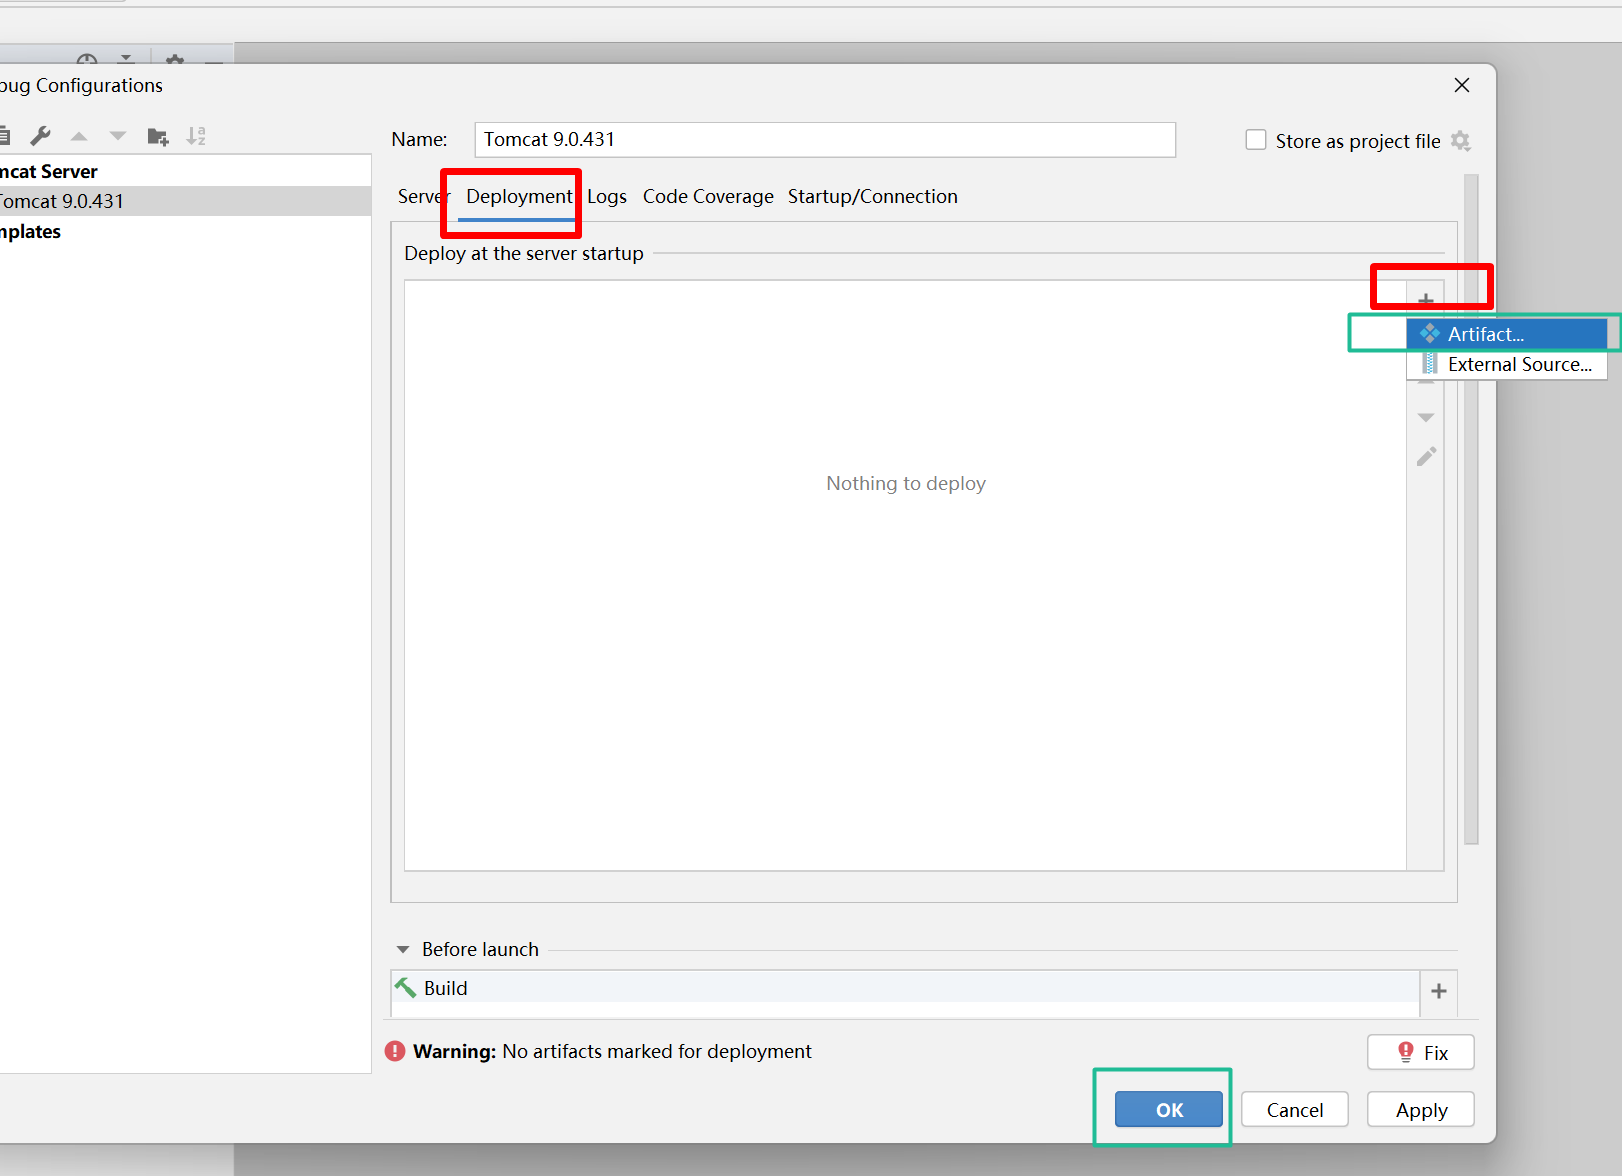
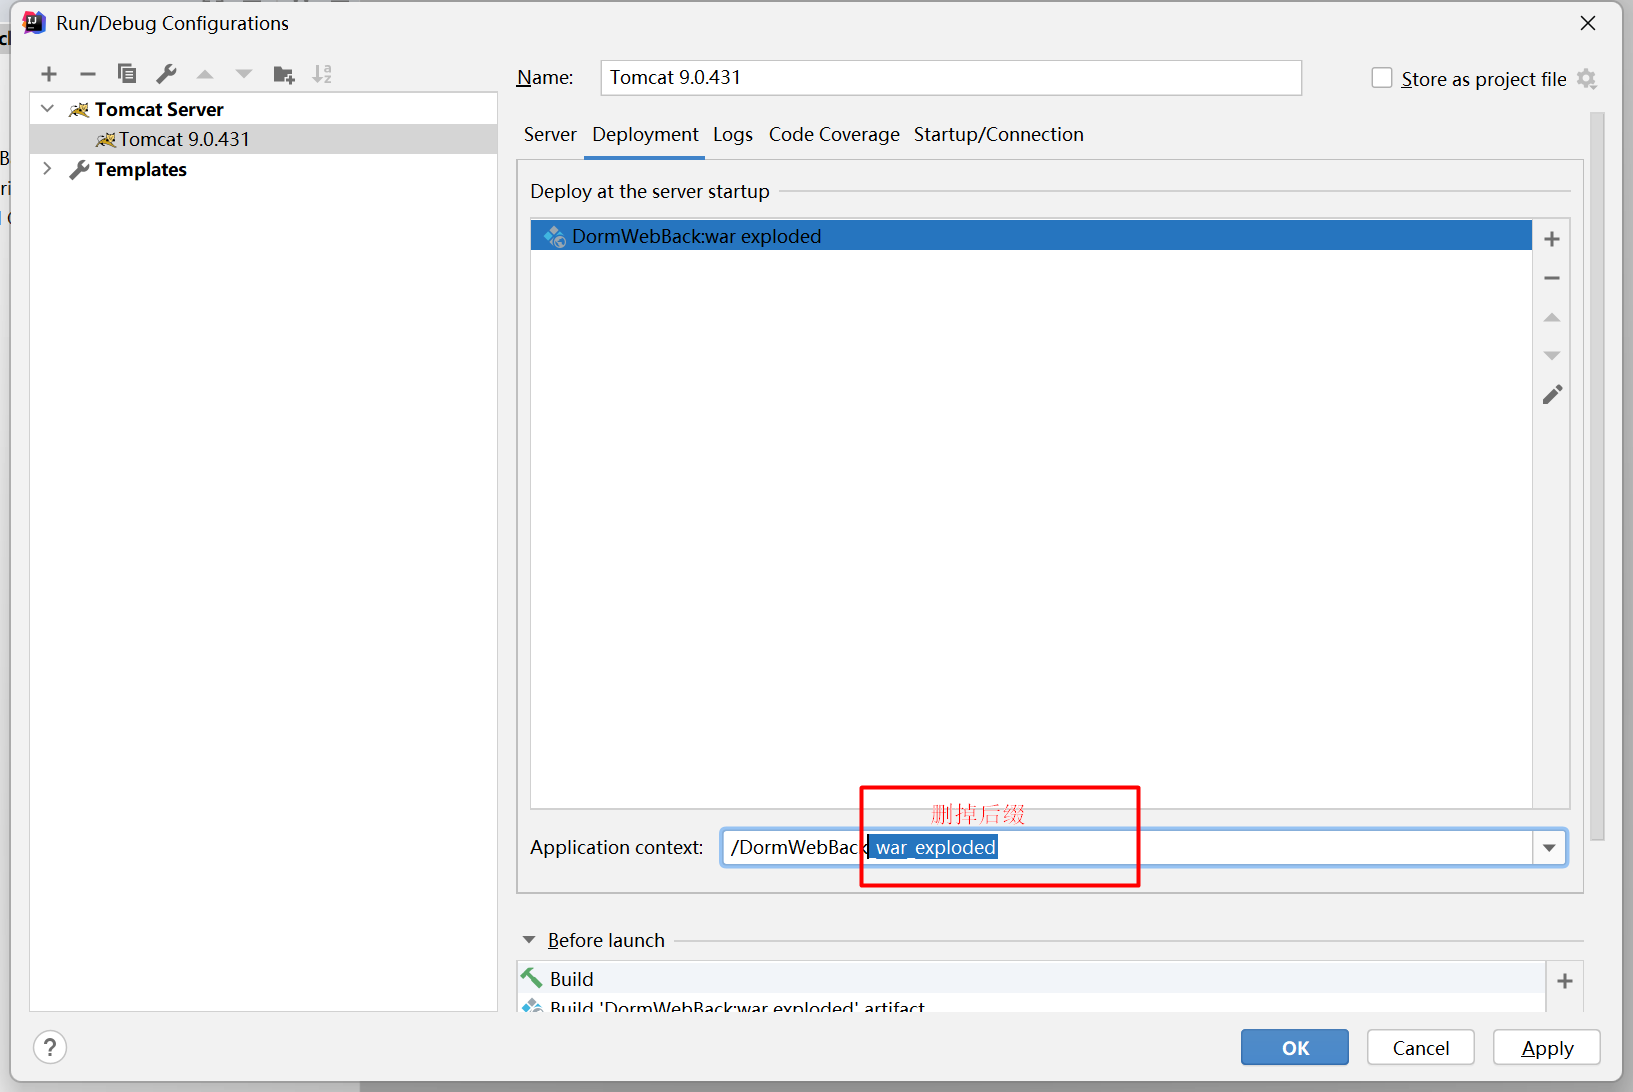
- 2.配置后端服务器tomcat
- 3.创建处理程序,导入jar包
- 🏨[这是需要导入的jar包下载地址---阿里云盘](https://www.aliyundrive.com/s/gox2K1pR8RL)
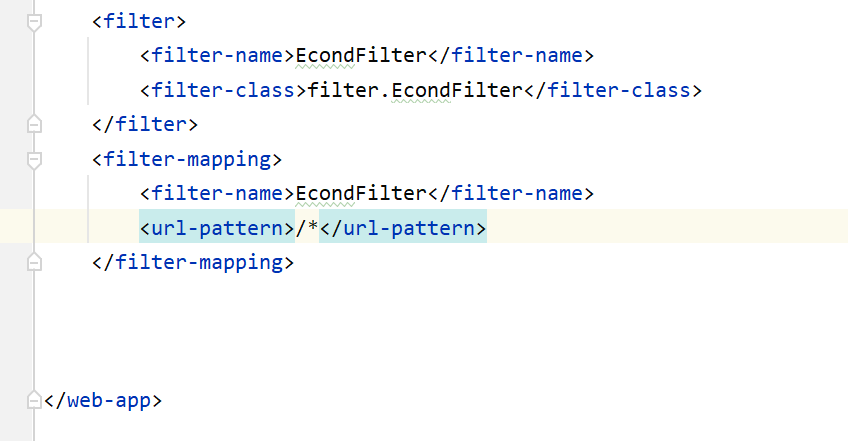
- 记得配置servlet处理程序的地址,配置xml文件时,记得在标签里面写,优先配置编码过滤器EcondFilter
- 🧸创建公共类(记得util包中定义commentResoult类)
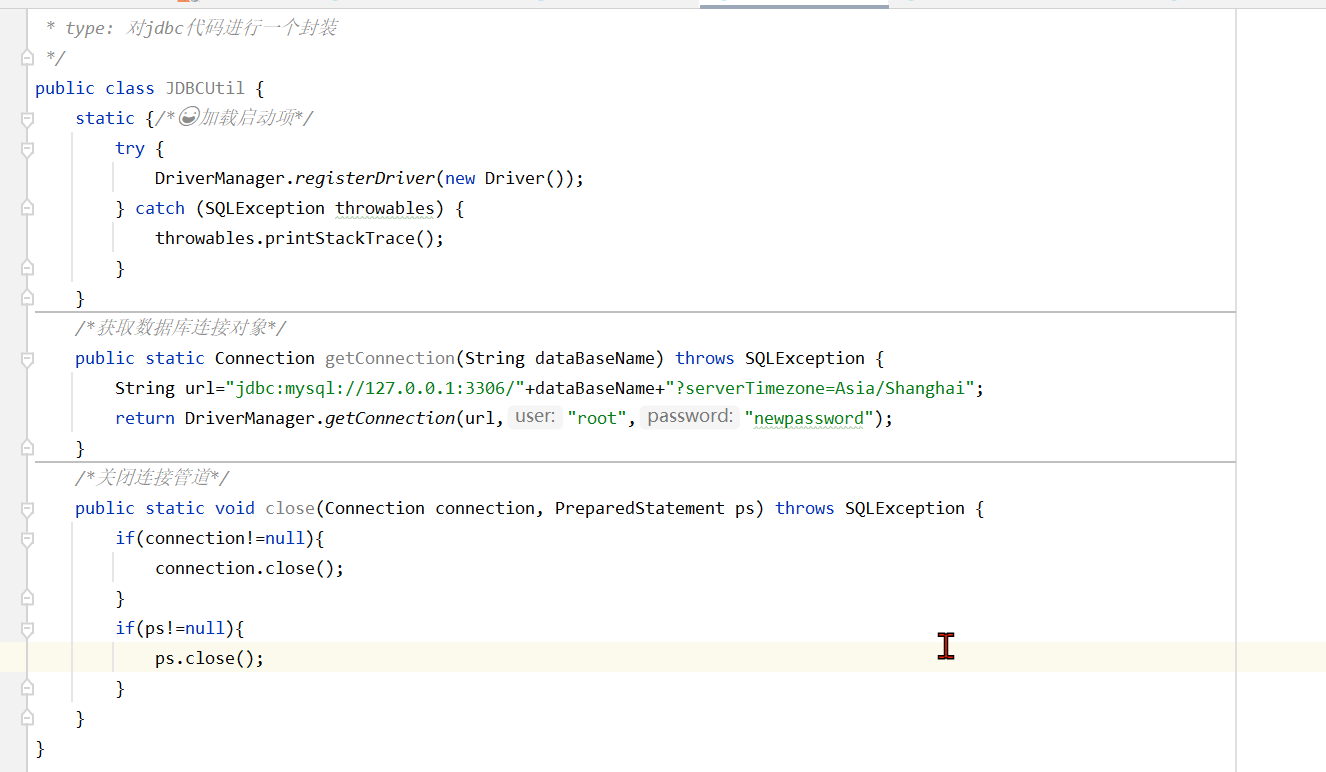
- 🧸可以在util包中定义JDBC的封装类(使代码更加简洁)
- 🏅【采用json格式的打印】
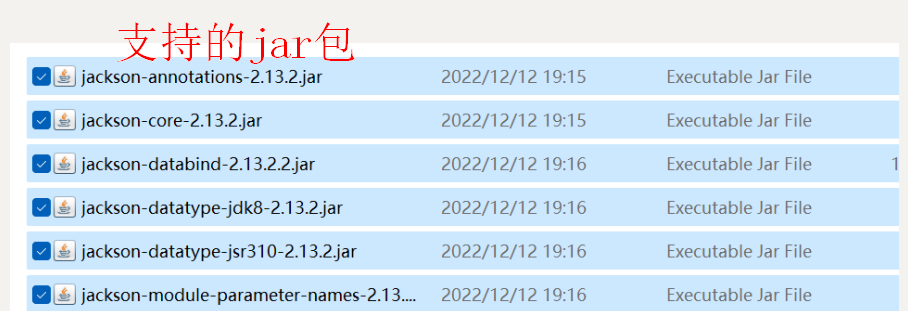
- 🪂后端借助ObjectMapper类将对象转为json格式的字符串
- 🪂【前端发送数据时,由于axios发出的异步请求格式为json格式,利用jsonToString()方法转为默认键值对格式】
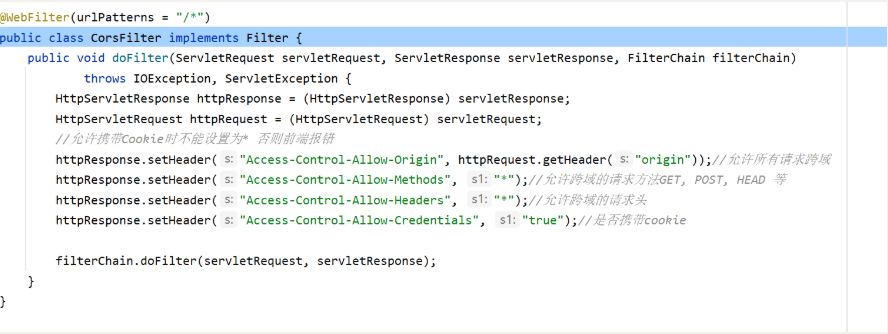
- 🧸如果使用前端ajax的axios,后端记得使用“跨域请求声明”
- 🎀【🐒持续更新中...】
🐒个人主页
🏅JavaEE系列专栏
📖前言:
本篇博客主要以巩固前后端分离式项目架构流程,通过开发一个宿舍管理系统为例,系统地梳理所学知识以及提高业务逻辑能力,欢迎大家来交流经验🐒
【🎇前端】先创建Vue-cli项目(版本2.6.10,仅包含babel),请选择此项目并创建

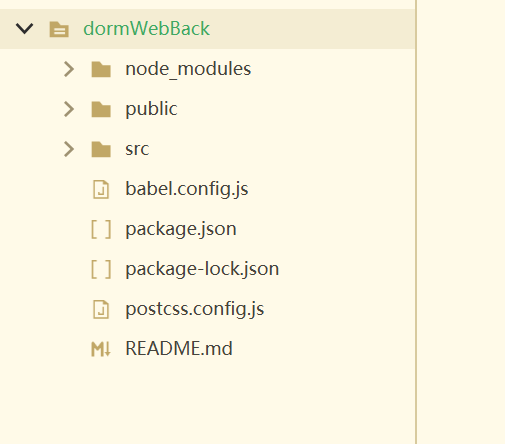
这个是创建完成后的样子
执行npm run serve命令,按回车进入浏览器,生成此页面,说明项目创建完成·
![[外链图片转存失败,源站可能有防盗链机制,建议将图片保存下来直接上传(img-vLvKFhdA-1685517220725)(../AppData/Roaming/Typora/typora-user-images/1685279544519.png)]](https://img-blog.csdnimg.cn/961b36682b2c437e8cbaf432a05a42e2.png)
【整理简化项目模板】
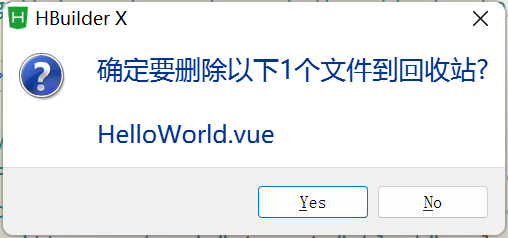
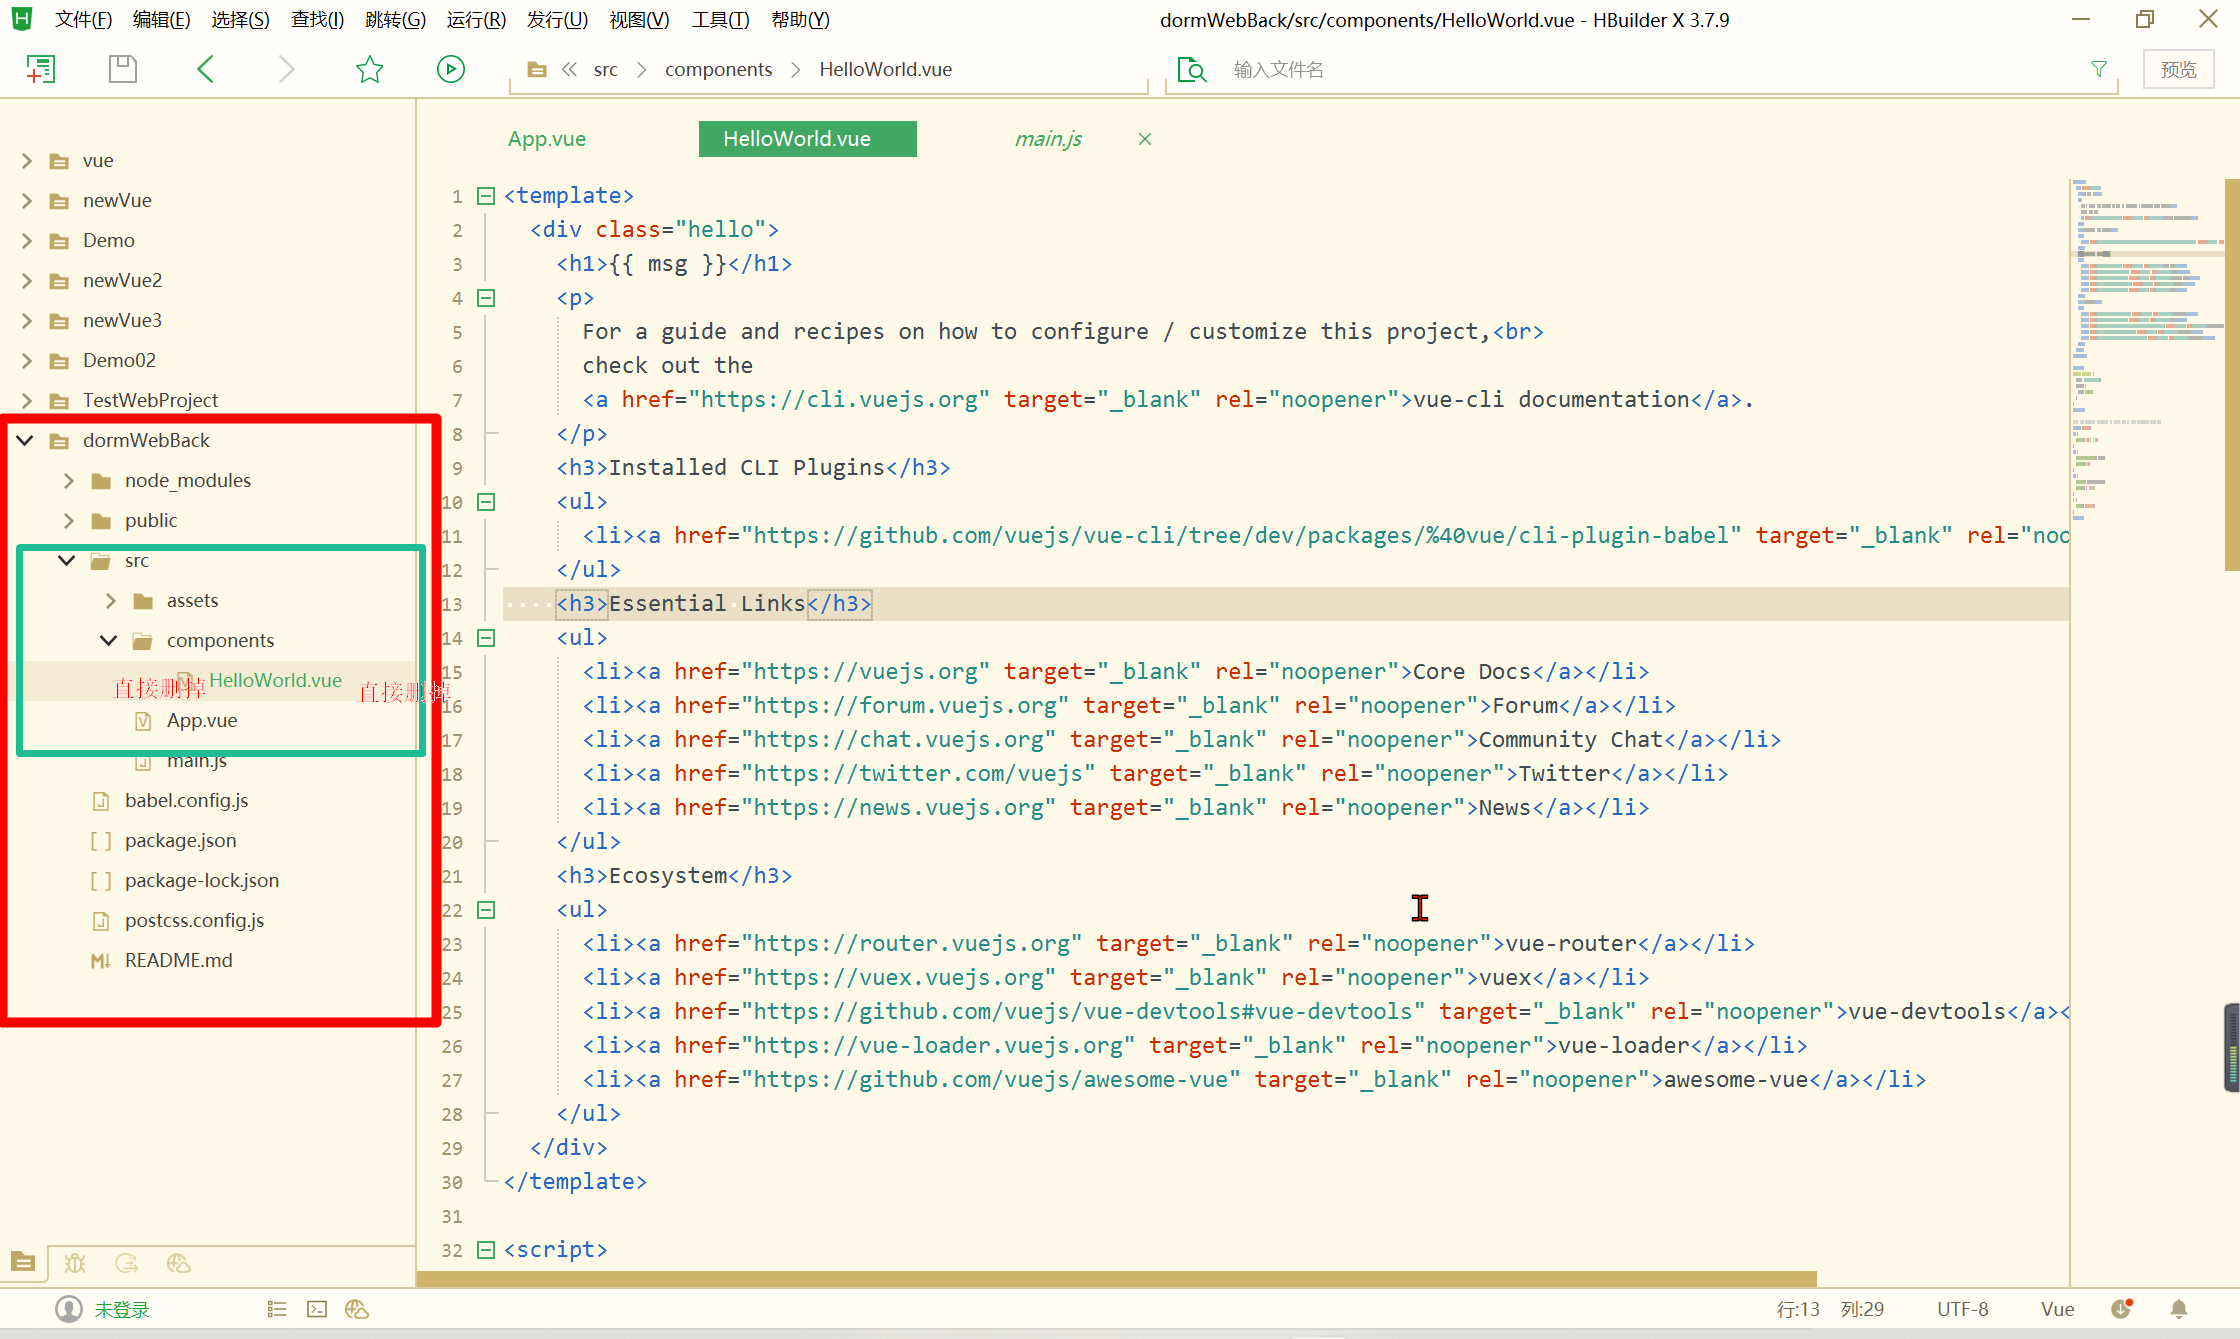
1.直接删掉components文件下的HelloWorld.vue组件
2.清理APP.vue默认组件内容:
【🎀创建路由】
打开命令行工具,进入你的项目目录,输入下面命令。并回车下载
npm i vue-router@3.5.3


1.在src路径下创建 router 目录~创建 index.js 文件,在其中配置路由

【🧸在index.js配置】
import Vue from 'vue';
import router from 'vue-router'; /* 导入路由 */
import login from '../views/login'; /* 导入其他组件--【回头得改!】 */
import content from '../components/content'; /* 导入其他组件【回头得改!】 */
Vue.use(router)


/* 定义组件路由 */
var rout = new router({
	routes: [{
			path: '/index',
			name: 'index',
			component: index
		},
		{
			path: '/content',
			component: content
		}
	]
})

//导出路由对象
export default rout;
2.在🧸APP.vue中添加路由视图
<!-- 【路由组件】显示不同组件,就像一个画布 -->
    <router-view/>

3.在🧸 main.js 中配置路由
/* 【导入路由】 */
import router from './router/index.js'
Vue.use(router);

new Vue({//【一个Vue对象】
	render: h => h(App),
	router,
}).$mount('#app')
【🎀配置Element UI】
🦓安装 Element UI
npm i element-ui -S
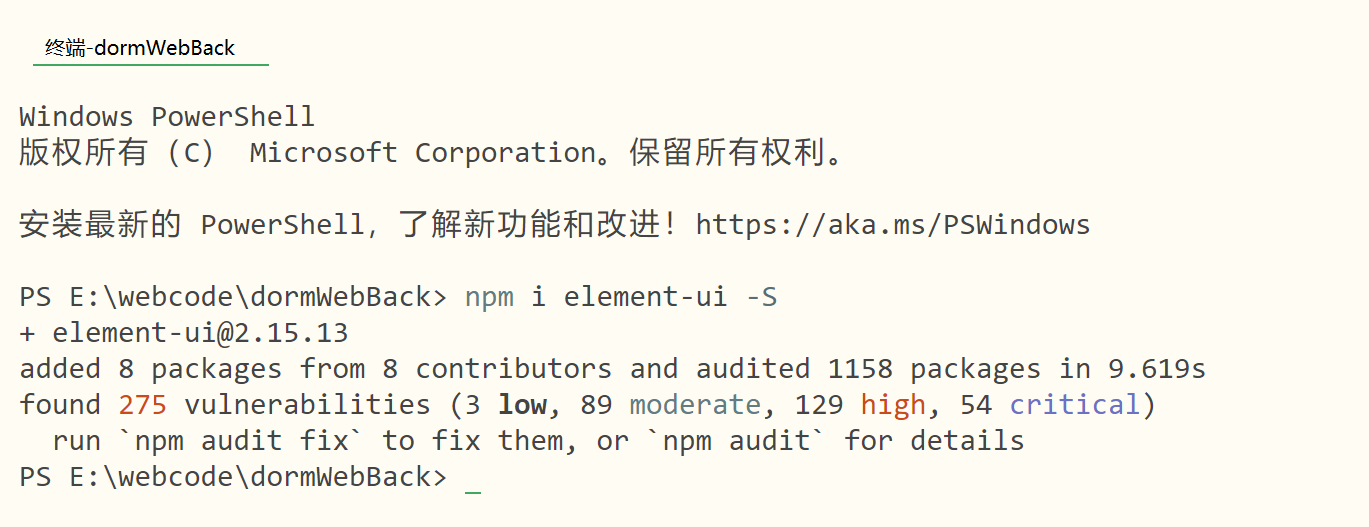
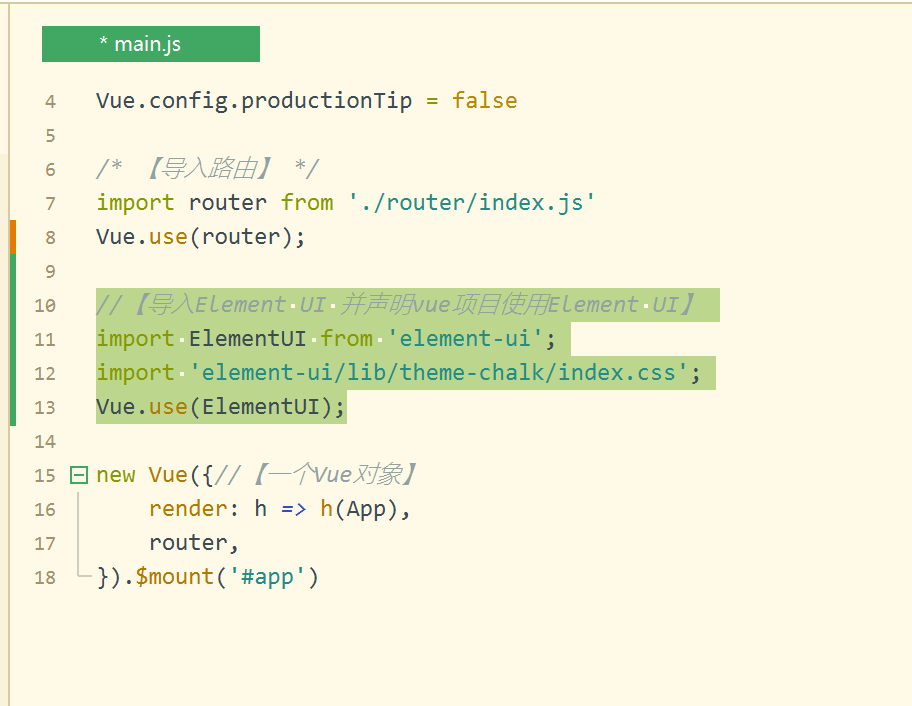
🪂在 main.js 中写入以下内容:
//【导入Element UI 并声明vue项目使用Element UI】
import ElementUI from 'element-ui';
import 'element-ui/lib/theme-chalk/index.css';
Vue.use(ElementUI);
🦓进入 Element UI官网网站
https://element.eleme.cn/#/zh-CN
【🏨创建组件并利用 Element UI修饰】
1.在src路径components路径下创建组件login.vue,注意:《template》《/template》中只能有一个根标签《div》《/div》(就是可以理解为所有标签写在根标签div的里面)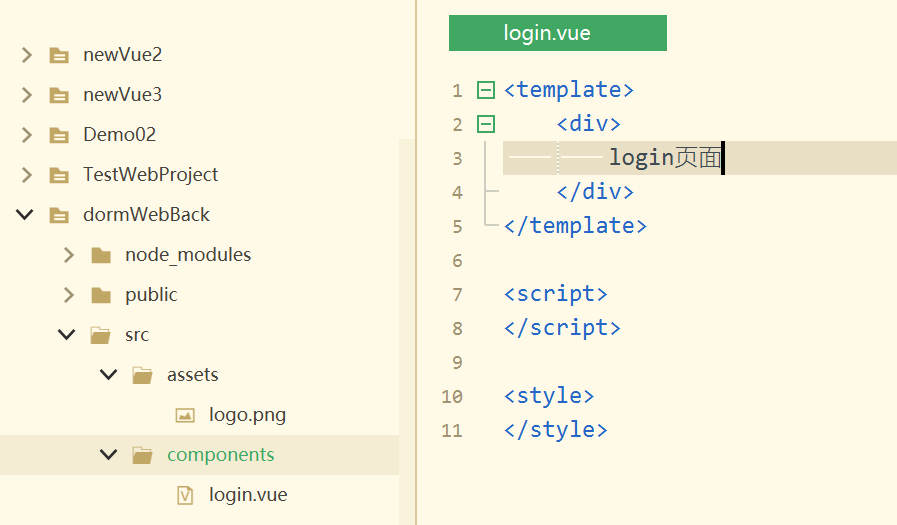
2.在index.js中导入该组件

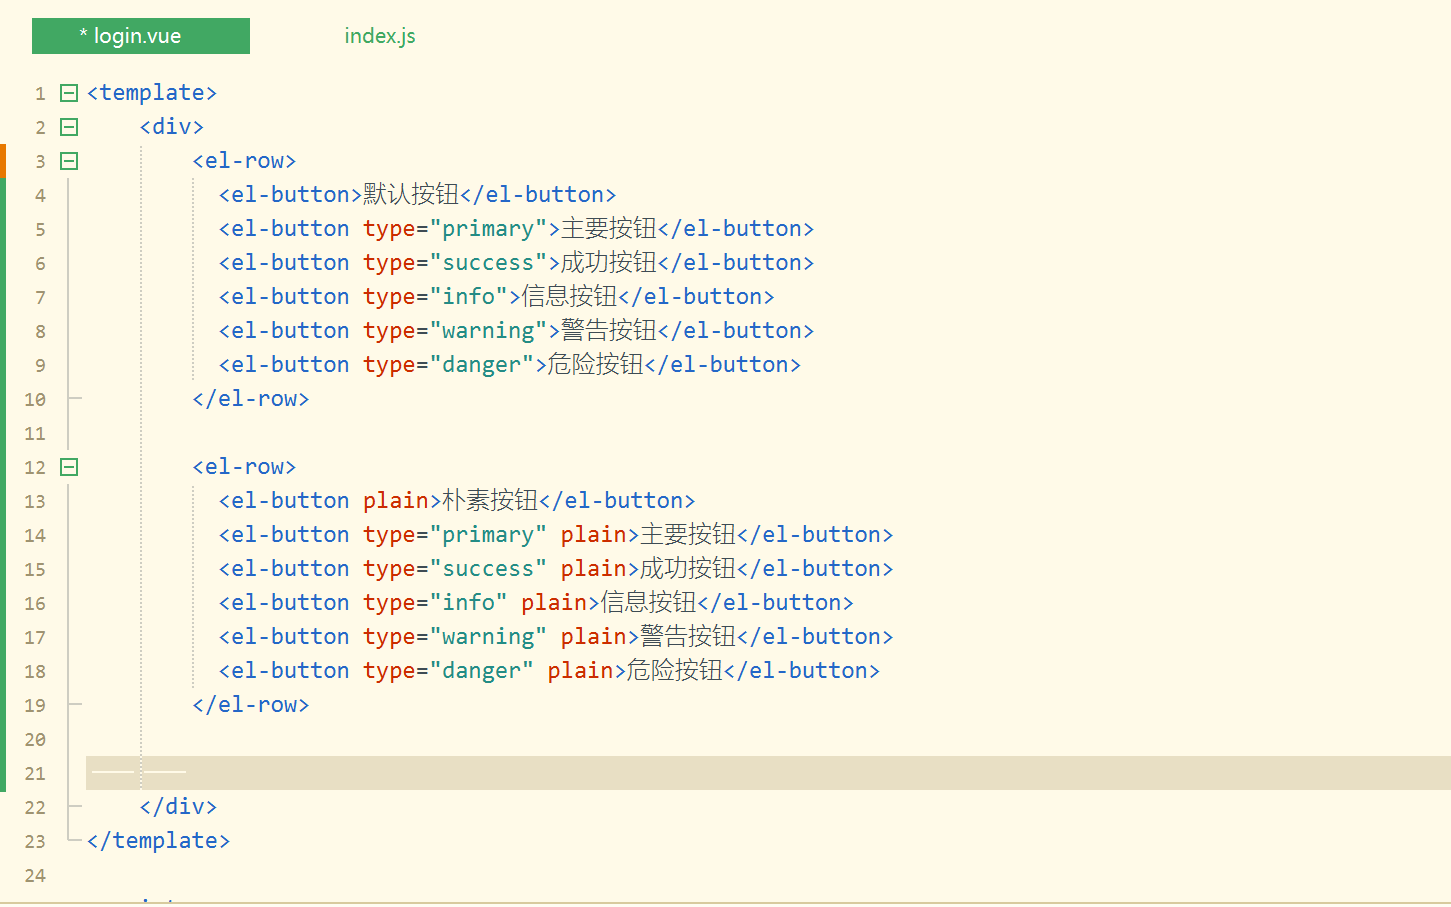
3.利用 Element UI修饰

【🎀如何使背景图片最大自适应】
#divbox{
		width: 100%;
		  height: 100vh;
		  background-image: url("[图片链接]"); /*将图片路径替换为你自己的图片路径*/
		  background-size: cover; /*保持图片比例并完全覆盖元素*/
		  background-position: center center; /*将图片居中对齐*/
	}

【🎀登录组件模板】
<template>
<div id="divbox">
<!-- 【此图像是圆圈头像logo】 -->
<img src="https://ts1.cn.mm.bing.net/th/id/R-C.3aeeb6d5725738095a7ad521d46ce428?rik=prLV4puYz%2btYuw&riu=http%3a%2f%2fwww.gx8899.com%2fuploads%2fallimg%2f2018021008%2fjrmgrhcgro0.jpg&ehk=Im%2fy1GA0xuqdwYNnKtzfue2b09jzjym4jjUXy7e0Seo%3d&risl=&pid=ImgRaw&r=0"
alt="Your Image">
<div class="login-form">
<div id="logo">
<span style="font-family: 'Microsoft YaHei';letter-spacing: 0.5px; font-weight: bold; font-size: 40px;">
<span style="color:#4F5155"> 欢迎登录</span><span style="color:rgb(137, 204, 255) ;">宿舍管理系统</span>
</span>
</div>
<el-form ref="form" :rules="rules" :model="form" label-width="80px">
<el-form-item label="用户名" prop="account">
<el-input v-model="form.account" class="input"></el-input>
</el-form-item>
<el-form-item label="密码" prop="password">
<el-input type="password" v-model="form.password" class="input"></el-input>
</el-form-item>
<el-form-item>
<el-button type="primary" @click="onSubmit('form')" style="width: 300px;">登录</el-button>
<br />
<span style="color: #006A5A;" @click="reg()">没有账号?点击注册</span>
</el-form-item>
</el-form>
</div>
</div>
</template>
<script>
export default {
data() {
return {
form: {
account: '',
password: '',
},
rules: {
account: [
{ required: true, message: '请输入账户', trigger: 'blur' },
{ min: 3, max: 5, message: '长度在 3 到 10 个字符~', trigger: 'blur' }
],
password: [
{ required: true, message: '请输入密码', trigger: 'blur' },
{ min: 3, max: 5, message: '长度在 1 到 10 个字符~', trigger: 'blur' }
],
}
}
},
methods: {
reg() {
alert("注册");
},
onSubmit(form) {//【登录】
//数据向后端发送进行验证
//$refs是一个引用
this.$refs[form].validate((valid) => {
if (valid) {
//如果发送成功,跳转到其他组件
//【跳转语句】
this.$message({showClose: true,message: '恭喜你,账户正确✔',type: 'success'});
/* this.$message({showClose: true,message: '输入的账户或密码错误~', type: 'error'});
this.$message({showClose: true,message: '系统忙,维修人员正在抢修!',type: 'warning'}); */
}
});
}
}
}
</script>
<style>
#divbox {
width: 100%;
height: 100vh;
/*将🎀页面背景 图片路径替换为你自己的图片路径*/
background-image: url("https://ts1.cn.mm.bing.net/th/id/R-C.b923d0630782b4e46dcbb2121b22bdbf?rik=l7wVr9wcUyyTzw&riu=http%3a%2f%2fpic.bizhi360.com%2fbbpic%2f68%2f768.jpg&ehk=anhoZ%2fxmeecIhRHc2n9reoQbtJ2xXrvIEx0sJbLLMiI%3d&risl=&pid=ImgRaw&r=0");
/*保持图片比例并完全覆盖元素*/
background-size: cover;
background-position: center center;
/*将图片居中对齐*/
}
.login-form {
width: 442px;
height: 400px;
background-color: rgba(248, 242, 235, 0.5);
;
position: relative;
left: 455px;
top: 170px;
}
#logo {
width: 100%;
height: 60px;
/* background-color: aquamarine; */
margin-bottom: 60px;
}
.input {
max-width: 300px;
}
img {
border-radius: 50%;
width: 100px;
position: absolute;
left: 638px;
top: 50px;
}
</style>
【🎀注册组件模板】
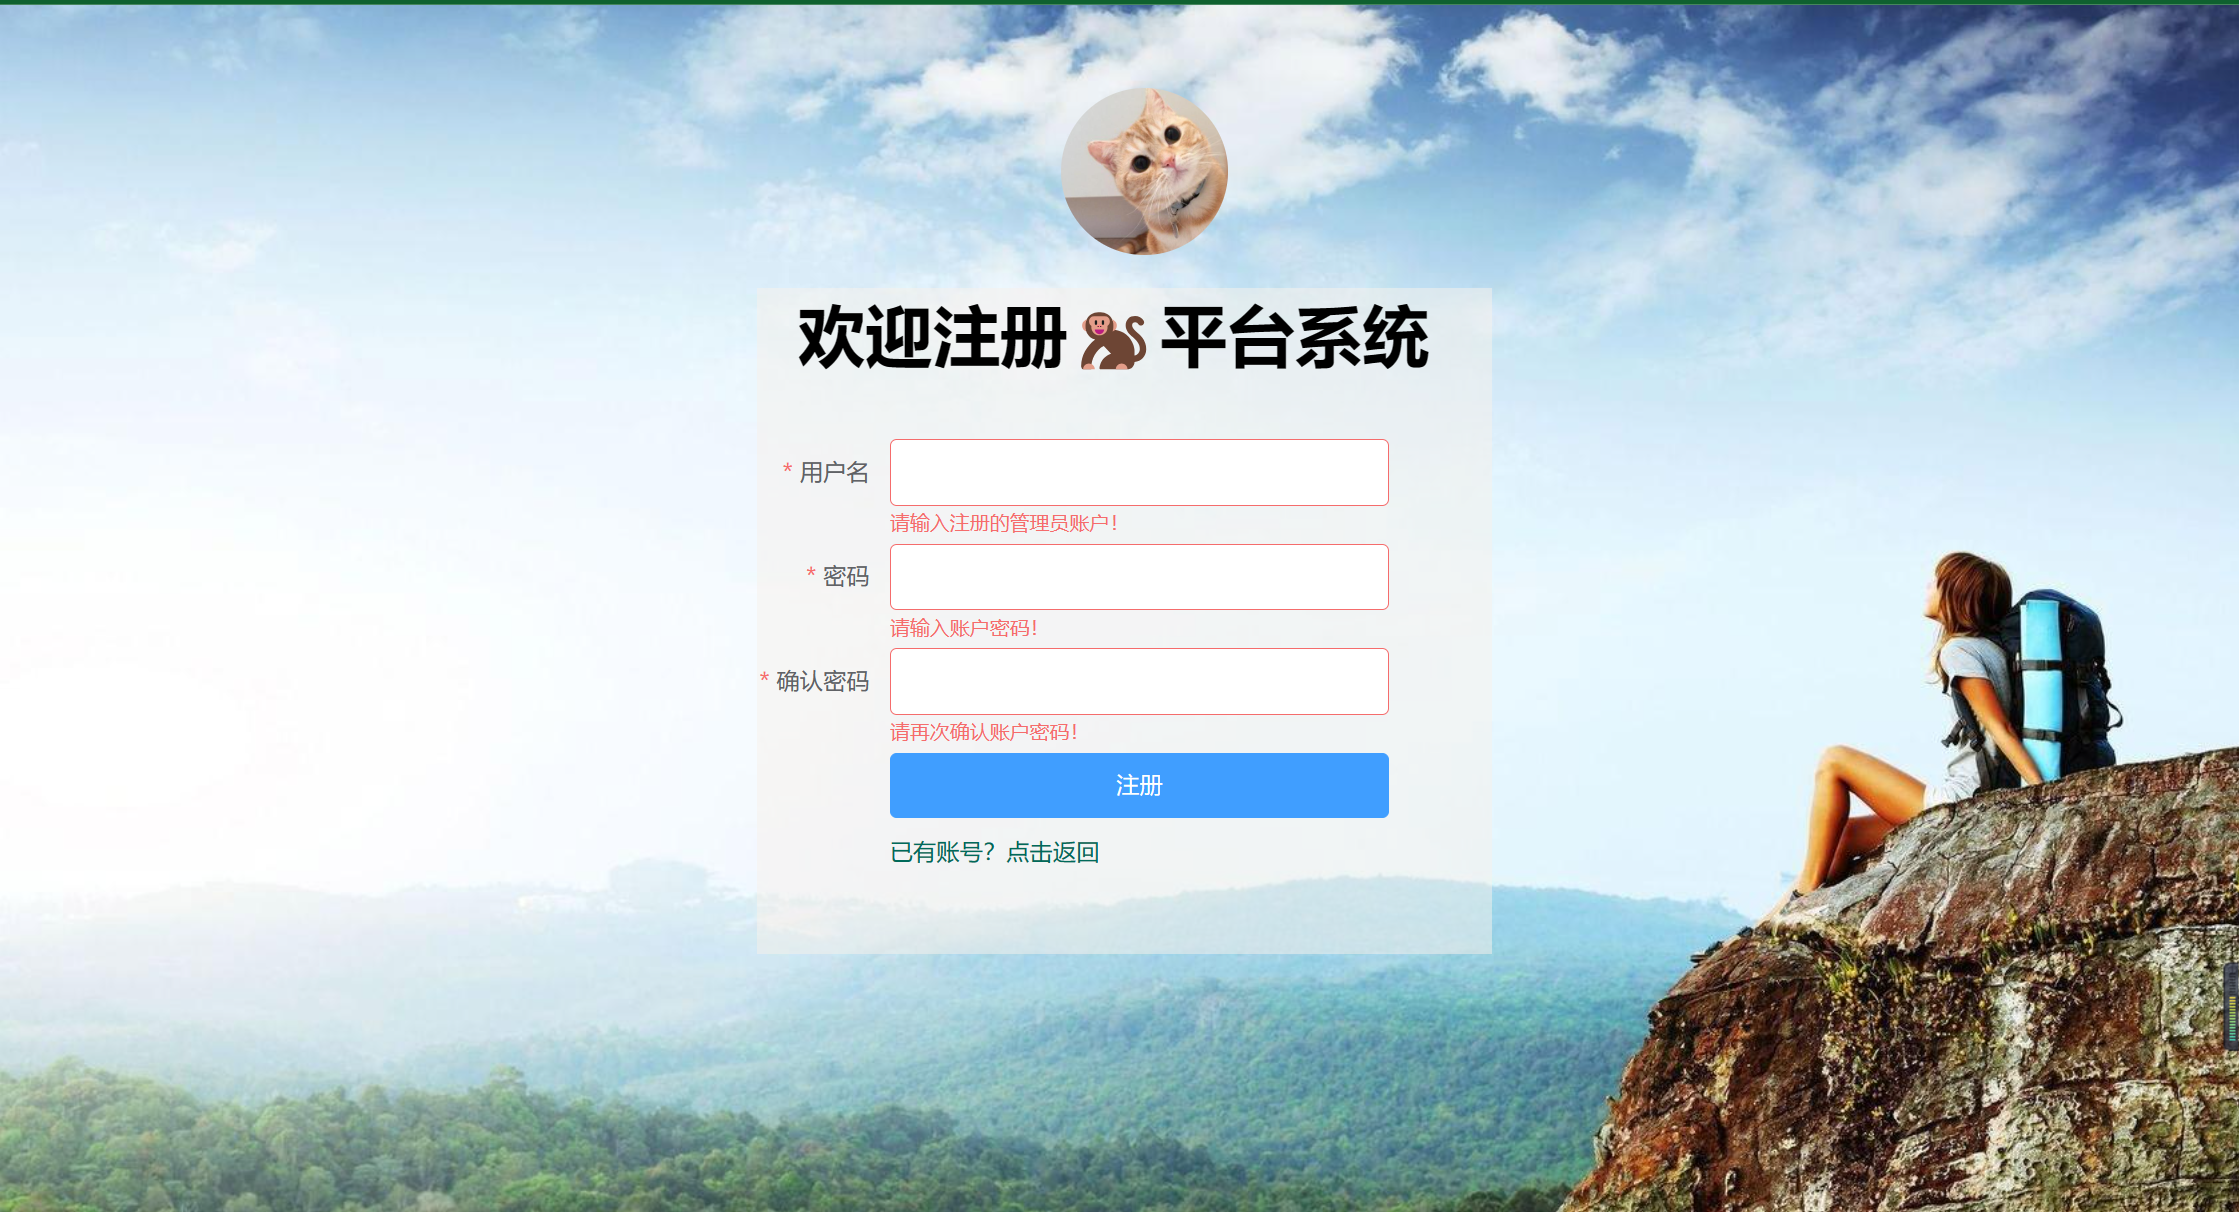
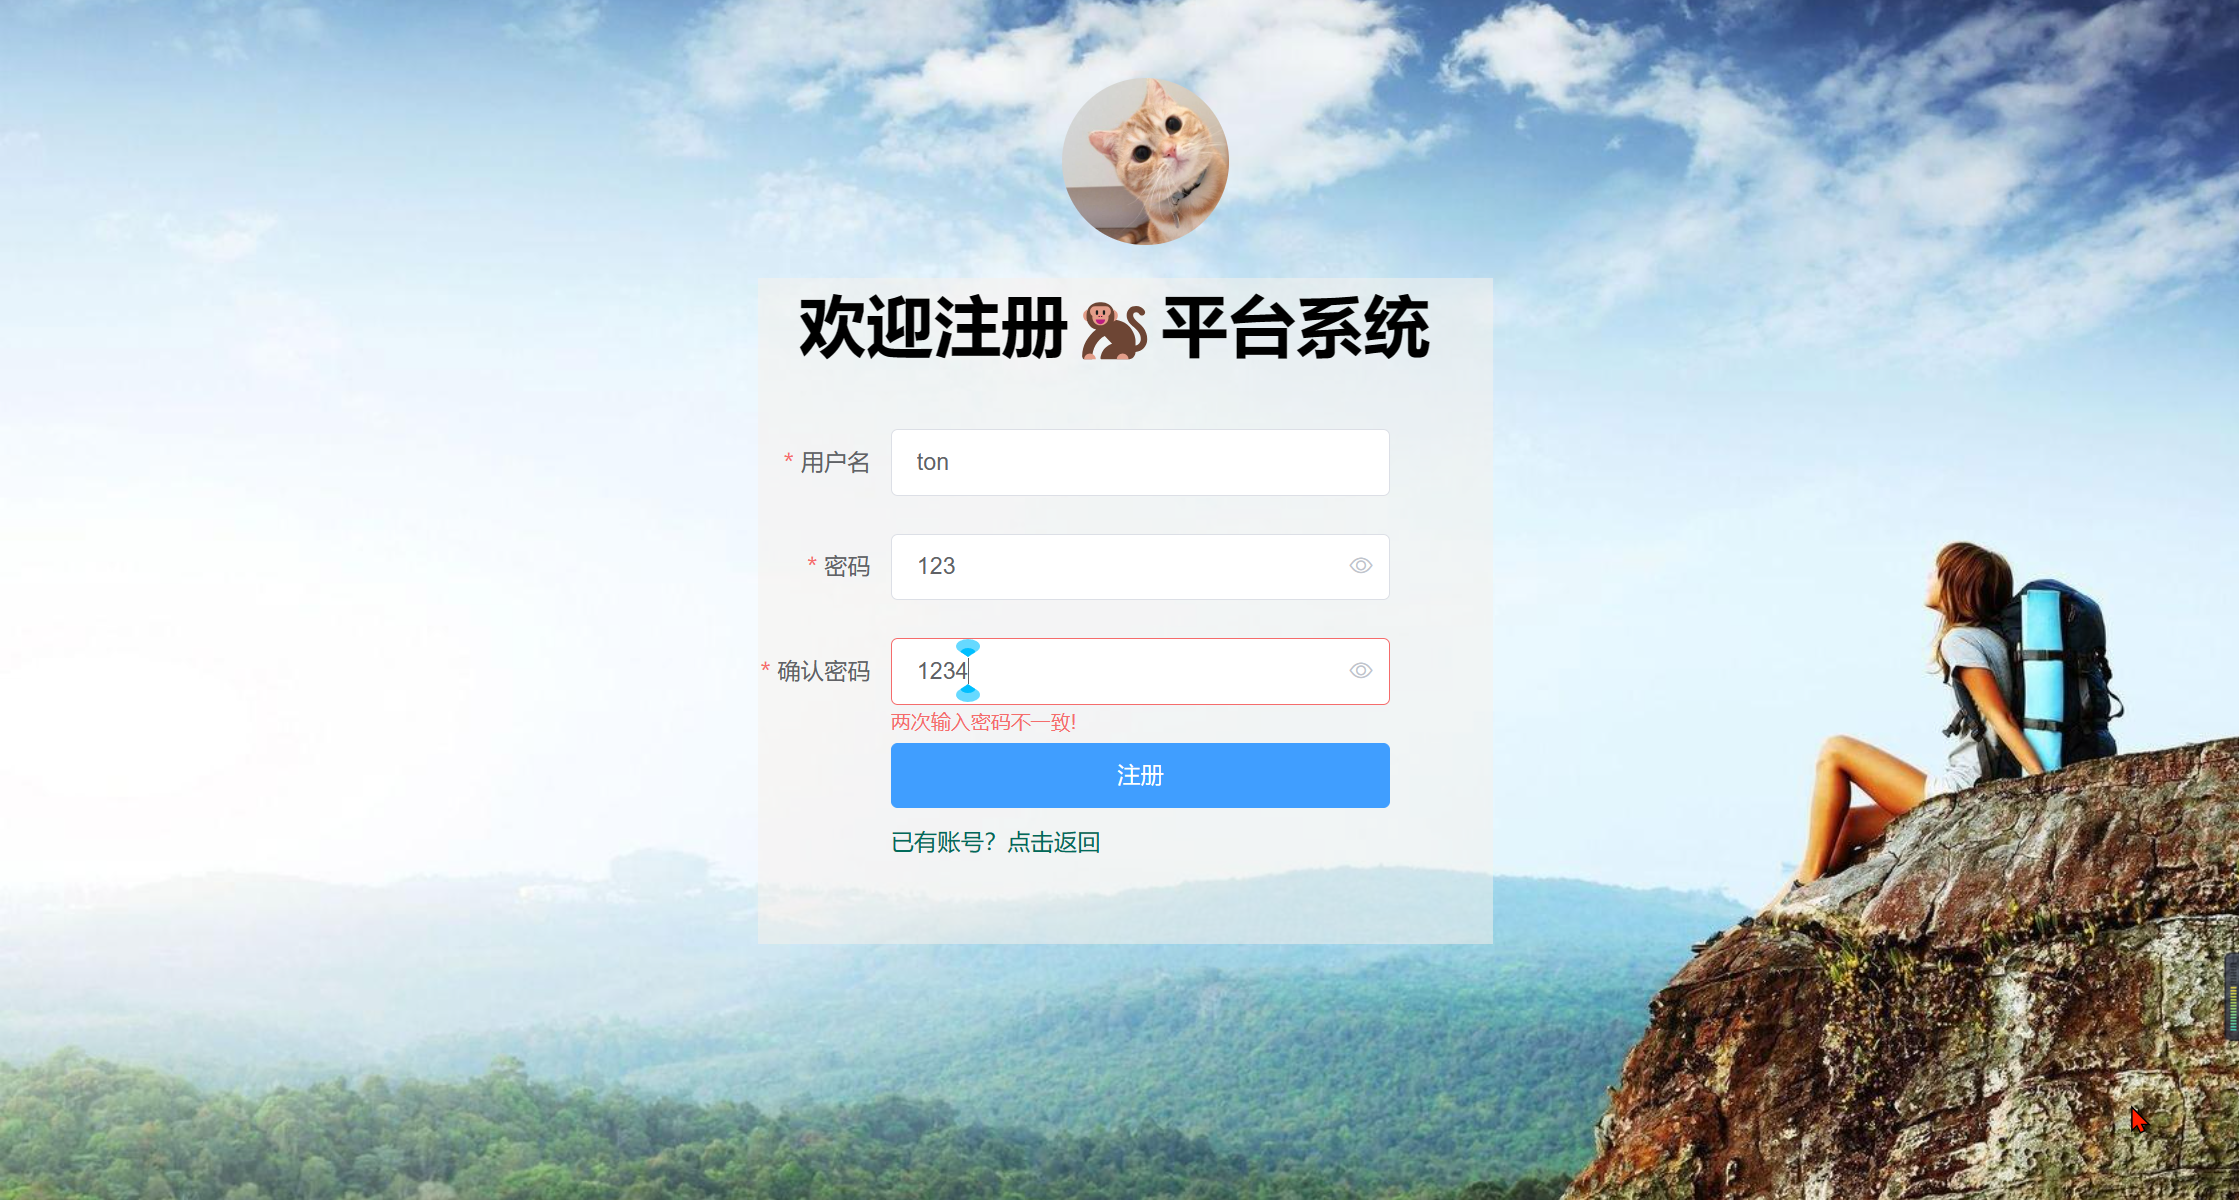
<template>
<div id="divbox">
<!-- 【此图像是圆圈头像logo】 -->
<img src="https://ts1.cn.mm.bing.net/th/id/R-C.3aeeb6d5725738095a7ad521d46ce428?rik=prLV4puYz%2btYuw&riu=http%3a%2f%2fwww.gx8899.com%2fuploads%2fallimg%2f2018021008%2fjrmgrhcgro0.jpg&ehk=Im%2fy1GA0xuqdwYNnKtzfue2b09jzjym4jjUXy7e0Seo%3d&risl=&pid=ImgRaw&r=0"
alt="Your Image">
<div class="login-form">
<div id="logo">
<span style="font-family: 'Microsoft YaHei';letter-spacing: 0.5px; font-weight: bold; font-size: 40px;">
欢迎注册🐒平台系统
</span>
</div>
<el-form ref="form" :rules="rules" :model="form" label-width="80px">
<el-form-item label="用户名" prop="account">
<el-input v-model="form.account" class="input"></el-input>
</el-form-item>
<el-form-item label="密码" prop="password">
<el-input type="password" v-model="form.password" class="input" show-password></el-input>
</el-form-item>
<el-form-item label="确认密码" prop="password1">
<el-input type="password" v-model="form.password1" class="input" show-password></el-input>
</el-form-item>
<el-form-item>
<el-button type="primary" @click="RegAccount('form')" style="width: 300px;">注册</el-button>
<br />
<span style="color: #006A5A;" @click="login()">已有账号?点击返回</span>
</el-form-item>
</el-form>
</div>
</div>
</template>
<script>
export default {
data() {
var validatePass = (rule, value, callback) => {
if (value === '') {
callback(new Error('请输入密码'));
} else {
if (this.form.password1 !== '') {
this.$refs.form.validateField('password1');
}
callback();
}
};
var validatePass2 = (rule, value, callback) => {
if (value === '') {
callback(new Error('请再次输入密码'));
} else if (value !== this.form.password) {
callback(new Error('两次输入密码不一致!'));
} else {
callback();
}
};
return {
form: {
account: '',
password: '',
password1: ''
},
rules: {
account: [{
required: true,
message: '请输入注册的管理员账户!',
trigger: 'blur'
},
{
min: 3,
max: 10,
message: '长度在 3 到 10 个字符',
trigger: 'blur'
}
],
password: [{
required: true,
message: '请输入账户密码!',
trigger: 'blur'
},
{
min: 3,
max: 10,
message: '长度在 3 到 10 个字符',
trigger: 'blur'
},{ validator: validatePass, trigger: 'blur' }
],
password1: [{
required: true,
message: '请再次确认账户密码!',
trigger: 'blur'
},
{
min: 3,
max: 10,
message: '长度在 3 到 10 个字符',
trigger: 'blur'
},{ validator: validatePass2, trigger: 'blur' }
]
}
}
},
methods: {
login() {
alert("登录页面");
//this.$router.push('/');
},
RegAccount(reffrom) { //【注册】
//数据向后端发送进行验证
//$refs是一个引用
this.$refs[reffrom].validate((valid) => {
if (valid) {
//如果发送成功,跳转到其他组件
//【跳转语句】
this.$message({
showClose: true,
message: '恭喜你,账户已注册✔',
type: 'success'
});
/* this.$message({showClose: true,message: '输入的账户或密码错误~', type: 'error'});
this.$message({showClose: true,message: '系统忙,维修人员正在抢修!',type: 'warning'}); */
}
});
}
}
}
</script>
<style>
#divbox {
width: 100%;
height: 100vh;
/*将🎀页面背景 图片路径替换为你自己的图片路径*/
background-image: url("https://ts1.cn.mm.bing.net/th/id/R-C.b923d0630782b4e46dcbb2121b22bdbf?rik=l7wVr9wcUyyTzw&riu=http%3a%2f%2fpic.bizhi360.com%2fbbpic%2f68%2f768.jpg&ehk=anhoZ%2fxmeecIhRHc2n9reoQbtJ2xXrvIEx0sJbLLMiI%3d&risl=&pid=ImgRaw&r=0");
/*保持图片比例并完全覆盖元素*/
background-size: cover;
background-position: center center;
/*将图片居中对齐*/
}
.login-form {
width: 442px;
height: 400px;
background-color: rgba(248, 242, 235, 0.5);
;
position: relative;
left: 455px;
top: 170px;
}
#logo {
width: 100%;
height: 60px;
/* background-color: aquamarine; */
margin-bottom: 30px;
}
.input {
max-width: 300px;
}
img {
border-radius: 50%;
width: 100px;
position: absolute;
left: 638px;
top: 50px;
}
</style>
【🎇前端配置】
安装ajax(异步请求)之axios—网络请求库.
npm install axios
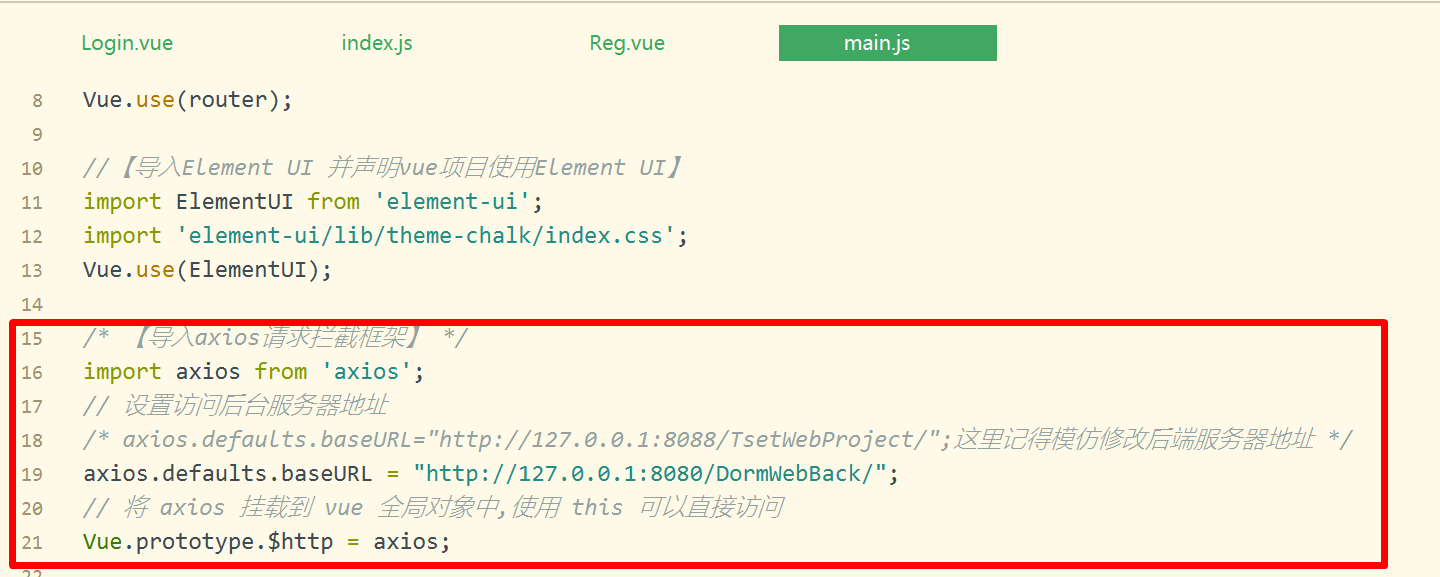
🎀在main.js中导入
// 导入 axios
import axios from ‘axios’;
// 设置访问后台服务器地址
/* axios.defaults.baseURL=“http://127.0.0.1:8088/TsetWebProject/”; 这里记得模仿修改后端服务器地址 */
axios.defaults.baseURL = “http://127.0.0.1:8088/Test/”;
// 将 axios 挂载到 vue 全局对象中,使用 this 可以直接访问
Vue.prototype.$http = axios;
🏅操作方法
this.$http.get(地址?Key=value&key2=val1).then(function(response){ }
this.$http.post(“login”,{key:“value”,key2:“val2”}).then(function(response){ }
【🎀创建后端项目+数据库,先完成注册与登陆功能】
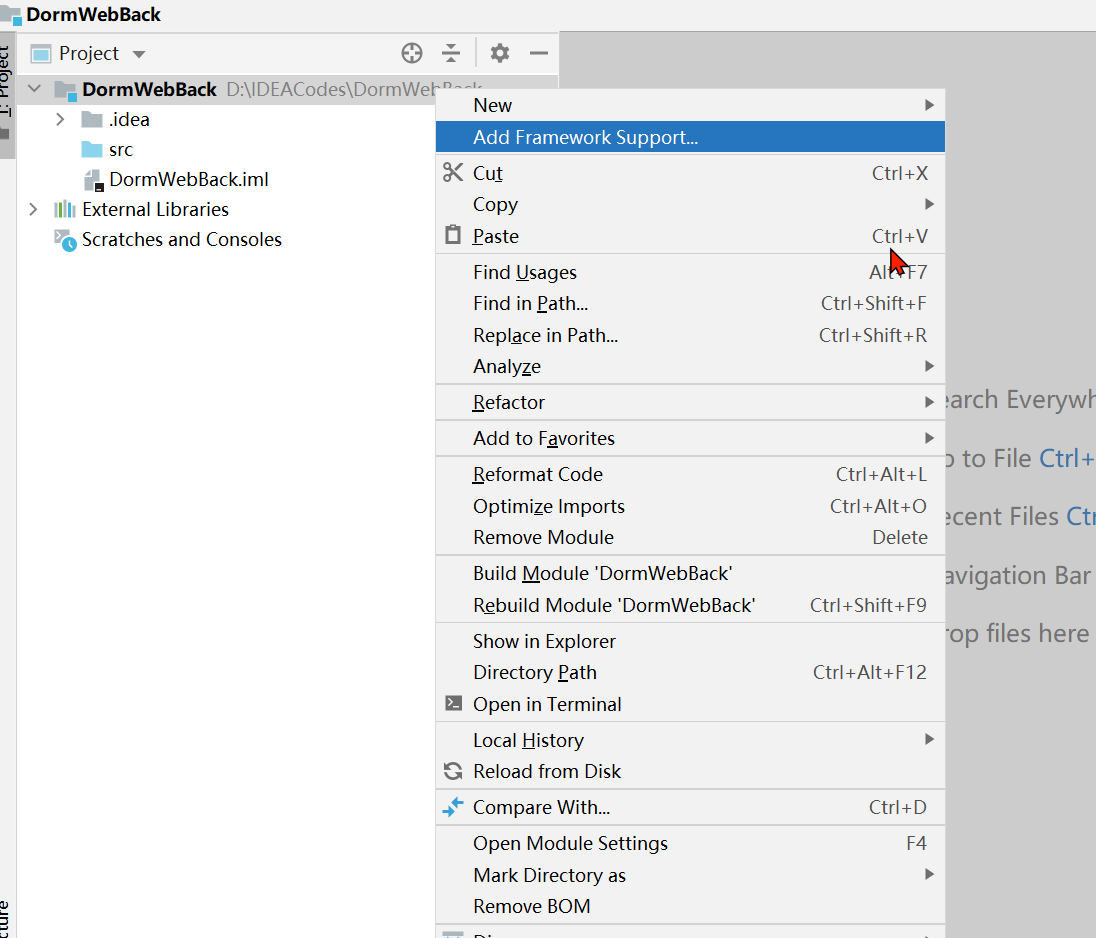
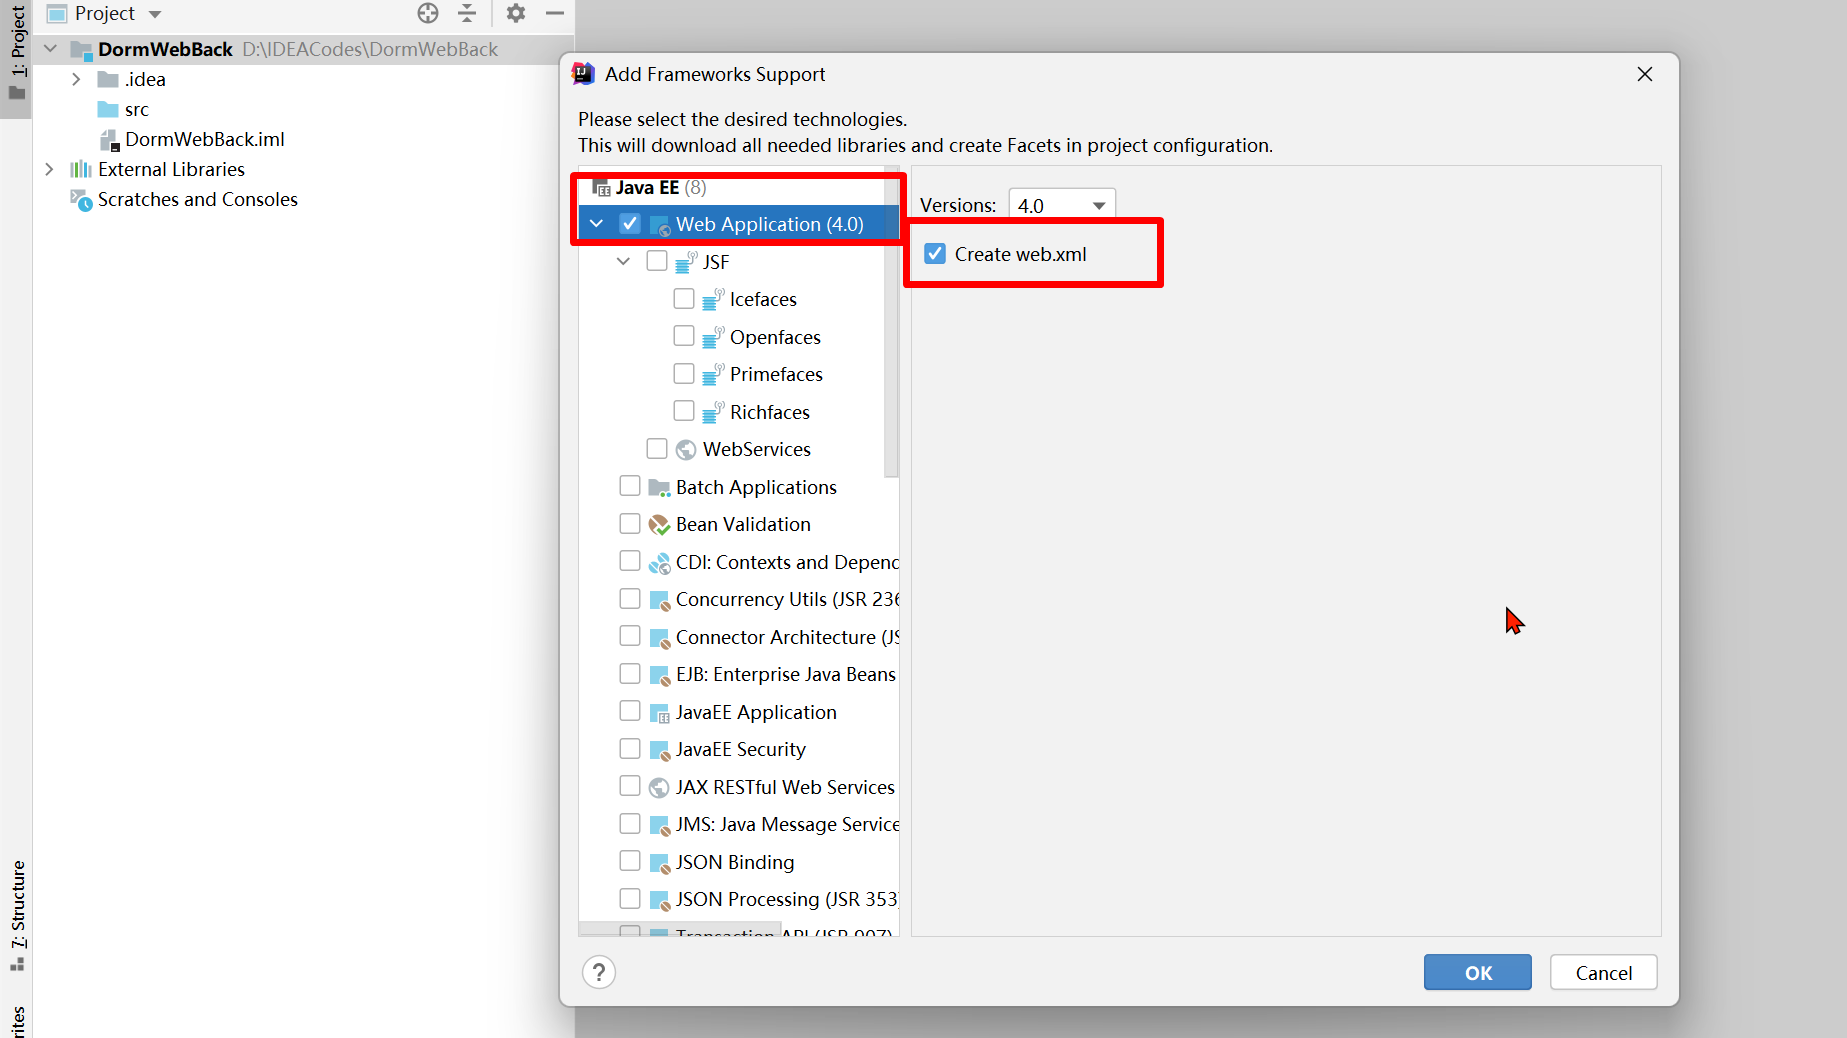
1.在idea中创建一个项目,然后右键单击
2.配置后端服务器tomcat

先点+,在滑动选择Tomcat Server 服务器,最好保存ok

点击路径配置,选择apache-Tomcat所在文件夹进行路径配置
3.点击运行,出现✔就算运行成功了
3.创建处理程序,导入jar包

🏨这是需要导入的jar包下载地址—阿里云盘
记得配置servlet处理程序的地址,配置xml文件时,记得在标签里面写,优先配置编码过滤器EcondFilter


🧸创建公共类(记得util包中定义commentResoult类)
来规定代码传输格式:code , data , message
package util;

public class CommentResoult {
    private int code;
    private Object data;
    private String message;

    public CommentResoult(int code, Object data, String message) {
        this.code = code;
        this.data = data;
        this.message = message;
    }

    @Override
    public String toString() {
        return "CommentResoult{" +
                "code=" + code +
                ", data=" + data +
                ", message='" + message + '\'' +
                '}';
    }
}
🧸可以在util包中定义JDBC的封装类(使代码更加简洁)
package util;
import com.mysql.jdbc.Driver;
import java.sql.Connection;
import java.sql.DriverManager;
import java.sql.PreparedStatement;
import java.sql.SQLException;
/**
* Created by 罗铠威 on 2023/8/8 13:57
* type: 对jdbc代码进行一个封装
*/
public class JDBCUtil {
static {/*加载启动项*/
try {
DriverManager.registerDriver(new Driver());
} catch (SQLException throwables) {
throwables.printStackTrace();
}
}
/*获取数据库连接对象*/
public static Connection getConnection(String dataBaseName) throws SQLException {
String url="jdbc:mysql://127.0.0.1:3306/"+dataBaseName+"?serverTimezone=Asia/Shanghai";
return DriverManager.getConnection(url,"root","newpassword");
}
/*关闭连接管道*/
public static void close(Connection connection, PreparedStatement ps) throws SQLException {
if(connection!=null){
connection.close();
}
if(ps!=null){
ps.close();
}
}
}
🏅【采用json格式的打印】
🪂后端借助ObjectMapper类将对象转为json格式的字符串

🪂【前端发送数据时,由于axios发出的异步请求格式为json格式,利用jsonToString()方法转为默认键值对格式】
//将json对象序列化为键=值&键=值
	function jsonToString(jsonObj){
		console.log(jsonObj);
		var str="";
		for (var s in jsonObj) {
			str+=s+"="+jsonObj[s]+"&";
		}
		return str.substring(0,str.length-1);
	}
🧸如果使用前端ajax的axios,后端记得使用“跨域请求声明”
