1.Nginx安装
1)首先创建Nginx的目录并进入
[root@lucky ~]# mkdir /soft && mkdir /soft/nginx/
[root@lucky ~]# cd /soft/nginx/
[root@lucky nginx]#
2)下载Nginx的安装包,可以通过FTP工具上传离线环境包,也可通过wget命令在线获取安装包
[root@lucky nginx]# wget https://nginx.org/download/nginx-1.21.6.tar.gz
--2023-08-08 08:41:04-- https://nginx.org/download/nginx-1.21.6.tar.gz
正在解析主机 nginx.org (nginx.org)... 52.58.199.22, 3.125.197.172, 2a05:d014:edb:5704::6, ...
正在连接 nginx.org (nginx.org)|52.58.199.22|:443... 已连接。
已发出 HTTP 请求,正在等待回应... 200 OK
长度:1073364 (1.0M) [application/octet-stream]
正在保存至: “nginx-1.21.6.tar.gz”100%[=============================================================================================>] 1,073,364 771KB/s 用时 1.4s
2023-08-08 08:41:09 (771 KB/s) - 已保存 “nginx-1.21.6.tar.gz” [1073364/1073364])
[root@lucky nginx]#
3)解压Nginx的压缩包
[root@lucky nginx]# tar -xvzf nginx-1.21.6.tar.gz
4)下载并安装Nginx所需的依赖库和包
[root@lucky ~]# yum install --downloadonly --downloaddir=/soft/nginx/ gcc-c++
[root@lucky ~]# yum install --downloadonly --downloaddir=/soft/nginx/ pcre pcre-devel4
[root@lucky ~]# yum install --downloadonly --downloaddir=/soft/nginx/ zlib zlib-devel
[root@lucky ~]# yum install --downloadonly --downloaddir=/soft/nginx/ openssl openssl-devel
执行完成后,然后ls查看目录文件,会看一大堆依赖
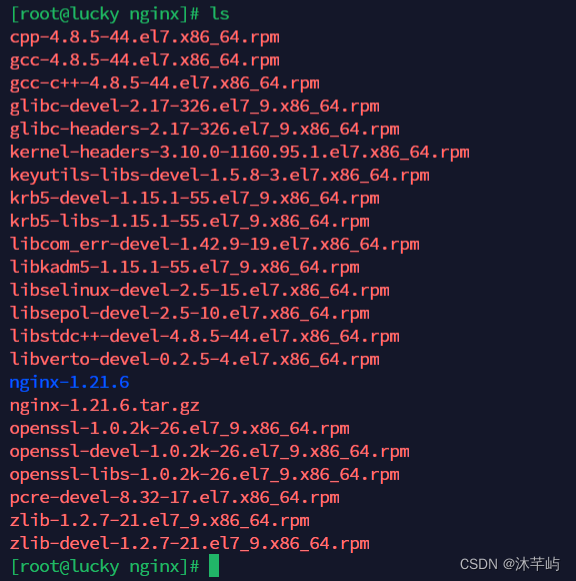
通过rpm命令依次将依赖包一个个构建,或者通过如下指令一键安装所有依赖包
[root@lucky nginx]# rpm -ivh --nodeps *.rpm
准备中... ################################# [100%]
软件包 zlib-1.2.7-21.el7_9.x86_64 已经安装
软件包 openssl-libs-1:1.0.2k-26.el7_9.x86_64 已经安装
软件包 krb5-libs-1.15.1-55.el7_9.x86_64 已经安装
软件包 libkadm5-1.15.1-55.el7_9.x86_64 已经安装
软件包 cpp-4.8.5-44.el7.x86_64 已经安装
软件包 zlib-devel-1.2.7-21.el7_9.x86_64 已经安装
软件包 pcre-devel-8.32-17.el7.x86_64 已经安装
软件包 libverto-devel-0.2.5-4.el7.x86_64 已经安装
软件包 libsepol-devel-2.5-10.el7.x86_64 已经安装
软件包 libselinux-devel-2.5-15.el7.x86_64 已经安装
软件包 libcom_err-devel-1.42.9-19.el7.x86_64 已经安装
软件包 keyutils-libs-devel-1.5.8-3.el7.x86_64 已经安装
软件包 krb5-devel-1.15.1-55.el7_9.x86_64 已经安装
软件包 kernel-headers-3.10.0-1160.95.1.el7.x86_64 已经安装
软件包 glibc-headers-2.17-326.el7_9.x86_64 已经安装
软件包 glibc-devel-2.17-326.el7_9.x86_64 已经安装
软件包 gcc-4.8.5-44.el7.x86_64 已经安装
软件包 openssl-devel-1:1.0.2k-26.el7_9.x86_64 已经安装
软件包 openssl-1:1.0.2k-26.el7_9.x86_64 已经安装
[root@lucky nginx]#
5)进入解压后的nginx目录,然后执行Nginx的配置脚本,为后续的安装提前配置好环境,默认位于/usr/local/nginx/目录下(可自定义目录)
[root@lucky nginx]# cd nginx-1.21.6
[root@lucky nginx-1.21.6]# ./configure --perfix=/soft/nginx/
6)编译并安装Nginx
[root@lucky nginx-1.21.6]# make && make install
7)最后回到前面的/soft/nginx/目录,输入ls即可看见安装nginx完成后生成的文件
[root@lucky nginx-1.21.6]# cd ..
[root@lucky nginx]# ls
conf
cpp-4.8.5-44.el7.x86_64.rpm
gcc-4.8.5-44.el7.x86_64.rpm
gcc-c++-4.8.5-44.el7.x86_64.rpm
glibc-devel-2.17-326.el7_9.x86_64.rpm
glibc-headers-2.17-326.el7_9.x86_64.rpm
html
kernel-headers-3.10.0-1160.95.1.el7.x86_64.rpm
keyutils-libs-devel-1.5.8-3.el7.x86_64.rpm
krb5-devel-1.15.1-55.el7_9.x86_64.rpm
krb5-libs-1.15.1-55.el7_9.x86_64.rpm
libcom_err-devel-1.42.9-19.el7.x86_64.rpm
libkadm5-1.15.1-55.el7_9.x86_64.rpm
libselinux-devel-2.5-15.el7.x86_64.rpm
libsepol-devel-2.5-10.el7.x86_64.rpm
libstdc++-devel-4.8.5-44.el7.x86_64.rpm
libverto-devel-0.2.5-4.el7.x86_64.rpm
logs
nginx-1.21.6
nginx-1.21.6.tar.gz
openssl-1.0.2k-26.el7_9.x86_64.rpm
openssl-devel-1.0.2k-26.el7_9.x86_64.rpm
openssl-libs-1.0.2k-26.el7_9.x86_64.rpm
pcre-devel-8.32-17.el7.x86_64.rpm
sbin
zlib-1.2.7-21.el7_9.x86_64.rpm
zlib-devel-1.2.7-21.el7_9.x86_64.rpm
[root@lucky nginx]#
8)修改安装后生成的conf目录下的nginx.conf配置文件
[root@lucky nginx]# vi conf/nginx.conf

9)制定配置文件并启动Nginx
[root@lucky nginx]# sbin/nginx -c conf/nginx.conf
nginx: [emerg] bind() to 0.0.0.0:80 failed (98: Address already in use)
nginx: [emerg] bind() to 0.0.0.0:80 failed (98: Address already in use)
nginx: [emerg] bind() to 0.0.0.0:80 failed (98: Address already in use)
nginx: [emerg] bind() to 0.0.0.0:80 failed (98: Address already in use)
nginx: [emerg] bind() to 0.0.0.0:80 failed (98: Address already in use)
nginx: [emerg] still could not bind()
[root@lucky nginx]# ps aux | grep nginx
root 5817 0.0 0.0 112824 984 pts/0 R+ 09:01 0:00 grep --color=auto nginx
[root@lucky nginx]#
10)开放80端口,并更新防火墙
[root@lucky nginx]# firewall-cmd --zone=public --add-port=80/tcp --permanent
success
[root@lucky nginx]# firewall-cmd --reload
success
[root@lucky nginx]# firewall-cmd --zone=public --list-ports
80/tcp
11)在Windows/Mac的浏览器中,直接输入刚刚配置的IP地址访问Nginx

2.docker安装
1)更新系统
[root@lucky ~]# yum update
2)安装所需的软件包以便使用存储库安装Docker
[root@lucky ~]# yum install -y yum-utils device-mapper-persistent-data lvm2
3)添加Docker存储库
[root@lucky ~]# yum-config-manager --add-repo https://download.docker.com/linux/centos/docker-ce.repo
4)安装Docker引擎
[root@lucky ~]# yum install docker-ce
5)启动Docker服务并设置开机启动
[root@lucky ~]# systemctl start docker
[root@lucky ~]# systemctl enable docker
6)添加当前用户到docker组,以便免去使用sudo运行Docker命令
[root@lucky ~]# usermod -aG docker $USER
7)配置Docker的镜像加速器以提高下载速度。编辑或创建 /etc/docker/daemon.json 文件并添加以下内容(如果文件不存在,就创建它)
{
"registry-mirrors": ["https://your-mirror-url"]
}
8)重新启动Docker服务以应用更改
[root@lucky ~]# systemctl restart docker
9)测试
[root@lucky ~]# docker run hello-world
Unable to find image 'hello-world:latest' locally
latest: Pulling from library/hello-world
719385e32844: Pull complete
Digest: sha256:926fac19d22aa2d60f1a276b66a20eb765fbeea2db5dbdaafeb456ad8ce81598
Status: Downloaded newer image for hello-world:latestHello from Docker!
This message shows that your installation appears to be working correctly.To generate this message, Docker took the following steps:
1. The Docker client contacted the Docker daemon.
2. The Docker daemon pulled the "hello-world" image from the Docker Hub.
(amd64)
3. The Docker daemon created a new container from that image which runs the
executable that produces the output you are currently reading.
4. The Docker daemon streamed that output to the Docker client, which sent it
to your terminal.To try something more ambitious, you can run an Ubuntu container with:
$ docker run -it ubuntu bashShare images, automate workflows, and more with a free Docker ID:
https://hub.docker.com/For more examples and ideas, visit:
https://docs.docker.com/get-started/


