文章目录
- 前言
- promise请求接口的封装
- 主入口功能的实现:
- 推荐歌单模块
- 新碟新歌模块
- 精选视频模块
- 最后
前言
本篇文章继续完成上篇文章的部分,主要实现prromise接口的封装和首页主入口的实现
promise请求接口的封装
在上篇文章中请求我们是这样写的:
methods: {
	getBanner() {
		uni.request({
			url: 'http://localhost:3000/banner',
			method: 'GET',
			success:(res)=>{
				this.swiper = res.data.banners;
			}
		})
	}
}
但实际开发中,接口非常多,这样又不方便管理,所以我们通常会进行接口的封装
先新建util文件夹中request.js文件,在文件中进行promise的封装:

封装里面的状态码根据实际情况写,我这里写简单写了几个
/**
 * 请求组件封装
 * @param {Object} url 请求地址 /banner
 * @param {Object} data 请求参数
 * @param {Object} method 请求的方法
 * @param {Object} contentType 请求内容类型 1=json  2=form
 */
function request({url, data, method="GET", contentType=1}) {
	let header = {
		'content-type': contentType === 1 ? 'application/json' : 'application/x-www-form-urlencoded'
	}
	let baseUrl = "http://localhost:3000";

	return new Promise((resolve, reject)=>{
		uni.request({
			url: baseUrl + url,
			data,
			method,
			header,
			success: (res) => {
				if (res.statusCode === 200) {
					//请求成功
					resolve(res.data);
				} else if (res.statusCode === 401) {
					uni.showToast({
						icon: 'none',
						title: "未登录或登录状态已超时",
						duration: 1500
					});
				} else if (res.statusCode === 405) {
					uni.showToast({
						icon: 'none',
						title: "请求方法错误",
						duration: 1500
					});
				} else {
					uni.showToast({
						icon: 'none',
						title: "请求错误:" + res.statusCode,
						duration: 1500
					});
				}
			},
			fail: (err) => {
				console.log("err:", err)
				uni.showToast({
					icon: 'none',
					title: err.errMsg,
					duration: 1500
				});
				reject(err);
			}
		})
	})
}
export default {request}
然后我们可以新建api文件夹新建index.js文件在里面进行api的封装

import request from "@/utils/request.js"

//轮播请求接口
export function apiGetBanner(data) {
	return request.request({
		url: '/banner',
		method: 'GET',
		data
	})
}
封装之后,在我们需要的页面就可以直接引入api进行使用,例如:
<script>
	import {apiGetBanner} from '@/apis/index.js',
	data() {
			return {
				swiper: [],                    //轮播
			}
		},
	methods: {
			getBanner() {
				apiGetBanner().then(res => {
					this.swiper = res.banners;
				})
			},
	}
</script>
主入口功能的实现:
下面来实现这一块的内容,首页的主入口部分

这一块的内容基本不会改动,所以直接用图片样式进行编写
这主要是把本地的图片渲染出来,css部分直接用flex布局拿很简单。
<view class="main-bar flex-box">
	<view class="flex-item" v-for="(item,index) in contentBar" :key="index">
		<image :src="'../../static/image/index/t_'+(index+1)+'.png'" class="img"></image>
		<view>
			{{item.name}}
		</view>
	</view>
</view>
推荐歌单模块
推荐歌单这块直接抽离成一个组件进行编写
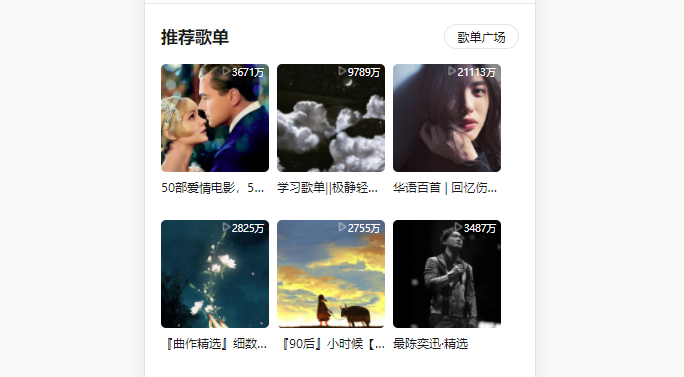
在components文件夹下新建文件,编写歌单的组件

css样式我就不贴了,主要是写好组件,然后定义props接受父组件传过来的值
<template>
	<view class="song-list-comp">
		<view class="tit-bar">
			{{title}}
			<navigator :url="link" class="more fr">
				歌单广场
			</navigator>
		</view>
		<scroll-view class="scroll-view" scroll-x>
			<view class="item" v-for="(item,index) in list" :key="index">
				<image class="img" :src="item.picUrl" mode=""></image>
				<view class="desc ellipsis">
					{{item.name}}
				</view>
				<view class="count">
					{{item.playCount}}
				</view>
			</view>
		</scroll-view>
	</view>
</template>

<script>
	export default {
		props: {
			title: {
				type: String,
				default: ''
			},
			link: {
				type: String,
				default: ''
			},
			list: {
				type: Array,
				default: []
			}
		}
	}
</script>
在父组件中:
<song-list title="推荐歌单" link="" :list="recommendSongs"></song-list>
进行数据的请求,这里需要把请求数据中的播放量进行一个格式化
//推荐歌单
getRecommendSongs(){
	const params = {
		limit: 6
	}
	apiGetRecommendSongs(params).then(res => {
		//格式化播放量数据
		const formatCount = data=>{
			let tmp = data;
			if (data > 10000) {
				tmp = (parseInt(data/10000) + '万');
			}
			return tmp
		}
		this.recommendSongs = res.result;
		//格式化
		this.recommendSongs.forEach(item => {
			item.playCount = formatCount(item.playCount);
		})
	})
},
新碟新歌模块
这一块要实现一个可以点击切换的效果:

<!-- 新碟新歌 -->
<view class="song-list">
	<view class="switch-line flex-box">
			<view class="flex-box">
				<view class="switch-item" :class="{on : newType==1}" @click="switchTab(1)">
					新碟
				</view>
				<view class="switch-item" :class="{on : newType==2}" @click="switchTab(2)">
					新歌
				</view>
			</view>
			<template v-if="newType==1">
				<view class="more">
					更多新碟
				</view>
			</template>
			<template v-if="newType==2">
				<view class="more">
					更多新歌
				</view>
			</template>
	</view>
	<scroll-view class="scroll-view" scroll-x>
		<view class="item" v-for="(item,index) in latestAlbum" :key="index">
			<image class="img" :src="item.picUrl"></image>
			<view class="desc ellipsis">
				{{item.name}}
			</view>
			<view class="desc ellipsis c9">
				{{item.artist.name}}
			</view>
		</view>
	</scroll-view>
</view>
这里就是通过点击切换判断是新歌还是新碟,然后进行请求数据
// 切换新碟新歌
switchTab(type) {
	this.newType = type;
	// 设定开始start和结束end的位置
	let temp = {
		s: type == 1 ? 0 : 3,
		e: type == 1 ? 3 : 6
	}
	this.latestAlbum = this.latestTempAlbum.slice(temp.s, temp.e);
},
//新碟新歌  把前3首歌--新碟  后3首--新歌
getLatestAlbum() {
	apiGetTopAlbum().then(res=>{
		//将所有的数据暂存在临时变量中
		this.latestTempAlbum = res.albums;
		//取前3个作为第一类的数据展示
		this.latestAlbum = res.albums.slice(0, 3);
	})
},
精选视频模块
视频这款暂时做了封面,没有做视频播放功能,直接渲染封面:

<!-- 精选视频 -->
<view class="video-list song-list">
	<view class="tit-bar">
		精选视频
		<view class="more fr">
			更多
		</view>
	</view>
	<view class="video-item" v-for="(item, index) in relatedVideo" :key="index">
		<image :src="item.coverUrl" mode="" class="img"></image>
		<view class="desc ellipsis">
			{{item.title}}
		</view>
	</view>
</view>
//精选视频
			getRelatedVideo() {
				const params = {
					id: 32154      //根据资源id查询
				}
				apiGetRelatedVideo(params).then(res=>{
					// console.log(res)
					this.relatedVideo = res.data;
				})
			}
最后
到此首页基本实现了

后续会继续完成其他页面,持续更新,感兴趣可以订阅本专栏


![[Java] HashMap是如何实现的?扩容机制是什么?树化机制知道吗?结合源码带你理解HashMap的原理。](https://img-blog.csdnimg.cn/d11b725533394f57a8c5a894b7cc560c.png)
