一、为什么要造这个轮子
【C++】使用WebAssembly在浏览器端操作Excel_wasm文件用什么打开_你的薄荷醇的博客-CSDN博客使用WebAssembly在浏览器端操作Excel_wasm文件用什么打开https://blog.csdn.net/weixin_44305576/article/details/125545900?ops_request_misc=%257B%2522request%255Fid%2522%253A%2522168964185516800185863561%2522%252C%2522scm%2522%253A%252220140713.130102334..%2522%257D&request_id=168964185516800185863561&biz_id=0&utm_medium=distribute.pc_search_result.none-task-blog-2~all~baidu_landing_v2~default-4-125545900-null-null.142%5Ev88%5Econtrol_2,239%5Ev2%5Einsert_chatgpt&utm_term=C%2B%2B%20wasm&spm=1018.2226.3001.4187初学 WASM 时,使用的是 C++,当时看到上面这篇博客,只能使用 Web 端操作 xls 文件,而不支持 xlsx 文件,从该文章出发,确实达到了作者在 Web 简单操作 Excel 的目标。而本文仅从小白入门学习的角度出发,重造一个轮子,以更完善支持 Web 端操作 Excel。
二、Linux 开发环境搭建
Rust Wasm Linux开发环境搭建_centos安装rust_余衫马的博客-CSDN博客Linux 下 Rust + Wasm/Wasi 开发_centos安装rusthttps://blog.csdn.net/weixin_47560078/article/details/130559636参照这里的 Linux 开发环境。
三、OpenXLSX
# 参考官网 https://github.com/troldal/OpenXLSX1、安装CMake

# https://cmake.org/download/

# 解压
tar -zxvf cmake-3.27.0.tar.gz

# 进入目录
cd cmake-3.27.0

# 安装
./bootstrap && make -j4 && sudo make install

2、下载并编译 OpenXLSX
# clone 代码
git clone https://github.com/troldal/OpenXLSX.git

# 进入目录
cd OpenXLSX

# 新建 build 文件夹
mkdir build

# 进入 build 文件夹
cd build

# 编译
cmake ..

# 构建
cmake --build . --target OpenXLSX --config Release

# root 权限执行安装
cmake --install .

# 自定义安装路径
# cmake --install . --prefix=/home/sam/mylib


这里看到红色报错,不影响,实际上 OpenXLSX 库已经安装了,这个报错是说没有其他库。
3、使用 OpenXLSX 静态库
#include <OpenXLSX.hpp>

using namespace OpenXLSX;

int main() {

    XLDocument doc;
    doc.create("Spreadsheet.xlsx");
    auto wks = doc.workbook().worksheet("Sheet1");

    wks.cell("A1").value() = "Hello, OpenXLSX!";

    doc.save();

    return 0;
}
这里为方便,我把头文件和静态库放到了项目根目录下,
4、编译运行 c++
# 安装 C/C++ 编译器
# C/C++ 编译器
yum -y install gcc
yum -y install gcc-c++

[root@localhost demo]# gcc hello.c -o hello1
[root@localhost demo]# ./hello1
Hello,world

[root@localhost demo]# g++ hello.cpp -o hello2
[root@localhost demo]# ./hello2
Hello,world!
# 指定 C++ 17 标准,链接静态库 libOpenXLSX.a
g++ -std=c++17 main.cpp libOpenXLSX.a -o test_open_xlsx
./test_open_xlsx
可以看到,生成 Excel 文件,并且正常打开。
若直接引用头文件, 则 #include <OpenXLSX/OpenXLSX.hpp> ,编译时也需指定静态库的位置。
5、附:Windows 下编译使用 OpenXLSX
git clone 完成后,进入 OpenXLSX 根目录,新建 build 文件夹,然后执行编译,
mkdir build
cd build
cmake ..


cmake --build . --target OpenXLSX --config Release

cmake --install .
报错 file INSTALL cannot find,但其实已经安装了 OpenXlsx,因为这个报错很明显还没有编译 benchmark.lib,因为我们根本不需要这个库,
# 可以通过 prefix 指定安装路径,
cmake --install . --prefix=F:\OpenXLSX 
VS2019 中使用,需要配置 包含目录、库目录、库名字,


踩坑注意,C++语言标准会影响某些标准库,否则会报错 namespace std 没有成员 string_view,


同样的代码,运行成功。
6、附:封装 OpenXLSX 并导出为 DLL
VS2019 创建 DLL 项目,

定义 hpp 以及对应的 cpp,

注意必须包含 pch.h,

编译配置,


然后生成,

可以看到,已经导出函数,

Rust 中使用该 DLL,

[dependencies]
# 调用外部 dll
libloader = "0.1.4"
main.rs 调用 dll,
use cstr::cstr;
use libloader::*;
use std::{ffi::CStr,os::raw::c_char};

fn main() {
    get_libfn!("dll/mydll.dll", "println", println, (), s: &str);
    println("你好");

    get_libfn!("dll/mydll.dll", "add", add, usize, a: usize, b: usize);
    println!(" 1 + 2 = {}", add(1, 2));

    get_libfn!("dll/mydll.dll", "print_hello", print_hello, bool);
    print_hello();

    get_libfn!("dll/mydll.dll","return_str", return_str,*const c_char, s: *const c_char);
    let str = unsafe { CStr::from_ptr(return_str(cstr!("你好 ").as_ptr())) };
    print!("out {}", str.to_str().unwrap());

    get_libfn!("dll/Dll1.dll", "testExcel", test_excel, usize);
    test_excel();
}
编译运行,


7、附:Rust 调用 rlib 子库

[workspace]
#以子目录成员方式添加 lib
members = [
    "mydll"
]
编写 build.rs 指定 rlib 路径,

fn main() {
    // .rlib 路径
    println!("cargo:rustc-link-search=./target/debug/");
}
构建 rlib 库,

使用 extern crate ,
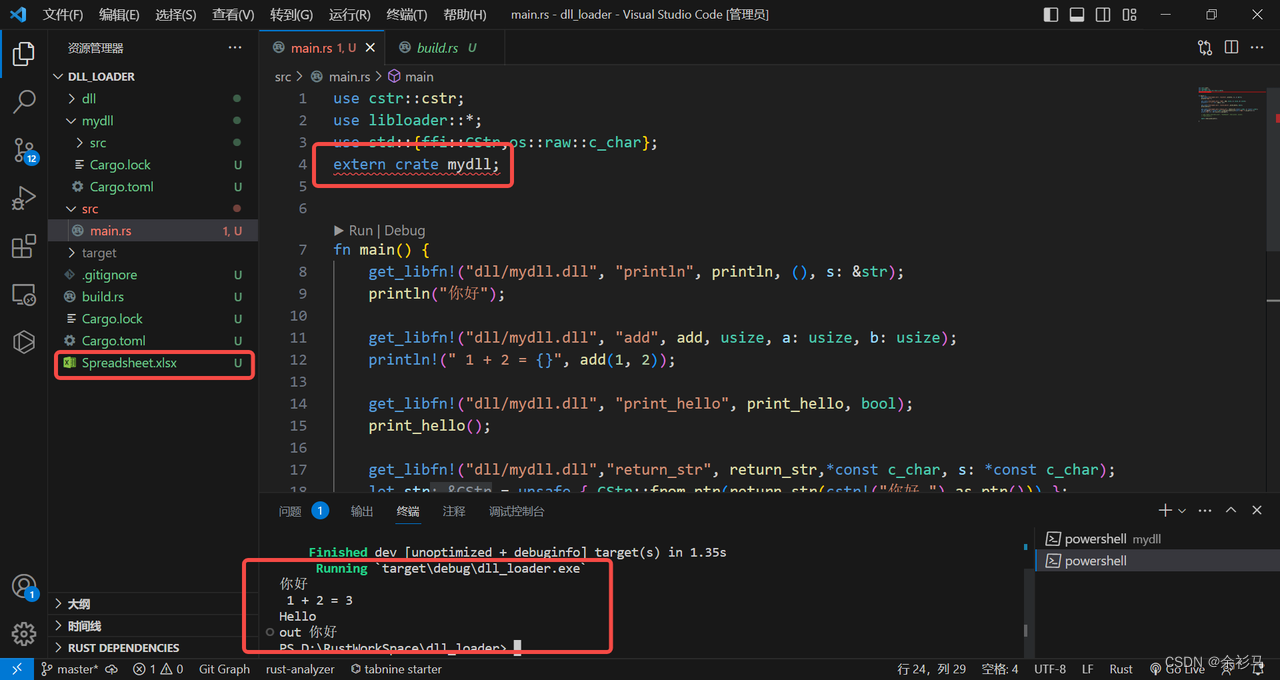
use cstr::cstr;
use libloader::*;
use std::{ffi::CStr,os::raw::c_char};
extern crate mydll;


fn main() {
    get_libfn!("dll/mydll.dll", "println", println, (), s: &str);
    println("你好");

    get_libfn!("dll/mydll.dll", "add", add, usize, a: usize, b: usize);
    println!(" 1 + 2 = {}", add(1, 2));

    get_libfn!("dll/mydll.dll", "print_hello", print_hello, bool);
    print_hello();

    get_libfn!("dll/mydll.dll","return_str", return_str,*const c_char, s: *const c_char);
    let str = unsafe { CStr::from_ptr(return_str(cstr!("你好 ").as_ptr())) };
    print!("out {}", str.to_str().unwrap());

    // get_libfn!("dll/Dll1.dll", "testExcel", test_excel, usize);
    // test_excel();

    mydll::test_excel_dll();

}
编译运行,同样运行成功。
8、附:Rust 调用外部 DLL 的三个库
# 调用外部 dll
# libloader = "0.1.4"
# libloading = "0.7.2"
# dlopen2 = "0.4"
注:rust wasm 不支持 libc,
issue 文档 https://github.com/astonbitecode/j4rs/issues/53

使用 rlib 调用,因为原构建 target 为 x86_64-pc-windows-msvc ,因此不兼容 wasm32-unknown-unknown,

四、Emscripten
参考 https://developer.mozilla.org/zh-CN/docs/WebAssembly/C_to_wasm1、下载安装
# 指定版本 git clone  -b 3.1.0  https://github.com/juj/emsdk.git

# 最新版本
git clone https://github.com/juj/emsdk.git

cd emsdk

./emsdk install latest

./emsdk activate latest

source ./emsdk_env.sh
遇到安装错误如下,

# 安装指令替换为:
# ./emsdk.py install latest
# ./emsdk.py activate latest

# 因为 emsdk 最终会调用 emsdk.py
如果权限不够,则需要赋权,


在最后一步遇到错误,这是 python 编译安装时候的问题,缺了一个模块,
ModuleNotFoundError: No module named '_ctypes'解决方案如下,
yum install libffi-devel

# 然后重新编译 python 源码,这里使用版本 Python-3.8.8.tgz

./configure --prefix=/usr/local/python3 --with-ssl

make

make install
重建软链接,
sudo rm -rf /usr/local/bin/python3
sudo ln -s /usr/local/lib/python3.8/bin/python3.8 /usr/local/bin/python3
emcc -v 
2、使用 emcc/em++ 编译 hello C/C++ 代码为 wasm
# 参考官方文档
https://emscripten.org/docs/compiling/Building-Projects.html
https://emscripten.org/docs/compiling/WebAssembly.html
2.1、编译方案1
编译到 wasm 并且生成一个用来运行我们代码的 HTML,将所有 wasm 在 web 环境下运行所需要的“胶水”JavaScript 代码都添加进去。
// hello.cpp
#include <stdio.h>

int main(int argc, char ** argv) {
  printf("Hello World\n");
}

// 编译指令
// emcc hello.cpp -s WASM=1 -o hello.html
可以看到已经生成了 hello.html 、hello.js 、hello.wasm,直接点开 html 文件运行是不行的,需要部署为 Web Server,这里使用 python 构建一个 Web Server,
# Python 版本是 3.X
python -m http.server
# Python 版本是 2.X
python -m SimpleHTTPServer

可以看到,已经自动调用了 main 函数中的 hello world 输出。
2.2、编译方案2
编译到 wasm 然后仅仅生成 JavaScript、WASM,
emcc -o hello2.js hello.cpp -O3 -s WASM=1
可以看到,仅生成了 hello2.js、hello2.wasm 文件,没有模板文件,
2.3、补充:使用自定义 HTML 模板
有些时候你可能想要使用一个自定义的 HTML 模板,让我们看看怎么实现,
# 在项目根目录下创建文件夹 html_template
mkdir html_template

# 在 emsdk 中搜索一个叫做 shell_minimal.html 的文件,然后复制它到刚刚创建的目录下的
html_template文件夹

cp  /home/sam/Downloads/emsdk/upstream/emscripten/src/shell_minimal.html html_template

执行编译脚本,
emcc -o hello3.html hello.cpp -O3 -s WASM=1 --shell-file html_template/shell_minimal.html

# 我们使用了 -o hello3.html,这意味编译器将仍然输出 js 胶水代码 和 html 文件
# 我们还使用了 --shell-file html_template/shell_minimal.html,这指定了要运行的例子使用 HTML 页面模板
hello3.html 运行效果,

五、JS 调用一个在 C/C++ 中自定义的函数
新建 hellojs.cpp,
#include <stdio.h>
#include <emscripten/emscripten.h>

int main(int argc, char ** argv) {
    printf("Hello World\n");
}

#ifdef __cplusplus
extern "C" {
#endif

int EMSCRIPTEN_KEEPALIVE myFunction(int argc, char ** argv) {
  printf("我的函数已被调用\n");
}

#ifdef __cplusplus
}
#endif
官方解释如下,
默认情况下,Emscripten 生成的代码只会调用
main()函数,其他的函数将被视为无用代码。在一个函数名之前添加EMSCRIPTEN_KEEPALIVE能够防止这样的事情发生。你需要导入emscripten.h库来使用EMSCRIPTEN_KEEPALIVE。
备注:为了保证万一你想在 C++ 代码中引用这些代码时代码可以正常工作,我们添加了
#ifdef代码块。由于 C 与 C++ 中名字修饰规则的差异,添加的代码块有可能产生问题,但目前我们设置了这一额外的代码块以保证你使用 C++ 时,这些代码会被视为外部 C 语言函数。
编译脚本如下,
emcc -o hellojs.html hellojs.cpp -O3 -s WASM=1 -s "EXTRA_EXPORTED_RUNTIME_METHODS=['ccall']" --shell-file html_template/shell_minimal.html
现在我们需要运行新的 myFunction() JavaScript 函数,在页面上新增一个按钮,并绑定 js 事件,
<button class="mybutton">运行我的函数</button>

document.querySelector(".mybutton").addEventListener("click", function () {
  alert("检查控制台");
  var result = Module.ccall(
    "myFunction", // name of C function
    null, // return type
    null, // argument types
    null,
  ); // arguments
});
然后运行 Web,

六、使用 Emscripten 编译 OpenXLSX
1、补充:emmake / emcmake

2、 重新编译 OpenXLSX
# 编译
emcmake cmake ..
# 生成lib.a 的llvm bitcode
emmake make 


在 output 文件夹下会生成静态库,
3、在项目中使用该静态库
把静态库拷贝到项目依赖库下,编译,
// main.cpp
#include <OpenXLSX/OpenXLSX.hpp>
#include <emscripten/emscripten.h>

using namespace OpenXLSX;

int main(){
    printf("call main function default\n");
    return 0;
}

#ifdef __cplusplus
extern "C" {
#endif

int EMSCRIPTEN_KEEPALIVE test_open_xlsx() {

    XLDocument doc;
    doc.create("Spreadsheet.xlsx");
    auto wks = doc.workbook().worksheet("Sheet1");

    wks.cell("A1").value() = "Hello, OpenXLSX!";

    doc.save();

    printf("函数 test_open_xlsx 已被调用\n");

    return 0;
}

#ifdef __cplusplus
}
#endif
// build_sh.sh
export SOURCE=./wasm_demo
echo "Running Emscripten..."
em++ -std=c++17 -O3 -flto ${SOURCE}/main.cpp -s WASM=1 \
-s "EXTRA_EXPORTED_RUNTIME_METHODS=['ccall']" -s ASSERTIONS=1 --shell-file ${SOURCE}/html_template/shell_minimal.html \
-o ${SOURCE}/final.html -I${SOURCE}/mylib/include -L${SOURCE}/mylib/lib64 \
-lOpenXLSX
echo "Finished Build"最终生成 final 三个文件,

部署 final.html ,访问效果如下,


js 调用函数,


如果直接使用Cmake,则编译出来的静态库不兼容,最终导致调用函数出错,


七、资源 IO
项目中的 C++ 里使用了很多系统的 API,主要是一些文件 IO,而 emscripten 对文件 IO 有很好的封装,并提供了一套虚拟文件系统,以兼容不同环境下文件 IO 的适配问题。
在最底层,Emscripten提供了三套文件系统
- MEMFS: 系统的数据完全存储在内存中,其非常类似于 webpack 的实现,在内存里模拟了一套文件系统的操作,运行时写入的文件不会持久化到本地
- NODEFS: Node.js 文件系统,该系统可以访问本地文件系统,可以持久化存储文件,但只能用于Node.js环境
- IDBFS: indexDB 文件系统,该系统基于浏览器的 IndexDB 对象,可以持久化存储,但只用于浏览器环境

7.1、src/setting.js 介绍
该文件指示了 -s <flag> 可以配置什么内容,例如 NODERAWFS、EXPORT_ES6、SIDE_MODULE 等,


7.2、使用 IDBFS 示例
官方文档,
https://emscripten.org/docs/api_reference/Filesystem-API.html#filesystem-api-idbfs

https://emscripten.org/docs/porting/files/index.html#packaging-code-index

https://emscripten.org/docs/porting/files/file_systems_overview.html#file-system-overview
改造 main.cpp ,注意这里两种导出函数的方法,对应不同的编译参数,以及在 js 调用时有 _ 前缀区别,
#include <OpenXLSX/OpenXLSX.hpp>
#include <emscripten/emscripten.h>
#include <emscripten/val.h>
#include <emscripten/bind.h>

using namespace OpenXLSX;

int main(){
    printf("call main function default\n");
    return 0;
}


void  setup_idbfs()  {
    EM_ASM(
        FS.mkdir('/data');
        FS.mount(IDBFS, {root : '.'},'/data');
    );
}

int test_node_fs(){

    setup_idbfs();

    XLDocument doc;
    doc.create("/data/Spreadsheet.xlsx");
    auto wks = doc.workbook().worksheet("Sheet1");

    wks.cell("A1").value() = "EMSCRIPTEN_BINDINGS >>> Hello, OpenXLSX!";

    doc.save();

    printf("函数 test_node_fs 已被调用\n");

    return 0;

}

EMSCRIPTEN_BINDINGS(Module){
    emscripten::function("test_node_fs",&test_node_fs);
}


#ifdef __cplusplus
extern "C" {
#endif

int EMSCRIPTEN_KEEPALIVE test_open_xlsx() {

    XLDocument doc;
    doc.create("/data/Spreadsheet.xlsx");
    auto wks = doc.workbook().worksheet("Sheet1");

    wks.cell("A1").value() = "EMSCRIPTEN_KEEPALIVE >>> Hello, OpenXLSX!";

    doc.save();

    printf("函数 test_open_xlsx 已被调用\n");

    return 0;
}

#ifdef __cplusplus
}
#endif
编译脚本,
# build.sh
export SOURCE=./wasm_demo

echo "Running Emscripten..."

emcc -std=c++17 -Oz --bind ${SOURCE}/main.cpp -s WASM=1 \
--shell-file ${SOURCE}/html_template/shell_minimal.html \
-s EXTRA_EXPORTED_RUNTIME_METHODS='[FS]' -s ASSERTIONS=1 \
-s INITIAL_MEMORY=268435456 -s ALLOW_MEMORY_GROWTH=1 \
-s STACK_OVERFLOW_CHECK=2 -s PTHREAD_POOL_SIZE_STRICT=2 \
-o ${SOURCE}/final.html -I${SOURCE}/mylib/include -L${SOURCE}/mylib/lib64 \
-lOpenXLSX -lidbfs.js

echo "Finished Build"
编译产物,

同样需要手动新增按钮、以及绑定按钮事件,
<button class="mybutton">运行我的函数</button><script>
function downloadBlob(blob, filename) {
const url = URL.createObjectURL(blob);
const link = document.createElement('a');
link.href = url;
link.download = filename;
document.body.appendChild(link);
link.click();
document.body.removeChild(link);
URL.revokeObjectURL(url);
}
document.querySelector(".mybutton").addEventListener("click", function () {
//alert("检查控制台");
// Module._test_open_xlsx();
Module.test_node_fs();
var data = FS.readFile("/data/Spreadsheet.xlsx");
var blob;
blob = new Blob([data.buffer], { type: "application/vnd.ms-excel" });
downloadBlob(blob, "Spreadsheet.xlsx");
});
</script>最后发布一个 web 来查看效果,

补充:js 下载 Blob 二进制对象,
# CSDN `C知道`生成代码
# 补充:js 下载 Blob 二进制对象
要在JavaScript中下载一个Blob对象,你可以使用以下步骤:

1. 创建一个Blob对象,可以通过使用Blob构造函数或者从其他地方获取。
2. 创建一个URL对象,可以通过调用`URL.createObjectURL(blob)`来实现。这将为Blob对象创建一个临时URL。
3. 创建一个链接元素(`<a>`)并设置其`href`属性为临时URL。
4. 设置链接元素的`download`属性为所需的文件名。
5. 使用JavaScript模拟点击链接元素,以触发文件下载。

以下是一个示例代码:

```javascript
function downloadBlob(blob, filename) {
  const url = URL.createObjectURL(blob);

  const link = document.createElement('a');
  link.href = url;
  link.download = filename;

  document.body.appendChild(link);
  link.click();

  document.body.removeChild(link);
  URL.revokeObjectURL(url);
}
```

你可以调用`downloadBlob`函数并传入Blob对象和所需的文件名来下载Blob。例如:

```javascript
const data = 'Hello, world!';
const blob = new Blob([data], { type: 'text/plain' });

downloadBlob(blob, 'example.txt');
```

上述代码将下载一个名为`example.txt`的文本文件,内容为`Hello, world!`。

请注意,这段代码在浏览器环境下运行,不适用于Node.js。在Node.js中,你可以使用fs模块来完成文件下载操作。
7.3、使用 NODEFS 示例
// main_nodejs.cc
#include <OpenXLSX/OpenXLSX.hpp>
#include <emscripten/emscripten.h>
#include <emscripten/val.h>
#include <emscripten/bind.h>

using namespace OpenXLSX;

void setup_nodefs() {
        EM_ASM(
                FS.mkdir('/data');
                FS.mount(NODEFS, {root:'.'}, '/data');
        );
}

int main() {
        setup_nodefs();
                 printf("call main function default\n");
        return 0;
}

void test_open_xlsx() {

    XLDocument doc;
    doc.create("/data/Spreadsheet.xlsx");
    auto wks = doc.workbook().worksheet("Sheet1");

    wks.cell("A1").value() = "EMSCRIPTEN_KEEPALIVE >>> Hello, OpenXLSX!";

    doc.save();

    printf("函数 test_open_xlsx 已被调用\n");

}


EMSCRIPTEN_BINDINGS(Module){
    emscripten::function("test_open_xlsx_v2",&test_open_xlsx);
}
# build_nodejs.sh
export SOURCE=./wasm_demo
echo "Running Emscripten..."
emcc -std=c++17 --bind ${SOURCE}/main_nodefs.cc \
-o ${SOURCE}/out.js -I${SOURCE}/mylib/include -L${SOURCE}/mylib/lib64 \
-lOpenXLSX -lnodefs.js
echo "Finished Build"
cd wasm_demo/
node out.js


可以看到,当前目录下生成了 Excel 文件,

注意,这里的 nodejs 运行环境版本要跟 emsdk 的 nodejs 版本一致,否则跨平台运行时因版本不一致而报错,

7.4、补充:Node WASI 【官方说该接口未稳定】
# node 官网 https://nodejs.org/api/wasi.html
# 以下摘自 C知道
要在 Node.js 中使用 WASI,你需要安装 `wasi` 模块。以下是安装和使用的步骤:

1. 确保你已经安装了 Node.js,并且版本在 14 或更高。

2. 打开终端或命令提示符,并使用以下命令安装 `wasi` 模块:

   ```shell
   npm install wasi
   ```

3. 在你的 Node.js 项目中,通过以下方式引入 `wasi` 模块:

   ```javascript
   const { WASI } = require('wasi');
   ```

4. 创建一个新的 WASI 实例:

   ```javascript
   const wasi = new WASI({
     args: process.argv,
     env: process.env,
     preopens: { '/sandbox': '/path/to/sandbox' }
   });
   ```

   在上面的代码中,你可以通过 `args` 传递命令行参数,`env` 传递环境变量,`preopens` 指定预打开的目录。

5. 加载 WebAssembly 模块,并将其与 WASI 实例相关联:

   ```javascript
   const importObj = {
     wasi_snapshot_preview1: wasi.wasiImport
   };

   const wasmModule = new WebAssembly.Module(fs.readFileSync('/path/to/module.wasm'));
   const wasmInstance = new WebAssembly.Instance(wasmModule, importObj);
   ```

6. 启动 WASI 实例,并在其中运行 WebAssembly 模块:

   ```javascript
   wasi.start(wasmInstance);
   ```

这样,你就可以在 Node.js 中使用 WASI 运行 WebAssembly 模块了。请注意,WASI 目前仍然处于实验阶段,可能会有一些限制和不完善的地方。
# Step1、安装 wasi 模块
# npm install
cnpm install wasi


// node v18.x
// test_node_wasi.js
'use strict';
const { readFile } = require('node:fs/promises');
const { WASI } = require('wasi');
const { argv, env } = require('node:process');
const { join } = require('node:path');

const wasi = new WASI({
  args: argv,
  env,
  preopens: {
    '/sandbox': '/some/real/path/that/wasm/can/access',
  },
});

// Some WASI binaries require:
//   const importObject = { wasi_unstable: wasi.wasiImport };
const importObject = { wasi_snapshot_preview1: wasi.wasiImport };

(async () => {
  const wasm = await WebAssembly.compile(
    await readFile(join(__dirname, 'demo.wasm')),
  );
  const instance = await WebAssembly.instantiate(wasm, importObject);

  wasi.start(instance);
})();
node --experimental-wasi-unstable-preview1 test_node_wasi.js # 如果遇到报错
Cannot find module 'node:fs/promises'
# 这是 node 版本太低导致
[sam@localhost wasm_demo]$ node -v
v14.15.5
# 解决:升级 node
清理 npm 缓存:npm cache clean -f
安装版本管理工具:npm install -g n
升级到最新的版本:n latest(最新版本)或者 n stable(最新稳定版本)
# 切换版本
n 18
# node 18 文档
https://nodejs.org/dist/latest-v18.x/docs/api/八、OpenXLSX 基础操作封装
1、C++ 代码封装与编译
// main_web_excel.cc
#include <OpenXLSX/OpenXLSX.hpp>
#include <emscripten/emscripten.h>
#include <emscripten/val.h>
#include <emscripten/bind.h>
#include <string>
#include <iostream>
#include <json11/json11.hpp>

using namespace json11;
using namespace std;
using namespace OpenXLSX;

// 手动挂载 IDBFS 文件系统
void setup_nodefs() {
	EM_ASM(
		FS.mkdir('/data');
		FS.mount(IDBFS, {root:'.'}, '/data');
	);
}

// 窄字符转宽字符
// 一开始是返回宽字符,发现Web输出乱码,又将结果以窄字符返回,显示正常
wstring string_to_wstring(string str){
    wstring wstr(str.length(), L' ');
    copy(str.begin(), str.end(), wstr.begin());
    return wstr;
}

// 将一个向量数组以分隔符拼接为字符串数组返回
string join(char c, vector<string> src) {

    string res = "";
    if (src.size() == 0) return res;

    vector<string>::iterator it = src.begin();
    res += "\"" + *it + "\"";

    for (it++; it != src.end(); it++) {
        res += c;
        res += "\"" + *it + "\"";
    }

    return res;
}

// 向量数组转字符串数组
string vec_to_array_str(vector<string> sheetNames) {
    string outputstr = "[";
    string sheetNamesStr = join(',',sheetNames);
    outputstr += sheetNamesStr;
    outputstr += "]";
    return outputstr;
}

// Excel 封装
class MyExcel {
    private:
        // 文件名
        string _filename;
        // 文件路径
        string _filePath;
        // 文档对象
        XLDocument _doc;
    public:
        // 构造函数,指定文件名,拼接虚拟路径
        MyExcel (string filename) {
            _filename = filename;
            _filePath = string("/data/") + filename;
        }
        // 创建文件
        void create(){
            _doc.create(_filePath);
        }
        // 打开文件
        void open(){
            _doc.open(_filePath);
            cout << "open file " << _filePath << endl;
        }
        // 关闭文件
        void close(){
            _doc.close();
            cout << "close file." << endl;
        }
        // 获取 Excel 全部的 sheet
        vector<string> get_all_sheetname(){
            XLWorkbook wb = _doc.workbook();
            return wb.sheetNames();
        }
        // 加载某个 sheet 的全部内容
        string load_sheet_content(string sheetName){
            cout << "load_sheet_content " << sheetName <<endl;
            auto wks = _doc.workbook().worksheet(sheetName);
            cout << "rowCount: " << wks.rows().rowCount() << endl;
            string rowsJsonStr = "[";
            for (auto& row : wks.rows()) {
                vector<string> rowValue = vector<string> {};
                for (auto& value : list<XLCellValue>(row.values())) {
                    //rowValue.insert(rowValue.end(),(string) value);
                    if (value.typeAsString() == "float" ) {
                        rowValue.insert(rowValue.end(),to_string( value.get<float>() ));
                    } else if(value.typeAsString() == "integer" ) {
                        rowValue.insert(rowValue.end(),to_string( value.get<int>() ));
                    } else {
                        rowValue.insert(rowValue.end(),value.get<string>() );
                    }
                    cout << value.typeAsString() << endl;
                }

                //rowsJsonStr += "\"r" + to_string(row.rowNumber()) + "\"" + ":" + vec_to_array_str(rowValue);
                rowsJsonStr += vec_to_array_str(rowValue);
                if( row.rowNumber() != wks.rows().rowCount()) {
                    rowsJsonStr += ",";
                }
            }

            rowsJsonStr += "]";

            string out = "{";
            out += "\"rowsData\":" +  rowsJsonStr + ",";
            //out += "\"sheetName\":\"" + sheetName + "\",";
            out += "\"rowCount\":" + to_string(wks.rows().rowCount());
            out += "}";

            return out;
        }
        // 将 json 字符解析并保存到 excel
        string save_json_to_excel(string jsonstr) {
            string err;
            const auto json = Json::parse(jsonstr,err);
            cout << "Json::parse Err " << err << endl;
            const auto data = json["data"];
            const auto sheetList = json["sheetList"].array_items();
            for(int i = 0; i < sheetList.size(); i++) {
                const string sheetname = sheetList[i].string_value();
                const int rowCount = data[sheetname]["rowCount"].int_value();
                if (!_doc.workbook().sheetExists(sheetname)) {
                    _doc.workbook().addWorksheet(sheetname);
                }
                auto wks = _doc.workbook().worksheet(sheetname);
                //cout << sheetname << " " << rowCount << endl;
                for(int j = 0; j < rowCount; j++) {
                    // attention: j must begin from 1 to ... , since rowid > 0
                    vector<string> cellValues = vector<string> {};
                    const auto jsonArray = data[sheetname]["rowsData"][j].array_items();
                    for(int k = 0; k < jsonArray.size(); k++) {
                        cellValues.insert(cellValues.end(), jsonArray[k].string_value());
                    }
                    wks.row(j+1).values() = cellValues;
                }
            }
            cout << "Saving Excel File ..." << endl;
            _doc.save();
            return _filename;
        }
};

// 保存到 excel 文件,返回保存文件名
string save_excel(string str) {
    MyExcel myExcel = MyExcel("save.xlsx");
    myExcel.create();
    string save_filename =  myExcel.save_json_to_excel(str);
    myExcel.close();
    return save_filename;
}

// 加载某个 excel 文档
string load_excel(string filename) {
    MyExcel myExcel = MyExcel(filename);
    myExcel.open();
    vector<string> sheetNames = myExcel.get_all_sheetname();
    cout << "sheet size: " << sheetNames.size() <<endl;
    string out = "{";
    out += "\"sheetList\":" + vec_to_array_str(sheetNames) + ",";
    out += "\"data\":{";
    for(int i = 0; i < sheetNames.size(); i++) {
        out += "\"" + sheetNames[i] + "\":" + myExcel.load_sheet_content(sheetNames[i]);
        if( i < sheetNames.size() - 1){
            out += ",";
        }
    }
    out += "}";
    out += "}";
    myExcel.close();
    return out;
}

// 测试
void test_open_xlsx() {

    XLDocument doc;
    doc.create("/data/Spreadsheet.xlsx");
    auto wks = doc.workbook().worksheet("Sheet1");

    wks.cell("A1").value() = "EMSCRIPTEN_KEEPALIVE >>> Hello, OpenXLSX!";

    doc.save();

    printf("函数 test_open_xlsx 已被调用\n");

}

int main() {
        setup_nodefs();
        printf("call main function default\n");
        return 0;
}

EMSCRIPTEN_BINDINGS(Module){
    emscripten::function("test_open_xlsx_v2",&test_open_xlsx);
    emscripten::function("load_excel",&load_excel);
    emscripten::function("save_excel",&save_excel);
}
# build.sh
export SOURCE=./wasm_excel

echo "Running Emscripten..."

emcc -std=c++17 -Oz --bind ${SOURCE}/main_web_excel.cc ${SOURCE}/json11.cpp -s WASM=1 \
--shell-file ${SOURCE}/html_template/shell_minimal.html \
-s EXTRA_EXPORTED_RUNTIME_METHODS='[FS]' -s ASSERTIONS=1 \
-s INITIAL_MEMORY=268435456 -s ALLOW_MEMORY_GROWTH=1 \
-s STACK_OVERFLOW_CHECK=2 -s PTHREAD_POOL_SIZE_STRICT=2 \
-o ${SOURCE}/final.html -I${SOURCE}/mylib/include -L${SOURCE}/mylib/lib64 \
-lOpenXLSX -lidbfs.js

echo "Finished Build"

2、前端代码封装
<!-- index.html -->
<!doctypehtml>
    <html lang=en-us>

    <head>
        <meta charset=utf-8>
        <meta content="text/html; charset=utf-8" http-equiv=Content-Type>
        <title>WASM + OpenXLSX</title>
        <link rel="stylesheet" href="excel.css" type="text/css">
        </link>
    </head>

    <body>
        <div class="top">
            <input type="file" id="file" onchange="loadExcel(event)">
            <button class="save_btn">SaveChange</button>
            <button class="download_btn">DownloadExcel</button>
        </div>

        <div class="wyb-excel wyb-excel-table">
            <table width="100%">
                <tbody>
                    <tr style="height: 38px;" id="letter">
                        <td class="drug-ele-td" style="width: 49px; text-align: center;">
                        </td>
                        <td class="drug-ele-td" style="text-align: center; width: 91px;">A</td>
                        <td class="drug-ele-td" style="text-align: center; width: 91px;">B</td>
                        <td class="drug-ele-td" style="text-align: center; width: 91px;">C</td>
                        <td class="drug-ele-td" style="text-align: center; width: 91px;">D</td>
                        <td class="drug-ele-td" style="text-align: center; width: 91px;">E</td>
                        <td class="drug-ele-td" style="text-align: center; width: 91px;">F</td>
                        <td class="drug-ele-td" style="text-align: center; width: 92px;">G</td>
                        <td class="drug-ele-td" style="text-align: center; width: 92px;">H</td>
                        <td class="drug-ele-td" style="text-align: center; width: 93px;">I</td>
                        <td class="drug-ele-td" style="text-align: center; width: 93px;">J</td>
                    </tr>
                </tbody>
            </table>

        </div>
        <div class="sheetlist">
        </div>

        <script async src=final.js></script>
        <script src=index.js></script>
        <script type="text/javascript" src=jquery-3.4.1.js></script>
    </body>

    </html>
// index.js
let reader = new FileReader();
let jsonMap = Object.create({});
let globalSheetList = [];
let file;
let currentsheet;
// 保存并下载
document.querySelector(".download_btn").addEventListener("click", function () {
// Module._test_open_xlsx();
// Module.test_node_fs();
const saveFilename = Module.save_excel(cast_excel_to_jsonstr());
downloadExcel(saveFilename);
});
// 保存 sheet 修改
document.querySelector(".save_btn").addEventListener("click", function () {
save_current_sheet_change();
});
/**
* 下载 Excel 到本地
* @param {*} filename 保存时的文件名
*/
function downloadExcel(filename) {
if (filename) {
var data = FS.readFile("/data/" + filename);
var blob;
blob = new Blob([data.buffer], { type: "application/vnd.ms-excel" });
downloadBlob(blob, "Spreadsheet.xlsx");
}
}
/**
* 下载 blob 文件
* @param {*} blob 二进制流数据
* @param {*} filename 保存文件名
*/
function downloadBlob(blob, filename) {
const url = URL.createObjectURL(blob);
const link = document.createElement('a');
link.href = url;
link.download = filename;
document.body.appendChild(link);
link.click();
document.body.removeChild(link);
URL.revokeObjectURL(url);
}
/**
* 将 excel 各个 sheet 的数据内容保存到本地对应的 json 对象中
* @param {*} jsonObj json 对象
*/
function save_excel_json_to_local(jsonObj) {
const sheetList = Object.keys(jsonObj.data);
for (let i = 0; i < sheetList.length; i++) {
jsonMap[sheetList[i]] = jsonObj.data[sheetList[i]];
}
globalSheetList = jsonObj["sheetList"];
}
/**
* 保存当前 sheet 的修改
*/
function save_current_sheet_change() {
jsonMap[currentsheet] = cast_current_sheet_to_jsonstr();
}
/**
* 加载 Excel
* @param {*} e 事件参数
*/
function loadExcel(e) {
// 清空 jsonMap、globalSheetList
jsonMap = {};
globalSheetList = [];
// 获取文件列表
let files = document.getElementById('file').files;
// 取第一个文件
file = files[0];
// 绑定加载事件
reader.addEventListener('loadend', writeFile);
// 读取文件为缓存数组
reader.readAsArrayBuffer(file);
// 定时读取文件内容输出到控制台
setTimeout(() => {
// 调用 c++ 函数 loadexcel,返回 json 字符串
let jsonstr = Module.load_excel(file.name);
// 清空旧数据
$(".sheetlist").empty();
// 序列化 json 字符
let json = JSON.parse(jsonstr);
save_excel_json_to_local(json);
showTableList();
// console.log(Object.keys(json.data)[0]);
// 拿到 data 下的全部 sheet key,默认取第一个 sheet key 显示
showCellList(Object.keys(json.data)[0]);
// console.log('result: ' + jsonstr);
}, 1000)
}
/**
* 复制一份文件到容器路径下
* @param {*} e 事件参数
*/
function writeFile(e) {
let result = reader.result;
const uint8_view = new Uint8Array(result);
FS.writeFile('/data/' + file.name, uint8_view)
console.log(uint8_view.byteLength)
}
/**
* 渲染表格列表
*/
function showTableList() {
let sheetElementStr = '';
// 渲染 sheet 列表
for (var i = 0; i < globalSheetList.length; i++) {
if (i == 0) {
sheetElementStr += `<div _na="${globalSheetList[i]}" class="currentsheet">${globalSheetList[i]}</div>`;
} else {
sheetElementStr += `<div _na="${globalSheetList[i]}">${globalSheetList[i]}</div>`;
}
}
// append 元素
$(".sheetlist").append(sheetElementStr);
// 添加样式与点击事件
$(".sheetlist>div").each(function () {
$(this).click(function () {
$(".sheetlist>div").each(function () {
$(this).removeClass('currentsheet')
})
$(this).addClass('currentsheet');
showCellList($(this).text())
})
})
}
/**
* 渲染指定 sheet 的单元格数据
* @param {*} sheetKey sheet 名
*/
function showCellList(sheetKey) {
currentsheet = sheetKey;
let rowElementStr = '';
// 拿到 sheet 的 rows 数据数组
const currentSheetJson = jsonMap[sheetKey];
const excelRowsData = currentSheetJson['rowsData'];
const rowCount = currentSheetJson['rowCount'];
// 第一层循环,渲染行数
for (var j = 0; j < rowCount; j++) {
rowElementStr += `<tr style="height: 38px;" >
<td class="drug-ele-td" style="width: 48px; text-align: center;">${j + 1}</td>`;
// 第二层循环,渲染列数,这里不确定有多少列,默认了 10 列
for (var i = 0; i < 10; i++) {
if (excelRowsData[j][i]) {
rowElementStr += `<td style="width: 90px;">${excelRowsData[j][i]}</td>`;
} else {
rowElementStr += `<td style="width: 90px;"></td>`;
}
}
rowElementStr += `</tr>`;
}
// 移除旧数据元素
$("table tbody tr").not("#letter").remove()
// 渲染新数据元素
$("table tbody").append(rowElementStr);
// 新增单元格的点击事件
$("td").not('.drug-ele-td').each(function () {
$(this).click(function () {
// 新增属性,内容可编辑
$(this).attr('contenteditable', "true");
// 新增可编辑时的样式
$(this).addClass('contenteditable', "true")
})
})
}
/**
* Excel sheet 内容转 json
*/
function cast_current_sheet_to_jsonstr() {
const obj = Object.create({});
// 获取当前 sheet 全部行
let rowTrList = $("table tbody tr").not("#letter");
let rowCount = rowTrList.length;
let totalRow = [];
for (var i = 0; i < rowTrList.length; i++) {
// 获取该行元素
let colsList = $(rowTrList[i]).children();
// 缓存该行每列的数据
let rowData = [];
for (var j = 1; j < colsList.length; j++) {
let td = $(colsList[j]);
var textValue = td.text();
rowData.push(textValue);
}
totalRow.push(rowData);
}
obj.rowCount = rowCount;
obj.rowsData = totalRow;
return obj;
}
/**
* 把 Excel 转 json
*/
function cast_excel_to_jsonstr() {
const obj = Object.create({});
obj.data = jsonMap;
obj.sheetList = globalSheetList;
// console.log(JSON.stringify(obj));
return JSON.stringify(obj);
}
3、运行效果
npm start


可以看到,读取Excel、修改Excel后保存、下载Excel功能都正常。
4、踩坑记录
4.1、关于 wstring 与string
一开始是返回了 wstring 用于兼容中文问题,但是发现 Web 输出乱码,最后统一返回 string,才解决了这个乱码问题。


返回 string,

4.2、关于大数与日期类型解析
大数和日期都会被转成整型integer,溢出的大数会变成 1,日期时间则被转成float,


这两个问题都无解,除非全部都使用字符串格式的 Cell 单元格式,


4.3、关于 sheet 命名格式与行数
sheet 的名字与行数有一个奇怪的 bug,当 sheetname 包含下划线 _ 时,读取 1k 行左右的数据正常,而读取 1w 行左右的数据失败,最后将下划线去掉,则可以正常读取 1w 行的数据,


还有一点需要注意,写入数据时,行号必须以 1 开始,否则会报错,

4.4、补充:使用 json11
一开始不知道哪个序列化工具好用,走了很多弯路,最终觉得使用 json11,
使用 json11 库,官网 https://gitcode.net/mirrors/dropbox/json11?utm_source=csdn_github_accelerator,

# 克隆代码
git clone https://gitcode.net/mirrors/dropbox/json11.git
使用示例,把 json11 两个文件复制到项目根目录,

添加到项目中,

测试代码,引用头文件、命名空间,

#include <iostream>
#include "json11.hpp"

using namespace json11;
using namespace std;

void test_json() {
    Json my_json = Json::object{
            { "key1", "value1" },
            { "key2", false },
            { "key3", Json::array { 1, 2, 3 } },
    };
    std::string json_str = my_json.dump();
    cout << json_str << endl;
}

int main() {
    test_json();
    return 0;
}
4.5、补充:格式化工具 fmt
# 参考
https://zhuanlan.zhihu.com/p/590654984?utm_id=0
https://github.com/fmtlib/fmt
https://fmt.dev/latest/index.html
https://hackingcpp.com/cpp/libs/fmt.html
# fmt 下载地址
https://github.com/fmtlib/fmt/releases/download/10.0.0/fmt-10.0.0.zip
https://github.com/fmtlib/fmt.git
5、不足与TODO
本人是 C++ 和 web 菜鸟,功能代码都基于简单原则实现,因此存在很多不足和需要改进的地方,
5.1、C++ 封装的各个函数还可以继续优化
5.2、使用 json11 库优化 json 对象返回字符
5.3、编译脚本优化
5.4、C++ 保存文件时,使用 uuid 生成文件名
5.5、Web 功能新增 行添加、行删除、简单函数
6、补充:使用 uuid

# 官网 https://www.boost.org/
# 下载后解压
tar -zxvf boost_1_82_0.tar.gz


使用示例,
// main.cc
#include <iostream>
#include <string>
#include <boost/uuid/uuid.hpp>
#include <boost/uuid/uuid_io.hpp>
#include <boost/uuid/uuid_generators.hpp>

using namespace std;

string Genuuid()
{
    boost::uuids::uuid a_uuid = boost::uuids::random_generator()();
    return boost::uuids::to_string(a_uuid);
}

int main(){
    cout << Genuuid() << endl;
}
# build.sh
g++ -std=c++17 main.cc -I /home/sam/Downloads/boost_1_82_0/ -o gen_uuid
./gen_uuid

整合到 wasm-excel 项目中,
// main_web_excel.cc

string gen_uuid() {
    boost::uuids::uuid a_uuid = boost::uuids::random_generator()();
    return boost::uuids::to_string(a_uuid);
}

string save_excel(string str) {
    MyExcel myExcel = MyExcel(gen_uuid() + ".xlsx");
    myExcel.create();
    string save_filename =  myExcel.save_json_to_excel(str);
    myExcel.close();
    return save_filename;
}
# build.sh
export SOURCE=./wasm_excel

echo "Running Emscripten..."

emcc -std=c++17 -Oz --bind ${SOURCE}/main_nodefs.cc ${SOURCE}/json11.cpp -s WASM=1 \
--shell-file ${SOURCE}/html_template/shell_minimal.html \
-s EXTRA_EXPORTED_RUNTIME_METHODS='[FS]' -s ASSERTIONS=1 \
-s INITIAL_MEMORY=268435456 -s ALLOW_MEMORY_GROWTH=1 \
-s STACK_OVERFLOW_CHECK=2 -s PTHREAD_POOL_SIZE_STRICT=2 \
-o ${SOURCE}/final.html -I${SOURCE}/mylib/include -L${SOURCE}/mylib/lib64 \
-I /home/sam/Downloads/boost_1_82_0/ \
-lOpenXLSX -lidbfs.js

echo "Finished Build"
测试效果,

可以看到,文件名使用的是 uuid 。
九、参考资料
1、编译 C/C++ 为 WebAssembly - WebAssembly | MDN
2、Main — Emscripten 3.1.44-git (dev) documentation
3、C++动态链接库(DLL)的创建和调用 - 知乎
4、GitHub - troldal/OpenXLSX: A C++ library for reading, writing, creating and modifying Microsoft Excel® (.xlsx) files.
5、Python安装报错:”ModuleNotFoundError:No module named _ctypes“ 的解决方案_六指黑侠i的博客-CSDN博客
6、Linux中gcc创建与使用静态库和动态库_gcc 指定静态库_on the moon的博客-CSDN博客
7、I want to… - WebAssembly
8、WebAssembly System Interface (WASI) | Node.js v20.5.0 Documentation
9、wasi - npm
10、【C++】使用WebAssembly在浏览器端操作Excel_wasm文件用什么打开_你的薄荷醇的博客-CSDN博客
11、webassembly网页无插件播放技术 - 知乎
12、Rust Wasm Linux开发环境搭建_centos安装rust_余衫马的博客-CSDN博客
13、mirrors / dropbox / json11 · GitCode
14、关于Emscripten | Emscripten
15、GitHub - fmtlib/fmt: A modern formatting library
16、Boost C++ Libraries