监听器
1.执行监听器
在流程实例执行过程中触发某个事件时,Activiti提供的执行监听器可以捕获该事件并执行相应的外部的Java代码,或者对指定的表达式求值。在流程实例执行过程中触发某个事件时,Activiti提供的执行监听器可以捕获该事件并执行相应的外部的Java代码,或者对指定的表达式求值。
- start:开始事件
- take:执行事件,只能在顺序流中
- end:结束事件
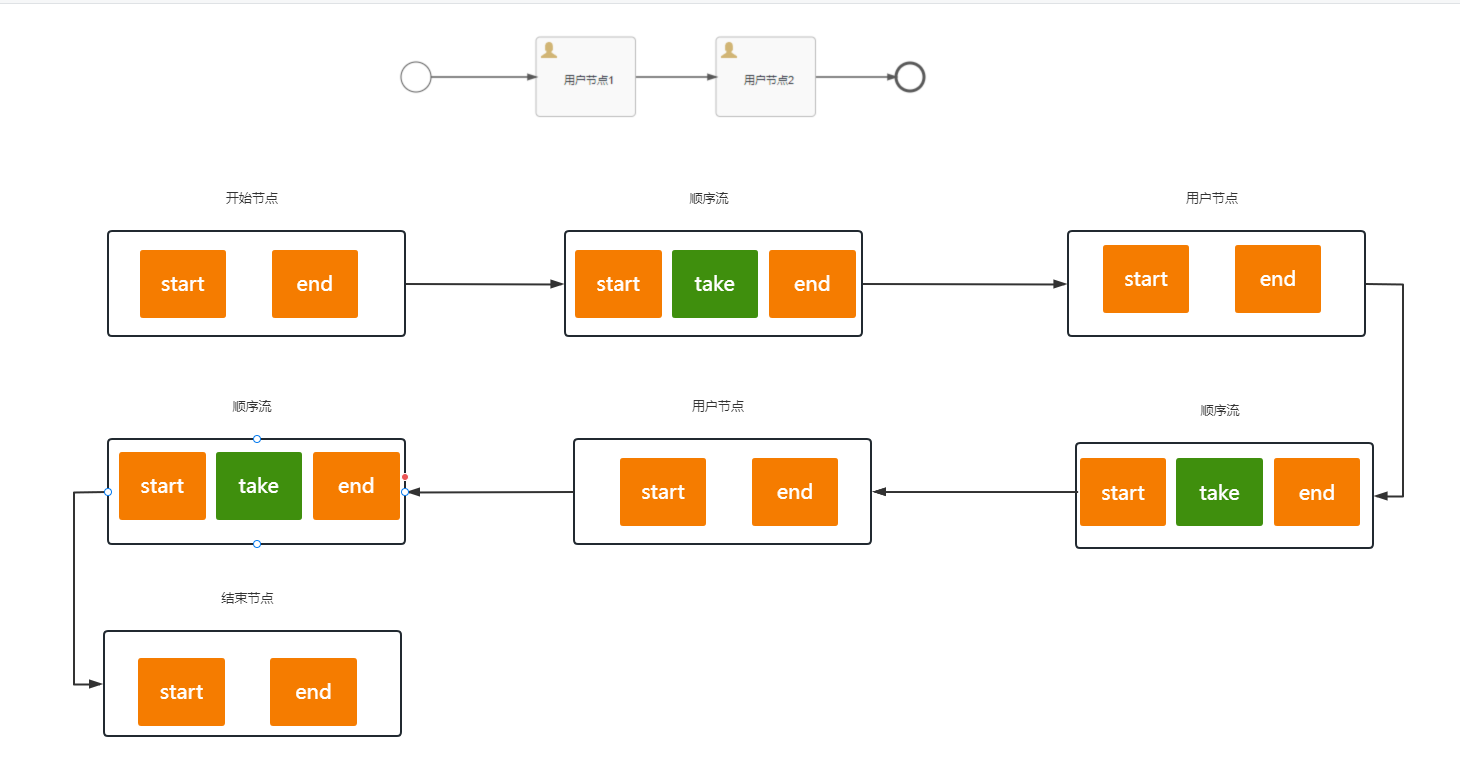
具体通过案例来介绍

对应的执行监听器完成的生命周期:
然后在这个过程中我们可以配置监听器的方式:
- 直接配置class:需要配置实现了ExecutionListener接口的实现类型
- DelegateExpression:需要从Spring容器中获取实现了ExecutionListener接口的实现类
- Expression:需要从Spring中获取对应的bean对象及要调用的相关的方法
上面案例中完整的xml文件:
<?xml version="1.0" encoding="UTF-8"?>
<definitions xmlns="http://www.omg.org/spec/BPMN/20100524/MODEL" xmlns:xsi="http://www.w3.org/2001/XMLSchema-instance" xmlns:xsd="http://www.w3.org/2001/XMLSchema" xmlns:activiti="http://activiti.org/bpmn" xmlns:bpmndi="http://www.omg.org/spec/BPMN/20100524/DI" xmlns:omgdc="http://www.omg.org/spec/DD/20100524/DC" xmlns:omgdi="http://www.omg.org/spec/DD/20100524/DI" typeLanguage="http://www.w3.org/2001/XMLSchema" expressionLanguage="http://www.w3.org/1999/XPath" targetNamespace="http://www.activiti.org/processdef">
  <process id="execution-listener1" name="execution-listener1" isExecutable="true">
    <documentation>execution-listener1</documentation>
    <startEvent id="start-el1" name="开始节点">
      <extensionElements>
        <activiti:executionListener event="start" class="com.boge.activiti.execution.ExecutionListener1">
          <activiti:field name="msg1">
            <activiti:string><![CDATA[boge666]]></activiti:string>
          </activiti:field>
          <activiti:field name="msg2">
            <activiti:expression><![CDATA[${msg2}]]></activiti:expression>
          </activiti:field>
        </activiti:executionListener>
        <activiti:executionListener event="end" class="com.boge.activiti.execution.ExecutionListener1">
          <activiti:field name="msg1">
            <activiti:string><![CDATA[boge-end]]></activiti:string>
          </activiti:field>
          <activiti:field name="msg2">
            <activiti:string><![CDATA[boge-msg2-end]]></activiti:string>
          </activiti:field>
        </activiti:executionListener>
      </extensionElements>
    </startEvent>
    <userTask id="sid-065D83B9-2D5A-4770-A1E8-A1D0A154DD86" name="用户节点1" activiti:assignee="s1">
      <extensionElements>
        <activiti:executionListener event="start" expression="${executionListener2.test1(execution)}"></activiti:executionListener>
        <modeler:initiator-can-complete xmlns:modeler="http://activiti.com/modeler"><![CDATA[false]]></modeler:initiator-can-complete>
      </extensionElements>
    </userTask>
    <endEvent id="sid-C8D80560-62C9-44CE-AE7A-65235F11B7F6"></endEvent>
    <sequenceFlow id="sid-FF78808D-D503-4B50-9CB8-14079609F480" sourceRef="sid-C1F4513F-24AD-44A3-8596-B51E2815D604" targetRef="sid-C8D80560-62C9-44CE-AE7A-65235F11B7F6"></sequenceFlow>
    <userTask id="sid-C1F4513F-24AD-44A3-8596-B51E2815D604" name="用户节点2"></userTask>
    <sequenceFlow id="sid-157E09A5-8D4C-4D96-B938-EFC3863CE682" name="顺序流1" sourceRef="start-el1" targetRef="sid-065D83B9-2D5A-4770-A1E8-A1D0A154DD86"></sequenceFlow>
    <sequenceFlow id="sid-372284A1-CE05-4FCA-97C3-3DFB49B55CE6" name="顺序流2" sourceRef="sid-065D83B9-2D5A-4770-A1E8-A1D0A154DD86" targetRef="sid-C1F4513F-24AD-44A3-8596-B51E2815D604">
      <extensionElements>
        <activiti:executionListener event="take" delegateExpression="${executionListener3}"></activiti:executionListener>
      </extensionElements>
    </sequenceFlow>
  </process>
  <bpmndi:BPMNDiagram id="BPMNDiagram_execution-listener1">
    <bpmndi:BPMNPlane bpmnElement="execution-listener1" id="BPMNPlane_execution-listener1">
      <bpmndi:BPMNShape bpmnElement="start-el1" id="BPMNShape_start-el1">
        <omgdc:Bounds height="30.0" width="30.0" x="195.0" y="210.0"></omgdc:Bounds>
      </bpmndi:BPMNShape>
      <bpmndi:BPMNShape bpmnElement="sid-065D83B9-2D5A-4770-A1E8-A1D0A154DD86" id="BPMNShape_sid-065D83B9-2D5A-4770-A1E8-A1D0A154DD86">
        <omgdc:Bounds height="80.0" width="100.0" x="330.0" y="185.0"></omgdc:Bounds>
      </bpmndi:BPMNShape>
      <bpmndi:BPMNShape bpmnElement="sid-C8D80560-62C9-44CE-AE7A-65235F11B7F6" id="BPMNShape_sid-C8D80560-62C9-44CE-AE7A-65235F11B7F6">
        <omgdc:Bounds height="28.0" width="28.0" x="690.0" y="211.0"></omgdc:Bounds>
      </bpmndi:BPMNShape>
      <bpmndi:BPMNShape bpmnElement="sid-C1F4513F-24AD-44A3-8596-B51E2815D604" id="BPMNShape_sid-C1F4513F-24AD-44A3-8596-B51E2815D604">
        <omgdc:Bounds height="80.0" width="100.0" x="510.0" y="185.0"></omgdc:Bounds>
      </bpmndi:BPMNShape>
      <bpmndi:BPMNEdge bpmnElement="sid-FF78808D-D503-4B50-9CB8-14079609F480" id="BPMNEdge_sid-FF78808D-D503-4B50-9CB8-14079609F480">
        <omgdi:waypoint x="610.0" y="225.0"></omgdi:waypoint>
        <omgdi:waypoint x="690.0" y="225.0"></omgdi:waypoint>
      </bpmndi:BPMNEdge>
      <bpmndi:BPMNEdge bpmnElement="sid-157E09A5-8D4C-4D96-B938-EFC3863CE682" id="BPMNEdge_sid-157E09A5-8D4C-4D96-B938-EFC3863CE682">
        <omgdi:waypoint x="225.0" y="225.0"></omgdi:waypoint>
        <omgdi:waypoint x="330.0" y="225.0"></omgdi:waypoint>
      </bpmndi:BPMNEdge>
      <bpmndi:BPMNEdge bpmnElement="sid-372284A1-CE05-4FCA-97C3-3DFB49B55CE6" id="BPMNEdge_sid-372284A1-CE05-4FCA-97C3-3DFB49B55CE6">
        <omgdi:waypoint x="430.0" y="225.0"></omgdi:waypoint>
        <omgdi:waypoint x="510.0" y="225.0"></omgdi:waypoint>
      </bpmndi:BPMNEdge>
    </bpmndi:BPMNPlane>
  </bpmndi:BPMNDiagram>
</definitions>
对应的监听器的处理类:
/**
 * 执行监听器
 *   需要实现 ExecutionListener 接口
 */
public class ExecutionListener1 implements ExecutionListener {

    @Setter
    private Expression msg1;
    @Setter
    private Expression msg2;

    @Override
    public void notify(DelegateExecution execution) {
        System.out.println("------ExecutionListener1  开始-------------");
        FlowElement currentFlowElement = execution.getCurrentFlowElement();
        System.out.println("currentFlowElement.getName() = " + currentFlowElement.getName());
        String currentActivityId = execution.getCurrentActivityId();
        System.out.println("currentActivityId = " + currentActivityId);
        String eventName = execution.getEventName();
        System.out.println("eventName = " + eventName);
        System.out.println(msg1.getValue(execution));
        System.out.println(msg2.getValue(execution));
        System.out.println("------ExecutionListener1  结束-------------");
    }
}
@Component
public class ExecutionListener2 {


    public void test1(DelegateExecution execution){
        System.out.println("------ExecutionListener2  开始-------------");
        FlowElement currentFlowElement = execution.getCurrentFlowElement();
        System.out.println("currentFlowElement.getName() = " + currentFlowElement.getName());
        String currentActivityId = execution.getCurrentActivityId();
        System.out.println("currentActivityId = " + currentActivityId);
        String eventName = execution.getEventName();
        System.out.println("eventName = " + eventName);
        System.out.println("------ExecutionListener2  结束-------------");
    }
}
@Component
public class ExecutionListener3 implements ExecutionListener {

    @Override
    public void notify(DelegateExecution execution) {
        System.out.println("------ExecutionListener3  开始-------------");
        FlowElement currentFlowElement = execution.getCurrentFlowElement();
        System.out.println("currentFlowElement.getName() = " + currentFlowElement.getName());
        String currentActivityId = execution.getCurrentActivityId();
        System.out.println("currentActivityId = " + currentActivityId);
        String eventName = execution.getEventName();
        System.out.println("eventName = " + eventName);
        System.out.println("------ExecutionListener3  结束-------------");
    }
}
2.任务监听器
任务监听器(Task Listener)是Activiti7中的一个重要概念,用于在任务生命周期中执行特定的操作。任务监听器可以在任务创建、任务分配、任务完成等事件发生时触发,从而执行相应的逻辑。
任务监听器可以用于执行各种操作,例如记录任务日志、发送通知、更新任务状态等。通过在任务监听器中编写逻辑,可以实现对任务生命周期的全面控制和管理。
任务监听器只能在用户任务节点上配置。可被任务监听器捕获的任务相关事件类型包括以下几种。
create:任务创建事件,发生在任务创建后,所有属性被设置时。assignment:任务指派事件,发生在将任务指派给某人时。需要注意的是,该事件在任务创建事件前执行。complete:任务完成事件,发生在任务完成时,即任务数据从执行数据表删除之前。delete:任务删除事件,发生在任务完成时,即任务数据从执行数据表删除之前。
具体的案例讲解:
我们可以通过3中方式来配置任务监听器:
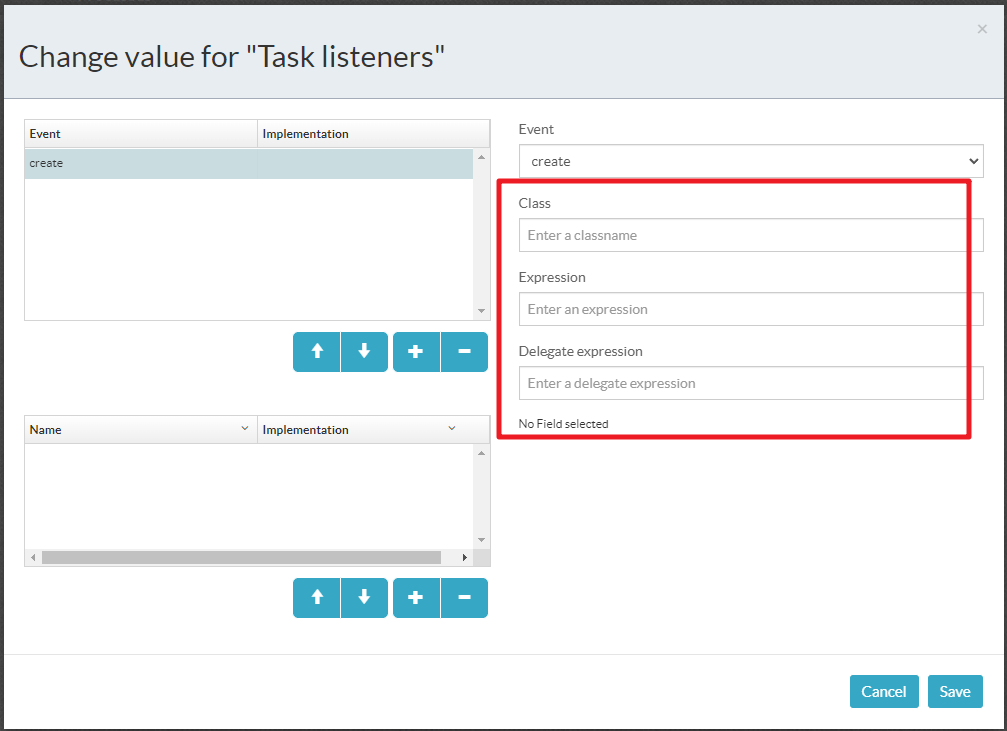
分别是:
- class属性配置
- expression属性配置
- delegateExpression属性配置
我们分别定义这三种类型的Class,分别如下:
public class MyTaskListener1 implements TaskListener {
    @Override
    public void notify(DelegateTask delegateTask) {
        System.out.println("MyTaskListener1-----------开始了");
        String taskDefinitionKey = delegateTask.getTaskDefinitionKey();
        System.out.println("taskDefinitionKey = " + taskDefinitionKey);
        String eventName = delegateTask.getEventName();
        System.out.println("eventName = " + eventName);
        System.out.println("MyTaskListener1-----------结束了");
    }
}

@Component
public class MyTaskListener2 {

    public void test1(DelegateTask delegateTask){
        System.out.println("MyTaskListener2-----------开始了");
        String taskDefinitionKey = delegateTask.getTaskDefinitionKey();
        System.out.println("taskDefinitionKey = " + taskDefinitionKey);
        String eventName = delegateTask.getEventName();
        System.out.println("eventName = " + eventName);
        System.out.println("MyTaskListener2-----------结束了");
    }
}

@Component
public class MyTaskListener3 implements TaskListener {
    @Override
    public void notify(DelegateTask delegateTask) {
        System.out.println("MyTaskListener3-----------开始了");
        String taskDefinitionKey = delegateTask.getTaskDefinitionKey();
        System.out.println("taskDefinitionKey = " + taskDefinitionKey);
        String eventName = delegateTask.getEventName();
        System.out.println("eventName = " + eventName);
        System.out.println("MyTaskListener3-----------结束了");
    }
}
然后再做相关的配置了
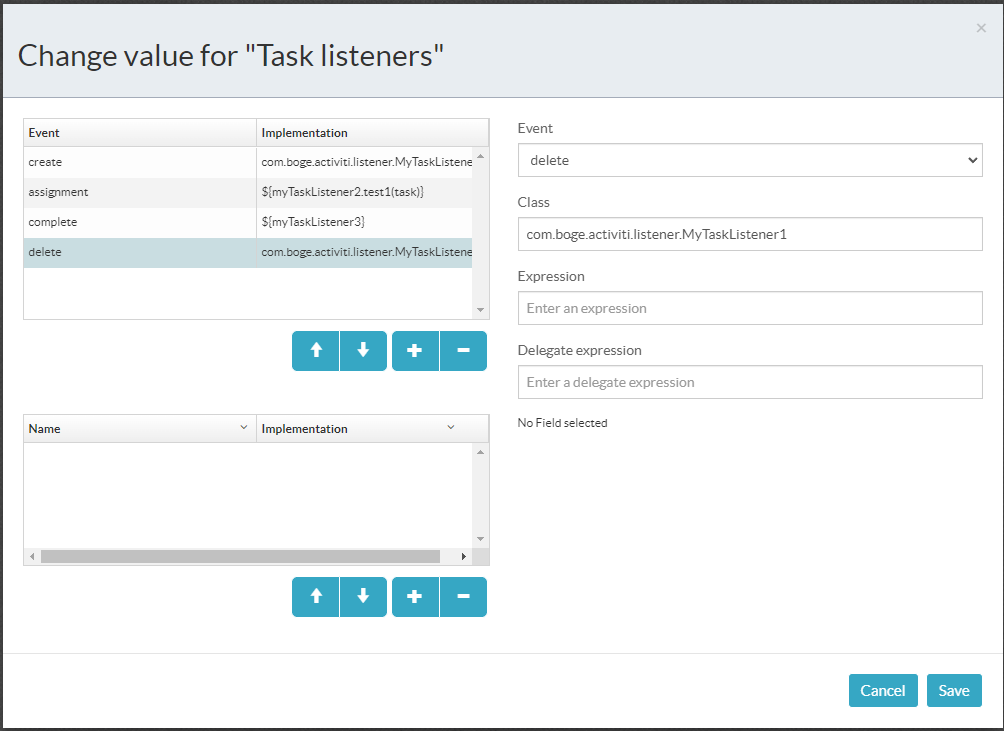
我们在一个用户任务上配置了4个TaskListener.然后部署运行看看具体的效果,启动流程的时候触发了assignment和create事件,而且审批人指派是在前面执行的
MyTaskListener2-----------开始了
taskDefinitionKey = sid-4449755D-AC66-41B5-AC4E-68012BE95880
eventName = assignment
MyTaskListener2-----------结束了
MyTaskListener1-----------开始了
taskDefinitionKey = sid-4449755D-AC66-41B5-AC4E-68012BE95880
eventName = create
MyTaskListener1-----------结束了
然后做用户节点的审批操作,complete和delete事件执行了。
MyTaskListener3-----------开始了
taskDefinitionKey = sid-4449755D-AC66-41B5-AC4E-68012BE95880
eventName = complete
MyTaskListener3-----------结束了
MyTaskListener1-----------开始了
taskDefinitionKey = sid-4449755D-AC66-41B5-AC4E-68012BE95880
eventName = delete
MyTaskListener1-----------结束了
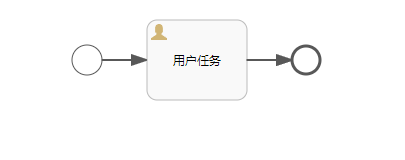
完整的流程图信息:
<?xml version="1.0" encoding="UTF-8"?>
<definitions xmlns="http://www.omg.org/spec/BPMN/20100524/MODEL" xmlns:xsi="http://www.w3.org/2001/XMLSchema-instance" xmlns:xsd="http://www.w3.org/2001/XMLSchema" xmlns:activiti="http://activiti.org/bpmn" xmlns:bpmndi="http://www.omg.org/spec/BPMN/20100524/DI" xmlns:omgdc="http://www.omg.org/spec/DD/20100524/DC" xmlns:omgdi="http://www.omg.org/spec/DD/20100524/DI" typeLanguage="http://www.w3.org/2001/XMLSchema" expressionLanguage="http://www.w3.org/1999/XPath" targetNamespace="http://www.activiti.org/processdef">
  <process id="test111" name="test111" isExecutable="true">
    <documentation>test111</documentation>
    <startEvent id="startEvent1"></startEvent>
    <userTask id="sid-4449755D-AC66-41B5-AC4E-68012BE95880" name="用户任务" activiti:assignee="${user1}">
      <extensionElements>
        <activiti:taskListener event="create" class="com.boge.activiti.listener.MyTaskListener1"></activiti:taskListener>
        <activiti:taskListener event="assignment" expression="${myTaskListener2.test1(task)}"></activiti:taskListener>
        <activiti:taskListener event="complete" delegateExpression="${myTaskListener3}"></activiti:taskListener>
        <activiti:taskListener event="delete" class="com.boge.activiti.listener.MyTaskListener1"></activiti:taskListener>
        <modeler:initiator-can-complete xmlns:modeler="http://activiti.com/modeler"><![CDATA[false]]></modeler:initiator-can-complete>
      </extensionElements>
    </userTask>
    <sequenceFlow id="sid-07C5D7FE-48DA-4A7E-9F96-A716EB4DC825" sourceRef="startEvent1" targetRef="sid-4449755D-AC66-41B5-AC4E-68012BE95880"></sequenceFlow>
    <endEvent id="sid-3DB05158-BBE1-44FC-902B-368FBD3C5E71"></endEvent>
    <sequenceFlow id="sid-257B3F54-79C6-41A3-9CE3-103A33697253" sourceRef="sid-4449755D-AC66-41B5-AC4E-68012BE95880" targetRef="sid-3DB05158-BBE1-44FC-902B-368FBD3C5E71"></sequenceFlow>
  </process>
  <bpmndi:BPMNDiagram id="BPMNDiagram_test111">
    <bpmndi:BPMNPlane bpmnElement="test111" id="BPMNPlane_test111">
      <bpmndi:BPMNShape bpmnElement="startEvent1" id="BPMNShape_startEvent1">
        <omgdc:Bounds height="30.0" width="30.0" x="300.0" y="160.0"></omgdc:Bounds>
      </bpmndi:BPMNShape>
      <bpmndi:BPMNShape bpmnElement="sid-4449755D-AC66-41B5-AC4E-68012BE95880" id="BPMNShape_sid-4449755D-AC66-41B5-AC4E-68012BE95880">
        <omgdc:Bounds height="80.0" width="100.0" x="375.0" y="135.0"></omgdc:Bounds>
      </bpmndi:BPMNShape>
      <bpmndi:BPMNShape bpmnElement="sid-3DB05158-BBE1-44FC-902B-368FBD3C5E71" id="BPMNShape_sid-3DB05158-BBE1-44FC-902B-368FBD3C5E71">
        <omgdc:Bounds height="28.0" width="28.0" x="520.0" y="161.0"></omgdc:Bounds>
      </bpmndi:BPMNShape>
      <bpmndi:BPMNEdge bpmnElement="sid-257B3F54-79C6-41A3-9CE3-103A33697253" id="BPMNEdge_sid-257B3F54-79C6-41A3-9CE3-103A33697253">
        <omgdi:waypoint x="475.0" y="175.0"></omgdi:waypoint>
        <omgdi:waypoint x="520.0" y="175.0"></omgdi:waypoint>
      </bpmndi:BPMNEdge>
      <bpmndi:BPMNEdge bpmnElement="sid-07C5D7FE-48DA-4A7E-9F96-A716EB4DC825" id="BPMNEdge_sid-07C5D7FE-48DA-4A7E-9F96-A716EB4DC825">
        <omgdi:waypoint x="330.0" y="175.0"></omgdi:waypoint>
        <omgdi:waypoint x="375.0" y="175.0"></omgdi:waypoint>
      </bpmndi:BPMNEdge>
    </bpmndi:BPMNPlane>
  </bpmndi:BPMNDiagram>
</definitions>
3.全局事件监听器
咱们上面详细介绍了执行监听器和任务监听器,他们可以捕获流程在运转过程中产生的相关事件,但是是需要给特定的流程和对应的节点来绑定相关的监听器,有特殊性在这里。在Activiti中还给我们提供了全局事件监听器,它是引擎范围的事件监听器,可以捕获所有的Activiti事件。
3.1 事件监听器的实现
首先我们来看下针对事件监听器的实现类如何来定义。具体的定义如下,只需实现ActivitiEventListener的接口即可。
public class MyGlobalEventListener implements ActivitiEventListener {

    /**
     * 事件触发执行的方法
     * @param event
     */
    @Override
    public void onEvent(ActivitiEvent event) {
        System.out.println("---全局事件监听器---"+event.getType().toString());
        if (event instanceof TaskRuntimeEvent) {
            TaskRuntimeEvent taskEvent = (TaskRuntimeEvent) event;
            if (event instanceof TaskCreatedEventImpl) {
                // 处理任务创建事件
                System.out.println("Task created: " + taskEvent);
            } else if (event instanceof TaskAssignedEvent) {
                // 处理任务分配事件
                System.out.println("Task assigned: " + taskEvent);
            } else if (event instanceof TaskCompletedEvent) {
                // 处理任务完成事件
                System.out.println("Task completed: " + taskEvent);
            } else if (event instanceof TaskCancelledEvent) {
                // 处理任务取消事件
                System.out.println("Task cancelled: " + taskEvent);
            } else if (event instanceof TaskSuspendedEvent) {
                // 处理任务挂起事件
                System.out.println("Task suspended: " + taskEvent);
            }
        }
    }

    /**
     * 上面的 onEvent 方法抛出异常的后续处理动作
     * @return
     *    false :表示忽略onEvent()方法方法中抛出的异常
     *    true :表示onEvent()方法中抛出的异常继续向上传播,导致当前操作失败
     */
    @Override
    public boolean isFailOnException() {
        return false;
    }
}
在自定义的监听器实现类中我们需要重写如下的两个方法:
- onEvent:事件触发执行的方法
- isFailOnException:上面的 onEvent 方法抛出异常的后续处理动作,false :表示忽略onEvent()方法方法中抛出的异常,true :表示onEvent()方法中抛出的异常继续向上传播,导致当前操作失败
3.2 配置事件监听器
全局监听器的配置有三种方式在工作流引擎配置文件中配置、在流程定义文件中配置、在代码中调用API动态添加。
在工作流引擎配置文件中配置
我们可以在Activiti7的配置文件中来注册我们上面定义的事件监听器。
<bean id="processEngineConfiguration" class="org.activiti.engine.impl.cfg.StandaloneProcessEngineConfiguration">

    <property name="jdbcUrl" value="jdbc:mysql://localhost:3306/activiti7?nullCatalogMeansCurrent=true" />
    <property name="jdbcDriver" value="com.mysql.cj.jdbc.Driver" />
    <property name="jdbcUsername" value="root" />
    <property name="jdbcPassword" value="123456" />
    <property name="databaseSchemaUpdate" value="true" />
    <property name="asyncExecutorActivate" value="true" />
    <property name="mailServerHost" value="mail.my-corp.com" />
    <property name="mailServerPort" value="5025" />
    <property name="eventListeners">
        <list>
            <bean class="com.boge.activiti.listener.MyGlobalEventListener"></bean>
        </list>
    </property>
</bean>
上面我们通过eventListeners这个属性来配置全局的事件监听器,他会监听所有的事件,如果我们想要监听特定的事件,可以通过typedEventListeners这个属性来配置
<bean id="processEngineConfiguration" class="org.activiti.engine.impl.cfg.StandaloneProcessEngineConfiguration">

    <property name="jdbcUrl" value="jdbc:mysql://localhost:3306/activiti7?nullCatalogMeansCurrent=true" />
    <property name="jdbcDriver" value="com.mysql.cj.jdbc.Driver" />
    <property name="jdbcUsername" value="root" />
    <property name="jdbcPassword" value="123456" />
    <property name="databaseSchemaUpdate" value="true" />
    <property name="asyncExecutorActivate" value="true" />
    <property name="mailServerHost" value="mail.my-corp.com" />
    <property name="mailServerPort" value="5025" />
    <property name="typedEventListeners">
        <map>
            <entry key="TASK_CREATED,TASK_COMPLETED">
                <list>
                    <bean class="com.boge.activiti.listener.MyGlobalEventListener"></bean>
                </list>
            </entry>
        </map>
    </property>
</bean>
上面的这个配置就只监听TASK_CREATED和TASK_COMPLETED事件,注意多个事件类型通过,连接。当然我们现在都是在SpringBoot项目中来做项目开发。这块我们的配置需要在配置类中完成。具体如下:
@Configuration
public class Activiti7Config {

    @Autowired
    SpringProcessEngineConfiguration config;

    @PostConstruct
    public void springProcessEngineConfiguration() {
        // 设置自定义的全局事件监听器
        config.setEventListeners(Collections.singletonList(new MyGlobalEventListener()));
    }
}
指派具体的事件类型
@Configuration
public class Activiti7Config {

    @Autowired
    SpringProcessEngineConfiguration config;

    @PostConstruct
    public void springProcessEngineConfiguration() {
        // 设置自定义的全局事件监听器
        Map<String, List<ActivitiEventListener>> map = new HashMap<>();
        map.put("TASK_CREATED", Arrays.asList(new MyGlobalEventListener()));
        config.setTypedEventListeners(map);
    }
}
然后我们可以启动前面案例中部署的任务监听器的流程。先看没有指定具体事件类型的日志输出
---全局事件监听器---ENTITY_CREATED
---全局事件监听器---HISTORIC_PROCESS_INSTANCE_CREATED
---全局事件监听器---ENTITY_CREATED
---全局事件监听器---ENTITY_INITIALIZED
---全局事件监听器---ENTITY_CREATED
---全局事件监听器---ENTITY_INITIALIZED
---全局事件监听器---ENTITY_CREATED
---全局事件监听器---ENTITY_INITIALIZED
---全局事件监听器---VARIABLE_CREATED
---全局事件监听器---ENTITY_INITIALIZED
---全局事件监听器---ENTITY_CREATED
---全局事件监听器---ENTITY_INITIALIZED
---全局事件监听器---PROCESS_STARTED
---全局事件监听器---ENTITY_CREATED
---全局事件监听器---ENTITY_INITIALIZED
---全局事件监听器---HISTORIC_ACTIVITY_INSTANCE_CREATED
---全局事件监听器---ACTIVITY_STARTED
---全局事件监听器---HISTORIC_ACTIVITY_INSTANCE_ENDED
---全局事件监听器---ACTIVITY_COMPLETED
---全局事件监听器---SEQUENCEFLOW_TAKEN
---全局事件监听器---ENTITY_CREATED
---全局事件监听器---ENTITY_INITIALIZED
---全局事件监听器---HISTORIC_ACTIVITY_INSTANCE_CREATED
---全局事件监听器---ACTIVITY_STARTED
---全局事件监听器---ENTITY_CREATED
---全局事件监听器---ENTITY_INITIALIZED
---全局事件监听器---ENTITY_CREATED
---全局事件监听器---ENTITY_INITIALIZED
---全局事件监听器---ENTITY_CREATED
---全局事件监听器---ENTITY_INITIALIZED
---全局事件监听器---ENTITY_CREATED
---全局事件监听器---ENTITY_INITIALIZED
---全局事件监听器---VARIABLE_CREATED
MyTaskListener2-----------开始了
taskDefinitionKey = sid-4449755D-AC66-41B5-AC4E-68012BE95880
eventName = assignment
MyTaskListener2-----------结束了
---全局事件监听器---ENTITY_CREATED
---全局事件监听器---ENTITY_INITIALIZED
MyTaskListener1-----------开始了
taskDefinitionKey = sid-4449755D-AC66-41B5-AC4E-68012BE95880
eventName = create
MyTaskListener1-----------结束了
---全局事件监听器---TASK_CREATED
---全局事件监听器---TASK_ASSIGNED
然后是特定事件类型的全局监听器的执行,日志输入如下:
MyTaskListener2-----------开始了
taskDefinitionKey = sid-4449755D-AC66-41B5-AC4E-68012BE95880
eventName = assignment
MyTaskListener2-----------结束了
MyTaskListener1-----------开始了
taskDefinitionKey = sid-4449755D-AC66-41B5-AC4E-68012BE95880
eventName = create
MyTaskListener1-----------结束了
---全局事件监听器---TASK_CREATED
通过流程定义文件配置事件监听器
当然我们还可以在流程定义中配置事件监听器,不过这种方式配置的事件监听器只能监听于该流程相关的事件以及该流程定义上发起的所有流程实例的事件,具体如下:
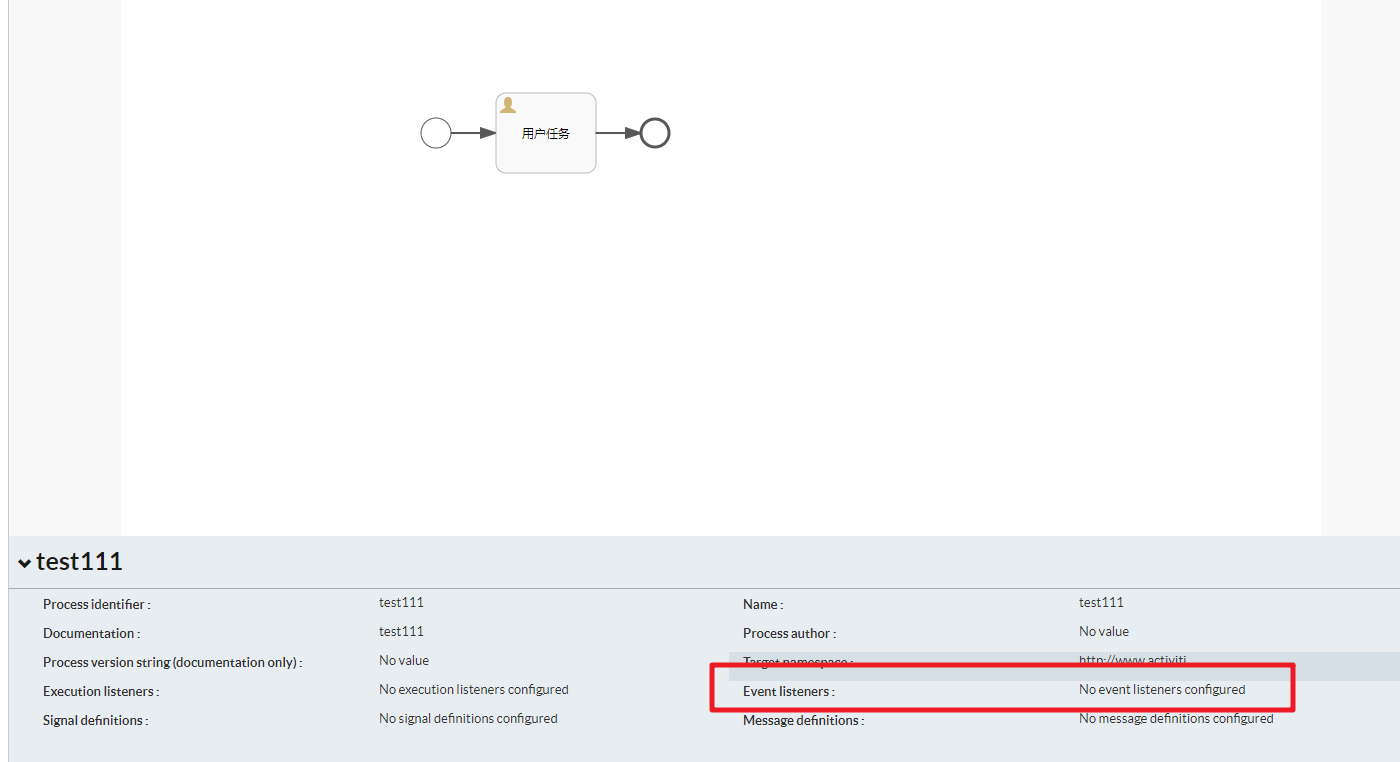
在设计器中点击空白地方有个Event Listeners。可以通过这个功能来设置。但是通过流程设计器在这块配置的时候不是很灵活。我们可以基于BPMN的规范直接在流程图的xml中配置,监听器的配置可以使用3中方式来处理。
- 通过class属性进行全类名定义;
- 通过delegateExpression属性引用实现了监听器接口的表达式;
- 使用throwEvent属性及其额外属性指定抛出的BPMN事件类型。
<definitions xmlns="http://www.omg.org/spec/BPMN/20100524/MODEL" xmlns:xsi="http://www.w3.org/2001/XMLSchema-instance" xmlns:xsd="http://www.w3.org/2001/XMLSchema" xmlns:activiti="http://activiti.org/bpmn" xmlns:bpmndi="http://www.omg.org/spec/BPMN/20100524/DI" xmlns:omgdc="http://www.omg.org/spec/DD/20100524/DC" xmlns:omgdi="http://www.omg.org/spec/DD/20100524/DI" typeLanguage="http://www.w3.org/2001/XMLSchema" expressionLanguage="http://www.w3.org/1999/XPath" targetNamespace="http://www.activiti.org/processdef">
  <process id="test111" name="test111" isExecutable="true">
    <documentation>test111</documentation>
    <extensionElements>
      <!-- 通过class属性来配置事件监听器 -->
      <activiti:eventListener class="com.boge.activiti.listener.MyGlobalEventListener" entityType="task">
      </activiti:eventListener>
      <activiti:eventListener  delegateExpression="${myGlobalEventListener2}"
                              ></activiti:eventListener>
    </extensionElements>
      <!-- .... 省略 -->
    </process>
</definitions>
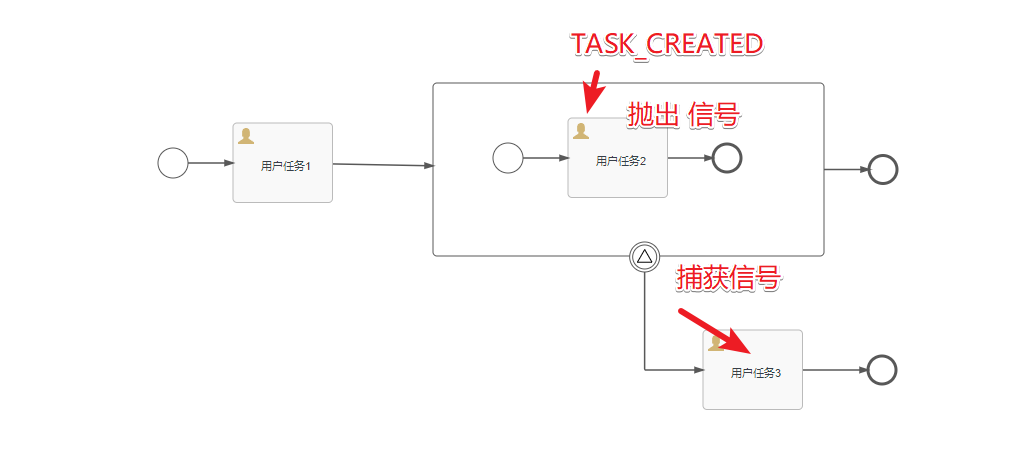
在流程运转过程中会有相关的各种信号、错误、消息等抛出的BPMN事件。在全局事件监听器的配置中我们可以在对应的事件触发的情况下向外抛出相关的事件动作。比如:
<extensionElements>
  <!-- 配置抛出的信号事件 -->
  <activiti:eventListener throwEvent="signal" signalName="MySignal1" events="TASK_CREATED"></activiti:eventListener>
</extensionElements>
上面xml中的相关属性的作用:
- events: TASK_CREATED 表示监听Task的创建事件
- throwEvent:signal 表示当触发 task的创建事件后会向外抛出信号事件
- signalName:MySignal1 表示抛出的事件名称
具体的案例为:
在这里throwEvent可以抛出的类型有:
- signal:普通信号
- GlobalSignal:全局信号
- error:错误
- message:消息
当然这块也可以和我们前面配置的class 一块使用如下:
<extensionElements>
  <!-- 通过class属性来配置事件监听器 -->
  <activiti:eventListener throwEvent="signal" class="com.boge.activiti.listener.MyGlobalEventListener" signalName="signal1" events="TASK_CREATED"></activiti:eventListener>
</extensionElements>
这个流程定义表示的是即会抛出相关的信号。同时也会在events事件发生的时候触发对应的class中的监听器来处理。
在代码中调用API动态添加
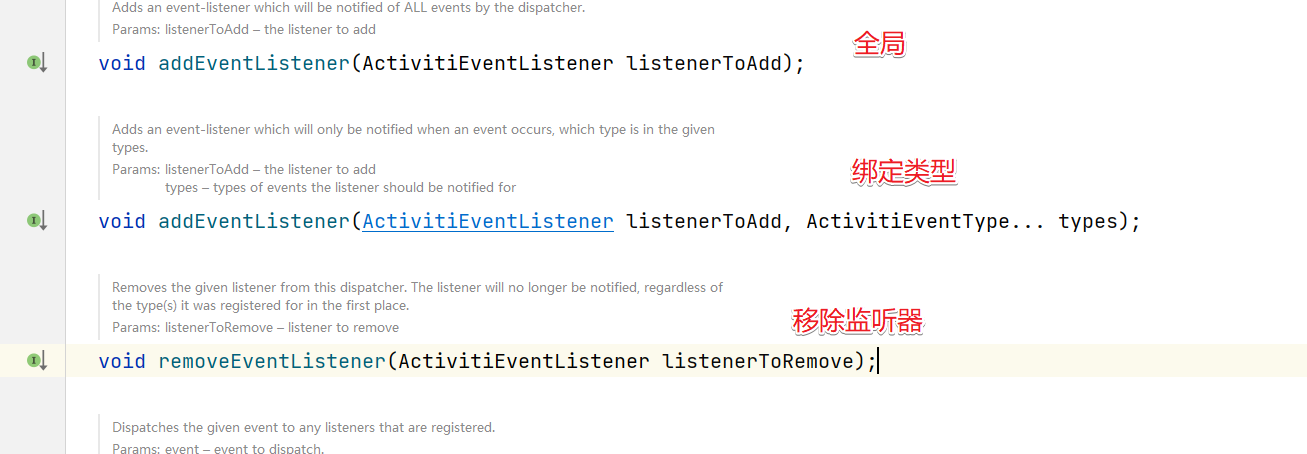
前面都是我们需要在启动服务之前就要配置好,非常的不灵活。在流程部署和运行后如果需要添加相关的事件监听器。这时可以通过RuntimeService中提供的addEventListener()方法来实现监听器的注册操作。
注意:流程引擎重启后相关的监听器会消失!!!
3.3 日志监听器
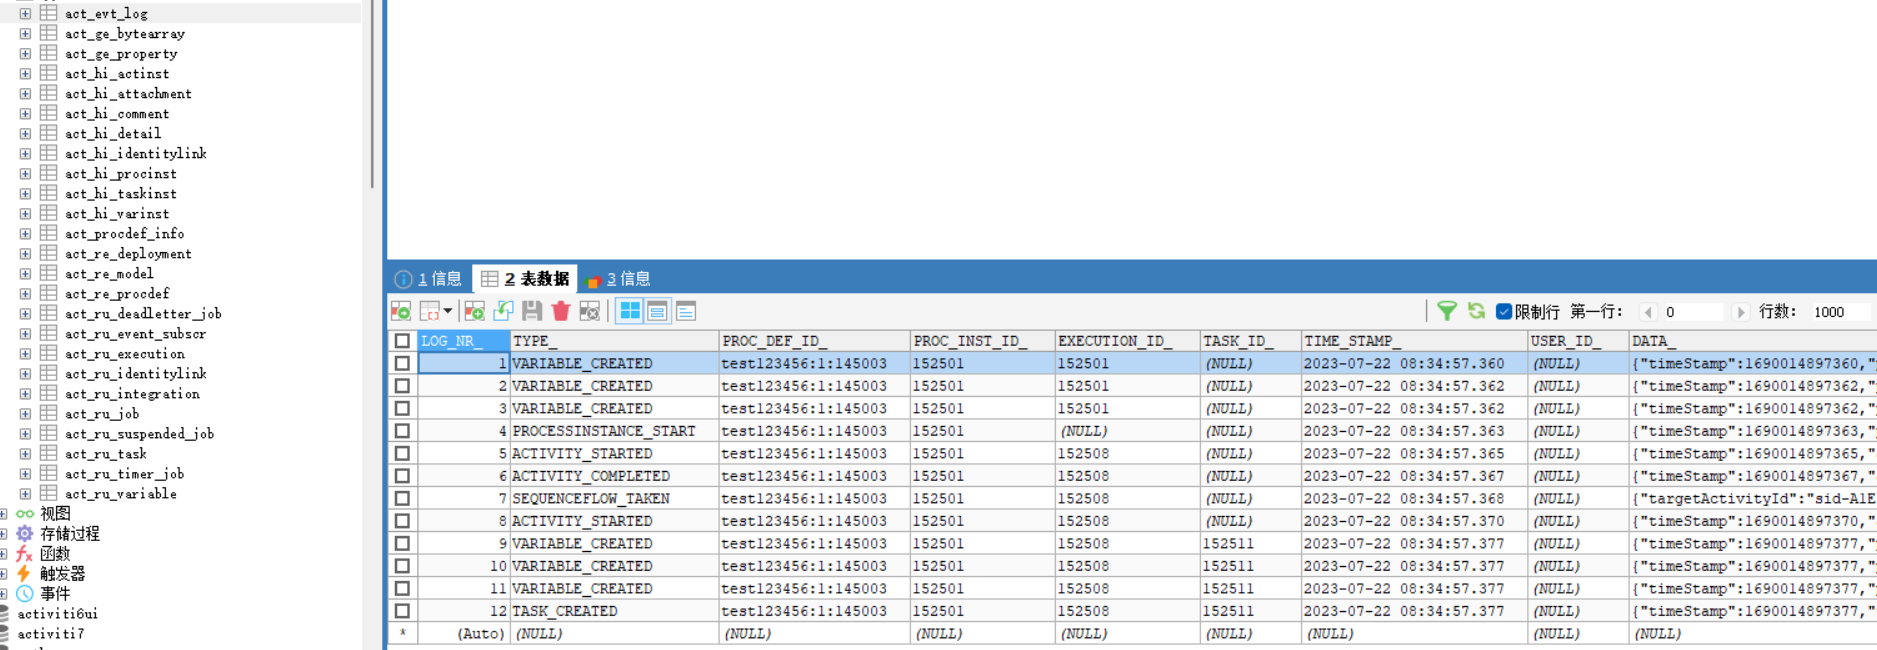
如果我们需要把全局事件监听器的信息持久化到数据库中。也就是保存在act_evt_log表中。那么我们可以通过设置enableDatabaseEventLogging属性来开启。
@Configuration
public class Activiti7Config {

    @Autowired
    SpringProcessEngineConfiguration config;

    @PostConstruct
    public void springProcessEngineConfiguration() {
        // 设置自定义的全局事件监听器
        config.setEventListeners(Collections.singletonList(new MyGlobalEventListener()));
        // 开启日志监听
        config.setEnableDatabaseEventLogging(true);
    }
}
然后在act_evt_log中会记录相关的信息
当然我们也可以禁用掉全局事件监听器。毕竟这块对性能的影响还是比较大的。
@Configuration
public class Activiti7Config {

    @Autowired
    SpringProcessEngineConfiguration config;

    @PostConstruct
    public void springProcessEngineConfiguration() {
        // 设置自定义的全局事件监听器
        config.setEventListeners(Collections.singletonList(new MyGlobalEventListener()));
        // 禁用 全局事件监听器
        config.setEnableEventDispatcher(false);
    }
}
这块的禁用仅仅是禁用了全局事件监听器,对执行监听器和任务监听器是没有影响的。