【Flutter 组件】002-基础组件:文本与样式
文章目录
- 【Flutter 组件】002-基础组件:文本与样式
- 一、Text
- 1、概述
- 2、属性列表
- 3、构造方法
- 4、示例
- 代码演示
- 运行结果
- 二、TextStyle
- 1、概述
- 2、属性列表
- 3、构造方法
- 4、示例
- 代码示例
- 运行结果
- 三、TextSpan
- 1、概述
- 2、构造方法
- 3、示例
- 代码示例
- 运行结果
- 四、DefaultTextStyle
- 1、概述
- 2、构造方法
- 3、示例
- 代码示例
- 运行结果
- 五、字体
- 1、概述
- 2、详细使用步骤
- 第一步:在 asset 中声明
- 第二步:使用字体
- 3、Package中的字体
- N、参考资料
一、Text
1、概述
Text 用于显示简单样式文本,它包含一些控制文本显示样式的一些属性。
继承关系: Text -> StatelessWidget -> Widget -> DiagnosticableTree -> Diagnosticable -> Object
2、属性列表
| Text 属性 | 介绍 |
|---|---|
| style | TextStyle 对象,最常用属性,详情见下方表格 |
| strutStyle | 字体在文本内的一些偏移,使用时 style 属性必须有值,很少使用 |
| textAlign | 对齐方式:left、start、right、end、center、justify |
| textDirection | TextDirection.ltr:从左到右、TextDirection.rtl:从右到左 |
| locale | 区域设置,基本不会用 |
| softWrap | 是否自动换行 |
| overflow | 超出部分截取方式,clip->直接截取,fade->渐隐,ellipsis->省略号 |
| textScaleFactor | 字体缩放 |
| maxLines | 最多显示行数 |
| semanticsLabel | 语义标签,如文本为"$$“,这里设置为"双美元” |
| textWidthBasis | 测量行宽度 |
| textHeightBehavior | 官方备注: 定义如何应用第一行的ascent和最后一行的descent |
3、构造方法
const Text(
    // 要显示的文字内容
    this.data,
   {
    // key类似于id
    Key key,
    // 文字显示样式和属性
    this.style,
    this.strutStyle,
    // 文字对齐方式
    this.textAlign,
    // 文字显示方向
    this.textDirection,
    // 设置语言环境
    this.locale,
    // 是否自动换行
    this.softWrap,
    // 文字溢出后处理方式
    this.overflow,
    // 字体缩放
    this.textScaleFactor,
    // 最大显示行数
    this.maxLines,
    // 图像的语义描述,用于向Andoid上的TalkBack和iOS上的VoiceOver提供图像描述
    this.semanticsLabel,
  })
4、示例
代码演示
import 'package:flutter/material.dart';
void main() {
runApp(MaterialApp(
home: Scaffold(
appBar: AppBar(title: const Text("訾博的学习笔记")),
body: const MyApp(),
),
));
}
// 代码块 StatelessWidget
class MyApp extends StatelessWidget {
const MyApp({Key? key}) : super(key: key);
Widget build(BuildContext context) {
return Center(
child: Container(
alignment: Alignment.center,
height: 200,
width: 200,
// LinearGradient 背景线性渐变 RadialGradient 径向渐变
decoration: BoxDecoration(
color: Colors.yellow,
gradient: const LinearGradient(
colors: [Colors.lightBlue, Colors.greenAccent, Colors.purple],
),
boxShadow: const [
//卡片阴影
BoxShadow(
color: Colors.blue,
offset: Offset(2.0, 2.0),
blurRadius: 10.0,
)
],
border: Border.all(color: Colors.black, width: 1),
),
transform: Matrix4.rotationZ(0.2),
child: const Text(
"你好 Flutter !",
textAlign: TextAlign.left,
overflow: TextOverflow.ellipsis,
maxLines: 2,
textScaleFactor: 1.5,
),
),
);
}
}
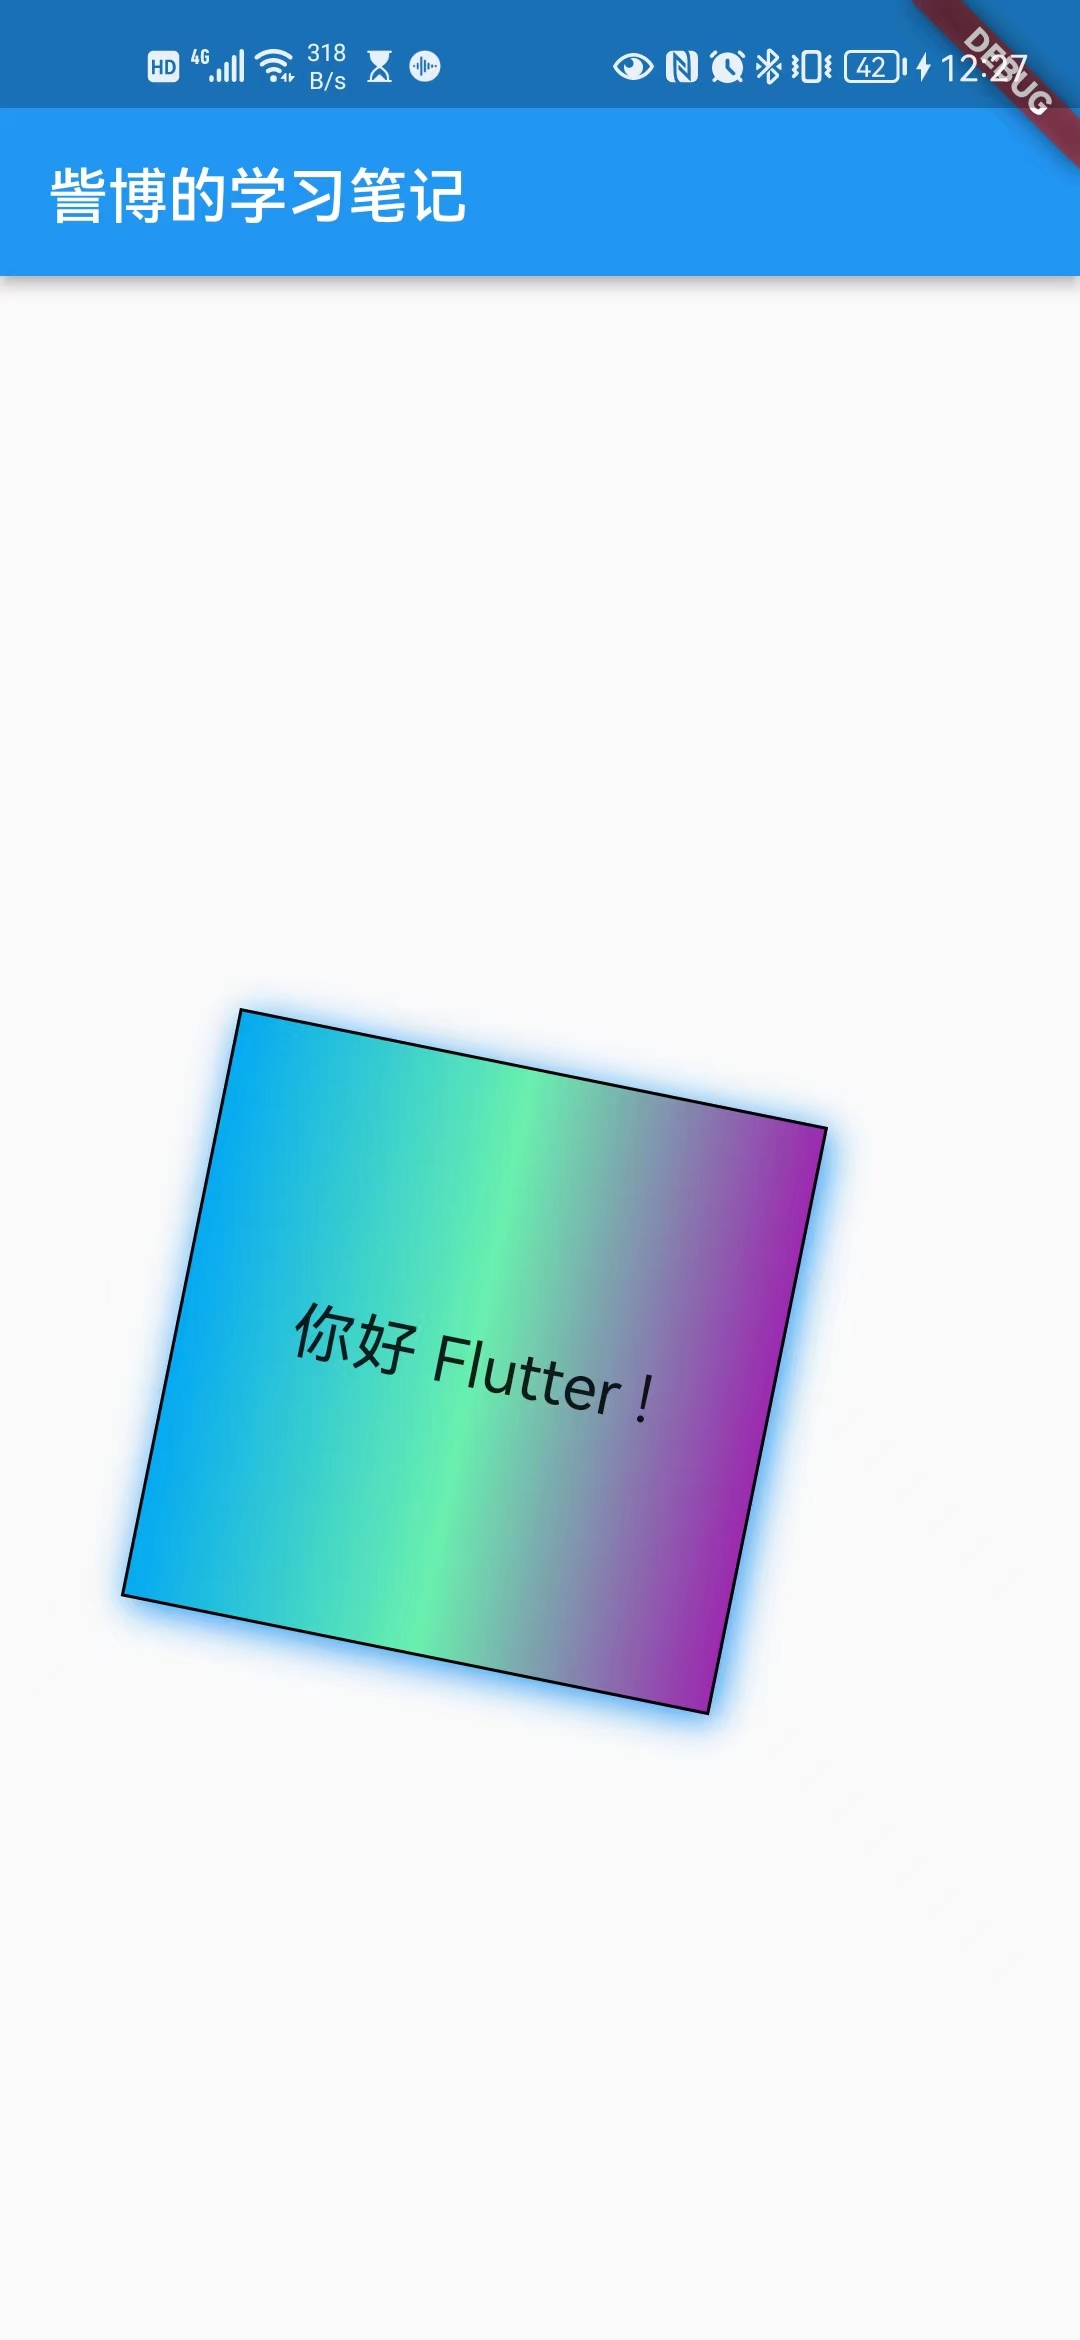
运行结果
二、TextStyle
1、概述
TextStyle用于指定文本显示的样式如颜色、字体、粗细、背景等。
2、属性列表
| TextStyle 属性 | 介绍 |
|---|---|
| inherit | 是否继承父类 |
| color | 字体颜色 |
| backgroundColor | 背景色 |
| fontSize | 字体大小 |
| fontWeight | 字体加粗 |
| fontStyle | 系统字体 |
| fontFamily | 字体 |
| letterSpacing | 字母间距 |
| wordSpacing | 单词间距 |
| textBaseline | 字体基线,有兴趣的可以单独了解,flex 布局中会有一种baseline,不常用 |
| height | 高度 |
| locale | 区域设置 |
| foreground | 前置层 |
| background | 背景层 |
| shadows | 阴影 |
| fontFeatures | 指定字体的多种变体 |
| decoration | 文字划线:上,中,下 |
| decorationColor | 划线颜色 |
| decorationStyle | 划线样式:虚线,单线,双线 |
| decorationThickness | 线宽,默认1.0 |
| debugLabel | 仅在 debug 模式下有用 |
3、构造方法
const TextStyle({
    // 是否继承父类组件属性
    this.inherit = true,
    // 字体颜色
    this.color,
    // 文字大小,默认14px
    this.fontSize,
    // 字体粗细
    this.fontWeight,
    // 字体样式,normal或italic
    this.fontStyle,
    // 字母间距,默认为0,负数间距缩小,正数间距增大
    this.letterSpacing,
    // 单词间距,默认为0,负数间距缩小,正数间距增大
    this.wordSpacing,
    // 字体基线
    this.textBaseline,
    // 行高
    this.height,
    // 设置区域
    this.locale,
    // 前景色
    this.foreground,
    // 背景色
    this.background,
    // 阴影
    this.shadows,
    // 文字划线,下换线等等装饰
    this.decoration,
    // 划线颜色
    this.decorationColor,
    // 划线样式,虚线、实线等样式
    this.decorationStyle,
    // 描述信息
    this.debugLabel,
    // 字体
    String fontFamily,
    List<String> fontFamilyFallback,
    String package,
  })
4、示例
代码示例
Text("Hello world",
  style: TextStyle(
    color: Colors.blue,
    fontSize: 18.0,
    height: 1.2,
    fontFamily: "Courier",
    background: Paint()..color=Colors.yellow,
    decoration:TextDecoration.underline,
    decorationStyle: TextDecorationStyle.dashed
  ),
);
运行结果

三、TextSpan
1、概述
不同样式的文本组合在一起!
Text 的所有文本内容只能按同一种样式,如果我们需要对一个 Text 内容的不同部分按照不同的样式显示,这时就可以使用TextSpan,它代表文本的一个“片段”。
2、构造方法
const TextSpan({
    // 文本内容
    this.text,
    // 子 TextSpan ,可以指定多个
    this.children,
    // 文本样式
    super.style,
    // 手势识别监听器
    this.recognizer,
    MouseCursor? mouseCursor,
    this.onEnter,
    this.onExit,
    this.semanticsLabel,
    this.locale,
    this.spellOut,
  }) : mouseCursor = mouseCursor ??
         (recognizer == null ? MouseCursor.defer : SystemMouseCursors.click),
       assert(!(text == null && semanticsLabel != null));
3、示例
代码示例
import 'package:flutter/material.dart';
void main() {
runApp(MaterialApp(
home: Scaffold(
appBar: AppBar(title: const Text("訾博的学习笔记")),
body: const MyApp(),
),
));
}
class MyApp extends StatelessWidget {
const MyApp({Key? key}) : super(key: key);
Widget build(BuildContext context) {
return Center(
child: Container(
alignment: Alignment.center,
height: 200,
width: 200,
child: Text.rich(
TextSpan(
text: "訾博",
style: TextStyle(
color: Colors.black,
fontSize: 40,
fontWeight: FontWeight.bold,
fontStyle: FontStyle.italic,
decoration: TextDecoration.underline,
decorationStyle: TextDecorationStyle.dashed,
),
children: [
TextSpan(
text: "正在学习",
style: TextStyle(
fontSize: 22,
color: Colors.red,
),
),
TextSpan(
text: "Flutter",
style: TextStyle(
fontSize: 34,
color: Colors.green,
),
),
],
),
),
),
);
}
}
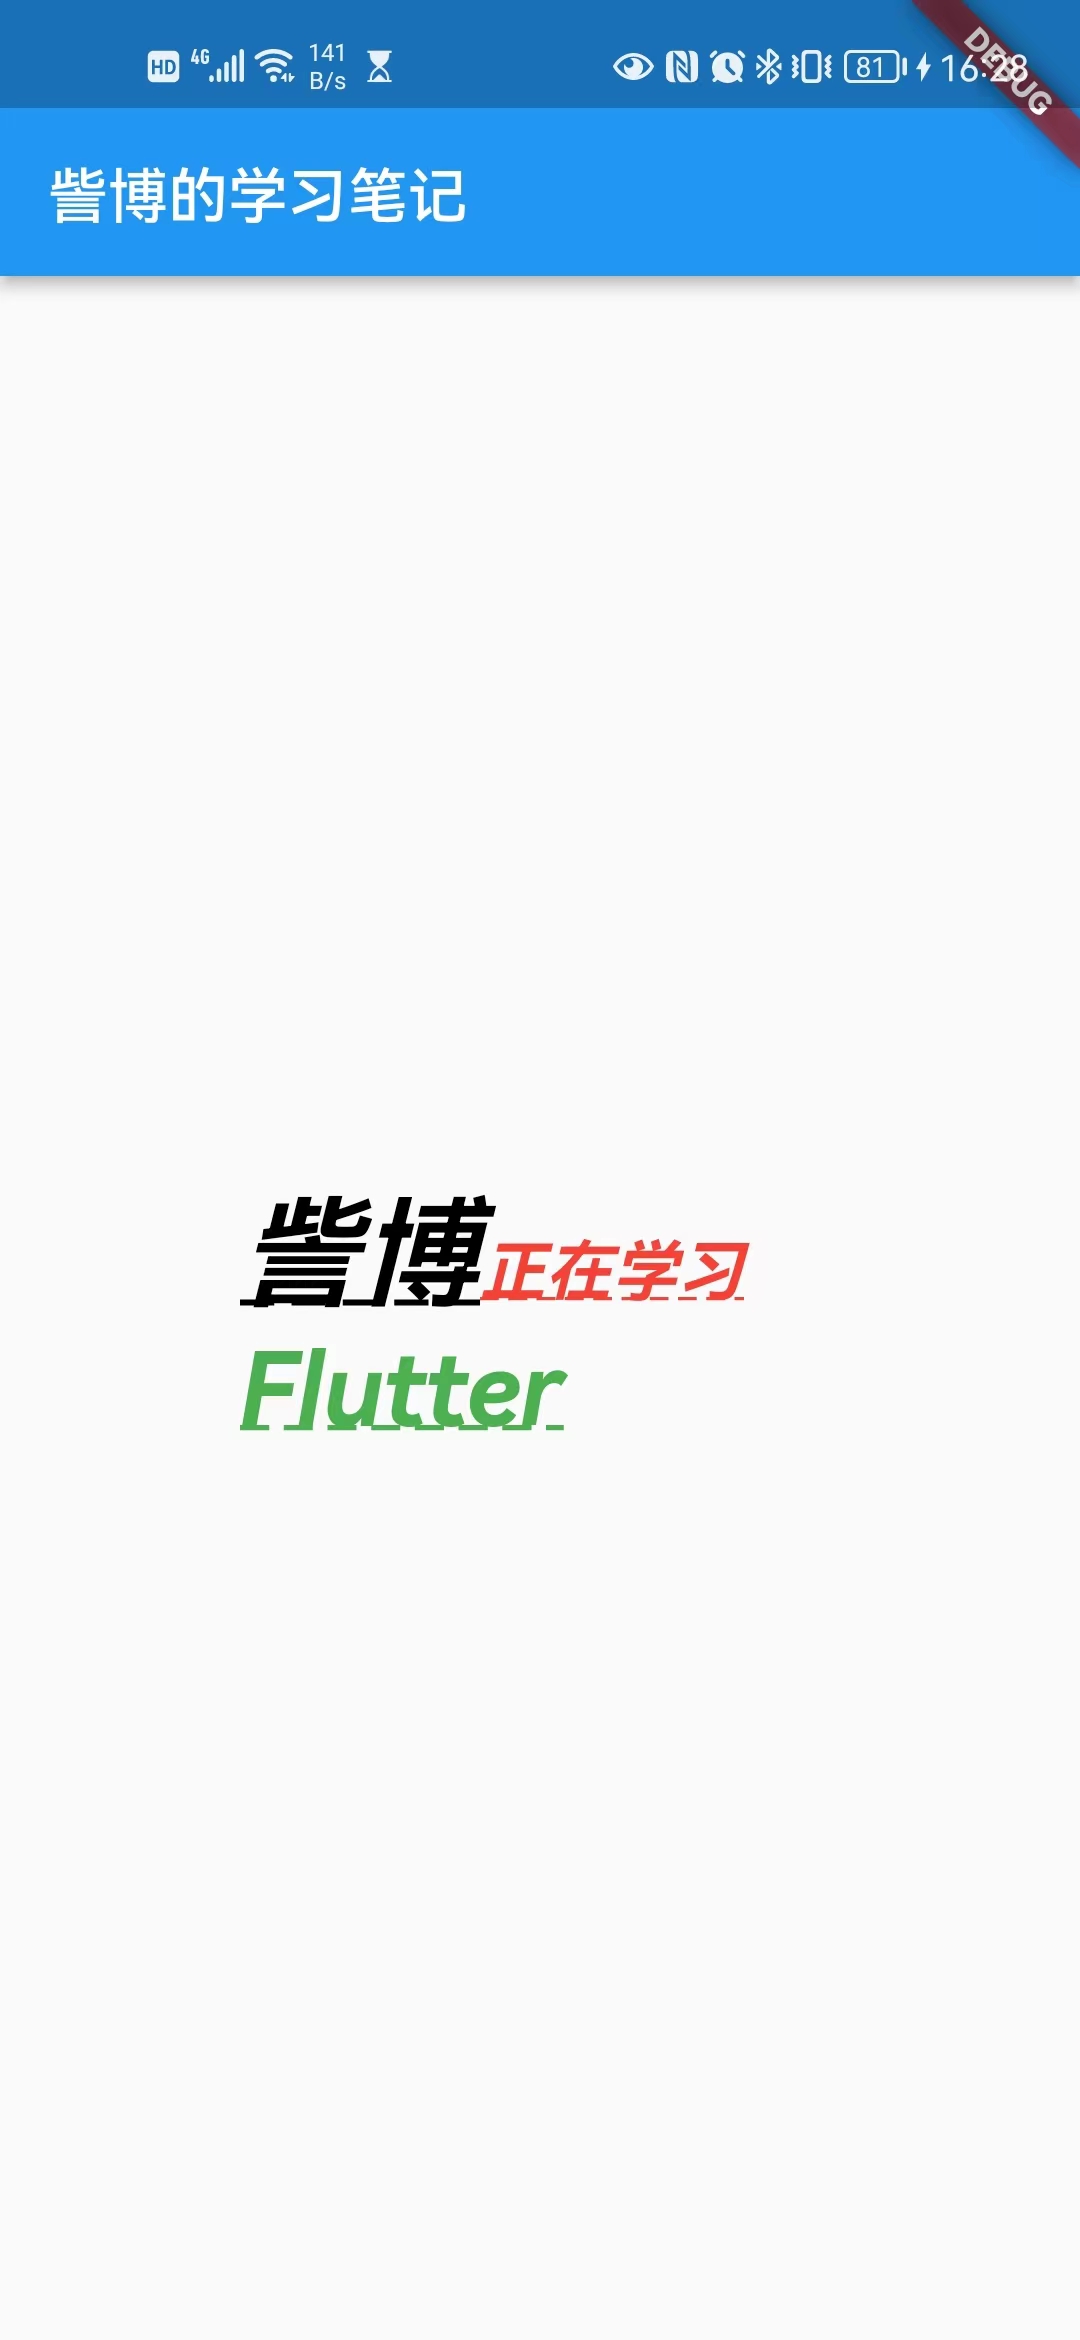
运行结果
四、DefaultTextStyle
1、概述
文本的默认样式!
在 Widget 树中,文本的样式默认是可以被继承的(子类文本类组件未指定具体样式时可以使用 Widget 树中父级设置的默认样式),因此,如果在 Widget 树的某一个节点处设置一个默认的文本样式,那么该节点的子树中所有文本都会默认使用这个样式,而DefaultTextStyle正是用于设置默认文本样式的。
2、构造方法
const DefaultTextStyle({
    super.key,
    required this.style,
    this.textAlign,
    this.softWrap = true,
    this.overflow = TextOverflow.clip,
    this.maxLines,
    this.textWidthBasis = TextWidthBasis.parent,
    this.textHeightBehavior,
    required super.child,
  }) : assert(style != null),
       assert(softWrap != null),
       assert(overflow != null),
       assert(maxLines == null || maxLines > 0),
       assert(child != null),
       assert(textWidthBasis != null);
3、示例
代码示例
import 'package:flutter/material.dart';
void main() {
runApp(MaterialApp(
home: Scaffold(
appBar: AppBar(title: const Text("訾博的学习笔记")),
body: const MyApp(),
),
));
}
class MyApp extends StatelessWidget {
const MyApp({Key? key}) : super(key: key);
Widget build(BuildContext context) {
return Center(
child: Container(
alignment: Alignment.center,
height: 200,
width: 200,
child: DefaultTextStyle(
// 1.设置文本默认样式
style: TextStyle(
color:Colors.red,
fontSize: 20.0,
),
textAlign: TextAlign.start,
child: Column(
crossAxisAlignment: CrossAxisAlignment.start,
children: <Widget>[
Text("刘备"),
Text("关羽"),
Text("张飞",
style: TextStyle(
inherit: false,
// 2.不继承默认样式
color: Colors.blue
),
),
],
),
),
),
);
}
}
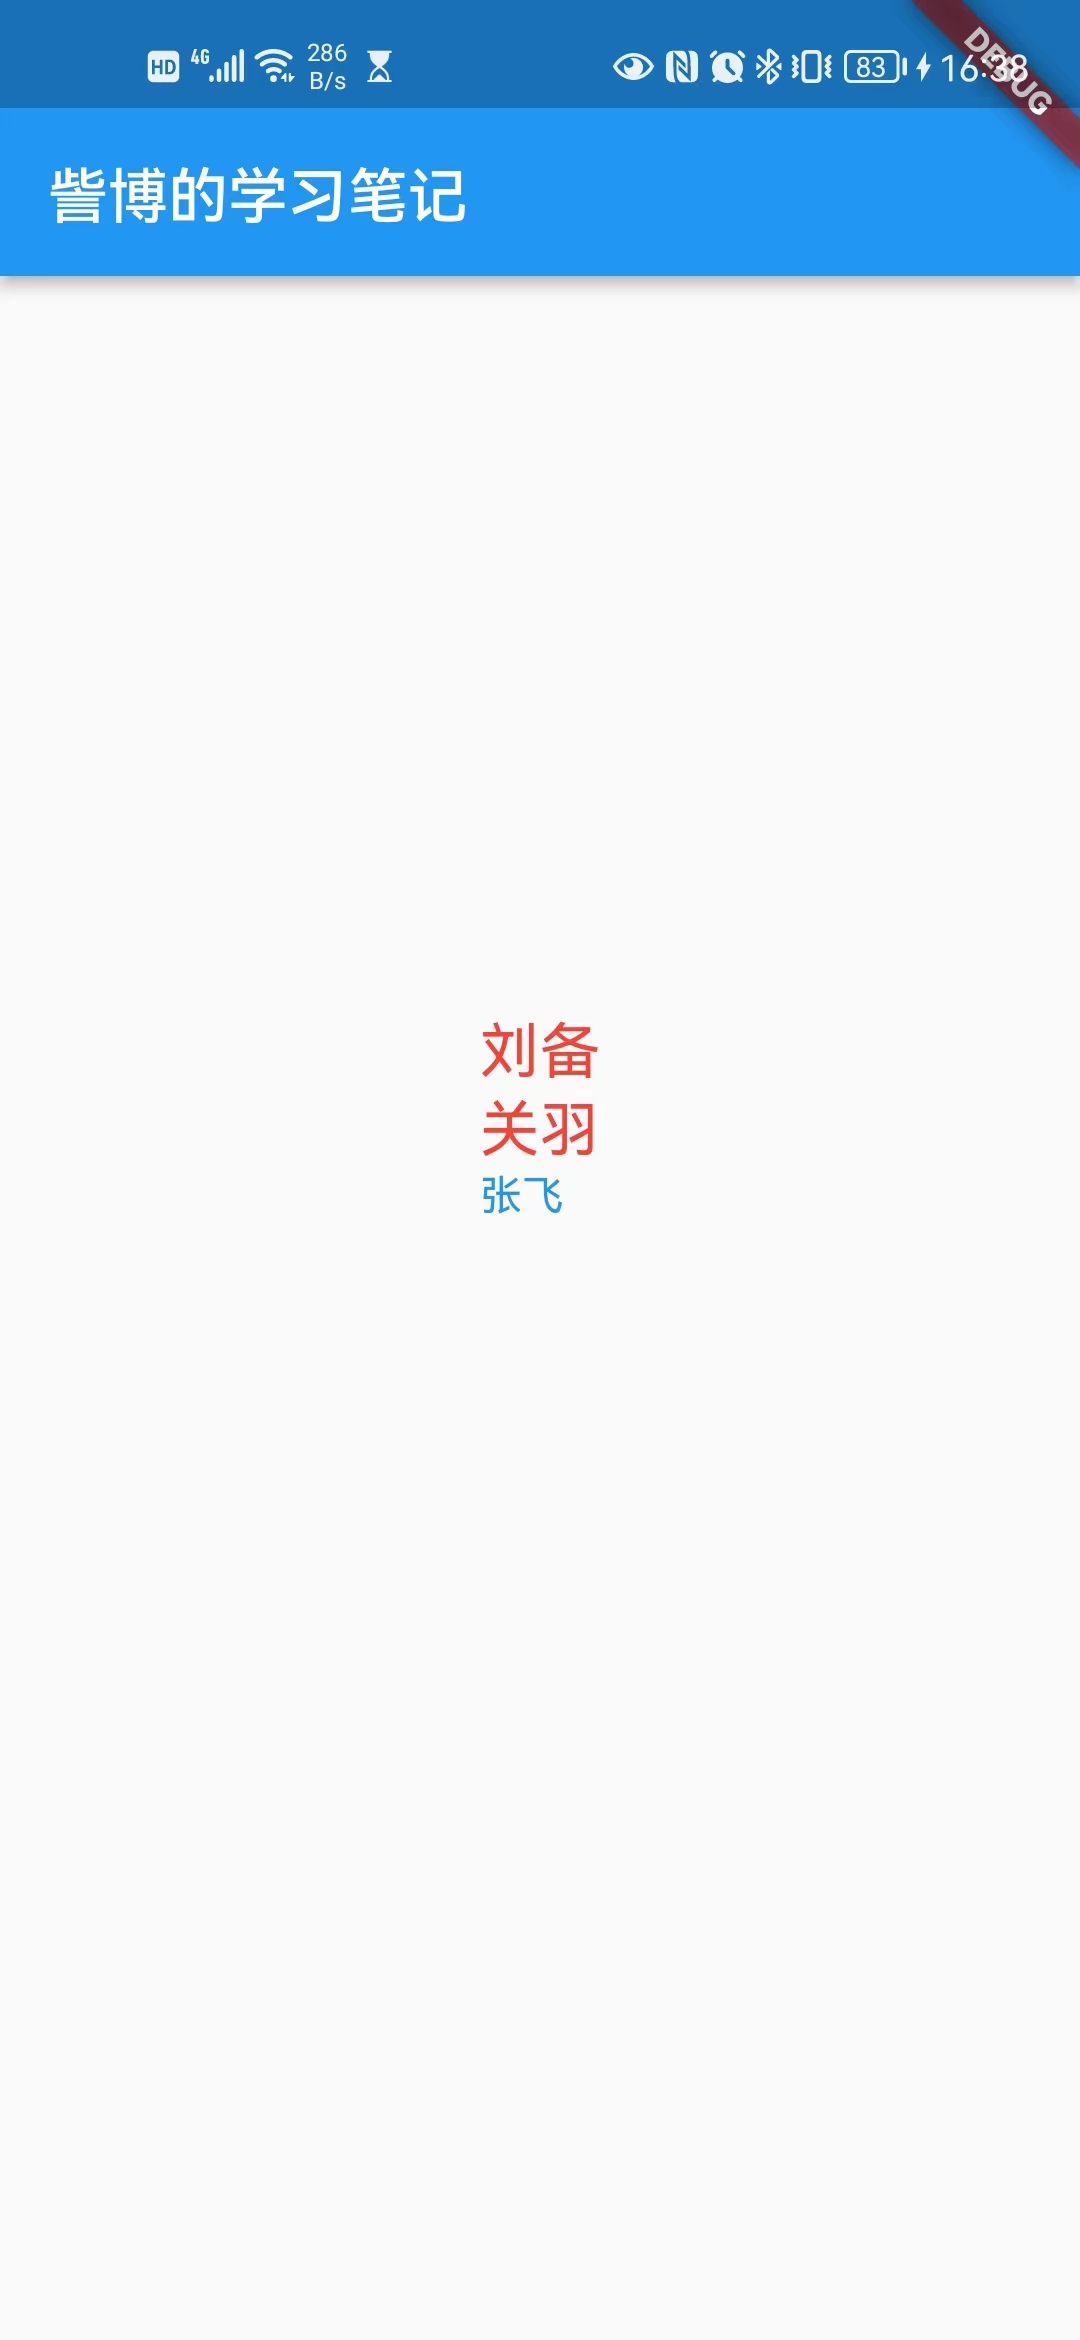
运行结果
五、字体
1、概述
可以在 Flutter 应用程序中使用不同的字体。
在 Flutter 中使用字体分两步完成。首先在pubspec.yaml中声明它们,以确保它们会打包到应用程序中。然后通过TextStyle 属性使用字体。
2、详细使用步骤
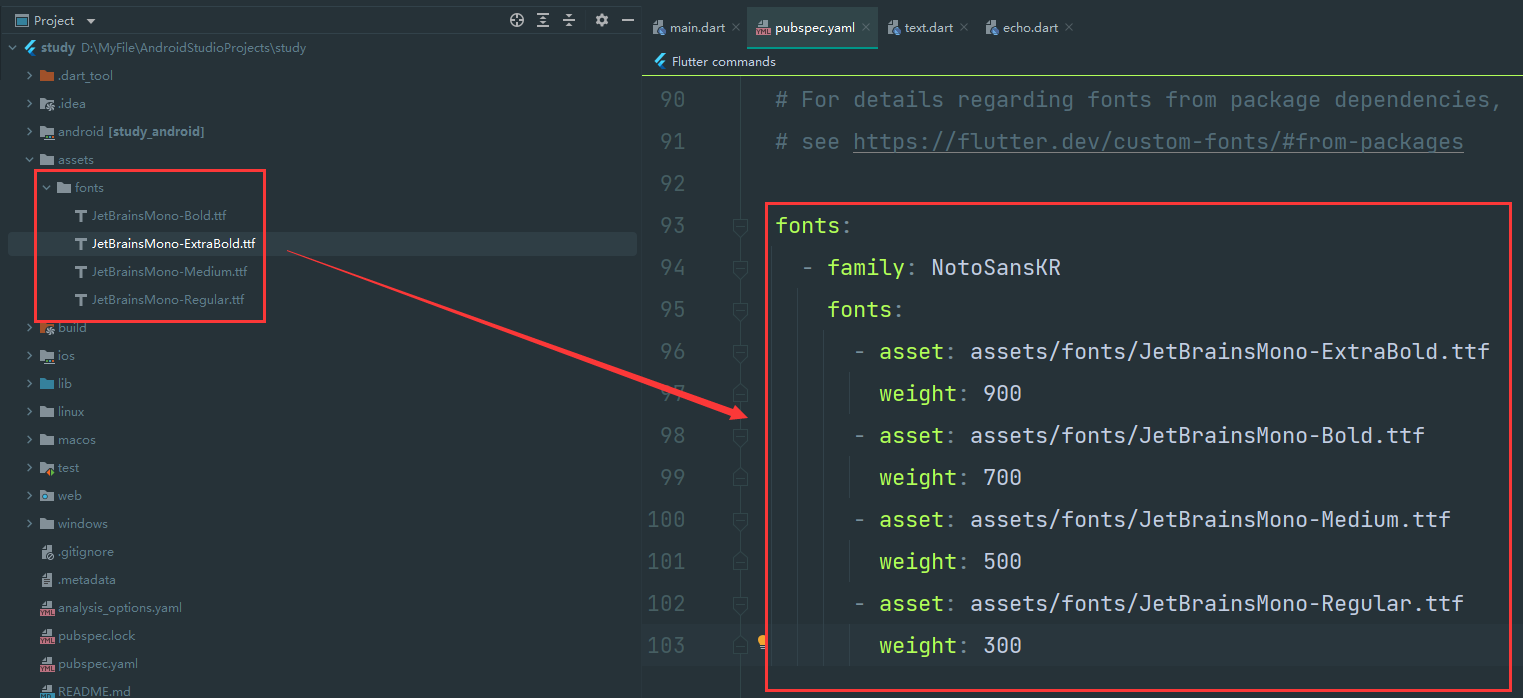
第一步:在 asset 中声明
要将字体文件打包到应用中,和使用其他资源一样,要先在pubspec.yaml中声明它。然后将字体文件复制到在pubspec.yaml中指定的位置。
第二步:使用字体
import 'package:flutter/material.dart';
void main() {
runApp(MaterialApp(
home: Scaffold(
appBar: AppBar(title: const Text("訾博的学习笔记")),
body: const MyApp(),
),
));
}
class MyApp extends StatelessWidget {
const MyApp({Key? key}) : super(key: key);
Widget build(BuildContext context) {
return Center(
child: Container(
alignment: Alignment.center,
height: 200,
width: 200,
child: Text(
"使用 JetBrainsMono 字体!\nSystem.out.print(Hello World!)",
style: TextStyle(
color: Colors.blue,
fontSize: 20,
fontFamily: "JetBrainsMono",
fontWeight: FontWeight.bold,
),
),
),
);
}
}
3、Package中的字体
要使用 Package 中定义的字体,必须提供package参数。例如,假设上面的字体声明位于my_package包中。然后创建 TextStyle 的过程如下:
const textStyle = const TextStyle(
  fontFamily: 'Raleway',
  package: 'my_package', //指定包名
);
如果在 package 包内部使用它自己定义的字体,也应该在创建文本样式时指定 package 参数,如上例所示。
一个包也可以只提供字体文件而不需要在 ·pubspec.yaml· 中声明。 这些文件应该存放在包的lib/文件夹中。字体文件不会自动绑定到应用程序中,应用程序可以在声明字体时有选择地使用这些字体。假设一个名为 my_package 的包中有一个字体文件:
lib/fonts/Raleway-Medium.ttf
然后,应用程序可以声明一个字体,如下面的示例所示:
 flutter:
   fonts:
     - family: Raleway
       fonts:
         - asset: assets/fonts/Raleway-Regular.ttf
         - asset: packages/my_package/fonts/Raleway-Medium.ttf
           weight: 500
lib/是隐含的,所以它不应该包含在 asset 路径中。
在这种情况下,由于应用程序本地定义了字体,所以在创建TextStyle时可以不指定package参数:
const textStyle = const TextStyle(
  fontFamily: 'Raleway',
);
N、参考资料
Flutter入门(10):Flutter 组件之 Text 详解
https://www.jianshu.com/p/e2a29c9dfed1
Flutter学习记录——6.基础组件详解
https://blog.51cto.com/u_15781233/5654677#1Text_Widget_3
flutter 实战
https://book.flutterchina.club/chapter3/text.html#_3-1-2-textstyle






![[附源码]Python计算机毕业设计SSM基于的餐厅管理系统(程序+LW)](https://img-blog.csdnimg.cn/b2123e09604447c19a9a18e585a4c401.png)

