目录
- 1、基于POI模板导出列表数据 📚
- 1.1、需求 📝
- 1.2、思路 🌱
- 1.3、实现 🏡
- 2、导出用户详细数据 🙎
- 2.1、需求 💼
- 2.2、思路 👨💻
- 2.3、实现 👭
- 3、导出数据带图片、公式 🤖
- 3.1、导出图片 💬
- 3.2、导出公式 ✨
- 4、自定义导出详细数据的引擎 🔨
- 4.1、说明 🤔
- 4.2、思路 📢
- 4.3、实现 📹
1、基于POI模板导出列表数据 📚
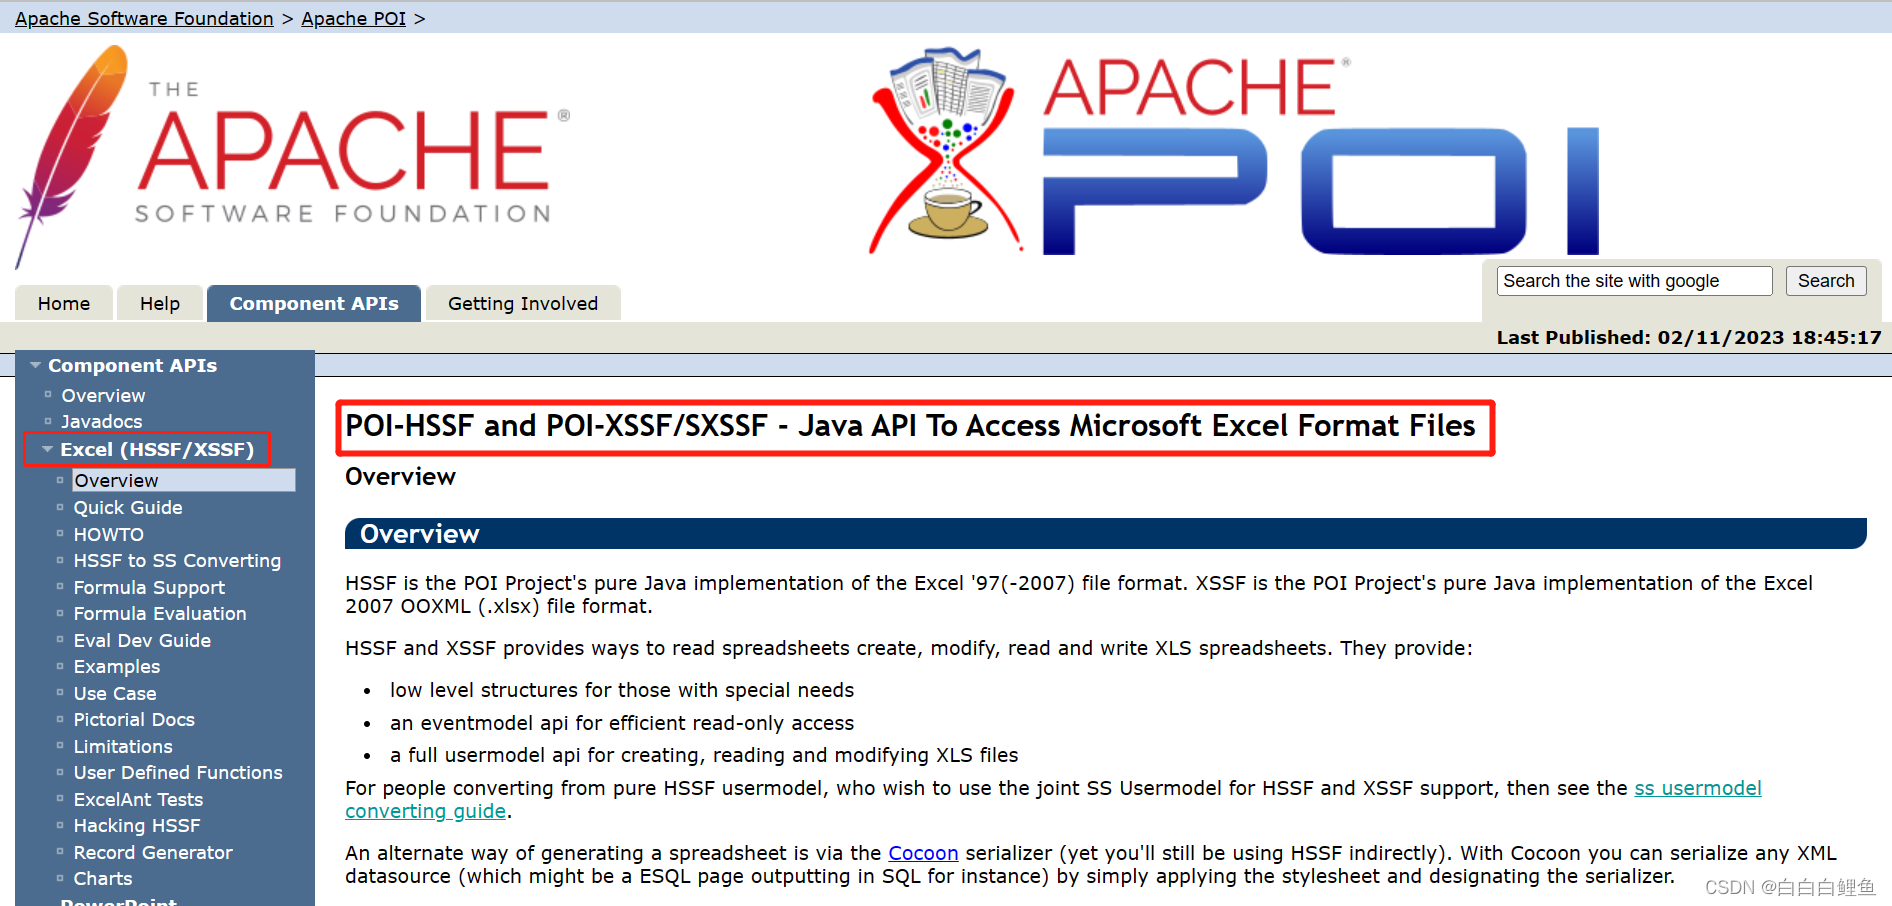
官方文档 :https://poi.apache.org/components/spreadsheet/index.html
1.1、需求 📝
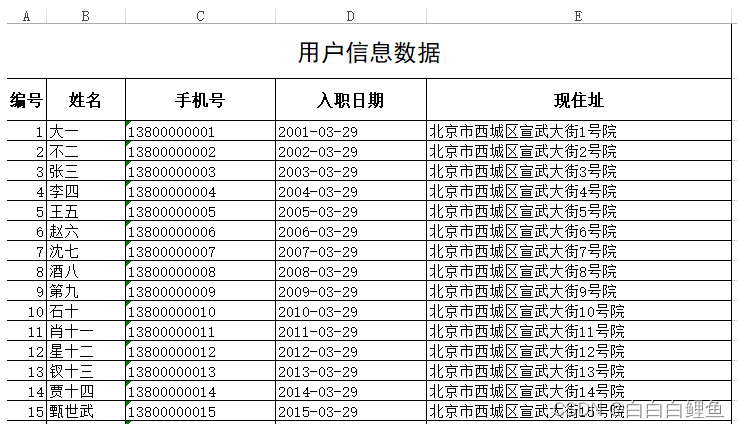
按照以下样式导出excel
1.2、思路 🌱
首先准备一个excel模板,这个模板把复杂的样式和固定的内容先准备好并且放入到项目中,然后读取到模板后向里面放入数据。
1.3、实现 🏡
第一步:准备一个excel作为导出的模板,模板内容如下
第一个sheet:
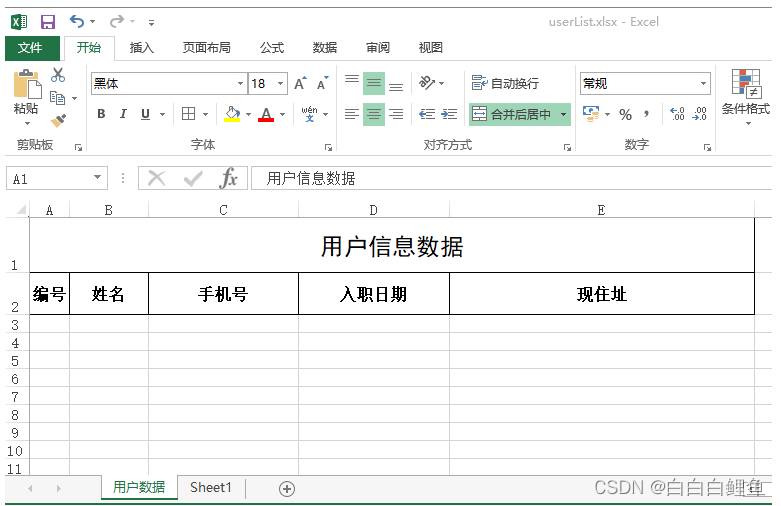
第二个sheet:
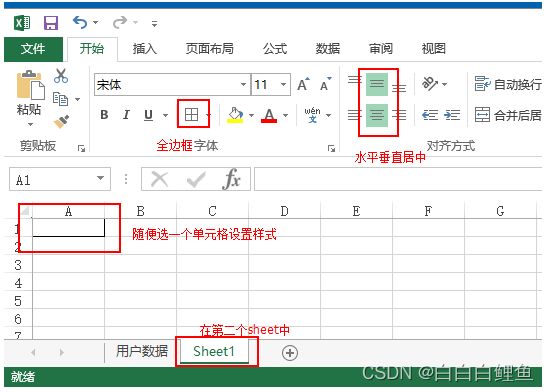
第二步:把这个模板改一个英文名称比如:userList.xlsx,放入到项目中
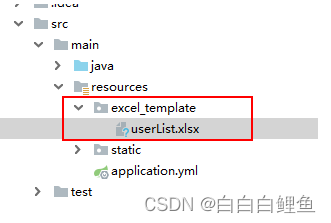
第三步:UserService实现方法
public void downLoadXlsxWithTempalte(HttpServletRequest request, HttpServletResponse response) throws Exception {
    //        获取模板的路径
    File rootPath = new File(ResourceUtils.getURL("classpath:").getPath()); //SpringBoot项目获取根目录的方式
    File templatePath = new File(rootPath.getAbsolutePath(),"/excel_template/userList.xlsx");
    //        读取模板文件产生workbook对象,这个workbook是一个有内容的工作薄
    Workbook workbook  = new XSSFWorkbook(templatePath);
    //        读取工作薄的第一个工作表,向工作表中放数据
    Sheet sheet = workbook.getSheetAt(0);
    //        获取第二个的sheet中那个单元格中的单元格样式
    CellStyle cellStyle = workbook.getSheetAt(1).getRow(0).getCell(0).getCellStyle();
    //        处理内容
    List<User> userList = this.findAll();
    int rowIndex = 2;
    Row row = null;
    Cell cell = null;
    for (User user : userList) {
        row = sheet.createRow(rowIndex);
        row.setHeightInPoints(15); //设置行高

        cell = row.createCell(0);
        cell.setCellValue(user.getId());
        cell.setCellStyle(cellStyle); //设置单元格样式

        cell = row.createCell(1);
        cell.setCellValue(user.getUserName());
        cell.setCellStyle(cellStyle);

        cell = row.createCell(2);
        cell.setCellValue(user.getPhone());
        cell.setCellStyle(cellStyle);

        cell = row.createCell(3);
        cell.setCellValue(simpleDateFormat.format(user.getHireDate()));
        cell.setCellStyle(cellStyle);

        cell = row.createCell(4);
        cell.setCellValue(user.getAddress());
        cell.setCellStyle(cellStyle);

        rowIndex++;
    }
    //            导出的文件名称
    String filename="用户列表数据.xlsx";
    //            设置文件的打开方式和mime类型
    ServletOutputStream outputStream = response.getOutputStream();
    response.setHeader( "Content-Disposition", "attachment;filename="  + new String(filename.getBytes(),"ISO8859-1"));
    response.setContentType("application/vnd.openxmlformats-officedocument.spreadsheetml.sheet");
    workbook.write(outputStream);

}
第四步:修改UserController中的方法,导出测试
@GetMapping(value = "/downLoadXlsxByPoi",name = "使用POI下载高版本")
public void downLoadXlsx(HttpServletRequest request,HttpServletResponse response) throws Exception{
    //       userService.downLoadXlsx(response);
    userService.downLoadXlsxWithTempalte(request,response); //下载的excel带样式
}
2、导出用户详细数据 🙎
2.1、需求 💼
如下,点击用户列表中的下载按钮,下载文件内容如下
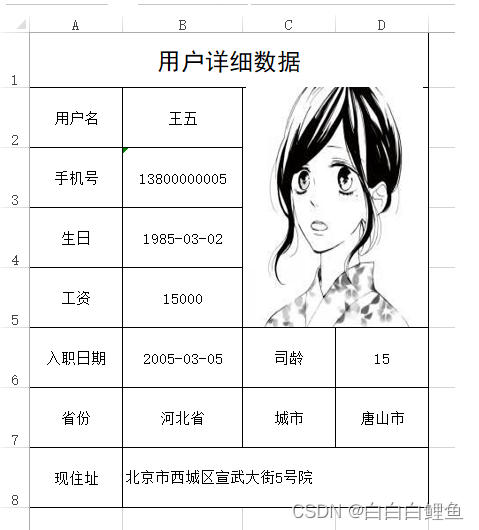
2.2、思路 👨💻
最简单的方式就是先根据案例制作模板,导出时查询用户数据、读取模板,把数据放入到模板中对应的单元格中,其中我们先处理最基本的数据,稍后再处理图片。
2.3、实现 👭
第一步:制作一个excel导出模板,如下:
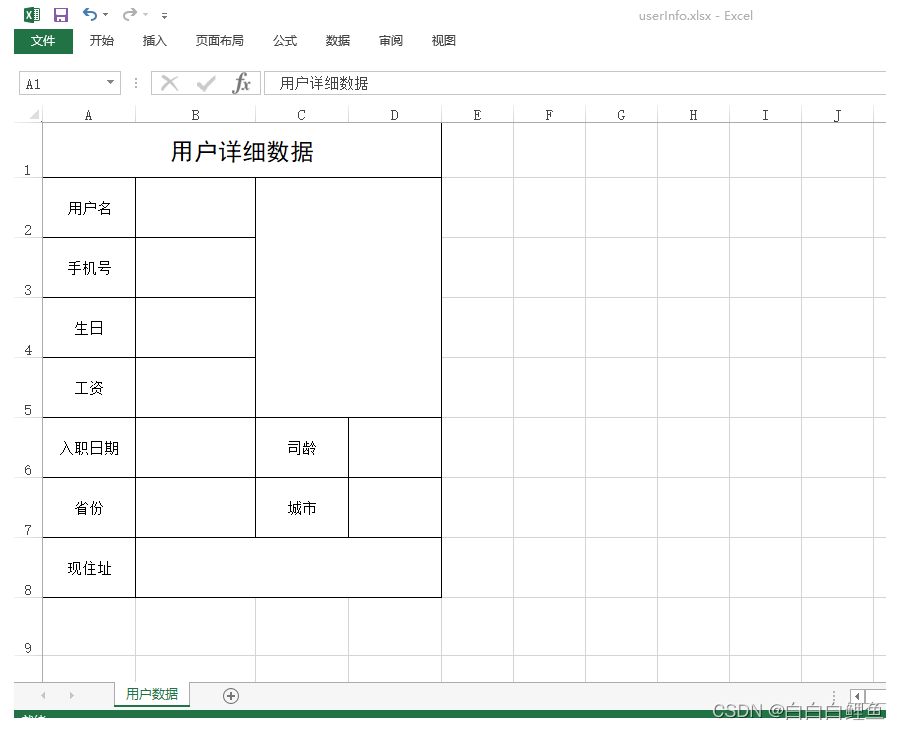
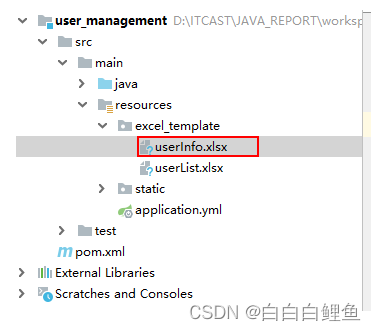
第二步:制作好的模板放入到项目中
第三步:Controller中添加方法
@GetMapping(value = "/download",name = "导出用户详细信息")
public void downLoadUserInfoWithTempalte(Long id,HttpServletRequest request,HttpServletResponse response) throws Exception{
    userService.downLoadUserInfoWithTempalte(id,request,response);
}
第四步:在UserService中添加方法
    public void downLoadUserInfoWithTempalte(Long id, HttpServletRequest request, HttpServletResponse response) throws Exception  {
        //        获取模板的路径
        File rootPath = new File(ResourceUtils.getURL("classpath:").getPath()); //SpringBoot项目获取根目录的方式
        File templatePath = new File(rootPath.getAbsolutePath(),"/excel_template/userInfo.xlsx");
//        读取模板文件产生workbook对象,这个workbook是一个有内容的工作薄
        Workbook workbook  = new XSSFWorkbook(templatePath);
//        读取工作薄的第一个工作表,向工作表中放数据
        Sheet sheet = workbook.getSheetAt(0);
//        处理内容
        User user = userMapper.selectByPrimaryKey(id);
//        接下来向模板中单元格中放数据
//        用户名   第2行第2列
        sheet.getRow(1).getCell(1).setCellValue(user.getUserName());
//        手机号   第3行第2列
        sheet.getRow(2).getCell(1).setCellValue(user.getPhone());
//        生日     第4行第2列  日期转成字符串
        sheet.getRow(3).getCell(1).setCellValue
            (simpleDateFormat.format(user.getBirthday()));
//        工资 第5行第2列
        sheet.getRow(4).getCell(1).setCellValue(user.getSalary());
//        工资 第6行第2列
        sheet.getRow(5).getCell(1).setCellValue
            (simpleDateFormat.format(user.getHireDate()));
//        省份     第7行第2列
        sheet.getRow(6).getCell(1).setCellValue(user.getProvince());
//        现住址   第8行第2列
        sheet.getRow(7).getCell(1).setCellValue(user.getAddress());
//        司龄     第6行第4列暂时先不考虑

//        城市     第7行第4列
        sheet.getRow(6).getCell(3).setCellValue(user.getCity());

//            导出的文件名称
        String filename="用户详细信息数据.xlsx";
//            设置文件的打开方式和mime类型
        ServletOutputStream outputStream = response.getOutputStream();
        response.setHeader( "Content-Disposition", "attachment;filename="  + new String(filename.getBytes(),"ISO8859-1"));
        response.setContentType("application/vnd.openxmlformats-officedocument.spreadsheetml.sheet");
        workbook.write(outputStream);
    }
点击页面上的下载按钮,效果如下:
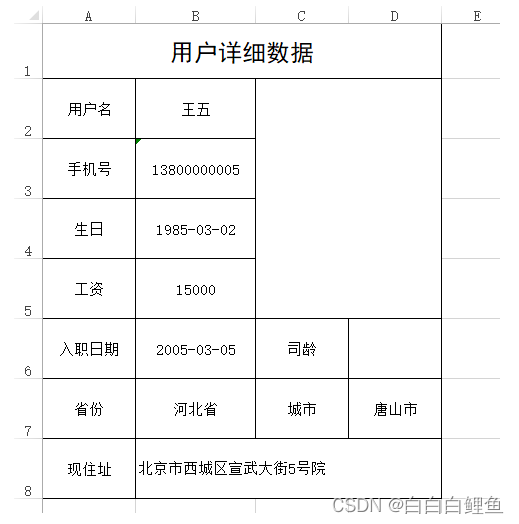
接下来处理一下头像照片和司龄。
3、导出数据带图片、公式 🤖
3.1、导出图片 💬
个人信息的导出中包含了头像照片,需要用到POI的导出图片功能,那么POI主要提供了两个类来处理照片,这两个类是Patriarch和ClientAnchor前者负责在表中创建图片,后者负责设置图片的大小位置。
在UserService的方法中添加以下代码 :
// 先创建一个字节输出流
ByteArrayOutputStream byteArrayOut = new ByteArrayOutputStream();
// BufferedImage是一个带缓冲区图像类,主要作用是将一幅图片加载到内存中
BufferedImage bufferImg = ImageIO.read(new File(rootPath + user.getPhoto()));
// 把读取到图像放入到输出流中
ImageIO.write(bufferImg, "jpg", byteArrayOut);
// 创建一个绘图控制类,负责画图
Drawing patriarch = sheet.createDrawingPatriarch();
// 指定把图片放到哪个位置
ClientAnchor anchor = new XSSFClientAnchor(0, 0, 0, 0, 2, 1, 4, 5);
// 开始把图片写入到sheet指定的位置
patriarch.createPicture(anchor, workbook.addPicture(
    byteArrayOut.toByteArray(), Workbook.PICTURE_TYPE_JPEG));
关于XSSFClientAnchor的8个参数说明:
dx1 - the x coordinate within the first cell.//定义了图片在第一个cell内的偏移x坐标,既左上角所在cell的偏移x坐标,一般可设0
dy1 - the y coordinate within the first cell.//定义了图片在第一个cell的偏移y坐标,既左上角所在cell的偏移y坐标,一般可设0
dx2 - the x coordinate within the second cell.//定义了图片在第二个cell的偏移x坐标,既右下角所在cell的偏移x坐标,一般可设0
dy2 - the y coordinate within the second cell.//定义了图片在第二个cell的偏移y坐标,既右下角所在cell的偏移y坐标,一般可设0

col1 - the column (0 based) of the first cell.//第一个cell所在列,既图片左上角所在列
row1 - the row (0 based) of the first cell.//图片左上角所在行
col2 - the column (0 based) of the second cell.//图片右下角所在列
row2 - the row (0 based) of the second cell.//图片右下角所在行
3.2、导出公式 ✨
应用场景说明,在导出用户详细数据时有一个司龄的显示,这里的司龄就是截止到现在入职到本公司的时间,为了学习POI对公式的操作,我们这里使用POI的公式来做。
计算截止到现在入职到本公司的时间应该用到两个日期相差的函数:DATEDIF函数,这个函数需要3个参数
P1: 一个日期 P2:截止日期 P3: 时间单位 举例:
1、DATEDIF(“2015-10-01”,“2020-10-01”,“y”) 结果是5
2、CONCATENATE(DATEDIF(“2015-10-01”,“2020-10-01”,“y”)),“年”,DATEDIF(“2015-10-01”,“2020-10-01”,“ym”),“个月”) 结果是5年0个月
放到这个用户导出时,第一个参数就是放到相应单元格上数据,第二个参数就是当天时间,
如果直接在excel中操作,如下:
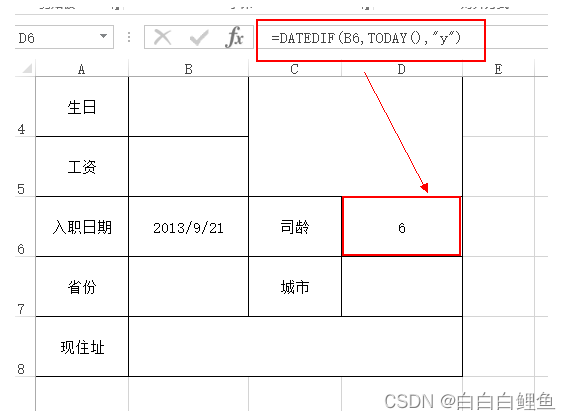
在使用POI导出时使用setCellFormula方法来设置公式:

关于POI支持公式详见官网: https://poi.apache.org/components/spreadsheet/eval-devguide.html
ps:其实在正常开发时应该在模板中直接设置好公式,这样打开直接导出的excel文档时公式会直接运行出我们想要的结果
4、自定义导出详细数据的引擎 🔨
4.1、说明 🤔
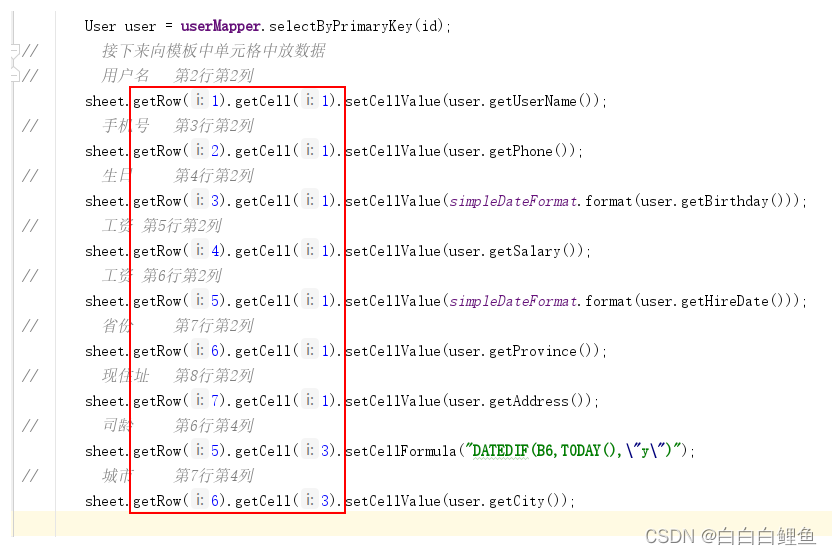
看我们刚才导出时写的代码,必须要提前知道要导出数据在哪一行哪一个单元格,但是如果模板一旦发生调整,那么我们的java代码必须要修改,我们可以自定义个导出的引擎,有了这个引擎即使模板修改了我们的java代码也不用修改
4.2、思路 📢
在制作模板时,在需要插入数据的位置我们坐上标记,在导出时,对象的属性要和标记做对应,如果对应匹配一样,就把值赋值到相应的位置。
4.3、实现 📹
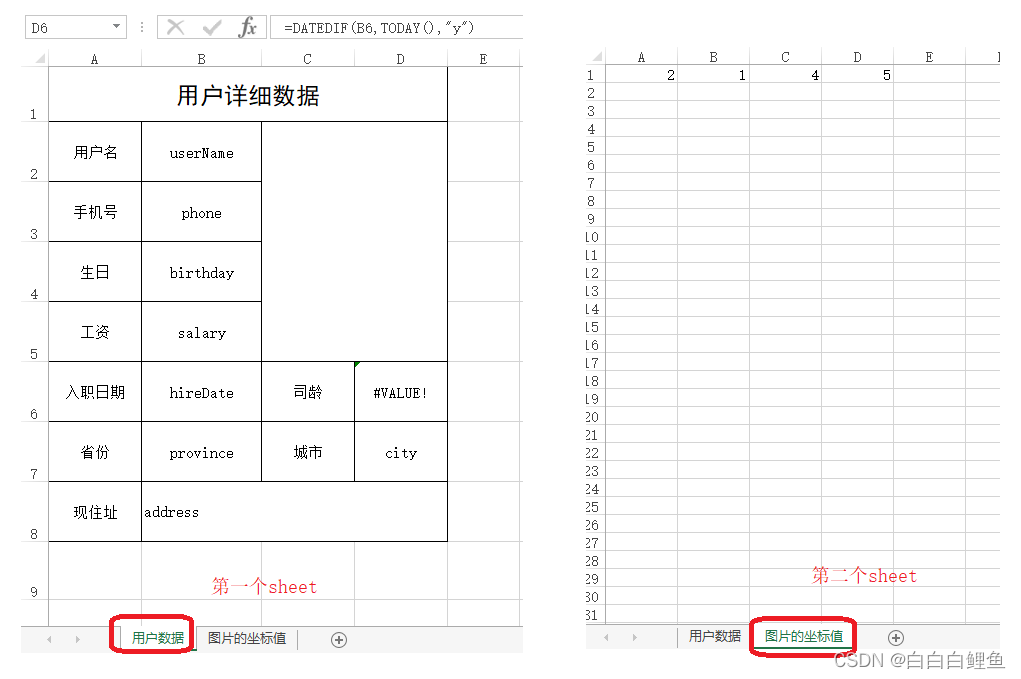
第一步:制作模板,命名 userInfo2.xlsx
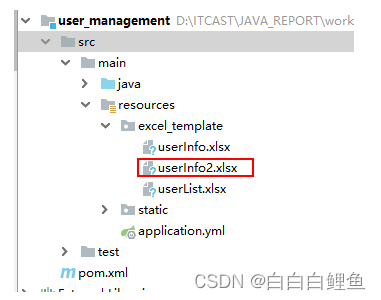
第二步:添加到项目中
第三步:实现导出的引擎代码
package com.itheima.utils;

import org.apache.commons.lang3.StringUtils;
import org.apache.poi.ss.usermodel.*;
import org.apache.poi.xssf.usermodel.XSSFClientAnchor;
import org.apache.tomcat.util.http.fileupload.ByteArrayOutputStream;
import org.springframework.util.ResourceUtils;

import javax.imageio.ImageIO;
import java.awt.image.BufferedImage;
import java.io.File;
import java.text.SimpleDateFormat;
import java.util.Date;
import java.util.Map;

public class ExcelExportEngine {

    private static SimpleDateFormat  sdf = new SimpleDateFormat("yyyy-MM-dd");

    public  static Workbook writeToExcel(Object object, Workbook workbook,String photoPath) throws Exception{
      //先把bean转成map
        Map<String, Object> map = EntityUtils.entityToMap(object);
        //循环遍历每一对数据,把日期型的转成字符串,方便导出
        for (String key : map.keySet()) {
            Object vlaue = map.get(key);
            if(vlaue instanceof Date){
                System.out.println(sdf.format(vlaue));
                map.put(key,sdf.format(vlaue));
            }
        }
        //获取第一个sheet,整体的思路是循环100个行的100个单元格
        Sheet sheet = workbook.getSheetAt(0);
        Cell cell =null;
        Row row = null;
        for (int i = 0; i < 100; i++) {
            row = sheet.getRow(i); //获取到空行为止
            if(row==null){
                break;
            }else{
                for (int j = 0; j < 100; j++) {
                    cell = row.getCell(j);//获取到空单元格不处理
                    if(cell!=null){
                        writeCell(cell,map); //开始向单元格中写内容
                    }
                }
            }
        }

        if(StringUtils.isNotBlank(photoPath)){
            File rootPath = new File(ResourceUtils.getURL("classpath:").getPath()); //SpringBoot项目获取根目录的方式
            ByteArrayOutputStream byteArrayOut = new ByteArrayOutputStream();
//        BufferedImage是一个带缓冲区图像类,主要作用是将一幅图片加载到内存中
            BufferedImage bufferImg = ImageIO
                    .read(new File(rootPath + photoPath));
            ImageIO.write(bufferImg, "jpg", byteArrayOut);
            Drawing patriarch = sheet.createDrawingPatriarch();

            Sheet sheet2 = workbook.getSheetAt(1);
            row = sheet2.getRow(0);
            int col1 = ((Double) row.getCell(0).getNumericCellValue()).intValue();
            int row1 = ((Double) row.getCell(1).getNumericCellValue()).intValue();
            int col2 = ((Double) row.getCell(2).getNumericCellValue()).intValue();
            int row2 = ((Double) row.getCell(3).getNumericCellValue()).intValue();
//            锚点,固定点
            ClientAnchor anchor = new XSSFClientAnchor(0, 0, 0, 0,  col1, row1, col2, row2);
            patriarch.createPicture(anchor, workbook.addPicture(byteArrayOut.toByteArray(), Workbook.PICTURE_TYPE_JPEG));
            workbook.removeSheetAt(1);
        }

        return workbook;
    }

    private static void writeCell(Cell cell, Map<String, Object> map) {
        CellType cellType = cell.getCellType();
        switch (cellType){
            case FORMULA:{  //如果是公式就直接放行了
                break;
            }default:{
                String cellValue = cell.getStringCellValue();
                //就是判断一下获取到单元格中的值是否和map中的key保持一致
                if(StringUtils.isNotBlank(cellValue)){
                    for (String key : map.keySet()) {
                        if(key.equals(cellValue)){
                            cell.setCellValue(map.get(key).toString());
                        }
                    }
                }
            }
        }
    }
}
第四步:修改UserService的方法
public void downLoadUserInfoWithTempalte2(Long id, HttpServletRequest request, HttpServletResponse response) throws Exception  {
    //        获取模板的路径
    File rootPath = new File(ResourceUtils.getURL("classpath:").getPath()); //SpringBoot项目获取根目录的方式
    File templatePath = new File(rootPath.getAbsolutePath(),"/excel_template/userInfo2.xlsx");
    //        读取模板文件产生workbook对象,这个workbook是一个有内容的工作薄
    Workbook workbook  = new XSSFWorkbook(templatePath);
    // 查询用户信息
    User user = userMapper.selectByPrimaryKey(id);
   // 这里使用引擎直接导出
    workbook = ExcelExportEngine.writeToExcel(user,workbook,user.getPhoto());
    //            导出的文件名称
    String filename="用户详细信息数据.xlsx";
    //            设置文件的打开方式和mime类型
    ServletOutputStream outputStream = response.getOutputStream();
    response.setHeader( "Content-Disposition", "attachment;filename="  + new String(filename.getBytes(),"ISO8859-1"));
    response.setContentType("application/vnd.openxmlformats-officedocument.spreadsheetml.sheet");
    workbook.write(outputStream);
}
