tinkerCAD案例:30. 冰球挑战赛
这些简单易学、循序渐进的 Tinkercad 课程将指导你设计出属于自己的超棒曲棍球冰球;这些设计将性能和风格推向了极限!
本课有两个目标利用科学方法提高曲棍球球的性能。通过在冰球上添加图案,发挥设计的艺术性。
我们将把你的 Tinkercad 知识推向新的极限,因此我们建议你先从 "让我们学习 Tinkercad 项目 "开始!
入门 - 简单实验
step 1:项目概述:
step 2
现在,您已经学习了 “Let’s Learn Tinkercad”,是时候使用这个强大的工具来设计您的实验冰球了!
首先,我们将制作一个规范的冰球,然后尝试改进它!
step 3
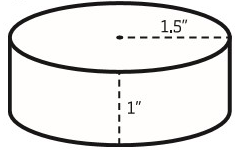
标准的美国曲棍球联盟(NHL)冰球是一个扁平的黑色圆柱体,由硫化橡胶制成,直径 3 英寸,厚 1 英寸。
Tinkercad 可以以英寸为单位进行操作,但为了避免使用混乱的分数,我们还是换算成毫米(mm)。一英寸大约是 25 毫米,所以直径大约是 75 毫米。
srep 4
让我们快速制作一个规整的冰球,这将是我们的控制区。
如果我们要尝试改进常规尺寸的冰球,我们就需要制作一个常规冰球来比较你的新颖、出色的冰球设计。
在进行实验时,确定正常状态是非常重要的,这样你就有了可以与你的改变结果进行比较的东西。这种 "正常 "状态被称为 “对照”。
Instructions 指示
[外链图片转存失败,源站可能有防盗链机制,建议将图片保存下来直接上传(img-b2gE3Ug7-1690861285844)(https://ibles-content.tinkercad.com/FEP/D65E/IRPPNVI5/FEPD65EIRPPNVI5.png?width=320)]
说明
-
Drag out a cylinder and scale it to 75mm in diameter and 25mm along the Z axis.
拖出一个圆柱体,并将其直径缩放到 75 毫米,沿 Z 轴缩放到 25 毫米。
-
Continue to the next step.
继续执行下一步。
step 5
Now that you have designed a regulation sized puck, we can use this as the ‘Control’ for our experiment.
现在您已经设计了一个调节尺寸的冰球,我们可以将其用作实验的“对照”。
Copy and paste your control.
复制并粘贴控件。
Voila! You now will have a copy of your control puck that you can change. Let’s get on with the experiment!
瞧!现在,您将拥有可以更改的控制冰球的副本。让我们继续实验吧!
Instructions 指示
[外链图片转存失败,源站可能有防盗链机制,建议将图片保存下来直接上传(img-Wo2TkJpQ-1690861285845)(https://ibles-content.tinkercad.com/F1D/ISU9/IRPPNVHG/F1DISU9IRPPNVHG.png?width=320)]
说明
-
Copy and Paste your Puck
复制并粘贴您的冰球
-
Continue to the next step.
继续执行下一步。
step 6
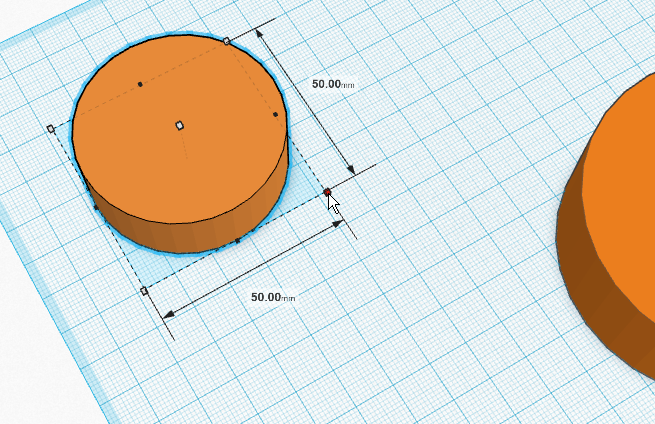
Take your copy and consider how you want to change it. Do you want to scale the object proportionally, or do you want to scale it along one axis?
拿起你的副本,考虑你想如何改变它。是要按比例缩放对象,还是要沿一个轴缩放对象?
Scaling the object proportionally will only affect the mass and volume of the object, but not the shape. In this way, you can see if changing the size, alone, is enough to dramatically affect performance.
按比例缩放对象只会影响对象的质量和体积,而不会影响形状。通过这种方式,您可以查看仅更改大小是否足以显着影响性能。
Changing the proportions will have a more dramatic effect. When the shape of the puck changes, aspects like balances and stability will come into play.
改变比例将产生更戏剧性的效果。当冰球的形状发生变化时,平衡和稳定性等方面就会发挥作用。
What are other aspects we can change? What about changing the original shape?
我们还可以改变哪些方面?改变原来的形状怎么样?
Instructions 指示
说明
-
Change the volume of your puck by scaling it proportionally or keep the volume the same and change the proportions
通过按比例缩放来更改冰球的体积,或保持体积不变并更改比例
-
Continue to the next step.
继续执行下一步。
step 7
We’ve been working with a Cylinder for this entire lesson. However, we shouldn’t let the shape limit us. What about other shapes?
在整个课程中,我们一直在使用圆柱体。但是,我们不应该让形状限制我们。其他形状呢?
Let’s model this! 让我们对此进行建模!
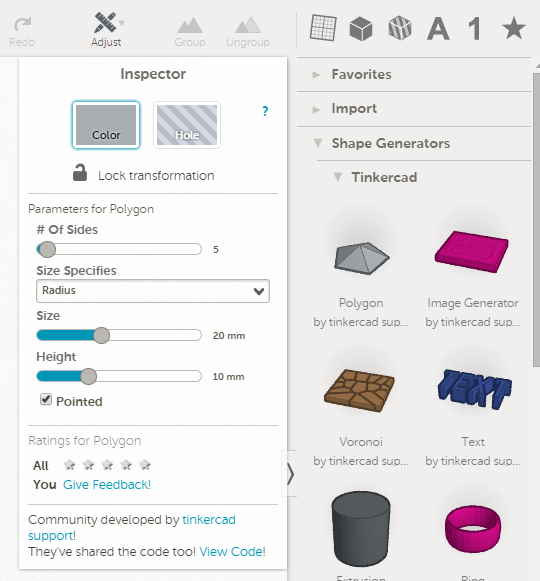
Go to the Shapes menu, look for the sub-menu Shape Generators. Underneath that, you’ll find the Tinkercad Shape Generators.
转到“形状”菜单,查找子菜单“形状生成器”。在此之下,你会发现Tinkercad形状生成器。
We want the Polygon shape generator!
我们想要多边形形状生成器!
Drag one of those out and let’s take a look at our this Shape Generator!
拖出其中一个,让我们来看看我们的这个形状生成器!
Instructions 指示
说明
-
Drag out the Polygon Shape Generator.
拖出多边形形状生成器。
-
Continue to the next step
继续执行下一步
step 8
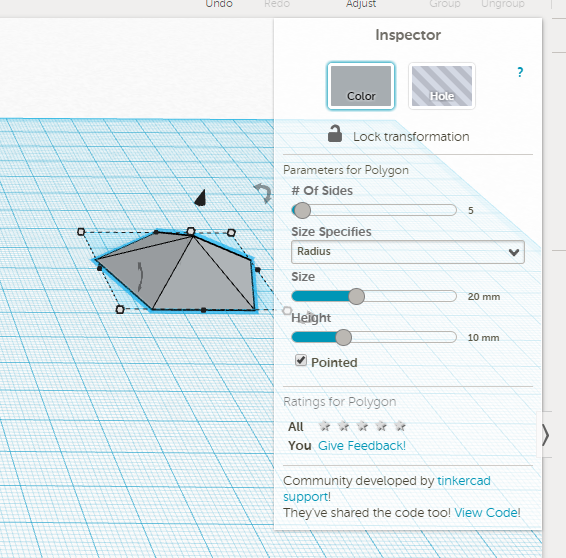
You’ll notice that this Shape Generator has a number of variables, or changeable options. We have number of sides, we have radius, and we have height!
您会注意到此形状生成器具有许多变量或可更改的选项。我们有边数,我们有半径,我们有高度!
There are a number of variables in the generator that affect size. If you wanted to be ultra-precise, you could use those values, but we can actually ignore them and adjust the puck’s size by scaling in Tinkercad.
生成器中有许多变量会影响大小。如果你想超精确,你可以使用这些值,但我们实际上可以忽略它们,并通过缩放 Tinkercad 来调整冰球的大小。
So let’s get to it!
所以让我们开始吧!
Instructions 指示
说明
- Continue to the next step.
继续执行下一步。
step 9
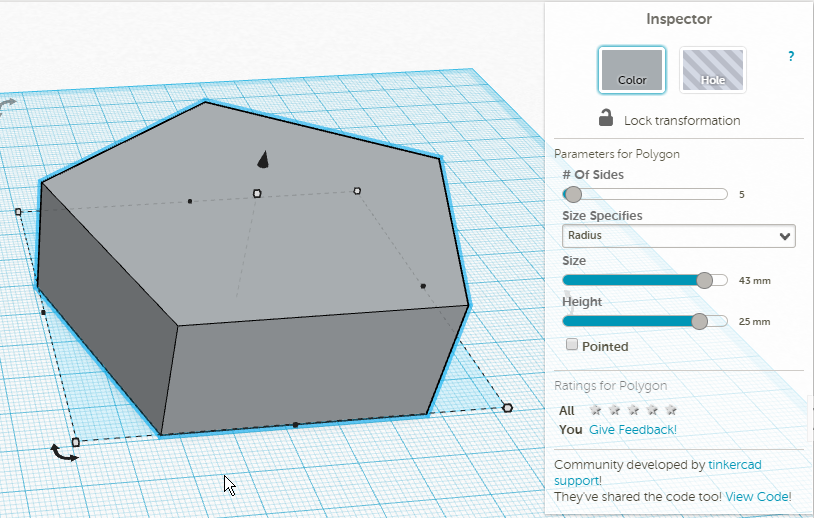
For the polygonal puck, there are only two things we need to set.
对于多边形冰球,我们只需要设置两件事。
When you resize your polygonal puck, the values X and Y may be different. Just make sure you hold Shift and your proportions will be correct.
调整多边形冰球的大小时,值 X 和 Y 可能会有所不同。只要确保按住 Shift 并且您的比例是正确的。
Instructions 指示
说明
-
Set the number of sides you desire for your polygonal puck and uncheck the ‘Pointed’ check box.
为多边形圆盘设置所需的边数,然后取消选中“指向”复选框。
-
Proportional Scale your puck to roughly 75mm in diameter.
按比例缩放冰球直径约 75 毫米。
-
Scale the puck to be 25mm thick along the Z Axis
沿 Z 轴将圆盘缩放至 25 毫米厚
-
Continue to the next step.
继续执行下一步。
step 10
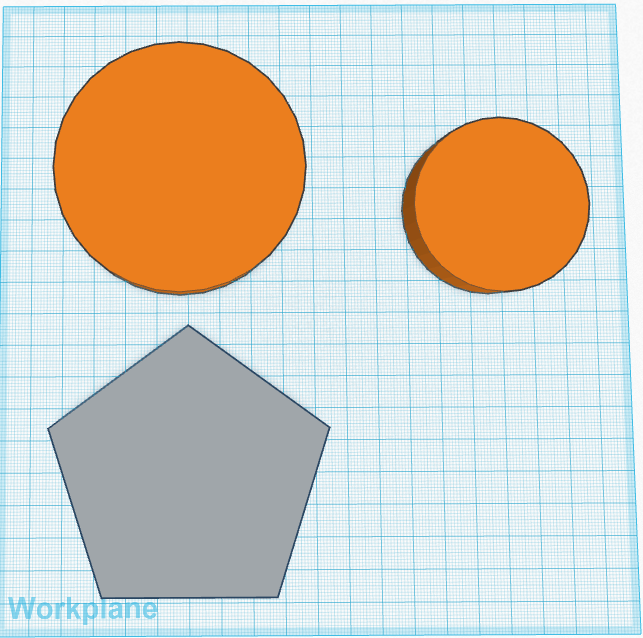
Now we have three pucks to test!
现在我们有三个冰球要测试!
In the upper left hand corner, we have our Control Puck.
在左上角,我们有我们的控制冰球。
On the far right, we have our Scaled Puck.
在最右边,我们有我们的缩放冰球。
On the bottom, we have our Polygon Puck.
在底部,我们有多边形冰球。
Let the tests begin! 让测试开始吧!
Instructions 指示
说明
-
Set the number of sides you desire for your polygonal puck and uncheck the ‘Pointed’ check box.
为多边形圆盘设置所需的边数,然后取消选中“指向”复选框。
-
Proportional Scale your puck to roughly 75mm in diameter.
按比例缩放冰球直径约 75 毫米。
-
Scale the puck to be 25mm thick along the Z Axis
沿 Z 轴将圆盘缩放至 25 毫米厚
-
Continue to the next step.
继续执行下一步。
