AppCompatActivity.setContentView()与Activity.setContentView()主要的区别,Activity.setContentView直接将视图添加到Window上,AppCompatActivity.setContentView()借助AppCompatActivity的Delegate代理类,将要显示的视图加入到代理层视图,代理层视图再添加到Window上;
1.setContentView()调用流程
Activity extends AppCompatActivity
@Override
protected void onCreate(Bundle savedInstanceState) {
    super.onCreate(savedInstanceState);
    setContentView(R.layout.activity_main);//android.R.id.content
}
1.1 在AppCompatActivity定义了setContentView
    //设置要显示视图的布局ID或者View
    @Override
    public void setContentView(@LayoutRes int layoutResID) {
        getDelegate().setContentView(layoutResID);
    }

    @Override
    public void setContentView(View view) {
        getDelegate().setContentView(view);
    }

    @Override
    public void setContentView(View view, ViewGroup.LayoutParams params) {
        getDelegate().setContentView(view, params);
    }
实现了三个重载的setContentView方法,getDelegate()方法负责创建Activity的代理类实例,然后调用setContentView方法添加显示的视图,Activity通过代理模式添加要显示的视图;
然后看看这个里面 setContentView 是从哪里来的?这是 AppCompatDelegate 这个的一个函数,可以看看这个类是做什么用的
 This class represents a delegate which you can use to extend AppCompat's support to any
 * {@link android.app.Activity}.
翻译过来就是: 此类表示可用于将AppCompat支持扩展到任何Activity的委托。
AppCompatDelegate是抽像类,具体的实现是AppCompatDelegateImp。
1.2 AppCompatDelegateImp$setContentView
     @Override
    public void setContentView(int resId) {
        //初始化DecorView
        ensureSubDecor();
        //设置setContentView 要记载的父布局
        ViewGroup contentParent = (ViewGroup) mSubDecor.findViewById(android.R.id.content);
        //加载之前移除所有的布局
        contentParent.removeAllViews();
        //完成布局的加载
        LayoutInflater.from(mContext).inflate(resId, contentParent);
        mOriginalWindowCallback.onContentChanged();
    }
1.3 ensureSubDecor();
 private void ensureSubDecor() {
            //默认是false,如果为true的表明 subDecor已经被加载过了
        if (!mSubDecorInstalled) {

            mSubDecor = createSubDecor();


            //设置actiivty 的title
            // If a title was set before we installed the decor, propagate it now
            CharSequence title = getTitle();
            if (!TextUtils.isEmpty(title)) {
                if (mDecorContentParent != null) {
                    mDecorContentParent.setWindowTitle(title);
                } else if (peekSupportActionBar() != null) {
                    peekSupportActionBar().setWindowTitle(title);
                } else if (mTitleView != null) {
                    mTitleView.setText(title);
                }
            }

            //为subDecor 设置固定的大小
            applyFixedSizeWindow();

            //空方法
            onSubDecorInstalled(mSubDecor);

            //设置 subDecor 已经被加载过了
            mSubDecorInstalled = true;

            // Invalidate if the panel menu hasn't been created before this.
            // Panel menu invalidation is deferred avoiding application onCreateOptionsMenu
            // being called in the middle of onCreate or similar.
            // A pending invalidation will typically be resolved before the posted message
            // would run normally in order to satisfy instance state restoration.
            PanelFeatureState st = getPanelState(FEATURE_OPTIONS_PANEL, false);
            if (!mIsDestroyed && (st == null || st.menu == null)) {
                invalidatePanelMenu(FEATURE_SUPPORT_ACTION_BAR);
            }
        }
    }
mSubDecorInstalled表示mSubDecor视图是否创建,没创建则调用createSubDecor()方法创建;
1.3.1 createSubDecor()
负责创建mSubDecor视图(ViewGroup) ,同时将视图添加到Window窗口上;
 private ViewGroup createSubDecor() {
        //获取主题数组
        TypedArray a = mContext.obtainStyledAttributes(R.styleable.AppCompatTheme);
        //AppCompatActivity需要设置Theme.AppCompat主题,否则抛出异常
        if (!a.hasValue(R.styleable.AppCompatTheme_windowActionBar)) {
            a.recycle();
            throw new IllegalStateException(
                    "You need to use a Theme.AppCompat theme (or descendant) with this activity.");
        }
        //1.初始化视图显示相关特征
        if (a.getBoolean(R.styleable.AppCompatTheme_windowNoTitle, false)) {
            //样式没有Title
            requestWindowFeature(Window.FEATURE_NO_TITLE);
        } else if (a.getBoolean(R.styleable.AppCompatTheme_windowActionBar, false)) {           //样式显示ActionBar
            // Don't allow an action bar if there is no title.
            requestWindowFeature(FEATURE_SUPPORT_ACTION_BAR);
        }
        if (a.getBoolean(R.styleable.AppCompatTheme_windowActionBarOverlay, false)) {
            requestWindowFeature(FEATURE_SUPPORT_ACTION_BAR_OVERLAY);
        }
        if (a.getBoolean(R.styleable.AppCompatTheme_windowActionModeOverlay, false)) {
            requestWindowFeature(FEATURE_ACTION_MODE_OVERLAY);
        }
        mIsFloating = a.getBoolean(R.styleable.AppCompatTheme_android_windowIsFloating, false);
        a.recycle();

        //确认Window上是否已经安装DecorView,没有则创建DecorView并添加到Window上

        mWindow.getDecorView();

        final LayoutInflater inflater = LayoutInflater.from(mContext);
        ViewGroup subDecor = null;//依据相关参数设置创建subDecor,并添加到Window上

        //2.上面说了主题默认都是NoTitle,所以不会走里面的方法
        if (!mWindowNoTitle) {
            if (mIsFloating) {
                // 如果是弹框Dialog,则加载弹框视图
                subDecor = (ViewGroup) inflater.inflate(
                        R.layout.abc_dialog_title_material, null);

                // 浮动窗口没有ActionBar,重设置标志
                mHasActionBar = mOverlayActionBar = false;
            } else if (mHasActionBar) {//有ActionBar
                /**
                *这需要一些解释。因为我们不能使用android:theme属性
                *pre-L,我们通过使用
                *ContextThemeWrapper指向actionBarTheme。
                */
                TypedValue outValue = new TypedValue();
                mContext.getTheme().resolveAttribute(R.attr.actionBarTheme, outValue, true);

                Context themedContext;
                if (outValue.resourceId != 0) {
                    themedContext = new ContextThemeWrapper(mContext, outValue.resourceId);
                } else {
                    themedContext = mContext;
                }

                // 通过themedContext加载视图,并设置为内容视图
                subDecor = (ViewGroup) LayoutInflater.from(themedContext)
                        .inflate(R.layout.abc_screen_toolbar, null);

                mDecorContentParent = (DecorContentParent) subDecor
                        .findViewById(R.id.decor_content_parent);
                mDecorContentParent.setWindowCallback(getWindowCallback());

                /**
                 * 为DecorContentParent设置相应特征
                 */
                if (mOverlayActionBar) {
                    mDecorContentParent.initFeature(FEATURE_SUPPORT_ACTION_BAR_OVERLAY);
                }
                if (mFeatureProgress) {
                    mDecorContentParent.initFeature(Window.FEATURE_PROGRESS);
                }
                if (mFeatureIndeterminateProgress) {
                    mDecorContentParent.initFeature(Window.FEATURE_INDETERMINATE_PROGRESS);
                }
            }
        } else {//3.有Title时
            //Overlay模式,则加载Overlay模式的视图
            if (mOverlayActionMode) {
                subDecor = (ViewGroup) inflater.inflate(
                        R.layout.abc_screen_simple_overlay_action_mode, null);
            } else {
                subDecor = (ViewGroup) inflater.inflate(R.layout.abc_screen_simple, null);
            }

            if (Build.VERSION.SDK_INT >= 21) {
                //运行API版本21及以上,可以依赖ViewCompat的setOnApplyWindowInsetsListener设置监听器
                ViewCompat.setOnApplyWindowInsetsListener(subDecor,
                        new OnApplyWindowInsetsListener() {
                            @Override
                            public WindowInsetsCompat onApplyWindowInsets(View v,
                                    WindowInsetsCompat insets) {
                                final int top = insets.getSystemWindowInsetTop();
                                final int newTop = updateStatusGuard(top);

                                if (top != newTop) {
                                    insets = insets.replaceSystemWindowInsets(
                                            insets.getSystemWindowInsetLeft(),
                                            newTop,
                                            insets.getSystemWindowInsetRight(),
                                            insets.getSystemWindowInsetBottom());
                                }

                                //应用insets到我们的视图上
                                return ViewCompat.onApplyWindowInsets(v, insets);
                            }
                        });
            } else {
                // Else, we need to use our own FitWindowsViewGroup handling
                ((FitWindowsViewGroup) subDecor).setOnFitSystemWindowsListener(
                        new FitWindowsViewGroup.OnFitSystemWindowsListener() {
                            @Override
                            public void onFitSystemWindows(Rect insets) {
                                insets.top = updateStatusGuard(insets.top);
                            }
                        });
            }
        }
        //判断是否创建了subDecor
        if (subDecor == null) {
            throw new IllegalArgumentException(
                    "AppCompat does not support the current theme features: { "
                            + "windowActionBar: " + mHasActionBar
                            + ", windowActionBarOverlay: "+ mOverlayActionBar
                            + ", android:windowIsFloating: " + mIsFloating
                            + ", windowActionModeOverlay: " + mOverlayActionMode
                            + ", windowNoTitle: " + mWindowNoTitle
                            + " }");
        }

        if (mDecorContentParent == null) {
            mTitleView = (TextView) subDecor.findViewById(R.id.title);
        }

        // Make the decor optionally fit system windows, like the window's decor
        ViewUtils.makeOptionalFitsSystemWindows(subDecor);
        //这是添加我们布局父容器FrameLayout
        final ContentFrameLayout contentView = (ContentFrameLayout) subDecor.findViewById(
                R.id.action_bar_activity_content);
        //获取Window窗口上的视图,android.R.id.content这个Id在以前是我们布局的父容器的Id
        final ViewGroup windowContentView = (ViewGroup) mWindow.findViewById(android.R.id.content);
        if (windowContentView != null) {
            //4.将在Window已经创建的视图移除后添加到subDecor上
            // There might be Views already added to the Window's content view so we need to
            // migrate them to our content view
            while (windowContentView.getChildCount() > 0) {
                final View child = windowContentView.getChildAt(0);
                windowContentView.removeViewAt(0);
                contentView.addView(child);
            }

            // Change our content FrameLayout to use the android.R.id.content id.
            // Useful for fragments.
            //5.标记android.R.id.content视图没有ID
            windowContentView.setId(View.NO_ID);
            //将我们布局父容器FrameLayout的ID设置为android.R.id.content
            contentView.setId(android.R.id.content);

            // The decorContent may have a foreground drawable set (windowContentOverlay).
            // Remove this as we handle it ourselves
            if (windowContentView instanceof FrameLayout) {
                ((FrameLayout) windowContentView).setForeground(null);
            }
        }

        // Now set the Window's content view with the decor
        //6.将我们添加视图的父视图添加到Window上
        mWindow.setContentView(subDecor);

        contentView.setAttachListener(new ContentFrameLayout.OnAttachListener() {
            @Override
            public void onAttachedFromWindow() {}

            @Override
            public void onDetachedFromWindow() {
                dismissPopups();
            }
        });

        return subDecor;
    }
创建父视图的大概流程如下:
a.初始化视图显示相关特征
b.根据是否有Title加载不同视图
c.将在Window已经创建的子视图移除后添加到subDecor上
d.将我们布局父容器FrameLayout的ID设置为android.R.id.content
e.将我们要添加视图的父视图添加到Window,mWindow.setContentView(subDecor)
我们在创建subDecor时候发现会调用requestWindowFeature(),然后mWindow.getDecorView()创建DecorView添加相应的特征(Feature)设置,大概能了解requestWindowFeature()需要在setContentView()方法之前调用才能起作用,假如在setContentView()之后调用设置无效;
subDecor对应的布局文件abc_screen_simple.xml
xml version="1.0" encoding="utf-8"?>
<!-- Copyright (C) 2013 The Android Open Source Project

    Licensed under the Apache License, Version 2.0 (the "License");
    you may not use this file except in compliance with the License.
    You may obtain a copy of the License at

         http://www.apache.org/licenses/LICENSE-2.0

    Unless required by applicable law or agreed to in writing, software
    distributed under the License is distributed on an "AS IS" BASIS,
    WITHOUT WARRANTIES OR CONDITIONS OF ANY KIND, either express or implied.
    See the License for the specific language governing permissions and
    limitations under the License.
-->

<android.support.v7.widget.FitWindowsLinearLayout
   xmlns:android="http://schemas.android.com/apk/res/android"
   android:id="@+id/action_bar_root"
   android:layout_width="match_parent"
   android:layout_height="match_parent"
   android:orientation="vertical"
   android:fitsSystemWindows="true">

    <android.support.v7.widget.ViewStubCompat
       android:id="@+id/action_mode_bar_stub"
       android:inflatedId="@+id/action_mode_bar"
       android:layout="@layout/abc_action_mode_bar"
       android:layout_width="match_parent"
       android:layout_height="wrap_content" />

    <include layout="@layout/abc_screen_content_include" />

</android.support.v7.widget.FitWindowsLinearLayout>
abc_screen_content_include.xml
<merge xmlns:android="http://schemas.android.com/apk/res/android">

    <android.support.v7.internal.widget.ContentFrameLayout
            android:id="@id/action_bar_activity_content"
            android:layout_width="match_parent"
            android:layout_height="match_parent"
            android:foregroundGravity="fill_horizontal|top"
            android:foreground="?android:attr/windowContentOverlay" />

</merge>
subDecor实际是FitWindowsLinearLayout;
依据上面创建视图的过程,分析一下视图结构,实际上FitWindowsLinearLayout外层还有Window层
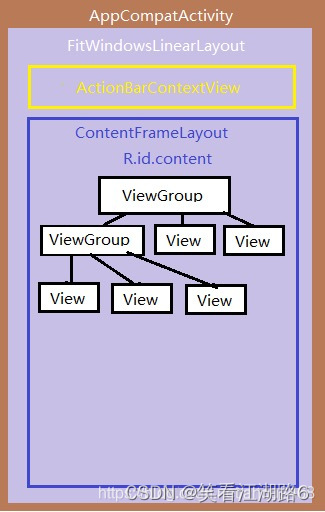
createSubDecor方法中还有两行的关键代码如下 :
//创建DecorView
mWindow.getDecorView();
//将subDecor添加到Window上
mWindow.setContentView(subDecor);
1.3.2 mWindow.getDecorView()
getDecorView()具体实现
主要负责创建和添加DecorView;
PhoneWindow.java
@Override
public final View getDecorView() {
    //mDecor为空或者强制DecorView重新安装
    if (mDecor == null || mForceDecorInstall) {
         installDecor();
    }
    return mDecor;
}
installDecor()具体实现
mDecor = generateDecor();
mContentParent = generateLayout(mDecor);
PhoneWindow
private void installDecor() {
        mForceDecorInstall = false;
        if (mDecor == null) {//DecorView为空需要新建DecorView
            mDecor = generateDecor(-1);
            mDecor.setDescendantFocusability(ViewGroup.FOCUS_AFTER_DESCENDANTS);
            mDecor.setIsRootNamespace(true);
            if (!mInvalidatePanelMenuPosted && mInvalidatePanelMenuFeatures != 0) {
                mDecor.postOnAnimation(mInvalidatePanelMenuRunnable);
            }
        } else {
            mDecor.setWindow(this);
        }
        if (mContentParent == null) {//mContentParent为空需要新建mContentParent
            mContentParent = generateLayout(mDecor);//把刚创建的DecorView传进去
            ......
        }
}
generateDecor()具体实现
创建DecorView视图;
protected DecorView generateDecor() {
        ......
        //新建DecorView视图对象
        return new DecorView(getContext(), -1);
    }
DecorView视图实际是帧布局,起到装饰作用;
public class DecorView extends FrameLayout implements RootViewSurfaceTaker, WindowCallbacks {
    ...
}
generateLayout(mDecor)具体实现
protected ViewGroup generateLayout(DecorView decor) {
        // Apply data from current theme.
        //获取窗口的样式Style
        TypedArray a = getWindowStyle();

        if (false) {
            System.out.println("From style:");
            String s = "Attrs:";
            for (int i = 0; i < R.styleable.Window.length; i++) {
                s = s + " " + Integer.toHexString(R.styleable.Window[i]) + "="
                        + a.getString(i);
            }
            System.out.println(s);
        }
        //设置相关的标志位
        mIsFloating = a.getBoolean(R.styleable.Window_windowIsFloating, false);
        int flagsToUpdate = (FLAG_LAYOUT_IN_SCREEN|FLAG_LAYOUT_INSET_DECOR)
                & (~getForcedWindowFlags());
        if (mIsFloating) {
            setLayout(WRAP_CONTENT, WRAP_CONTENT);
            setFlags(0, flagsToUpdate);
        } else {
            setFlags(FLAG_LAYOUT_IN_SCREEN|FLAG_LAYOUT_INSET_DECOR, flagsToUpdate);
        }

        if (a.getBoolean(R.styleable.Window_windowNoTitle, false)) {
            requestFeature(FEATURE_NO_TITLE);
        } else if (a.getBoolean(R.styleable.Window_windowActionBar, false)) {
            // Don't allow an action bar if there is no title.
            requestFeature(FEATURE_ACTION_BAR);
        }

        if (a.getBoolean(R.styleable.Window_windowActionBarOverlay, false)) {
            requestFeature(FEATURE_ACTION_BAR_OVERLAY);
        }

        if (a.getBoolean(R.styleable.Window_windowActionModeOverlay, false)) {
            requestFeature(FEATURE_ACTION_MODE_OVERLAY);
        }

        if (a.getBoolean(R.styleable.Window_windowSwipeToDismiss, false)) {
            requestFeature(FEATURE_SWIPE_TO_DISMISS);
        }

        if (a.getBoolean(R.styleable.Window_windowFullscreen, false)) {
            setFlags(FLAG_FULLSCREEN, FLAG_FULLSCREEN & (~getForcedWindowFlags()));
        }

        if (a.getBoolean(R.styleable.Window_windowTranslucentStatus,
                false)) {
            setFlags(FLAG_TRANSLUCENT_STATUS, FLAG_TRANSLUCENT_STATUS
                    & (~getForcedWindowFlags()));
        }

        if (a.getBoolean(R.styleable.Window_windowTranslucentNavigation,
                false)) {
            setFlags(FLAG_TRANSLUCENT_NAVIGATION, FLAG_TRANSLUCENT_NAVIGATION
                    & (~getForcedWindowFlags()));
        }

        if (a.getBoolean(R.styleable.Window_windowOverscan, false)) {
            setFlags(FLAG_LAYOUT_IN_OVERSCAN, FLAG_LAYOUT_IN_OVERSCAN&(~getForcedWindowFlags()));
        }

        if (a.getBoolean(R.styleable.Window_windowShowWallpaper, false)) {
            setFlags(FLAG_SHOW_WALLPAPER, FLAG_SHOW_WALLPAPER&(~getForcedWindowFlags()));
        }

        if (a.getBoolean(R.styleable.Window_windowEnableSplitTouch,
                getContext().getApplicationInfo().targetSdkVersion
                        >= android.os.Build.VERSION_CODES.HONEYCOMB)) {
            setFlags(FLAG_SPLIT_TOUCH, FLAG_SPLIT_TOUCH&(~getForcedWindowFlags()));
        }

        a.getValue(R.styleable.Window_windowMinWidthMajor, mMinWidthMajor);
        a.getValue(R.styleable.Window_windowMinWidthMinor, mMinWidthMinor);
        if (DEBUG) Log.d(TAG, "Min width minor: " + mMinWidthMinor.coerceToString()
                + ", major: " + mMinWidthMajor.coerceToString());
        if (a.hasValue(R.styleable.Window_windowFixedWidthMajor)) {
            if (mFixedWidthMajor == null) mFixedWidthMajor = new TypedValue();
            a.getValue(R.styleable.Window_windowFixedWidthMajor,
                    mFixedWidthMajor);
        }
        if (a.hasValue(R.styleable.Window_windowFixedWidthMinor)) {
            if (mFixedWidthMinor == null) mFixedWidthMinor = new TypedValue();
            a.getValue(R.styleable.Window_windowFixedWidthMinor,
                    mFixedWidthMinor);
        }
        if (a.hasValue(R.styleable.Window_windowFixedHeightMajor)) {
            if (mFixedHeightMajor == null) mFixedHeightMajor = new TypedValue();
            a.getValue(R.styleable.Window_windowFixedHeightMajor,
                    mFixedHeightMajor);
        }
        if (a.hasValue(R.styleable.Window_windowFixedHeightMinor)) {
            if (mFixedHeightMinor == null) mFixedHeightMinor = new TypedValue();
            a.getValue(R.styleable.Window_windowFixedHeightMinor,
                    mFixedHeightMinor);
        }
        if (a.getBoolean(R.styleable.Window_windowContentTransitions, false)) {
            requestFeature(FEATURE_CONTENT_TRANSITIONS);
        }
        if (a.getBoolean(R.styleable.Window_windowActivityTransitions, false)) {
            requestFeature(FEATURE_ACTIVITY_TRANSITIONS);
        }

        mIsTranslucent = a.getBoolean(R.styleable.Window_windowIsTranslucent, false);

        final Context context = getContext();
        final int targetSdk = context.getApplicationInfo().targetSdkVersion;
        final boolean targetPreHoneycomb = targetSdk < android.os.Build.VERSION_CODES.HONEYCOMB;
        final boolean targetPreIcs = targetSdk < android.os.Build.VERSION_CODES.ICE_CREAM_SANDWICH;
        final boolean targetPreL = targetSdk < android.os.Build.VERSION_CODES.LOLLIPOP;
        final boolean targetHcNeedsOptions = context.getResources().getBoolean(
                R.bool.target_honeycomb_needs_options_menu);
        final boolean noActionBar = !hasFeature(FEATURE_ACTION_BAR) || hasFeature(FEATURE_NO_TITLE);

        if (targetPreHoneycomb || (targetPreIcs && targetHcNeedsOptions && noActionBar)) {
            setNeedsMenuKey(WindowManager.LayoutParams.NEEDS_MENU_SET_TRUE);
        } else {
            setNeedsMenuKey(WindowManager.LayoutParams.NEEDS_MENU_SET_FALSE);
        }
        //设置主题状态栏默认的颜色
        if (!mForcedStatusBarColor) {
            mStatusBarColor = a.getColor(R.styleable.Window_statusBarColor, 0xFF000000);
        }
        获取底部NavigationBar颜色
        if (!mForcedNavigationBarColor) {
            mNavigationBarColor = a.getColor(R.styleable.Window_navigationBarColor, 0xFF000000);
            mNavigationBarDividerColor = a.getColor(R.styleable.Window_navigationBarDividerColor,
                    0x00000000);
        }
        //获取主题的一些资源
        WindowManager.LayoutParams params = getAttributes();

        // Non-floating windows on high end devices must put up decor beneath the system bars and
        // therefore must know about visibility changes of those.
        if (!mIsFloating) {
            if (!targetPreL && a.getBoolean(
                    R.styleable.Window_windowDrawsSystemBarBackgrounds,
                    false)) {
                setFlags(FLAG_DRAWS_SYSTEM_BAR_BACKGROUNDS,
                        FLAG_DRAWS_SYSTEM_BAR_BACKGROUNDS & ~getForcedWindowFlags());
            }
            if (mDecor.mForceWindowDrawsStatusBarBackground) {
                params.privateFlags |= PRIVATE_FLAG_FORCE_DRAW_STATUS_BAR_BACKGROUND;
            }
        }
        if (a.getBoolean(R.styleable.Window_windowLightStatusBar, false)) {
            decor.setSystemUiVisibility(
                    decor.getSystemUiVisibility() | View.SYSTEM_UI_FLAG_LIGHT_STATUS_BAR);
        }
        if (a.getBoolean(R.styleable.Window_windowLightNavigationBar, false)) {
            decor.setSystemUiVisibility(
                    decor.getSystemUiVisibility() | View.SYSTEM_UI_FLAG_LIGHT_NAVIGATION_BAR);
        }

        if (mAlwaysReadCloseOnTouchAttr || getContext().getApplicationInfo().targetSdkVersion
                >= android.os.Build.VERSION_CODES.HONEYCOMB) {
            if (a.getBoolean(
                    R.styleable.Window_windowCloseOnTouchOutside,
                    false)) {
                setCloseOnTouchOutsideIfNotSet(true);
            }
        }

        if (!hasSoftInputMode()) {
            params.softInputMode = a.getInt(
                    R.styleable.Window_windowSoftInputMode,
                    params.softInputMode);
        }

        if (a.getBoolean(R.styleable.Window_backgroundDimEnabled,
                mIsFloating)) {
            /* All dialogs should have the window dimmed */
            if ((getForcedWindowFlags()&WindowManager.LayoutParams.FLAG_DIM_BEHIND) == 0) {
                params.flags |= WindowManager.LayoutParams.FLAG_DIM_BEHIND;
            }
            if (!haveDimAmount()) {
                params.dimAmount = a.getFloat(
                        android.R.styleable.Window_backgroundDimAmount, 0.5f);
            }
        }

        if (params.windowAnimations == 0) {
            params.windowAnimations = a.getResourceId(
                    R.styleable.Window_windowAnimationStyle, 0);
        }

        // The rest are only done if this window is not embedded; otherwise,
        // the values are inherited from our container.
        if (getContainer() == null) {
            if (mBackgroundDrawable == null) {
                if (mBackgroundResource == 0) {
                    mBackgroundResource = a.getResourceId(
                            R.styleable.Window_windowBackground, 0);
                }
                if (mFrameResource == 0) {
                    mFrameResource = a.getResourceId(R.styleable.Window_windowFrame, 0);
                }
                mBackgroundFallbackResource = a.getResourceId(
                        R.styleable.Window_windowBackgroundFallback, 0);
                if (false) {
                    System.out.println("Background: "
                            + Integer.toHexString(mBackgroundResource) + " Frame: "
                            + Integer.toHexString(mFrameResource));
                }
            }
            if (mLoadElevation) {
                mElevation = a.getDimension(R.styleable.Window_windowElevation, 0);
            }
            mClipToOutline = a.getBoolean(R.styleable.Window_windowClipToOutline, false);
            mTextColor = a.getColor(R.styleable.Window_textColor, Color.TRANSPARENT);
        }

        // 找到Window上DecorView需要显示的布局ID

        int layoutResource;
        int features = getLocalFeatures();
        // System.out.println("Features: 0x" + Integer.toHexString(features));
        // 根据不同的样式找到对应的布局
       if ((features & (1 << FEATURE_SWIPE_TO_DISMISS)) != 0) {
            layoutResource = R.layout.screen_swipe_dismiss;
            setCloseOnSwipeEnabled(true);
        } else if ((features & ((1 << FEATURE_LEFT_ICON) | (1 << FEATURE_RIGHT_ICON))) != 0) {
            if (mIsFloating) {
                TypedValue res = new TypedValue();
                getContext().getTheme().resolveAttribute(
                        R.attr.dialogTitleIconsDecorLayout, res, true);
                layoutResource = res.resourceId;
            } else {
                layoutResource = R.layout.screen_title_icons;
            }
            // XXX Remove this once action bar supports these features.
            removeFeature(FEATURE_ACTION_BAR);
            // System.out.println("Title Icons!");
        } else if ((features & ((1 << FEATURE_PROGRESS) | (1 << FEATURE_INDETERMINATE_PROGRESS))) != 0
                && (features & (1 << FEATURE_ACTION_BAR)) == 0) {
            // Special case for a window with only a progress bar (and title).
            // XXX Need to have a no-title version of embedded windows.
            layoutResource = R.layout.screen_progress;
            // System.out.println("Progress!");
        } else if ((features & (1 << FEATURE_CUSTOM_TITLE)) != 0) {
            // Special case for a window with a custom title.
            // If the window is floating, we need a dialog layout
            if (mIsFloating) {
                TypedValue res = new TypedValue();
                getContext().getTheme().resolveAttribute(
                        R.attr.dialogCustomTitleDecorLayout, res, true);
                layoutResource = res.resourceId;
            } else {
                layoutResource = R.layout.screen_custom_title;
            }
            // XXX Remove this once action bar supports these features.
            removeFeature(FEATURE_ACTION_BAR);
        } else if ((features & (1 << FEATURE_NO_TITLE)) == 0) {
            // If no other features and not embedded, only need a title.
            // If the window is floating, we need a dialog layout
            if (mIsFloating) {
                TypedValue res = new TypedValue();
                getContext().getTheme().resolveAttribute(
                        R.attr.dialogTitleDecorLayout, res, true);
                layoutResource = res.resourceId;
            } else if ((features & (1 << FEATURE_ACTION_BAR)) != 0) {
                layoutResource = a.getResourceId(
                        R.styleable.Window_windowActionBarFullscreenDecorLayout,
                        R.layout.screen_action_bar);
            } else {
                layoutResource = R.layout.screen_title;
            }
            // System.out.println("Title!");
        } else if ((features & (1 << FEATURE_ACTION_MODE_OVERLAY)) != 0) {
            layoutResource = R.layout.screen_simple_overlay_action_mode;
        } else {
            // Embedded, so no decoration is needed.
            // 没有装饰被需要,默认视图
            layoutResource = R.layout.screen_simple;
            // System.out.println("Simple!");
        }
        //要开始更改mDecor啦~
        //将布局添加到DecorView
        mDecor.startChanging();
        mDecor.onResourcesLoaded(mLayoutInflater, layoutResource);
        //public static final int ID_ANDROID_CONTENT = com.android.internal.R.id.content;
        ViewGroup contentParent = (ViewGroup)findViewById(ID_ANDROID_CONTENT);
        if (contentParent == null) {
            throw new RuntimeException("Window couldn't find content container view");
        }

        if ((features & (1 << FEATURE_INDETERMINATE_PROGRESS)) != 0) {
            ProgressBar progress = getCircularProgressBar(false);
            if (progress != null) {
                progress.setIndeterminate(true);
            }
        }

        if ((features & (1 << FEATURE_SWIPE_TO_DISMISS)) != 0) {
            registerSwipeCallbacks(contentParent);
        }

        // Remaining setup -- of background and title -- that only applies
        // to top-level windows.
        //这里的getContainer()返回的是个Window类,也就是父Window,一般为空
        if (getContainer() == null) {
            final Drawable background;
            if (mBackgroundResource != 0) {
                background = getContext().getDrawable(mBackgroundResource);
            } else {
                background = mBackgroundDrawable;
            }
            //设置窗口背景
            mDecor.setWindowBackground(background);

            final Drawable frame;
            if (mFrameResource != 0) {
                frame = getContext().getDrawable(mFrameResource);
            } else {
                frame = null;
            }
            mDecor.setWindowFrame(frame);

            mDecor.setElevation(mElevation);
            mDecor.setClipToOutline(mClipToOutline);

            if (mTitle != null) {
                setTitle(mTitle);
            }

            if (mTitleColor == 0) {
                mTitleColor = mTextColor;
            }
            setTitleColor(mTitleColor);
        }

        mDecor.finishChanging();

        return contentParent;
    }
主要流程如下:
a.根据不同的样式找到对应的布局;
例如:layoutResource = R.layout.screen_simple;
b.将布局加载到DecorView上;
c.返回android:id="@android:id/content"对应的视图contentParent
screen_simple.xml
<LinearLayout xmlns:android="http://schemas.android.com/apk/res/android"
    android:layout_width="match_parent"
    android:layout_height="match_parent"
    android:fitsSystemWindows="true"
    android:orientation="vertical">
    <ViewStub android:id="@+id/action_mode_bar_stub"
              android:inflatedId="@+id/action_mode_bar"
              android:layout="@layout/action_mode_bar"
              android:layout_width="match_parent"
              android:layout_height="wrap_content"
              android:theme="?attr/actionBarTheme" />
    <FrameLayout
         android:id="@android:id/content"
         android:layout_width="match_parent"
         android:layout_height="match_parent"
         android:foregroundInsidePadding="false"
         android:foregroundGravity="fill_horizontal|top"
         android:foreground="?android:attr/windowContentOverlay" />
</LinearLayout>
1.3.3 Window.setContentView()
将我们的布局ID添加到mContentParent(android:id=“@android:id/content”)视图下
 @Override
    public void setContentView(int layoutResID) {
        // Note: FEATURE_CONTENT_TRANSITIONS may be set in the process of installing the window
        // decor, when theme attributes and the like are crystalized. Do not check the feature
        // before this happens.
        //调用getDecorView()时已经创建了mContentParent
        if (mContentParent == null) {
            installDecor();
        } else if (!hasFeature(FEATURE_CONTENT_TRANSITIONS)) {
            //是否有transitions动画,没有,进入else
            mContentParent.removeAllViews();
        }

        if (hasFeature(FEATURE_CONTENT_TRANSITIONS)) {
            //有动画,执行transitions动画
            final Scene newScene = Scene.getSceneForLayout(mContentParent, layoutResID,
                    getContext());
            transitionTo(newScene);
        } else {
            //重要!!将这个subDecor也就是FitWindowsLinearLayout添加到这个mContentParent里面了
            //mContentParent是FrameLayout,在之前设置的View.NO_ID
            mLayoutInflater.inflate(layoutResID, mContentParent);
        }
        mContentParent.requestApplyInsets();
        final Callback cb = getCallback();
        if (cb != null && !isDestroyed()) {
            cb.onContentChanged();
        }
        mContentParentExplicitlySet = true;
    }
整个setContentView的流程如下:
1.mWindow.getDecorView(); 创建DecorView
2.mDecor = generateDecor(-1); 创建DecorView
3.new DecorView(context, featureId, this, getAttributes()); 创建DecorView
4.mContentParent = generateLayout(mDecor); 根据样式找到对应视图
5.layoutResource = R.layout.screen_simple; 根据样式找到对应视图
6.mDecor.onResourcesLoaded(mLayoutInflater, layoutResource); 将视图加入到DecorView
7.subDecor = (ViewGroup) inflater.inflate(R.layout.abc_screen_simple, null); 根据样式找到需要的子视图
8.mWindow.setContentView(subDecor); //将需要的子视图Window上mContentParent
9.将我们的视图添加到subDecor上


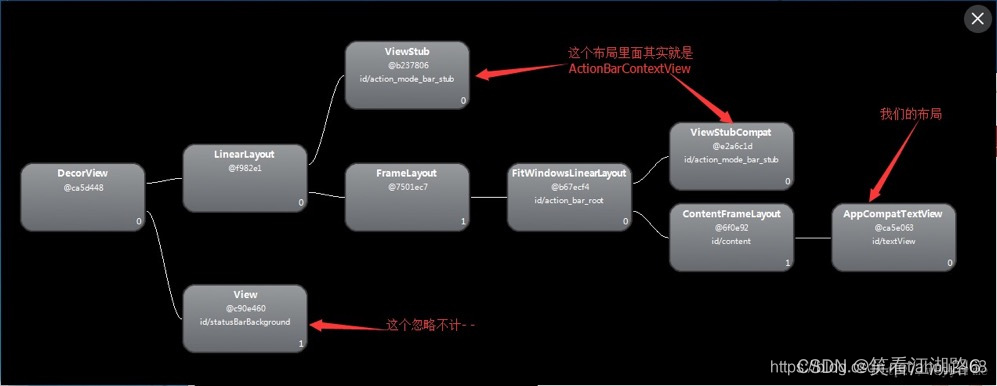
Activity
  PhoneWindow
    DecorView
        LinearLayout(根据设置特性选择相应的视图装载到DecorView中)
                     ActionBarContextView
                     FrameLayout("@android:id/")设置ID为空
                                    FitWindowsLinearLayout(根据设置特性选择相应的视图装载到FrameLayout("@android:id/content"))
                                          ActionBarContextView
                                          ContentFrameLayout设置ID("@android:id/content")
                                                    将我们要显示的视图加入到 ContentFrameLayout
完整的视图结构如下:
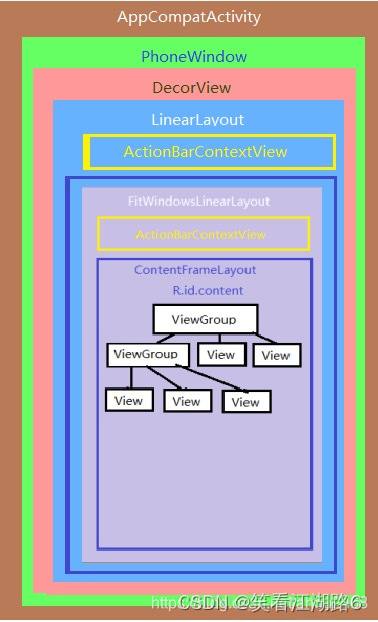
运行APP后,我们在用hierarchyviewer查看下
