44 服务监控讲解
1 需求
显示CPU、内存、服务器信息、Java虚拟机信息、磁盘状态的信息
2 前端
- RuoYi-Vue\ruoyi-ui\src\views\monitor\server\index.vue
<script> import { getServer } from "@/api/monitor/server"; export default { name: "Server", data() { return { // 服务器信息 server: [] }; }, created() { this.getList(); this.openLoading(); }, methods: { /** 查询服务器信息 */ getList() { getServer().then(response => { this.server = response.data; this.$modal.closeLoading(); }); }, // 打开加载层 openLoading() { this.$modal.loading("正在加载服务监控数据,请稍候!"); } } }; </script> - RuoYi-Vue\ruoyi-ui\src\api\monitor\server.js
import request from '@/utils/request'

// 获取服务信息
export function getServer() {
  return request({
    url: '/monitor/server',
    method: 'get'
  })
}
3 后端
- RuoYi-Vue\pom.xml:引入开源框架,获取cpu、内存、磁盘等信息。
<!-- 获取系统信息 --> <dependency> <groupId>com.github.oshi</groupId> <artifactId>oshi-core</artifactId> <version>${oshi.version}</version> </dependency> - RuoYi-Vue\ruoyi-framework\pom.xml:引入开源框架,获取cpu、内存、磁盘等信息。
<!-- 获取系统信息 --> <dependency> <groupId>com.github.oshi</groupId> <artifactId>oshi-core</artifactId> </dependency> - ServerController#getInfo
/** * 服务器监控 * * @author ruoyi */ @RestController @RequestMapping("/monitor/server") public class ServerController { @PreAuthorize("@ss.hasPermi('monitor:server:list')") @GetMapping() public AjaxResult getInfo() throws Exception { // 实例化 Server server = new Server(); // 设置相关的值 server.copyTo(); // 返回给前端 return AjaxResult.success(server); } } - Server:返回数据
/** * 服务器相关信息 * * @author ruoyi */ public class Server { private static final int OSHI_WAIT_SECOND = 1000; /** * CPU相关信息 */ private Cpu cpu = new Cpu(); /** * 內存相关信息 */ private Mem mem = new Mem(); /** * JVM相关信息 */ private Jvm jvm = new Jvm(); /** * 服务器相关信息 */ private Sys sys = new Sys(); /** * 磁盘相关信息 */ private List<SysFile> sysFiles = new LinkedList<SysFile>(); } - Server#copyTo:数据填充
/** * 数据填充 */ public void copyTo() throws Exception { // SystemInfo:框架api SystemInfo si = new SystemInfo(); // SystemInfo:框架api HardwareAbstractionLayer hal = si.getHardware(); // cpu信息,大多从开源框架的API中获取 setCpuInfo(hal.getProcessor()); // 内存信息 setMemInfo(hal.getMemory()); // 服务器信息 setSysInfo(); // 虚拟机信息,jdk的API setJvmInfo(); // 磁盘信息, setSysFiles(si.getOperatingSystem()); } - Cpu.java
/** * CPU相关信息 * * @author ruoyi */ public class Cpu { /** * 核心数 */ private int cpuNum; /** * CPU总的使用率 */ private double total; /** * CPU系统使用率 */ private double sys; /** * CPU用户使用率 */ private double used; /** * CPU当前等待率 */ private double wait; /** * CPU当前空闲率 */ private double free; } - Jvm.java
/** * JVM相关信息 * * @author ruoyi */ public class Jvm { /** * 当前JVM占用的内存总数(M) */ private double total; /** * JVM最大可用内存总数(M) */ private double max; /** * JVM空闲内存(M) */ private double free; /** * JDK版本 */ private String version; /** * JDK路径 */ private String home; } - Mem.java
/** * 內存相关信息 * * @author ruoyi */ public class Mem { /** * 内存总量 */ private double total; /** * 已用内存 */ private double used; /** * 剩余内存 */ private double free; } - Sys.java
/** * 系统相关信息 * * @author ruoyi */ public class Sys { /** * 服务器名称 */ private String computerName; /** * 服务器Ip */ private String computerIp; /** * 项目路径 */ private String userDir; /** * 操作系统 */ private String osName; /** * 系统架构 */ private String osArch; } - SysFile.java
/**
 * 系统文件相关信息
 *
 * @author ruoyi
 */
public class SysFile
{
    /**
     * 盘符路径
     */
    private String dirName;

    /**
     * 盘符类型
     */
    private String sysTypeName;

    /**
     * 文件类型
     */
    private String typeName;

    /**
     * 总大小
     */
    private String total;

    /**
     * 剩余大小
     */
    private String free;

    /**
     * 已经使用量
     */
    private String used;

    /**
     * 资源的使用率
     */
    private double usage;
}
4 拓展:
4 拓展:集群
如果要做成集群,就需要再扩展一下:
- 需要一个表去控制,把服务器的的名称、IP、地址等相关信息入库。
- 然后需要做实时的监控,比如使用websocket。
45 系统接口使用详解
1 需求
api文档
2 效果

3 使用
- 第一步:获取token
- 第二步:点击" Authorize ",配置token


- 第三步:传参数,调接口
4 拓展
-
可以使用很多第三方插件,把界面优化的更漂亮。
46 系统接口实现详解
1 RuoYi-Vue\pom.xml
    <properties>
        <swagger.version>3.0.0</swagger.version>
    </properties>

            <!-- Swagger3依赖 -->
            <dependency>
                <groupId>io.springfox</groupId>
                <artifactId>springfox-boot-starter</artifactId>
                <version>${swagger.version}</version>
                <exclusions>
                    <!--
                        排除:它和前端的UI有冲突
                    -->
                    <exclusion>
                        <groupId>io.swagger</groupId>
                        <artifactId>swagger-models</artifactId>
                    </exclusion>
                </exclusions>
            </dependency>
2 RuoYi-Vue\ruoyi-admin\pom.xml
        <!-- swagger3
             界面是swagger ui渲染出来的。
             而sawagger ui的所有页面,都在它的jar包中。
        -->
        <dependency>
            <groupId>io.springfox</groupId>
            <artifactId>springfox-boot-starter</artifactId>
        </dependency>

        <!--
             因为与前端ui冲突,所以做了排除。
             并把版本降了一下。
        -->
        <!-- 防止进入swagger页面报类型转换错误,排除3.0.0中的引用,手动增加1.6.2版本 -->
        <dependency>
            <groupId>io.swagger</groupId>
            <artifactId>swagger-models</artifactId>
            <version>1.6.2</version>
        </dependency>
3 前端
- ruoyi-ui\src\views\tool\swagger\index.vue
<template>
  <!--url指定了后台的接口地址 -->
  <i-frame :src="url" />
</template>
<script>
import iFrame from "@/components/iFrame/index";
export default {
  name: "Swagger",
  components: { iFrame },
  data() {
    return {
      url: process.env.VUE_APP_BASE_API + "/swagger-ui/index.html"
    };
  },
};
</script>
4 后端
- ResourcesConfig#addResourceHandlers:swagger ui映射。swagger ui怎么去加载的呢?
@Override public void addResourceHandlers(ResourceHandlerRegistry registry) { /** 本地文件上传路径 */ registry.addResourceHandler(Constants.RESOURCE_PREFIX + "/**") .addResourceLocations("file:" + RuoYiConfig.getProfile() + "/"); /** swagger配置 */ /** * 映射配置: * "/swagger-ui/**":访问的地址。 * "classpath:/META-INF/resources/webjars/springfox-swagger-ui/":找到对应的路径(在jar包中)。 * 因为默认情况下swagger ui首页是英文版的,但是可以对它做一些国际化的操作。 */ registry.addResourceHandler("/swagger-ui/**") .addResourceLocations("classpath:/META-INF/resources/webjars/springfox-swagger-ui/") .setCacheControl(CacheControl.maxAge(5, TimeUnit.HOURS).cachePublic());; } - SwaggerConfig:swagger配置类
package com.ruoyi.web.core.config;

import java.util.ArrayList;
import java.util.List;
import org.springframework.beans.factory.annotation.Autowired;
import org.springframework.beans.factory.annotation.Value;
import org.springframework.context.annotation.Bean;
import org.springframework.context.annotation.Configuration;
import com.ruoyi.common.config.RuoYiConfig;
import io.swagger.annotations.ApiOperation;
import io.swagger.models.auth.In;
import springfox.documentation.builders.ApiInfoBuilder;
import springfox.documentation.builders.PathSelectors;
import springfox.documentation.builders.RequestHandlerSelectors;
import springfox.documentation.service.ApiInfo;
import springfox.documentation.service.ApiKey;
import springfox.documentation.service.AuthorizationScope;
import springfox.documentation.service.Contact;
import springfox.documentation.service.SecurityReference;
import springfox.documentation.service.SecurityScheme;
import springfox.documentation.spi.DocumentationType;
import springfox.documentation.spi.service.contexts.SecurityContext;
import springfox.documentation.spring.web.plugins.Docket;

/**
 * Swagger2的接口配置
 */
@Configuration
public class SwaggerConfig
{
    /**
     * 系统基础配置。
     * 读取项目相关配置文件常用的几个属性。
     * */
    @Autowired
    private RuoYiConfig ruoyiConfig;

    /** 是否开启swagger */
    @Value("${swagger.enabled}")
    private boolean enabled;

    /**
     * 设置:请求的统一前缀。
     * 即使用swagger ui页面调用接口进行测试时,请求url都会拼接这样的一个前缀。不然就映射不到后台来了,因为前端有对应的路由控制。
     * 为什么需要请求前缀呢?因为路由有映射。
     * 当然这个是可以改的,可根据实际情况去调整。
     * */
    @Value("${swagger.pathMapping}")
    private String pathMapping;

    /**
     * 创建API
     */
    @Bean
    public Docket createRestApi()
    {
        // 版本:DocumentationType.OAS_30
        return new Docket(DocumentationType.OAS_30)
                // 是否启用Swagger
                .enable(enabled)
                // 用来创建该API的基本信息,展示在文档的页面中(自定义展示的信息)
                .apiInfo(apiInfo())
                // 设置哪些接口暴露给Swagger展示
                .select()
                // 暴露方式1:扫描所有有注解的api,用这种方式更灵活
                .apis(RequestHandlerSelectors.withMethodAnnotation(ApiOperation.class))
                // 暴露方式2:扫描指定包中的swagger注解
                // .apis(RequestHandlerSelectors.basePackage("com.ruoyi.project.tool.swagger"))
                // 暴露方式3:扫描所有 .apis(RequestHandlerSelectors.any())
                .paths(PathSelectors.any())
                .build()
                /* 设置安全模式,swagger可以设置访问token */
                /**
                 * 默认情况下,直接访问会提示没有权限,所以需要设置一下安全模式(即页面中的” Authorize按钮 ”)。
                 * 点击“ Authorize按钮 ”,可以看到,接口需要哪些属性。
                 * 可以按实际情况传更多的参数。
                 */
                .securitySchemes(securitySchemes())
                .securityContexts(securityContexts())
                .pathMapping(pathMapping);
    }

    /**
     * 安全模式,这里指定token通过Authorization头请求头传递
     */
    private List<SecurityScheme> securitySchemes()
    {
        List<SecurityScheme> apiKeyList = new ArrayList<SecurityScheme>();
        apiKeyList.add(new ApiKey("Authorization", "Authorization", In.HEADER.toValue()));
        return apiKeyList;
    }

    /**
     * 安全上下文
     */
    private List<SecurityContext> securityContexts()
    {
        List<SecurityContext> securityContexts = new ArrayList<>();
        securityContexts.add(
                SecurityContext.builder()
                        .securityReferences(defaultAuth())
                        .operationSelector(o -> o.requestMappingPattern().matches("/.*"))
                        .build());
        return securityContexts;
    }

    /**
     * 默认的安全上引用
     */
    private List<SecurityReference> defaultAuth()
    {
        AuthorizationScope authorizationScope = new AuthorizationScope("global", "accessEverything");
        AuthorizationScope[] authorizationScopes = new AuthorizationScope[1];
        authorizationScopes[0] = authorizationScope;
        List<SecurityReference> securityReferences = new ArrayList<>();
        securityReferences.add(new SecurityReference("Authorization", authorizationScopes));
        return securityReferences;
    }

    /**
     * 添加摘要信息。
     * 自定义展示的api基本信息。
     */
    private ApiInfo apiInfo()
    {
        // 用ApiInfoBuilder进行定制
        return new ApiInfoBuilder()
                // 设置标题
                .title("标题:若依管理系统_接口文档")
                // 描述
                .description("描述:用于管理集团旗下公司的人员信息,具体包括XXX,XXX模块...")
                // 作者信息
                .contact(new Contact(ruoyiConfig.getName(), null, null))
                // 版本
                .version("版本号:" + ruoyiConfig.getVersion())
                .build();
    }
}
- RuoYiConfig:系统基础配置
/** * 读取项目相关配置。 * 基础配置,对应配置文件中的常用的几个属性。 */ @Component @ConfigurationProperties(prefix = "ruoyi") public class RuoYiConfig { /** 项目名称 */ private String name; /** 版本 */ private String version; /** 版权年份 */ private String copyrightYear; /** 实例演示开关 */ private boolean demoEnabled; /** 上传路径 */ private static String profile; /** 获取地址开关 */ private static boolean addressEnabled; /** 验证码类型 */ private static String captchaType; /** * 获取导入上传路径 */ public static String getImportPath() { return getProfile() + "/import"; } /** * 获取头像上传路径 */ public static String getAvatarPath() { return getProfile() + "/avatar"; } /** * 获取下载路径 */ public static String getDownloadPath() { return getProfile() + "/download/"; } /** * 获取上传路径 */ public static String getUploadPath() { return getProfile() + "/upload"; } } - application.yml
# 项目相关配置 ruoyi: # 名称 name: RuoYi # 版本 version: 3.8.6 # 版权年份 copyrightYear: 2023 # 实例演示开关 demoEnabled: true # 文件路径 示例( Windows配置D:/ruoyi/uploadPath,Linux配置 /home/ruoyi/uploadPath) profile: D:/ruoyi/uploadPath # 获取ip地址开关 addressEnabled: false # 验证码类型 math 数字计算 char 字符验证 captchaType: math - SwaggerConfig#securitySchemes:安全模式,这里指定token通过Authorization头请求头传递
    /**
     * 安全模式,这里指定token通过Authorization头请求头传递
     */
    private List<SecurityScheme> securitySchemes()
    {
        List<SecurityScheme> apiKeyList = new ArrayList<SecurityScheme>();
        apiKeyList.add(new ApiKey("Authorization", "Authorization", In.HEADER.toValue()));
        return apiKeyList;
    }
5 如何汉化系统接口Swagger
想必很多小伙伴都曾经使用过Swagger,但是打开UI界面是纯英文的界面并不太友好,作为国人还是习惯中文界面。
- 找到m2/repository/io/springfox/springfox-swagger-ui/x.x.x/springfox-swagger-ui-x.x.x.jar
- 修改对应springfox-swagger-ui-x.x.x.jar包内
resources目录下swagger-ui.html,添加如下JS代码<!-- 选择中文版 --> <script src='webjars/springfox-swagger-ui/lang/translator.js' type='text/javascript'></script> <script src='webjars/springfox-swagger-ui/lang/zh-cn.js' type='text/javascript'></script> - 本地修改结束后,在覆盖压缩包文件重启就实现汉化了
6 编码案例
@Api("用户信息管理")
public class TestController extends BaseController{
    // 暴露注解
    @ApiOperation("获取用户列表")
    // 参数注解
    /**
     * name:参数
     * value:显示的文本
     * required:是否必填
     * dataType:数据类型
     * paramType:参数类型。如path对应的是getUser(@PathVariable Integer userId)中的@PathVariable传参方式。
     * dataTypeClass:数据类型
     */
    @ApiImplicitParam(name = "userId", value = "用户ID", required = true, dataType = "int", paramType = "path", dataTypeClass = Integer.class)
    public R<UserEntity> getUser(@PathVariable Integer userId)
    {
        List<UserEntity> userList = new ArrayList<UserEntity>(users.values());
        return R.ok(userList);
    }
}
完整代码:
/**
 * swagger 用户测试方法
 *
 * @author ruoyi
 */
@Api("用户信息管理")
@RestController
@RequestMapping("/test/user")
public class TestController extends BaseController
{
    private final static Map<Integer, UserEntity> users = new LinkedHashMap<Integer, UserEntity>();
    {
        users.put(1, new UserEntity(1, "admin", "admin123", "15888888888"));
        users.put(2, new UserEntity(2, "ry", "admin123", "15666666666"));
    }

    @ApiOperation("获取用户列表")
    @GetMapping("/list")
    public R<List<UserEntity>> userList()
    {
        List<UserEntity> userList = new ArrayList<UserEntity>(users.values());
        return R.ok(userList);
    }

    @ApiOperation("获取用户详细")
    /**
     * name:参数
     * value:显示的文本
     * required:是否必填
     * dataType:数据类型
     * paramType:参数类型。如path对应的是getUser(@PathVariable Integer userId)中的@PathVariable传参方式。
     * dataTypeClass:数据类型
     */
    @ApiImplicitParam(name = "userId", value = "用户ID", required = true, dataType = "int", paramType = "path", dataTypeClass = Integer.class)
    @GetMapping("/{userId}")
    public R<UserEntity> getUser(@PathVariable Integer userId)
    {
        if (!users.isEmpty() && users.containsKey(userId))
        {
            return R.ok(users.get(userId));
        }
        else
        {
            return R.fail("用户不存在");
        }
    }

    @ApiOperation("新增用户")
    @ApiImplicitParams({
        @ApiImplicitParam(name = "userId", value = "用户id", dataType = "Integer", dataTypeClass = Integer.class),
        @ApiImplicitParam(name = "username", value = "用户名称", dataType = "String", dataTypeClass = String.class),
        @ApiImplicitParam(name = "password", value = "用户密码", dataType = "String", dataTypeClass = String.class),
        @ApiImplicitParam(name = "mobile", value = "用户手机", dataType = "String", dataTypeClass = String.class)
    })
    @PostMapping("/save")
    public R<String> save(UserEntity user)
    {
        if (StringUtils.isNull(user) || StringUtils.isNull(user.getUserId()))
        {
            return R.fail("用户ID不能为空");
        }
        users.put(user.getUserId(), user);
        return R.ok();
    }

    @ApiOperation("更新用户")
    @PutMapping("/update")
    public R<String> update(@RequestBody UserEntity user)
    {
        if (StringUtils.isNull(user) || StringUtils.isNull(user.getUserId()))
        {
            return R.fail("用户ID不能为空");
        }
        if (users.isEmpty() || !users.containsKey(user.getUserId()))
        {
            return R.fail("用户不存在");
        }
        users.remove(user.getUserId());
        users.put(user.getUserId(), user);
        return R.ok();
    }

    @ApiOperation("删除用户信息")
    @ApiImplicitParam(name = "userId", value = "用户ID", required = true, dataType = "int", paramType = "path", dataTypeClass = Integer.class)
    @DeleteMapping("/{userId}")
    public R<String> delete(@PathVariable Integer userId)
    {
        if (!users.isEmpty() && users.containsKey(userId))
        {
            users.remove(userId);
            return R.ok();
        }
        else
        {
            return R.fail("用户不存在");
        }
    }
}

/**
 * 参数类型为实体类
 */
@ApiModel(value = "UserEntity", description = "用户实体")
class UserEntity
{
    // 注解:显示的文本。如果没有这个注解,默认使用属性名称。
    @ApiModelProperty("用户ID")
    private Integer userId;

    @ApiModelProperty("用户名称")
    private String username;

    @ApiModelProperty("用户密码")
    private String password;

    @ApiModelProperty("用户手机")
    private String mobile;

    public UserEntity()
    {

    }

    public UserEntity(Integer userId, String username, String password, String mobile)
    {
        this.userId = userId;
        this.username = username;
        this.password = password;
        this.mobile = mobile;
    }

    // get/set方法
}
47 XSS脚本过滤详解
1 XSS攻击的定义
跨站脚本攻击(XSS),是最普遍的Web应用安全漏洞。
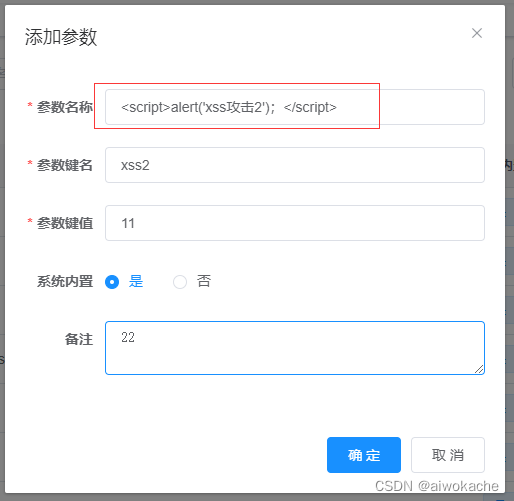
2 模拟xss攻击示例1:页面效果

ruoyi-ui\src\views\system\config\index.vue:v-text效果,正确
<!-- 添加或修改参数配置对话框 -->
    <el-dialog :title="title" :visible.sync="open" width="500px" append-to-body>
      <el-form ref="form" :model="form" :rules="rules" label-width="80px">
        <el-form-item label="参数名称" prop="configName">
          <!--
          <el-input v-model="form.configName" placeholder="请输入参数名称" />
          -->
          <!-- v-text其实是没有问题的,因为它默认会给我们做一些处理。 -->
          <div v-text="form.configName"></div>
        </el-form-item>
        <el-form-item label="参数键名" prop="configKey">
          <el-input v-model="form.configKey" placeholder="请输入参数键名" />
        </el-form-item>
        <el-form-item label="参数键值" prop="configValue">
          <el-input v-model="form.configValue" placeholder="请输入参数键值" />
        </el-form-item>
        <el-form-item label="系统内置" prop="configType">
          <el-radio-group v-model="form.configType">
            <el-radio
              v-for="dict in dict.type.sys_yes_no"
              :key="dict.value"
              :label="dict.value"
            >{{dict.label}}</el-radio>
          </el-radio-group>
        </el-form-item>
        <el-form-item label="备注" prop="remark">
          <el-input v-model="form.remark" type="textarea" placeholder="请输入内容" />
        </el-form-item>
      </el-form>
      <div slot="footer" class="dialog-footer">
        <el-button type="primary" @click="submitForm">确 定</el-button>
        <el-button @click="cancel">取 消</el-button>
      </div>
    </el-dialog>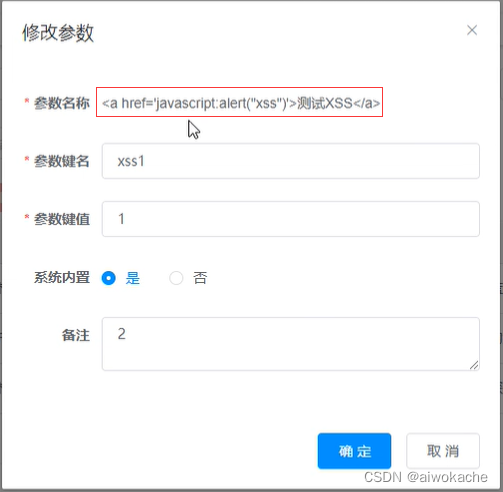
ruoyi-ui\src\views\system\config\index.vue:v-html效果,不正确。点击,出现脚本。这种情况下可能会造成恶意代码(没有经过特殊处理的脚本)注入到html里面去,进行攻击,
<!-- 添加或修改参数配置对话框 -->
    <el-dialog :title="title" :visible.sync="open" width="500px" append-to-body>
      <el-form ref="form" :model="form" :rules="rules" label-width="80px">
        <el-form-item label="参数名称" prop="configName">
          <!--
          <el-input v-model="form.configName" placeholder="请输入参数名称" />
          -->
          <!-- v-text其实是没有问题的,因为它默认会给我们做一些处理。 -->
          <!--<div v-text="form.configName"></div>-->
          <!--
              v-html有问题。
              v-html即支持标签为一个HTML类型。
          -->
          <div v-html="form.configName"></div>
        </el-form-item>
        <el-form-item label="参数键名" prop="configKey">
          <el-input v-model="form.configKey" placeholder="请输入参数键名" />
        </el-form-item>
        <el-form-item label="参数键值" prop="configValue">
          <el-input v-model="form.configValue" placeholder="请输入参数键值" />
        </el-form-item>
        <el-form-item label="系统内置" prop="configType">
          <el-radio-group v-model="form.configType">
            <el-radio
              v-for="dict in dict.type.sys_yes_no"
              :key="dict.value"
              :label="dict.value"
            >{{dict.label}}</el-radio>
          </el-radio-group>
        </el-form-item>
        <el-form-item label="备注" prop="remark">
          <el-input v-model="form.remark" type="textarea" placeholder="请输入内容" />
        </el-form-item>
      </el-form>
      <div slot="footer" class="dialog-footer">
        <el-button type="primary" @click="submitForm">确 定</el-button>
        <el-button @click="cancel">取 消</el-button>
      </div>
    </el-dialog>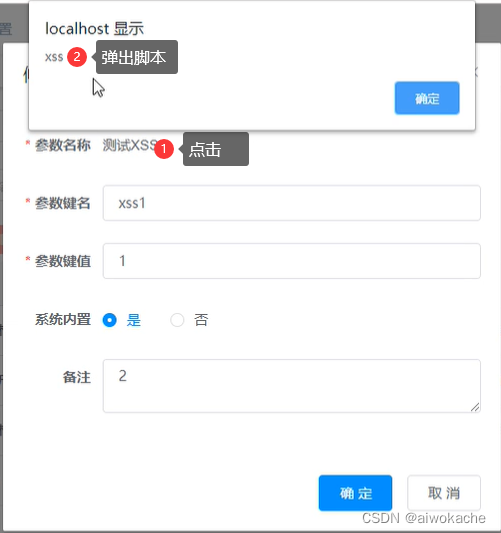
3 模拟xss攻击示例2:数据库效果
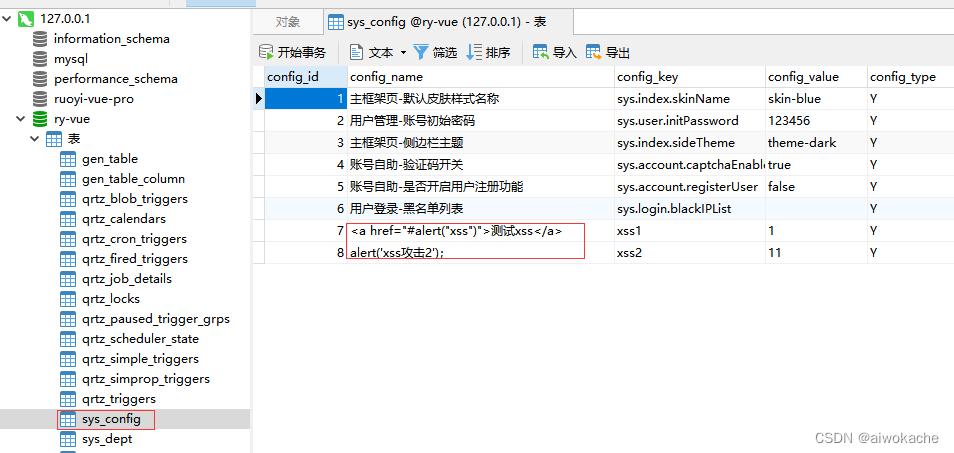
数据库表: sys_conifg。如下图所示,如果没有做XSS处理,在数据库里面就会完整的把标签和脚本进行入库,是非常危险的 :
4 如何在项目处理xss攻击?
- application.yml:xss处理开关
# 防止XSS攻击 xss: # 过滤开关 enabled: true # 排除链接(多个用逗号分隔) # 即哪些不需要去过滤。 # 因为通知公告的内容是富文本内容,可能会包含一些HTML内容。 # 所以一般排除,就会排除一些富文本的url。 # " * "表示所有 excludes: /system/notice # 匹配链接 # 即需要过滤的链接(/system/*:系统管理;/monitor/*:监控;/tool/*:工具) urlPatterns: /system/*,/monitor/*,/tool/* - 重启项目,刷新页面
- 面对" 模拟xss攻击示例2 ":数据库效果

- 面对" 模拟xss攻击示例2 ":页面效果,点击不再有弹出框
5 项目处理xss攻击实现原理
- FilterConfig:通用的过滤器的配置
/** * Filter配置 * 通用过滤器的配置。 */ @Configuration public class FilterConfig { /** * 获取application.yaml中的xss相关参数配置 */ @Value("${xss.excludes}") private String excludes; /** * 获取application.yaml中的xss相关参数配置 */ @Value("${xss.urlPatterns}") private String urlPatterns; /** * 这里可以添加加很多过滤器(现在只有一个xss过滤器), * 后续有其他的过滤器直接往里面加就行了, * 这样方便统一去管理所有的过滤器。 */ @SuppressWarnings({ "rawtypes", "unchecked" }) @Bean @ConditionalOnProperty(value = "xss.enabled", havingValue = "true") public FilterRegistrationBean xssFilterRegistration() { FilterRegistrationBean registration = new FilterRegistrationBean(); /** * 配置:请求类型 */ registration.setDispatcherTypes(DispatcherType.REQUEST); /** * 配置:xss核心过滤器 */ registration.setFilter(new XssFilter()); /** * 配置:需要过滤的链接 */ registration.addUrlPatterns(StringUtils.split(urlPatterns, ",")); /** * 配置:xss核心过滤器的名称,随意 */ registration.setName("xssFilter"); /** * 配置:xss核心过滤器的优先级 */ registration.setOrder(FilterRegistrationBean.HIGHEST_PRECEDENCE); /** * 配置:xss核心过滤器的初始化参数 */ Map<String, String> initParameters = new HashMap<String, String>(); /** * 配置:xss核心过滤器的初始化参数 —— 排除的链接(不需要过滤的链接) */ initParameters.put("excludes", excludes); registration.setInitParameters(initParameters); return registration; } } - com.ruoyi.common.filter.XssFilter:防止XSS攻击的过滤器
/** * 防止XSS攻击的过滤器 * * @author ruoyi */ public class XssFilter implements Filter { /** * 排除链接 */ public List<String> excludes = new ArrayList<>(); /** * 初化方法 */ @Override public void init(FilterConfig filterConfig) throws ServletException { /** * 排除链接List */ String tempExcludes = filterConfig.getInitParameter("excludes"); if (StringUtils.isNotEmpty(tempExcludes)) { String[] url = tempExcludes.split(","); for (int i = 0; url != null && i < url.length; i++) { excludes.add(url[i]); } } } /** * 核心处理 * @param request * @param response * @param chain * @throws IOException * @throws ServletException */ @Override public void doFilter(ServletRequest request, ServletResponse response, FilterChain chain) throws IOException, ServletException { HttpServletRequest req = (HttpServletRequest) request; HttpServletResponse resp = (HttpServletResponse) response; if (handleExcludeURL(req, resp)) { /** * 排除链接,正常执行 */ chain.doFilter(request, response); return; } /** * xss攻击的处理 */ XssHttpServletRequestWrapper xssRequest = new XssHttpServletRequestWrapper((HttpServletRequest) request); chain.doFilter(xssRequest, response); } private boolean handleExcludeURL(HttpServletRequest request, HttpServletResponse response) { /** * 获取请求url */ String url = request.getServletPath(); String method = request.getMethod(); // GET DELETE 不过滤 if (method == null || HttpMethod.GET.matches(method) || HttpMethod.DELETE.matches(method)) { return true; } return StringUtils.matches(url, excludes); } @Override public void destroy() { } } - XssHttpServletRequestWrapper:XSS过滤处理
/** * XSS过滤处理 */ public class XssHttpServletRequestWrapper extends HttpServletRequestWrapper { /** * @param request */ public XssHttpServletRequestWrapper(HttpServletRequest request) { super(request); } /** * 处理非json类型 * @param name * @return */ @Override public String[] getParameterValues(String name) { /** * 获取所有请求参数值 */ String[] values = super.getParameterValues(name); if (values != null) { int length = values.length; String[] escapesValues = new String[length]; for (int i = 0; i < length; i++) { // 防xss攻击和过滤前后空格 escapesValues[i] = EscapeUtil.clean(values[i]).trim(); } return escapesValues; } return super.getParameterValues(name); } /** * 处理json类型 */ @Override public ServletInputStream getInputStream() throws IOException { // 非json类型,直接返回 if (!isJsonRequest()) { return super.getInputStream(); } // 为空,直接返回 String json = IOUtils.toString(super.getInputStream(), "utf-8"); if (StringUtils.isEmpty(json)) { return super.getInputStream(); } // xss过滤 json = EscapeUtil.clean(json).trim(); byte[] jsonBytes = json.getBytes("utf-8"); final ByteArrayInputStream bis = new ByteArrayInputStream(jsonBytes); return new ServletInputStream() { @Override public boolean isFinished() { return true; } @Override public boolean isReady() { return true; } @Override public int available() throws IOException { return jsonBytes.length; } @Override public void setReadListener(ReadListener readListener) { } @Override public int read() throws IOException { return bis.read(); } }; } /** * 是否是Json请求 * * @param request */ public boolean isJsonRequest() { String header = super.getHeader(HttpHeaders.CONTENT_TYPE); return StringUtils.startsWithIgnoreCase(header, MediaType.APPLICATION_JSON_VALUE); } } - EscapeUtil#clean:清除所有HTML标签,但是不删除标签内的内容
    /**
     * 清除所有HTML标签,但是不删除标签内的内容
     *
     * @param content 文本
     * @return 清除标签后的文本
     */
    public static String clean(String content)
    {
        return new HTMLFilter().filter(content);
    }
48 防止重复提交过滤详解
1 应用场景:新增、修改、删除
2 前端处理方案:自己研究
3 后端处理方案1:唯一性校验
4 后端处理方案2:自定义注解防止表单重复提交
- RepeatSubmit:自定义注解防止表单重复提交
/** * 自定义注解防止表单重复提交 * */ @Inherited @Target(ElementType.METHOD) @Retention(RetentionPolicy.RUNTIME) @Documented public @interface RepeatSubmit { /** * 间隔时间(ms),小于此时间视为重复提交 */ public int interval() default 5000; /** * 提示消息 */ public String message() default "不允许重复提交,请稍候再试"; } - SysConfigController#add:XxxController的接口方法上加上防重复提交注解
/** * 新增参数配置 */ @PreAuthorize("@ss.hasPermi('system:config:add')") @Log(title = "参数管理", businessType = BusinessType.INSERT) @PostMapping @RepeatSubmit public AjaxResult add(@Validated @RequestBody SysConfig config) { if (!configService.checkConfigKeyUnique(config)) { return error("新增参数'" + config.getConfigName() + "'失败,参数键名已存在"); } config.setCreateBy(getUsername()); return toAjax(configService.insertConfig(config)); } - 重启项目,再走" 多次点击,产生重复提交 "
- 提示" 不允许重复提交,请稍后再试 "
5 后端处理实现原理
- SysConfigController#add:@RequestBody注解会造成二次读取的操作。
/** * @RequestBody SysConfig config:会造成二次读取的操作。 * * SysConfigController#add会第一次获取@RequestBody中前端提交的数据信息。 * 重要!重要!重要! * */ @PreAuthorize("@ss.hasPermi('system:config:add')") @Log(title = "参数管理", businessType = BusinessType.INSERT) @PostMapping public AjaxResult add(@Validated @RequestBody SysConfig config) { if (!configService.checkConfigKeyUnique(config)) { return error("新增参数'" + config.getConfigName() + "'失败,参数键名已存在"); } config.setCreateBy(getUsername()); return toAjax(configService.insertConfig(config)); } - FilterConfig#someFilterRegistration:过滤器统一配置
/** * 后续新建过滤器后,在这里可以添加多个过滤器 */ @Bean public FilterRegistrationBean someFilterRegistration() { FilterRegistrationBean registration = new FilterRegistrationBean(); registration.setFilter(new RepeatableFilter()); /** * 过滤所有的请求 */ registration.addUrlPatterns("/*"); /** * 过滤器的名称,随意 */ registration.setName("repeatableFilter"); /** * 优先级。 * 防重复提交过滤的优先级比XSS低,因此所有请求都会先进到他XSS里面去校验,然后才走防重复提交过滤器。 */ registration.setOrder(FilterRegistrationBean.LOWEST_PRECEDENCE); return registration; } - RepeatableFilter#doFilter:Repeatable 过滤器
/** * Repeatable 过滤器 * * @author ruoyi */ public class RepeatableFilter implements Filter { @Override public void init(FilterConfig filterConfig) throws ServletException { } /** * 方法中没有做太多的处理,简单来说,就只是说把request给包装了一下。 */ @Override public void doFilter(ServletRequest request, ServletResponse response, FilterChain chain) throws IOException, ServletException { ServletRequest requestWrapper = null; if (request instanceof HttpServletRequest && StringUtils.startsWithIgnoreCase(request.getContentType(), MediaType.APPLICATION_JSON_VALUE)) { requestWrapper = new RepeatedlyRequestWrapper((HttpServletRequest) request, response); } if (null == requestWrapper) { chain.doFilter(request, response); } else { chain.doFilter(requestWrapper, response); } } @Override public void destroy() { } } - RepeatedlyRequestWrapper:构建可重复读取的IO。简单来说,就只是说把request给包装了一下。
/** * 构建可重复读取的IO。 * 构建可重复读取inputStream的request。 */ public class RepeatedlyRequestWrapper extends HttpServletRequestWrapper { private final byte[] body; public RepeatedlyRequestWrapper(HttpServletRequest request, ServletResponse response) throws IOException { super(request); request.setCharacterEncoding(Constants.UTF8); response.setCharacterEncoding(Constants.UTF8); body = HttpHelper.getBodyString(request).getBytes(Constants.UTF8); } @Override public BufferedReader getReader() throws IOException { return new BufferedReader(new InputStreamReader(getInputStream())); } /** * 默认情况下,请求流只能被读取一次,当第二次读取请求流就会报错 * @return * @throws IOException */ @Override public ServletInputStream getInputStream() throws IOException { final ByteArrayInputStream bais = new ByteArrayInputStream(body); return new ServletInputStream() { @Override public int read() throws IOException { return bais.read(); } @Override public int available() throws IOException { return body.length; } @Override public boolean isFinished() { return false; } @Override public boolean isReady() { return false; } @Override public void setReadListener(ReadListener readListener) { } }; } } - RepeatSubmitInterceptor:防止重复提交拦截器
/** * 防止重复提交拦截器 */ @Component public abstract class RepeatSubmitInterceptor implements HandlerInterceptor { @Override public boolean preHandle(HttpServletRequest request, HttpServletResponse response, Object handler) throws Exception { if (handler instanceof HandlerMethod) { HandlerMethod handlerMethod = (HandlerMethod) handler; Method method = handlerMethod.getMethod(); /** * 方法是否有防重复提交的注解:@RepeatSubmit */ RepeatSubmit annotation = method.getAnnotation(RepeatSubmit.class); if (annotation != null) { /** * 验证是否重复提交由子类实现具体的防重复提交的规则 */ if (this.isRepeatSubmit(request, annotation)) { /** * 给前端提示:“ 不允许重复提交,请稍后再试 ” */ AjaxResult ajaxResult = AjaxResult.error(annotation.message()); ServletUtils.renderString(response, JSON.toJSONString(ajaxResult)); return false; } } return true; } else { return true; } } /** * 验证是否重复提交由子类实现具体的防重复提交的规则 * * @param request * @return * @throws Exception */ public abstract boolean isRepeatSubmit(HttpServletRequest request, RepeatSubmit annotation); } - SameUrlDataInterceptor#isRepeatSubmit:验证是否重复提交由子类实现具体的防重复提交的规则
/**
 * 判断请求url和数据是否和上一次相同,
 * 如果和上次相同,则是重复提交表单。 有效时间为10秒内。
 */
@Component
public class SameUrlDataInterceptor extends RepeatSubmitInterceptor
{
    public final String REPEAT_PARAMS = "repeatParams";

    public final String REPEAT_TIME = "repeatTime";

    // 令牌自定义标识
    @Value("${token.header}")
    private String header;

    @Autowired
    private RedisCache redisCache;

    /**
     * 验证是否重复提交由子类实现具体的防重复提交的规则
     */
    @SuppressWarnings("unchecked")
    @Override
    public boolean isRepeatSubmit(HttpServletRequest request, RepeatSubmit annotation)
    {
        String nowParams = "";
        if (request instanceof RepeatedlyRequestWrapper)
        {
            /**
             * 简单来说,就只是说把request给包装了一下。
             */
            RepeatedlyRequestWrapper repeatedlyRequest = (RepeatedlyRequestWrapper) request;
            /**
             * 从IO流中获取@RequestBody传输的数据信息。
             *
             * 第二次读取@RequestBody中前端提交的数据信息。
             * 重要!重要!重要!
             *
             */
            nowParams = HttpHelper.getBodyString(repeatedlyRequest);
        }

        /**
         * 如果body参数为空,就去获取Parameter的数据
         */
        if (StringUtils.isEmpty(nowParams))
        {
            nowParams = JSON.toJSONString(request.getParameterMap());
        }
        Map<String, Object> nowDataMap = new HashMap<String, Object>();
        /**
         * 设置前端提交的数据
         */
        nowDataMap.put(REPEAT_PARAMS, nowParams);
        /**
         * 设置前端提交数据的时候
         */
        nowDataMap.put(REPEAT_TIME, System.currentTimeMillis());

        // 请求地址(作为存放cache的key值)
        String url = request.getRequestURI();

        // 唯一值(没有消息头则使用请求地址)
        String submitKey = StringUtils.trimToEmpty(request.getHeader(header));

        // 唯一标识(指定key + url + 消息头)
        String cacheRepeatKey = CacheConstants.REPEAT_SUBMIT_KEY + url + submitKey;

        /**
         * 从缓存中获取同样的请求参数
         */
        Object sessionObj = redisCache.getCacheObject(cacheRepeatKey);
        if (sessionObj != null)
        {
            Map<String, Object> sessionMap = (Map<String, Object>) sessionObj;
            if (sessionMap.containsKey(url))
            {
                Map<String, Object> preDataMap = (Map<String, Object>) sessionMap.get(url);
                /**
                 * 相同的参数两次提交的时间差太小,被视为重复提交
                 */
                if (compareParams(nowDataMap, preDataMap) && compareTime(nowDataMap, preDataMap, annotation.interval()))
                {
                    return true;
                }
            }
        }
        Map<String, Object> cacheMap = new HashMap<String, Object>();
        cacheMap.put(url, nowDataMap);
        redisCache.setCacheObject(cacheRepeatKey, cacheMap, annotation.interval(), TimeUnit.MILLISECONDS);
        return false;
    }

    /**
     * 判断参数是否相同
     */
    private boolean compareParams(Map<String, Object> nowMap, Map<String, Object> preMap)
    {
        String nowParams = (String) nowMap.get(REPEAT_PARAMS);
        String preParams = (String) preMap.get(REPEAT_PARAMS);
        return nowParams.equals(preParams);
    }

    /**
     * 判断两次间隔时间
     */
    private boolean compareTime(Map<String, Object> nowMap, Map<String, Object> preMap, int interval)
    {
        long time1 = (Long) nowMap.get(REPEAT_TIME);
        long time2 = (Long) preMap.get(REPEAT_TIME);
        if ((time1 - time2) < interval)
        {
            return true;
        }
        return false;
    }
}
49 全局异常处理器
1 SysRoleServiceImpl#checkRoleAllowed:抛出业务异常ServiceException
    /**
     * 校验角色是否允许操作
     *
     * @param role 角色信息
     */
    @Override
    public void checkRoleAllowed(SysRole role)
    {
        if (StringUtils.isNotNull(role.getRoleId()) && role.isAdmin())
        {
            throw new ServiceException("不允许操作超级管理员角色");
        }
    }
2 ServiceException:自定义的业务异常类
/**
 * 业务异常
 *
 * @author ruoyi
 */
public final class ServiceException extends RuntimeException
{
    private static final long serialVersionUID = 1L;

    /**
     * 错误码
     */
    private Integer code;

    /**
     * 错误提示
     */
    private String message;

    /**
     * 错误明细,内部调试错误
     *
     * 和 {@link CommonResult#getDetailMessage()} 一致的设计
     */
    private String detailMessage;

    /**
     * 空构造方法,避免反序列化问题
     */
    public ServiceException()
    {
    }
}
3 ControllerAdvice:spring自带的注解
@Target({ElementType.TYPE})
@Retention(RetentionPolicy.RUNTIME)
@Documented
@Component
public @interface ControllerAdvice {
    @AliasFor("basePackages")
    String[] value() default {};

    @AliasFor("value")
    String[] basePackages() default {};

    Class<?>[] basePackageClasses() default {};

    Class<?>[] assignableTypes() default {};

    Class<? extends Annotation>[] annotations() default {};
}
4 RestControllerAdvice:spring自带的注解
@Target({ElementType.TYPE})
@Retention(RetentionPolicy.RUNTIME)
@Documented
@ControllerAdvice
/**
 * 因为我们想让方法返回json数据,
 * 所以正常情况下所有方法后面都会加一个@ResponseBody。
 * 但是每个方法都手动加@ResponseBody注解很麻烦,
 * 因此后续我们在方法上使用@RestControllerAdvice注解以后,
 * XxxController接口方法上就不用加@ResponseBody注解了。
 */
@ResponseBody
public @interface RestControllerAdvice {
    @AliasFor(
        annotation = ControllerAdvice.class
    )
    String[] value() default {};

    @AliasFor(
        annotation = ControllerAdvice.class
    )
    String[] basePackages() default {};

    @AliasFor(
        annotation = ControllerAdvice.class
    )
    Class<?>[] basePackageClasses() default {};

    @AliasFor(
        annotation = ControllerAdvice.class
    )
    Class<?>[] assignableTypes() default {};

    @AliasFor(
        annotation = ControllerAdvice.class
    )
    Class<? extends Annotation>[] annotations() default {};
}
5 GlobalExceptionHandler
/**
 * 全局异常处理器
 */
@RestControllerAdvice
public class GlobalExceptionHandler
{
    private static final Logger log = LoggerFactory.getLogger(GlobalExceptionHandler.class);

    /**
     * @ExceptionHandler指定将要处理的异常。
     * 异常可以填写多个({})。
     */

    /**
     * 捕捉处理:业务异常
     */
    @ExceptionHandler(ServiceException.class)
    public AjaxResult handleServiceException(ServiceException e, HttpServletRequest request)
    {
        log.error(e.getMessage(), e);
        Integer code = e.getCode();
        return StringUtils.isNotNull(code) ? AjaxResult.error(code, e.getMessage()) : AjaxResult.error(e.getMessage());
    }
}
50 框架验证详解
1 组件 | Element | 表单验证
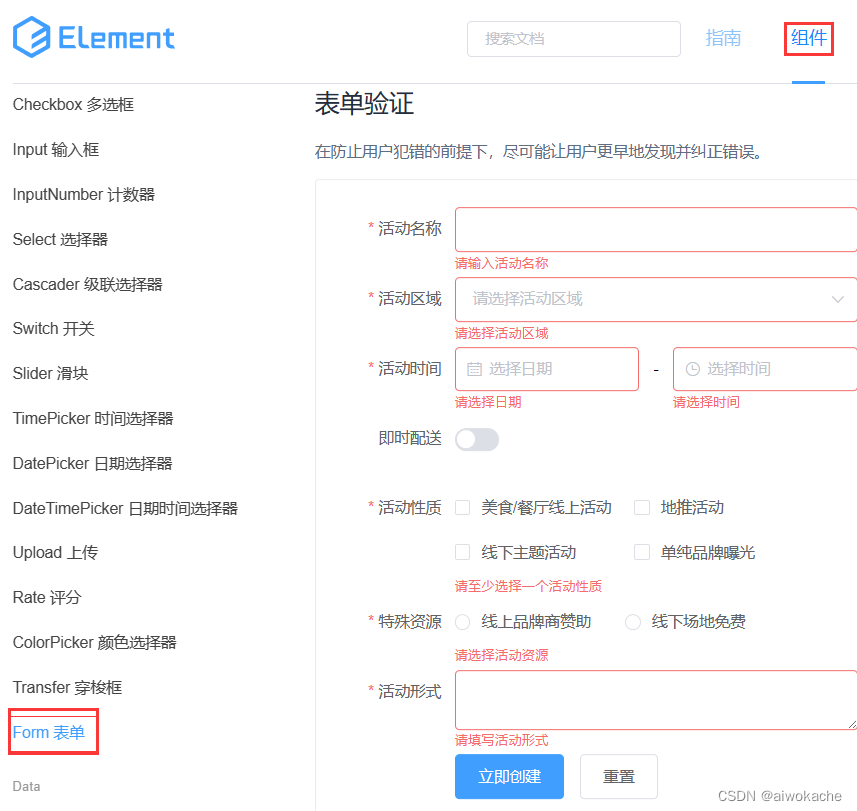
Form 组件提供了表单验证的功能,只需要通过 rules 属性传入约定的验证规则,并将 Form-Item 的 prop 属性设置为需校验的字段名即可。校验规则参见 async-validator
<el-form :model="ruleForm" :rules="rules" ref="ruleForm" label-width="100px" class="demo-ruleForm">
  <el-form-item label="活动名称" prop="name">
    <el-input v-model="ruleForm.name"></el-input>
  </el-form-item>
  <el-form-item label="活动区域" prop="region">
    <el-select v-model="ruleForm.region" placeholder="请选择活动区域">
      <el-option label="区域一" value="shanghai"></el-option>
      <el-option label="区域二" value="beijing"></el-option>
    </el-select>
  </el-form-item>
  <el-form-item label="活动时间" required>
    <el-col :span="11">
      <el-form-item prop="date1">
        <el-date-picker type="date" placeholder="选择日期" v-model="ruleForm.date1" style="width: 100%;"></el-date-picker>
      </el-form-item>
    </el-col>
    <el-col class="line" :span="2">-</el-col>
    <el-col :span="11">
      <el-form-item prop="date2">
        <el-time-picker placeholder="选择时间" v-model="ruleForm.date2" style="width: 100%;"></el-time-picker>
      </el-form-item>
    </el-col>
  </el-form-item>
  <el-form-item label="即时配送" prop="delivery">
    <el-switch v-model="ruleForm.delivery"></el-switch>
  </el-form-item>
  <el-form-item label="活动性质" prop="type">
    <el-checkbox-group v-model="ruleForm.type">
      <el-checkbox label="美食/餐厅线上活动" name="type"></el-checkbox>
      <el-checkbox label="地推活动" name="type"></el-checkbox>
      <el-checkbox label="线下主题活动" name="type"></el-checkbox>
      <el-checkbox label="单纯品牌曝光" name="type"></el-checkbox>
    </el-checkbox-group>
  </el-form-item>
  <el-form-item label="特殊资源" prop="resource">
    <el-radio-group v-model="ruleForm.resource">
      <el-radio label="线上品牌商赞助"></el-radio>
      <el-radio label="线下场地免费"></el-radio>
    </el-radio-group>
  </el-form-item>
  <el-form-item label="活动形式" prop="desc">
    <el-input type="textarea" v-model="ruleForm.desc"></el-input>
  </el-form-item>
  <el-form-item>
    <el-button type="primary" @click="submitForm('ruleForm')">立即创建</el-button>
    <el-button @click="resetForm('ruleForm')">重置</el-button>
  </el-form-item>
</el-form>
<script>
  export default {
    data() {
      return {
        ruleForm: {
          name: '',
          region: '',
          date1: '',
          date2: '',
          delivery: false,
          type: [],
          resource: '',
          desc: ''
        },
        rules: {
          name: [
            { required: true, message: '请输入活动名称', trigger: 'blur' },
            { min: 3, max: 5, message: '长度在 3 到 5 个字符', trigger: 'blur' }
          ],
          region: [
            { required: true, message: '请选择活动区域', trigger: 'change' }
          ],
          date1: [
            { type: 'date', required: true, message: '请选择日期', trigger: 'change' }
          ],
          date2: [
            { type: 'date', required: true, message: '请选择时间', trigger: 'change' }
          ],
          type: [
            { type: 'array', required: true, message: '请至少选择一个活动性质', trigger: 'change' }
          ],
          resource: [
            { required: true, message: '请选择活动资源', trigger: 'change' }
          ],
          desc: [
            { required: true, message: '请填写活动形式', trigger: 'blur' }
          ]
        }
      };
    },
    methods: {
      submitForm(formName) {
        this.$refs[formName].validate((valid) => {
          if (valid) {
            alert('submit!');
          } else {
            console.log('error submit!!');
            return false;
          }
        });
      },
      resetForm(formName) {
        this.$refs[formName].resetFields();
      }
    }
  }
</script>
2 前端验证:表单验证
ruoyi-ui\src\views\system\config\index.vue:系统参
<template>
    <!-- 添加或修改参数配置对话框 -->
    <el-dialog :title="title" :visible.sync="open" width="500px" append-to-body>
      <!--
        :rules="rules":给表单绑定自定义的校验规则
      -->
      <el-form ref="form" :model="form" :rules="rules" label-width="80px">
        <!--
          除了绑定rules,即:rules="rules"以外。
          我们还需要指定prop,用于指定需要验证的属性。
          rule的字段和prop属性是一一对应的,这样才能进行对应的验证。
        -->
        <el-form-item label="参数名称" prop="configName">
          <el-input v-model="form.configName" placeholder="请输入参数名称" />
        </el-form-item>
        <el-form-item label="参数键名" prop="configKey">
          <el-input v-model="form.configKey" placeholder="请输入参数键名" />
        </el-form-item>
        <el-form-item label="参数键值" prop="configValue">
          <el-input v-model="form.configValue" placeholder="请输入参数键值" />
        </el-form-item>
        <el-form-item label="系统内置" prop="configType">
          <el-radio-group v-model="form.configType">
            <el-radio
              v-for="dict in dict.type.sys_yes_no"
              :key="dict.value"
              :label="dict.value"
            >{{dict.label}}</el-radio>
          </el-radio-group>
        </el-form-item>
        <el-form-item label="备注" prop="remark">
          <el-input v-model="form.remark" type="textarea" placeholder="请输入内容" />
        </el-form-item>
      </el-form>
      <div slot="footer" class="dialog-footer">
        <el-button type="primary" @click="submitForm">确 定</el-button>
        <el-button @click="cancel">取 消</el-button>
      </div>
    </el-dialog>
</template>
<script>
export default {
  name: "Config",
  dicts: ['sys_yes_no'],
  data() {
      // 表单参数
      form: {},
      // 表单校验
      rules: {
        configName: [
          { required: true, message: "参数名称不能为空", trigger: "blur" }
        ],
        configKey: [
          { required: true, message: "参数键名不能为空", trigger: "blur" }
        ],
        configValue: [
          { required: true, message: "参数键值不能为空", trigger: "blur" }
        ],
        /**
         * 前端正则表达式的使用
         */
        phone: [
          {
            pattern: /^1[3|4|5|6|7|8|9][0-9]\d{8}$/,
            message: "请输入正确的手机号码",
            trigger: "blur"
          }
        ]
      }
    };
  },
}
</script>
3 后端验证:如接口提交的验证
- SysConfigController#add:新增参数
@PreAuthorize("@ss.hasPermi('system:config:add')") @Log(title = "参数管理", businessType = BusinessType.INSERT) @PostMapping /** * @Validated:后端请求参数SysConfig config的验证 */ public AjaxResult add(@Validated @RequestBody SysConfig config) { if (!configService.checkConfigKeyUnique(config)) { return error("新增参数'" + config.getConfigName() + "'失败,参数键名已存在"); } config.setCreateBy(getUsername()); return toAjax(configService.insertConfig(config)); } - SysConfig:后端请求参数SysConfig config的属性的验证
/**
 * 参数配置表 sys_config
 */
public class SysConfig extends BaseEntity
{
    private static final long serialVersionUID = 1L;

    /** 参数主键 */
    @Excel(name = "参数主键", cellType = ColumnType.NUMERIC)
    private Long configId;

    /** 参数名称 */
    @Excel(name = "参数名称")
    private String configName;

    /** 参数键名 */
    @Excel(name = "参数键名")
    private String configKey;

    /** 参数键值 */
    @Excel(name = "参数键值")
    private String configValue;

    /** 系统内置(Y是 N否) */
    @Excel(name = "系统内置", readConverterExp = "Y=是,N=否")
    private String configType;


    @NotBlank(message = "参数名称不能为空")
    @Size(min = 0, max = 100, message = "参数名称不能超过100个字符")
    public String getConfigName()
    {
        return configName;
    }

    @NotBlank(message = "参数键名长度不能为空")
    @Size(min = 0, max = 100, message = "参数键名长度不能超过100个字符")
    public String getConfigKey()
    {
        return configKey;
    }

    @NotBlank(message = "参数键值不能为空")
    @Size(min = 0, max = 500, message = "参数键值长度不能超过500个字符")
    public String getConfigValue()
    {
        return configValue;
    }

    @NotBlank(message = "字典类型不能为空")
    @Size(min = 0, max = 100, message = "字典类型类型长度不能超过100个字符")
    @Pattern(regexp = "^[a-z][a-z0-9_]*$", message = "字典类型必须以字母开头,且只能为(小写字母,数字,下滑线)")
    public String getDictType()
    {
        return dictType;
    }
}
4 注解参数说明
| 注解名称 | 功能 |
|---|---|
| @Xss | 检查该字段是否存在跨站脚本工具 |
| @Null | 检查该字段为空 |
| @NotNull | 不能为null |
| @NotBlank | 不能为空,常用于检查空字符串 |
| @NotEmpty | 不能为空,多用于检测list是否size是0 |
| @Max | 该字段的值只能小于或等于该值 |
| @Min | 该字段的值只能大于或等于该值 |
| @Past | 检查该字段的日期是在过去 |
| @Future | 检查该字段的日期是否是属于将来的日期 |
| 检查是否是一个有效的email地址 | |
| @Pattern(regex=,flag=) | 被注释的元素必须符合指定的正则表达式 |
| @Range(min=,max=,message=) | 被注释的元素必须在合适的范围内 |
| @Size(min=, max=) | 检查该字段的size是否在min和max之间,可以是字符串、数组、集合、Map等 |
| @Length(min=,max=) | 检查所属的字段的长度是否在min和max之间,只能用于字符串 |
| @AssertTrue | 用于boolean字段,该字段只能为true |
| @AssertFalse | 该字段的值只能为false |
5 框架验证注解使用原理
- 注解,校验不通过,抛出异常
- GlobalExceptionHandler#handleMethodArgumentNotValidException:捕抓处理,校验异常
    /**
     * 捕抓处理,校验异常
     */
    @ExceptionHandler(MethodArgumentNotValidException.class)
    public Object handleMethodArgumentNotValidException(MethodArgumentNotValidException e)
    {
        log.error(e.getMessage(), e);
        /**
         * 随机获取异常的其中一个提示信息(可能有多个)
         */
        String message = e.getBindingResult().getFieldError().getDefaultMessage();
        return AjaxResult.error(message);
    }
51 日志配置详解
1 spring boot默认集成了logback
2 logback.xml:日志配置文件(spring boot默认自动找到此文件),配置了日志的生成规则
3 application.yml:包含日志配置
#
# 重要!重要!重要!
# 注意:application.yaml中的配置是优先的,logback.xml配置是次选择。
#
# 日志配置
logging:
  level:
    # debug日志:数据库操作sql日志。
    *
    * 自定义包扫描级别,debug
    # 因为在程序里面做一些动作的时候,很多debug的信息也需要显示出来。
    # 可以看到控制台是有很多debug信息。
    #
    # 拓展:上生产时如果不需要debug信息,就可以改这里日志级别。
    #
    com.ruoyi: debug
    # spring相关包扫描级别,warn。spring包中的fail和debug太多东西了,看了也没啥用。
    org.springframework: warn
4 使用案例1:常规使用
/**
 * 引入slf4j日志桥接对象
 */
import org.slf4j.Logger;
import org.slf4j.LoggerFactory;

public class AddressUtils
{
    /**
     * 获取日志对象:
     *  log.info
     *  log.error
     *  log.debug
     *  log.warn
     *  ......
     */
    private static final Logger log = LoggerFactory.getLogger(AddressUtils.class);

    public static String getRealAddressByIP(String ip)
    {
        // 内网不查询
        if (IpUtils.internalIp(ip))
        {
            return "内网IP";
        }
        if (RuoYiConfig.isAddressEnabled())
        {
            try
            {
                String rspStr = HttpUtils.sendGet(IP_URL, "ip=" + ip + "&json=true", Constants.GBK);
                if (StringUtils.isEmpty(rspStr))
                {
                    log.error("获取地理位置异常 {}", ip);
                    return UNKNOWN;
                }
                JSONObject obj = JSON.parseObject(rspStr);
                String region = obj.getString("pro");
                String city = obj.getString("city");
                return String.format("%s %s", region, city);
            }
            catch (Exception e)
            {
                log.error("获取地理位置异常 {}", ip);
            }
        }
        return UNKNOWN;
    }
}
5 使用案例2:自定义日志处理
AsyncFactory:自定义日志处理
public class AsyncFactory
{
    /**
     * 指定日志输出到哪个节点
     */
    private static final Logger sys_user_logger = LoggerFactory.getLogger("sys-user");

    public static TimerTask recordLogininfor(final String username, final String status, final String message,
            final Object... args)
    {
        final UserAgent userAgent = UserAgent.parseUserAgentString(ServletUtils.getRequest().getHeader("User-Agent"));
        final String ip = IpUtils.getIpAddr();
        return new TimerTask()
        {
            @Override
            public void run()
            {
                String address = AddressUtils.getRealAddressByIP(ip);
                StringBuilder s = new StringBuilder();
                s.append(LogUtils.getBlock(ip));
                s.append(address);
                s.append(LogUtils.getBlock(username));
                s.append(LogUtils.getBlock(status));
                s.append(LogUtils.getBlock(message));
                /**
                 * 打印登录日志到日志文件sys_user.log
                 */
                sys_user_logger.info(s.toString(), args);
                String os = userAgent.getOperatingSystem().getName();
                String browser = userAgent.getBrowser().getName();
                SysLogininfor logininfor = new SysLogininfor();
                logininfor.setUserName(username);
                logininfor.setIpaddr(ip);
                logininfor.setLoginLocation(address);
                logininfor.setBrowser(browser);
                logininfor.setOs(os);
                logininfor.setMsg(message);
                if (StringUtils.equalsAny(status, Constants.LOGIN_SUCCESS, Constants.LOGOUT, Constants.REGISTER))
                {
                    logininfor.setStatus(Constants.SUCCESS);
                }
                else if (Constants.LOGIN_FAIL.equals(status))
                {
                    logininfor.setStatus(Constants.FAIL);
                }
                SpringUtils.getBean(ISysLogininforService.class).insertLogininfor(logininfor);
            }
        };
    }
}
6 效果
- 日志存放路径

7 注意事项
- application.yaml中的配置是优先的,logback.xml配置是次选择。
- debug日志:数据库操作sql日志。因此如果想看到数据库的sql语句,就需要把日志级别调整为debug级别。
52 上传详解
1 应用地方
- 个人中心,头像上传
- 新增 通知公告
2 前端
ruoyi-ui\src\views\system\user\profile\userAvatar.vue:个人中心,头像上传:
</template>
 </div>
    </el-dialog>
      <el-row>
        <el-col :lg="2" :sm="3" :xs="3">
          <!-- 使用Element的上传组件,网址https://element.eleme.cn/#/zh-CN/component/upload -->
          <el-upload action="#" :http-request="requestUpload" :show-file-list="false" :before-upload="beforeUpload">
            <el-button size="small">
              选择
              <i class="el-icon-upload el-icon--right"></i>
            </el-button>
          </el-upload>
        </el-col>
        <el-col :lg="{span: 1, offset: 2}" :sm="2" :xs="2">
          <el-button icon="el-icon-plus" size="small" @click="changeScale(1)"></el-button>
        </el-col>
        <el-col :lg="{span: 1, offset: 1}" :sm="2" :xs="2">
          <el-button icon="el-icon-minus" size="small" @click="changeScale(-1)"></el-button>
        </el-col>
        <el-col :lg="{span: 1, offset: 1}" :sm="2" :xs="2">
          <el-button icon="el-icon-refresh-left" size="small" @click="rotateLeft()"></el-button>
        </el-col>
        <el-col :lg="{span: 1, offset: 1}" :sm="2" :xs="2">
          <el-button icon="el-icon-refresh-right" size="small" @click="rotateRight()"></el-button>
        </el-col>
        <el-col :lg="{span: 2, offset: 6}" :sm="2" :xs="2">
          <el-button type="primary" size="small" @click="uploadImg()">提 交</el-button>
        </el-col>
      </el-row>
    </el-dialog>
  </div>
</template>
<script>
    // 上传图片
    uploadImg() {
      this.$refs.cropper.getCropBlob(data => {
        let formData = new FormData();
        /**
         * 后端会用别名映射方式进行接收
         */
        formData.append("avatarfile", data);
        /**
         * 调用接口
         */
        uploadAvatar(formData).then(response => {
          this.open = false;
          this.options.img = process.env.VUE_APP_BASE_API + response.imgUrl;
          store.commit('SET_AVATAR', this.options.img);
          this.$modal.msgSuccess("修改成功");
          this.visible = false;
        });
      });
    },
</script>
ruoyi-ui\src\api\system\user.js:个人中心,头像上传:
// 用户头像上传
export function uploadAvatar(data) {
  return request({
    url: '/system/user/profile/avatar',
    method: 'post',
    data: data
  })
}
3 后端
(1)上传
- SysProfileController#avatar:头像上传
/** * 头像上传 * * @RequestParam("avatarfile"):参数别名。 * 不起别名,默认参数名是file。 * MultipartFile file,包含一系列的api,比如: * (1)获取文件的名称 * (2)获取文件的内容 * (3)获取文件的大小 * (4)调用它的方法实现保存到目标系统 */ @Log(title = "用户头像", businessType = BusinessType.UPDATE) @PostMapping("/avatar") public AjaxResult avatar(@RequestParam("avatarfile") MultipartFile file) throws Exception { if (!file.isEmpty()) { /** * 从缓存中获取当前登录用户的信息 */ LoginUser loginUser = getLoginUser(); /** * 文件上传: * (1)RuoYiConfig.getAvatarPath():获取头像上传路径 * (2)MimeTypeUtils.IMAGE_EXTENSION:媒体类型工具类{ "bmp", "gif", "jpg", "jpeg", "png" } */ String avatar = FileUploadUtils.upload(RuoYiConfig.getAvatarPath(), file, MimeTypeUtils.IMAGE_EXTENSION); if (userService.updateUserAvatar(loginUser.getUsername(), avatar)) { AjaxResult ajax = AjaxResult.success(); ajax.put("imgUrl", avatar); // 更新缓存用户头像 loginUser.getUser().setAvatar(avatar); tokenService.setLoginUser(loginUser); return ajax; } } return error("上传图片异常,请联系管理员"); } - application.yml:文件上传路径
# 项目相关配置 ruoyi: # 文件路径 示例( Windows配置D:/ruoyi/uploadPath,Linux配置 /home/ruoyi/uploadPath) profile: D:/ruoyi/uploadPath - RuoYiConfig#getAvatarPath:获取头像上传路径
/** * 读取项目相关配置。 * 基础配置,对应配置文件中的常用的几个属性。 */ @Component @ConfigurationProperties(prefix = "ruoyi") public class RuoYiConfig { /** 上传路径 */ private static String profile; public static String getProfile() { return profile; } /** * 获取头像上传路径 */ public static String getAvatarPath() { return getProfile() + "/avatar"; } } - FileUploadUtils#upload():文件上传
/**
     * 文件上传
     *
     * @param baseDir 相对应用的基目录
     * @param file 上传的文件
     * @param allowedExtension 上传文件类型
     * @return 返回上传成功的文件名
     * @throws FileSizeLimitExceededException 如果超出最大大小
     * @throws FileNameLengthLimitExceededException 文件名太长
     * @throws IOException 比如读写文件出错时
     * @throws InvalidExtensionException 文件校验异常
     */
    public static final String upload(String baseDir, MultipartFile file, String[] allowedExtension)
            throws FileSizeLimitExceededException, IOException, FileNameLengthLimitExceededException,
            InvalidExtensionException
    {
        int fileNamelength = Objects.requireNonNull(file.getOriginalFilename()).length();
        /**
         * 长度校验
         */
        if (fileNamelength > FileUploadUtils.DEFAULT_FILE_NAME_LENGTH)
        {
            throw new FileNameLengthLimitExceededException(FileUploadUtils.DEFAULT_FILE_NAME_LENGTH);
        }
        /**
         * 文件大小校验:小于50M
         * 文件格式的校验,后续格式不够用的话可以再加
         */
        assertAllowed(file, allowedExtension);
        /**
         * 日期格式(如2023/07/28/xxx.txt) + 获取转义的文件名字 + 文件后缀
         */
        String fileName = extractFilename(file);
        /**
         * 保存文件到哪里(本地路径),如果路径不存在则创建相应的目录结构
         */
        String absPath = getAbsoluteFile(baseDir, fileName).getAbsolutePath();
        /**
         * 把文件上传到本地
         */
        file.transferTo(Paths.get(absPath));
        /**
         * 此字符串会被保存到数据库里面。
         * 可以直接在浏览器中去访问,
         * 如http://localhost/dev-api/profile/avatar/2020/03/08/afdhadhgakdg;ljqq879587135h1kl35.jpeg,
         * 由于有路由所以我们加上了“ /dev-api/ ”。
         */
        return getPathFileName(baseDir, fileName);
    }
(2)数据库保存效果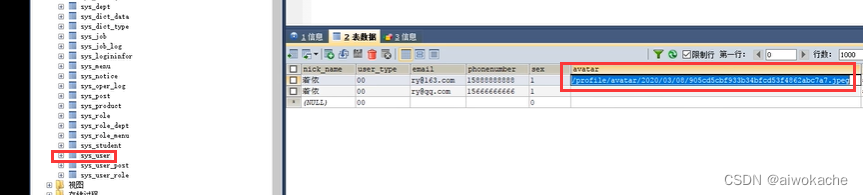
(3)浏览器直接访问(显示)效果
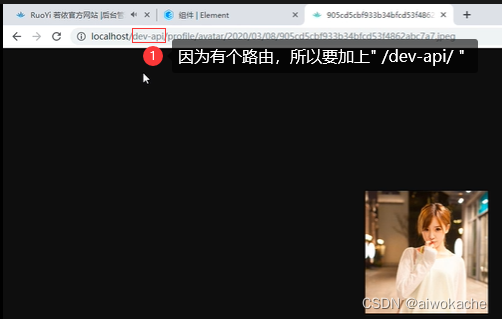
(4)项目前端访问(显示):项目前端如何找到并显示上传到本地的文件(如图片)?为什么在前端直接输入" /profiel/avatar/2020/03/08/198jjh09874550982y4h.jpeg "就能找到上传到本地文件(图片、文件)呢?
- application.yml:文件上传路径
# 项目相关配置 ruoyi: # 文件路径 示例( Windows配置D:/ruoyi/uploadPath,Linux配置 /home/ruoyi/uploadPath) profile: D:/ruoyi/uploadPath - ResourcesConfig#addResourceHandlers:路径映射
/** * 通用资源配置 */ @Configuration public class ResourcesConfig implements WebMvcConfigurer { @Override public void addResourceHandlers(ResourceHandlerRegistry registry) { /** * 本地文件上传路径: * (1)Constants#RESOURCE_PREFIX = " /profile " * (2)"/**":只要请求路径中有" /profile "的,不管理" /profile "后面是什么,都会映射到本地路径(本地磁盘),即下面 * (3)RuoYiConfig.getProfile() = " D:/ruoyi/uploadPath " * (4)所以前端最终由: * 1)http://localhost:8080/dev-api/profiel/avatar/2020/03/08/198jjh09874550982y4h.jpeg * 映射成: * 2)D:/ruoyi/uploadPath/avatar/2020/03/08/198jjh09874550982y4h.jpeg * 最后找到文件(图片、文件) * */ registry.addResourceHandler(Constants.RESOURCE_PREFIX + "/**") .addResourceLocations("file:" + RuoYiConfig.getProfile() + "/"); registry.addResourceHandler("/swagger-ui/**") .addResourceLocations("classpath:/META-INF/resources/webjars/springfox-swagger-ui/") .setCacheControl(CacheControl.maxAge(5, TimeUnit.HOURS).cachePublic());; } } - 浏览器直接访问本地也是可以的:

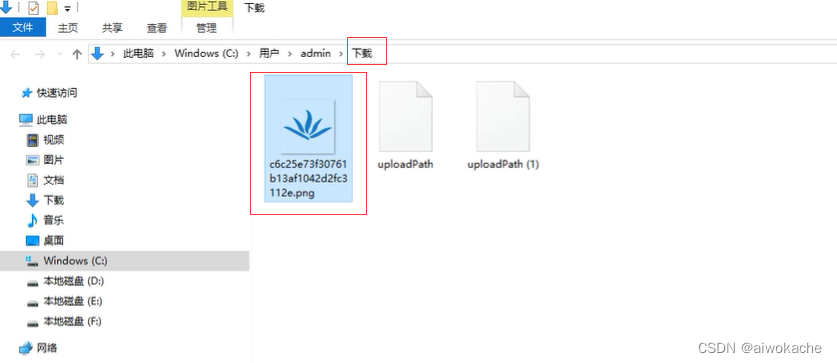
53 下载详解
1 CommonController#resourceDownload:本地资源通用下载
/**
     * 本地资源通用下载
     * (1)resource:文件(文件、图片)上传之后的路径,比如” /profile/upload/2020/03/06/10916uyt0928745wyrt098475hrs.jpeg “
     *     注意:以" /profile/ "这个前缀开始就行了
     * (2)request:http请求
     * (3)response:http响应
     */
    @GetMapping("/download/resource")
    public void resourceDownload(String resource, HttpServletRequest request, HttpServletResponse response)
            throws Exception
    {
        try
        {
            if (!FileUtils.checkAllowDownload(resource))
            {
                throw new Exception(StringUtils.format("资源文件({})非法,不允许下载。 ", resource));
            }
            // 本地资源路径(在application.yml中配置)
            String localPath = RuoYiConfig.getProfile();
            // 下载地址 = 本地资源路径  + 数据库资源地址
            String downloadPath = localPath + StringUtils.substringAfter(resource, Constants.RESOURCE_PREFIX);
            // 下载地址 = 本地资源路径 + 数据库资源地址 + 文件名称
            String downloadName = StringUtils.substringAfterLast(downloadPath, "/");
            /**
             * 通过文件流下载文件(文件、图片)
             */
            response.setContentType(MediaType.APPLICATION_OCTET_STREAM_VALUE);
            FileUtils.setAttachmentResponseHeader(response, downloadName);
            FileUtils.writeBytes(downloadPath, response.getOutputStream());
        }
        catch (Exception e)
        {
            log.error("下载文件失败", e);
        }
    }
2 浏览器下载演示:localhost/dev-api/common/download/resourceDownload?name=/profile/upload/2020/03/06/10916uyt0928745wyrt098475hrs.jpeg