文章目录
- size && capacity
- reserve
- resize
- empty
- 迭代器
- begin和end
- push_back &&pop_back
- insert && erase
- find
- swap
- [ ]
- 范围for遍历vector
- 迭代器失效问题
size && capacity
#include <iostream>
#include <vector>
using namespace std;

int main()
{
	vector<int> v(10, 2);
	cout << v.size() << endl; //获取当前容器中的有效元素个数
	cout << v.capacity() << endl; //获取当前容器的最大容量
	return 0;
}
reserve
通过reserse函数改变容器的capactiy
1、当所给值大于容器当前的capacity时,将capacity扩大到该值。
2、当所给值小于容器当前的capacity时,什么也不做。
resize
resize函数改变容器中的有效元素个数 ,也就是size
1、当所给值大于容器当前的size时,将size扩大到该值,扩大的元素为第二个所给值,若未给出,则默认为0。
2、当所给值小于容器当前的size时,将size缩小到该值。
#include <iostream>
#include <vector>
using namespace std;

int main()
{
	vector<int> v(10, 2);
	cout << v.size() << endl; //10
	cout << v.capacity() << endl; //10
	v.reserve(20); //改变容器的capacity为20,size不变
	cout << v.size() << endl; //10
	cout << v.capacity() << endl; //20
	v.resize(15); //改变容器的size为15
	cout << v.size() << endl; //15
	cout << v.capacity() << endl; //20
	return 0;
}
empty
#include <iostream>
#include <vector>
using namespace std;

int main()
{
	vector<int> v(10, 2);
	cout << v.empty() << endl;
	return 0;
}
迭代器
begin和end
#include <iostream>
#include <vector>
using namespace std;

int main()
{
	vector<int> v(10, 2);
	//正向迭代器遍历容器
	vector<int>::iterator it = v.begin();
	while (it != v.end())
	{
		cout << *it << " ";
		it++;
	}
	cout << endl;
	return 0;
}
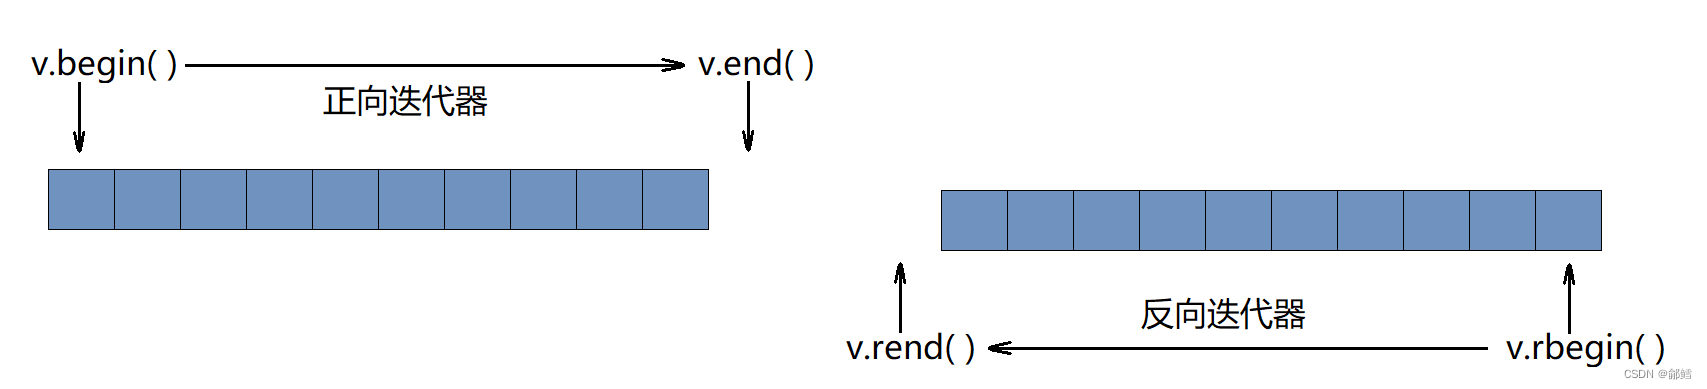
反向迭代器遍历容器:
#include <iostream>
#include <vector>
using namespace std;

int main()
{
	vector<int> v(10, 2);
	//反向迭代器遍历容器
	vector<int>::reverse_iterator rit = v.rbegin();
	while (rit != v.rend())
	{
		cout << *rit << " ";
		rit++;
	}
	cout << endl;
	return 0;
}
push_back &&pop_back
#include <iostream>
#include <vector>
using namespace std;

int main()
{
	vector<int> v;
	v.push_back(1);
	v.push_back(2);
	v.push_back(3);
	v.push_back(4);

	v.pop_back();
	v.pop_back();
	v.pop_back();
	v.pop_back();
	return 0;
}
insert && erase
#include <iostream>
#include <vector>
using namespace std;

int main()
{
	vector<int> v;
	v.push_back(1);
	v.push_back(2);
	v.push_back(3);
	v.push_back(4);
	v.insert(v.begin(), 0); //在容器开头插入0

	v.insert(v.begin(), 5, -1); //在容器开头插入5个-1

	v.erase(v.begin()); //删除容器中的第一个元素

	v.erase(v.begin(), v.begin() + 5); //删除在该迭代器区间内的元素(左闭右开)

	return 0;
}
find
find函数是在算法模块(algorithm)当中实现的,不是vector的成员函数
#include <iostream>
#include <vector>
#include <algorithm>
using namespace std;

int main()
{
	vector<int> v;
	v.push_back(1);
	v.push_back(2);
	v.push_back(3);
	v.push_back(4);

	vector<int>::iterator pos = find(v.begin(), v.end(), 2); //左闭右开
	//auto pos =find(v.begin()  , v.end() , 2) ;
	v.insert(pos, 10); //在2的位置插入10
    //左闭右开
	pos = find(v.begin(), v.end(), 3); //获取值为3的元素的迭代器

	v.erase(pos); //删除3

	return 0;
}
swap
通过swap函数可以交换两个容器的数据空间,实现两个容器的交换。
#include <iostream>
#include <vector>
using namespace std;

int main()
{
	vector<int> v1(10, 1);
	vector<int> v2(10, 2);

	v1.swap(v2); //交换v1,v2的数据空间

	return 0;
}
[ ]
vector当中实现了 [ ] 操作符的重载
#include <iostream>
#include <vector>
using namespace std;

int main()
{
	vector<int> v(10, 1);
	//使用“下标+[]”的方式遍历容器
	for (size_t i = 0; i < v.size(); i++)
	{
		cout << v[i] << " ";
	}
	cout << endl;
	return 0;
}
范围for遍历vector
用范围for对vector容器进行遍历。(支持迭代器就支持范围for,在编译时编译器会自动将范围for替换为迭代器的形式)
#include <iostream>
#include <vector>
using namespace std;

int main()
{
	vector<int> v(10, 1);
	//范围for
	for (auto e : v)
	{
		cout << e << " ";
	}
	cout << endl;
	return 0;
}
迭代器失效问题
迭代器的主要作用就是让算法能够不用关心底层数据结构,其底层实际就是一个指针,或者是对指针进行了封装,比如:vector的迭代器就是原生态指针T* 。因此迭代器失效,实际就是迭代器底层对应指针所指向的空间被销毁了,而使用一块已经被释放的空间,造成的后果是程序崩溃(即如果继续使用已经失效的迭代器,程序可能会崩溃)。
一、
#include <iostream>
#include <algorithm>
#include <vector>
using namespace std;

int main()
{
	vector<int> v;
	v.push_back(1);
	v.push_back(2);
	v.push_back(3);
	v.push_back(4);
	v.push_back(5);
	//v: 1 2 3 4 5
	vector<int>::iterator pos = find(v.begin(), v.end(), 2); //获取值为2的元素的迭代器
	//auto pos =find(v.begin(),v.end() ,2);
	v.insert(pos, 10); //在值为2的元素的位置插入10
	//v: 1 10 2 3 4 5
	v.erase(pos); //删除元素2  error(迭代器失效)
	//v: 1 2 3 4 5
	return 0;
}
在该代码中,我们本意是使用元素2的迭代器在原序列中2的位置插入一个10,然后将2删除,但我们实际上获取的是指向2的指针,当我们在2的位置插入10后,该指针就指向了10,所以我们之后删除的实际上是10,而不是2
解决方法:迭代器失效解决办法:在使用前,对迭代器重新赋值即可
#include <iostream>
#include <algorithm>
#include <vector>
using namespace std;

int main()
{
	vector<int> v;
	v.push_back(1);
	v.push_back(2);
	v.push_back(3);
	v.push_back(4);
	v.push_back(5);
	//v: 1 2 3 4 5
	vector<int>::iterator pos = find(v.begin(), v.end(), 2); //获取值为2的元素的迭代器
	//auto pos =find(v.begin(),v.end() ,2);
	v.insert(pos, 10); //在值为2的元素的位置插入10
	//v: 1 10 2 3 4 5
	pos = find(v.begin(), v.end(), 2); //重新获取值为2的元素的迭代器,(解决迭代器失效,重新赋值即可)
	v.erase(pos); //删除元素2
	//v: 1 10 3 4 5
	return 0;
}
二、
#include <iostream>
#include <vector>
using namespace std;

int main()
{
	vector<int> v;
	v1.push_back(1);
    v1.push_back(2);
    v1.push_back(2);
    v1.push_back(3);
    v1.push_back(4);
    v1.push_back(5);
    v1.push_back(6);
	vector<int>::iterator it = v.begin();
	//auto it = v.begin();
	while (it != v.end())
	{
		if (*it % 2 == 0) //删除容器当中的全部偶数
		{
			v.erase(it);
		}
		it++;
	}
	return 0;
}
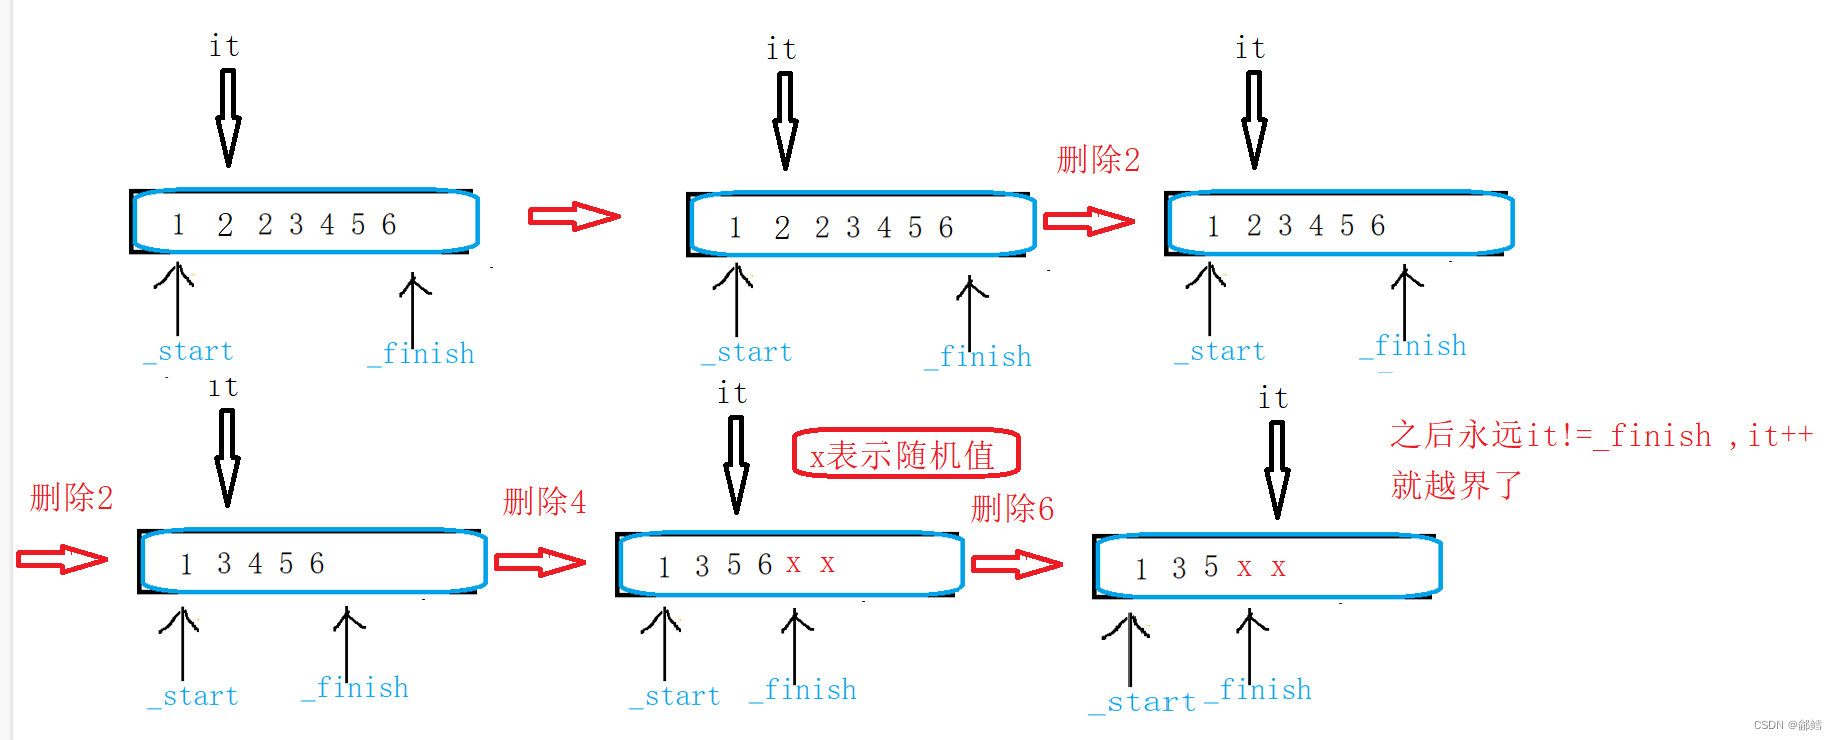
解决方案:我们可以接收erase函数的返回值(erase函数返回删除元素的后一个元素的新位置),并且控制代码的逻辑:当元素被删除后继续判断该位置的元素(因为该位置的元素已经更新,需要再次判断)。
下面是测试vector代码
#include<iostream>
#include<vector>
#include<string>
#include<algorithm>
using namespace std;
void test_vector1()
{
	vector<int> v;
	v.push_back(1);
	v.push_back(2);
	v.push_back(3);
	v.push_back(4);
	for (size_t i = 0; i < v.size(); ++i)
	{
		cout << v[i];
	}
	cout << endl;
	//迭代器访问
	vector<int> ::iterator it = v.begin();
	//auto it = v.begin();
	while (it != v.end())
	{
		cout << *it;
		it++;
	}
	cout << endl;
	//范围for
	for (auto e : v)
	{
		cout << e;
	}

}
void test_vector2()
{

	vector<string> v;
	//第一种方式
	string name1("zhangsan");
		v.push_back(name1);

	//第二种方式
		//匿名对象
		v.push_back(string("zhangsan"));

	//第三种方式(推荐)
		v.push_back("zhangsan");

}
void test_vector3()
{
	vector<int> v1(10, 1);
	vector<string> v2(10,"***");
	for (auto e : v1)
	{
		cout << e;
	}
	cout << endl;
	for (auto e : v2)
	{
		cout << e;
	}
	cout << endl;
	//自己类型的迭代器
	vector<int> v3(v1.begin(), v1.end());
	for (auto e : v3)
	{
		cout << e;
	}
	cout << endl;
	string str("hello world");
	vector<char> v4 (str.begin(), str.end());
	for (auto e : v4)
	{
		cout << e;
	}
	cout << endl;

	int a[] = { 16,2,77,29 };
	vector<int> v5(a, a + 4);
	for (auto e : v5)
	{
		cout << e<<" ";
	}
	cout << endl;
	//升序  less  <
	//sort(v5.begin(), v5.end());
	//降序
	/*sort(v5.rbegin(), v5.rend());*/

	for (auto e : v5)
	{
		cout << e << " ";
	}
	cout << endl;
	//降序 greater >
	/*greater <int> gt;*/
	//sort(v5.begin(), v5.end(),gt);
	sort(v5.begin(), v5.end(), greater<int>() ); //匿名对象

	for (auto e : v5)
	{
		cout << e << " ";
	}
	cout << endl;
}
void test_vector4()
{
	vector<int>  v1;
	cout << v1.max_size() << endl;
	v1.resize(10);
	//这里使用v1.reserve(10)是错的   []重载的实现里面有assert(pos <_size ) 但是此时_size是0;
	for (size_t i = 0; i < 10; i++)
	{
		v1[i] = i;
	}
	for (auto e : v1)
	{
		cout << e<<" ";
	}
	cout << endl;

	vector <int> v2;
	v2.reserve(10);
	for (size_t i = 0; i < 10; ++i)
	{
		v2.push_back(i);
	}
	for (auto e : v2)
	{
		cout << e << " ";
	}
	cout << endl;
}
void test_vector5()
{
	int a[] = { 16,2,77,29,3,33,43,3,2,3,3,2 };
	vector<int> v1(a,  a+sizeof(a)/sizeof(int) );
	for (auto e : v1)
	{
		cout << e << " ";
	}
	cout << endl;
	 头删
	//v1.erase(v1.begin());
	//for (auto e : v1)
	//{
	//	cout << e << " ";
	//}
	//cout << endl;
	 头插
	//v1.insert(v1.begin(),16);
	//for (auto e : v1)
	//{
	//	cout << e << " ";
	//}
	//cout << endl;
	// 删除第3个数据
	//v1.erase(v1.begin() + 2);
	//for (auto e : v1)
	//{
	//	cout << e << " ";
	//}
	//cout << endl;


	// 删除3,但是不知道3在哪个位置,怎么办?
	//使用迭代器
	vector<int>::iterator   pos =  find(v1.begin(), v1.end(), 3);
	//auto pos = find(v1.begin(), v1.end(), 3);
	// 通过查询文档发现, find函数没有找到会return last
	if (pos != v1.end( ))//find找到了3的位置
	{
		v1.erase(pos);
	}

	for (auto e : v1)
	{
		cout << e << " ";
	}
	cout << endl;
	// 删除所有的3 -- 涉及迭代器失效!后面解决

	pos = find(v1.begin(), v1.end(), 3);

	while (pos != v1.end())//pos不能越界
		//删除第一个找到的3,然后继续找3 ,删除一个3,更新一次pos
	{
		v1.erase(pos);//删除第一个找到的3
		pos = find(v1.begin(), v1.end(), 3);//删除一个3,更新一次pos
	}
	for (auto e : v1)
	{
		cout << e << " ";
	}
	cout << endl;

	/*v1.assign(10, 1);
	for (auto e : v1)
	{
		cout << e << " ";
	}
	cout << endl;*/
}
void test_vector6()
{
	string str("hello world");
	sort(str.begin(), str.end());
	cout << str << endl;
	int a[] = { 16,2,77,29 };
	sort(a ,a+4);
	for (auto e : a)
	{
		cout << e << " ";
	}
}
int main()
{
	//test_vector1();
	//test_vector2();
	//test_vector3();
	//test_vector4();
	test_vector5();
	//test_vector6();

	return 0;
}
如果你觉得这篇文章对你有帮助,不妨动动手指给点赞收藏加转发,给鄃鳕一个大大的关注你们的每一次支持都将转化为我前进的动力!!!