1、什么是RALL,手动代码实现
RALL(resource Acquisition Is Initialization )C++ 之父Bjarne Stroustrup 提出;
使用局部对象来管理资源的技术称为资源获取即初始化;它的生命周期是由操作系统来管理的,无需人工介入;资源的销毁容易忘记,造成死锁或者内存泄漏。
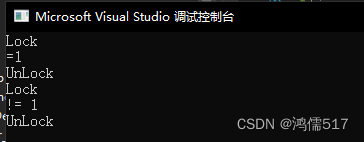
1.1、手动实现RALL管理mutex资源
RALL 编写代码方式,代码更简介,而且不会遗漏解锁
#include <thread>
#include <iostream>
#include <string>
#include <mutex>
#include <shared_mutex>

using namespace std;

//RALL
class XMutex
{
public:
	XMutex(mutex & mux):mux_(mux)//引用的时候赋值,在初始化的时候就记到成员变量中
	{//构造函数中加锁
		cout << "Lock" << endl;
		mux.lock();
	}

	~XMutex()
	{
		cout << "UnLock" << endl;
		mux_.unlock();
	}
private:
	mutex& mux_;//把初始化的锁存下来,引用

};

static mutex mux;
void TestMutex(int status )
{//业务逻辑
	XMutex lock(mux);
	if (status == 1)
	{
		cout << "=1" << endl;
		return;
	}
	else
	{
		cout << "!= 1" << endl;
		return;
	}
	return;
}

int main()
{
	TestMutex(1);
	TestMutex(2);
	return 0;

}
1.2、C++ 11 支持的RALL管理互斥资源lock_guard
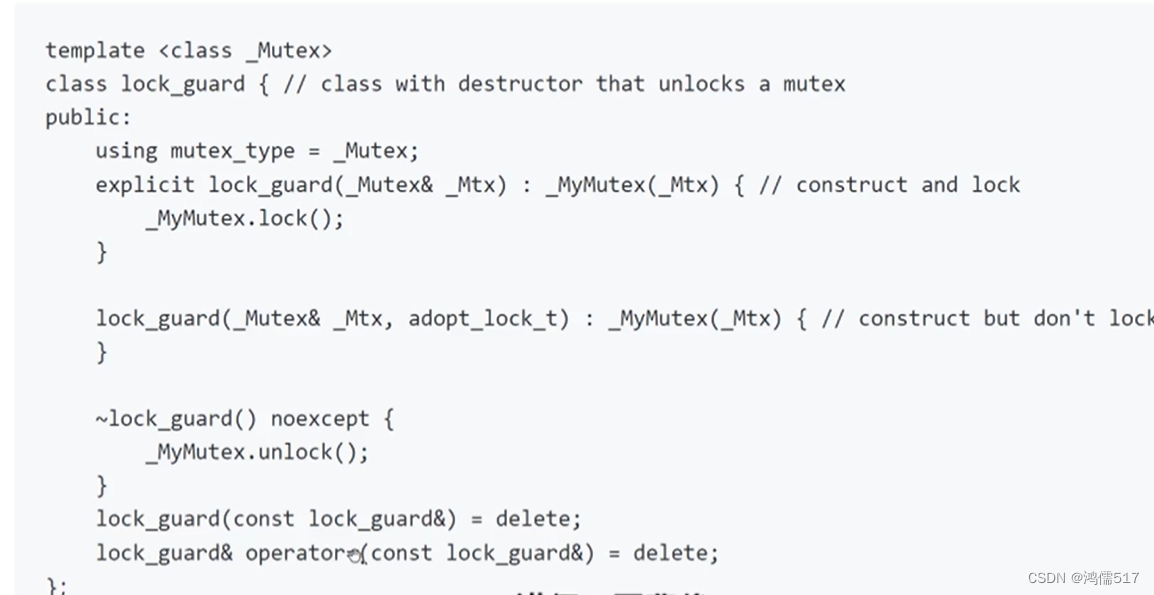
C++ 11 实现严格基于作用域的互斥体所有权包装器;
adopt_lock C++11 类型为adopt_lock_t ,假设调用方已拥有互斥的所有权;
通过{}控制锁的临界区
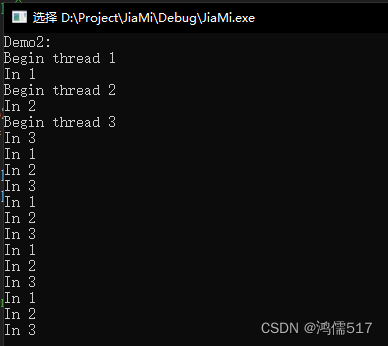
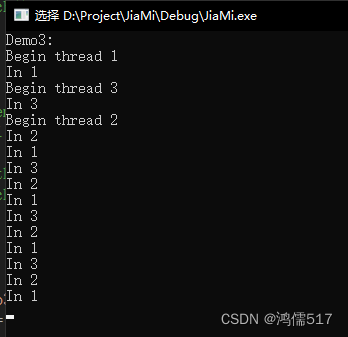
举例了三种情形
#include <thread>
#include <iostream>
#include <string>
#include <mutex>
#include <shared_mutex>

using namespace std;


static mutex gmutex;
void TestLockGuard(int i)
{//错误用法示例:这样写会被第一个线程占用,不能出来
	lock_guard<mutex> lock(gmutex);
	for (;;)
	{
		cout << "In " << i << endl;
		this_thread::sleep_for(500ms);
	}

}

void TestLockGuard_Demo2(int i)
{//正确用法,用大括号来释放锁
	{
		lock_guard<mutex> lock(gmutex);
		cout << "Begin thread " << i << endl;
	}
	for (;;)
	{
		{
			lock_guard<mutex> lock(gmutex);
			cout << "In " << i << endl;
			this_thread::sleep_for(200ms);
		}
		this_thread::sleep_for(1ms);
	}

}

void TestLockGuard_Demo3(int i)
{//举例开头拥有锁的初始化情况

	gmutex.lock();
	{
		//开头已经用有锁
		//lock_guard<mutex>lock(gmutex);//这样写会报错,因为这个锁在外部已经锁住了,通过捕获异常可以进行分析;
		lock_guard<mutex>lock(gmutex,adopt_lock);//如果外部锁住了,这样写可以避免(调用了重载特性),程序可以正常运行
		//解锁
	}


	{
		lock_guard<mutex> lock(gmutex);
		cout << "Begin thread " << i << endl;
	}
	for (;;)
	{
		{
			lock_guard<mutex> lock(gmutex);
			cout << "In " << i << endl;
			this_thread::sleep_for(200ms);
		}
		this_thread::sleep_for(1ms);
	}

}


int main()
{
	//printf("Demo1:\n");
	//for (int i = 0; i < 3; i++)
	//{
	//	thread th(TestLockGuard,i+1);
	//	th.detach();
	//}
	//getchar();


	//printf("Demo2:\n");
	//for (int i = 0; i < 3; i++)
	//{
	//	thread th(TestLockGuard_Demo2, i + 1);
	//	th.detach();
	//}
	//getchar();


	printf("Demo3:\n");
	for (int i = 0; i < 3; i++)
	{
		thread th(TestLockGuard_Demo3, i + 1);
		th.detach();
	}


	getchar();
	return 0;

}

1.3、unique_lock C++ 11
unique_lock C++ 11实现可移动的互斥体所有权包装器
支持临时释放锁unlock
支持adopt_lock(已经用有锁,不加锁,出栈区会释放)
支持defer_lock(延后拥有,不加锁,出栈区不释放)
支持try_to_lock尝试获得互斥的所有权而不阻塞,获取失败退出栈区不会释放,通过owns_lock函数判断
#include <thread>
#include <iostream>
#include <string>
#include <mutex>
#include <shared_mutex>

using namespace std;


int main()
{
	{
		static mutex mux;
		{
			//第一种常规特性,与lock_guard使用方法一样,但是不一样的是,执行过程中可以临时释放锁,再加锁
			unique_lock<mutex>lock(mux);//
			lock.unlock();//但是unique_lock支持中间临时释放锁
			lock.lock();//加锁
		}//出栈释放锁


		{
			//第二个特性:已经用有锁,不锁定,退出解锁
			mux.lock();
			unique_lock<mutex>lock(mux,adopt_lock);//针对已经用有锁

		}
		{
			//第三个特性,延后加锁,不拥有,退出不解锁
			unique_lock<mutex>lock(mux,defer_lock);//延时锁,在后面再进行上锁
			lock.lock();//主动上锁,退出栈区解锁

		}
		{
			//mux.lock();//如果被锁定,后面也不会阻塞,不用有所
			//第四种特性,尝试加锁,不阻塞,失败不拥有锁
			unique_lock<mutex> lock(mux, try_to_lock);
			if (lock.owns_lock())
			{
				cout << "owns_lock" << endl;
			}
			else
			{
				cout << "not owns_lock" << endl;
			}

		}

	}
	getchar();

	return 0;

}
1.4、shared_lock C++ 14
C++14才有的特性
实现可移动的共享互斥体所有权封装器
使用方法:
#include <thread>
#include <iostream>
#include <string>
#include <mutex>
#include <shared_mutex>

using namespace std;


int main()
{
	{
		//共享锁
		static shared_timed_mutex tmux;
		//读取锁,共享锁
		{
			//调用共享锁
			shared_lock<shared_timed_mutex>lock(tmux);
			cout << "Read data" << endl;

		}//退出栈区释放构造,释放共享锁

		{
			//写入锁,互斥锁
			unique_lock<shared_timed_mutex>lock(tmux);
			cout << "write data" << endl;


		}
	}


	getchar();

	return 0;

}
1.5、scoped_lock C++17
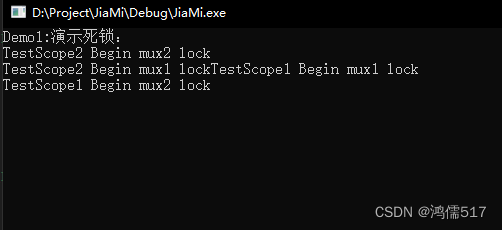
scoped_lock C++17 用于多个互斥体的免死锁RAII封装器,类似lock
设置方法:
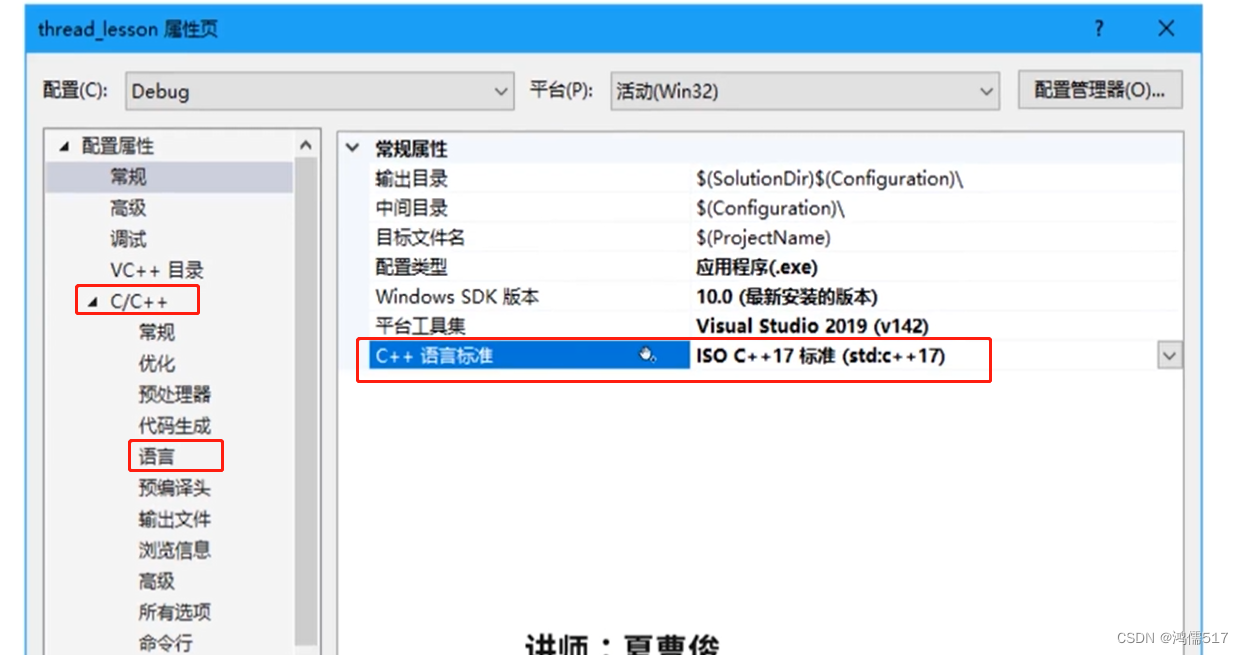
//要用到C++17,需要在属性->C++ ->语言 ->C++语言标注-> C++17


#include <thread>
#include <iostream>
#include <string>
#include <mutex>
#include <shared_mutex>

using namespace std;

static mutex mux1;
static mutex mux2;

void TestScope1()
{//死锁的测试代码
	this_thread::sleep_for(100ms);//模拟死锁,停100ms
	cout << "TestScope1 Begin mux1 lock" << endl;
	mux1.lock();
	cout << "TestScope1 Begin mux2 lock" << endl;
	mux2.lock();//死锁
	cout <<"In :TestScope1" << endl;
	this_thread::sleep_for(1000ms);
	mux1.unlock();
	mux2.unlock();
}
void TestScope2()
{//这个代码不变
	cout << "TestScope2 Begin mux2 lock" << endl;
	mux2.lock();
	this_thread::sleep_for(100ms);//模拟死锁,停100ms

	cout << "TestScope2 Begin mux1 lock" << endl;
	mux1.lock();//死锁
	cout << "In :TestScope2" << endl;

	this_thread::sleep_for(1500ms);
	mux2.unlock();
	mux1.unlock();
}


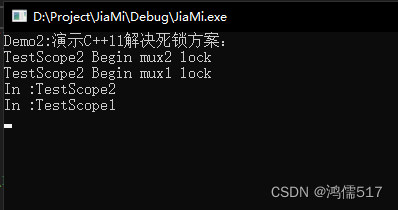
void TestScope1_C11()//C++11的解决方案
{
	this_thread::sleep_for(100ms);//模拟死锁,停100ms
	//cout << "TestScope1 Begin mux1 lock" << endl;
	//mux1.lock();
	//cout << "TestScope1 Begin mux2 lock" << endl;
	//mux2.lock();//死锁
	lock(mux1,mux2);//C++11的解决方案,两个同时锁住才能进行下一步操作,有一个没有锁住,则不进行下一步操作
	cout << "In :TestScope1" << endl;
	this_thread::sleep_for(1000ms);
	mux1.unlock();
	mux2.unlock();
}


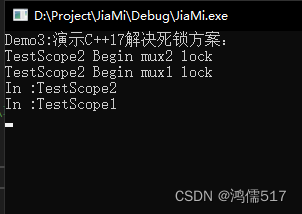
void TestScope1_C17()//C++17的解决方案
{
	this_thread::sleep_for(100ms);//模拟死锁,停100ms
	//cout << "TestScope1 Begin mux1 lock" << endl;
	//mux1.lock();
	//cout << "TestScope1 Begin mux2 lock" << endl;
	//mux2.lock();//死锁
	//lock(mux1, mux2);//C++11的解决方案,两个同时锁住才能进行下一步操作,有一个没有锁住,则不进行下一步操作
	scoped_lock lock(mux1,mux2);//C++17的解决方案,必须要把属性设置为C++17才行

	cout << "In :TestScope1" << endl;
	this_thread::sleep_for(1000ms);
	//mux1.unlock();//C++17这种方法改后,这里不需要手动释放,否则会报错
	//mux2.unlock();
}


int main()
{
	{
		//printf("Demo1:演示死锁:\n");
		演示死锁
		//{
		//	thread th(TestScope1);
		//	th.detach();
		//}

		//printf("Demo2:演示C++11解决死锁方案:\n");
		//{//C++ 11的解决方案
		//	thread th(TestScope1_C11);
		//	th.detach();
		//}

		printf("Demo3:演示C++17解决死锁方案:\n");
		{//C++ 17的解决方案
			thread th(TestScope1_C17);
			th.detach();
		}


		{//下面代码不注释,不动
			thread th(TestScope2);
			th.detach();
		}

	}

	getchar();

	return 0;

}
