原文合集地址如下,有需要的朋友可以关注
本文地址
合集地址
前言
之前遇到不分页直接获取到全部数据,前端滚动查看数据,页面就听卡顿的,当然这和电脑浏览器性能啥的还是有点关系。但根源还是一次性渲染数据过多导致的,因此就想到解决这个问题,最常见就是虚拟滚动,实现只渲染当前可见的部分,这样浏览器一次性渲染的数据少了。
本文介绍虚拟列表和虚拟Table的实现,基于React + ts技术栈。
虚拟列表
虚拟列表通过仅渲染当前可见区域的列表项来解决这个问题。它利用浏览器的滚动事件,根据用户可见区域的大小和滚动位置动态地计算应该渲染哪些列表项。这样,即使数据量很大,也只有当前可见的列表项会被渲染,大大减少了DOM元素的数量,提高了页面性能和响应性。
结合下图想象一下
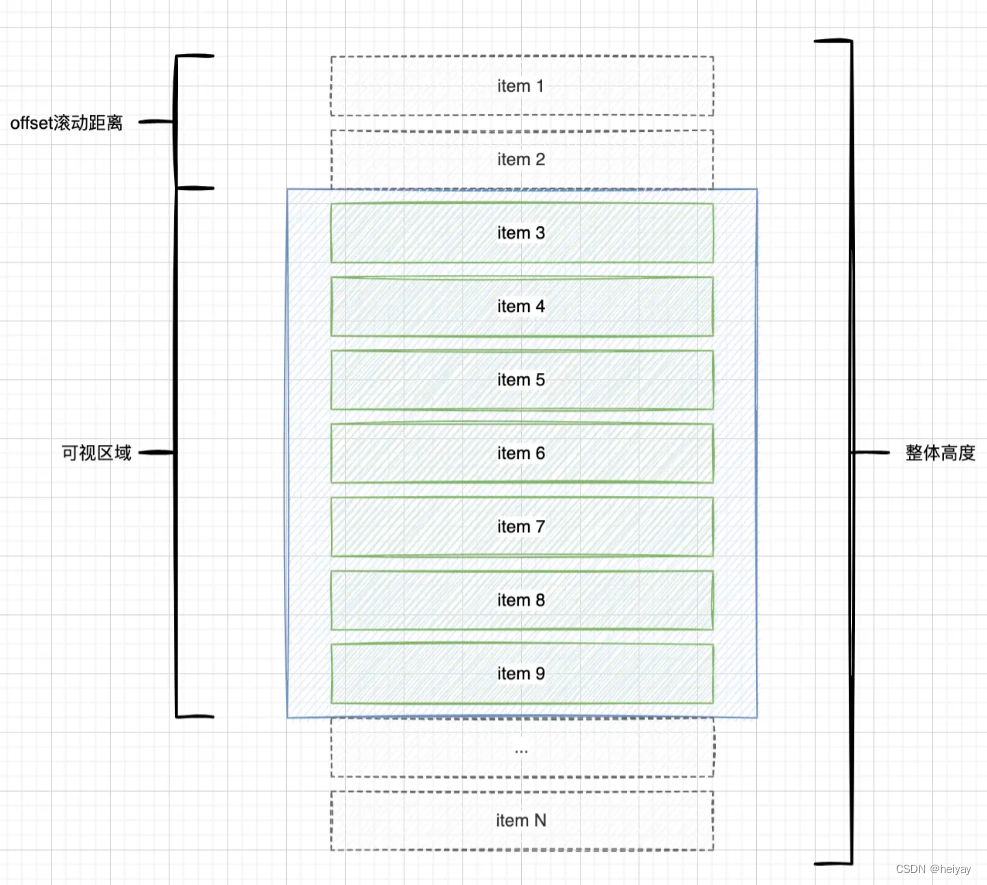
实现虚拟列表的方法主要涉及以下步骤:
-
计算可见区域:根据容器的尺寸(假如500px)和每一项的高度(50px),计算出可见的列表项数量。然后可视的数据就是10个。
-
监听滚动事件:在容器上添加滚动事件监听,以便实时获取滚动位置。为了容器可滚动,需要在容器内添加空的带有高度的元素,将父元素撑开,然后可滚动。获取scrollTop的高度,就能计算出当前显示第一项的下标(scrollTop / itemHeight),动态更新数据。
基于上面的思路,封装一个滚动列表组件。
import _ from "lodash";
import React, { useEffect, useState } from "react";
import { listData } from "./data";

type ListType = {
  itemHeight?: number; // 每一项的高度
  visibleHeight?: number; // 可见高度
  total?: number; // 数据总数
  dataSource?: any[]; // 全部数据
};

// 为了看效果我模拟的数据
const myList = Array.from(Array(1000), (item, index) => ({name: `名字${item}`, id: index}));

const List = (props: ListType) => {
  const {
    itemHeight = 54,
    visibleHeight = 540,
    total = 130,
    dataSource = myList,
  } = props;
  const [showData, setShowData] = useState<any>([]);
  const [offset, setOffset] = useState<any>({ top: 0, bottom: 0 });
  const visibleCount = Math.ceil(visibleHeight / itemHeight);

  useEffect(() => {
    const list = _.slice(dataSource, 0, visibleCount);
    const bottom = (total - visibleCount) * itemHeight;
    setOffset({ top: 0, bottom });
    setShowData(list);
  }, [dataSource]);

  const onScroll = (event: React.UIEvent<HTMLDivElement>) => {
    const target = event.currentTarget;
    const startIdx = Math.floor(target.scrollTop / itemHeight);
    const endIdx = startIdx + visibleCount;
    setShowData(dataSource.slice(startIdx, endIdx));
    const top = startIdx * itemHeight;
    const bottom = (total - endIdx) * itemHeight;

    setOffset({ top, bottom });
  };

  return (
    <div
      className="virtual"
      style={{
        height: visibleHeight,
        width: "100%",
        overflow: "auto",
        border: "1px solid #d9d9d9",
      }}
      onScroll={onScroll} // 在父元素上添加滚动事件监听
    >
      {/* 可视数据 为了滚动数据一直在可视区。加上顶部偏移 */}
      <div style={{ height: visibleHeight, marginTop: offset.top }}>
        {_.map(showData, (item, index: any) => {
          return (
            <div
              style={{
                display: "flex",
                alignItems: "center",
                height: itemHeight,
                borderBottom: "1px solid #d9d9d9",
              }}
              key={index}
            >
              {item.name}
            </div>
          );
        })}
      </div>
      {/* 底部占位 */}
      <div style={{ height: offset.bottom }} />
    </div>
  );
};

export default List;
虚拟Table
虚拟表格和虚拟列表的思路差不多,是虚拟列表的一种特殊形式,通常用于处理大型的表格数据。类似于虚拟列表,虚拟表格也只渲染当前可见区域的表格单元格,以优化性能并减少内存占用。
在ant design4+的版本,也是给出了虚拟列表的实现方式的,基于‘react-window’,大家也可以研究研究。我这里就是根据ant 提供的api components重写渲染的数据;获取到可视区起点和终点下标,然后只展示当前可视的数据。
思路和上面的列表基本一样,直接上代码
import React, { useEffect, useRef, useState } from "react";
import { Table } from "antd";
import _ from "lodash";
type TableType = {
  itemHeight?: number; // 每一项的高度
  visibleHeight?: number; // 可见高度
  total?: number; // 数据总数
  dataSource?: any[]; // 全部数据
};
// 为了看效果我模拟的数据
const myList = Array.from(Array(1000), (item, index) => ({name: `名字${item}`, id: index}));

const VirtualTable = (props: TableType) => {
  const {
    itemHeight = 54,
    visibleHeight = 540,
    total = 130,
    dataSource = myList,
  } = props;
  const [point, setPoint] = useState<any>([0, 20]);
  const [offset, setOffset] = useState<any>({top:0, bottom: 0 });
  const tabRef = useRef<any>();
  const containRef = useRef<any>();
  const visibleCount = Math.ceil(visibleHeight / itemHeight);
  useEffect(() => {
    const bottom = (total - visibleCount) * itemHeight;
    setOffset({ bottom });
    setPoint([0, visibleCount]);
    const scrollDom = tabRef?.current?.querySelector(".ant-table-body");
    console.log("aaa",scrollDom);

    if (scrollDom) {
      containRef.current = scrollDom;
      containRef.current.addEventListener("scroll", onScroll);

      return () => {
        containRef.current.removeEventListener("scroll", onScroll);
      };
    }
  }, [myList]);

  const onScroll = (e: any) => {
    const startIdx = Math.floor(e?.target?.scrollTop / itemHeight);
    const endIdx = startIdx + visibleCount;
    const bottom = (total - endIdx) * itemHeight;
    const top = startIdx * itemHeight;
    setOffset({top,bottom});
    setPoint([startIdx, endIdx]);
  };

  const columns = [
    { title: "ID", dataIndex: "id", width: 150 },
    { title: "名字", dataIndex: "name", width: 150 },
  ];

  return (
    <Table
      ref={tabRef}
      className="virtual-table"
      pagination={false}
      columns={columns}
      dataSource={dataSource}
      scroll={{ y: visibleHeight }}
      components={{
        body: {
          wrapper: ({ className, children }: any) => {
            return (
              <tbody className={className}>
                {children?.[0]}
                <tr style={{height: offset.top}}/>
                {_.slice(children?.[1], point?.[0], point?.[1])}
                <tr style={{height: offset.bottom}}></tr>
              </tbody>
            );
          },
        },
      }}
    />
  );
};
export default VirtualTable;
在上面的代码里,用到Ant Design的Table组件中的components.body.wrapper定制表格内容区域的包装器组件。它的作用是对表格的内容进行包装,并且可以自定义一些显示逻辑。components.body.wrapper函数接收一个对象参数,其中包含以下参数:
-
className: 传递给tbody标签的类名。它是一个字符串,包含了tbody标签的类名,可以用于自定义样式。 -
children: 表格的内容区域的子元素,即表格的数据行和列。
在给定的代码中,components.body.wrapper函数接收了一个参数对象,该对象包含className和children属性。在函数内部,它会将children分割成三部分:
-
children?.[0]:这是表格的标题行,即表头部分,对应于<thead>标签。 -
{_.slice(children?.[1], point?.[0], point?.[1])}:这是表格的数据行,根据point的取值进行了切片,只渲染point范围内的数据行,对应于<tr>标签。 -
<tr style={{height: offset.bottom}}></tr>:这是底部占位行,用于确保在滚动时能正确显示表格的底部内容,对应于<tr>标签,并通过style设置高度为offset.bottom。
其中,point和offset是通过其他逻辑计算得到的,可能是在组件的其他部分定义或使用的变量。
通过自定义components.body.wrapper函数,您可以对表格内容进行更加灵活的渲染和定制。在这种情况下,它主要用于实现虚拟表格的功能,只渲染可见区域的数据行,从而优化大型表格的性能。
总结
本文只是实现了在固定每项列表高度的情况下的虚拟列表,现实很多情况是不定高的。这个比定高的复杂,不过原理也是一样的,多了一步需要计算渲染后的实际高度的步骤。我也只是在项目中遇到了,写下来记录方便后续查看。
如有问题欢迎留言讨论,如有更好的实现方式,可以交流学习哦

