目录
promtool检查语法
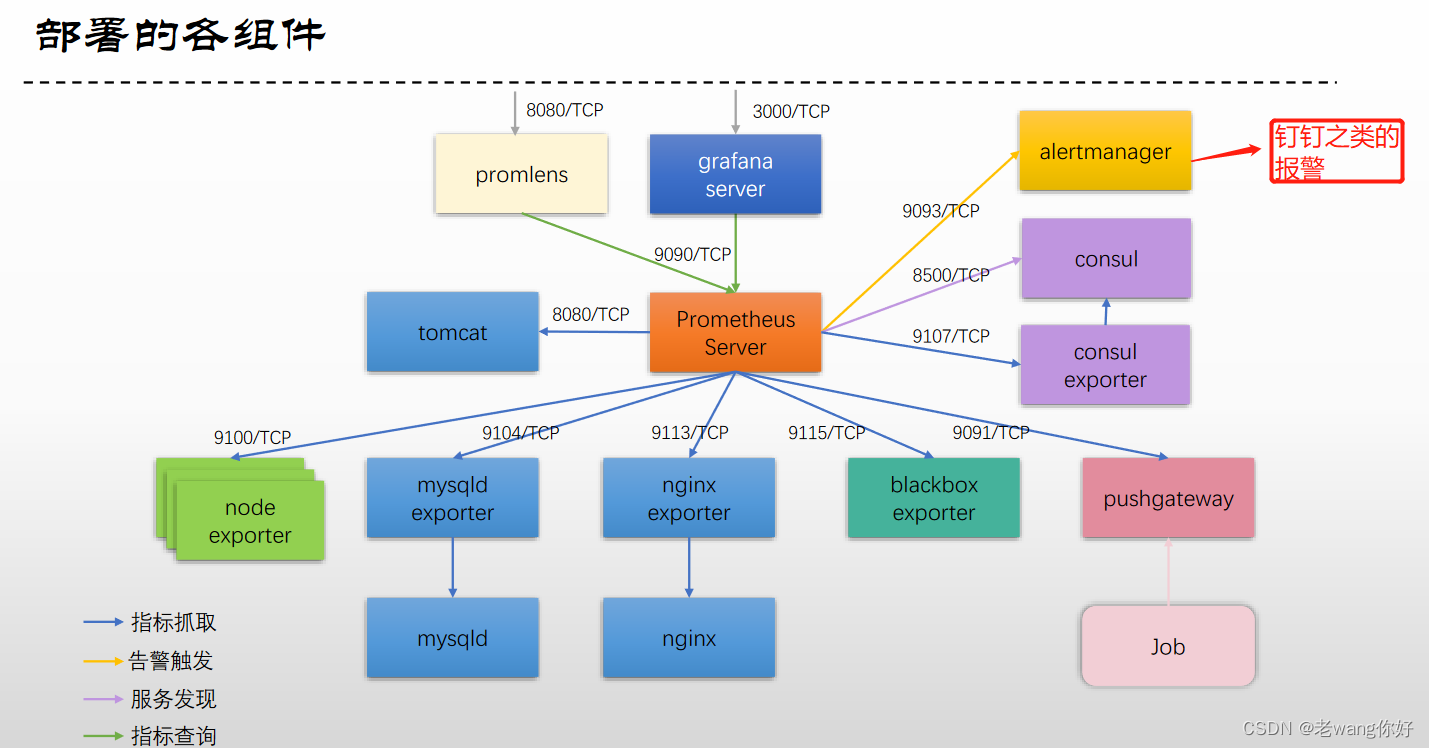
部署Prometheus Server
检查语法是否规范
部署node-exporter
部署Consul
直接请求API进行服务注册
使用register命令注册服务(建议使用) 单个和多个注册,多个后面多加了s
在Prometheus上做consul的服务发现
部署Consul Exporter
在Prometheus上做Consul Exporter的服务发现 因为Prometheus是对Consul做的服务发现所以
部署MySQL Exporter
在Prometheus上做Consul Exporter的服务发现
部署nginx Exporter
在Prometheus上做Consul Exporter的服务发现
在Prometheus上做tomcat
tomcat允许远程登录
tomcat下载及扩充支持相应的功能
注册到consul上面去及Prometheus上做服务发现
署Blackbox Exporter 取决于黑盒监控
在Prometheus里面做黑河发现
- Record Rule: 保存在配置文件中,由Prometheus Server周期去评估,结果会生成一个时序数据,回存至TSDB,并支持查询
- Alert Rule: 布尔型告警表达式,保存在配置文件中,由Prometheus Server周期去评估,结果会生成一个时序数据,服务状态转换时,即会生成告警;
- 布尔型告警表达式:监控指标的值或其他相关条件来判断系统是否处于异常状态,并触发相应的告警。
record 记录规则,
- 当Prometheus里面用promQL写的规则执行文件,执行完成时,如果恰巧是grafana所需要的文件,就会直接在这里读取,而不是再从TSDB里面重新读取,从而省去大量IO
查询持久化:
把查询语句的执行结果长期保存;
记录规则:保存于配置文件,由Server自动在后台周期性执行;
evaluation_interval: 15s
promtool检查语法
./promtool check config prometheus.yml # promtool 可以用这命令检查语法
/usr/local/consul services register server02.json 注册consul的发现表
/usr/local/consul services dederegister -id server02.json 注销consul的发现表
https://prometheus.io/download/ 官网
部署Prometheus Server
下载程序包,以2.40.2版为例:
curl -LO https://github.com/prometheus/prometheus/releases/download/v2.40.2/prometheus-2.40.2.linux-amd64.tar.gz展开程序包:
tar xf prometheus-2.40.2.linux-amd64.tar.gz -C /usr/local/
ln -sv /usr/local/prometheus-2.40.2.linux-amd64 /usr/local/prometheus
创建用户,并设定目录权限:
useradd -r prometheus
mkdir /usr/local/prometheus/data
chown -R prometheus.prometheus /usr/local/prometheus/data
创建Systemd Unitfile,保存于/usr/lib/systemd/system/prometheus.service文件中:
[Unit]
Description=Monitoring system and time series database
Documentation=https://prometheus.io/docs/introduction/overview/

[Service]
Restart=always
User=prometheus
EnvironmentFile=-/etc/default/prometheus
ExecStart=/usr/local/prometheus/prometheus \
            --config.file=/usr/local/prometheus/prometheus.yml \
            --storage.tsdb.path=/usr/local/prometheus/data \
            --web.console.libraries=/usr/share/prometheus/console_libraries \
            --web.enable-lifecycle \
            $ARGS
ExecReload=/bin/kill -HUP $MAINPID
TimeoutStopSec=20s
SendSIGKILL=no
LimitNOFILE=8192

[Install]
WantedBy=multi-user.target
如有必要,可创建环境配置文件/etc/default/prometheus,通过变量ARGS为prometheus指定启动参数
启动服务:
systemctl daemon-reload
systemctl start prometheus.service
systemctl enable prometheus.service
验证监听的端口,并测试访问其暴露的指标
ss -tnlp | grep '9090'
curl localhost:9090/metrics
修改配置后的重载命令:
curl -XPOST http://localhost:9090/-/reload基于文件的服务发现
[root@rocky8 prometheus]#mkdir targets
[root@rocky8 targets]#vim nodes-linux.yml    #以yml结尾就行,后续容易在Prometheus里面指定
- targets:     #可以名字
  - 10.0.0.18:9100
  - 10.0.0.8:9100
  labels:   #标签。可以多个
    app: nede-exporter


[root@rocky8 prometheus]#vim prometheus.yml
  - job_name: "node_exporter"
    metrics_path: '/metrics'  #默认定义的输出路径
    scheme: 'http'
    file_sd_configs:          #基于文件发现
      - files:
          - targets/nodes-*.yml   #可以通配符
        refresh_interval: 2m
curl -XPOST http://localhost:9090/-/reload   定义完成之后可以重启
检查语法是否规范
[root@rocky8 prometheus]#./promtool check config ./prometheus.yml 可以检查语法是否规范
部署node-exporter
提示:每个主机节点上均应该部署node-exporter;
下载程序包,以1.4.0版本为例:
curl -LO https://github.com/prometheus/node_exporter/releases/download/v1.4.0/node_exporter-1.4.0.linux-amd64.tar.gz展开程序包:
tar xf node_exporter-1.4.0.linux-amd64.tar.gz -C /usr/local/
ln -sv /usr/local/node_exporter-1.4.0.linux-amd64 /usr/local/node_exporter
创建用户,若prometheus用户已经存在,可略过该步骤:
useradd -r prometheus创建Systemd Unitfile,保存于/usr/lib/systemd/system/node_exporter.service文件中:
[Unit]
Description=node_exporter
Documentation=https://prometheus.io/docs/introduction/overview/
After=network.target

[Service]
Type=simple
User=prometheus
ExecStart=/usr/local/node_exporter/node_exporter \
  --collector.ntp \
  --collector.mountstats \
  --collector.systemd \
  --collector.ethtool \
  --collector.tcpstat
ExecReload=/bin/kill -HUP $MAINPID
TimeoutStopSec=20s
Restart=always

[Install]
WantedBy=multi-user.target
启动服务:
systemctl daemon-reload
systemctl start node_exporter.service
systemctl enable node_exporter.service
验证监听的端口,并测试访问其暴露的指标
ss -tnlp | grep '9100'
curl localhost:9100/metrics
部署Consul
组件功能:用于为Prometheus提供基于Consul进行服务发现的测试环境。
部署
下载Consul,以1.14.1版本为例:
curl -LO https://releases.hashicorp.com/consul/1.14.1/consul_1.14.1_linux_amd64.zip展开程序包:
mkdir -p /usr/local/consul/{data,config}  #给consul 保存配置文件和数据的目录
unzip consul_1.14.1_linux_amd64.zip -d /usr/local/consul
创建用户,若consul用户已经存在,可略过该步骤:
useradd -r consul
chown consul.consul /usr/local/consul/{data,config}
创建Systemd Unitfile,保存于/usr/lib/systemd/system/consul.service文件中:
[Unit]
Description="HashiCorp Consul - A service mesh solution"
Documentation=https://www.consul.io/
Requires=network-online.target
After=network-online.target

[Service]
EnvironmentFile=-/etc/consul.d/consul.env
User=consul
Group=consul
ExecStart=/usr/local/consul/consul agent -dev -bootstrap \
            -config-dir /usr/local/consul/config \
            -data-dir /usr/local/consul/data \
            -ui \
            -log-level INFO \
            -bind 127.0.0.1 \
            -client 0.0.0.0
ExecReload=/bin/kill --signal HUP $MAINPID
KillMode=process
KillSignal=SIGTERM
Restart=on-failure
LimitNOFILE=65536

[Install]
WantedBy=multi-user.target
启动服务:
systemctl daemon-reload
systemctl start consul.service
systemctl enable consul.service  #开机自动
直接请求API进行服务注册
列出已经注册的服务:
curl -XGET http://localhost:8500/v1/agent/services
获取某个特定服务的配置信息:
curl -XGET http://localhost:8500/v1/agent/service/<SERVICE_ID>
例如,下面定义了一个要注册的tomcat服务示例,它保存于tomcat.json文件中
{
      "id": "tomcat",
      "name": "tomcat",
      "address": "tomcat",
      "port": 8080,
      "tags": ["tomcat"],
      "checks": [{
        "http": "http://tomcat:8080/metrics",
        "interval": "5s"
      }]
}
我们可以使用类似如下命令完成服务注册。
curl -XPUT --data @tomcat.json http://localhost:8500/v1/agent/service/register
注销某个服务:
curl -XPUT http://localhost:8500/v1/agent/service/deregister/<SERVICE_ID>
使用register命令注册服务(建议使用) 单个和多个注册,多个后面多加了s
consul services register命令也可用于进行服务注册,只是其使用的配置格式与直接请求HTTP API有所不同。
-address=XXX 指明服务器地址,不指默认本地
-port=xx 指定服务的端口号
consul services register /path/to/pyload_file.json
注册单个服务时,使用service进行定义,注册多个服务时,使用services以列表格式进行定义。下面的示例定义了单个要注册的服务。
{
  "service": {
      "id": "tomcat",
      "name": "tomcat",
      "address": "tomcat",
      "port": 8080,
      "tags": ["tomcat"],
      "checks": [{
        "http": "http://tomcat:8080/metrics",
        "interval": "5s"
      }]
  }
}
下面的示例,以多个的服务的格式给出了定义。
{
  "services": [{
      "id": "tomcat",
      "name": "tomcat",
      "address": "tomcat",
      "port": 8080,
      "tags": ["tomcat"],
      "checks": [{
        "http": "http://tomcat:8080/metrics",
        "interval": "5s"
      }]
    }
  ]
}
注销服务,也可以使用consul services deregister命令进行。
consul services deregister -id <SERVICE_ID>在Prometheus上做consul的服务发现
在consul上可以正常查到相关节点后,在Prometheus.yml上增加相关配置
  - job_name: "node_exporter"
    consul_sd_configs:
       - server: '10.0.0.8:8500'
         tags:
           - "node_exporter"     #只有consul里带有该标签的服务才会被 Prometheus 发现和监控
         refresh_interval: 1m

[root@rocky8 prometheus]#curl -XPOST localhost:9090/-/reload  #重启

部署Consul Exporter
提示:仅需要为每个Consul实例部署consul-exporter,它负责将Consul的状态信息转为Prometheus兼容的指标格式并予以暴露。
下载程序包,以0.8.0版本为例:
curl -LO https://github.com/prometheus/consul_exporter/releases/download/v0.8.0/consul_exporter-0.8.0.linux-amd64.tar.gz展开程序包:
tar xf consul_exporter-0.8.0.linux-amd64.tar.gz -C /usr/local/
ln -sv /usr/local/consul_exporter-0.8.0.linux-amd64 /usr/local/consul_exporter
创建用户,若consul用户已经存在,可略过该步骤:
useradd -r consul创建Systemd Unitfile,保存于/usr/lib/systemd/system/consul_exporter.service文件中:
[Unit]
Description=consul_exporter
Documentation=https://prometheus.io/docs/introduction/overview/
After=network.target

[Service]
Type=simple
User=consul
EnvironmentFile=-/etc/default/consul_exporter
# 具体使用时,若consul_exporter与consul server不在同一主机时,consul server要指向实际的地址;
ExecStart=/usr/local/consul_exporter/consul_exporter \
            --consul.server="http://localhost:8500" \
            --web.listen-address=":9107" \
            --web.telemetry-path="/metrics" \
            --log.level=info \
            $ARGS
ExecReload=/bin/kill -HUP $MAINPID
TimeoutStopSec=20s
Restart=always

[Install]
WantedBy=multi-user.target
启动服务:
systemctl daemon-reload
systemctl start consul_exporter.service
systemctl enable consul_exporter.service
在Prometheus上做Consul Exporter的服务发现 因为Prometheus是对Consul做的服务发现所以
Consul Exporter用于监控Consul万一consul崩了呢
[root@rocky8 services]#cat consul-exporter.json
{
      "id": "consul_exporter",
      "name": "consul_exporter.magedu.com",
      "address": "prometheus.magedu.com",
      "port": 9107,
      "tags": ["consul_exporter"],
      "checks": [{
        "http":"http://prometheus.magedu.com:9107/metrics",
        "interval": "5s"
      }]
}


[root@rocky8 prometheus]#vim prometheus.yml
  - job_name: "consul_exporter"
    consul_sd_configs:
       - server: '10.0.0.8'
         tags:
           - "consul_exporter"
         refresh_interval: 1m
加入服务注册
curl -XPUT --data @consul-exporter.json http://localhost:8500/v1/agent/service/register

curl -XGET http://localhost:8500/v1/agent/services   查看
部署MySQL Exporter
提示:仅需要为每个MySQL Server实例部署mysql-exporter,它负责将MySQL Server的状态信息转为Prometheus兼容的指标格式并予以暴露。
下载程序包,以0.14.0版本为例:
curl -LO https://github.com/prometheus/mysqld_exporter/releases/download/v0.14.0/mysqld_exporter-0.14.0.linux-amd64.tar.gz展开程序包:
tar xf mysqld_exporter-0.14.0.linux-amd64.tar.gz -C /usr/local/
ln -sv /usr/local/mysqld_exporter-0.14.0.linux-amd64 /usr/local/mysqld_exporter
创建用户,或mysql用户已经存在,可略过该步骤:
useradd -r mysql创建Systemd Unitfile,保存于/usr/lib/systemd/system/mysqld_exporter.service文件中:
[Unit]
Description=consul_exporter
Documentation=https://prometheus.io/docs/introduction/overview/
After=network.target

[Service]
Type=simple
User=mysql
EnvironmentFile=-/etc/default/mysqld_exporter
# 具体使用时,若mysql_exporter与mysql server不在同一主机时,mysql server要指向实际的地址;
# mysql_exporter连接mysql server使用的用户名和密码均为exporter,该用户要获得正确的授权;
Environment='DATA_SOURCE_NAME=exporter:exporter@(localhost:3306)'
ExecStart=/usr/local/mysqld_exporter/mysqld_exporter \
            --web.listen-address=":9104" \
            --web.telemetry-path="/metrics" \
            --collect.info_schema.innodb_tablespaces \
            --collect.info_schema.innodb_metrics \
            --collect.global_status \
            --collect.global_variables \
            --collect.slave_status \
            --collect.engine_innodb_status \
            $ARGS
ExecReload=/bin/kill -HUP $MAINPID
TimeoutStopSec=20s
Restart=always

[Install]
WantedBy=multi-user.target
在mysqld server上添加用户,并授权其能够加载mysql的信息并转换为指标输出。需要注意的是用户账号授权时使用的主机范围。
mysql> CREATE USER 'exporter'@'localhost' IDENTIFIED BY 'exporter';
mysql> GRANT PROCESS, REPLICATION CLIENT ON *.* TO 'exporter'@'localhost';
mysql> GRANT SELECT ON performance_schema.* TO 'exporter'@'localhost';
mysql> FLUSH PRIVILEGES;
启动服务:
systemctl daemon-reload
systemctl start mysqld_exporter.service
systemctl enable mysqld_exporter.service
在Prometheus上做Consul Exporter的服务发现
[root@rocky8 services]#cat mysqld_exporter.json
{
      "id": "mysqld_exporter",
      "name": "mysqld_exporter.magedu.com",
      "address": "prometheus.magedu.com",
      "port": 9107,
      "tags": ["mysqld_exporter"],
      "checks": [{
        "http":"http://prometheus.magedu.com/metrics",
        "interval": "5s"
      }]
}

[root@rocky8 prometheus]#vim prometheus.yml
  - job_name: "mysqld_exporter"
    consul_sd_configs:
       - server: "10.0.0.8"
         tags:
           - "mysqld_exporter"
         refresh_interval: 1m
加入服务注册
curl -XPUT --data @mysqld_exporter.json http://localhost:8500/v1/agent/service/register

curl -XGET http://localhost:8500/v1/agent/services   查看

部署nginx Exporter
基于镜像
version: '3.6'

networks:
  monitoring:
    driver: bridge
    ipam:
      config:
        - subnet: 172.31.107.0/24

services:
  nginx:
    image: nginx:1.22.1
    volumes:
      - ./nginx/stub_status-server.conf:/etc/nginx/conf.d/stub_status-server.conf:ro   #定义·文件夹
    networks:
      - monitoring
    expose:
      - 8080
      - 80
    ports:
      - 80:80

  nginx-exporter:
    image: nginx/nginx-prometheus-exporter:0.11
    command:
      - '-nginx.scrape-uri=http://nginx:8080/stub_status'
    networks:
      - monitoring
    ports:
      - '9113:9113'
    depends_on:
      - nginx
~
[root@rocky8 nginx-and-exporter]#ls
docker-compose.yml nginx
[root@rocky8 nginx-and-exporter]#vim docker-compose.yml
[root@rocky8 nginx-and-exporter]#tree nginx/
nginx/
└── stub_status-server.conf
0 directories, 1 file
[root@rocky8 nginx-and-exporter]#cat nginx/stub_status-server.conf
server {
listen 8080;
server_name localhost;
文件·
location /stub_status {
stub_status;
access_log off;
#allow 172.31.0.0/16;
#deny all;
}
}
启动
[root@rocky8 nginx-and-exporter]#docker-compose up
/usr/local/lib/python3.6/site-packages/paramiko/transport.py:32: CryptographyDeprecationWarning: Python 3.6 is no longer supported by the Python core
在Prometheus上做Consul Exporter的服务发现
[root@rocky8 services]#/usr/local/consul/consul services register nginx-exporter.json
curl -XGET http://localhost:8500/v1/agent/services 查看
[root@rocky8 services]#cat nginx-exporter.json
{
  "service":{
      "id": "nginx_exporter",
      "name": "nginx_exporter.magedu.com",
      "address": "server02.magedu.com",
      "port": 9113,
      "tags": ["nginx_exporter"],
      "checks": [{
        "http": "http://server02.magedu.com:9113/metrics",
        "interval": "5s"
      }]
 }
}

[root@rocky8 services]#cat prometheus.yml
  - job_name: "nginx_exporter"
    consul_sd_configs:
       - server: "10.0.0.8:8500"
         tags:
           - "nginx_exporter"
         refresh_interval: 1m
[root@rocky8 prometheus]#curl -XPOST localhost:9090/-/reload 刷新在Prometheus上面查看

在Prometheus上做tomcat
[root@rocky8 tomcat-and-metrics]#ls
docker-compose.yml  tomcat
[root@rocky8 tomcat-and-metrics]#cat docker-compose.yml    #安装
version: '3.6'

volumes:
    tomcat_webapps: {}

networks:
  monitoring:
    driver: bridge
    ipam:
      config:
        - subnet: 172.31.130.0/24

services:
  tomcat:
    #image: tomcat:jdk11
    build:
      context: tomcat
      dockerfile: Dockerfile
    hostname: tomcat.magedu.com
    expose:
      - 8080
    ports:
      - 8080:8080
    volumes:
      - tomcat_webapps:/usr/local/tomcat/webapps
      - ./tomcat/tomcat-users.xml:/usr/local/tomcat/conf/tomcat-users.xml
    networks:
      - monitoring
    environment:
      TZ: Asia/Shanghai
[root@rocky8 tomcat-and-metrics]#cd tomcat/

[root@rocky8 tomcat]#ls
context.xml  Dockerfile  sources.list  tomcat-users.xml

[root@rocky8 tomcat]#cat tomcat-users.xml     #tomcat账户配置
<?xml version="1.0" encoding="UTF-8"?>
<!--
  Licensed to the Apache Software Foundation (ASF) under one or more
  contributor license agreements.  See the NOTICE file distributed with
  this work for additional information regarding copyright ownership.
  The ASF licenses this file to You under the Apache License, Version 2.0
  (the "License"); you may not use this file except in compliance with
  the License.  You may obtain a copy of the License at

      http://www.apache.org/licenses/LICENSE-2.0

  Unless required by applicable law or agreed to in writing, software
  distributed under the License is distributed on an "AS IS" BASIS,
  WITHOUT WARRANTIES OR CONDITIONS OF ANY KIND, either express or implied.
  See the License for the specific language governing permissions and
  limitations under the License.
-->
<tomcat-users xmlns="http://tomcat.apache.org/xml"
              xmlns:xsi="http://www.w3.org/2001/XMLSchema-instance"
              xsi:schemaLocation="http://tomcat.apache.org/xml tomcat-users.xsd"
              version="1.0">
<!--
  By default, no user is included in the "manager-gui" role required
  to operate the "/manager/html" web application.  If you wish to use this app,
  you must define such a user - the username and password are arbitrary.

  Built-in Tomcat manager roles:
    - manager-gui    - allows access to the HTML GUI and the status pages
    - manager-script - allows access to the HTTP API and the status pages
    - manager-jmx    - allows access to the JMX proxy and the status pages
    - manager-status - allows access to the status pages only

  The users below are wrapped in a comment and are therefore ignored. If you
  wish to configure one or more of these users for use with the manager web
  application, do not forget to remove the <!.. ..> that surrounds them. You
  will also need to set the passwords to something appropriate.
-->
<!--
  <user username="admin" password="<must-be-changed>" roles="manager-gui"/>
  <user username="robot" password="<must-be-changed>" roles="manager-script"/>
-->
<!--
  The sample user and role entries below are intended for use with the
  examples web application. They are wrapped in a comment and thus are ignored
  when reading this file. If you wish to configure these users for use with the
  examples web application, do not forget to remove the <!.. ..> that surrounds
  them. You will also need to set the passwords to something appropriate.
-->
<!--
  <role rolename="tomcat"/>
  <role rolename="role1"/>
  <user username="tomcat" password="<must-be-changed>" roles="tomcat"/>
  <user username="both" password="<must-be-changed>" roles="tomcat,role1"/>
  <user username="role1" password="<must-be-changed>" roles="role1"/>
-->
  <role rolename="manager-gui"/>
  <role rolename="manager-script"/>
  <user username="tomcat" password="magedu.com" roles="manager-gui,manager-script"/>
</tomcat-users>
tomcat允许远程登录
[root@rocky8 tomcat]#cat context.xml   允许远程登录
<?xml version="1.0" encoding="UTF-8"?>
<!--
  Licensed to the Apache Software Foundation (ASF) under one or more
  contributor license agreements.  See the NOTICE file distributed with
  this work for additional information regarding copyright ownership.
  The ASF licenses this file to You under the Apache License, Version 2.0
  (the "License"); you may not use this file except in compliance with
  the License.  You may obtain a copy of the License at

      http://www.apache.org/licenses/LICENSE-2.0

  Unless required by applicable law or agreed to in writing, software
  distributed under the License is distributed on an "AS IS" BASIS,
  WITHOUT WARRANTIES OR CONDITIONS OF ANY KIND, either express or implied.
  See the License for the specific language governing permissions and
  limitations under the License.
-->
<Context antiResourceLocking="false" privileged="true" >
  <CookieProcessor className="org.apache.tomcat.util.http.Rfc6265CookieProcessor"
                   sameSiteCookies="strict" />
<!--
  <Valve className="org.apache.catalina.valves.RemoteAddrValve"
         allow="127\.\d+\.\d+\.\d+|::1|0:0:0:0:0:0:0:1" />
-->
  <Manager sessionAttributeValueClassNameFilter="java\.lang\.(?:Boolean|Integer|Long|Number|String)|org\.apache\.catalina\.filters\.CsrfPreventionFilter\$LruCache(?:\$1)?|java\.util\.(?:Linked)?HashMap"/>
</Context>
tomcat的镜像仓库地址
[root@rocky8 tomcat]#cat sources.list
deb https://repo.huaweicloud.com/debian/ bullseye main non-free contrib
deb-src https://repo.huaweicloud.com/debian/ bullseye main non-free contrib
deb https://repo.huaweicloud.com/debian-security/ bullseye-security main
deb-src https://repo.huaweicloud.com/debian-security/ bullseye-security main
deb https://repo.huaweicloud.com/debian/ bullseye-updates main non-free contrib
deb-src https://repo.huaweicloud.com/debian/ bullseye-updates main non-free contrib
deb https://repo.huaweicloud.com/debian/ bullseye-backports main non-free contrib
deb-src https://repo.huaweicloud.com/debian/ bullseye-backports main non-free contrib
tomcat下载及扩充支持相应的功能
[root@rocky8 tomcat]#cat Dockerfile
FROM tomcat:9.0-jdk17-openjdk-slim

ADD ./sources.list /etc/apt/sources.list

ENV TOMCAT_SIMPLECLIENT_VERSION=0.12.0
ENV TOMCAT_EXPORTER_VERSION=0.0.15

RUN apt-get update && apt-get install -y curl && \
    curl -v --fail --location https://search.maven.org/remotecontent?filepath=io/prometheus/simpleclient/${TOMCAT_SIMPLECLIENT_VERSION}/simpleclient-${TOMCAT_SIMPLECLIENT_VERSION}.jar --output /usr/local/tomcat/lib/simpleclient-${TOMCAT_SIMPLECLIENT_VERSION}.jar && \
    curl -v --fail --location https://search.maven.org/remotecontent?filepath=io/prometheus/simpleclient_common/${TOMCAT_SIMPLECLIENT_VERSION}/simpleclient_common-${TOMCAT_SIMPLECLIENT_VERSION}.jar --output /usr/local/tomcat/lib/simpleclient_common-${TOMCAT_SIMPLECLIENT_VERSION}.jar && \
    curl -v --fail --location https://search.maven.org/remotecontent?filepath=io/prometheus/simpleclient_hotspot/${TOMCAT_SIMPLECLIENT_VERSION}/simpleclient_hotspot-${TOMCAT_SIMPLECLIENT_VERSION}.jar --output /usr/local/tomcat/lib/simpleclient_hotspot-${TOMCAT_SIMPLECLIENT_VERSION}.jar && \
    curl -v --fail --location https://search.maven.org/remotecontent?filepath=io/prometheus/simpleclient_servlet/${TOMCAT_SIMPLECLIENT_VERSION}/simpleclient_servlet-${TOMCAT_SIMPLECLIENT_VERSION}.jar --output /usr/local/tomcat/lib/simpleclient_servlet-${TOMCAT_SIMPLECLIENT_VERSION}.jar && \
    curl -v --fail --location https://search.maven.org/remotecontent?filepath=io/prometheus/simpleclient_servlet_common/${TOMCAT_SIMPLECLIENT_VERSION}/simpleclient_servlet_common-${TOMCAT_SIMPLECLIENT_VERSION}.jar --output /usr/local/tomcat/lib/simpleclient_servlet_common-${TOMCAT_SIMPLECLIENT_VERSION}.jar && \
    curl -v --fail --location https://search.maven.org/remotecontent?filepath=nl/nlighten/tomcat_exporter_client/${TOMCAT_EXPORTER_VERSION}/tomcat_exporter_client-${TOMCAT_EXPORTER_VERSION}.jar --output /usr/local/tomcat/lib/tomcat_exporter_client-${TOMCAT_EXPORTER_VERSION}.jar && \
    curl -v --fail --location https://search.maven.org/remotecontent?filepath=nl/nlighten/tomcat_exporter_servlet/${TOMCAT_EXPORTER_VERSION}/tomcat_exporter_servlet-${TOMCAT_EXPORTER_VERSION}.war --output /usr/local/tomcat/webapps/metrics.war

RUN mv /usr/local/tomcat/webapps.dist/* /usr/local/tomcat/webapps/
ADD ./context.xml /usr/local/tomcat/webapps/manager/META-INF/context.xml
注册到consul上面去及Prometheus上做服务发现
[root@rocky8 services]#/usr/local/consul/consul services register tomcat.json
Node name "rocky8.wang.org" will not be discoverable via DNS due to invalid characters. Valid characters include all alpha-numerics and dashes.
Registered service: tomcat.magedu.com

[root@rocky8 services]#cat tomcat.json
{
  "service":{
      "id": "tomcat",
      "name": "tomcat.magedu.com",
      "address": "server02.magedu.com",
      "port": 8080,
      "tags": ["tomcat"],
      "checks": [{
        "http": "http://server02.magedu.com:8080/metrics",
        "interval": "5s"
      }]
 }
}


[root@rocky8 prometheus]#cat prometheus.yml
  - job_name: "tomcat"
    consul_sd_configs:
       - server: "10.0.0.8:8500"
         tags:
           - "tomcat"
         refresh_interval: 1m

[root@rocky8 prometheus]#curl -XPOST localhost:9090/-/reload   重新加载
署Blackbox Exporter 取决于黑盒监控
提示:仅需要部署的Blackbox Exporter实例数据,取决于黑盒监控的任务量及节点的可用资源。
[root@rocky8 blackbox-exporter]#cat configs/blackbox.yml
modules:
  # https://github.com/prometheus/blackbox_exporter/blob/master/example.yml
  http_2xx:
    prober: http
    timeout: 5s
    http:
      valid_http_versions:
      - "HTTP/1.1"
      - "HTTP/2"
      valid_status_codes: []  # Defaults to 2xx
      enable_http2: false
      method: GET
      no_follow_redirects: false
      # fail_if_ssl为true时,表示如果站点启用了SSL则探针失败,反之成功;
      # fail_if_not_ssl刚好相反;
      fail_if_ssl: false
      fail_if_not_ssl: false
      #  fail_if_body_matches_regexp, fail_if_body_not_matches_regexp, fail_if_header_matches, fail_if_header_not_matches
      #  可以定义一组正则表达式,用于验证HTTP返回内容是否符合或者不符合正则表达式的内容
      fail_if_body_matches_regexp:
        - "Could not connect to database"
      tls_config:
        insecure_skip_verify: false
      preferred_ip_protocol: "ip4" # defaults to "ip6"
  http_with_proxy:
    prober: http
    http:
      proxy_url: "http://127.0.0.1:3128"
      skip_resolve_phase_with_proxy: true
  http_post_2xx:
    prober: http
    timeout: 5s
    http:
      method: POST
      headers:
        Content-Type: application/json
      body: '{}'
  http_basic_auth_example:
    prober: http
    timeout: 5s
    http:
      method: POST
      headers:
        Host: "login.example.com"
      basic_auth:
        username: "username"
        password: "mysecret"
  http_custom_ca_example:
    prober: http
    http:
      method: GET
      tls_config:
        ca_file: "/certs/my_cert.crt"
  http_gzip:
    prober: http
    http:
      method: GET
      compression: gzip
  http_gzip_with_accept_encoding:
    prober: http
    http:
      method: GET
      compression: gzip
      headers:
        Accept-Encoding: gzip
  tls_connect:
    prober: tcp
    timeout: 5s
    tcp:
      tls: true
  dns_udp_example:
    prober: dns
    timeout: 5s
    dns:
      query_name: "www.prometheus.io"
      query_type: "A"
      valid_rcodes:
        - NOERROR
      validate_answer_rrs:
        fail_if_matches_regexp:
          - ".*127.0.0.1"
        fail_if_all_match_regexp:
          - ".*127.0.0.1"
        fail_if_not_matches_regexp:
          - "www.magedu.com.\t300\tIN\tA\t127.0.0.1"
        fail_if_none_matches_regexp:
          - "127.0.0.1"
      validate_authority_rrs:
        fail_if_matches_regexp:
          - ".*127.0.0.1"
      validate_additional_rrs:
        fail_if_matches_regexp:
          - ".*127.0.0.1"
[root@rocky8 blackbox-exporter]#ls
configs  docker-compose.yml
[root@rocky8 blackbox-exporter]#cat docker-compose.yml
version: '3.6'

networks:
  monitoring:
    driver: bridge
    ipam:
      config:
        - subnet: 172.31.136.0/24

services:
  blackbox_exporter:
    image: prom/blackbox-exporter:v0.24.0
    volumes:
      - ./configs/:/etc/blackboxexporter/
    command:
      - '--config.file=/etc/blackboxexporter/blackbox.yml'
    networks:
      - monitoring
    ports:
      - 9115:9115
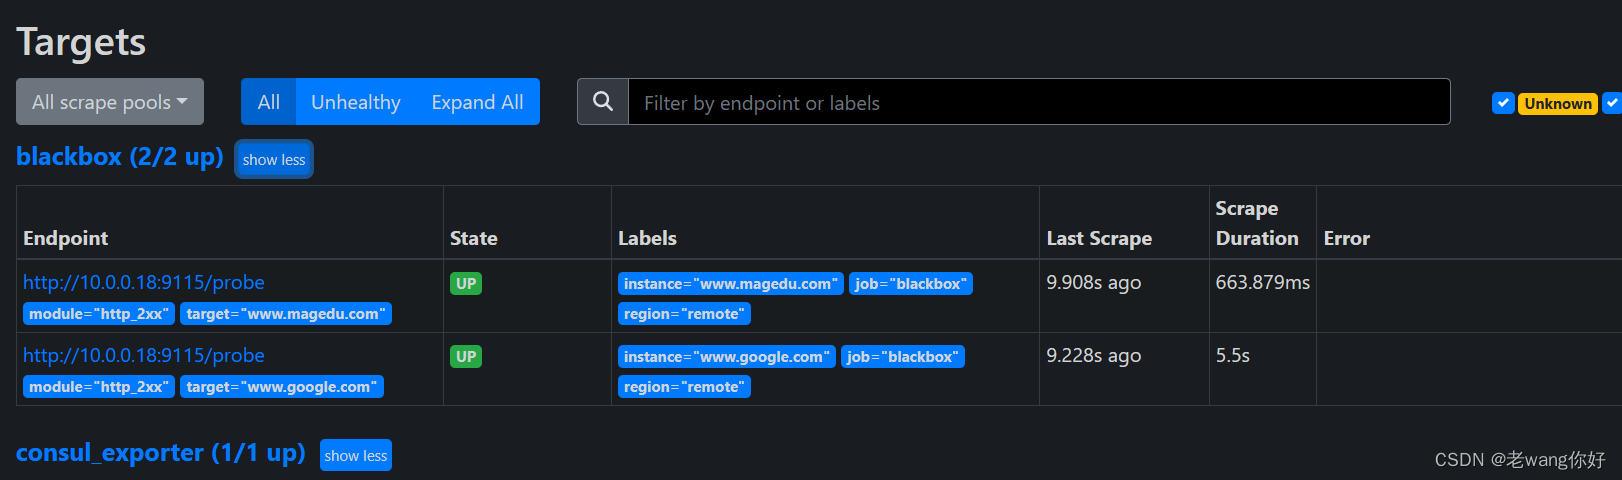
在Prometheus里面做黑河发现
[root@rocky8 prometheus]#cat prometheus.yml

  # Blackbox Exporter
  - job_name: 'blackbox'
    metrics_path: /probe
    params:
      module: [http_2xx]  # Look for a HTTP 200 response.
    static_configs:
    - targets:
      - www.magedu.com
      - www.google.com
    relabel_configs:
      - source_labels: [__address__]
        target_label: __param_target
      - source_labels: [__param_target]
        target_label: instance
      - target_label: __address__
        replacement: "10.0.0.18:9115"  # Blackbox exporter.
      - target_label: region
        replacement: "remote"


[root@rocky8 prometheus]#curl -XPOST localhost:9090/-/reload  #加载