系列文章
【如何训练一个中英翻译模型】LSTM机器翻译seq2seq字符编码(一)
【如何训练一个中英翻译模型】LSTM机器翻译模型训练与保存(二)
【如何训练一个中英翻译模型】LSTM机器翻译模型部署(三)
【如何训练一个中英翻译模型】LSTM机器翻译模型部署之onnx(python)(四)
目录
- 系列文章
- 1、加载训练集
- 2、训练集数据处理
- 3、网络搭建
- 4、启动训练
- 5、模型保存
- 6、模型加载与推理
基于LSTM训练一个翻译器,要怎么做呢?其实很简单,也没那么复杂。
主要包括以下几个步骤:
1、加载训练集
2、训练集数据处理(字符编码),可参见:
【如何训练一个中译英翻译器】LSTM机器翻译seq2seq字符编码(一)
3、网络搭建
4、启动训练
5、模型保存
6、模型加载与推理
下面来看下整个过程:
1、加载训练集
from keras.models import Model
from keras.layers import Input, LSTM, Dense
import numpy as np

batch_size = 64  # Batch size for training.
epochs = 1000  # Number of epochs to train for.
latent_dim = 256  # Latent dimensionality of the encoding space.
num_samples = 12000  # Number of samples to train on.
data_path = 'cmn.txt'
2、训练集数据处理
数据集预处理
# Vectorize the data.
input_texts = [] # 保存英文数据集
target_texts = [] # 保存中文数据集
input_characters = set() # 保存英文字符,比如a,b,c
target_characters = set() # 保存中文字符,比如,你,我,她
with open(data_path, 'r', encoding='utf-8') as f:
    lines = f.read().split('\n')# 一行一行读取数据
for line in lines[: min(num_samples, len(lines) - 1)]: # 遍历每一行数据集(用min来防止越出)
    input_text, target_text = line.split('\t') # 分割中英文
    # We use "tab" as the "start sequence" character
    # for the targets, and "\n" as "end sequence" character.
    target_text = '\t' + target_text + '\n'
    input_texts.append(input_text)
    target_texts.append(target_text)
    for char in input_text: # 提取字符
        if char not in input_characters:
            input_characters.add(char)
    for char in target_text:
        if char not in target_characters:
            target_characters.add(char)

input_characters = sorted(list(input_characters)) # 排序一下
target_characters = sorted(list(target_characters))
num_encoder_tokens = len(input_characters) # 英文字符数量
num_decoder_tokens = len(target_characters) # 中文文字数量
max_encoder_seq_length = max([len(txt) for txt in input_texts]) # 输入的最长句子长度
max_decoder_seq_length = max([len(txt) for txt in target_texts])# 输出的最长句子长度

print('Number of samples:', len(input_texts))
print('Number of unique input tokens:', num_encoder_tokens)
print('Number of unique output tokens:', num_decoder_tokens)
print('Max sequence length for inputs:', max_encoder_seq_length)
print('Max sequence length for outputs:', max_decoder_seq_length)
数据集编码
# mapping token to index, easily to vectors
# 处理方便进行编码为向量
# {
#   'a': 0,
#   'b': 1,
#   'c': 2,
#   ...
#   'z': 25
# }
input_token_index = dict([(char, i) for i, char in enumerate(input_characters)])
target_token_index = dict([(char, i) for i, char in enumerate(target_characters)])

# np.zeros(shape, dtype, order)
# shape is an tuple, in here 3D
encoder_input_data = np.zeros( # (12000, 32, 73) (数据集长度、句子长度、字符数量)
    (len(input_texts), max_encoder_seq_length, num_encoder_tokens),
    dtype='float32')
decoder_input_data = np.zeros( # (12000, 22, 2751)
    (len(input_texts), max_decoder_seq_length, num_decoder_tokens),
    dtype='float32')
decoder_target_data = np.zeros( # (12000, 22, 2751)
    (len(input_texts), max_decoder_seq_length, num_decoder_tokens),
    dtype='float32')

# 遍历输入文本(input_texts)和目标文本(target_texts)中的每个字符,
# 并将它们转换为数值张量以供深度学习模型使用。
#编码如下
#我,你,他,这,国,是,家,人,中
#1  0  0   0  1   1  0   1  1,我是中国人
#1  0   1  0  0   1  1   1  0,他是我家人
# input_texts contain all english sentences
# output_texts contain all chinese sentences
# zip('ABC','xyz') ==> Ax By Cz, looks like that
# the aim is: vectorilize text, 3D
# zip(input_texts, target_texts)成对取出输入输出,比如input_text = 你好,target_text = you good

for i, (input_text, target_text) in enumerate(zip(input_texts, target_texts)):
    for t, char in enumerate(input_text):
        # 3D vector only z-index has char its value equals 1.0
        encoder_input_data[i, t, input_token_index[char]] = 1.
    for t, char in enumerate(target_text):
        # decoder_target_data is ahead of decoder_input_data by one timestep
        decoder_input_data[i, t, target_token_index[char]] = 1.
        if t > 0:
            # decoder_target_data will be ahead by one timestep
            # and will not include the start character.
            # igone t=0 and start t=1, means
            decoder_target_data[i, t - 1, target_token_index[char]] = 1.
3、网络搭建
编码器搭建
# Define an input sequence and process it.
# input prodocts keras tensor, to fit keras model!
# 1x73 vector
# encoder_inputs is a 1x73 tensor!
encoder_inputs = Input(shape=(None, num_encoder_tokens))

# units=256, return the last state in addition to the output
encoder_lstm = LSTM((latent_dim), return_state=True)

# LSTM(tensor) return output, state-history, state-current
encoder_outputs, state_h, state_c = encoder_lstm(encoder_inputs)

# We discard `encoder_outputs` and only keep the states.
encoder_states = [state_h, state_c]
解码器搭建
# Set up the decoder, using `encoder_states` as initial state.
decoder_inputs = Input(shape=(None, num_decoder_tokens))

# We set up our decoder to return full output sequences,
# and to return internal states as well. We don't use the
# return states in the training model, but we will use them in inference.
decoder_lstm = LSTM((latent_dim), return_sequences=True, return_state=True)

# obtain output
decoder_outputs, _, _ = decoder_lstm(decoder_inputs,initial_state=encoder_states)
整体网络模型
# dense 2580x1 units full connented layer
decoder_dense = Dense(num_decoder_tokens, activation='softmax')

# why let decoder_outputs go through dense ?
decoder_outputs = decoder_dense(decoder_outputs)

# Define the model that will turn, groups layers into an object
# with training and inference features
# `encoder_input_data` & `decoder_input_data` into `decoder_target_data`
# model(input, output)
model = Model([encoder_inputs, decoder_inputs], decoder_outputs)

# Run training
# compile -> configure model for training
model.compile(optimizer='rmsprop', loss='categorical_crossentropy')
# model optimizsm
4、启动训练
model.fit([encoder_input_data, decoder_input_data],
          decoder_target_data,
          batch_size=batch_size,
          epochs=epochs,
          validation_split=0.2)
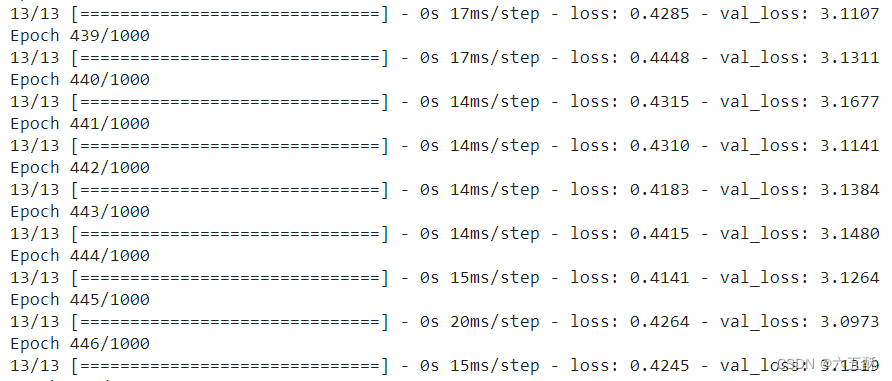
可在控制台看到训练的相关信息:
5、模型保存
首先,保存权重文件
这里将解码器与编码器分别保存下来
encoder_model = Model(encoder_inputs, encoder_states)
# tensor 73x1
decoder_state_input_h = Input(shape=(latent_dim,))
# tensor 73x1
decoder_state_input_c = Input(shape=(latent_dim,))
# tensor 146x1
decoder_states_inputs = [decoder_state_input_h, decoder_state_input_c]
# lstm
decoder_outputs, state_h, state_c = decoder_lstm(decoder_inputs, initial_state=decoder_states_inputs)
#
decoder_states = [state_h, state_c]
#
decoder_outputs = decoder_dense(decoder_outputs)
#
decoder_model = Model(
    [decoder_inputs] + decoder_states_inputs,
    [decoder_outputs] + decoder_states)
encoder_model.save('encoder_model.h5')
decoder_model.save('decoder_model.h5')
其次,保存编码文件
# 将 input_characters保存为 input_words.txt 文件
with open('input_words.txt', 'w', newline='') as f:
    for char in input_characters:
        if char == '\t':
            f.write('\\t\n')
        elif char == '\n':
            f.write('\\n\n')
        else:
            f.write(char + '\n')


# 将 target_characters保存为 target_words.txt 文件
with open('target_words.txt', 'w', newline='') as f:
    for char in target_characters:
        if char == '\t':
            f.write('\\t\n')
        elif char == '\n':
            f.write('\\n\n')
        else:
            f.write(char + '\n')
最后,保存一下配置文件:
import json

# 将数据保存到JSON文件
data = {
    "max_encoder_seq_length": max_encoder_seq_length,
    "max_decoder_seq_length": max_decoder_seq_length
}

with open('config.json', 'w') as file:
    json.dump(data, file)
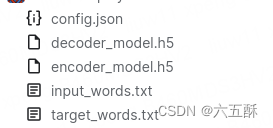
所以保存下来我们可以看到一共有以下几个文件,这几个文件要保存好,我们后面的文章讲到部署的时候要用到:
6、模型加载与推理
加载模型权重
from keras.models import load_model
encoder_model = load_model('encoder_model.h5')
decoder_model = load_model('decoder_model.h5')
推理模型搭建
# something readable.
reverse_input_char_index = dict(
    (i, char) for char, i in input_token_index.items())
reverse_target_char_index = dict(
    (i, char) for char, i in target_token_index.items())

def decode_sequence(input_seq):
    # Encode the input as state vectors.
    states_value = encoder_model.predict(input_seq)

    # Generate empty target sequence of length 1.
    target_seq = np.zeros((1, 1, num_decoder_tokens))
    # Populate the first character of target sequence with the start character.
    target_seq[0, 0, target_token_index['\t']] = 1.
    # this target_seq you can treat as initial state

    # Sampling loop for a batch of sequences
    # (to simplify, here we assume a batch of size 1).
    stop_condition = False
    decoded_sentence = ''
    while not stop_condition:
        output_tokens, h, c = decoder_model.predict([target_seq] + states_value)

        # Sample a token
        # argmax: Returns the indices of the maximum values along an axis
        # just like find the most possible char
        sampled_token_index = np.argmax(output_tokens[0, -1, :])
        # find char using index
        sampled_char = reverse_target_char_index[sampled_token_index]
        # and append sentence
        decoded_sentence += sampled_char

        # Exit condition: either hit max length
        # or find stop character.
        if (sampled_char == '\n' or len(decoded_sentence) > max_decoder_seq_length):
            stop_condition = True

        # Update the target sequence (of length 1).
        # append then ?
        # creating another new target_seq
        # and this time assume sampled_token_index to 1.0
        target_seq = np.zeros((1, 1, num_decoder_tokens))
        target_seq[0, 0, sampled_token_index] = 1.

        # Update states
        # update states, frome the front parts
        states_value = [h, c]

    return decoded_sentence
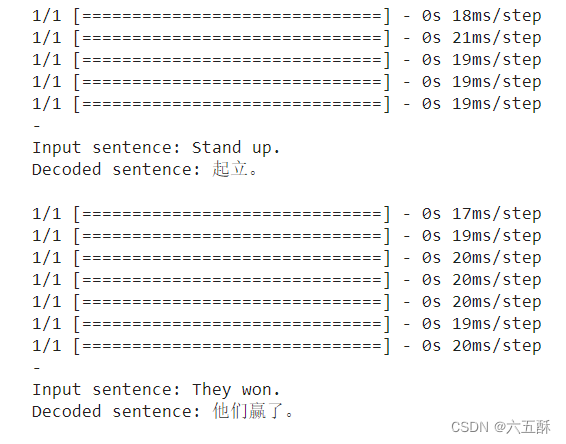
进行模型推理
for seq_index in range(100,200):
    # Take one sequence (part of the training set)
    # for trying out decoding.
    input_seq = encoder_input_data[seq_index: seq_index + 1]
    decoded_sentence = decode_sequence(input_seq)
    print('-')
    print('Input sentence:', input_texts[seq_index])
    print('Decoded sentence:', decoded_sentence)
可以看到输出:
以上的代码可在kaggle上运行:how-to-train-a-chinese-to-english-translator-ii
