SringMVC
- 1 SpringMVC简介
- 2 SpringMVC入门案例
- 2.1 入门案例
- 2.2 入门案例工作流程
- 2.3 bean加载控制
- 2.4 PostMan工具
- 3 请求与响应
- 3.1 请求映射路径
- 3.2 Get和Post请求发送普通参数
- 3.3 请求头的五种类型参数传递
- 3.4 请求体的JSON数据传输参数
- 3.5 日期型参数
- 3.6 响应
- 4 REST风格
- 4.1 REST简介
- 4.2 RESTful入门案例
- 4.3 RESTful优化(简化开发)
- 4.4 案例:基于RESTful页面数据交互
1 SpringMVC简介
SpringMVC是隶属于Spring框架的一部分,主要是用来进行Web开发,是对Servlet进行了封装。
- SpringMVC技术与Servlet技术功能等同,均属于web层开发技术
- SpringMVC是一种基于Java实现MVC模型的轻量级Web框架
- 优点:使用简单,开发便捷(相比于Servlet);灵活性强
2 SpringMVC入门案例
2.1 入门案例
实现:
- 使用SpringMVC技术需要先导入SpringMVC坐标与Servlet坐标
<?xml version="1.0" encoding="UTF-8"?>
<project xmlns="http://maven.apache.org/POM/4.0.0" xmlns:xsi="http://www.w3.org/2001/XMLSchema-instance"
         xsi:schemaLocation="http://maven.apache.org/POM/4.0.0 http://maven.apache.org/xsd/maven-4.0.0.xsd">
    <modelVersion>4.0.0</modelVersion>
    <groupId>com.zs</groupId>
    <artifactId>springmvc_01_quickstart</artifactId>
    <version>1.0-SNAPSHOT</version>
    <packaging>war</packaging>

    <dependencies>
        <dependency>
            <groupId>javax.servlet</groupId>
            <artifactId>javax.servlet-api</artifactId>
            <version>3.1.0</version>
            <scope>provided</scope>
        </dependency>
        <dependency>
            <groupId>org.springframework</groupId>
            <artifactId>spring-webmvc</artifactId>
            <version>5.2.10.RELEASE</version>
        </dependency>
    </dependencies>

    <build>
        <plugins>
            <plugin>
                <groupId>org.apache.tomcat.maven</groupId>
                <artifactId>tomcat7-maven-plugin</artifactId>
                <version>2.1</version>
                <configuration>
                    <port>8080</port>
                    <path>/</path>
                </configuration>
            </plugin>
        </plugins>
    </build>
</project>
- 创建SpringMVC控制器类(等同于Servlet功能)
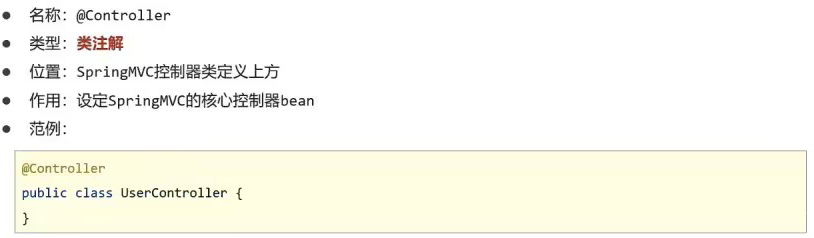
//设置springmvc的核心控制器bean,使用@Controller定义bean
@Controller
public class UserController {
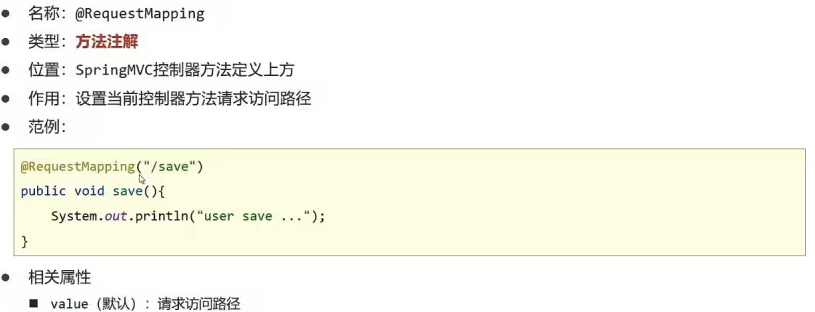
//设置当前控制器方法请求访问路径
@RequestMapping("/save")
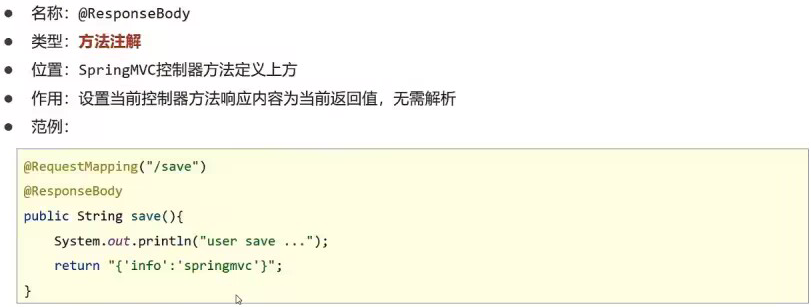
//@ResponseBody设置当前控制器方法响应内容为当前返回值,无需解析
@ResponseBody
public String save(){
System.out.println("user save ...");
//如果不加@ResponseBody,系统会根据返回值字符串寻找路径,例如return "index.jsp";会跳转到jsp页面
//返回真正json只需要返回对象,在pom引入jackson,springmvcconfig配置类注解@@EnableWebMvc,下面注释的语句就是返回JSON数据
//return new User("zhangsan",23);
return "{'info':'springmvc'}";
}
}
- 初始化SpringMVC环境(同Spring环境),设定SpringMVC加载对应的bean
//3.创建SpringMVC的配置文件,加载controller对应的bean
@Configuration
@ComponentScan("com.zs.controller")
public class SpringMvcConfig {
}
- 初始化Servlet容器,加载SpringMVC环境,并设置SpringMVC技术处理的请求
public class ServletContainersInitConfig extends AbstractDispatcherServletInitializer {
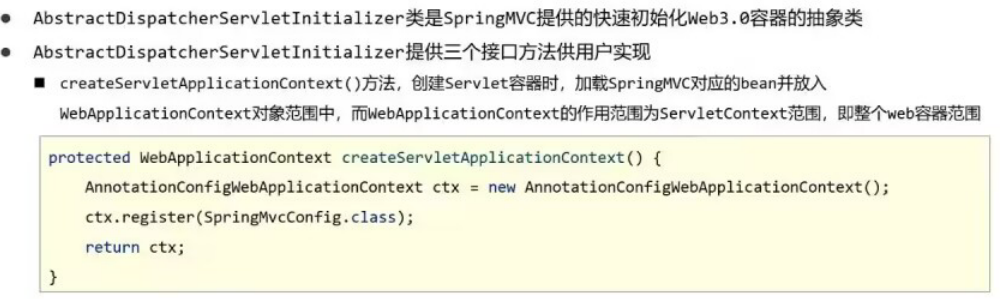
//创建Servlet容器时,加载springmvc的配置。将springmvc对应的bean并放入WebApplicationContext对象范围中。
//最终返回web容器WebApplicationContext ,web容器就是springmvc最终体现的容器。ApplicationContext应用上下文,容器
protected WebApplicationContext createServletApplicationContext() {
//创建注解配置的web容器。使用AnnotationConfigWebApplicationContext,比前面Spring创建注解容器的类AnnotationConfigApplicationContext中间多了Web
AnnotationConfigWebApplicationContext ctx = new AnnotationConfigWebApplicationContext();
//加载springmvc的配置类字节码到web容器中,从而可以让web容器管理加载配置类管理的bean
//因为AnnotationConfigWebApplicationContext类没有带参构造方法,所以要手动为容器加载指定配置类字节码文件
ctx.register(SpringMvcConfig.class);
return ctx;
}
//设置由springmvc拦截并处理的请求路径,即springmvc拦截哪些请求。
//返回值String数组只有一个"/",代表所有路径都由springmvc处理
protected String[] getServletMappings() {
return new String[]{"/"};
}
//加载spring配置类,方法和加载springmvc方法相同,只是加载的配置类改成spring的配置文件
//如果创建Servlet容器时需要加载非表现层的bean,使用当前方法进行,使用方式和createServletApplicationContext相同。
protected WebApplicationContext createRootApplicationContext() {
AnnotationConfigWebApplicationContext ctx = new AnnotationConfigWebApplicationContext();
ctx.register(SpringConfig.class);
return ctx;
}
}
运行:

- @Controller
- @RequestMapping
- @ResponseBody
- AbstractDispatcherServletInitializer


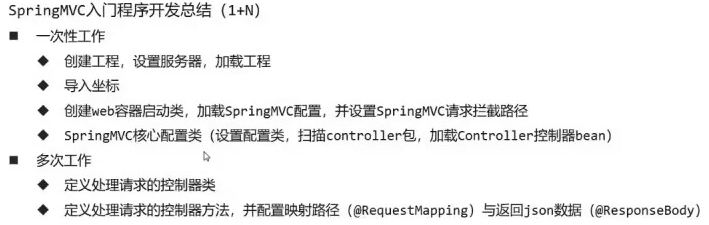
- 案例总结:
2.2 入门案例工作流程
- 启动服务器初始化过程(容器初始化工作流程):
- 服务器启动,执行ServletContainersInitConfig类,初始化web容器。功能类似于以前的web.xml
- 执行createServletApplicationContext方法,创建了WebApplicationContext对象
- 加载SpringMvcConfig配置类
- 执行@ComponentScan加载对应的bean
- 加载UserController,每个@RequestMapping的名称对应一个具体的方法
- 执行getServletMappings方法,设定SpringMVC拦截请求的路径规则
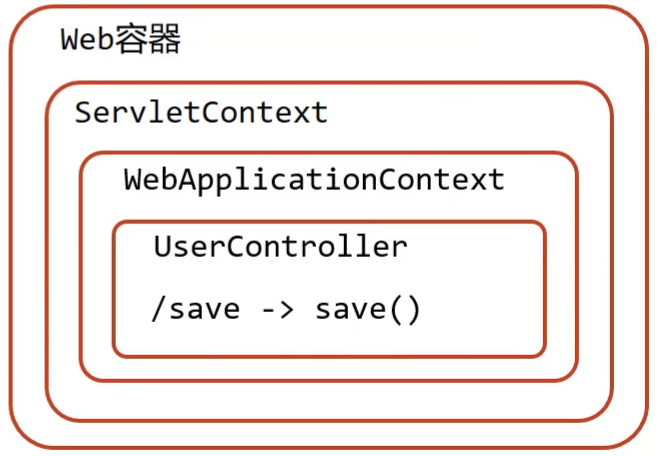
- 单次请求过程:
- 发送请求http://localhost/save
- web容器发现该请求满足SpringMVC拦截规则,将请求交给SpringMVC处理
- 解析请求路径/save
- 由/save匹配执行对应的方法save()
- 执行save()
- 检测到有@ResponseBody直接将save()方法的返回值作为响应体返回给请求方
2.3 bean加载控制
- SpringMVC相关的bean(表现层bean,controller)
- Spring控制的bean:业务bean(Service);功能bean(DataSource等)
- 问题:因为功能不同,如何避免Spring错误加载到SpringMVC的bean?
- 解决:加载Spring控制的bean的时候排除掉SpringMVC控制的bean
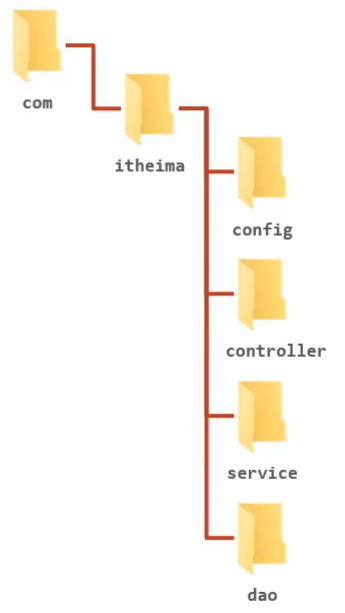
- SpringMVC相关bean加载控制:
SpringMVC加载的bean对应的包均在com.itheima.controller包内 - Spring相关bean加兹安控制:
方法一:Spring加载的bean设定扫描范围为com.itheima,排除掉controller包中的bean
方法二:Spring加载的bean设定扫描范围为精准范围,例如service包、dao包等
方式三:不区分Spring与SpringMVC的环境,加载到同一个环境中(了解)
方式一:
@Configuration
@ComponentScan({"com.itheima.service","comitheima.dao"})
public class SpringConfig {
}
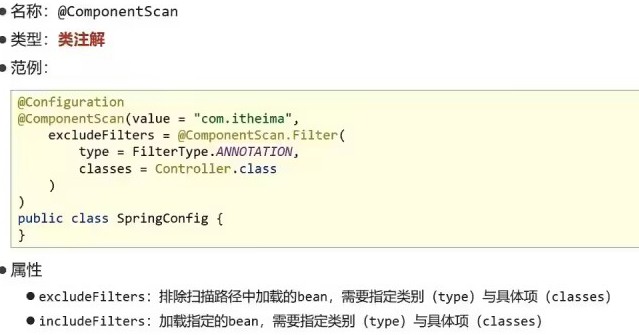
方式二:
@Configuration
@ComponentScan(value="com.itheima",
    excludeFilters=@ComponentScan.Filter(
        type = FilterType.ANNOTATION,
        classes = Controller.class
    )
)
public class SpringConfig {
}
excludeFilters属性:设置扫描加载bean时,排除的过滤规则
type属性:设置排除规则,当前使用按照bean定义时的注解类型进行排除
ANNOTATION:按照注解排除
ASSIGNABLE_TYPE:按照指定的类型过滤
ASPECTJ:按照Aspectj表达式排除,基本上不会用
REGEX:按照正则表达式排除
CUSTOM:按照自定义规则排除
大家只需要知道第一种ANNOTATION即可
classes属性:设置排除的具体注解类,当前设置排除@Controller定义的bean
总结:
- bean的加载格式:
public class ServletContainersInitConfig extends AbstractDispatcherServletInitializer {
    protected WebApplicationContext createServletApplicationContext() {
        AnnotationConfigWebApplicationContext ctx = new AnnotationConfigWebApplicationContext();
        ctx.register(SpringMvcConfig.class);
        return ctx;
    }
    protected String[] getServletMappings() {
        return new String[]{"/"};
    }
    protected WebApplicationContext createRootApplicationContext() {
      AnnotationConfigWebApplicationContext ctx = new AnnotationConfigWebApplicationContext();
        ctx.register(SpringConfig.class);
        return ctx;
    }
}
- 简化开发
public class ServletContainersInitConfig extends AbstractAnnotationConfigDispatcherServletInitializer {

    protected Class<?>[] getRootConfigClasses() {
        return new Class[]{SpringConfig.class};
    }

    protected Class<?>[] getServletConfigClasses() {
        return new Class[]{SpringMvcConfig.class};
    }

    protected String[] getServletMappings() {
        return new String[]{"/"};
    }
}
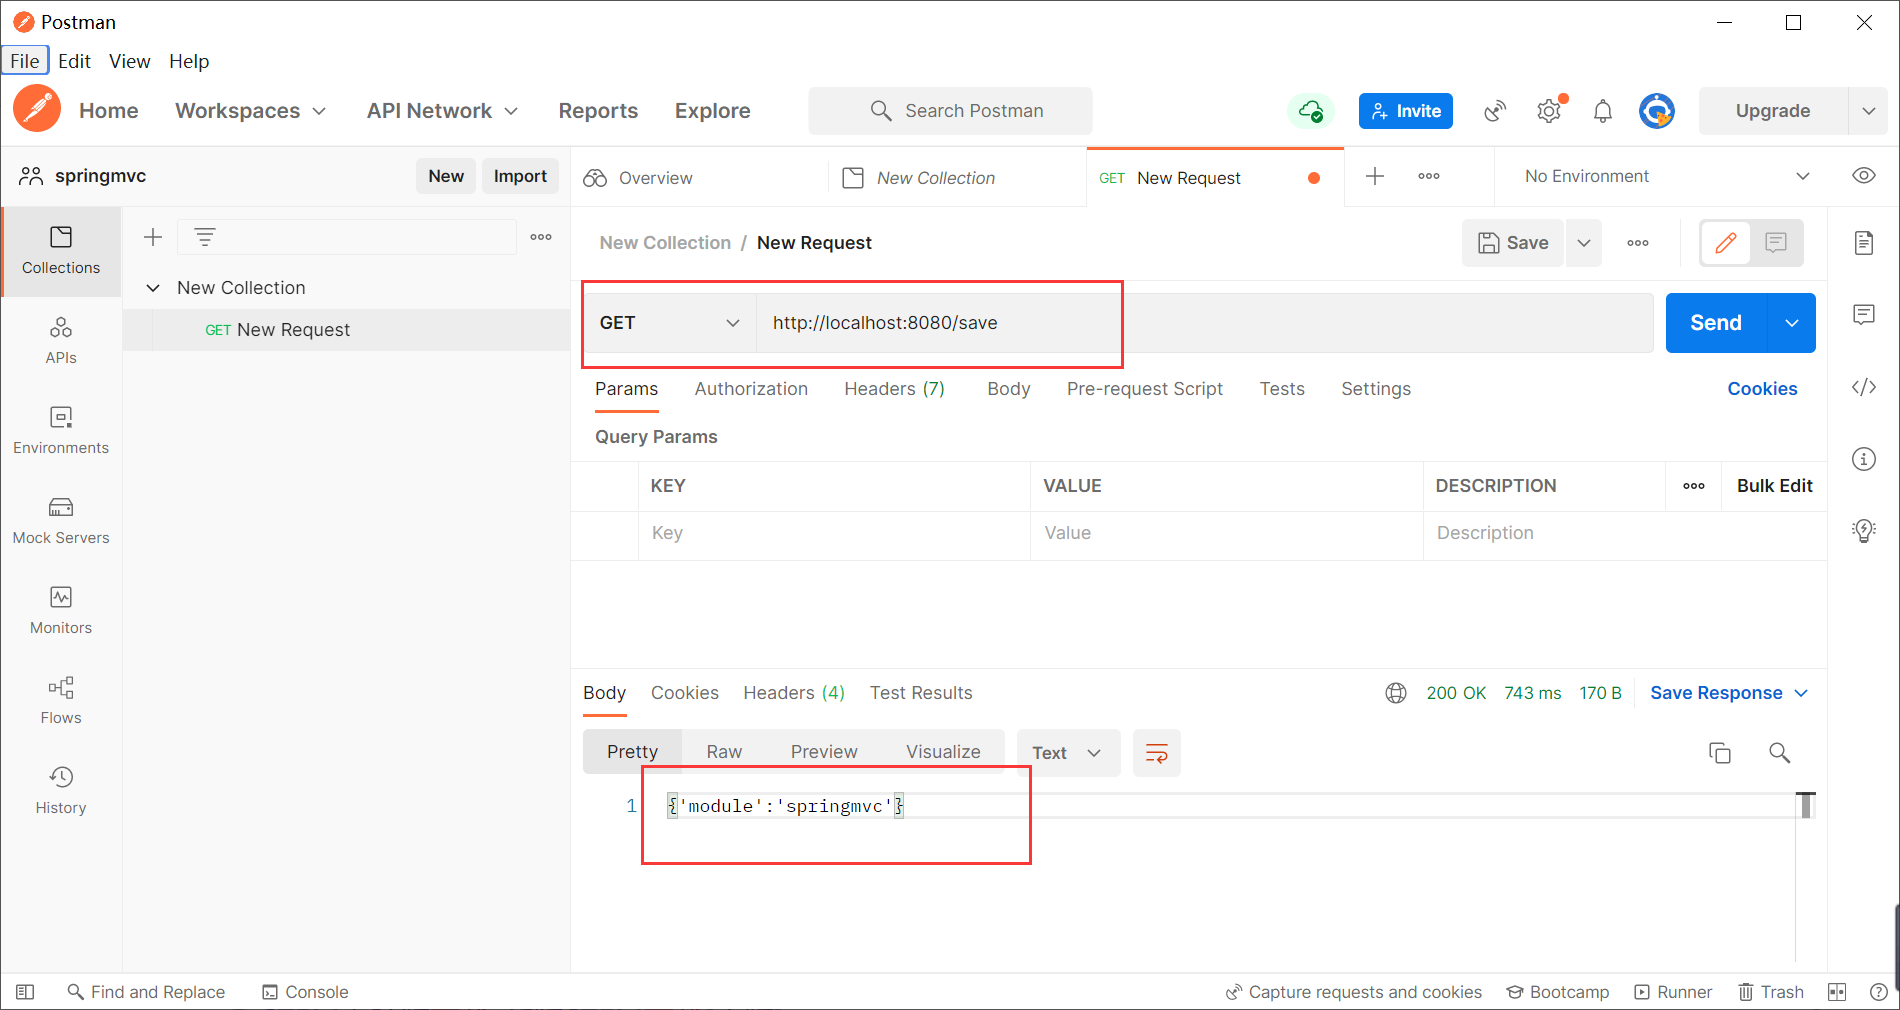
2.4 PostMan工具
如果要求发送的是post请求,我们就得准备页面在页面上准备form表单,测试起来比较麻烦。所以我们就需要借助一些第三方工具,如PostMan
- PostMan是一款功能强大的网页调试与发送网页HTTP请求的Chrome插件
- 作用:常用于进行接口测试
- 特征:简单、实用、美观、大方
基本使用:
-
注册登录
-
创建工作空间/进入工作空间

-
发起请求测试结果
3 请求与响应
3.1 请求映射路径
思考:团队多人开发,每个人设置不同的请求路径,冲突问题如何解决?
解决:设置模块名作为请求路径前缀
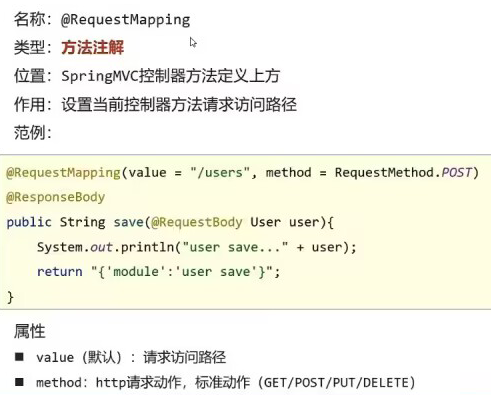
@RequestMapping

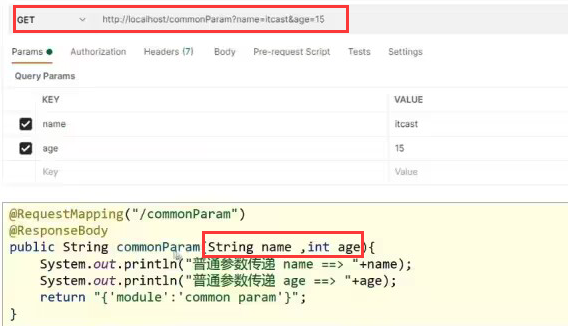
3.2 Get和Post请求发送普通参数
- Get请求传参
普通参数:url地址传参,地址参数与形参变量名相同,定义形参即可接受参数
- Post请求参数
普通参数:form表单post请求传参,表单参数名与形参变量名相同,定义形参即可接收参数

- Get请求中文乱码问题解决
如果Tomcat8.5之前版本,我们传递的参数中有中文,接收到的参数会出现中文乱码问题。
解决乱码:
Tomcat8.5以后的版本已经处理了中文乱码的问题,但是IDEA中的Tomcat插件目前只到Tomcat7,所以需要修改pom.xml来解决GET请求中文乱码问题
<build>
    <plugins>
      <plugin>
        <groupId>org.apache.tomcat.maven</groupId>
        <artifactId>tomcat7-maven-plugin</artifactId>
        <version>2.1</version>
        <configuration>
          <port>80</port><!--tomcat端口号-->
          <path>/</path> <!--虚拟目录-->
          <uriEncoding>UTF-8</uriEncoding><!--访问路径编解码字符集-->
        </configuration>
      </plugin>
    </plugins>
  </build>
- Post请求中文乱码问题
所有Tomcat版本都中文乱码
解决:配置过滤器,在Servlet容器配置类里,alt+insert重写getServletFilters过滤器方法
public class ServletContainersInitConfig extends AbstractAnnotationConfigDispatcherServletInitializer {
    protected Class<?>[] getRootConfigClasses() {
        return new Class[0];
    }

    protected Class<?>[] getServletConfigClasses() {
        return new Class[]{SpringMvcConfig.class};
    }

    protected String[] getServletMappings() {
        return new String[]{"/"};
    }

    //重写getServletFilters过滤器方法,返回数组传入CharacterEncodingFilter过滤器对象,乱码处理
    @Override
    protected Filter[] getServletFilters() {
        //创建字符编码过滤器CharacterEncodingFilter对象
        CharacterEncodingFilter filter = new CharacterEncodingFilter();
        //设置编码
        filter.setEncoding("UTF-8");
        //返回过滤器数组,元素为CharacterEncodingFilter对象
        return new Filter[]{filter};
    }
}
说明:CharacterEncodingFilter是在spring-webmvc包中,会自动导入对应的依赖jar包
3.3 请求头的五种类型参数传递
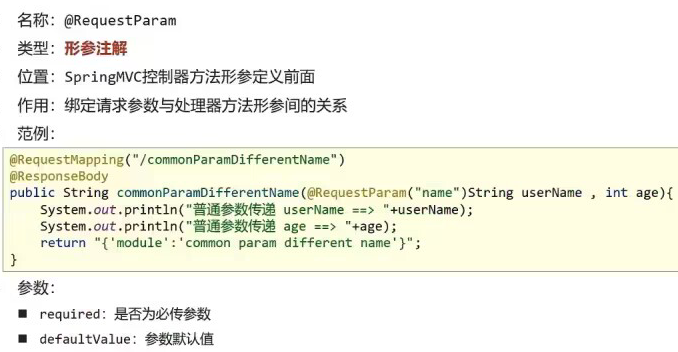
- 普通参数
问题:如果形参与地址参数名不一致该如何解决?
解决方案:使用@RequestParam注解,用法跟dao层传参@Param类似
示例:
发送请求与参数:
http://localhost/commonParamDifferentName?name=张三&age=18
接收参数::
	@RequestMapping("/commonParamDifferentName")
    @ResponseBody
    public String commonParamDifferentName(@RequestParam("name") String userName , int age){
        System.out.println("普通参数传递 userName ==> "+userName);
        System.out.println("普通参数传递 age ==> "+age);
        return "{'module':'common param different name'}";
    }
- POJO数据类型
请求参数名与形参对象的属性名相同,定义POJO类型形参即可接收参数
示例:
POJO类,User
public class User {
    private String name;
    private int age;
    //setter...getter...略
}
发送请求和参数:
http://localhost/commonParamDifferentName?name=张三&age=18
接收参数:
//POJO参数:请求参数与形参对象中的属性对应即可完成参数传递
@RequestMapping("/pojoParam")
@ResponseBody
public String pojoParam(User user){
    System.out.println("pojo参数传递 user ==> "+user);
    return "{'module':'pojo param'}";
}
说明:请求参数key的名称要和POJO中属性的名称一致,否则无法封装
- 嵌套POJO类型参数
请求参数名与形参对象属性名相同,注意内嵌的pojo类在发送请求时参数要设成内嵌类对象.属性名,形参依然是传外层类的对象,按照对象层次结构关系即可接收嵌套POJO属性参数
示例:
发送请求和参数:
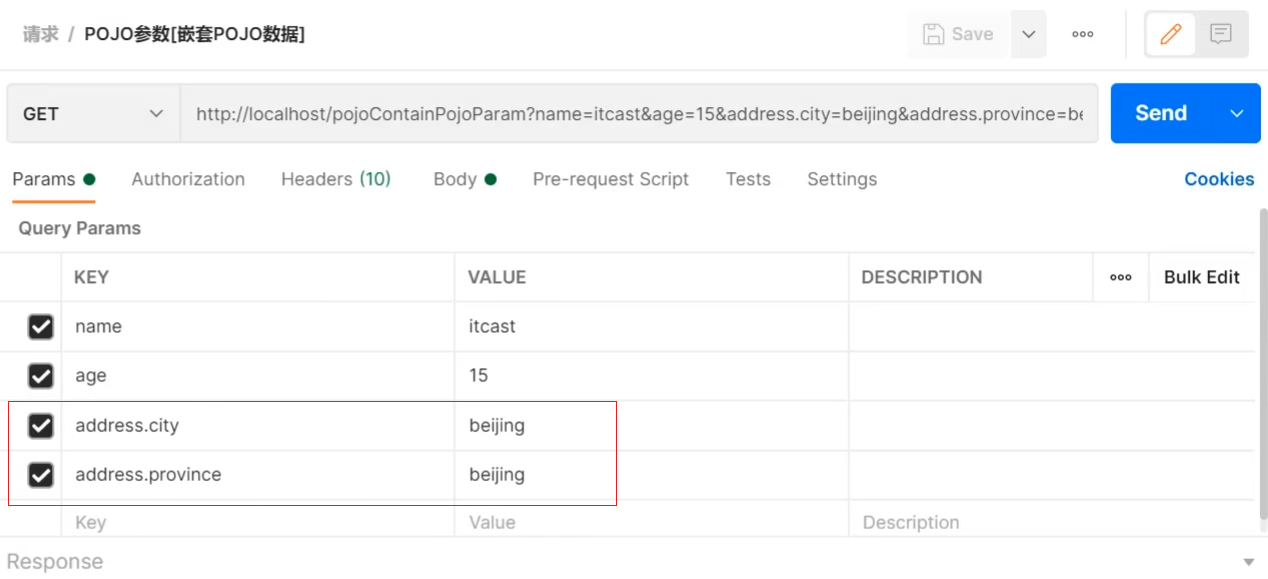 接收参数:
接收参数:
//POJO参数嵌套:请求参数与形参对象中的属性对应即可完成参数传递
@RequestMapping("/pojoParam")
@ResponseBody
public String pojoParam(User user){
    System.out.println("pojo参数传递 user ==> "+user);
    return "{'module':'pojo param'}";
}
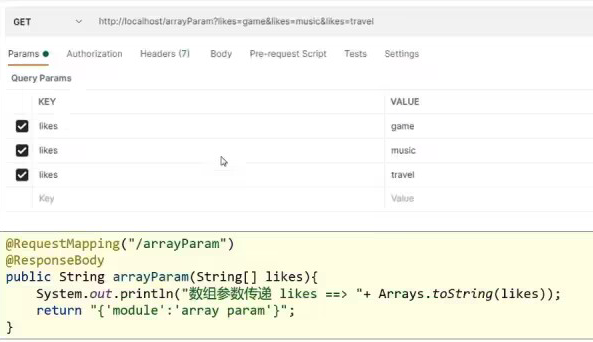
- 数组参数
请求参数名与形参数组名相同,且请求参数为多个,定义数组类型即可接收参数
示例:
- 集合类型参数
请求参数名与形参集合对象名相同,且请求参数为多个,@RequestParam绑定参数关系

3.4 请求体的JSON数据传输参数
- 添加json数据转换相关坐标
        <dependency>
            <groupId>com.fasterxml.jackson.core</groupId>
            <artifactId>jackson-databind</artifactId>
            <version>2.9.0</version>
        </dependency>
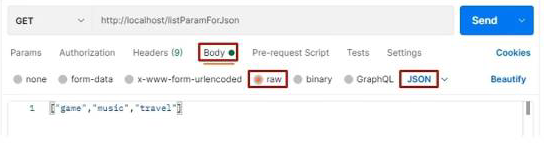
- 设置发送json数据(请求body中添加json数据)
- 开启自动转换json数据的支持@EnableWebMvc
@Configuration
@ComponentScan("com.itheima.controller")
//开启json数据类型自动转换
@EnableWebMvc
public class SpringMvcConfig {
}
说明:@EnableWebMvc,这个注解功能很强大,这里用到的是将JSON数据自动类型转换成对象的功能
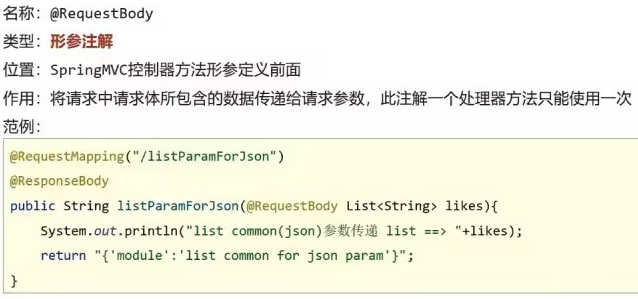
4.设置接收json数据@RequestBody
- JSON普通数组:

@RequestMapping("/listParamForJson")
@ResponseBody
//使用@RequestBody注解将前端请求体传递的json数组数据,传递并转换到形参的集合对象中作为数据
public String listParamForJson(@RequestBody List<String> likes){
    System.out.println("list common(json)参数传递 list ==> "+likes);
    return "{'module':'list common for json param'}";
}
- JSON对象(POJO)
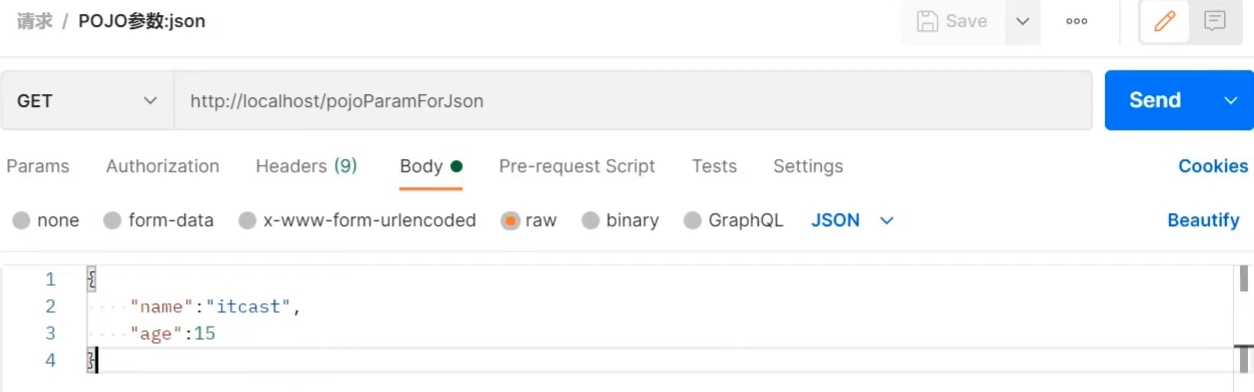
@RequestMapping("/pojoParamForJson")
@ResponseBody
public String pojoParamForJson(@RequestBody User user){
    System.out.println("pojo(json)参数传递 user ==> "+user);
    return "{'module':'pojo for json param'}";
}
- JSON对象数组(POJO)
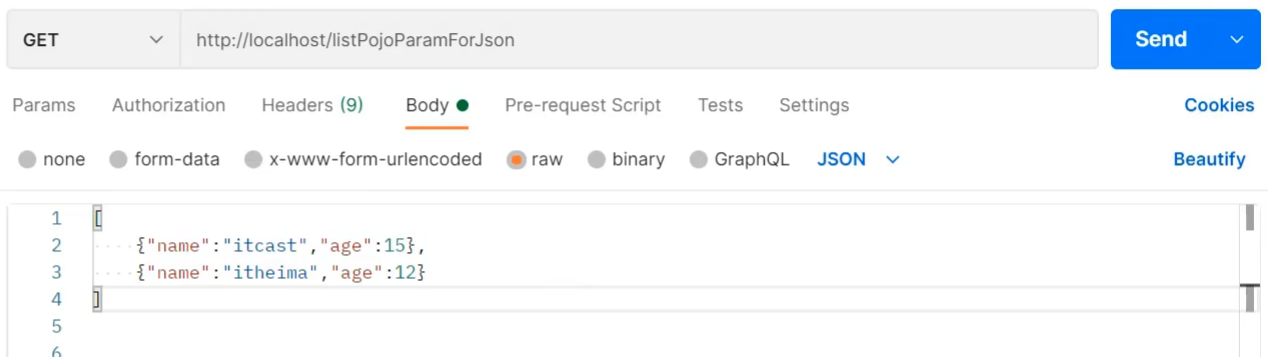
@RequestMapping("/listPojoParamForJson")
@ResponseBody
public String listPojoParamForJson(@RequestBody List<User> list){
    System.out.println("list pojo(json)参数传递 list ==> "+list);
    return "{'module':'list pojo for json param'}";
}
- @EnableWebMvc

- @RequestBody
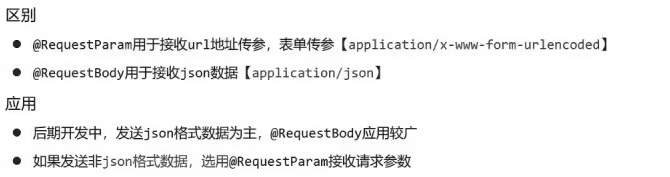
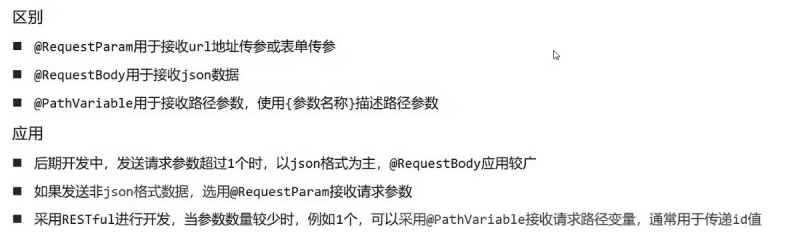
- @RequestBody与@RequestParam区别
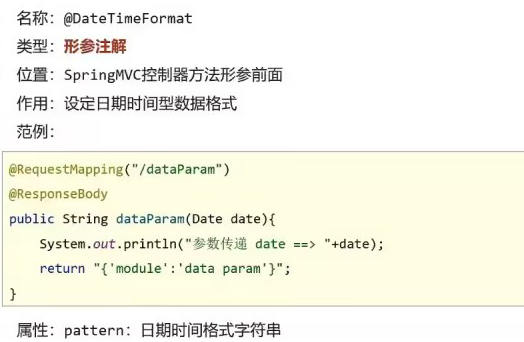
3.5 日期型参数
- 日期类型数据基于系统不同格式也不尽相同
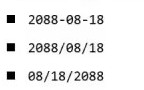
- 接收形参时,根据不同的日期格式设置不同的接收方式
@RequestMapping("/dataParam")
@ResponseBody
public String dataParam(Date date,
                        @DateTimeFormat(pattern="yyyy-MM-dd") Date date1,
                        @DateTimeFormat(pattern="yyyy/MM/dd HH:mm:ss") Date date2)
    System.out.println("参数传递 date ==> "+date);
    System.out.println("参数传递 date1(yyyy-MM-dd) ==> "+date1);
    System.out.println("参数传递 date2(yyyy/MM/dd HH:mm:ss) ==> "+date2);
    return "{'module':'data param'}";
}
使用PostMan发送请求,携带两个不同的日期格式:
http://localhost/dataParam?date=2088/08/08&date1=2088-08-08&date2=2088/08/08 8:08:08
- @DataTimeFormat
- 类型转换内部实现原理:类型转换器
后台需要的数据类型有很多中在数据的传递过程中存在很多类型的转换,如:前端传递字符串,后端使用日期Date接收等等
问题:谁来做这个类型转换?如何实现类型转换的?
答案:SpringMVC,提供了很多类型转换接口和实现类- Converter接口,所属的包为org.springframework.core.convert.converter:
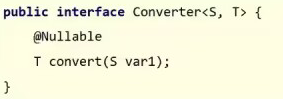
框架中有提供很多对应Converter接口的实现类,用来实现不同数据类型之间的转换,如:
请求参数年龄数据(String→Integer)
日期格式转换(String → Date)
- Converter接口,所属的包为org.springframework.core.convert.converter:
- HttpMessageConverter接口:该接口是实现对象与JSON之间的转换工作
@EnableWebMvc功能之一:根据类型匹配对应的类型转化器
3.6 响应
- 响应页面
@Controller
public class UserController {

    @RequestMapping("/toJumpPage")
    //注意
    //1.此处不能添加@ResponseBody,如果加了该注入,会直接将page.jsp当字符串返回前端
    //2.方法需要返回String
    public String toJumpPage(){
        System.out.println("跳转页面");
        return "page.jsp";
    }

}
- 响应数据:文本数据
@Controller
public class UserController {

    @RequestMapping("/toText")
    //注意此处该注解就不能省略,如果省略了,会把response text当前页面名称去查找,如果没有回报404错误
    @ResponseBody
    public String toText(){
        System.out.println("返回纯文本数据");
        return "response text";
    }

}
- 响应数据:JSON数据(对象转JSON)
@Controller
public class UserController {

    @RequestMapping("/toJsonPOJO")
    @ResponseBody
    @JsonFormat(pattern="yyyy-MM-dd HH:mm:ss", timezone = "GMT+8")    //导入jackson-databind后可以格式化日期格式
    public User toJsonPOJO(){
        System.out.println("返回json对象数据");
        User user = new User();
        user.setName("itcast");
        user.setAge(15);
        return user;
    }
}
返回值为实体类对象,设置返回值为实体类类型,即可实现返回对应对象的json数据,需要依赖@ResponseBody注解和@EnableWebMvc注解
- 响应数据:JSON数据(对象集合转JSON数组)
@Controller
public class UserController {

    @RequestMapping("/toJsonList")
    @ResponseBody
    public List<User> toJsonList(){
        System.out.println("返回json集合数据");
        User user1 = new User();
        user1.setName("传智播客");
        user1.setAge(15);

        User user2 = new User();
        user2.setName("黑马程序员");
        user2.setAge(12);

        List<User> userList = new ArrayList<User>();
        userList.add(user1);
        userList.add(user2);

        return userList;
    }

}
- @ResponseBody
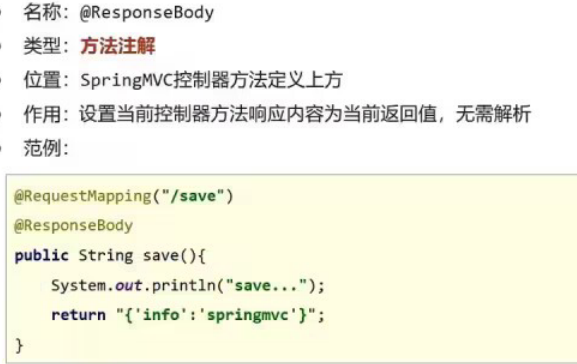
当方法上有@ReponseBody注解后
方法的返回值为字符串,会将其作为文本内容直接响应给前端
方法的返回值为对象,会将对象转换成JSON响应给前端
此处又使用到了类型转换,内部通过HttpMessageConverter接口的实现类完成的
4 REST风格
4.1 REST简介
- REST(Representational State Transfer),表现性状态转换,它是一种软件架构风格
-
传统风格资源描述形式

-
REST风格描述形式

-
- 优点
- 隐藏资源访问行为,无法通过地址得知对资源是何种操作
- 书写简化
问题:一个相同的url地址即可以是新增也可以是修改或者查询,我们该如何区分?
答:通过调用它的行为进行区分
- 按照REST风格访问资源时使用行为动作即请求方式区分对资源进行了何种操作
- http://localhost/users 查询全部用户信息 GET(查询)
- http://localhost/users/1 查询指定用户信息 GET(查询)
- http://localhost/users 添加用户信息 POST(新增/保存)
- http://localhost/users 修改用户信息 PUT(修改/更新)
- http://localhost/users/1 删除用户信息 DELETE(删除)
- 根据REST风格对资源进行访问称为RESTful
4.2 RESTful入门案例
环境准备:
1.导入坐标:
<?xml version="1.0" encoding="UTF-8"?>

<project xmlns="http://maven.apache.org/POM/4.0.0" xmlns:xsi="http://www.w3.org/2001/XMLSchema-instance"
  xsi:schemaLocation="http://maven.apache.org/POM/4.0.0 http://maven.apache.org/xsd/maven-4.0.0.xsd">
  <modelVersion>4.0.0</modelVersion>

  <groupId>com.itheima</groupId>
  <artifactId>springmvc_06_rest</artifactId>
  <version>1.0-SNAPSHOT</version>
  <packaging>war</packaging>

  <dependencies>
    <dependency>
      <groupId>javax.servlet</groupId>
      <artifactId>javax.servlet-api</artifactId>
      <version>3.1.0</version>
      <scope>provided</scope>
    </dependency>
    <dependency>
      <groupId>org.springframework</groupId>
      <artifactId>spring-webmvc</artifactId>
      <version>5.2.10.RELEASE</version>
    </dependency>
    <dependency>
      <groupId>com.fasterxml.jackson.core</groupId>
      <artifactId>jackson-databind</artifactId>
      <version>2.9.0</version>
    </dependency>
  </dependencies>

  <build>
    <plugins>
      <plugin>
        <groupId>org.apache.tomcat.maven</groupId>
        <artifactId>tomcat7-maven-plugin</artifactId>
        <version>2.1</version>
        <configuration>
          <port>8080</port>
          <path>/</path>
        </configuration>
      </plugin>
    </plugins>
  </build>
</project>
- 创建实体类User和Book
  public class User {
      private String name;
      private int age;
      //getter...setter...toString省略
  }

  public class Book {
      private String name;
      private double price;
       //getter...setter...toString省略
  }
- 编写UserController和BookController
  @Controller
  public class UserController {
      @RequestMapping("/save")
      @ResponseBody
      public String save(@RequestBody User user) {
          System.out.println("user save..."+user);
          return "{'module':'user save'}";
      }

      @RequestMapping("/delete")
      @ResponseBody
      public String delete(Integer id) {
          System.out.println("user delete..." + id);
          return "{'module':'user delete'}";
      }

      @RequestMapping("/update")
      @ResponseBody
      public String update(@RequestBody User user) {
          System.out.println("user update..." + user);
          return "{'module':'user update'}";
      }

      @RequestMapping("/getById")
      @ResponseBody
      public String getById(Integer id) {
          System.out.println("user getById..." + id);
          return "{'module':'user getById'}";
      }

      @RequestMapping("/findAll")
      @ResponseBody
      public String getAll() {
          System.out.println("user getAll...");
          return "{'module':'user getAll'}";
      }
  }


  @Controller
  public class BookController {

      @RequestMapping(value = "/books",method = RequestMethod.POST)
      @ResponseBody
      public String save(@RequestBody Book book){
          System.out.println("book save..." + book);
          return "{'module':'book save'}";
      }

      @RequestMapping(value = "/books/{id}",method = RequestMethod.DELETE)
      @ResponseBody
      public String delete(@PathVariable Integer id){
          System.out.println("book delete..." + id);
          return "{'module':'book delete'}";
      }

      @RequestMapping(value = "/books",method = RequestMethod.PUT)
      @ResponseBody
      public String update(@RequestBody Book book){
          System.out.println("book update..." + book);
          return "{'module':'book update'}";
      }

      @RequestMapping(value = "/books/{id}",method = RequestMethod.GET)
      @ResponseBody
      public String getById(@PathVariable Integer id){
          System.out.println("book getById..." + id);
          return "{'module':'book getById'}";
      }

      @RequestMapping(value = "/books",method = RequestMethod.GET)
      @ResponseBody
      public String getAll(){
          System.out.println("book getAll...");
          return "{'module':'book getAll'}";
      }

  }
- 创建对应的配置类
  public class ServletContainersInitConfig extends AbstractAnnotationConfigDispatcherServletInitializer {
      protected Class<?>[] getRootConfigClasses() {
          return new Class[0];
      }

      protected Class<?>[] getServletConfigClasses() {
          return new Class[]{SpringMvcConfig.class};
      }

      protected String[] getServletMappings() {
          return new String[]{"/"};
      }

      //乱码处理
      @Override
      protected Filter[] getServletFilters() {
          CharacterEncodingFilter filter = new CharacterEncodingFilter();
          filter.setEncoding("UTF-8");
          return new Filter[]{filter};
      }
  }

  @Configuration
  @ComponentScan("com.itheima.controller")
  //开启json数据类型自动转换
  @EnableWebMvc
  public class SpringMvcConfig {
  }
REST风格实现@RequestMapping的method属性,@PathVariable
- 设定http请求动作 @RequestMapping的method属性
    @RequestMapping(value = "/users",method = RequestMethod.POST)
    @ResponseBody
    public String save() {
        System.out.println("user save...");
        return "{'module':'user save'}";
    }
    @RequestMapping(value = "/users",method = RequestMethod.PUT)
    @ResponseBody
    public String update(@RequestBody User user) {
        System.out.println("user update..." + user);
        return "{'module':'user update'}";
    }
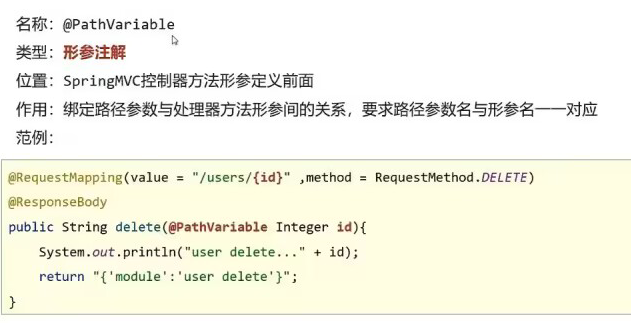
- 设定请求参数路径(路径变量)
    @RequestMapping(value = "/users/{id}",method = RequestMethod.DELETE)
    @ResponseBody
    public String delete(@PathVariable Integer id) {
        System.out.println("user delete..." + id);
        return "{'module':'user delete'}";
    }
- @RequestMapping
- @PathVariable
- @RequestBody @RequestParam @PathVariable
4.3 RESTful优化(简化开发)
/*@Controller
@ResponseBody*/
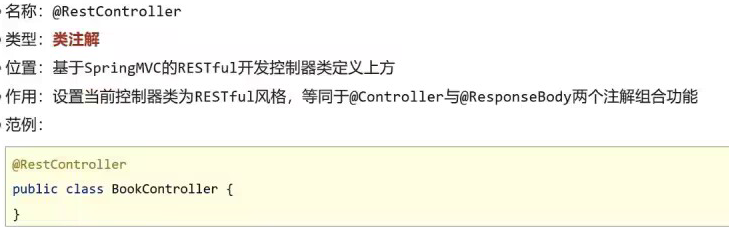
@RestController
@RequestMapping("/books")
public class BookController {
//@RequestMapping(method = RequestMethod.POST)
@PostMapping
public String save(@RequestBody Book book){
System.out.println("book save..." + book);
return "{'module':'book save'}";
}
//@RequestMapping(value = "/{id}",method = RequestMethod.DELETE)
@DeleteMapping("/{id}")
public String delete(@PathVariable Integer id){
System.out.println("book delete..." + id);
return "{'module':'book delete'}";
}
//@RequestMapping(method = RequestMethod.PUT)
@PutMapping
public String update(@RequestBody Book book){
System.out.println("book update..." + book);
return "{'module':'book update'}";
}
//@RequestMapping(value = "/{id}",method = RequestMethod.GET)
@GetMapping("/{id}")
public String getById(@PathVariable Integer id){
System.out.println("book getById..." + id);
return "{'module':'book getById'}";
}
//@RequestMapping(method = RequestMethod.GET)
@GetMapping
public String getAll(){
System.out.println("book getAll...");
return "{'module':'book getAll'}";
}
}
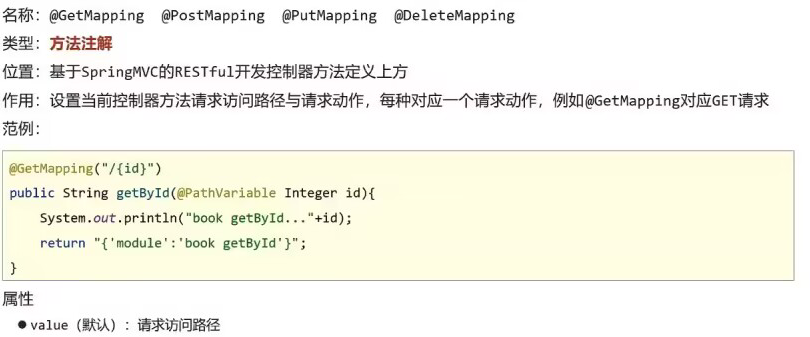
- @RestController
- 4种标准请求动作映射(@GetMapping @PostMapping @PutMapping @DeleteMapping)
4.4 案例:基于RESTful页面数据交互
实现:
1.搭建项目导入jar包
2.编写Controller类,提供两个方法,一个用来做列表查询,一个用来做新增
3.在方法上使用RESTful进行路径设置
4.完成请求、参数的接收和结果的响应
5.使用PostMan进行测试
6.将前端页面拷贝到项目中
7.页面发送ajax请求
8.完成页面数据的展示
- 导入依赖
<?xml version="1.0" encoding="UTF-8"?>

<project xmlns="http://maven.apache.org/POM/4.0.0" xmlns:xsi="http://www.w3.org/2001/XMLSchema-instance"
         xsi:schemaLocation="http://maven.apache.org/POM/4.0.0 http://maven.apache.org/xsd/maven-4.0.0.xsd">
    <modelVersion>4.0.0</modelVersion>

    <groupId>com.zs</groupId>
    <artifactId>spring_rest_case</artifactId>
    <version>1.0-SNAPSHOT</version>
    <packaging>war</packaging>

    <dependencies>
        <dependency>
            <groupId>javax.servlet</groupId>
            <artifactId>javax.servlet-api</artifactId>
            <version>3.1.0</version>
            <scope>provided</scope>
        </dependency>
        <dependency>
            <groupId>org.springframework</groupId>
            <artifactId>spring-webmvc</artifactId>
            <version>5.2.10.RELEASE</version>
        </dependency>
        <dependency>
            <groupId>com.fasterxml.jackson.core</groupId>
            <artifactId>jackson-databind</artifactId>
            <version>2.9.0</version>
        </dependency>
    </dependencies>

    <build>
        <plugins>
            <plugin>
                <groupId>org.apache.tomcat.maven</groupId>
                <artifactId>tomcat7-maven-plugin</artifactId>
                <version>2.1</version>
                <configuration>
                    <port>8080</port>
                    <path>/</path>
                </configuration>
            </plugin>
        </plugins>
    </build>
</project>
- 实体类Book
  public class Book {
      private Integer id;
      private String type;
      private String name;
      private String description;
      //setter...getter...toString略
  }
- BookController
@RestController
@RequestMapping("/books")
public class BookController {
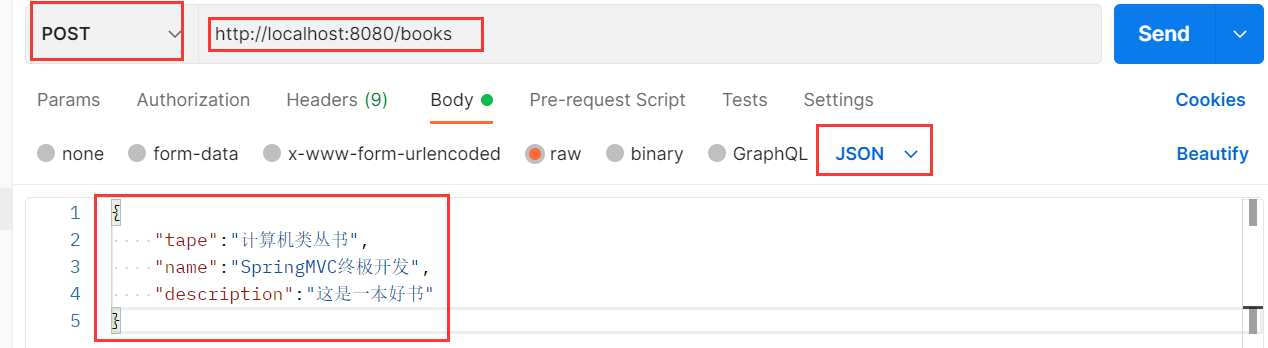
@PostMapping
public String save(@RequestBody Book book) {
System.out.println("book save =>"+book);
return "{'module':'book save success'}";
}
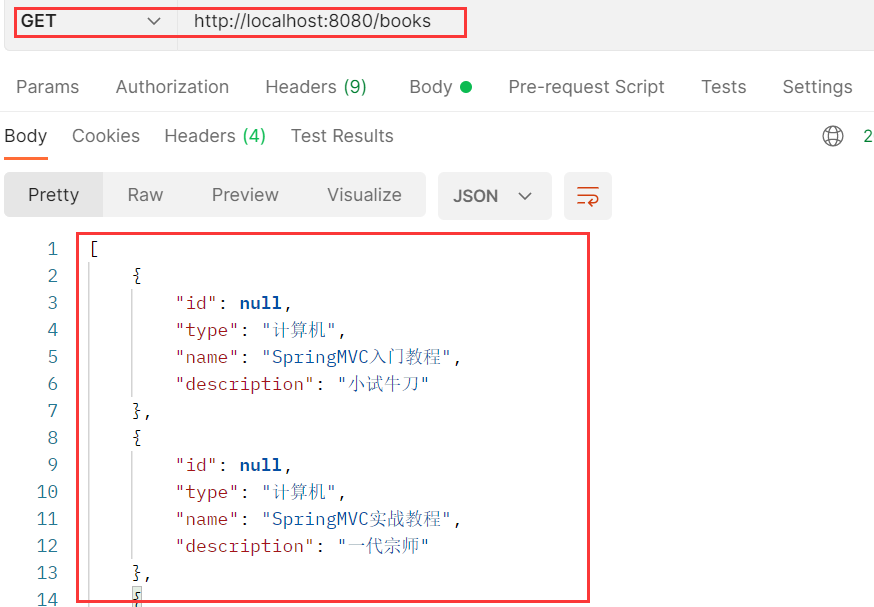
@GetMapping
public List<Book> getAll() {
System.out.println("book getAll is running ...");
List<Book> bookList = new ArrayList<Book>();
Book book1 = new Book();
book1.setType("计算机");
book1.setName("SpringMVC入门教程");
book1.setDescription("小试牛刀");
bookList.add(book1);
Book book2 = new Book();
book2.setType("计算机");
book2.setName("SpringMVC实战教程");
book2.setDescription("一代宗师");
bookList.add(book2);
Book book3 = new Book();
book3.setType("计算机丛书");
book3.setName("SpringMVC实战教程进阶");
book3.setDescription("一代宗师呕心创作");
bookList.add(book3);
return bookList;
}
}
- 创建对应的配置类
  public class ServletContainersInitConfig extends AbstractAnnotationConfigDispatcherServletInitializer {
      protected Class<?>[] getRootConfigClasses() {
          return new Class[0];
      }

      protected Class<?>[] getServletConfigClasses() {
          return new Class[]{SpringMvcConfig.class};
      }

      protected String[] getServletMappings() {
          return new String[]{"/"};
      }

      //乱码处理
      @Override
      protected Filter[] getServletFilters() {
          CharacterEncodingFilter filter = new CharacterEncodingFilter();
          filter.setEncoding("UTF-8");
          return new Filter[]{filter};
      }
  }

  @Configuration
  @ComponentScan("com.zs.controller")
  //开启json数据类型自动转换
  @EnableWebMvc
  public class SpringMvcConfig {
  }
- PostMan测试

- 拷贝静态页面
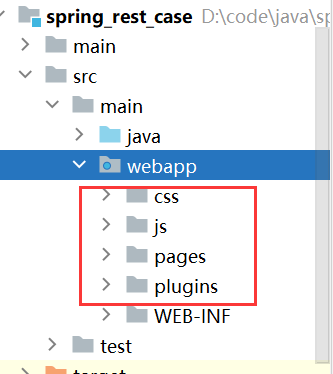
- 访问pages目录下的books.html
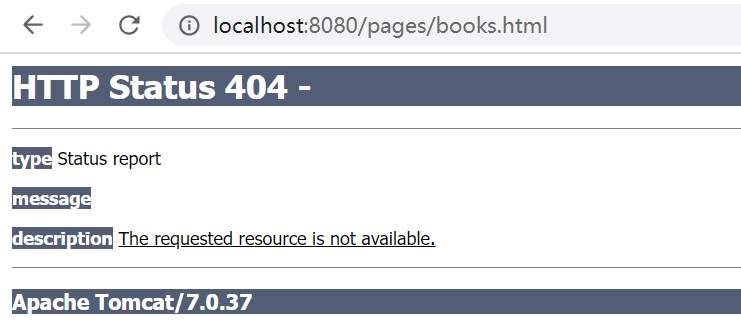
问题: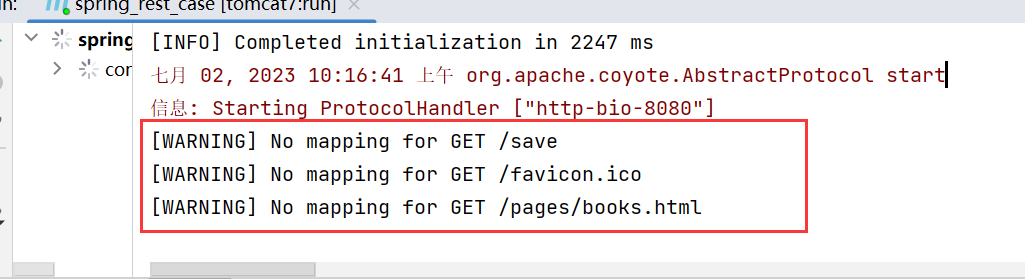
原因:SpringMVC拦截了静态资源,根据/pages/books.html去controller找对应的方法,找不到所以会报404的错误。静态资源应该交给Tomcat处理,而不是springmvc处理

解决方案:SpringMVC将静态资源进行放行
方式一:
创建 SpringMvcSupport 配置类,设置静态资源访问过滤。
继承WebMvcConfigurationSupport 类,重写addResourceHandlers方法
@Configuration
public class SpringMvcSupport extends WebMvcConfigurationSupport {
    @Override
    protected void addResourceHandlers(ResourceHandlerRegistry registry) {
        //当访问/pages/**时,走/pages目录下的内容
        registry.addResourceHandler("/pages/**").addResourceLocations("/pages/");
        registry.addResourceHandler("/js/**").addResourceLocations("/js/");
        registry.addResourceHandler("/css/**").addResourceLocations("/css/");
        registry.addResourceHandler("/plugins/**").addResourceLocations("/plugins/");
    }
}
SpringMvcConfig扫描SpringMvcSupport配置类
@Configuration
//@ComponentScan({"com.itheima.controller","com.itheima.config"})
@ComponentScan("com.zs")
@EnableWebMvc
public class SpringMvcConfig {
}
方式二:
SpringMvcConfig 实现WebMvcConfigurer 接口,既可以添加资源处理器,也可以添加拦截器,既然不用config的SpringMvcSupport,springmvc配置类也就不用扫描config目录
@Configuration
@ComponentScan({"package1.controller"})
@EnableWebMvc
public class SpringMvcConfig implements WebMvcConfigurer {
    @Autowired
    private ProjectInterception projectInterception;
    //添加拦截器,配置本地资源映射路径,在访问A(虚拟的)的时候,需要到B(实际的)的位置去访问。
//    @Override
//    public void addInterceptors(InterceptorRegistry registry) {
//        registry.addInterceptor(projectInterception).addPathPatterns("/books","/books/*");
        //如果只拦截/books,发送http://localhost/books/100后会发现拦截器没有被执行
        //registry.addInterceptor(projectInterceptor).addPathPatterns("/books");
//    }
    //添加资源处理器
    @Override
    public void addResourceHandlers(ResourceHandlerRegistry registry) {
        registry.addResourceHandler("/pages/**").addResourceLocations("/pages/");
        registry.addResourceHandler("/js/**").addResourceLocations("/js/");
        registry.addResourceHandler("/css/**").addResourceLocations("/css/");
        registry.addResourceHandler("/plugins/**").addResourceLocations("/plugins/");
    }
}
- 前端页面通过异步提交访问后台控制器
saveBook () {
    axios.post("/books",this.formData).then((res)=>{

    });
},
//主页列表查询
getAll() {
    axios.get("/books").then((res)=>{
        this.dataList = res.data;
    });
},
参考文章