上节讲到了nacos的客户端,通过把实例信息封装成instance,调用服务端的接口:/instance,进行注册.
接下来,我们一起看看服务端是怎么处理客户端发来的请求的.
服务端
在nacos-naming这个模块中,在这个模块里边有一个InstanceController
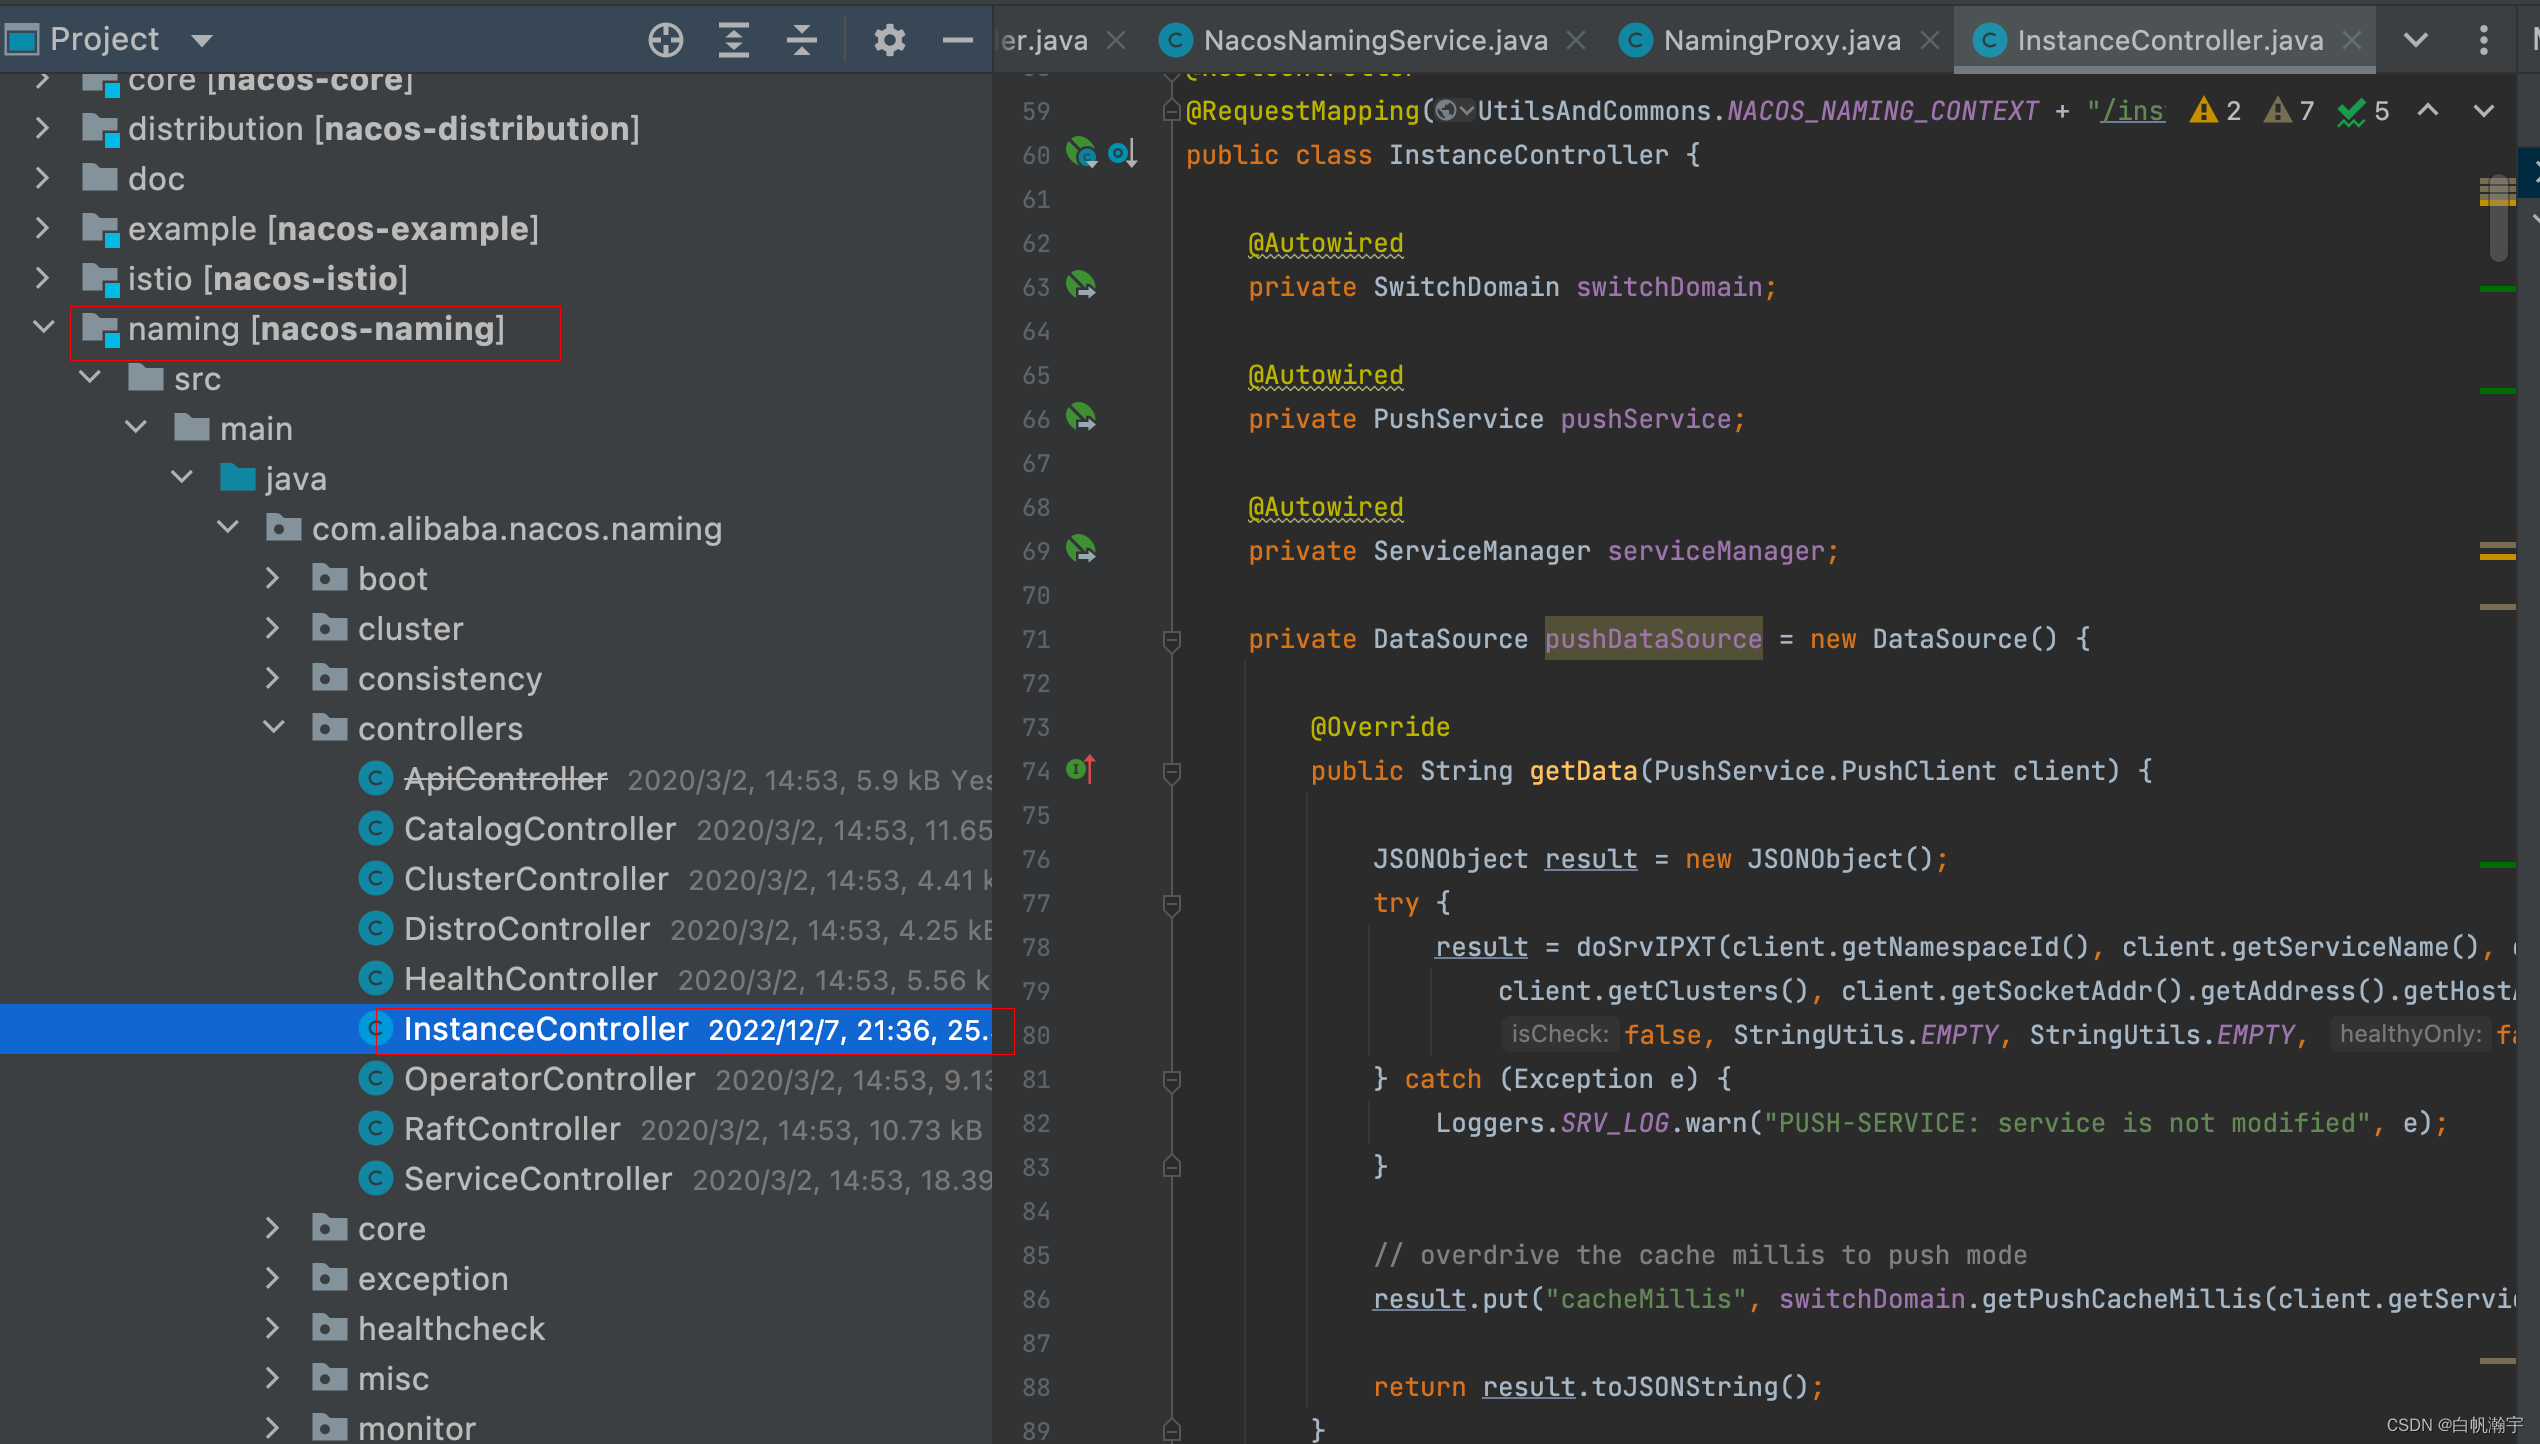
其中在com.alibaba.nacos.naming.controllers包下就有服务注册、发现等相关接口,其中的服务注册是InstanceController.
在这个类中,可以根据客户端请求的接口的地址,找到对应的方法:
    @CanDistro
    @PostMapping
    @Secured(parser = NamingResourceParser.class, action = ActionTypes.WRITE)
    public String register(HttpServletRequest request) throws Exception {

        // 尝试获取serviceName,其格式为 group_name@@service_name
        String serviceName = WebUtils.required(request, CommonParams.SERVICE_NAME);
        // 尝试获取namespaceId
        String namespaceId = WebUtils.optional(request, CommonParams.NAMESPACE_ID, Constants.DEFAULT_NAMESPACE_ID);

        // parseInstance(request):解析出实例信息,封装为 Instance 对象
        serviceManager.registerInstance(namespaceId, serviceName, parseInstance(request));
        return "ok";
    }
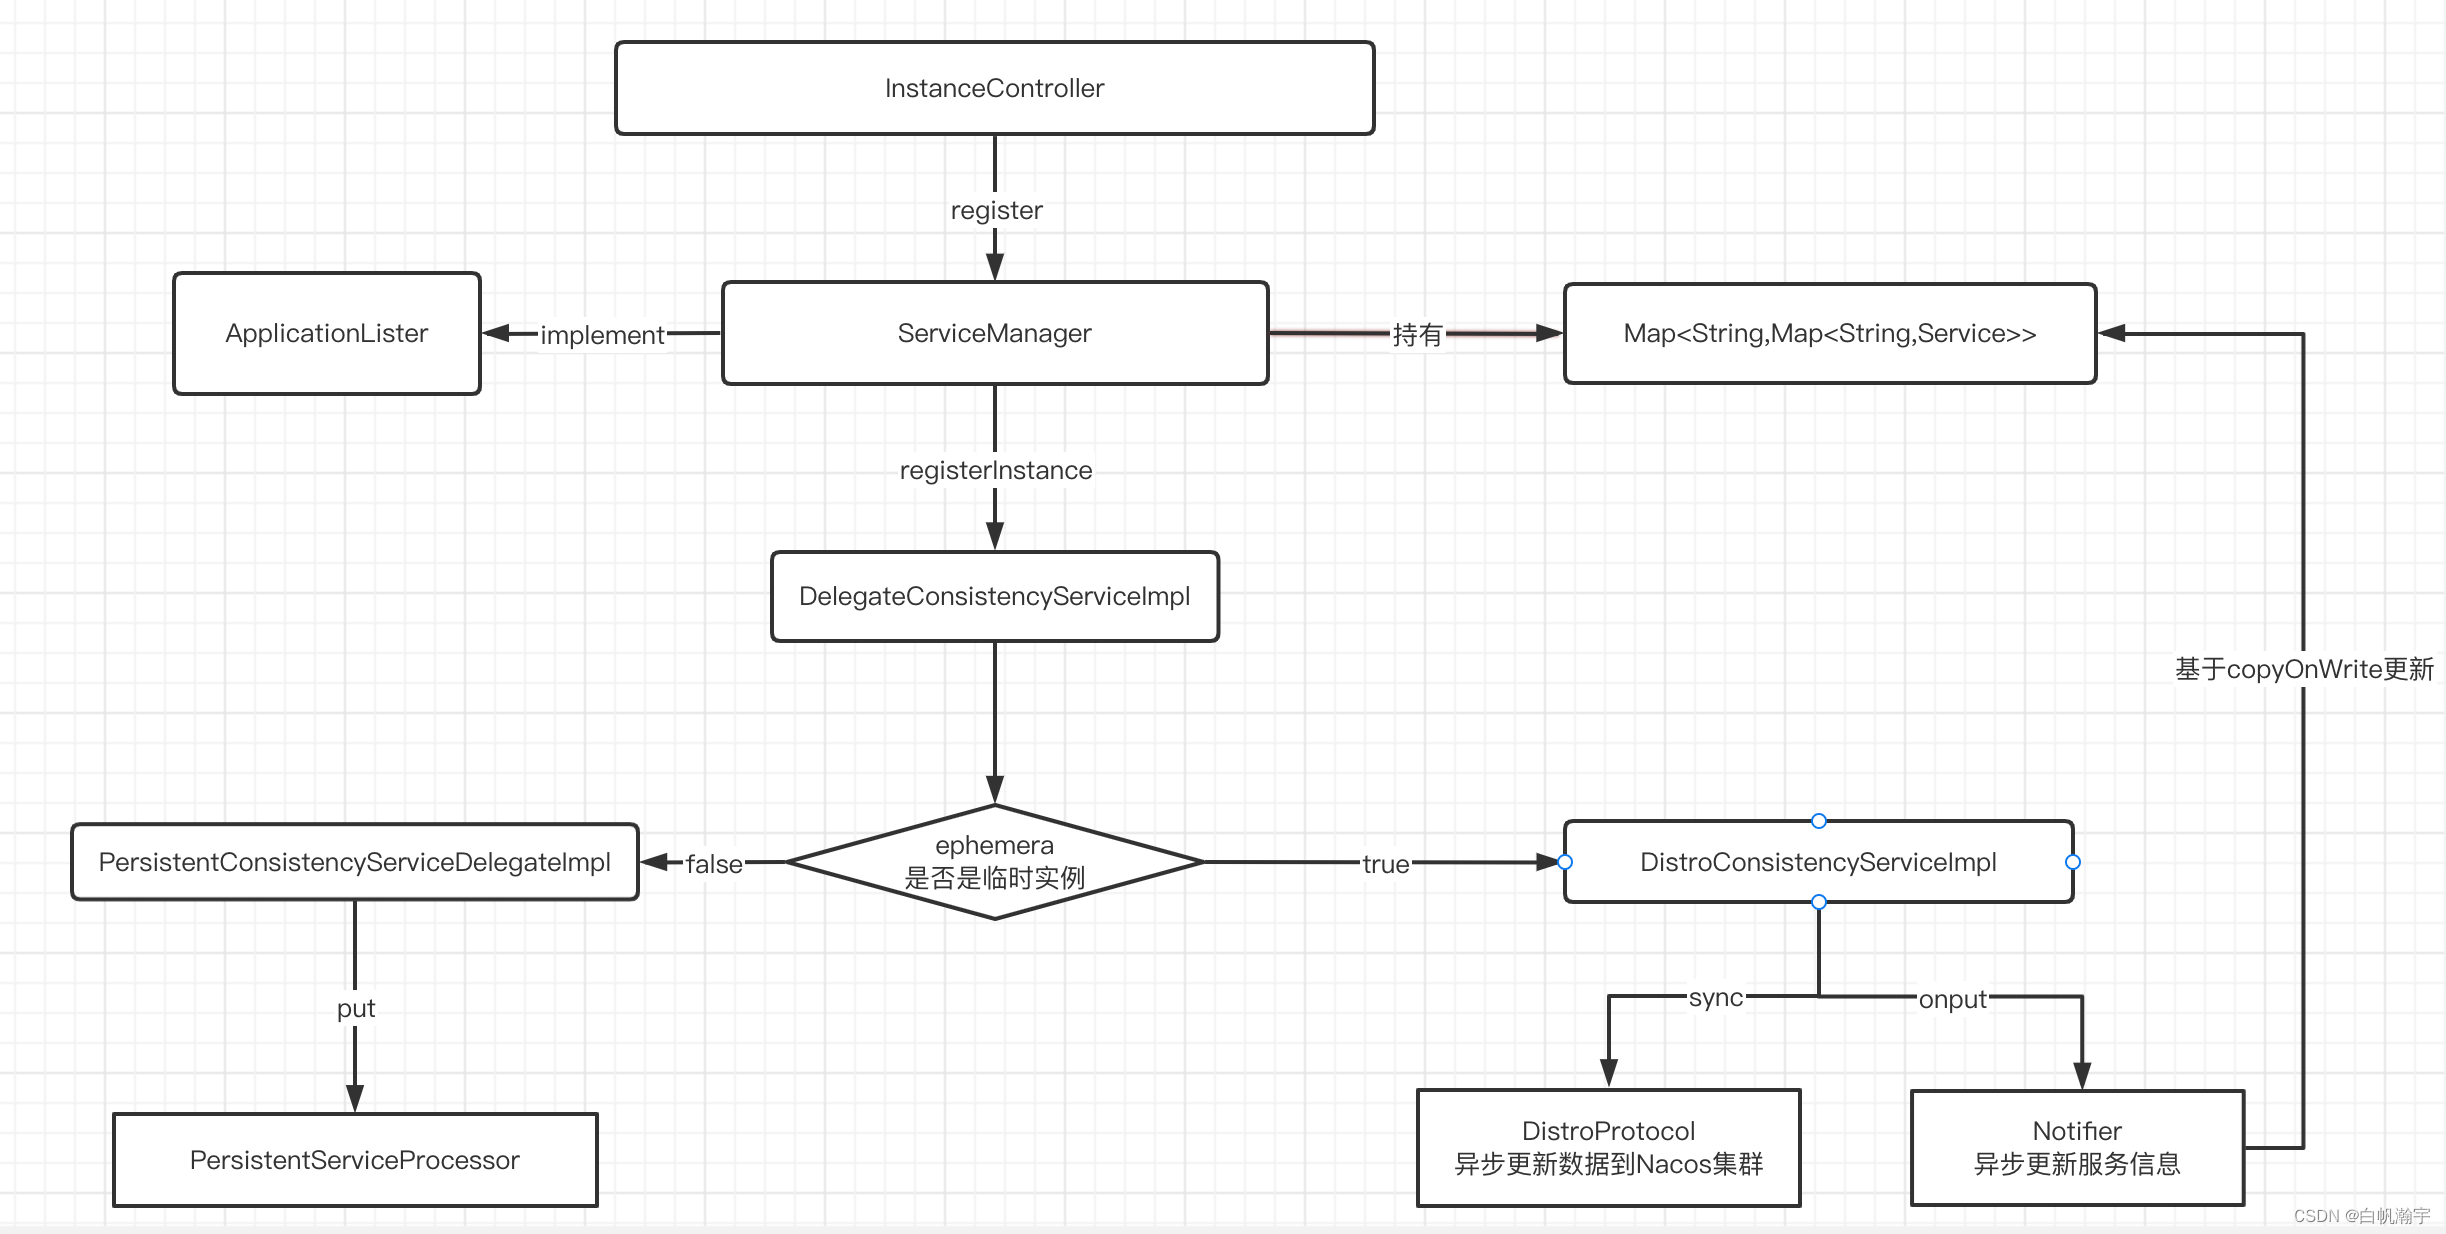
上面的方法主要是把注册的功能交给serviceManager
    public void registerInstance(String namespaceId, String serviceName, Instance instance) throws NacosException {
        // 创建一个空的service(如果是第一次来注册实例,要创建一个空service出来,放入注册表)
        // 此时不包含实例信息
        createEmptyService(namespaceId, serviceName, instance.isEphemeral());
        // 拿到创建好的service
        Service service = getService(namespaceId, serviceName);

        // 拿不到则抛异常
        if (service == null) {
            throw new NacosException(NacosException.INVALID_PARAM,
                "service not found, namespace: " + namespaceId + ", service: " + serviceName);
        }

        // 添加要注册的实例到service中
        addInstance(namespaceId, serviceName, instance.isEphemeral(), instance);
    }
接着看addInstance方法
    public void addInstance(String namespaceId, String serviceName, boolean ephemeral, Instance... ips) throws NacosException {

        // 监听服务列表用到的key,服务的唯一标识:
        // 例如: com.alibaba.nacos.naming.iplist.ephemeral.public##DEFAULT_GROUP@@order-service
        String key = KeyBuilder.buildInstanceListKey(namespaceId, serviceName, ephemeral);

        // 获取刚才创建的service
        Service service = getService(namespaceId, serviceName);

        // 同步锁,避免并发修改的安全问题
        // 注意:在第1步的addIPAddress中,会拷贝旧的实例列表,添加新实例到列表中。
        // 在第3步中,完成对实例状态更新后,则会用新列表直接覆盖旧实例列表。而在更新过程中,旧实例列表不受影响,用户依然可以读取。
        // 这样在更新列表状态过程中,无需阻塞用户的读操作,也不会导致用户读取到脏数据,性能比较好。这种方案称为CopyOnWrite方案。
        synchronized (service) {
            // 1) 获取要更新的实例列表
            List<Instance> instanceList = addIpAddresses(service, ephemeral, ips);

            // 2) 封装实例列表到Instances 对象
            Instances instances = new Instances();
            instances.setInstanceList(instanceList);

            // 3) 完成注册表更新 以及Nacos集群的数据同步
            // 注意这里不是简单的put操作
            // 有三种不同的实现:
            // DelegateConsistencyServiceImpl: 委托类,将集群一致性委托给其他实现类
            // DistroConsistencyServiceImpl: 临时实现,委托后采用nacos自定义的Distro协议实现集群一致性
            // RaftConsistencyServiceImpl: 永久实例,委托后采用简化的Raft协议来实现集群一致性
            consistencyService.put(key, instances);
        }
    }
可以看到上面核心一共分为三大步:
1、获取要更新的实例列表(把当前实例放到要old的实例列表中)
2、封装实例列表到Instances里边
3、完成注册表的更新,以及nacos集群的数据同步(前面已经介绍过服务注册表的结构,以及存储的东西,可以看上篇文章:nacos的服务注册之客户端)

获取要更新的实例列表
    public List<Instance> addIpAddresses(Service service, boolean ephemeral, Instance... ips) throws NacosException {
        return updateIpAddresses(service, UtilsAndCommons.UPDATE_INSTANCE_ACTION_ADD, ephemeral, ips);
    }
    public List<Instance> updateIpAddresses(Service service, String action, boolean ephemeral, Instance... ips) throws NacosException {

        // 根据namespaceId、serviceName获取当前服务的实例列表,返回值是Datum
        // 第一次注册的时候为null
        Datum datum = consistencyService.get(KeyBuilder.buildInstanceListKey(service.getNamespaceId(), service.getName(), ephemeral));

        // 得到服务中现有的实例列表,从集群中获取,是最新的
        List<Instance> currentIPs = service.allIPs(ephemeral);

        // 创建map, 保存实例列表,key为ip地址,value是Instance对象
        Map<String, Instance> currentInstances = new HashMap<>(currentIPs.size());
        // 创建Set集合,保存实例的instanceId
        Set<String> currentInstanceIds = Sets.newHashSet();

        // 遍历现有的实例列表
        for (Instance instance : currentIPs) {
            currentInstances.put(instance.toIPAddr(), instance);
            currentInstanceIds.add(instance.getInstanceId());
        }
        // 创建map,用来保存更新后的实例列表
        Map<String, Instance> instanceMap;
        if (datum != null) {
            // 如果服务中已经有旧数据,则先保存旧的实例列表
            instanceMap = setValid(((Instances) datum.value).getInstanceList(), currentInstances);
        } else {
            // 如果没有旧数据,则直接创建新的map
            instanceMap = new HashMap<>(ips.length);
        }

        // 遍历实例列表
        for (Instance instance : ips) {
            // 判断服务中是否包含要注册的实例的cluster信息
            if (!service.getClusterMap().containsKey(instance.getClusterName())) {
                // 如果不包含,创建新的cluster
                Cluster cluster = new Cluster(instance.getClusterName(), service);
                cluster.init();
                // 将集群放入service的注册表
                service.getClusterMap().put(instance.getClusterName(), cluster);
                Loggers.SRV_LOG.warn("cluster: {} not found, ip: {}, will create new cluster with default configuration.",
                    instance.getClusterName(), instance.toJSON());
            }

            // 判断是删除还是新增实例
            if (UtilsAndCommons.UPDATE_INSTANCE_ACTION_REMOVE.equals(action)) {
                instanceMap.remove(instance.getDatumKey());
            } else {

                instance.setInstanceId(instance.generateInstanceId(currentInstanceIds));
                instanceMap.put(instance.getDatumKey(), instance);
            }

        }

        if (instanceMap.size() <= 0 && UtilsAndCommons.UPDATE_INSTANCE_ACTION_ADD.equals(action)) {
            throw new IllegalArgumentException("ip list can not be empty, service: " + service.getName() + ", ip list: "
                + JSON.toJSONString(instanceMap.values()));
        }

        return new ArrayList<>(instanceMap.values());
    }
简单来讲,就是先获取旧的实例列表,然后把新的实例信息与旧的做对比,新的实例就添加,老的实例同步ID。然后返回最新的实例列表。
第二步没什么好说的,就是把实例列表封装到Instances的对象中
注册表的更新,以及nacos集群的数据同步

可以看到对于put方法,有三种不同的实现,而对应的实现的介绍我在注释中已经给出了,这里再贴一遍
DelegateConsistencyServiceImpl: 委托类,将集群一致性委托给其他实现类
DistroConsistencyServiceImpl: 临时实现,委托后采用nacos自定义的Distro协议实现集群一致性
RaftConsistencyServiceImpl: 永久实例,委托后采用简化的Raft协议来实现集群一致性
我们主要看下临时实例的实现方式,这种是默认的
    @Override
    public void put(String key, Record value) throws NacosException {
        // 先将要更新的实例信息写入本地实例列表
        // 其中value就是instances,要更新的服务信息。这里主要基于线程池方式,异步的将service信息写入注册表中(就是那个多重Map)
        onPut(key, value);
        // 开始集群同步
        // 就是通过Distro协议将数据同步给集群中的其他Nacos节点
        taskDispatcher.addTask(key);
    }
其中有两个方法,一个就是onPut()、另一个是taskDispatcher.addTask(key);
onPut()
 public void onPut(String key, Record value) {

        // 判断是否是临时实例
        if (KeyBuilder.matchEphemeralInstanceListKey(key)) {
            // 封装 Instances 信息到 数据集:Datum
            Datum<Instances> datum = new Datum<>();
            datum.value = (Instances) value;
            datum.key = key;
            datum.timestamp.incrementAndGet();
            // 放入 DataStore
            dataStore.put(key, datum);
        }

        if (!listeners.containsKey(key)) {
            return;
        }

        // 放入阻塞队列,这里的 notifier 维护了一个阻塞队列,并且基于线程池异步执行队列中的任务
        // notifier 的类型就是 DistroConsistencyServiceImpl.Notifier 内部维护了一个阻塞队列,存放服务列表变更事件
        // private BlockingQueue<Pair> tasks = new LinkedBlockingQueue<Pair>(1024 * 1024);
        // notifier 同时还是一个Runnable,通过一个单线程的线程池来不断的从阻塞队列中获取任务,执行服务列表的更新。
        notifier.addTask(key, ApplyAction.CHANGE);
    }
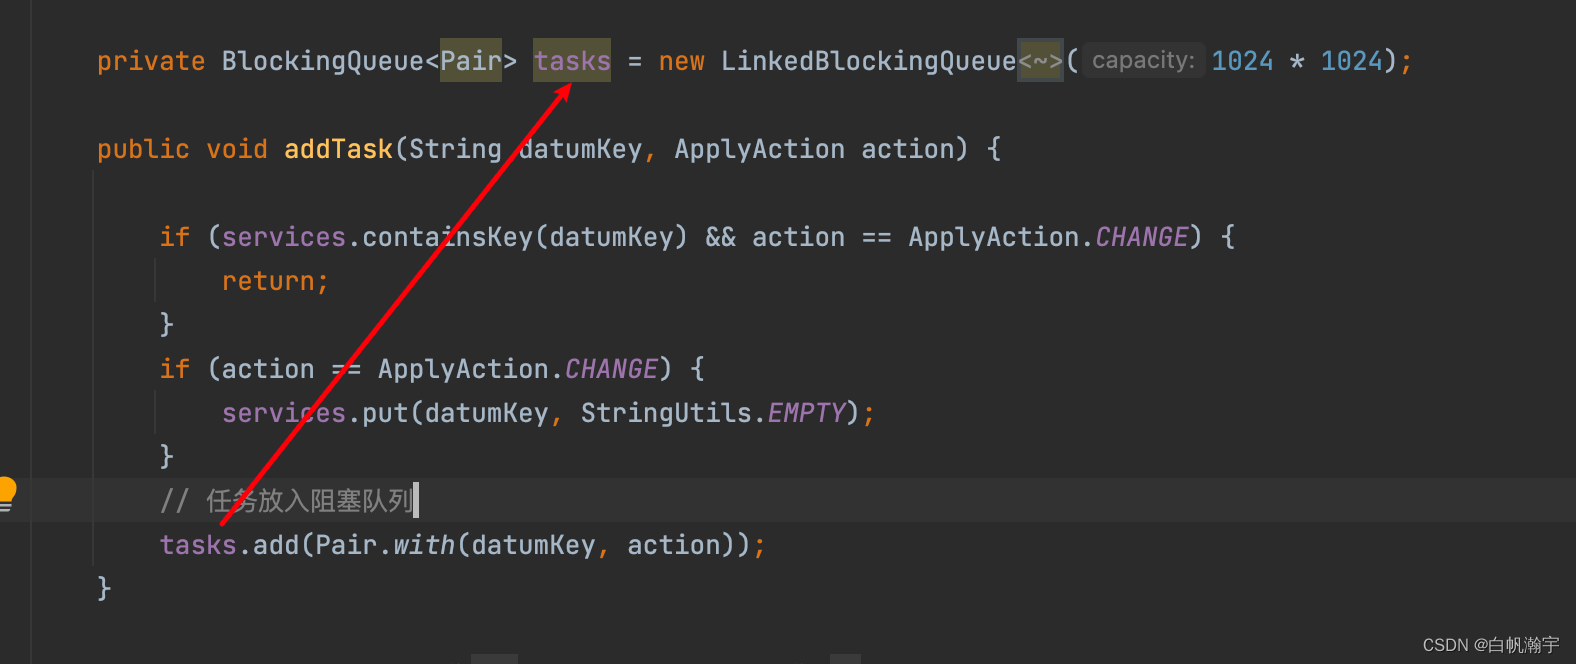
下面看下notifier里的addTask方法
        public void addTask(String datumKey, ApplyAction action) {

            if (services.containsKey(datumKey) && action == ApplyAction.CHANGE) {
                return;
            }
            if (action == ApplyAction.CHANGE) {
                services.put(datumKey, StringUtils.EMPTY);
            }
            // 任务放入阻塞队列
            tasks.add(Pair.with(datumKey, action));
        }
因为notifier还是一个线程,所以来看下他的run方法
        @Override
        public void run() {
            Loggers.DISTRO.info("distro notifier started");

            // 死循环,不断执行任务。因为是阻塞队列,不会导致CPU负载过高
            while (true) {
                try {

                    // 从阻塞队列中获取任务
                    Pair pair = tasks.take();

                    if (pair == null) {
                        continue;
                    }

                    String datumKey = (String) pair.getValue0();
                    ApplyAction action = (ApplyAction) pair.getValue1();

                    services.remove(datumKey);

                    int count = 0;

                    if (!listeners.containsKey(datumKey)) {
                        continue;
                    }

                    // 遍历,找到变化的service,这里的 RecordListener 就是 Service
                    for (RecordListener listener : listeners.get(datumKey)) {

                        count++;

                        try {
                            // 服务的实例列表 CHANGE 事件
                            if (action == ApplyAction.CHANGE) {
                                // 更新服务列表
                                listener.onChange(datumKey, dataStore.get(datumKey).value);
                                continue;
                            }
                            // 服务的实例列表 DELETE事件
                            if (action == ApplyAction.DELETE) {
                                listener.onDelete(datumKey);
                                continue;
                            }
                        } catch (Throwable e) {
                            Loggers.DISTRO.error("[NACOS-DISTRO] error while notifying listener of key: {}", datumKey, e);
                        }
                    }

                    if (Loggers.DISTRO.isDebugEnabled()) {
                        Loggers.DISTRO.debug("[NACOS-DISTRO] datum change notified, key: {}, listener count: {}, action: {}",
                            datumKey, count, action.name());
                    }
                } catch (Throwable e) {
                    Loggers.DISTRO.error("[NACOS-DISTRO] Error while handling notifying task", e);
                }
            }
        }
    }
紧接着执行onChange方法
    @Override
    public void onChange(String key, Instances value) throws Exception {

        Loggers.SRV_LOG.info("[NACOS-RAFT] datum is changed, key: {}, value: {}", key, value);

        for (Instance instance : value.getInstanceList()) {

            if (instance == null) {
                // Reject this abnormal instance list:
                throw new RuntimeException("got null instance " + key);
            }

            if (instance.getWeight() > 10000.0D) {
                instance.setWeight(10000.0D);
            }

            if (instance.getWeight() < 0.01D && instance.getWeight() > 0.0D) {
                instance.setWeight(0.01D);
            }
        }

        // 更新实例列表
        updateIPs(value.getInstanceList(), KeyBuilder.matchEphemeralInstanceListKey(key));

        recalculateChecksum();
    }
updateIPs方法
public void updateIPs(Collection<Instance> instances, boolean ephemeral) {
        // 准备map,key是cluster,值是集群下的Instance集合
        Map<String, List<Instance>> ipMap = new HashMap<>(clusterMap.size());
        for (String clusterName : clusterMap.keySet()) {
            ipMap.put(clusterName, new ArrayList<>());
        }

        // 遍历要更新的实例
        for (Instance instance : instances) {
            try {
                if (instance == null) {
                    Loggers.SRV_LOG.error("[NACOS-DOM] received malformed ip: null");
                    continue;
                }

                // 判断实例是否包含clusterName,没有的话用默认cluster
                if (StringUtils.isEmpty(instance.getClusterName())) {
                    instance.setClusterName(UtilsAndCommons.DEFAULT_CLUSTER_NAME);
                }

                // 判断 cluster 是否存在,不存在则创建新的 cluster
                if (!clusterMap.containsKey(instance.getClusterName())) {
                    Loggers.SRV_LOG.warn("cluster: {} not found, ip: {}, will create new cluster with default configuration.",
                        instance.getClusterName(), instance.toJSON());
                    Cluster cluster = new Cluster(instance.getClusterName(), this);
                    cluster.init();
                    getClusterMap().put(instance.getClusterName(), cluster);
                }

                // 获取当前cluster实例的集合,不存在则创建新的
                List<Instance> clusterIPs = ipMap.get(instance.getClusterName());
                if (clusterIPs == null) {
                    clusterIPs = new LinkedList<>();
                    ipMap.put(instance.getClusterName(), clusterIPs);
                }

                // 添加新的实例到 Instance 集合
                clusterIPs.add(instance);
            } catch (Exception e) {
                Loggers.SRV_LOG.error("[NACOS-DOM] failed to process ip: " + instance, e);
            }
        }

        for (Map.Entry<String, List<Instance>> entry : ipMap.entrySet()) {
            //make every ip mine

            List<Instance> entryIPs = entry.getValue();
            // 将实例集合更新到 clusterMap(注册表)
            clusterMap.get(entry.getKey()).updateIPs(entryIPs, ephemeral);
        }

        setLastModifiedMillis(System.currentTimeMillis());
        // 发布服务变更的通知消息
        getPushService().serviceChanged(this);
        StringBuilder stringBuilder = new StringBuilder();

        for (Instance instance : allIPs()) {
            stringBuilder.append(instance.toIPAddr()).append("_").append(instance.isHealthy()).append(",");
        }

        Loggers.EVT_LOG.info("[IP-UPDATED] namespace: {}, service: {}, ips: {}",
            getNamespaceId(), getName(), stringBuilder.toString());

    }
上面的clusterMap.get(entry.getKey()).updateIPs(entryIPs, ephemeral);就是对实例列表的更新操作
    public void updateIPs(List<Instance> ips, boolean ephemeral) {

        // 获取旧实例列表
        Set<Instance> toUpdateInstances = ephemeral ? ephemeralInstances : persistentInstances;

        HashMap<String, Instance> oldIPMap = new HashMap<>(toUpdateInstances.size());

        for (Instance ip : toUpdateInstances) {
            // copy 旧的实例中的信息到一个新的map中:oldIPMap
            oldIPMap.put(ip.getDatumKey(), ip);
        }


        List<Instance> updatedIPs = updatedIPs(ips, oldIPMap.values());
        if (updatedIPs.size() > 0) {
            for (Instance ip : updatedIPs) {
                Instance oldIP = oldIPMap.get(ip.getDatumKey());

                // do not update the ip validation status of updated ips
                // because the checker has the most precise result
                // Only when ip is not marked, don't we update the health status of IP:
                if (!ip.isMarked()) {
                    ip.setHealthy(oldIP.isHealthy());
                }

                if (ip.isHealthy() != oldIP.isHealthy()) {
                    // ip validation status updated
                    Loggers.EVT_LOG.info("{} {SYNC} IP-{} {}:{}@{}",
                        getService().getName(), (ip.isHealthy() ? "ENABLED" : "DISABLED"), ip.getIp(), ip.getPort(), getName());
                }

                if (ip.getWeight() != oldIP.getWeight()) {
                    // ip validation status updated
                    Loggers.EVT_LOG.info("{} {SYNC} {IP-UPDATED} {}->{}", getService().getName(), oldIP.toString(), ip.toString());
                }
            }
        }
        // 检查新加入实例的状态
        List<Instance> newIPs = subtract(ips, oldIPMap.values());
        if (newIPs.size() > 0) {
            Loggers.EVT_LOG.info("{} {SYNC} {IP-NEW} cluster: {}, new ips size: {}, content: {}",
                getService().getName(), getName(), newIPs.size(), newIPs.toString());

            for (Instance ip : newIPs) {
                HealthCheckStatus.reset(ip);
            }
        }

        // 移除要删除的实例
        List<Instance> deadIPs = subtract(oldIPMap.values(), ips);

        if (deadIPs.size() > 0) {
            Loggers.EVT_LOG.info("{} {SYNC} {IP-DEAD} cluster: {}, dead ips size: {}, content: {}",
                getService().getName(), getName(), deadIPs.size(), deadIPs.toString());

            for (Instance ip : deadIPs) {
                HealthCheckStatus.remv(ip);
            }
        }

        toUpdateInstances = new HashSet<>(ips);

        // 直接覆盖旧实例列表
        if (ephemeral) {
            ephemeralInstances = toUpdateInstances;
        } else {
            persistentInstances = toUpdateInstances;
        }
    }


![[附源码]计算机毕业设计家庭医生签约服务管理系统Springboot程序](https://img-blog.csdnimg.cn/7f8a4a35395d4a1489f8ca98367a19dc.png)