本篇文章,我们聊了如何使用搭载了 Apple Silicon 芯片(M1 和 M2 CPU)的 MacBook 设备上运行 Stable Diffusion 模型。
写在前面
在上一篇文章《使用 Docker 来快速上手中文 Stable Diffusion 模型:太乙》中,我们聊过了如何使用配备了“传统的 Nvidia 显卡”的设备(云服务器)来运行 Stable Dif fusion 模型。在之前的文章中我提到过,接下来将聊聊如何使用 CPU 来运行 “SD 模型应用”。
本篇文章,我们就先从 Apple Silicon 这类 ARM 芯片开始(M1 / M1 Pro / M1 Max / M1 Ultra / M2),用 CPU 来运行 Stable Diffusion 。十一月末,为 Apple Core ML Tools 开源项目贡献代码的主要工程师之一,正式发布了一个新的开源项目:apple/ml-stable-diffusion。
下面我们就来聊聊这个项目该如何简单、快速的上手。
支持运行的设备
本文中,我的实验环境是 Apple M2 CPU 的 MacBook Pro,机器内存容量为 16GB。同样还能够运行本文的设备包含:
- 2022 年生产的MacBook Air (M2)、13寸的 MacBook Pro (M2)、Mac Studio (2022)
- 2021 年生产的 14寸和16寸的 MacBook Pro、24寸的 iMac (M1)
- 2020 年生产的 Mac mini (M1)、MacBook Air (M1)、13寸的 MacBook Pro (M1)
- 当然,还有搭载了 M1 芯片的第五代 iPad Pro
基础环境准备
想要在 ARM 芯片的 Mac 设备上运行这个模型应用,我们需要做几件事:
- 准备 Python 基础运行环境
- 准备软件运行所需要的软件包
为 MacOS 设备安装 Python 环境管理工具
在《用让新海诚本人惊讶的 AI 模型制作属于你的动漫视频》这篇文章中,我分享过关于“使用 Conda 简化 Python 程序环境准备工作”,正巧年底 Conda 版本更新,这里就顺带也更新一个版本的安装和使用方式。

虽然我们可以从 Conda 官方网站的下载页面得到合适的安装程序。不过,我一般从 Conda 官方的 “Archive” 页面进行下载,因为能够更加直观的看到,我们想要下载的目标文件的各种信息,比如:名称、版本、尺寸、更新时间、文件指纹。
Filename                          Size   Last Modified       SHA256
Anaconda3-2022.10-MacOSX-arm64.sh 472.5M 2022-10-17 16:15:38 200700077db8eed762fbc996b830c3f8cc5a2bb7d6b20bb367147eb35f2dcc72
这里为了更快的得到下载文件,可以通过“清华源”中的 Conda 镜像来加速下载过程。比如,官方的原始下载地址 https://repo.anaconda.com/archive/Anaconda3-2022.10-MacOSX-arm64.sh ,那么加速下载的地址就是:https://mirrors.tuna.tsinghua.edu.cn/anaconda/archive/Anaconda3-2022.10-MacOSX-arm64.sh,完成 Conda 安装文件下载之后,我们可以执行 shasum -a 256 来验证下载文件的完整性:
shasum -a 256 ~/Downloads/Anaconda3-2022.10-MacOSX-arm64.sh
200700077db8eed762fbc996b830c3f8cc5a2bb7d6b20bb367147eb35f2dcc72  /Users/soulteary/Downloads/Anaconda3-2022.10-MacOSX-arm64.sh
接着,执行 bash Anaconda3-2022.10-MacOSX-arm64.sh 进行安装,“一路 Next”,完成程序的安装即可。
和之前的文章里的观点相同,国内用户推荐在使用 Conda 时,先进行软件源配置操作。这样可以减少在下载软件包过程中造成的不必要时间浪费。使用 vi ~/.condarc 编辑 Conda 配置文件,在其中加入下面的内容(以“清华源”为例):
channels:
  - https://mirrors.tuna.tsinghua.edu.cn/anaconda/pkgs/free/
  - https://mirrors.tuna.tsinghua.edu.cn/anaconda/pkgs/main/
  - https://mirrors.tuna.tsinghua.edu.cn/anaconda/cloud/pytorch/
  - defaults
show_channel_urls: true
在完成了 ~/.condarc 的内容修改后,重启 Shell。然后,使用 conda info 查看配置是否生效:
conda info

     active environment : base
    active env location : /Users/soulteary/anaconda3
            shell level : 1
       user config file : /Users/soulteary/.condarc
 populated config files : /Users/soulteary/.condarc
          conda version : 22.9.0
    conda-build version : 3.22.0
         python version : 3.9.13.final.0
       virtual packages : __osx=13.0.1=0
                          __unix=0=0
                          __archspec=1=arm64
       base environment : /Users/soulteary/anaconda3  (writable)
      conda av data dir : /Users/soulteary/anaconda3/etc/conda
  conda av metadata url : None
           channel URLs : https://mirrors.tuna.tsinghua.edu.cn/anaconda/pkgs/free/osx-arm64
                          https://mirrors.tuna.tsinghua.edu.cn/anaconda/pkgs/free/noarch
                          https://mirrors.tuna.tsinghua.edu.cn/anaconda/pkgs/main/osx-arm64
                          https://mirrors.tuna.tsinghua.edu.cn/anaconda/pkgs/main/noarch
                          https://mirrors.tuna.tsinghua.edu.cn/anaconda/cloud/pytorch/osx-arm64
                          https://mirrors.tuna.tsinghua.edu.cn/anaconda/cloud/pytorch/noarch
                          https://repo.anaconda.com/pkgs/main/osx-arm64
                          https://repo.anaconda.com/pkgs/main/noarch
                          https://repo.anaconda.com/pkgs/r/osx-arm64
                          https://repo.anaconda.com/pkgs/r/noarch
          package cache : /Users/soulteary/anaconda3/pkgs
                          /Users/soulteary/.conda/pkgs
       envs directories : /Users/soulteary/anaconda3/envs
                          /Users/soulteary/.conda/envs
               platform : osx-arm64
             user-agent : conda/22.9.0 requests/2.28.1 CPython/3.9.13 Darwin/22.1.0 OSX/13.0.1
                UID:GID : 502:20
             netrc file : None
           offline mode : False
如果输出的内容中包含我们刚刚设置的“清华源”,就说明我们的配置生效了。
快速准备 MacOS 上的 Python 运行环境
在完成 Conda 的安装之后,我们就可以用它来快速的创建不影响本地机器环境(MacOS),只和项目关联的干净的 Python 运行环境了。
检查 apple/ml-stable-diffusion/setup.py 文件,我们可以看到,项目支持运行的环境有 Python 3.7 ~ Python 3.9,那我们随便取个中间数 3.8 吧:
conda create -n coreml_stable_diffusion python=3.8 -y
等待上面的命令执行完毕,我们指定的名为 coreml_stable_diffusion 的环境就初始化好啦,环境使用的具体 Python 版本为 3.8 (虚拟环境的版本可以和系统不一样)。
当然,默认创建好之后,并不会直接切换到创建好的新环境,我们还需要使用命令,来完成环境的切换。
conda activate coreml_stable_diffusion
当命令执行完毕之后,我们会看到终端前的展示字符串会出现变化,展示我们当前正所处于的虚拟环境:
(base) # conda activate coreml_stable_diffusion
(coreml_stable_diffusion) #
因为,我们后续需要使用 pip 命令来安装程序依赖的软件包,为了减少时间的浪费,这里我们同样可以使用命令,来调整软件下载源为“清华源”:
pip config set global.index-url https://pypi.tuna.tsinghua.edu.cn/simple
如果我们关闭了终端,你会发现环境“失效了”,这时还是可以用和上文中提到的相同的命令 conda activate,来激活(切换)回我们之前配置好的环境。
conda activate coreml_stable_diffusion
避免 MacOS 上 Tokenizers 软件包安装出错
如果你经常在 MacOS 上折腾 “Huggingface” 等项目,尤其是运行相对新一些的模型项目,大概率会遇到 “Failed building wheel for tokenizers”这个问题。
解决问题的方法很简单,只需要在 MacOS 上完成 Rust 的安装即可:
curl https://sh.rustup.rs -sSf | sh
完成安装之后,可以使用 rustc --version 来做一个简单的命令“可执行”的验证:
# rustc --version
rustc 1.65.0 (897e37553 2022-11-02)
当然,为了加速 rust 软件包的下载,同样建议在 Rust 的配置文件(~/.cargo/config)中,完成“清华源”的配置:
# vi ~/.cargo/config
[source.crates-io]
registry = "https://github.com/rust-lang/crates.io-index"
replace-with = 'tuna'
[source.tuna]
registry = "https://mirrors.tuna.tsinghua.edu.cn/git/crates.io-index.git"
完成配置文件的保存,接下来在遇到需要 Rust 编译,或下载依赖包的时候,速度也会变的飞快。
如果你没有补全 rustc 的依赖,那么大概率会遇到类似下面的报错:
Building wheels for collected packages: pyyaml, tokenizers
  Building wheel for pyyaml (pyproject.toml) ... done
  Created wheel for pyyaml: filename=PyYAML-6.0-cp38-cp38-macosx_11_0_arm64.whl size=45335 sha256=e27236fa2771f8d6ffbba947c48931a8fcf95ad33d77b91d4c693d04d5344710
  Stored in directory: /Users/soulteary/Library/Caches/pip/wheels/fe/be/21/a238a4532fd03d32998d6a07c6b4f572ea8cb4eaa89ddc2a41
  Building wheel for tokenizers (pyproject.toml) ... error
  error: subprocess-exited-with-error

  × Building wheel for tokenizers (pyproject.toml) did not run successfully.
  │ exit code: 1
  ╰─> [51 lines of output]
      running bdist_wheel
      running build
      running build_py
      creating build
      creating build/lib.macosx-11.1-arm64-cpython-38
      creating build/lib.macosx-11.1-arm64-cpython-38/tokenizers
      copying py_src/tokenizers/__init__.py -> build/lib.macosx-11.1-arm64-cpython-38/tokenizers
      creating build/lib.macosx-11.1-arm64-cpython-38/tokenizers/models
      copying py_src/tokenizers/models/__init__.py -> build/lib.macosx-11.1-arm64-cpython-38/tokenizers/models
      creating build/lib.macosx-11.1-arm64-cpython-38/tokenizers/decoders
      copying py_src/tokenizers/decoders/__init__.py -> build/lib.macosx-11.1-arm64-cpython-38/tokenizers/decoders
      creating build/lib.macosx-11.1-arm64-cpython-38/tokenizers/normalizers
      copying py_src/tokenizers/normalizers/__init__.py -> build/lib.macosx-11.1-arm64-cpython-38/tokenizers/normalizers
      creating build/lib.macosx-11.1-arm64-cpython-38/tokenizers/pre_tokenizers
      copying py_src/tokenizers/pre_tokenizers/__init__.py -> build/lib.macosx-11.1-arm64-cpython-38/tokenizers/pre_tokenizers
      creating build/lib.macosx-11.1-arm64-cpython-38/tokenizers/processors
      copying py_src/tokenizers/processors/__init__.py -> build/lib.macosx-11.1-arm64-cpython-38/tokenizers/processors
      creating build/lib.macosx-11.1-arm64-cpython-38/tokenizers/trainers
      copying py_src/tokenizers/trainers/__init__.py -> build/lib.macosx-11.1-arm64-cpython-38/tokenizers/trainers
      creating build/lib.macosx-11.1-arm64-cpython-38/tokenizers/implementations
      copying py_src/tokenizers/implementations/byte_level_bpe.py -> build/lib.macosx-11.1-arm64-cpython-38/tokenizers/implementations
      copying py_src/tokenizers/implementations/sentencepiece_unigram.py -> build/lib.macosx-11.1-arm64-cpython-38/tokenizers/implementations
      copying py_src/tokenizers/implementations/sentencepiece_bpe.py -> build/lib.macosx-11.1-arm64-cpython-38/tokenizers/implementations
      copying py_src/tokenizers/implementations/base_tokenizer.py -> build/lib.macosx-11.1-arm64-cpython-38/tokenizers/implementations
      copying py_src/tokenizers/implementations/__init__.py -> build/lib.macosx-11.1-arm64-cpython-38/tokenizers/implementations
      copying py_src/tokenizers/implementations/char_level_bpe.py -> build/lib.macosx-11.1-arm64-cpython-38/tokenizers/implementations
      copying py_src/tokenizers/implementations/bert_wordpiece.py -> build/lib.macosx-11.1-arm64-cpython-38/tokenizers/implementations
      creating build/lib.macosx-11.1-arm64-cpython-38/tokenizers/tools
      copying py_src/tokenizers/tools/__init__.py -> build/lib.macosx-11.1-arm64-cpython-38/tokenizers/tools
      copying py_src/tokenizers/tools/visualizer.py -> build/lib.macosx-11.1-arm64-cpython-38/tokenizers/tools
      copying py_src/tokenizers/__init__.pyi -> build/lib.macosx-11.1-arm64-cpython-38/tokenizers
      copying py_src/tokenizers/models/__init__.pyi -> build/lib.macosx-11.1-arm64-cpython-38/tokenizers/models
      copying py_src/tokenizers/decoders/__init__.pyi -> build/lib.macosx-11.1-arm64-cpython-38/tokenizers/decoders
      copying py_src/tokenizers/normalizers/__init__.pyi -> build/lib.macosx-11.1-arm64-cpython-38/tokenizers/normalizers
      copying py_src/tokenizers/pre_tokenizers/__init__.pyi -> build/lib.macosx-11.1-arm64-cpython-38/tokenizers/pre_tokenizers
      copying py_src/tokenizers/processors/__init__.pyi -> build/lib.macosx-11.1-arm64-cpython-38/tokenizers/processors
      copying py_src/tokenizers/trainers/__init__.pyi -> build/lib.macosx-11.1-arm64-cpython-38/tokenizers/trainers
      copying py_src/tokenizers/tools/visualizer-styles.css -> build/lib.macosx-11.1-arm64-cpython-38/tokenizers/tools
      running build_ext
      running build_rust
      error: can't find Rust compiler

      If you are using an outdated pip version, it is possible a prebuilt wheel is available for this package but pip is not able to install from it. Installing from the wheel would avoid the need for a Rust compiler.

      To update pip, run:

          pip install --upgrade pip

      and then retry package installation.

      If you did intend to build this package from source, try installing a Rust compiler from your system package manager and ensure it is on the PATH during installation. Alternatively, rustup (available at https://rustup.rs) is the recommended way to download and update the Rust compiler toolchain.
      [end of output]

  note: This error originates from a subprocess, and is likely not a problem with pip.
  ERROR: Failed building wheel for tokenizers
Successfully built pyyaml
Failed to build tokenizers
ERROR: Could not build wheels for tokenizers, which is required to install pyproject.toml-based projects
完成 Stable Diffusion 项目的初始化
我们可以通过 git clone 命令,或者直接下载包含代码的压缩包,来获得项目的代码:
git clone https://github.com/apple/ml-stable-diffusion.git
项目比较小,所以下载速度还是蛮快的:
# git clone https://github.com/apple/ml-stable-diffusion.git

Cloning into 'ml-stable-diffusion'...
remote: Enumerating objects: 65, done.
remote: Counting objects: 100% (14/14), done.
remote: Compressing objects: 100% (13/13), done.
remote: Total 65 (delta 0), reused 14 (delta 0), pack-reused 51
Receiving objects: 100% (65/65), 9.05 MiB | 406.00 KiB/s, done.
Resolving deltas: 100% (1/1), done.
将工作目录切换到项目目录中,然后使用 pip install 完成项目依赖的安装:
cd ml-stable-diffusion
pip install -r requirements.txt
至此,基础环境准备工作就都就绪了。
转换和运行模型应用
基础环境就绪之后,我们需要转换 Huggingface 上的 PyTorch / TF 开放模型到 Apple Core ML 模型格式。
转换 PyTorch 模型为 Apple Core ML 模型
项目仓库中 python_coreml_stable_diffusion/torch2coreml.py 文件中,封装了调用 coremltools.models.MLModel 工具方法来转换其他格式模型到 Core ML 模型的逻辑:
coreml_model = coremltools.models.MLModel(...)
coreml_model.convert(...)
coreml_model.save(...)
所以,作为用户我们的使用就比较简单了,只需要执行下面的命令:
python -m python_coreml_stable_diffusion.torch2coreml --convert-unet --convert-text-encoder --convert-vae-decoder --convert-safety-checker -o ./models
命令执行会比较久,十来分钟左右,包含从 Huggingface 下载模型,加载并转换模型格式。默认情况下,模型使用的是 CompVis/stable-diffusion-v1-4,如果你希望使用其他的模型,可以通过添加 --model-version 参数,支持的模型版本除了默认的 “v1.4” 之外,还有: runwayml/stable-diffusion-v1-5 和 stabilityai/stable-diffusion-2-base。
如果你使用的 Mac 设备是 8GB 版本,在执行过程中,会得到内存不足之类的提示,可以用下面的命令进行替换:
python -m python_coreml_stable_diffusion.torch2coreml --convert-vae-decoder -o ./models && \
python -m python_coreml_stable_diffusion.torch2coreml --convert-unet -o ./models && \
python -m python_coreml_stable_diffusion.torch2coreml --convert-text-encoder -o ./models && \
python -m python_coreml_stable_diffusion.torch2coreml --convert-safety-checker -o ./models &&
命令执行完毕,我们将在 ./models 目录,得到必须的四个模型,尺寸都不算小:
# du -hs ./models/*
580M	./models/Stable_Diffusion_version_CompVis_stable-diffusion-v1-4_safety_checker.mlpackage
235M	./models/Stable_Diffusion_version_CompVis_stable-diffusion-v1-4_text_encoder.mlpackage
1.6G	./models/Stable_Diffusion_version_CompVis_stable-diffusion-v1-4_unet.mlpackage
 95M	./models/Stable_Diffusion_version_CompVis_stable-diffusion-v1-4_vae_decoder.mlpackage
当然,相比 HuggingFace 的原始模型来说,还是小了一些的:
du -hs ~/.cache/huggingface/diffusers/models--CompVis--stable-diffusion-v1-4/
5.1G	/Users/soulteary/.cache/huggingface/diffusers/models--CompVis--stable-diffusion-v1-4/
运行转换后的模型进行验证
完成模型构建之后,我们可以运行模型,来验证模型转换是否成功:
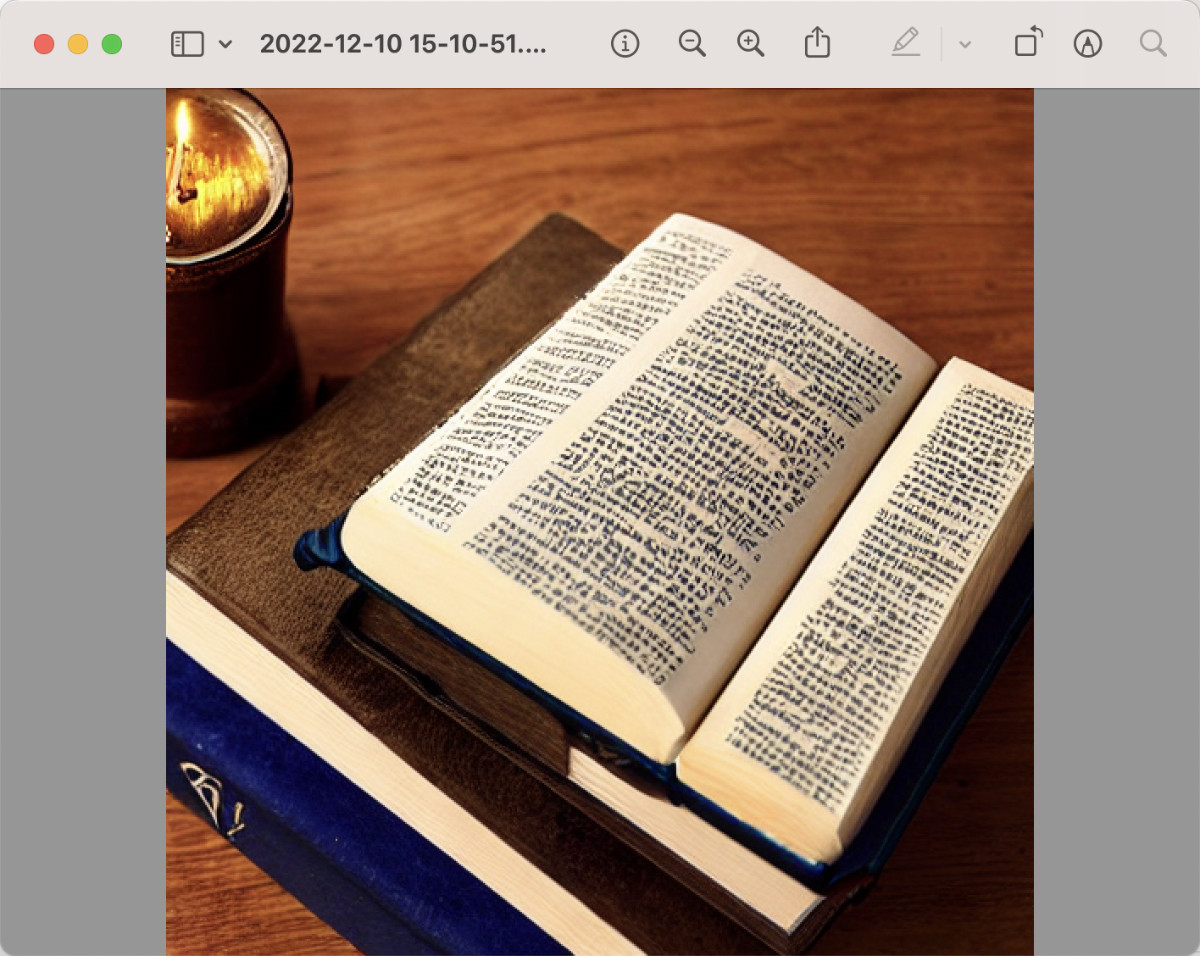
python -m python_coreml_stable_diffusion.pipeline --prompt "magic book on the table" -i ./models -o ./output --compute-unit ALL --seed 93
在上面的命令中,我们做了几件事,告诉程序使用 ./models 目录中的模型进行计算,将生成的图谱保存在 ./output 目录中,允许使用所有类型的运算单元(CPU/GPU),使用一个固定的随机数种子,确保每次生成的结果都是一样的,方便我们进行测试复现。当然,最重要的是,我们将要生成图片的文本描述写在 --prompt 参数中,告诉模型应用要生成“一本放在桌子上的魔法书”。如果你的设备只有 8GB 的内存,这里需要调整下 --compute-unit 参数,指定参数值为 CPU_AND_NE。
程序运行之后,需要等几分钟:
WARNING:coremltools:Torch version 1.13.0 has not been tested with coremltools. You may run into unexpected errors. Torch 1.12.1 is the most recent version that has been tested.
INFO:__main__:Setting random seed to 93
INFO:__main__:Initializing PyTorch pipe for reference configuration
Fetching 16 files: 100%|███████████████████████████████████████████████████████████████████████████████████████████████████| 16/16 [00:00<00:00, 9876.21it/s]
INFO:__main__:Removed PyTorch pipe to reduce peak memory consumption
INFO:__main__:Loading Core ML models in memory from ./models
INFO:python_coreml_stable_diffusion.coreml_model:Loading text_encoder mlpackage
INFO:python_coreml_stable_diffusion.coreml_model:Loading ./models/Stable_Diffusion_version_CompVis_stable-diffusion-v1-4_text_encoder.mlpackage
INFO:python_coreml_stable_diffusion.coreml_model:Done. Took 4.4 seconds.
INFO:python_coreml_stable_diffusion.coreml_model:Loading unet mlpackage
INFO:python_coreml_stable_diffusion.coreml_model:Loading ./models/Stable_Diffusion_version_CompVis_stable-diffusion-v1-4_unet.mlpackage
INFO:python_coreml_stable_diffusion.coreml_model:Done. Took 73.1 seconds.
INFO:python_coreml_stable_diffusion.coreml_model:Loading a CoreML model through coremltools triggers compilation every time. The Swift package we provide uses precompiled Core ML models (.mlmodelc) to avoid compile-on-load.
INFO:python_coreml_stable_diffusion.coreml_model:Loading vae_decoder mlpackage
INFO:python_coreml_stable_diffusion.coreml_model:Loading ./models/Stable_Diffusion_version_CompVis_stable-diffusion-v1-4_vae_decoder.mlpackage
INFO:python_coreml_stable_diffusion.coreml_model:Done. Took 5.5 seconds.
INFO:python_coreml_stable_diffusion.coreml_model:Loading safety_checker mlpackage
INFO:python_coreml_stable_diffusion.coreml_model:Loading ./models/Stable_Diffusion_version_CompVis_stable-diffusion-v1-4_safety_checker.mlpackage
INFO:python_coreml_stable_diffusion.coreml_model:Done. Took 2.2 seconds.
INFO:__main__:Done.
INFO:__main__:Initializing Core ML pipe for image generation
INFO:__main__:Stable Diffusion configured to generate 512x512 images
INFO:__main__:Done.
INFO:__main__:Beginning image generation.
100%|████████████████████████████████████████████████████████████████████████████████████████████████████████████████████████| 51/51 [01:50<00:00,  2.17s/it]
INFO:__main__:Generated image has nsfw concept=False
当程序运行完毕之后,我们将能够在 ./output 目录中,找到生成的图片。
但是,每次使用都要等三四分钟才能得到图片,未免太慢了。而且想生成不同的图,不论是需要调整“随机数种子”,还是要改变“描述文本”,都得在命令行中完成,遇到文本特别长的时候,非常不方便。
有没有什么方法,可以让 ML Stable Diffusion 的生成图片,使用起来方便些呢?
为 ML Stable Diffusion 编写一个 Web UI
在以往和 Python 相关的内容里,我提到过 gradio 这个有趣的工具,能够为 Python 应用,快速创建简洁美观的 Web 界面。Huggingface 中非常多的应用界面都是用它完成的。

为了解决上面的问题,我们可以用它来创建一个 Web 界面,把 ML Stable Diffusion 的图片生成和 Web 界面“绑定”到一起。实现代码很简单,不到 100 行:
import python_coreml_stable_diffusion.pipeline as pipeline

import gradio as gr
from diffusers import StableDiffusionPipeline

def init(args):
    pipeline.logger.info("Initializing PyTorch pipe for reference configuration")
    pytorch_pipe = StableDiffusionPipeline.from_pretrained(args.model_version,
                                                           use_auth_token=True)

    user_specified_scheduler = None
    if args.scheduler is not None:
        user_specified_scheduler = pipeline.SCHEDULER_MAP[
            args.scheduler].from_config(pytorch_pipe.scheduler.config)

    coreml_pipe = pipeline.get_coreml_pipe(pytorch_pipe=pytorch_pipe,
                                  mlpackages_dir=args.i,
                                  model_version=args.model_version,
                                  compute_unit=args.compute_unit,
                                  scheduler_override=user_specified_scheduler)


    def infer(prompt, steps):
        pipeline.logger.info("Beginning image generation.")
        image = coreml_pipe(
            prompt=prompt,
            height=coreml_pipe.height,
            width=coreml_pipe.width,
            num_inference_steps=steps,
        )
        images = []
        images.append(image["images"][0])
        return images


    demo = gr.Blocks()

    with demo:
        gr.Markdown(
            "<center><h1>Core ML Stable Diffusion</h1>Run Stable Diffusion on Apple Silicon with Core ML</center>")
        with gr.Group():
            with gr.Box():
                with gr.Row():
                    with gr.Column():
                        with gr.Row():
                            text = gr.Textbox(
                                label="Prompt",
                                lines=11,
                                placeholder="Enter your prompt",
                            )
                        with gr.Row():
                            btn = gr.Button("Generate image")
                        with gr.Row():
                            steps = gr.Slider(label="Steps", minimum=1,
                                            maximum=50, value=10, step=1)
                    with gr.Column():
                        gallery = gr.Gallery(
                            label="Generated image", elem_id="gallery"
                        )

            text.submit(infer, inputs=[text, steps], outputs=gallery)
            btn.click(infer, inputs=[text, steps], outputs=gallery)

    demo.launch(debug=True, server_name="0.0.0.0")


if __name__ == "__main__":
    parser = pipeline.argparse.ArgumentParser()

    parser.add_argument(
        "-i",
        required=True,
        help=("Path to input directory with the .mlpackage files generated by "
              "python_coreml_stable_diffusion.torch2coreml"))
    parser.add_argument(
        "--model-version",
        default="CompVis/stable-diffusion-v1-4",
        help=
        ("The pre-trained model checkpoint and configuration to restore. "
         "For available versions: https://huggingface.co/models?search=stable-diffusion"
         ))
    parser.add_argument(
        "--compute-unit",
        choices=pipeline.get_available_compute_units(),
        default="ALL",
        help=("The compute units to be used when executing Core ML models. "
              f"Options: {pipeline.get_available_compute_units()}"))
    parser.add_argument(
        "--scheduler",
        choices=tuple(pipeline.SCHEDULER_MAP.keys()),
        default=None,
        help=("The scheduler to use for running the reverse diffusion process. "
             "If not specified, the default scheduler from the diffusers pipeline is utilized"))

    args = parser.parse_args()
    init(args)
我们将上面的代码保存为 web.py,同样放在项目的 python_coreml_stable_diffusion 目录中。然后执行命令:
python -m python_coreml_stable_diffusion.web -i ./models --compute-unit ALL
命令执行后,我们将得到类似下面的日志:
WARNING:coremltools:Torch version 1.13.0 has not been tested with coremltools. You may run into unexpected errors. Torch 1.12.1 is the most recent version that has been tested.
INFO:python_coreml_stable_diffusion.pipeline:Initializing PyTorch pipe for reference configuration
Fetching 16 files: 100%|██████████████████████████████████████████████████████████████████████████████████████████████████| 16/16 [00:00<00:00, 16396.01it/s]
INFO:python_coreml_stable_diffusion.pipeline:Removed PyTorch pipe to reduce peak memory consumption
INFO:python_coreml_stable_diffusion.pipeline:Loading Core ML models in memory from ./models
INFO:python_coreml_stable_diffusion.coreml_model:Loading text_encoder mlpackage
INFO:python_coreml_stable_diffusion.coreml_model:Loading ./models/Stable_Diffusion_version_CompVis_stable-diffusion-v1-4_text_encoder.mlpackage
INFO:python_coreml_stable_diffusion.coreml_model:Done. Took 4.4 seconds.
INFO:python_coreml_stable_diffusion.coreml_model:Loading unet mlpackage
INFO:python_coreml_stable_diffusion.coreml_model:Loading ./models/Stable_Diffusion_version_CompVis_stable-diffusion-v1-4_unet.mlpackage
INFO:python_coreml_stable_diffusion.coreml_model:Done. Took 73.5 seconds.
INFO:python_coreml_stable_diffusion.coreml_model:Loading a CoreML model through coremltools triggers compilation every time. The Swift package we provide uses precompiled Core ML models (.mlmodelc) to avoid compile-on-load.
INFO:python_coreml_stable_diffusion.coreml_model:Loading vae_decoder mlpackage
INFO:python_coreml_stable_diffusion.coreml_model:Loading ./models/Stable_Diffusion_version_CompVis_stable-diffusion-v1-4_vae_decoder.mlpackage
INFO:python_coreml_stable_diffusion.coreml_model:Done. Took 6.0 seconds.
INFO:python_coreml_stable_diffusion.coreml_model:Loading safety_checker mlpackage
INFO:python_coreml_stable_diffusion.coreml_model:Loading ./models/Stable_Diffusion_version_CompVis_stable-diffusion-v1-4_safety_checker.mlpackage
INFO:python_coreml_stable_diffusion.coreml_model:Done. Took 1.9 seconds.
INFO:python_coreml_stable_diffusion.pipeline:Done.
INFO:python_coreml_stable_diffusion.pipeline:Initializing Core ML pipe for image generation
INFO:python_coreml_stable_diffusion.pipeline:Stable Diffusion configured to generate 512x512 images
INFO:python_coreml_stable_diffusion.pipeline:Done.
Running on local URL:  http://0.0.0.0:7860

To create a public link, set `share=True` in `launch()`.
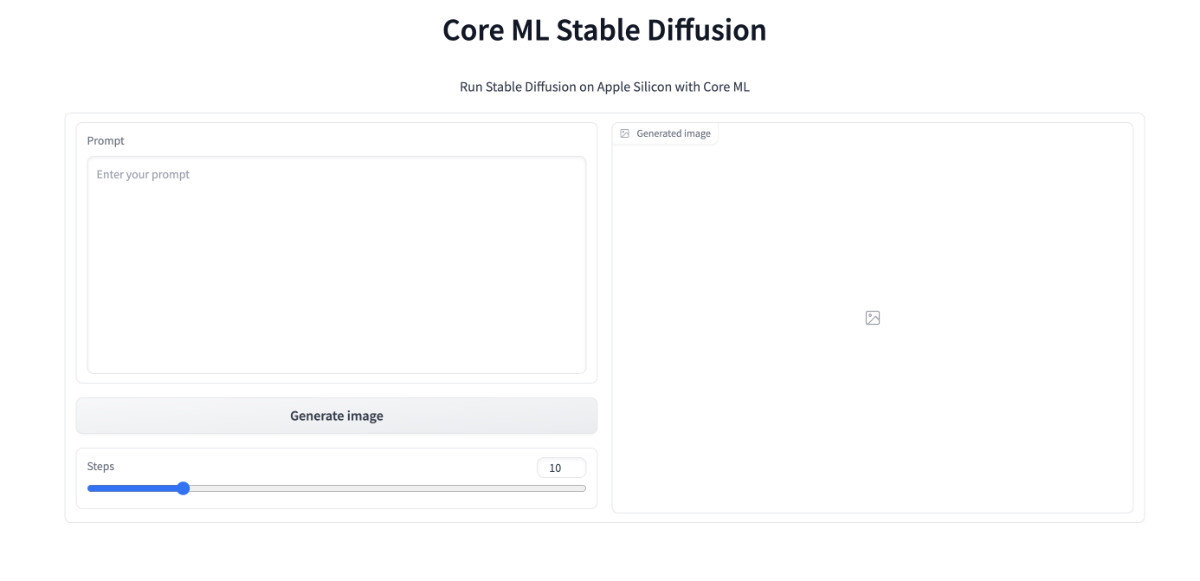
前半段日志是不是很熟悉,和我们运行模型进行验证时,基本一致。但是在日志的结束处,我们看到程序启动了 Web 服务,并监听了 7860 端口。打开浏览器,访问这个地址,我们就能看到预期中的 Web UI 啦。完整的项目代码,可以参考 GitHub 的提交。
都能看到界面了,不试一试是不是说不过去,我这里简单输入“colorful startrails” (绚丽星轨),然后点击 “Generate image” ,等待程序进行图片生成,图片生成完毕,将出现在右侧的 “Generated image” 图片展示框内。
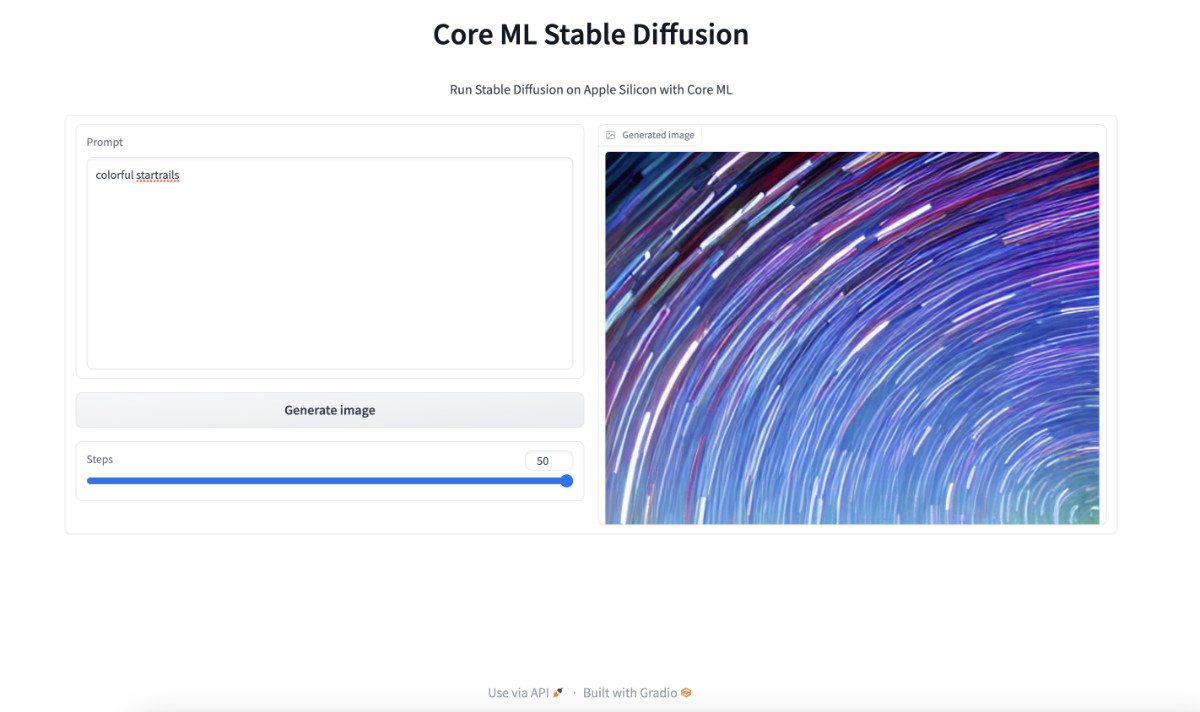
是不是还挺方便的,想要生成图片只需要调整文本框中的 “prompt” 文本,然后点击 “Generate image” ,等待结果展示在页面上就行了,不用去调整命令行,也不用去翻找文件夹里的图片了。并且,因为我们将程序当服务运行了起来,被模型加载只需要一次,不再需要像上文一样,每次生成图片都要先加载模型,再进行计算,能节约不少时间。
其他:一个低级 Bug
使用过其他版本的图片生成模型的同学,手里一定有“大段咒语”,当我们将超级长的咒语扔到 ML Stable Diffusion 中的时候,大概率会遇到类似下面的报错:
Traceback (most recent call last):
  File "/Users/soulteary/anaconda3/envs/coreml_stable_diffusion2/lib/python3.8/runpy.py", line 194, in _run_module_as_main
    return _run_code(code, main_globals, None,
  File "/Users/soulteary/anaconda3/envs/coreml_stable_diffusion2/lib/python3.8/runpy.py", line 87, in _run_code
    exec(code, run_globals)
  File "/Users/soulteary/ml-stable-diffusion/python_coreml_stable_diffusion/pipeline.py", line 534, in <module>
    main(args)
  File "/Users/soulteary/ml-stable-diffusion/python_coreml_stable_diffusion/pipeline.py", line 485, in main
    out_path = get_image_path(args)
  File "/Users/soulteary/ml-stable-diffusion/python_coreml_stable_diffusion/pipeline.py", line 444, in get_image_path
    os.makedirs(out_folder, exist_ok=True)
  File "/Users/soulteary/anaconda3/envs/coreml_stable_diffusion2/lib/python3.8/os.py", line 223, in makedirs
    mkdir(name, mode)
OSError: [Errno 63] File name too long: './output/.........'
想要避免这个问题,只有两个方法:
- 缩短你的 Prompt 文本长度
- 修改代码,避免出现超级长的文本
关于如何用代码解决这个问题,我在 GitHub 的这个 PR 中有提到,感兴趣的同学可以自行“复制粘贴”,来修正这个问题。或者,等等看官方是否会合并这个请求,更新程序版本即可解决问题 😄
最后
这篇文章就先写到这里啦。关于 Apple Mac 生态和模型的话题,其实还有不少可以聊的东西,希望后面有机会能够慢慢展开。
–EOF
我们有一个小小的折腾群,里面聚集了一些喜欢折腾的小伙伴。
在不发广告的情况下,我们在里面会一起聊聊软硬件、HomeLab、编程上的一些问题,也会在群里不定期的分享一些技术沙龙的资料。
喜欢折腾的小伙伴,欢迎阅读下面的内容,扫码添加好友。
- 关于“交友”的一些建议和看法
- 添加好友,请备注实名和公司或学校、注明来源和目的,否则不会通过审核。
- 关于折腾群入群的那些事
本文使用「署名 4.0 国际 (CC BY 4.0)」许可协议,欢迎转载、或重新修改使用,但需要注明来源。 署名 4.0 国际 (CC BY 4.0)
本文作者: 苏洋
创建时间: 2022年12月10日
统计字数: 22672字
阅读时间: 46分钟阅读
本文链接: https://soulteary.com/2022/12/10/play-the-stable-diffusion-model-on-macbook-devices-with-m1-and-m2-chips.html