目录
前言
1、下载mysql安装包
2、mysql 读写分离
3、docker安装三台mysql服务
4、修改主从配置文件
5、重启mysql
6、配置主库
7、配置从库创建同步账户
7.1、进入MySQL01和MySQL02和mysql03服务器新增MySQL用户user 密码root 用于同步账号和密码;
7.2、验证
7.3、进入从数据库停止同步
8、查看主机ip(mysql01)
9、查看主库同步状态
9.1、在主库中查询
9.2、在从库(mysql02,mysql03)中执行如下代码
9.3、启动从库同步
9.4、检查同步状态
9.4.1、错误及处理方法
1、防火墙是否关闭
shutdown -r now #重启系统
2、停止同步
3、检查主从库中的同步数据是否和主库保持一致
4、查看输入错误日志信息
5、重新同步
6、检查同步状态
7、检测是否完成
前言
MySQL读写分离是将数据库的读操作和写操作分配到不同的数据库服务器上的一种架构设计。它的主要意义包括以下几个方面:
-
提高性能:通过将读操作分散到多个从数据库上,可以分担主数据库的负载,提高整体的数据库性能和吞吐量。读写分离架构特别适合读多写少的应用场景。
-
优化用户体验:将读操作分流到从数据库上,可以减少主数据库的并发访问压力,提高响应速度和用户访问体验。对于读密集型应用,如电商网站或新闻门户,读写分离可以优化用户访问速度。
-
提高系统可靠性:通过主从复制的方式,从数据库实时复制主数据库的数据,起到冗余备份的作用。当主数据库发生故障或宕机时,可以快速切换到从数据库,确保系统的持续可用性和故障恢复能力。
-
方便维护和升级:通过读写分离,可以只对从数据库进行维护和升级操作,而不影响主数据库的正常使用。这样可以减少对整个系统的停机时间和维护成本,提高系统的可维护性。
-
节约成本:通过合理配置硬件资源,可以在从数据库上使用较低配置的服务器,减少硬件成本。主数据库可以独立配置高性能的服务器,提高写操作的处理能力。
综上所述,MySQL读写分离可以提升数据库性能、优化用户体验、提高系统可靠性、方便维护和降低成本。在高并发的应用场景下,读写分离是一种常用的架构设计方案。
1、下载mysql安装包
从其他可以连接外网的docker 环境中pull mysql:5.7
然后打包好拷贝到本机
2、mysql 读写分离
删除已经有的mysql容器,准备三台mysql服务器
配置要求:mysql01 为主 mysql02 、mysql03 为从
关闭三台mysql服务器防火墙
vi /etc/selinux/config
     #SELINUX=enforcing     #注释掉
     #SELINUXTYPE=targeted  #注释掉
     SELINUX=disabled  #增加
:wq #保存,关闭。 shutdown -r now #重启系统
3、docker安装三台mysql服务
##第一台mysql01
docker run \
-p 3306:3306  \
--name mysql01  \
--restart=always  \
-v  /home/mysql/conf1:/etc/mysql/conf.d  \
-v  /home/mysql/data1:/var/lib/mysql  \
 -v  /home/mysql/log1:/var/log/mysql \
-e MYSQL_ROOT_PASSWORD=root \
-d mysql:5.7
##第二台mysql02
docker run \
-p 3307:3306  \
--name mysql02  \
--restart=always  \
-v  /home/mysql/conf2:/etc/mysql/conf.d  \
-v  /home/mysql/data2:/var/lib/mysql  \
 -v  /home/mysql/log2:/var/log/mysql \
-e MYSQL_ROOT_PASSWORD=root \
-d mysql:5.7 ##第二台mysql03
docker run \
-p 3308:3306  \
--name mysql03  \
--restart=always  \
-v  /home/mysql/conf3:/etc/mysql/conf.d  \
-v  /home/mysql/data3:/var/lib/mysql  \
 -v  /home/mysql/log3:/var/log/mysql \
-e MYSQL_ROOT_PASSWORD=root \
-d mysql:5.7
4、修改主从配置文件
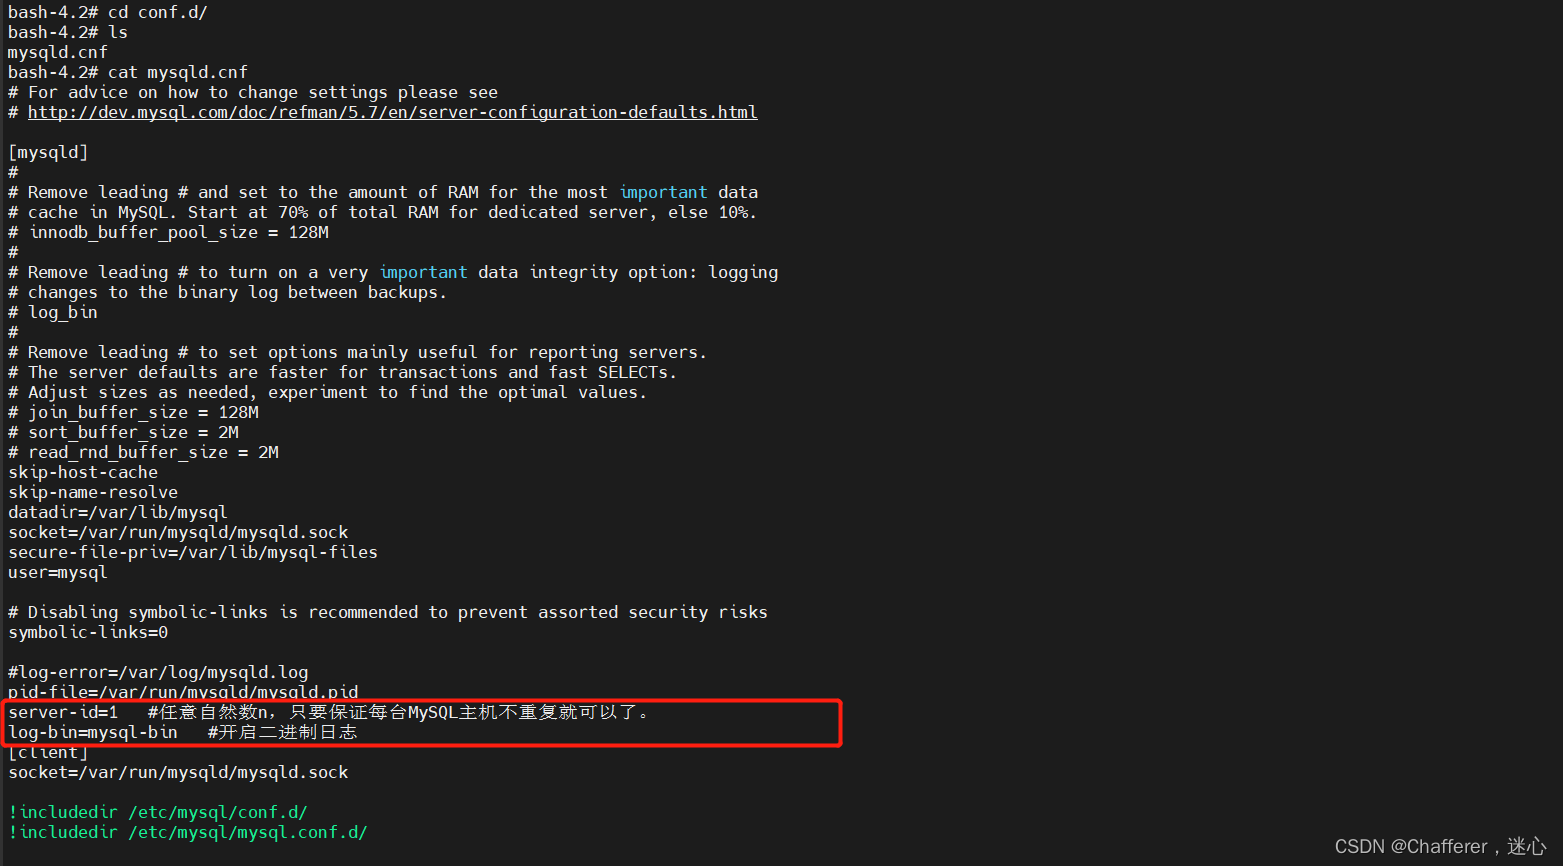
因为创建mysql 服务时已经将配置文件通过数据卷同步到了宿主机中的/home/mysql/ 只需要在宿主机中的配置文件中修改即可;在三台mysql服务器中的 /etc/mysql/conf.d/mysqld.cnf 都需要添加:
server-id=1   #任意自然数n,只要保证每台MySQL主机不重复就可以了。
log-bin=mysql-bin   #开启二进制日志
注意:原本在mysql服务器中的 /etc/mysql/conf.d/目录下是没有mysqld.cnf文件,我们需要将/etc/my.cnf内容拷贝出来然后在[mysqld]下面添加上
server-id=1   #任意自然数n,只要保证每台MySQL主机不重复就可以了。
log-bin=mysql-bin   #开启二进制日志
如下是三台mysql服务器的配置
第一台mysql01主
vi /home/mysql/conf1
# For advice on how to change settings please see
# http://dev.mysql.com/doc/refman/5.7/en/server-configuration-defaults.html
[mysqld]
#
# Remove leading # and set to the amount of RAM for the most important data
# cache in MySQL. Start at 70% of total RAM for dedicated server, else 10%.
# innodb_buffer_pool_size = 128M
#
# Remove leading # to turn on a very important data integrity option: logging
# changes to the binary log between backups.
# log_bin
#
# Remove leading # to set options mainly useful for reporting servers.
# The server defaults are faster for transactions and fast SELECTs.
# Adjust sizes as needed, experiment to find the optimal values.
# join_buffer_size = 128M
# sort_buffer_size = 2M
# read_rnd_buffer_size = 2M
skip-host-cache
skip-name-resolve
datadir=/var/lib/mysql
socket=/var/run/mysqld/mysqld.sock
secure-file-priv=/var/lib/mysql-files
user=mysql
# Disabling symbolic-links is recommended to prevent assorted security risks
symbolic-links=0
#log-error=/var/log/mysqld.log
pid-file=/var/run/mysqld/mysqld.pid
server-id=1 #任意自然数n,只要保证每台MySQL主机不重复就可以了。
log-bin=mysql-bin #开启二进制日志
[client]
socket=/var/run/mysqld/mysqld.sock
!includedir /etc/mysql/conf.d/
!includedir /etc/mysql/mysql.conf.d/第二台mysql02从
vi /home/mysql/conf2
# For advice on how to change settings please see
# http://dev.mysql.com/doc/refman/5.7/en/server-configuration-defaults.html
[mysqld]
#
# Remove leading # and set to the amount of RAM for the most important data
# cache in MySQL. Start at 70% of total RAM for dedicated server, else 10%.
# innodb_buffer_pool_size = 128M
#
# Remove leading # to turn on a very important data integrity option: logging
# changes to the binary log between backups.
# log_bin
#
# Remove leading # to set options mainly useful for reporting servers.
# The server defaults are faster for transactions and fast SELECTs.
# Adjust sizes as needed, experiment to find the optimal values.
# join_buffer_size = 128M
# sort_buffer_size = 2M
# read_rnd_buffer_size = 2M
skip-host-cache
skip-name-resolve
datadir=/var/lib/mysql
socket=/var/run/mysqld/mysqld.sock
secure-file-priv=/var/lib/mysql-files
user=mysql
# Disabling symbolic-links is recommended to prevent assorted security risks
symbolic-links=0
#log-error=/var/log/mysqld.log
pid-file=/var/run/mysqld/mysqld.pid
server-id=2 #任意自然数n,只要保证每台MySQL主机不重复就可以了。
log-bin=mysql-bin #开启二进制日志
[client]
socket=/var/run/mysqld/mysqld.sock
!includedir /etc/mysql/conf.d/
!includedir /etc/mysql/mysql.conf.d/第三台mysql03从
vi /home/mysql/conf3
# For advice on how to change settings please see
# http://dev.mysql.com/doc/refman/5.7/en/server-configuration-defaults.html
[mysqld]
#
# Remove leading # and set to the amount of RAM for the most important data
# cache in MySQL. Start at 70% of total RAM for dedicated server, else 10%.
# innodb_buffer_pool_size = 128M
#
# Remove leading # to turn on a very important data integrity option: logging
# changes to the binary log between backups.
# log_bin
#
# Remove leading # to set options mainly useful for reporting servers.
# The server defaults are faster for transactions and fast SELECTs.
# Adjust sizes as needed, experiment to find the optimal values.
# join_buffer_size = 128M
# sort_buffer_size = 2M
# read_rnd_buffer_size = 2M
skip-host-cache
skip-name-resolve
datadir=/var/lib/mysql
socket=/var/run/mysqld/mysqld.sock
secure-file-priv=/var/lib/mysql-files
user=mysql
# Disabling symbolic-links is recommended to prevent assorted security risks
symbolic-links=0
#log-error=/var/log/mysqld.log
pid-file=/var/run/mysqld/mysqld.pid
server-id=3 #任意自然数n,只要保证每台MySQL主机不重复就可以了。
log-bin=mysql-bin #开启二进制日志
[client]
socket=/var/run/mysqld/mysqld.sock
!includedir /etc/mysql/conf.d/
!includedir /etc/mysql/mysql.conf.d/配置完成后就可以去任意一台部署的mysql服务中查看是否同步
docker exec -it 3a /bin/bash ##查看是否配置同步 /etc/mysql/conf.d/mysqld.cnf
5、重启mysql
docker restart mysql01 && docker restart mysql02 && docker restart mysql03
6、配置主库
进入主库查看配置是否生效
##进入主库
docker  exec -it  3a  /bin/bash

##登录数据库
mysql -uroot -proot
##登录成功后输入
SHOW VARIABLES LIKE 'server_id';
第一台mysql01 主

第二台mysql02从

第三台mysql03 从

7、配置从库创建同步账户
7.1、进入MySQL01和MySQL02和mysql03服务器新增MySQL用户user 密码root 用于同步账号和密码;
##从库执行
grant replication client on *.* to 'user'@'%'identified by 'root';
##mysql :8及以上使用下面语句
GRANT REPLICATION CLIENT,REPLICATION SLAVE ON *.* TO user@'%' IDENTIFIED BY 'root';
##主库执行
grant replication slave on *.* to 'user'@'%' identified by 'root';7.2、验证
##验证
mysql> use mysql;
Reading table information for completion of table and column names
You can turn off this feature to get a quicker startup with -A
Database changed
mysql> select user,host,authentication_string from user;
+---------------+-----------+-------------------------------------------+
| user | host | authentication_string |
+---------------+-----------+-------------------------------------------+
| root | localhost | *81F5E21E35407D884A6CD4A731AEBFB6AF209E1B |
| mysql.session | localhost | *THISISNOTAVALIDPASSWORDTHATCANBEUSEDHERE |
| mysql.sys | localhost | *THISISNOTAVALIDPASSWORDTHATCANBEUSEDHERE |
| root | % | *81F5E21E35407D884A6CD4A731AEBFB6AF209E1B |
| user | % | *81F5E21E35407D884A6CD4A731AEBFB6AF209E1B |
+---------------+-----------+-------------------------------------------+
5 rows in set (0.00 sec)
mysql> 7.3、进入从数据库停止同步
docker exec -it e6 /bin/bash
mysql -uroot -proot;
stop slave; ##停止同步;
bash-4.2# mysql -uroot -proot;
mysql: [Warning] skipping '!includedir /etc/mysql/conf.d/' directive as maximum includerecursion level was reached in file /etc/mysql/conf.d/mysqld.cnf at line 37!
mysql: [Warning] skipping '!includedir /etc/mysql/mysql.conf.d/' directive as maximum includerecursion level was reached in file /etc/mysql/conf.d/mysqld.cnf at line 38!
mysql: [Warning] Using a password on the command line interface can be insecure.
Welcome to the MySQL monitor. Commands end with ; or \g.
Your MySQL connection id is 3
Server version: 5.7.42-log MySQL Community Server (GPL)
Copyright (c) 2000, 2023, Oracle and/or its affiliates.
Oracle is a registered trademark of Oracle Corporation and/or its
affiliates. Other names may be trademarks of their respective
owners.
Type 'help;' or '\h' for help. Type '\c' to clear the current input statement.
##停止同步
mysql> stop slave;
Query OK, 0 rows affected, 1 warning (0.00 sec)
mysql> 8、查看主机ip(mysql01)
docker inspect 3a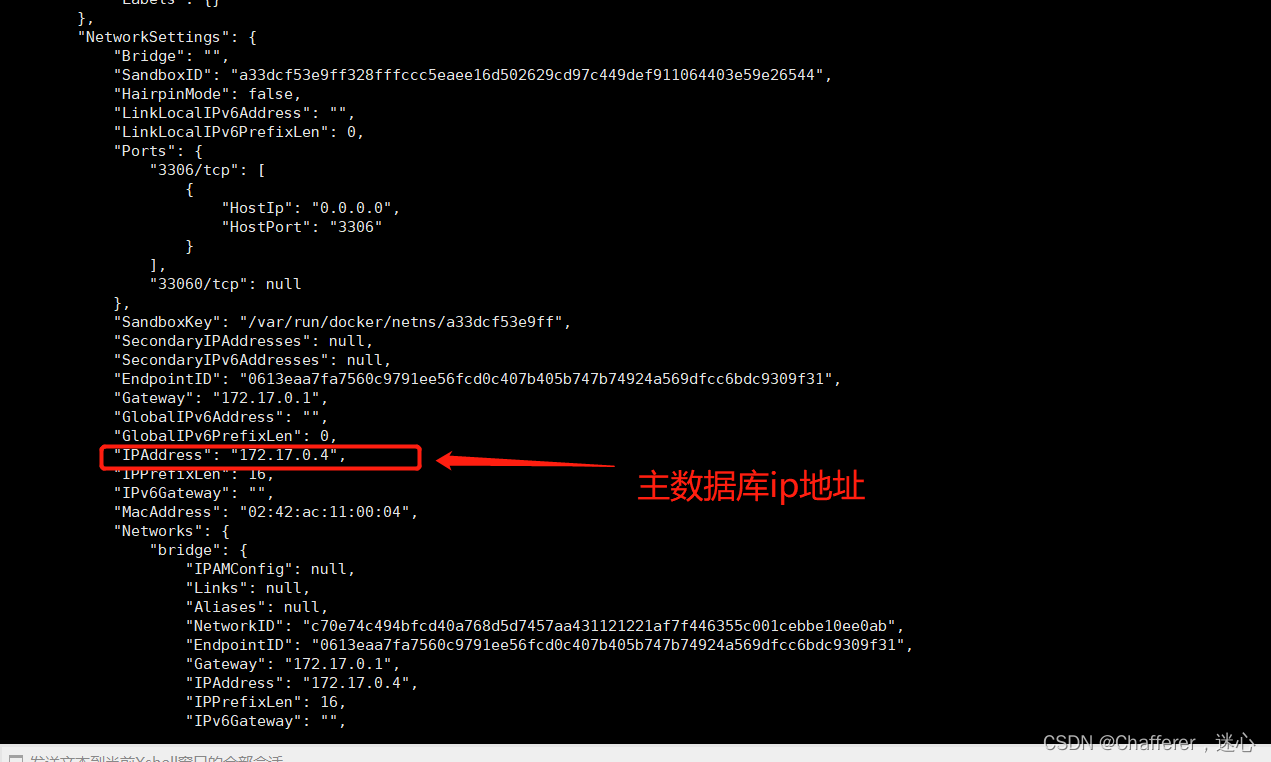
9、查看主库同步状态
9.1、在主库中查询
##在主库中查询
mysql> show master status\G
*************************** 1. row ***************************
File: mysql-bin.000003
Position: 443
Binlog_Do_DB:
Binlog_Ignore_DB:
Executed_Gtid_Set:
1 row in set (0.00 sec)
mysql>9.2、在从库(mysql02,mysql03)中执行如下代码
mysql> CHANGE MASTER TO MASTER_HOST='172.17.0.4', #主库IP
MASTER_PORT=3306, #主服务器端口
MASTER_USER='user', #主服务器用户名
MASTER_PASSWORD='root', #主服务器用户密码
MASTER_LOG_FILE='mysql-bin.000003', #日志文件名,获取方法往上看
MASTER_LOG_POS=443; #同步位置,获取方式往上看
# 执行结果
mysql> CHANGE MASTER TO MASTER_HOST='172.17.0.4', #IP
-> MASTER_PORT=3306, #
-> MASTER_USER='user', #
-> MASTER_PASSWORD='root', #
-> MASTER_LOG_FILE='mysql-bin.000003', #
-> MASTER_LOG_POS=154;
Query OK, 0 rows affected, 2 warnings (0.30 sec)9.3、启动从库同步
mysql> start slave;
Query OK, 0 rows affected (0.00 sec)
9.4、检查同步状态
 Slave_IO_Running:Yes   ##必须为yes
 Slave_SQL_Running: Yes   ##必须为yes
mysql> start slave;
Query OK, 0 rows affected (0.13 sec)
mysql> show slave status\G
*************************** 1. row ***************************
Slave_IO_State: Waiting for master to send event
Master_Host: 172.17.0.4
Master_User: user
Master_Port: 3306
Connect_Retry: 60
Master_Log_File: mysql-bin.000004
Read_Master_Log_Pos: 442
Relay_Log_File: 32124be62dde-relay-bin.000004
Relay_Log_Pos: 655
Relay_Master_Log_File: mysql-bin.000004
Slave_IO_Running: Yes
Slave_SQL_Running: Yes
Replicate_Do_DB:
Replicate_Ignore_DB:
Replicate_Do_Table:
Replicate_Ignore_Table:
Replicate_Wild_Do_Table:
Replicate_Wild_Ignore_Table:
Last_Errno: 0
Last_Error:
Skip_Counter: 0
Exec_Master_Log_Pos: 442
Relay_Log_Space: 1035
Until_Condition: None
Until_Log_File:
Until_Log_Pos: 0
Master_SSL_Allowed: No
Master_SSL_CA_File:
Master_SSL_CA_Path:
Master_SSL_Cert:
Master_SSL_Cipher:
Master_SSL_Key:
Seconds_Behind_Master: 0
Master_SSL_Verify_Server_Cert: No
Last_IO_Errno: 0
Last_IO_Error:
Last_SQL_Errno: 0
Last_SQL_Error:
Replicate_Ignore_Server_Ids:
Master_Server_Id: 1
Master_UUID: 31151b6d-215f-11ee-a0f5-0242ac110002
Master_Info_File: /var/lib/mysql/master.info
SQL_Delay: 0
SQL_Remaining_Delay: NULL
Slave_SQL_Running_State: Slave has read all relay log; waiting for more updates
Master_Retry_Count: 86400
Master_Bind:
Last_IO_Error_Timestamp:
Last_SQL_Error_Timestamp:
Master_SSL_Crl:
Master_SSL_Crlpath:
Retrieved_Gtid_Set:
Executed_Gtid_Set:
Auto_Position: 0
Replicate_Rewrite_DB:
Channel_Name:
Master_TLS_Version:
1 row in set (0.00 sec)
mysql>9.4.1、错误及处理方法
需要检查 1. 网络不通 2. 密码不对 3. pos不对
解决方法:
1、防火墙是否关闭
 vi /etc/selinux/config
     #SELINUX=enforcing     #注释掉
     #SELINUXTYPE=targeted  #注释掉
     SELINUX=disabled  #增加
shutdown -r now #重启系统
2、停止同步
mysql>stop slave;
Query OK, 0 rows affected (0.01 sec)
3、检查主从库中的同步数据是否和主库保持一致
Position :154
mysql> stop slave;
Query OK, 0 rows affected (0.01 sec)
mysql> show master status;
+------------------+----------+--------------+------------------+-------------------+
| File | Position | Binlog_Do_DB | Binlog_Ignore_DB | Executed_Gtid_Set |
+------------------+----------+--------------+------------------+-------------------+
| mysql-bin.000003 | 154 | | | |
+------------------+----------+--------------+------------------+-------------------+
1 row in set (0.00 sec)4、查看输入错误日志信息
Slave_IO_Running: Connecting
Slave_SQL_Running: Yes
Last_IO_Error: Accessdenied for user 'replica'@'192.168.0.4' (using password: YES) (Errno: 1045), Error_code:1597
看这个错误是因为权限不够被拒绝,查了一下文档还需要在master上对复制账号增加下面的权限:
在主库中添加账号user 并赋予权限:
grant replication slave on *.* to 'user'@'%' identified by 'root';错误信息查看如下:
mysql> show slave status\G
*************************** 1. row ***************************
Slave_IO_State: Connecting to master
Master_Host: 172.17.0.4
Master_User: user
Master_Port: 3306
Connect_Retry: 60
Master_Log_File: mysql-bin.000003
Read_Master_Log_Pos: 154
Relay_Log_File: e6172c2f5cb9-relay-bin.000001
Relay_Log_Pos: 4
Relay_Master_Log_File: mysql-bin.000003
Slave_IO_Running: Connecting ##必须为yes
Slave_SQL_Running: Yes ##必须为yes
Replicate_Do_DB:
Replicate_Ignore_DB:
Replicate_Do_Table:
Replicate_Ignore_Table:
Replicate_Wild_Do_Table:
Replicate_Wild_Ignore_Table:
Last_Errno: 0
Last_Error:
Skip_Counter: 0
Exec_Master_Log_Pos: 154
Relay_Log_Space: 154
Until_Condition: None
Until_Log_File:
Until_Log_Pos: 0
Master_SSL_Allowed: No
Master_SSL_CA_File:
Master_SSL_CA_Path:
Master_SSL_Cert:
Master_SSL_Cipher:
Master_SSL_Key:
Seconds_Behind_Master: NULL
Master_SSL_Verify_Server_Cert: No
Last_IO_Errno: 1045
Last_IO_Error: Accessdenied for user 'replica'@'192.168.0.4' (using password: YES) (Errno: 1045), Error_code:1597
Last_SQL_Errno: 0
Last_SQL_Error:
Replicate_Ignore_Server_Ids:
Master_Server_Id: 0
Master_UUID:
Master_Info_File: /var/lib/mysql/master.info
SQL_Delay: 0
SQL_Remaining_Delay: NULL
Slave_SQL_Running_State: Slave has read all relay log; waiting for more updates
Master_Retry_Count: 86400
Master_Bind:
Last_IO_Error_Timestamp: 230717 07:36:32
Last_SQL_Error_Timestamp:
Master_SSL_Crl:
Master_SSL_Crlpath:
Retrieved_Gtid_Set:
Executed_Gtid_Set:
Auto_Position: 0
Replicate_Rewrite_DB:
Channel_Name:
Master_TLS_Version:
1 row in set (0.00 sec)
mysql> 5、重新同步
mysql> start slave;
Query OK, 0 rows affected (0.13 sec)
6、检查同步状态
mysql> show slave status\G
*************************** 1. row ***************************
Slave_IO_State: Waiting for master to send event
Master_Host: 172.17.0.4
Master_User: user
Master_Port: 3306
Connect_Retry: 60
Master_Log_File: mysql-bin.000004
Read_Master_Log_Pos: 442
Relay_Log_File: 32124be62dde-relay-bin.000004
Relay_Log_Pos: 655
Relay_Master_Log_File: mysql-bin.000004
Slave_IO_Running: Yes
Slave_SQL_Running: Yes
Replicate_Do_DB:
Replicate_Ignore_DB:
Replicate_Do_Table:
Replicate_Ignore_Table:
Replicate_Wild_Do_Table:
Replicate_Wild_Ignore_Table:
Last_Errno: 0
Last_Error:
Skip_Counter: 0
Exec_Master_Log_Pos: 442
Relay_Log_Space: 1035
Until_Condition: None
Until_Log_File:
Until_Log_Pos: 0
Master_SSL_Allowed: No
Master_SSL_CA_File:
Master_SSL_CA_Path:
Master_SSL_Cert:
Master_SSL_Cipher:
Master_SSL_Key:
Seconds_Behind_Master: 0
Master_SSL_Verify_Server_Cert: No
Last_IO_Errno: 0
Last_IO_Error:
Last_SQL_Errno: 0
Last_SQL_Error:
Replicate_Ignore_Server_Ids:
Master_Server_Id: 1
Master_UUID: 31151b6d-215f-11ee-a0f5-0242ac110002
Master_Info_File: /var/lib/mysql/master.info
SQL_Delay: 0
SQL_Remaining_Delay: NULL
Slave_SQL_Running_State: Slave has read all relay log; waiting for more updates
Master_Retry_Count: 86400
Master_Bind:
Last_IO_Error_Timestamp:
Last_SQL_Error_Timestamp:
Master_SSL_Crl:
Master_SSL_Crlpath:
Retrieved_Gtid_Set:
Executed_Gtid_Set:
Auto_Position: 0
Replicate_Rewrite_DB:
Channel_Name:
Master_TLS_Version:
1 row in set (0.00 sec)
mysql> 7、检测是否完成
创建test_mysql 之前可以先查看三台mysql服务器中的数据库:
mysql> show databases;
+--------------------+
| Database |
+--------------------+
| information_schema |
| mysql |
| performance_schema |
| sys |
+--------------------+
4 rows in set (0.00 sec)
mysql> 在主数据库mysql01中执行下面代码创建数据库;
create database test_mysql charset=utf8;
use test_mysql;
create table user(id int primary key auto_increment);
在从库查询是否已存在创建的test_mysql数据库
mysql> show databases;
+--------------------+
| Database |
+--------------------+
| information_schema |
| mysql |
| performance_schema |
| sys |
| test_mysql |
+--------------------+
5 rows in set (0.00 sec)
mysql> use test_mysql;
Reading table information for completion of table and column names
You can turn off this feature to get a quicker startup with -A
Database changed
mysql> show tables;
+----------------------+
| Tables_in_test_mysql |
+----------------------+
| user |
+----------------------+
1 row in set (0.00 sec)
mysql> select * from user;
Empty set (0.00 sec)
mysql> 同步完成!!!


