目录
一、Mybatis-Plus简介
(一)什么是Mybatis-Plus
(二)Mybatis-Plus的优势
(三)Mybatis-Plus的框架结构
二、SpringBoot整合Mybatis-Plus入门
(一)创建maven工程,添加依赖
(二)创建数据库表employee
(三)构建数据模型Employee
(四)配置application.yml
(五)编写SpringBoot启动类
(六)编写mapper接口
(七)启动服务测试结果
三、Lombok插件
(一)Lombok插件简介
(二)常用的Lombok注解介绍
(三)idea安装Lombok插件
(四)Lombok插件的使用
1、引入依赖
2、去除Employee类中的setter和getter方法
3、在Employee类上添加Lombok注解
四、CRUD
(一)BaseMapper接口方法介绍
(二)Insert方法
(三)@TableId注解
(四)@TableName注解
(五)@TableField注解
(六)插入数据获取主键值
(七)更新数据的通用方法
1、updateById方法
2、update(entity,wrapper)方法
(八)查询数据的通用方法
1、selectById方法
2、selectBatchIds方法
3、selectByMap方法
(九)删除数据方法
1、deleteById方法
2、deleteByMap方法
3、deletebatchIds方法
五、Mybatis-Plus条件构造器
(一)条件构造器介绍
(二)SelectOne方法
(三)SelectList方法
(四)SelectPage方法
(五)Update方法
(六)Delete方法
六、Mybatis-Plus的Service封装
(一)通用service简介
(二)通用service常用方法介绍
(三)通用service的案例
1、构建工程,添加依赖
2、构建service接口
3、构建service实现类
4、通用service测试
七、Mybatis-Plus代码生成器
(一)代码生成器介绍
(二)构建maven工程,引入依赖
(三)编写生成器代码
1、GlobalConfig全局配置编码
2、DataSourceConfig数据源配置编码
3、PackageConfig包名策略配置
4、StrategyConfig策略配置编码
5、执行
(四)执行生成器代码完成测试
一、Mybatis-Plus简介
(一)什么是Mybatis-Plus
Mybatis-Plus是一个Mybatis(opens new window)的增强工具,在Mybatis的基础上只做增强不做改变,为简化开发。
(二)Mybatis-Plus的优势
- 无侵入:只做增强不做改变,引入它不会对现有工程产生影响。
- 损耗小:启动即会自动注入基本CURD,性能基本无损耗,直接面向对象操作。
- 强大的CRUD操作:内置通用Mapper、通用Service,仅仅通过少量配置即可实现单表大部分CRUD操作,更有强大的条件构造器,满足各类使用需求。
- 支持Lambda形式调用:通过 Lambda 表达式,方便的编写各类查询条件,无需再担心字段写
错。
-
支持主键自动生成:支持多达4种主键策略(内含分布式唯一 ID 生成器 - Sequence),可自由配置,完美解决主键问题。
- 支持ActiveRecord模式:支持 ActiveRecord 形式调用,实体类只需继承 Model 类即可进行强大的 CRUD 操作。
-
支持自定义全局通用操作:支持全局通用方法注入( Write once, use anywhere )。
-
内置代码生成器:采用代码或者 Maven 插件可快速生成 Mapper 、 Model 、 Service 、 Controller 层代码,支持模板引擎,更有超多自定义配置等您来使用。
-
内置分页插件:基于 MyBatis 物理分页,开发者无需关心具体操作,配置好插件之后,写分页等同于普通 List 查询。
-
分页插件支持多种数据库:支持 MySQL、MariaDB、Oracle、DB2、H2、HSQL、SQLite、Postgre、SQLServer 等多种数据库。
-
内置性能分析插件:可输出 Sql 语句以及其执行时间,建议开发测试时启用该功能,能快速揪出慢查询。
-
内置全局拦截插件:提供全表 delete 、 update 操作智能分析阻断,也可自定义拦截规则,预防误操作。
(三)Mybatis-Plus的框架结构
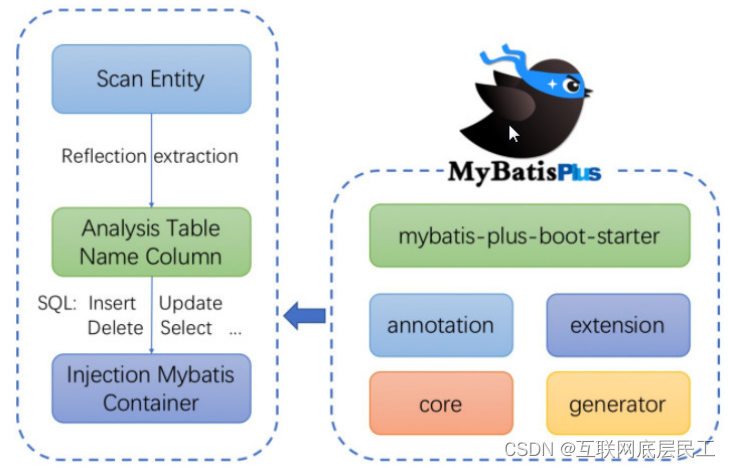
二、SpringBoot整合Mybatis-Plus入门
(一)创建maven工程,添加依赖
<dependency>
    <groupId>mysql</groupId>
    <artifactId>mysql-connector-java</artifactId>
    <version>5.1.47</version>
</dependency>
<dependency>
    <groupId>org.springframework.boot</groupId>
    <artifactId>spring-boot-starter-test</artifactId>
    <scope>test</scope>
</dependency>
<dependency>
    <groupId>com.baomidou</groupId>
    <artifactId>mybatis-plus-boot-starter</artifactId>
    <version>3.4.2</version>
</dependency>
<dependency>
    <groupId>junit</groupId>
    <artifactId>junit</artifactId>
    <version>4.12</version>
</dependency>
(二)创建数据库表employee
CREATE TABLE employee(
emp_id BIGINT(20) NOT NULL,
name VARCHAR(30),
emp_gender VARCHAR(6),
age INT,
email VARCHAR(50),
PRIMARY KEY(emp_id)
);
INSERT INTO employee(emp_id,name,emp_gender,age,email)
VALUES(1367686308726788098,'刘晓娟','女',20,'liuxianjuan@qq.com');
INSERT INTO employee(emp_id,name,emp_gender,age,email)
VALUES(1367709299695099906,'张春雨','男',28,'zhangchunyu@sina.com');
INSERT INTO employee(emp_id,name,emp_gender,age,email)
VALUES(1367717669156028418,'何雨柱','男',23,'heyuzhu@126.com');
(三)构建数据模型Employee
public class Employee {
    private Long empId;
    private String name;
    private String empGender;
    private Integer age;
    private String email;

    public Long getEmpId() {
        return empId;
    }

    public void setEmpId(Long empId) {
        this.empId = empId;
    }

    public String getName() {
        return name;
    }

    public void setName(String name) {
        this.name = name;
    }

    public String getEmpGender() {
        return empGender;
    }

    public void setEmpGender(String empGender) {
        this.empGender = empGender;
    }

    public Integer getAge() {
        return age;
    }

    public void setAge(Integer age) {
        this.age = age;
    }

    public String getEmail() {
        return email;
    }

    public void setEmail(String email) {
        this.email = email;
    }

    @Override
    public String toString() {
        return "Employee{" +
        "empId=" + empId +
        ", name='" + name + '\'' +
        ", empGender='" + empGender + '\'' +
        ", age=" + age +
        ", email='" + email + '\'' +
        '}';
    }
}
(四)配置application.yml
spring:
datasource:
 driver-class-name: com.mysql.jdbc.Driver
 url: jdbc:mysql:///mybatis_plus
 username: root
 password: root
logging:
level:
 com:
   offcn:
      mapper: debug
(五)编写SpringBoot启动类
@SpringBootApplication
@MapperScan("com.offcn.mapper")
public class MybatisPlus01Application {
    public static void main(String[] args) {
        SpringApplication.run(MybatisPlus01Application.class, args);
    }
}
(六)编写mapper接口
public interface EmployeeMapper extends BaseMapper<Employee> {}(七)启动服务测试结果
@RunWith(SpringRunner.class)
@SpringBootTest
public class MybatisPlus01ApplicationTests {
    @Autowired
    private EmployeeMapper employeeMapper;

    @Test
    public void testSelect(){
        List<Employee> employeeList = employeeMapper.selectList(null);
        employeeList.forEach( System.out::println);
    }
}
三、Lombok插件
(一)Lombok插件简介
Lombok是一个插件,用途是使用注解给你类里面的字段,自动的加上属性,构造器,ToString方法,Equals方法等,比较方便的一点是,你在更改字段的时候,Lombok会立即发生改变以保持和你代码的一致性。
(二)常用的Lombok注解介绍
| @Data | 注在类上,提供类的get、set、equals、hashCode、toString等方法 |
| @Getter | 加在类上,可以自动生成参数的getter方法 |
| @Setter | 加在类上,可以自动生成参数的setter方法 |
| @ToString | 加在类上,调用toString()方法,可以输出实体类中所有属性的值 |
| @RequiredArgsConstructor | 生成一个包含常量,和标识了NotNull的变量的构造方法。生成的构造方法是私有的private |
| @EqualsAndHashCode | 生成equals和hashCode方法, 默认使用非静态的属性, 可以通过exclude参数排除不需要生成的属性。 通过of参数来指定需要生成的属性 |
|
@NoArgsConstructor
|
生成一个无参数的构造方法
|
|
@AllArgsConstructor
|
生成一个包含所有变量的构造方法。
|
|
@Value
|
这个注解要和Spring的@Value注解区分,Spring的是从配置文件读取内容,这个注解是在类中的所有字段默认全部声明为private final类型,只会生成Getter方法,不会生成Setter方法。
|
|
@Cleanup
|
主要用于关闭资源使用。
|
(三)idea安装Lombok插件
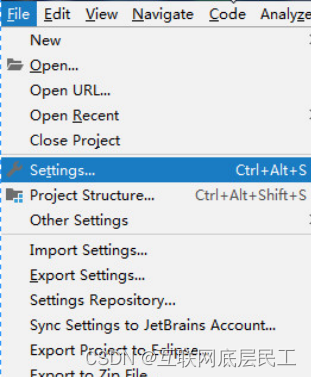
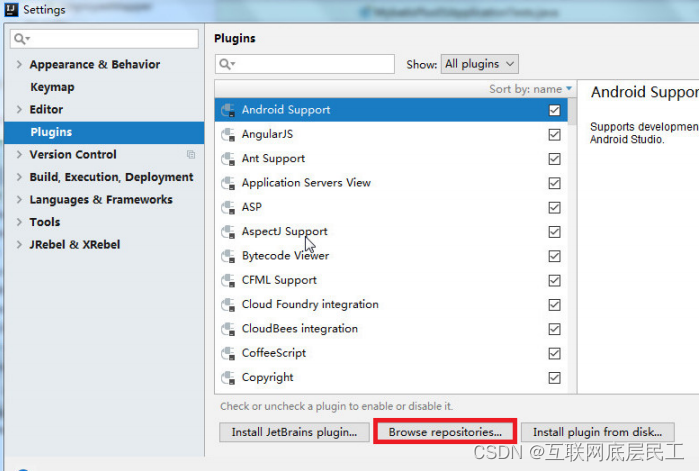
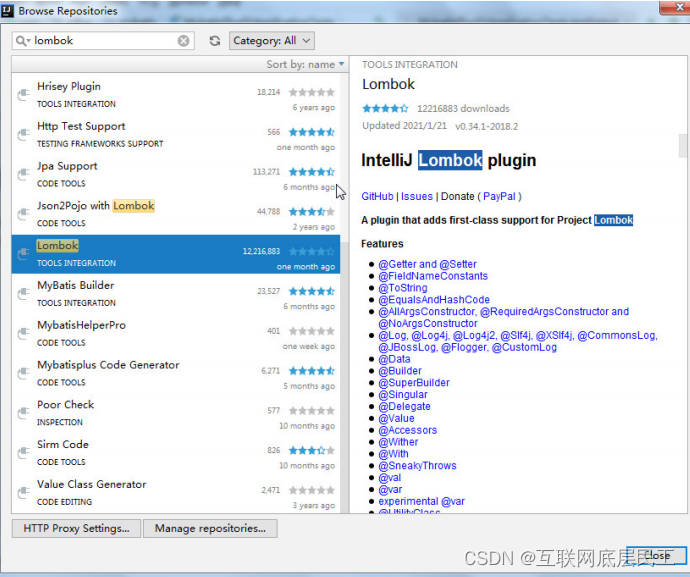
安装完成之后重启idear即可。
(四)Lombok插件的使用
1、引入依赖
<dependency>
    <groupId>org.projectlombok</groupId>
    <artifactId>lombok</artifactId>
    <version>1.18.4</version>
    <scope>provided</scope>
</dependency>
2、去除Employee类中的setter和getter方法
public class Employee {
    private Long empId;
    private String name;
    private String empGender;
    private Integer age;
    private String email;
}
3、在Employee类上添加Lombok注解
@NoArgsConstructor
@AllArgsConstructor
@Data
@ToString
public class Employee {
    private Long empId;
    private String name;
    private String empGender;
    private Integer age;
    private String email;
}
四、CRUD
(一)BaseMapper接口方法介绍
BaseMapper中提供了CRUD方法,具体方法如下:
// 插入一条记录
int insert(T entity);

// 根据 entity 条件,删除记录
int delete(@Param(Constants.WRAPPER) Wrapper<T> wrapper);

// 删除(根据ID 批量删除)
int deleteBatchIds(@Param(Constants.COLLECTION) Collection<? extends Serializable> idList);

// 根据 ID 删除
int deleteById(Serializable id);

// 根据 columnMap 条件,删除记录
int deleteByMap(@Param(Constants.COLUMN_MAP) Map<String, Object> columnMap);

// 根据 whereEntity 条件,更新记录
int update(@Param(Constants.ENTITY) T entity, @Param(Constants.WRAPPER) Wrapper<T> updateWrapper);

// 根据 ID 修改
int updateById(@Param(Constants.ENTITY) T entity);
List<T> selectList(@Param(Constants.WRAPPER) Wrapper<T> queryWrapper);

// 查询(根据 columnMap 条件)
List<T> selectByMap(@Param(Constants.COLUMN_MAP) Map<String, Object> columnMap);

// 根据 Wrapper 条件,查询全部记录
List<Map<String, Object>> selectMaps(@Param(Constants.WRAPPER) Wrapper<T> queryWrapper);

// 根据 Wrapper 条件,查询全部记录。注意: 只返回第一个字段的值
List<Object> selectObjs(@Param(Constants.WRAPPER) Wrapper<T> queryWrapper);

// 根据 entity 条件,查询全部记录(并翻页)
IPage<T> selectPage(IPage<T> page, @Param(Constants.WRAPPER) Wrapper<T> queryWrapper);

// 根据 Wrapper 条件,查询全部记录(并翻页)
IPage<Map<String, Object>> selectMapsPage(IPage<T> page,
@Param(Constants.WRAPPER) Wrapper<T> queryWrapper);

// 根据 Wrapper 条件,查询总记录数
Integer selectCount(@Param(Constants.WRAPPER) Wrapper<T> queryWrapper);
(二)Insert方法
//插入一条记录
int insert (T entity);
测试:
@Test
public void testInsert() {
    Employee employee=new Employee();
    //employee.setEmpId(100000);
    employee.setName("刘龙");
    employee.setEmpGender("男");
    employee.setAge(25);
    employee.setEmail("liulong@163.com");
    employeeMapper.insert(employee);
}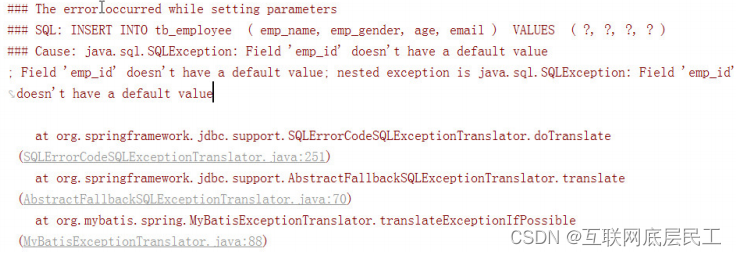
从上面的异常可以看出,我们没有给Employee类的empId属性赋值,定义数据库时对应的emp_id列不能为空,所以出错了,为了解决这个错误,你可以给empId属性赋值一个值,可以解决此问题。
Mybatis-Plus默认采用雪花算法生成唯一值,如果想使用Mybatis-Plus自动生成的雪花算法值可以在实体类的属性上加@FiledId注解。
(三)@TableId注解
描述:主键注解
| 属性 | 类型 | 必须指定 | 默认值 | 描述 |
| value | String | 否 | " " | 主键字段名 |
| type | Enum | 否 | IdType.NONE | 主键类型 |
IdType
| 值 | 描述 |
| Auto | 数据库ID自增 |
| None | 无状态,该类型为未设置主键类型(注解里等于跟随全局,全局里约等于Input) |
| Input | Insert前自行set主键值 |
|
ASSIGN_ID
|
分配ID(主键类型为Number(Long和Integer)或String)(since 3.3.0),使用接口IdentifierGenerator 的方法 nextId (默认实现类为DefaultIdentifierGenerator 雪花算法)
|
|
ASSIGN_UUI
|
分配UUID,主键类型为String(since 3.3.0),使用接口 IdentifierGenerator 的方法 nextUUID (默认default方法)
|
@NoArgsConstructor
@AllArgsConstructor
@Data
@ToString
public class Employee {
    //使用数据库自增策略
    //@TableId(type=IdType.AUTO)
    //默认使用雪花算法生成数字
    @TableId
    private Long empId;
    private String empName;
    private String empGender;
    private Integer age;
    private String email;
}
(四)@TableName注解
描述:表名注解
| 属性 | 类型 | 必须指定 | 默认值 | 描述 |
| value | String | 否 | "" | 表名 |
| schema | String | 否 | "" | schema |
| keepGlobalPrefix | boolean | 否 | false |
是否保持使用全局的tablePrefix 的值 (如果设置了全局tablePrefix 且自行设置了 value 的值)
|
| resultMap | String | 否 | "" | xml中resultMap的id |
| AutoResultMap | boolean | 否 | false |
是否自动构建 resultMap 并使用(如果设置 resultMap 则不会进行 resultMap 的自动构建并注入)
|
| excludeProperty | String[] | 否 | {} | 需要排除的属性名(@since 3.3.1) |
当表名跟实体类类名不一致时,要使用@TableName注解进行映射
@NoArgsConstructor
@AllArgsConstructor
@Data
@ToString
@TableName(value = "tb_employee")
public class Employee {
    //使用数据库自增策略
    //@TableId(type=IdType.AUTO)
    //默认使用雪花算法生成数字
    @TableId
    private Long empId;
    private String empName;
    private String empGender;
    private Integer age;
    private String email;
}
(五)@TableField注解
描述:字段注解(非主键)
| 属性 | 类型 | 必须指定 | 默认值 | 描述 |
| value | String | 否 | "" | 数据库字段名 |
| el | String | 否 | "" |
映射为原生 #{ ... } 逻辑,相当于写在
xml 里的 #{ ... } 部分
|
| exist | boolean | 否 | true | 是否为数据库表字段 |
| condition | String | 否 | "" |
字段 where 实体查询比较条件,有值设置则按设置的值为准,没有则为默认全局的 %s=#{%s}
|
| update | String | 否 | "" |
字段 update set 部分注入, 例如:
update="%s+1":表示更新时会set
version=version+1(该属性优先级高于
el 属性)
|
| insertStrategy | Enum | N | DEFAULT |
举例:NOT_NULL: insert into table_a(<if test="columnProperty != null">column</if>) values (<if test="columnProperty != null"># {columnProperty}</if>)
|
| updateStrategy | Enum | N | DEFAULT |
举例:IGNORED: update table_a set column=#{columnProperty}
|
| whereStrategy | Enum | N | DEFAULT |
举例:NOT_EMPTY: where <if test="columnProperty != null and columnProperty!=''">column=# {columnProperty}</if>
|
| fill | Enum | 否 | FieldFill.DEFAULT | 字段自动填充策略 |
| Select | boolean | 否 | true | 是否进行select查询 |
|
keepGlobalFormat
|
boolean
|
否
|
false
|
是否保持使用全局的 format 进行处理
|
|
jdbcType
|
JdbcType
|
否
|
JdbcType.UNDEFINE
|
JDBC类型 (该默认值不代表会按照该值生效)
|
|
typeHandler
|
Class<?extends TypeHandler>
|
否
|
UnknownTypeHandler.class
|
类型处理器 (该默认值不代表会按照该值生效)
|
|
numericScale
|
String
|
否
| "" |
指定小数点后保留的位数
|
@NoArgsConstructor
@AllArgsConstructor
@Data
@ToString
@TableName(value = "tb_employee")
public class Employee {
    @TableId
    private Long empId;
    //当表中的列与实体类属性不一致时,使用TableField指定数据库中的列名
    @TableField(value = "emp_name")
    private String name;
    private String empGender;
    private Integer age;
    private String email;
    //当表中没有remark时,使用TableField的exist=false属性忽略该字段
    @TableField(exist = false)
    private String remark;
}
(六)插入数据获取主键值
修改Employee的empId注解
@TableId(type=IdType.AUTO)
private Long empId;
mysql-plus会自动获取自增主键,把数据库的emp_id设置为自增。测试获取自增主键
public void testInsert() {
    Employee employee=new Employee();
    employee.setName("刘龙200");
    employee.setEmpGender("男");
    employee.setAge(25);
    employee.setEmail("liulong@163.com");
    employee.setRemark("该员工是一个好员工");
    employeeMapper.insert(employee);
    System.out.println(employee.getEmpId());
}
(七)更新数据的通用方法
1、updateById方法
根据id进行记录更新,如果对象属性未传值,则不会更新该字段,保持数据库表原来字段值
public void testUpdateById() {
    Employee employee=new Employee();
    employee.setEmpId(10)
    employee.setName("刘龙");
    employee.setEmpGender("女");
    employee.setAge(23);
    employee.setEmail("liulong@163.com");
    employeeMapper.updateById(employee);
}
2、update(entity,wrapper)方法
public void testdateById(){
    //根据员工的名字,更新
    Employee employee2=new Employee();
    employee2.setEmpGender("男");
    employee2.setAge(18);
    employee2.setEmail("liulong@126.com");
    employeeMapper.update(employee2,new UpdateWrapper<Employee>().eq("name","刘龙"));
}
(八)查询数据的通用方法
1、selectById方法
根据id查询指定记录
@Test
public void testSelectById() {
    Employee employee=employeeMapper.selectById(1);
    System.out.println(employee);
}
2、selectBatchIds方法
批量查询指多个id的记录集合
@Test
public void testSelectBatchIds() {
    List list= Arrays.asList(1,2,3);
    List<Employee> employeeList = employeeMapper.selectBatchIds(list);
    employeeList.forEach(System.out::println);
}
3、selectByMap方法
根据Map集合中传入的条件进行查询,每个条件都是and关系
@Test
public void testSelectByMap() {
    Map<String,Object> map=new HashMap<>();
    map.put("emp_gender","男");
    map.put("age",29);
    List<Employee> employeeList = employeeMapper.selectByMap(map);
    employeeList.forEach(System.out::println);
}
(九)删除数据方法
1、deleteById方法
根据id删除记录
@Test
public void testDeleteById(){
    int rows=employeeMapper.deleteById(1);
    System.out.println("受影响的行数:"+rows);
}
2、deleteByMap方法
根据Map中的条件进行删除,map中的条件在sql语句中是and关系
@Test
public void testDeleteByMap(){
    Map<String,Object> map=new HashMap<>();
    map.put("emp_gender","男");
    map.put("emp_name","刘辉");
    int rows=employeeMapper.deleteByMap(map);
    System.out.println("受影响的行数:"+rows);
}
3、deletebatchIds方法
根据传入List集合中的id进行批量删除
@Test
public void testDeleteBatchIds(){
    List list= Arrays.asList(4,7,1);
    int rows=employeeMapper.deleteBatchIds(list);
    System.out.println("受影响的行数:"+rows);
}
五、Mybatis-Plus条件构造器
(一)条件构造器介绍
(二)SelectOne方法
//查询姓名为刘辉军并且性别为男的员工
@Test
public void testSelectOne(){
    QueryWrapper<Employee> queryWrapper=new QueryWrapper<>();
    queryWrapper.eq("name","刘辉军");
    queryWrapper.eq("emp_gender","男");
    Employee employee = employeeMapper.selectOne(queryWrapper);
    System.out.println(employee);
}
(三)SelectList方法
//查询姓名中带有"磊"的并且年龄小于30的员工
@Test
public void testSelectList(){
    QueryWrapper<Employee> queryWrapper=new QueryWrapper<>();
    queryWrapper.like("name","磊").lt("age",30);
    List<Employee> employeeList = employeeMapper.selectList(queryWrapper);
    employeeList.forEach(System.out::println);
}

//查询姓刘的或者性别为男,按年龄的除序排序
@Test
public void testSelectList2(){
    QueryWrapper<Employee> queryWrapper=new QueryWrapper<>();
    queryWrapper.like("name","王")
        .or().eq("emp_gender","男")
        .orderByDesc("age");
    List<Employee> employeeList = employeeMapper.selectList(queryWrapper);
    employeeList.forEach(System.out::println);
}

//查询姓刘的并且(年龄小于35或者邮箱不为空)
@Test
public void testSelectList3(){
    QueryWrapper<Employee> queryWrapper=new QueryWrapper<>();
    queryWrapper.likeRight("name","刘")
        .and(wq->wq.lt("age",35).or().isNotNull("email"));
    List<Employee> employeeList = employeeMapper.selectList(queryWrapper);
    employeeList.forEach(System.out::println);
}
(四)SelectPage方法
SelectPage用于分页,在Mybatis-Plus中分页有两种:一种是逻辑分页或叫内存分页,另一个是物理分页。内存分页就是把数据全部查询出来放到内容中,返回你想要的一部分数据,当数据量非常庞大时,这种方法就行不通了,因为太耗内容,所以一般采用物理分页,需要SpringMVC中加入物理分页配置:
@Configuration
public class MybatisPlusConfig {

    @Bean
    public MybatisPlusInterceptor mybatisPlusInterceptor() {
        MybatisPlusInterceptor interceptor = new MybatisPlusInterceptor();
        interceptor.addInnerInterceptor(new PaginationInnerInterceptor(DbType.MYSQL));
        return interceptor;
    }
}
@Test
public void testSelectPage(){
QueryWrapper<Employee> queryWrapper=new QueryWrapper<>();
queryWrapper.lt("age",50);
Page<Employee> page=new Page<>(1,2);
Page<Employee> employeePage = employeeMapper.selectPage(page, queryWrapper);
System.out.println("当前页:"+ employeePage.getCurrent());
System.out.println("每页记录数:"+employeePage.getSize());
System.out.println("总记录数:"+employeePage.getTotal());
System.out.println("总页数:"+employeePage.getPages());
List<Employee> employeeList = employeePage.getRecords();
employeeList.forEach(System.out::println);
}(五)Update方法
//根据姓名和年龄修改记录
@Test
public void testUpdate(){
    QueryWrapper<Employee> updateWrapper=new QueryWrapper<>();
    updateWrapper.eq("name","刘龙")
        .eq("age",25);
    Employee employee=new Employee();
    employee.setEmpId(1367720249630318593L);
    employee.setName("刘龙");
    employee.setEmail("lilong111@.qq.com");
    employee.setAge(26);
    employee.setEmpGender("女");
    int rows=employeeMapper.update(employee,updateWrapper);
    System.out.println("受影响的行数:"+rows);
}
(六)Delete方法
//根据姓名和年龄删除记录
@Test
public void testDelete(){
    QueryWrapper<Employee> queryWrapper=new QueryWrapper<>();
    queryWrapper.eq("name","刘龙")
        .eq("age",26);
    int rows=employeeMapper.delete(queryWrapper);
    System.out.println("受影响的行数:"+rows);
}
六、Mybatis-Plus的Service封装
(一)通用service简介
Mybatis-Plus除了通用的Mapper还有通用的Servcie层,这也减少了相对应的代码工作量,把通用 的接口提取到公共。其实按照MP的这种思想,可以自己也实现一些通用的Controller。
(二)通用service常用方法介绍
/**
* 插入一条记录(选择字段,策略插入)
*
* @param entity 实体对象
*/
default boolean save(T entity) {
    return SqlHelper.retBool(getBaseMapper().insert(entity));
}

/**
* 根据 ID 选择修改
*
* @param entity 实体对象
*/
default boolean updateById(T entity) {
    return SqlHelper.retBool(getBaseMapper().updateById(entity));
}

/**
* TableId 注解存在更新记录,否插入一条记录
*
* @param entity 实体对象
*/
boolean saveOrUpdate(T entity);

/**
* 根据 Wrapper,查询一条记录 <br/>
* <p>结果集,如果是多个会抛出异常,随机取一条加上限制条件 wrapper.last("LIMIT
1")</p>
*
* @param queryWrapper 实体对象封装操作类 {@link
com.baomidou.mybatisplus.core.conditions.query.QueryWrapper}
*/
default T getOne(Wrapper<T> queryWrapper) {
    return getOne(queryWrapper, true);
}

/**
* 根据 Wrapper,查询一条记录
*
* @param queryWrapper 实体对象封装操作类 {@link
com.baomidou.mybatisplus.core.conditions.query.QueryWrapper}
* @param throwEx 有多个 result 是否抛出异常
*/
T getOne(Wrapper<T> queryWrapper, boolean throwEx);
(三)通用service的案例
1、构建工程,添加依赖
<dependency>
    <groupId>mysql</groupId>
    <artifactId>mysql-connector-java</artifactId>
    <version>5.1.47</version>
</dependency>
<dependency>
    <groupId>org.projectlombok</groupId>
    <artifactId>lombok</artifactId>
    <optional>true</optional>
</dependency>
<dependency>
    <groupId>org.springframework.boot</groupId>
    <artifactId>spring-boot-starter-test</artifactId>
    <scope>test</scope>
</dependency>
<dependency>
    <groupId>com.baomidou</groupId>
    <artifactId>mybatis-plus-boot-starter</artifactId>
    <version>3.4.2</version>
</dependency>
2、构建service接口
public interface EmloyeeService extends IService<Employee> {
}
3、构建service实现类
@Service
public class EmployeeServiceImpl extends ServiceImpl<EmployeeMapper,Employee> implements EmloyeeService {
}
4、通用service测试
@Test
public void testSave(){
    Employee employee=new Employee();
    employee.setName("孙宝来");
    employee.setEmpGender("男");
    employee.setAge(30);
    employee.setEmail("sunbaolai@qq.com");
    employeeService.save(employee);
}

@Test
public void testSaveOrUpdate(){
    Employee employee=new Employee();
    employee.setEmpId(1367720249630318594L);
    employee.setName("孙宝来");
    employee.setEmpGender("女");
    employee.setAge(33);
    employee.setEmail("sunbaolai@qq.com");
    employeeService.saveOrUpdate(employee);
}

@Test
public void testGetOne(){
    QueryWrapper<Employee> queryWrapper=new QueryWrapper<>();
    queryWrapper.gt("age",24);
    Employee employee = employeeService.getOne(queryWrapper,false);
    System.out.println(employee);
}
七、Mybatis-Plus代码生成器
(一)代码生成器介绍
代码生成器顾名思义就是为我们生成一些代码,省去了我们一些时间。AutoGenerator 是 MyBatis-Plus 的代码生成器,通过 AutoGenerator 可以快速生成 Entity、Mapper、Mapper XML、Service、Controller 等各个模块的代码,极大的提升了开发效率,MyBatis-Plus从3.0.3 之后移除了代码生成器与模板引擎的默认依赖,需要手动添加相关依赖,才能实现代码生成器功能。
(二)构建maven工程,引入依赖
<dependency>
    <groupId>org.springframework.boot</groupId>
    <artifactId>spring-boot-starter-web</artifactId>
</dependency>
<dependency>
    <groupId>org.springframework.boot</groupId>
    <artifactId>spring-boot-starter-test</artifactId>
    <scope>test</scope>
</dependency>
<dependency>
    <groupId>mysql</groupId>
    <artifactId>mysql-connector-java</artifactId>
    <version>5.1.47</version>
</dependency>
<dependency>
    <groupId>com.baomidou</groupId>
    <artifactId>mybatis-plus-generator</artifactId>
    <version>3.2.0</version>
</dependency>
<dependency>
    <groupId>com.baomidou</groupId>
    <artifactId>mybatis-plus-boot-starter</artifactId>
    <version>3.2.0</version>
</dependency>
<dependency>
    <groupId>org.apache.velocity</groupId>
    <artifactId>velocity-engine-core</artifactId>
    <version>2.3</version>
</dependency>
<dependency>
    <groupId>org.projectlombok</groupId>
    <artifactId>lombok</artifactId>
</dependency>
(三)编写生成器代码
1、GlobalConfig全局配置编码
// 代码生成器
AutoGenerator mpg = new AutoGenerator();
// 全局配置
GlobalConfig gc = new GlobalConfig();
//获取工程路径
String projectPath = System.getProperty("user.dir");
gc.setOutputDir(projectPath + "/src/main/java");
gc.setAuthor("zs");//设置作者
gc.setOpen(false);//生成是后是否打开资源管理器
gc.setFileOverride(false);//重新生成文件时是否覆盖
gc.setServiceName("%sService");
// gc.setSwagger2(true); 实体属性 Swagger2 注解
mpg.setGlobalConfig(gc);
2、DataSourceConfig数据源配置编码
// 数据源配置
DataSourceConfig dsc = new DataSourceConfig();
dsc.setUrl("jdbc:mysql://localhost:3306/mybatis_plus?
useUnicode=true&useSSL=false&characterEncoding=utf8");
// dsc.setSchemaName("public");
dsc.setDriverName("com.mysql.jdbc.Driver");
dsc.setUsername("root");
dsc.setPassword("root");
dsc.setDbType(DbType.MYSQL);
mpg.setDataSource(dsc);
3、PackageConfig包名策略配置
// 包配置
PackageConfig pc = new PackageConfig();
pc.setModuleName(null);
pc.setParent("com.offcn.ssm");
pc.setController("controller");
pc.setEntity("entity");
pc.setService("service");
pc.setMapper("mapper");
mpg.setPackageInfo(pc);
4、StrategyConfig策略配置编码
//策略配置
StrategyConfig strategy = new StrategyConfig();
strategy.setInclude("tb_employee");//对那一张表生成代码
strategy.setNaming(NamingStrategy.underline_to_camel);//数据库表映射到实体的命名策略
strategy.setTablePrefix(pc.getModuleName() + "_"); //生成实体时去掉表前缀
strategy.setColumnNaming(NamingStrategy.underline_to_camel);//数据库表字段映射到实体的命名策略
strategy.setEntityLombokModel(true); // lombok 模型 @Accessors(chain = true) setter链式操作
strategy.setRestControllerStyle(true); //restful api风格控制器
strategy.setControllerMappingHyphenStyle(true); //url中驼峰转连字符
mpg.setStrategy(strategy);
5、执行
//执行
mpg.execute();
(四)执行生成器代码完成测试
在主启动类上用@MapperScan扫描mapper接口
@MapperScan("com.offcn.ssm.mapper")在application.yml中添加数据库配置信息
spring:
 datasource:
  driver-class-name: com.mysql.jdbc.Driver
  url: jdbc:mysql:///mybatis_plus
  username: root
  password: root
logging:
level:
 com:
  offcn:
   mybatis:
    dao: debug
在生成的Controller中编写查询方法
@RequestMapping("/tb-employee")
public class TbEmployeeController {
    @Autowired
    private TbEmployeeService tbEmployeeService;
    @RequestMapping("/emps")
    public List<TbEmployee> getEmployees(){
        List<TbEmployee> list = tbEmployeeService.list();
        return list;
    }
}






![[JVM] 2. 类加载子系统(1)-- 内存结构、类加载子系统概述](https://img-blog.csdnimg.cn/93afdd733ba048279a5c5abba45b09eb.png)


