1、准备数据集
1、自定义数据集(下面都是分类数据的自定义数据集准备)
CustomDataset是一个通用数据集类,供您使用自己的数据集。要使用CustomDataset,您需要根据以下两种格式组织数据集文件:
1、子文件夹格式
在这种格式下,您只需重新组织数据集文件夹并将所有样本放在一个文件夹中,而无需创建任何注释文件。
1、对于监督任务(带有with_label=True),
我们使用子文件夹的名称作为类别名称,如下例所示,class_x、class_y被识别为类别名称。
data_prefix/
├── class_x
│ ├── xxx.png
│ ├── xxy.png
│ └── …
│ └── xxz.png
└── class_y
├── 123.png
├── nsdf3.png
├── …
└── asd932_.png
2、对于无监督任务(带有with_label=False),
我们直接加载指定文件夹下的所有示例文件:
data_prefix/
├── folder_1
│ ├── xxx.png
│ ├── xxy.png
│ └── …
├── 123.png
├── nsdf3.png
└── …
假设您想将其用作训练数据集,以下是您的配置文件中的配置。
train_dataloader = dict(
    ...
    # Training dataset configurations
    dataset=dict(
        type='CustomDataset',
        data_prefix='path/to/data_prefix',
        with_label=True,   # or False for unsupervised tasks
        pipeline=...
    )
)
如果要使用此格式,请不要指定ann_file,或指定ann_file=‘’。
2、文本注释文件格式
在这种格式中,我们使用文本注释文件来存储图像文件路径和相应的类别索引。
1、对于监督任务(带有with_label=True),
注释文件应将文件路径和一个样本的类别索引包含在一行中,并用空格分隔,如下所示:
所有这些文件路径可以是绝对路径,也可以是相对于data_prefix.
folder_1/xxx.png 0
folder_1/xxy.png 1
123.png 4
nsdf3.png 3
...
类别的索引号从 0 开始。并且真实标签的值应落在[0, num_classes - 1]范围内。
另外,请使用classes数据集设置中的字段指定每个类别的名称。
2、对于无监督任务(带with_label=False),
注释文件只需一行包含一个样本的文件路径,如下:
folder_1/xxx.png
folder_1/xxy.png
123.png
nsdf3.png
…
假设整个数据集文件夹如下:
data_root
├── meta
│ ├── test.txt # The annotation file for the test dataset
│ ├── train.txt # The annotation file for the training dataset
│ └── val.txt # The annotation file for the validation dataset.
├── train
│ ├── 123.png
│ ├── folder_1
│ │ ├── xxx.png
│ │ └── xxy.png
│ └── nsdf3.png
├── test
└── val
以下是配置文件中的数据集设置示例:
# Training dataloader configurations
train_dataloader = dict(
    dataset=dict(
        type='CustomDataset',
        data_root='path/to/data_root',  # The common prefix of both `ann_flie` and `data_prefix`.
        ann_file='meta/train.txt',      # The path of annotation file relative to the data_root.
        data_prefix='train',            # The prefix of file paths in the `ann_file`, relative to the data_root.
        with_label=True,                # or False for unsupervised tasks
        classes=['A', 'B', 'C', 'D', ...],  # The name of every category.
        pipeline=...,    # The transformations to process the dataset samples.
    )
    ...
)
2、imageNet数据集的目录结构
我们支持两种组织 ImageNet 数据集的方式:子文件夹格式和文本注释文件格式。
子文件夹格式
我们提供了一个示例,您可以从此链接下载并提取该示例。数据集的目录结构应如下所示:
data/imagenet/
├── train/
│ ├── n01440764
│ │ ├── n01440764_10026.JPEG
│ │ ├── n01440764_10027.JPEG
│ │ ├── n01440764_10029.JPEG
│ │ ├── n01440764_10040.JPEG
│ │ ├── n01440764_10042.JPEG
│ │ ├── n01440764_10043.JPEG
│ │ └── n01440764_10048.JPEG
│ ├── …
├── val/
│ ├── n01440764
│ │ ├── ILSVRC2012_val_00000293.JPEG
│ │ ├── ILSVRC2012_val_00002138.JPEG
│ │ ├── ILSVRC2012_val_00003014.JPEG
│ │ └── …
│ ├── …
文本注释文件格式
您可以从此链接下载并解压元数据。并重新组织数据集,如下所示:
data/imagenet/
├── meta/
│ ├── train.txt
│ ├── test.txt
│ └── val.txt
├── train/
│ ├── n01440764
│ │ ├── n01440764_10026.JPEG
│ │ ├── n01440764_10027.JPEG
│ │ ├── n01440764_10029.JPEG
│ │ ├── n01440764_10040.JPEG
│ │ ├── n01440764_10042.JPEG
│ │ ├── n01440764_10043.JPEG
│ │ └── n01440764_10048.JPEG
│ ├── …
├── val/
│ ├── ILSVRC2012_val_00000001.JPEG
│ ├── ILSVRC2012_val_00000002.JPEG
│ ├── ILSVRC2012_val_00000003.JPEG
│ ├── ILSVRC2012_val_00000004.JPEG
│ ├── …
配置
按照上述方式组织数据集后,您可以使用ImageNet具有以下配置的数据集:
train_dataloader = dict(
    ...
    # Training dataset configurations
    dataset=dict(
        type='ImageNet',
        data_root='data/imagenet',
        split='train',
        pipeline=...,
    )
)

val_dataloader = dict(
    ...
    # Validation dataset configurations
    dataset=dict(
        type='ImageNet',
        data_root='data/imagenet',
        split='val',
        pipeline=...,
    )
)

test_dataloader = val_dataloader
3、支持的其他数据详情
要查找 MMPretrain 支持的更多数据集,并获取上述数据集的更多配置,请参阅
2、自定义数据管道
1、数据管道设计
在新的数据集教程中,我们知道数据集类使用该load_data_list方法来初始化整个数据集,并将每个样本的信息保存到一个字典中。
通常,为了节省内存使用,我们只加载load_data_list 中的图像路径和标签,并在使用时加载完整的图像内容。此外,我们可能希望在训练时选取样本时进行一些随机数据增强。几乎所有的数据加载、预处理和格式化操作都可以通过数据管道在 MMPretrain 中配置。
数据管道意味着当从数据集中索引样本时如何处理样本字典。它由一系列数据转换组成。每个数据转换都将一个字典作为输入,对其进行处理,并为下一个数据转换输出一个字典。
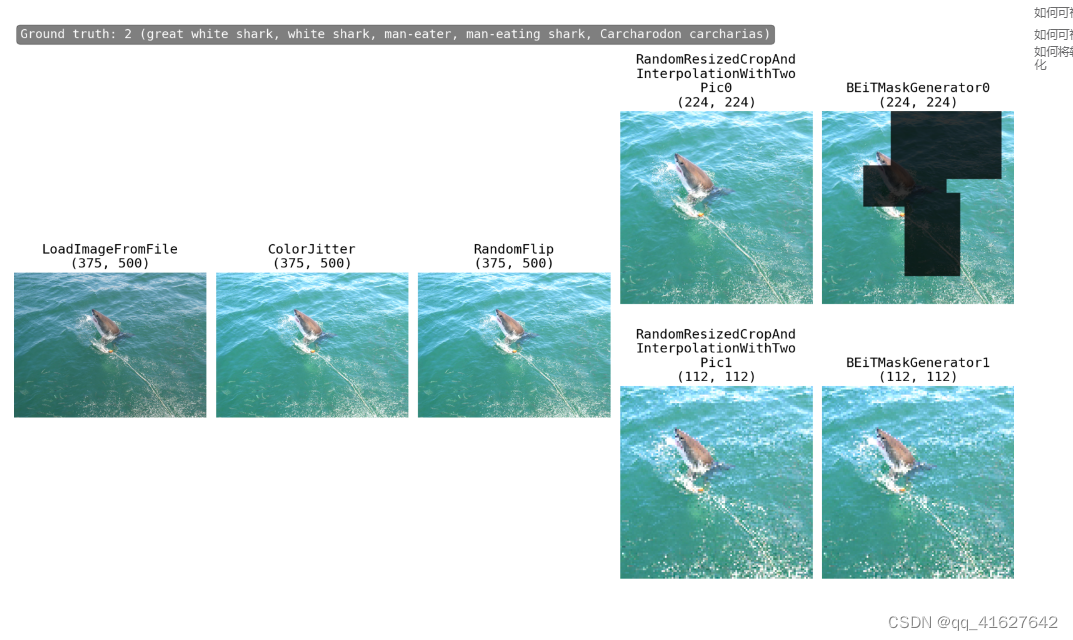
以下是在 ImageNet 上训练 ResNet-50 的数据管道示例。
train_pipeline = [
    dict(type='LoadImageFromFile'),
    dict(type='RandomResizedCrop', scale=224),
    dict(type='RandomFlip', prob=0.5, direction='horizontal'),
    dict(type='PackInputs'),
]
2、MMPretrain 中所有可用的数据转换都可以在数据转换文档中找到
在MMPreTrain中,数据处理和数据集被分解。数据集仅定义如何从文件系统获取样本的基本信息。这些基本信息包括真实标签和原始图像数据/图像路径。数据处理包括数据转换、数据预处理器和批量增强。
Data Transforms:转换包括加载、预处理、格式化等。 Data
Preprocessors:流程包括整理、归一化、堆叠、通道翻转等。 Batch
Augmentations:批量增强涉及多个样本,例如Mixup和CutMix。
1、Data Transforms,数据转换
为了准备输入数据,我们需要对这些基本信息进行一些转换。这些转换包括加载、预处理和格式化。一系列的数据转换组成了数据管道。因此,您可以在数据集的配置中找到一个pipeline参数,例如:
train_pipeline = [
    dict(type='LoadImageFromFile'),
    dict(type='RandomResizedCrop', scale=224),
    dict(type='RandomFlip', prob=0.5, direction='horizontal'),
    dict(type='PackInputs'),
]

train_dataloader = dict(
    ....
    dataset=dict(
        pipeline=train_pipeline,
        ....),
    ....
)
管道列表中的每一项都是以下数据转换类之一。如果您想添加自定义数据转换类,教程自定义数据管道将为您提供帮助。
Loading and Formatting,加载和格式化
Processing and Augmentation,处理和增强
MMCVtransforms,MMCV 变换
Transform Wrapper,变换包装器 TorchVision
Transforms,TorchVision 变换
1、Loading and Formatting(加载和格式化)
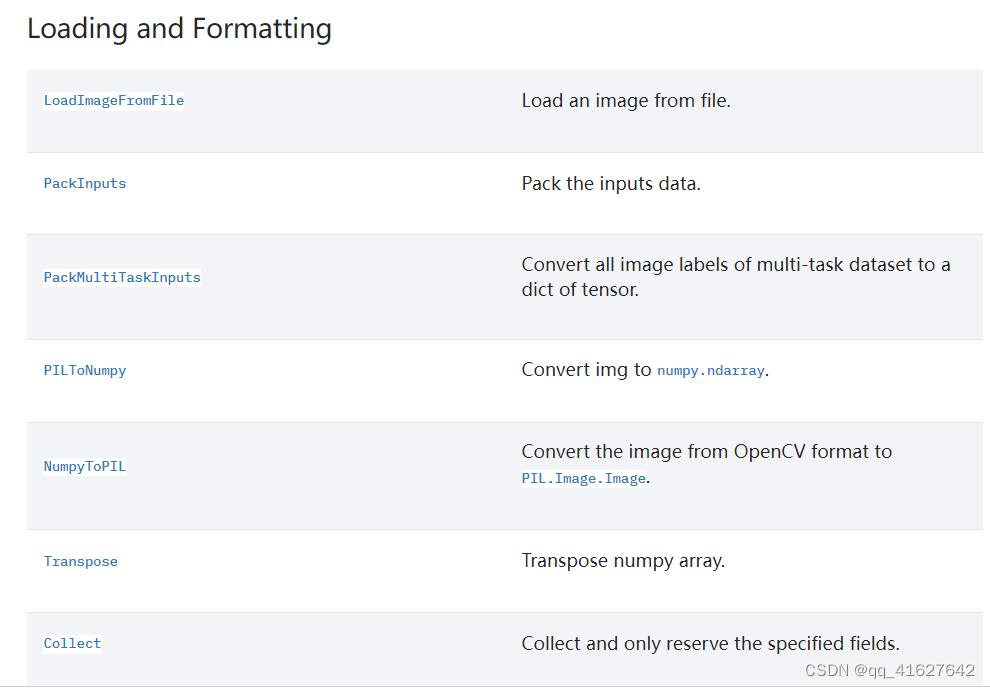
| LoadImageFromFile | 从文件加载图像 |
|---|---|
| PackInputs | 打包输入数据 |
| PackMultiTaskInputs | 将多任务数据集的所有图像标签转换为张量字典 |
| PILToNumpy | 将 img 转换为numpy.ndarray. |
| NumpyToPIL | 将图像从 OpenCV 格式转换为PIL.Image.Image… |
| Transpose | 转置 numpy 数组… |
| Collect | 收集并仅保留指定字段 |
2、Processing and Augmentation(处理和增强)
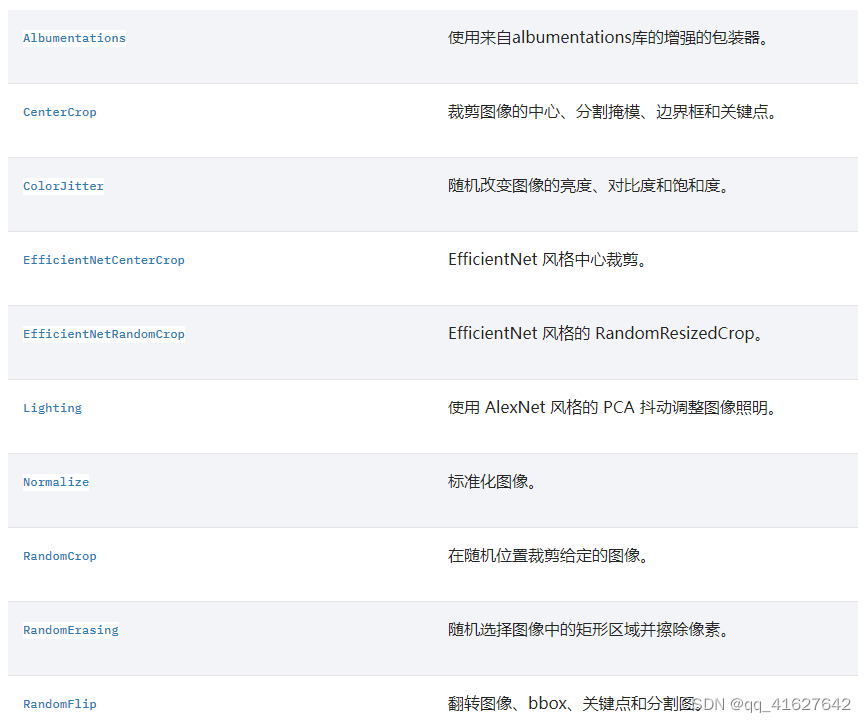
| Albumentations | 使用来自albumentations库的增强的包装器。 |
|---|---|
| CenterCrop | 裁剪图像的中心、分割掩模、边界框和关键点。 |
| ColorJitter | 随机改变图像的亮度、对比度和饱和度。 |
| EfficientNetCenterCrop | EfficientNet 风格中心裁剪。 |
| EfficientNetRandomCrop | EfficientNet 风格的 RandomResizedCrop。 |
| Lighting | 使用 AlexNet 风格的 PCA 抖动调整图像照明。 |
| Normalize | 标准化图像。 |
| RandomCrop | 在随机位置裁剪给定的图像。 |
| RandomErasing | 随机选择图像中的矩形区域并擦除像素。 |
| RandomFlip | 翻转图像、bbox、关键点和分割图。 |
| RandomGrayscale | 以概率随机将图像转换为灰度。 |
| RandomResize | 随机调整图像、bbox 和关键点的大小。 |
| RandomResizedCrop | 将给定图像裁剪为随机比例和纵横比。 |
| Resize | 将给定图像裁剪为随机比例和纵横比。 |
| ResizeEdge | 沿指定边缘调整图像大小。 |
| BEiTMaskGenerator | 生成图像蒙版。 |
| SimMIMMaskGenerator | 为每个图像生成随机块掩码。 |
3、Processing and Augmentation(处理和增强)组合增强
组合增强是一种组合一系列数据增强变换的方法,例如AutoAugment和RandAugment。
AutoAugment,自动增强。
RandAugment,随机增强。
上述变换由以下随机变换的一组策略组成:
| AutoContrast | 自动调整图像对比度。 |
|---|---|
| Brightness | 调整图像亮度。 |
| ColorTransform | 调整图像色彩平衡。 |
| Contrast | 调整图像对比度。 |
| Cutout | 剪切图像。 |
| Equalize | 均衡图像直方图。 |
| GaussianBlur | 高斯模糊图像。 |
| Invert | 反转图像。 |
| Posterize | 对图像进行色调分离(减少每个颜色通道的位数)。 |
| Rotate | 旋转图像。 |
| Sharpness | 调整图像清晰度。 |
| Sharpness | 调整图像清晰度。 |
| Shear | 剪切图像。 |
| Solarize | 曝光图像(反转高于阈值的所有像素值)。 |
| SolarizeAdd | SolarizeAdd 图像(向低于阈值的像素添加特定值)。 |
| Translate | 翻译图像。 |
| BaseAugTransform | RandAugment 的增强变换的基类。 |
4、MMCV 变换
我们还在 MMCV 中提供了许多变换。您可以直接在配置文件中使用它们。以下是一些常用的变换,整个变换列表可以在mmcv.transforms中找到。
变换包装器 MultiView
用于图像的多个视图的变换包装器。
5、TorchVision 变革
我们还提供 TorchVision 中的所有转换。您可以像下面的示例一样使用它们:
1. 使用一些由 NumpyToPIL 和 PILToNumpy 包围的 TorchVision Augs(推荐)
添加 TorchVision Augs,周围是和dict(type=‘NumpyToPIL’, to_rgb=True),dict(type=‘PILToNumpy’, to_bgr=True),
train_pipeline = [
    dict(type='LoadImageFromFile'),
    dict(type='NumpyToPIL', to_rgb=True),     # from BGR in cv2 to RGB  in PIL
    dict(type='torchvision/RandomResizedCrop',size=176),
    dict(type='PILToNumpy', to_bgr=True),     # from RGB  in PIL to BGR in cv2
    dict(type='RandomFlip', prob=0.5, direction='horizontal'),
    dict(type='PackInputs'),
]

data_preprocessor = dict(
    num_classes=1000,
    mean=[123.675, 116.28, 103.53],
    std=[58.395, 57.12, 57.375],
    to_rgb=True,                          # from BGR in cv2 to RGB  in PIL
)
2.使用TorchVision Augs和ToTensor&Normalize
确保“img”在由 TorchVision Augs 处理之前已从 BGR-Numpy 格式转换为 PIL 格式。
train_pipeline = [
    dict(type='LoadImageFromFile'),
    dict(type='NumpyToPIL', to_rgb=True),       # from BGR in cv2 to RGB  in PIL
    dict(
        type='torchvision/RandomResizedCrop',
        size=176,
        interpolation='bilinear'),            # accept str format interpolation mode
    dict(type='torchvision/RandomHorizontalFlip', p=0.5),
    dict(
        type='torchvision/TrivialAugmentWide',
        interpolation='bilinear'),
    dict(type='torchvision/PILToTensor'),
    dict(type='torchvision/ConvertImageDtype', dtype=torch.float),
    dict(
        type='torchvision/Normalize',
        mean=(0.485, 0.456, 0.406),
        std=(0.229, 0.224, 0.225),
    ),
    dict(type='torchvision/RandomErasing', p=0.1),
    dict(type='PackInputs'),
]

data_preprocessor = dict(num_classes=1000, mean=None, std=None, to_rgb=False)  # Normalize in dataset pipeline
3.使用TorchVision Augs,除了ToTensor&Normalize
train_pipeline = [
    dict(type='LoadImageFromFile'),
    dict(type='NumpyToPIL', to_rgb=True),   # from BGR in cv2 to RGB  in PIL
    dict(type='torchvision/RandomResizedCrop', size=176, interpolation='bilinear'),
    dict(type='torchvision/RandomHorizontalFlip', p=0.5),
    dict(type='torchvision/TrivialAugmentWide', interpolation='bilinear'),
    dict(type='PackInputs'),
]

# here the Normalize params is for the RGB format
data_preprocessor = dict(
    num_classes=1000,
    mean=[123.675, 116.28, 103.53],
    std=[58.395, 57.12, 57.375],
    to_rgb=False,
)
2、数据预处理器
数据预处理器也是在将数据输入神经网络之前处理数据的组件。与数据转换相比,数据预处理器是分类器的一个模块,它需要一批数据来处理,这意味着它可以使用GPU和批处理来加速处理。
MMPreTrain 中的默认数据预处理器可以进行如下预处理:
将数据移动到目标设备。
将输入填充到当前批次的最大大小。
将输入堆叠到批次中。
如果输入的形状为 (3, H, W),则将输入从 bgr 转换为 rgb。
使用定义的标准差和平均值对图像进行标准化。
在训练期间进行 Mixup 和 CutMix 等批量增强。
您可以通过配置文件中的data_preprocessor字段或字段来配置数据预处理器。model.data_preprocessor典型用法如下:
data_preprocessor = dict(
    # RGB format normalization parameters
    mean=[123.675, 116.28, 103.53],
    std=[58.395, 57.12, 57.375],
    to_rgb=True,    # convert image from BGR to RGB
)
或者定义model.data_preprocessor如下:
model = dict(
    backbone = ...,
    neck = ...,
    head = ...,
    data_preprocessor = dict(
                         mean=[123.675, 116.28, 103.53],
                         std=[58.395, 57.12, 57.375],
                         to_rgb=True)
    train_cfg=...,
)
请注意, 的model.data_preprocessor优先级高于data_preprocessor。
ClsDataPreprocessor
用于分类任务的图像预处理器。
SelfSupDataPreprocessor
用于操作的图像预处理器,例如标准化和 bgr 到 rgb。
TwoNormDataPreprocessor
CAE、BEiT v1/v2 等图像预处理器
VideoDataPreprocessor
用于操作的视频预处理器,例如标准化和 bgr 到 rgb 转换。
批量增强
批量增强是数据预处理器的一个组件。它涉及多个样本并以某种方式混合它们,例如 Mixup 和 CutMix。
这些增强通常仅在训练期间使用,因此,我们使用该model.train_cfg字段在配置文件中配置它们。
model = dict(
    backbone=...,
    neck=...,
    head=...,
    train_cfg=dict(augments=[
        dict(type='Mixup', alpha=0.8),
        dict(type='CutMix', alpha=1.0),
    ]),
)
您还可以通过字段指定每个批次增强的概率probs。
model = dict(
    backbone=...,
    neck=...,
    head=...,
    train_cfg=dict(augments=[
        dict(type='Mixup', alpha=0.8),
        dict(type='CutMix', alpha=1.0),
    ], probs=[0.3, 0.7])
)
以下是可在 MMPreTrain 中使用的批量增强的列表。
| Mixup | 混合批量增强。 |
|---|---|
| CutMix | CutMix 批量添加。 |
| ResizeMix | ResizeMix 随机粘贴一批数据的图层 |
3、修改训练/测试管道
MMPretrain 中的数据管道非常灵活。您可以从配置文件中控制数据预处理的几乎每一步,但另一方面,面对如此多的选项,您可能会感到困惑。
这是图像分类任务的常见实践和指南。
1、加载
在数据管道的开始,我们通常需要从文件路径加载图像数据。 LoadImageFromFile通常用于完成此任务。
train_pipeline = [
    dict(type='LoadImageFromFile'),
    ...
]
如果要从特殊格式或特殊位置的文件加载数据,可以实现新的加载转换并将其添加到数据管道的开头。
2、增强和其他处理
在训练过程中,我们通常需要进行数据增强以避免过度拟合。在测试过程中,我们还需要进行一些数据处理,例如调整大小和裁剪。这些数据转换将在加载过程之后进行。
这是一个简单的数据增强配方示例。它将随机调整并裁剪输入图像到指定的比例大小,并以概率随机水平翻转图像。
train_pipeline = [
    ...
    dict(type='RandomResizedCrop', scale=224),
    dict(type='RandomFlip', prob=0.5, direction='horizontal'),
    ...
]
这是Swin-Transformer训练中使用的大量数据增强配方示例 。为了与官方实现保持一致,它指定pillow为调整大小后端和bicubic 调整大小算法。此外,它还添加了RandAugment和 RandomErasing作为额外的数据增强方法。
此配置指定了数据增强的每个细节,您只需将其复制到您自己的配置文件即可应用 Swin-Transformer 的数据增强。
bgr_mean = [103.53, 116.28, 123.675]
bgr_std = [57.375, 57.12, 58.395]

train_pipeline = [
    ...
    dict(type='RandomResizedCrop', scale=224, backend='pillow', interpolation='bicubic'),
    dict(type='RandomFlip', prob=0.5, direction='horizontal'),
    dict(
        type='RandAugment',
        policies='timm_increasing',
        num_policies=2,
        total_level=10,
        magnitude_level=9,
        magnitude_std=0.5,
        hparams=dict(
            pad_val=[round(x) for x in bgr_mean], interpolation='bicubic')),
    dict(
        type='RandomErasing',
        erase_prob=0.25,
        mode='rand',
        min_area_ratio=0.02,
        max_area_ratio=1 / 3,
        fill_color=bgr_mean,
        fill_std=bgr_std),
    ...
]
通常,数据管道中的数据增强部分仅处理图像级变换,而不处理像图像归一化或混合/剪切之类的变换。这是因为我们可以对批量数据进行图像归一化和混合/剪切混合来加速。要配置图像标准化和混合/剪切混合,请使用数据预处理器。
3、格式化
格式化就是从数据信息字典中收集训练数据,并将这些数据转换为模型友好的格式。
大多数情况下,您可以简单地使用PackInputs,它会将 NumPy 数组格式的图像转换为 PyTorch 张量,并将真实类别信息和其他元信息打包为DataSample.
train_pipeline = [
    ...
    dict(type='PackInputs'),
]
4、添加新的数据转换
在任意文件(例如 )中写入新的数据转换my_transform.py,并将其放置在文件夹 中mmpretrain/datasets/transforms/。数据转换类需要继承该类mmcv.transforms.BaseTransform并重写transform以字典作为输入并返回字典的方法。
from mmcv.transforms import BaseTransform
from mmpretrain.registry import TRANSFORMS

@TRANSFORMS.register_module()
class MyTransform(BaseTransform):

    def transform(self, results):
        # Modify the data information dict `results`.
        return results
将新类导入到mmpretrain/datasets/transforms/init.py.
...
from .my_transform import MyTransform

__all__ = [
    ..., 'MyTransform'
]
在配置文件中使用它。
train_pipeline = [
    ...
    dict(type='MyTransform'),
    ...
]
5、管道可视化
设计数据管道后,您可以使用可视化工具查看性能。
介绍数据集可视化工具
python tools/visualization/browse_dataset.py \
    ${CONFIG_FILE} \
    [-o, --output-dir ${OUTPUT_DIR}] \
    [-p, --phase ${DATASET_PHASE}] \
    [-n, --show-number ${NUMBER_IMAGES_DISPLAY}] \
    [-i, --show-interval ${SHOW_INTERRVAL}] \
    [-m, --mode ${DISPLAY_MODE}] \
    [-r, --rescale-factor ${RESCALE_FACTOR}] \
    [-c, --channel-order ${CHANNEL_ORDER}] \
    [--cfg-options ${CFG_OPTIONS}]
Description of all arguments:
config : The path of a model config file.
-o, --output-dir: The output path for visualized images. If not specified, it will be set to ‘’, which means not to save.
-p, --phase: Phase of visualizing dataset,must be one of [‘train’, ‘val’, ‘test’]. If not specified, it will be set to ‘train’.
-n, --show-number: The number of samples to visualized. If not specified, display all images in the dataset.
–show-interval: The interval of show (s).
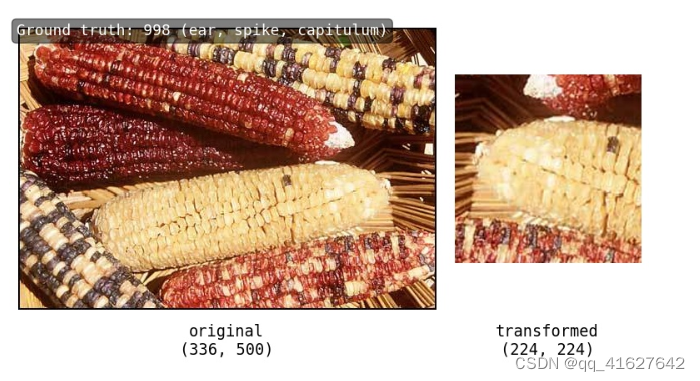
-m, --mode: The display mode, can be one of [‘original’, ‘transformed’, ‘concat’, ‘pipeline’]. If not specified, it will be set to ‘transformed’.
-r, --rescale-factor: The image rescale factor, which is useful if the output is too large or too small in the original mode.
-c, --channel-order: The channel of the showing images, could be “BGR” or “RGB”, If not specified, it will be set to ‘BGR’.
–cfg-options : Modifications to the configuration file, refer to Learn about Configs.
注意
The -m, --mode is about display mode, display original pictures or transformed pictures or comparison pictures:
“original” means show images load from disk;
“transformed” means to show images after transformed;
“concat” means show images stitched by “original” and “transformed” images;
“pipeline” means show all the intermediate images throghout the pipeline.
The -r, --rescale-factor option is set when the label information is too large or too small relative to the picture. For example, when visualizing the CIFAR dataset, since the resolution of the image is very small, --rescale-factor can be set to 10.
How to visualize the original image
In ‘original’ mode:
python ./tools/visualization/browse_dataset.py ./configs/resnet/resnet101_8xb16_cifar10.py --phase val --output-dir tmp --mode original --show-number 100 --rescale-factor 10 --channel-order RGB
–phase val:视觉验证集,可以简化为;-p val
–output-dir tmp:可视化结果保存在“tmp”文件夹中,可以简化为;-o tmp
–mode original:将原始图像可视化,可以简化为;-m original
–show-number 100:可视化 100 张图像,可以简化为;-n 100
–rescale-factor:图像放大10倍,可简化为;-r 10
–channel-order RGB:可视化图像的通道顺序为“RGB”,可以简化为。-c RGB
如何可视化转换后的图像
在“转换”模式下:
python ./tools/visualization/browse_dataset.py ./configs/resnet/resnet50_8xb32_in1k.py -n 100
如何将转换后的图像和原始图像一起可视化
在“连接”模式下:
python ./tools/visualization/browse_dataset.py configs/swin_transformer/swin-small_16xb64_in1k.py -n 10 -m concat
在“管道”模式下:
python ./tools/visualization/browse_dataset.py configs/swin_transformer/swin-small_16xb64_in1k.py -m pipeline

python ./tools/visualization/browse_dataset.py configs/beit/beit_beit-base-p16_8xb256-amp-coslr-300e_in1k.py -m pipeline
3、自定义模型
在我们的设计中,一个完整的模型被定义为一个顶层模块,其中包含基于其功能的几个模型组件。
model:顶层模块定义任务的类型,例如Imageclassifier用于图像分类,MAE用于自监督学习,ImageToImageRetriever用于图像检索。
backbone:通常是一个特征提取网络,记录模型之间的主要差异,如ResNet, MobileNet。
neck:backbone和head之间的部分,如GlobalAveragePooling。
head:特定任务的组件,例如clhead, ContrastiveHead。
loss:磁头中用于计算损耗的组件,如CrossEntropyLoss、LabelSmoothLoss。target_generator:专门用于自监督学习任务的组件,如vokp、HoGGenerator。
Add a new model
一般来说,对于图像分类和检索任务,管道是一致的。然而,管道不同于每个自监督学习算法,如MAE和BEiT。因此,在本节中,我们将解释如何添加自监督学习算法。
增加一个新的自监督学习算法
创建一个新文件mmpretrain/models/selfsup/new_algorithm.py,并在其中实现newalgalgorithm。
from mmpretrain.registry import MODELS
from .base import BaseSelfSupvisor


@MODELS.register_module()
class NewAlgorithm(BaseSelfSupvisor):

    def __init__(self, backbone, neck=None, head=None, init_cfg=None):
        super().__init__(init_cfg)
        pass

    # ``extract_feat`` function is defined in BaseSelfSupvisor, you could
    # overwrite it if needed
    def extract_feat(self, inputs, **kwargs):
        pass

    # the core function to compute the loss
    def loss(self, inputs, data_samples, **kwargs):
        pass
导入mmpretrain/models/selfsup/init_.py文件中的新算法模块
...
from .new_algorithm import NewAlgorithm

__all__ = [
    ...,
    'NewAlgorithm',
    ...
]
Use it in your config file.
model = dict(
    type='NewAlgorithm',
    backbone=...,
    neck=...,
    head=...,
    ...
)
Add a new backbone
在这里,我们通过一个ResNet_CIFAR的例子来展示如何开发一个新的骨干组件。由于CIFAR的输入大小为32x32,远小于ImageNet的默认大小224x224,因此该主干将kernel_size=7, stride=2替换为kernel_size=3, stride=1,并在主干层后删除MaxPooling,避免将小的特征映射转发到剩余块。
import torch.nn as nn

from mmpretrain.registry import MODELS
from .resnet import ResNet


@MODELS.register_module()
class ResNet_CIFAR(ResNet):

    """ResNet backbone for CIFAR.

    short description of the backbone

    Args:
        depth(int): Network depth, from {18, 34, 50, 101, 152}.
        ...
    """

    def __init__(self, depth, deep_stem, **kwargs):
        # call ResNet init
        super(ResNet_CIFAR, self).__init__(depth, deep_stem=deep_stem, **kwargs)
        # other specific initializations
        assert not self.deep_stem, 'ResNet_CIFAR do not support deep_stem'

    def _make_stem_layer(self, in_channels, base_channels):
        # override the ResNet method to modify the network structure
        self.conv1 = build_conv_layer(
            self.conv_cfg,
            in_channels,
            base_channels,
            kernel_size=3,
            stride=1,
            padding=1,
            bias=False)
        self.norm1_name, norm1 = build_norm_layer(
            self.norm_cfg, base_channels, postfix=1)
        self.add_module(self.norm1_name, norm1)
        self.relu = nn.ReLU(inplace=True)

    def forward(self, x):
        # Customize the forward method if needed.
        x = self.conv1(x)
        x = self.norm1(x)
        x = self.relu(x)
        outs = []
        for i, layer_name in enumerate(self.res_layers):
            res_layer = getattr(self, layer_name)
            x = res_layer(x)
            if i in self.out_indices:
                outs.append(x)
        # The return value needs to be a tuple with multi-scale outputs from different depths.
        # If you don't need multi-scale features, just wrap the output as a one-item tuple.
        return tuple(outs)

    def init_weights(self):
        # Customize the weight initialization method if needed.
        super().init_weights()

        # Disable the weight initialization if loading a pretrained model.
        if self.init_cfg is not None and self.init_cfg['type'] == 'Pretrained':
            return

        # Usually, we recommend using `init_cfg` to specify weight initialization methods
        # of convolution, linear, or normalization layers. If you have some special needs,
        # do these extra weight initialization here.
        ...
在mmpretrain/models/backbone /init.py中导入新的骨干模块。
...
from .resnet_cifar import ResNet_CIFAR

__all__ = [
    ..., 'ResNet_CIFAR'
]
修改配置文件中的相关设置。
model = dict(
    ...
    backbone=dict(
        type='ResNet_CIFAR',
        depth=18,
        ...),
    ...
Add a new neck
这里我们以GlobalAveragePooling为例。这是一个非常简单的脖子,没有任何争论。为了增加一个新的颈部,我们主要实现了转发函数,它对脊柱的输出进行一些操作,并将结果转发到头部。
在mmpretrain/models/neck /gap.py中创建一个新文件。
import torch.nn as nn

from mmpretrain.registry import MODELS

@MODELS.register_module()
class GlobalAveragePooling(nn.Module):

    def __init__(self):
        self.gap = nn.AdaptiveAvgPool2d((1, 1))

    def forward(self, inputs):
        # we regard inputs as tensor for simplicity
        outs = self.gap(inputs)
        outs = outs.view(inputs.size(0), -1)
        return outs
在mmpretrain/models/颈部/init.py中导入新的颈部模块。
...
from .gap import GlobalAveragePooling

__all__ = [
    ..., 'GlobalAveragePooling'
]
修改配置文件中的相关设置。
model = dict(
    neck=dict(type='GlobalAveragePooling'),
)
Add a new head
Based on ClsHead
在这里,我们展示了如何通过简化的visionTransformerClsHead的例子来开发一个新的头部,如下所示。为了实现一个新的分类头,我们需要在最终分类头之前为进程实现一个pre_logits方法和一个转发方法。
为什么我们需要pre_logits方法?
在分类任务中,我们通常使用线性laver进行最终分类,有时我们需要在最终分类之前获得特征,这就是pre_logits方法的输出。
在mmpretrain/models/heads/vit_head.py中创建一个新文件。
import torch.nn as nn

from mmpretrain.registry import MODELS
from .cls_head import ClsHead


@MODELS.register_module()
class VisionTransformerClsHead(ClsHead):

    def __init__(self, num_classes, in_channels, hidden_dim, **kwargs):
        super().__init__(**kwargs)
        self.in_channels = in_channels
        self.num_classes = num_classes
        self.hidden_dim = hidden_dim

        self.fc1 = nn.Linear(in_channels, hidden_dim)
        self.act = nn.Tanh()
        self.fc2 = nn.Linear(hidden_dim, num_classes)

    def pre_logits(self, feats):
        # The output of the backbone is usually a tuple from multiple depths,
        # and for classification, we only need the final output.
        feat = feats[-1]

        # The final output of VisionTransformer is a tuple of patch tokens and
        # classification tokens. We need classification tokens here.
        _, cls_token = feat

        # Do all works except the final classification linear layer.
        return self.act(self.fc1(cls_token))

    def forward(self, feats):
        pre_logits = self.pre_logits(feats)

        # The final classification linear layer.
        cls_score = self.fc2(pre_logits)
        return cls_score
导入mmpretrain/models/heads/ init .py文件中的模块。
...
from .vit_head import VisionTransformerClsHead

__all__ = [
    ..., 'VisionTransformerClsHead'
]
修改配置文件中的相关设置。
model = dict(
    head=dict(
        type='VisionTransformerClsHead',
        ...,
    ))
Based on BaseModule
MAEPretrainHead这是一个基于BaseModule掩模图像建模任务并实现的示例。需要实现loss生成损失的函数,但其他辅助函数是可选的。
# Copyright (c) OpenMMLab. All rights reserved.
import torch
from mmengine.model import BaseModule

from mmpretrain.registry import MODELS


@MODELS.register_module()
class MAEPretrainHead(BaseModule):
    """Head for MAE Pre-training."""

    def __init__(self,
                 loss: dict,
                 norm_pix: bool = False,
                 patch_size: int = 16) -> None:
        super().__init__()
        self.norm_pix = norm_pix
        self.patch_size = patch_size
        self.loss_module = MODELS.build(loss)

    def patchify(self, imgs: torch.Tensor) -> torch.Tensor:
        """Split images into non-overlapped patches."""
        p = self.patch_size
        assert imgs.shape[2] == imgs.shape[3] and imgs.shape[2] % p == 0

        h = w = imgs.shape[2] // p
        x = imgs.reshape(shape=(imgs.shape[0], 3, h, p, w, p))
        x = torch.einsum('nchpwq->nhwpqc', x)
        x = x.reshape(shape=(imgs.shape[0], h * w, p**2 * 3))
        return x

    def construct_target(self, target: torch.Tensor) -> torch.Tensor:
        """Construct the reconstruction target."""
        target = self.patchify(target)
        if self.norm_pix:
            # normalize the target image
            mean = target.mean(dim=-1, keepdim=True)
            var = target.var(dim=-1, keepdim=True)
            target = (target - mean) / (var + 1.e-6)**.5

        return target

    def loss(self, pred: torch.Tensor, target: torch.Tensor,
             mask: torch.Tensor) -> torch.Tensor:
        """Generate loss."""
        target = self.construct_target(target)
        loss = self.loss_module(pred, target, mask)

        return loss
实现后,以下步骤与基于ClsHead中的步骤2和步骤3相同。
Add a new loss
为了增加新的损失函数,我们主要在损失模块中实现前向函数。我们也应该将loss模块注册为model。此外,利用修饰器weighted_loss对每个元素的损失进行加权也是有帮助的。假设我们想要模拟由另一个分类模型生成的概率分布,我们实现一个L1Loss来实现如下目的。
在mmpretrain/models/losses/ 11_losses .py中创建一个新文件。
import torch
import torch.nn as nn

from mmpretrain.registry import MODELS
from .utils import weighted_loss

@weighted_loss
def l1_loss(pred, target):
    assert pred.size() == target.size() and target.numel() > 0
    loss = torch.abs(pred - target)
    return loss

@MODELS.register_module()
class L1Loss(nn.Module):

    def __init__(self, reduction='mean', loss_weight=1.0):
        super(L1Loss, self).__init__()
        self.reduction = reduction
        self.loss_weight = loss_weight

    def forward(self,
                pred,
                target,
                weight=None,
                avg_factor=None,
                reduction_override=None):
        assert reduction_override in (None, 'none', 'mean', 'sum')
        reduction = (
            reduction_override if reduction_override else self.reduction)
        loss = self.loss_weight * l1_loss(
            pred, target, weight, reduction=reduction, avg_factor=avg_factor)
        return loss
导入mmpretrain/models/losses/init.py文件中的模块。
...
from .l1_loss import L1Loss

__all__ = [
    ..., 'L1Loss'
]
修改头部配置中的loss字段。
model = dict(
    head=dict(
        loss=dict(type='L1Loss', loss_weight=1.0),
    ))
最后,我们可以将所有新的模型组件组合到一个配置文件中,为最佳实践创建一个新的模型。因为ResNet_CIFAR不是一个基于vit的主干,所以我们在这里没有实现VisionTransformerClsHead。
model = dict(
    type='ImageClassifier',
    backbone=dict(
        type='ResNet_CIFAR',
        depth=18,
        num_stages=4,
        out_indices=(3, ),
        style='pytorch'),
    neck=dict(type='GlobalAveragePooling'),
    head=dict(
        type='LinearClsHead',
        num_classes=10,
        in_channels=512,
        loss=dict(type='L1Loss', loss_weight=1.0),
        topk=(1, 5),
    ))
4、定制培训计划
在我们的代码库中,已经为 CIFAR、ImageNet 等常见数据集提供了默认的训练计划。如果我们尝试在这些数据集上进行实验以获得更高的准确性或在不同的新方法和数据集上进行实验,我们可能需要修改策略。
在本教程中,我们将介绍如何修改配置来构建优化器,使用参数化精细配置、梯度裁剪、梯度累积以及自定义学习率和动量计划。此外,引入模板来为项目定制自行实现的优化方法。
Customize optimization
我们使用optim_wrapper字段来配置优化策略,包括优化器的选择、自动混合精确训练的选择、参数化配置、梯度裁剪和累积。详情如下。
1、使用PyTorch支持的优化器
我们支持PyTorch实现的所有优化器,要使用它们,请更改配置文件的optimizer字段。例如,如果您想使用esgd,那么配置文件中的修改可以如下所示。注意,与优化相关的设置应该全部包装在optim_wrapper中。
optim_wrapper = dict(
    type='OptimWrapper',
    optimizer=dict(type='SGD', lr=0.0003, weight_decay=0.0001)
)
在PyTorch中,optimizer中的type不是构造函数,而是优化器的名称。参考PyTorch支持的优化器列表以获得更多选择。
例如,如果您想使用PyTorch 中的Adam设置。您可以使用下面的配置:torch.optim.Adam(params, lr=0.001, betas=(0.9, 0.999), eps=1e-08, weight_decay=0, amsgrad=False)
optim_wrapper = dict(
    type='OptimWrapper',
    optimizer = dict(
        type='Adam',
        lr=0.001,
        betas=(0.9, 0.999),
        eps=1e-08,
        weight_decay=0,
        amsgrad=False),
)
字段的默认类型optim_wrapper是OptimWrapper,因此,通常可以省略类型字段,例如:
optim_wrapper = dict(
optimizer=dict(
type=‘Adam’,
lr=0.001,
betas=(0.9, 0.999),
eps=1e-08,
weight_decay=0,
amsgrad=False))
2、使用 AMP 训练
如果我们想使用自动混合精确训练,我们可以简单地在配置文件中更改optim_wrapper类型to AmpOptimwrapper的。
optim_wrapper = dict(type='AmpOptimWrapper', optimizer=...)
或者,为了方便起见,我们可以在tools/train.pyscript中设置——amp参数来直接打开amp选项。有关开始培训的详细信息,请参阅培训教程。
3、参数精细配置
某些模型可能具有特定于参数的优化设置,例如,BatchNorm 层没有权重衰减或对不同网络层使用不同的学习率。为了精细地配置它们,我们可以使用paramwise_cfg中的参数optim_wrapper。
为不同类型的参数设置不同的超参数乘数。
例如,我们可以设置norm_decay_mul=0在paramwise_cfg中改变归一化层的权重衰减和偏置为零。
optim_wrapper = dict(
    optimizer=dict(type='SGD', lr=0.8, weight_decay=1e-4),
    paramwise_cfg=dict(norm_decay_mult=0.))
支持配置更多类型的参数,列表如下:
bias_lr_mult:偏差学习率的乘数(不包括归一化层的偏差和可变形卷积层的偏移)。默认为 1。
bias_decay_mult:偏差权重衰减的乘数(不包括归一化层的偏差和可变形卷积层的偏移)。默认为 1。
norm_decay_mult:权重衰减和归一化层偏差的乘数。默认为 1。
flat_decay_mult:所有一维参数权重衰减的乘数。默认为 1。
dwconv_decay_mult:深度卷积层权重衰减的乘数。默认为 1。
bypass_duplicate:是否绕过重复参数。默认为False.
dcn_offset_lr_mult:可变形卷积层学习率的乘数。默认为 1。
为特定参数设置不同的超参数乘数。
MMPretrain 可以用来custom_keys指定paramwise_cfg不同的参数以使用不同的学习率或权重衰减。
例如,要将所有学习率和权重衰减设置为backbone.layer00,其余部分backbone与优化器相同,并将学习率设置head为 0.001,请使用以下配置。
optim_wrapper = dict(
    optimizer=dict(type='SGD', lr=0.01, weight_decay=0.0001),
    paramwise_cfg=dict(
        custom_keys={
            'backbone.layer0': dict(lr_mult=0, decay_mult=0),
            'backbone': dict(lr_mult=1),
            'head': dict(lr_mult=0.1)
        }))
4、Gradient clipping
在训练过程中,损失函数可能会接近陡峭区域并导致梯度爆炸。并且梯度裁剪有助于稳定训练过程。更多介绍可以在这个页面找到。
目前我们支持梯度裁剪clip_grad选项optim_wrapper,请参阅PyTorch 文档。
这是一个例子:
optim_wrapper = dict(
    optimizer=dict(type='SGD', lr=0.01, weight_decay=0.0001),
    # norm_type: type of the used p-norm, here norm_type is 2.
    clip_grad=dict(max_norm=35, norm_type=2))
5、梯度累积
当计算资源缺乏时,batch size只能设置为较小的值,这可能会影响模型的性能。可以利用梯度累积来解决这个问题。我们支持accumulative_counts选项在optim_wrapper梯度累积
train_dataloader = dict(batch_size=64)
optim_wrapper = dict(
    optimizer=dict(type='SGD', lr=0.01, weight_decay=0.0001),
    accumulative_counts=4)
表示在训练过程中,每 4 迭代进行一次反向传播。上面等价于:
train_dataloader = dict(batch_size=256)
optim_wrapper = dict(
    optimizer=dict(type='SGD', lr=0.01, weight_decay=0.0001))
5、自定义评估指标
在 MMPretrain 中使用指标
在MMPretrain中,我们为单标签分类和多标签分类提供了多个指标:
单标签分类:
Accuracy
SingleLabelMetric,包括准确率、召回率、f1 分数和支持度。
多标签分类:
AveragePrecision,或 AP (mAP)。
MultiLabelMetric,包括准确率、召回率、f1 分数和支持度。
要在验证和测试期间使用这些指标,我们需要修改 配置文件中的val_evaluator和test_evaluator字段。
这里有几个例子:
在验证和测试期间计算 top-1 和 top-5 准确度。
val_evaluator = dict(type='Accuracy', topk=(1, 5))
test_evaluator = val_evaluator
在验证和测试期间计算 top-1 准确度、top-5 准确度、精确度和召回率。
val_evaluator = [
  dict(type='Accuracy', topk=(1, 5)),
  dict(type='SingleLabelMetric', items=['precision', 'recall']),
]
test_evaluator = val_evaluator
计算 mAP(平均平均精度)、CP(类平均精度)、CR(类平均召回率)、CF(类平均 F1 分数)、OP(总体平均精度)、OR(总体平均召回率)和OF1(总体平均 F1 分数)。
val_evaluator = [
  dict(type='AveragePrecision'),
  dict(type='MultiLabelMetric', average='macro'),  # class-wise mean
  dict(type='MultiLabelMetric', average='micro'),  # overall mean
]
test_evaluator = val_evaluator
添加新指标
MMPretrain支持为追求更高定制化的用户实现定制化的评价指标。
您需要在 下创建一个新文件mmpretrain/evaluation/metrics,并在该文件中实现新指标,例如在 中mmpretrain/evaluation/metrics/my_metric.py。MyMetric并创建一个继承的自定义评估指标类。BaseMetric in MMEngine
数据格式处理方法process和度量计算方法compute_metrics需要分别重写。将其添加到METRICS注册表以实施任何自定义的评估指标。
from mmengine.evaluator import BaseMetric
from mmpretrain.registry import METRICS

@METRICS.register_module()
class MyMetric(BaseMetric):

    def process(self, data_batch: Sequence[Dict], data_samples: Sequence[Dict]):
    """ The processed results should be stored in ``self.results``, which will
        be used to computed the metrics when all batches have been processed.
        `data_batch` stores the batch data from dataloader,
        and `data_samples` stores the batch outputs from model.
    """
        ...

    def compute_metrics(self, results: List):
    """ Compute the metrics from processed results and returns the evaluation results.
    """
        ...
然后,将其导入以mmpretrain/evaluation/metrics/init.py将其添加到mmpretrain.evaluation包中。
# In mmpretrain/evaluation/metrics/__init__.py
...
from .my_metric import MyMetric

__all__ = [..., 'MyMetric']
MyMetric最后,在配置文件的val_evaluator和字段中使用test_evaluator。
在这里插入代码片
6、MMPRETRAIN 中的约定
1、型号命名约定
我们遵循以下约定来命名模型。建议贡献者遵循相同的风格。模型名称分为五部分:算法信息、模块信息、预训练信息、训练信息和数据信息。逻辑上,不同部分用下划线连接’_‘,同一部分的单词用破折号连接’-'。
{algorithm info}_{module info}_{pretrain info}_{training info}_{data info}
algorithm info(可选):主要算法信息,包括MAE、BEiT等主要训练算法。
module info:模块信息,通常包括backbone名称,如resnet、vit等。
pretrain info:(可选):预训练模型信息,例如预训练模型是在ImageNet-21k上训练的。
training info:训练信息,一些训练计划,包括批量大小、lr 计划、数据增强等。
data info:数据信息,通常包括数据集名称、输入大小等,如imagenet、cifar等。
1、算法信息
训练模型的主要算法名称。例如:
simclr
mocov2
eva-mae-style
通过监督图像分类训练的模型可以省略该字段。
2、模块信息
模型的模块,通常,骨干必须包含在该字段中,颈部和头部信息可以省略。例如:
resnet50
vit-base-p16
swin-base
3、训练前信息
如果模型是预训练模型的微调模型,我们需要记录预训练模型的一些信息。例如:
预训练模型来源:fb、openai等
训练预训练模型的方法:clip、mae、distill等。
预训练使用的数据集:in21k、laion2b等(in1k可省略)
培训时长:300e、1600e等
并非所有信息都是必需的,仅选择必要的信息来区分不同的预训练模型。
在此字段的末尾,使用 a-pre作为标识符,例如mae-in21k-pre。
4、培训信息
训练计划,包括训练类型、数据增强、特殊损失函数等:batch sizelr schedule
格式,如{gpu x batch_per_gpu}8xb32
训练类型(主要见于Transformer网络,比如ViT算法,通常分为两种训练类型:预训练和微调):
ft:用于微调的配置文件
pt:预训练的配置文件
训练食谱。通常只会对与原论文不同的部分进行标记。这些方法将按顺序排列。{pipeline aug}-{train aug}-{loss trick}-{scheduler}-{epochs}
coslr-200e:使用cosine调度器训练200个epoch
autoaug-mixup-lbs-coslr-50e:使用autoaug, mixup, ,训练 50 个 epoch,label smooth cosine scheduler
如果模型是从第三方存储库(如官方存储库)转换而来的,则可以省略训练信息并使用 a3rdparty作为标识符。
5、数据信息
in1k:ImageNet1k数据集,默认使用输入图像尺寸224x224;
in21k:ImageNet21k数据集,也叫ImageNet22k数据集,默认使用输入图像大小224x224;
in1k-384px:表示输入图像尺寸为384x384;
cifar100
6、型号名称示例
vit-base-p32_clip-openai-pre_3rdparty_in1k
vit-base-p32:模块信息
clip-openai-pre:训练前信息。
clip:预训练方法是clip。
openai:预训练模型来自OpenAI。
pre:预训练标识符。
3rdparty:模型是从第三方存储库转换而来的。
in1k:数据集信息。该模型是根据 ImageNet-1k 数据集进行训练的,输入大小为224x224。
beit_beit-base-p16_8xb256-amp-coslr-300e_in1k
beit:算法信息
beit-base:模块信息,由于主干是从BEiT修改而来的ViT,所以主干名称也是beit。
8xb256-amp-coslr-300e:培训信息。
8xb256:使用 8 个 GPU,每个 GPU 上的批量大小为 256。
amp:使用自动混合精度训练。
coslr:使用余弦退火学习率调度程序。
300e:训练 300 个 epoch。
in1k:数据集信息。该模型是根据 ImageNet-1k 数据集进行训练的,输入大小为224x224。
2、配置文件命名约定
配置文件的命名与模型名称几乎相同,但有几个区别:
培训信息是必要的,而不是必要的3rdparty。
如果配置文件仅包含主干设置,既没有头设置也没有数据集设置。我们将其命名为. 此类配置文件通常用于大型数据集上的第三方预训练模型。{module info}_headless.py
检查点命名约定
权重的命名主要包括模型名称、日期和哈希值。
{model_name}_{date}-{hash}.pth


![[微信小程序] movable-view 可移动视图容器 - 范围问题](https://img-blog.csdnimg.cn/b8e4ec3de8a04dc192b476193e23e03b.gif)