1. Input 控件
1.1 最简单的Input控件
在UI5框架中,最简单的Input控件也提供了输入提示功能。当用户输入内容的时候,会自动匹配Input控件中所绑定的JSON模型中是数据。
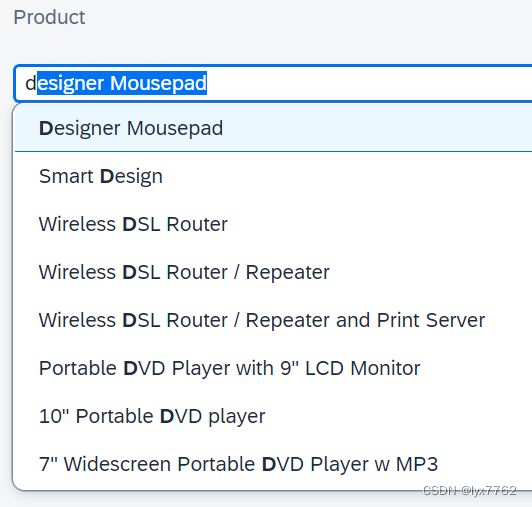
Input的默认匹配规则是匹配从头匹配每一个单词
前端代码如下:
<mvc:View
	controllerName="sap.ui5.walkthrough.controller.App"
	xmlns:core="sap.ui.core"
	xmlns:mvc="sap.ui.core.mvc"
	xmlns="sap.m"
	xmlns:l="sap.ui.layout"
>
	<l:VerticalLayout class="sapUiContentPadding" width="100%">
		<Label text="Product" labelFor="productInput" />
		<Input
			id="productInput"
			placeholder="Enter product"
			showSuggestion="true"
			showValueHelp="true"
			valueHelpRequest=".onValueHelpRequest"
			suggestionItems="{/ProductCollection}">
			<suggestionItems>
				<core:Item text="{Name}" />
			</suggestionItems>
		</Input>
	</l:VerticalLayout>
</mvc:View>
如果不需要弹出ValueHelper的对话框,
showValueHelp="true"可以设置为false,同样可以提供自动提示功能。
如果需要设置弹出ValueHelper,需要设置为
true,同时需要创建一个Fragment,作为弹出对话框的前端代码。
<c:FragmentDefinition
	xmlns="sap.m"
	xmlns:c="sap.ui.core"
>
	<SelectDialog
		id="selectDialog"
		title="Products"
		items="{/ProductCollection}"
		search=".onValueHelpSearch"
		confirm=".onValueHelpClose"
		cancel=".onValueHelpClose"
	>
		<StandardListItem
			icon="{ProductPicUrl}"
			iconDensityAware="false"
			iconInset="false"
			title="{Name}"
			description="{ProductId}"
		/>
	</SelectDialog>
</c:FragmentDefinition>
js代码如下:
sap.ui.define([
	'sap/ui/core/mvc/Controller',
	'sap/ui/model/json/JSONModel',
	"sap/ui/core/Core",
	"sap/ui/core/library",
	"sap/ui/unified/DateTypeRange",
	"sap/ui/core/date/UI5Date",
	'sap/m/MessageToast',
	"sap/ui/core/Fragment",
	"sap/ui/model/Filter",
	"sap/ui/model/FilterOperator"
], function (Controller,
	JSONModel,
	Core,
	library,
	DateTypeRange,
	UI5Date,
	MessageToast,
	Fragment,
	Filter,
	FilterOperator) {
	"use strict";

	return Controller.extend("sap.ui5.walkthrough.controller.App", {
		/**
		 * @override
		 */
		onInit: function() {
			var oModel = new JSONModel({
				ProductCollection : [
					{Name : "Mac mini", ProductId : "001"},
					{Name : "Mac Pro", ProductId : "002"},
					{Name : "Macbook", ProductId : "003"},
					{Name : "Macbook Pro", ProductId : "004"},
				]
			});
			this.getView().setModel(oModel);
		},

		// 打开对话框
		onValueHelpRequest: function (oEvent) {
			var sInputValue = oEvent.getSource().getValue(),
				oView = this.getView();

			// 如果对话框没有弹出,则创建
			if (!this._pValueHelpDialog) {
				this._pValueHelpDialog = Fragment.load({
					id: oView.getId(),
					name: "sap.ui5.walkthrough.view.ValueHelpDialog",
					controller: this
				}).then(function (oDialog) {
					oView.addDependent(oDialog);
					return oDialog;
				});
			}
			this._pValueHelpDialog.then(function(oDialog) {
				// Create a filter for the binding
				// 这句话的作用是设置弹出对话框的过滤器,比如我在输入框中已经输入了mini,那么再点击ValueHelper
				oDialog.getBinding("items").filter([new Filter("Name", FilterOperator.Contains, sInputValue)]);
				// Open ValueHelpDialog filtered by the input's value
				oDialog.open(sInputValue);
			});
		},

		onValueHelpSearch: function (oEvent) {
			var sValue = oEvent.getParameter("value");
			var oFilter = new Filter("Name", FilterOperator.Contains, sValue);

			oEvent.getSource().getBinding("items").filter([oFilter]);
		},

		onValueHelpClose: function (oEvent) {
			var oSelectedItem = oEvent.getParameter("selectedItem");
			oEvent.getSource().getBinding("items").filter([]);

			if (!oSelectedItem) {
				return;
			}

			this.byId("productInput").setValue(oSelectedItem.getTitle());
		}
	});
});
1.2 显示两类内容的Input
只需要添加additionalText="{SupplierName}"即可
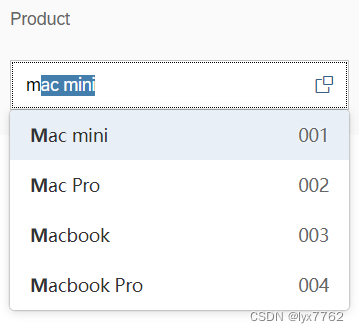
注意,之前使用的item是
<core:Item text="{Name}" />,这个item不提供additionalText属性
如果我们要使用该属性,需要将item换成<core:ListItem text="{Name}" additionalText="{ProductId}" />
1.3 显示表格输入提示的Input控件
可以同时显示一个item的多个属性,如下图所示:

具体代码如下:
<mvc:View
	controllerName="sap.ui5.walkthrough.controller.App"
	xmlns:core="sap.ui.core"
	xmlns:mvc="sap.ui.core.mvc"
	xmlns="sap.m"
	xmlns:l="sap.ui.layout"
>
	<l:VerticalLayout class="sapUiContentPadding" width="100%">
		<Label text="Product" labelFor="productInput" />
		<Input
			id="productInput"
			placeholder="Enter product"
			showSuggestion="true"
			showTableSuggestionValueHelp="false"
			suggestionRows="{/ProductCollection}">
			<suggestionColumns>
				<Column>
					<Label text="Brand"/>
				</Column>
				<Column>
					<Label text="Category"/>
				</Column>
				<Column>
					<Label text="Name"/>
				</Column>
				<Column>
					<Label text="ProductId"/>
				</Column>
			</suggestionColumns>

			<suggestionRows>
				<ColumnListItem>
					<Label text="{Brand}"></Label>
					<Label text="{Category}"></Label>
					<Label text="{Name}"></Label>
					<Label text="{ProductId}"></Label>
				</ColumnListItem>
			</suggestionRows>
		</Input>
	</l:VerticalLayout>
</mvc:View>
需要注意的是,之前提示的suggestion都是使用的
suggestionItems="{/ProductCollection}">属性。
如果使用表格的方式,那么需要修改为suggestionRows="{/ProductCollection}"
sap.ui.define([
	'sap/ui/core/mvc/Controller',
	'sap/ui/model/json/JSONModel',
	"sap/ui/core/Core",
	"sap/ui/core/library",
	"sap/ui/unified/DateTypeRange",
	"sap/ui/core/date/UI5Date",
	'sap/m/MessageToast',
	"sap/ui/core/Fragment",
	"sap/ui/model/Filter",
	"sap/ui/model/FilterOperator"
], function (Controller,
	JSONModel,
	Core,
	library,
	DateTypeRange,
	UI5Date,
	MessageToast,
	Fragment,
	Filter,
	FilterOperator) {
	"use strict";

	return Controller.extend("sap.ui5.walkthrough.controller.App", {
		/**
		 * @override
		 */
		onInit: function() {
			var oModel = new JSONModel({
				ProductCollection : [
					{Brand: "Apple Inc.", Category: "Personal Computer", Name : "Mac mini",  ProductId : "001"},
					{Brand: "Apple Inc.", Category: "Personal Computer", Name : "Mac Pro", ProductId : "002"},
					{Brand: "Apple Inc.", Category: "Personal Computer", Name : "Macbook", ProductId : "003"},
					{Brand: "Apple Inc.", Category: "Personal Computer", Name : "Macbook Pro", ProductId : "004"},
				]
			});
			this.getView().setModel(oModel);
		},
	});
});
1.4 带有输入验证的Input
在输入某些值的时候,可以设置相关的验证规则,比如长度的限制,包括格式的限制。下面的例子展示的是两个输入框,一个要求长度在1-10,另一个要求必须符合电子邮件的格式。具体代码如下:

<mvc:View
	controllerName="sap.ui5.walkthrough.controller.App"
	xmlns:core="sap.ui.core"
	xmlns:mvc="sap.ui.core.mvc"
	xmlns="sap.m"
	xmlns:l="sap.ui.layout"
>
	<l:VerticalLayout
		class="sapUiContentPadding"
		width="100%"
	>
		<Label
			text="Name"
			labelFor="nameInput"
		/>
		<Input
			id="nameInput"
			class="sapUiSmallMarginBottom"
			placeholder="Enter name"
			valueStateText="Name must not be empty. Maximum 10 characters."
			value="{
				path: '/name',
				type: 'sap.ui.model.type.String',
				constraints: {
					minLength: 1,
					maxLength: 10
				}
			}"
		/>
		<Label
			text="E-mail"
			labelFor="emailInput"
		/>
		<Input
			id="emailInput"
			class="sapUiSmallMarginBottom"
			type="Email"
			placeholder="Enter email"
			valueStateText="E-mail must be a valid email address."
			value="{
				path: '/email',
				type: '.customEMailType'
			}"
		/>

		<Button text="submit" press=".onSubmit"/>
	</l:VerticalLayout>
</mvc:View>
sap.ui.define([
	'sap/ui/core/mvc/Controller',
	'sap/ui/model/json/JSONModel',
	"sap/ui/core/Core",
	"sap/ui/core/library",
	"sap/ui/unified/DateTypeRange",
	"sap/ui/core/date/UI5Date",
	'sap/m/MessageToast',
	"sap/ui/core/Fragment",
	"sap/ui/model/Filter",
	"sap/ui/model/FilterOperator",
	"sap/ui/model/SimpleType",
	"sap/ui/model/ValidateException",
	"sap/m/MessageBox",
], function (Controller,
	JSONModel,
	Core,
	library,
	DateTypeRange,
	UI5Date,
	MessageToast,
	Fragment,
	Filter,
	FilterOperator,
	SimpleType,
	ValidateException,
	MessageBox) {
	"use strict";

	return Controller.extend("sap.ui5.walkthrough.controller.App", {
		onInit: function () {
			var oView = this.getView(),
				oMM = Core.getMessageManager();

			oView.setModel(new JSONModel({ name: "", email: "" }));
			oMM.registerObject(oView.byId("nameInput"), true);
			oMM.registerObject(oView.byId("emailInput"), true);
		},
		// 自定义
		customEMailType: SimpleType.extend("email", {
			formatValue: function (oValue) {
				return oValue;
			},

			parseValue: function (oValue) {
				//parsing step takes place before validating step, value could be altered here
				return oValue;
			},

			validateValue: function (oValue) {
				// The following Regex is only used for demonstration purposes and does not cover all variations of email addresses.
				// It's always better to validate an address by simply sending an e-mail to it.
				var rexMail = /^\w+[\w-+\.]*\@\w+([-\.]\w+)*\.[a-zA-Z]{2,}$/;
				if (!oValue.match(rexMail)) {
					throw new ValidateException("'" + oValue + "' is not a valid e-mail address");
				}
			}
		}),
	});
});
要想数据验证生效,必须要绑定JSON对象,并且要设置
oMM.registerObject(oView.byId("nameInput"), true);
此外,还可以添加一个提交按钮,按下提交按钮后,需要判断所有的inputs都合法,然后再允许用户提交,否则弹出错误的对话框。
// 如果只是验证,不再submit的时候再重新验证,下面的代码可以不用谢
onSubmit: function() {
	// 收集所有的输入框
	var oView = this.getView();
	var oInputs = [
		oView.byId("nameInput"),
		oView.byId("emailInput")
	];
	var bValidationError = false;

	// 循环遍历所有的inputs,判断每一个inputs是否都合法
	oInputs.forEach(function(oInput) {
		bValidationError = this._validateInput(oInput) || bValidationError;
	}, this);

	if (!bValidationError) {
		MessageToast.show("The input is ok");
	} else {
		MessageBox.alert("The input is not correct!")
	}
},

// 用于验证input是否合法
_validateInput: function(oInput) {
	var sValueState = "None"; // 用于设置输入框状态 如果不合法 输入框变成红色
	var bValidationError = false;
	var oBinding = oInput.getBinding("value"); // 获取用户输入内容

	try {
		oBinding.getType().validateValue(oInput.getValue()); // 对比是否满足验证条件,不满足就抛出异常
	} catch (oException) {
		sValueState = "Error";
		bValidationError = true;
	}
	return bValidationError;
}
1.5 自定义ValueHelper图标的Input
只需要给Input添加valueHelpIconSrc="sap-icon://arrow-left"属性即可。
<Input
	id="inputValueHelpCustomIcon"
	class="sapUiSmallMarginBottom"
	type="Text"
	placeholder="Enter product"
	showValueHelp="true"
	valueHelpIconSrc="sap-icon://arrow-left"
	valueHelpRequest="handleValueHelp"
/>
1.6 带有描述的Input
可以给Input属性添加description属性,内容会显示在Input之后
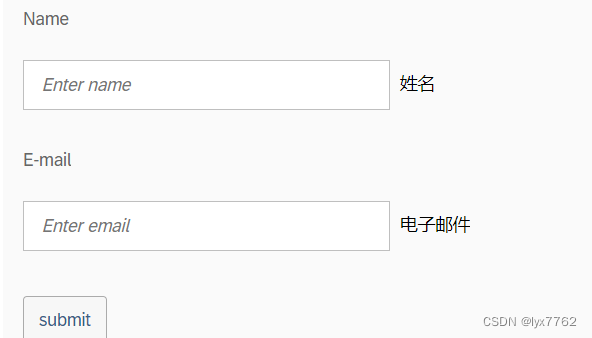
<Label
	text="Name"
	labelFor="nameInput"
/>
<Input
	id="nameInput"
	class="sapUiSmallMarginBottom"
	placeholder="Enter name"
	description="姓名"
	valueStateText="Name must not be empty. Maximum 10 characters."
	value="{
		path: '/name',
		type: 'sap.ui.model.type.String',
		constraints: {
			minLength: 1,
			maxLength: 10
		}
	}"
/>
<Label
	text="E-mail"
	labelFor="emailInput"
/>
<Input
	id="emailInput"
	class="sapUiSmallMarginBottom"
	type="Email"
	description="电子邮件"
	placeholder="Enter email"
	valueStateText="E-mail must be a valid email address."
	value="{
		path: '/email',
		type: '.customEMailType'
	}"
/>
此外,可以给Input添加showClearIcon属性,然后就会显示一个叉号用来清空Input内容

1.7 密码输入框Input
通过设置type="Password"来让Input输入框中不显示明文内容

1.8 自定义suggestion时的匹配规则
默认的匹配规则是匹配每一个单词的开头,比如Macbook Pro,如果输入ma,或者驶入pr都可以匹配到,但是如果输入oo,则匹配不到。我们可以通过设置Input的setFilterFunction来自定义自己的规则。具体代码如下:
<mvc:View
	controllerName="sap.ui5.walkthrough.controller.App"
	xmlns:core="sap.ui.core"
	xmlns:mvc="sap.ui.core.mvc"
	xmlns="sap.m"
	xmlns:l="sap.ui.layout"
>
	<l:VerticalLayout class="sapUiContentPadding" width="100%">
		<Label text="Product" labelFor="productInput" />
		<Input
			id="productInput"
			placeholder="Enter product"
			showSuggestion="true"
			showValueHelp="true"
			valueHelpRequest=".onValueHelpRequest"
			suggestionItems="{/ProductCollection}">
			<suggestionItems>
				<core:Item text="{Name}" />
			</suggestionItems>
		</Input>
	</l:VerticalLayout>
</mvc:View>
sap.ui.define([
	'sap/ui/core/mvc/Controller',
	'sap/ui/model/json/JSONModel',
	"sap/ui/core/Core",
	"sap/ui/core/library",
	"sap/ui/unified/DateTypeRange",
	"sap/ui/core/date/UI5Date",
	'sap/m/MessageToast',
	"sap/ui/core/Fragment",
	"sap/ui/model/Filter",
	"sap/ui/model/FilterOperator"
], function (Controller,
	JSONModel,
	Core,
	library,
	DateTypeRange,
	UI5Date,
	MessageToast,
	Fragment,
	Filter,
	FilterOperator) {
	"use strict";

	return Controller.extend("sap.ui5.walkthrough.controller.App", {
		/**
		 * @override
		 */
		onInit: function() {
			var oModel = new JSONModel({
				ProductCollection : [
					{Name : "Mac mini", ProductId : "001"},
					{Name : "Mac Pro", ProductId : "002"},
					{Name : "Macbook", ProductId : "003"},
					{Name : "Macbook Pro", ProductId : "004"},
				]
			});
			this.getView().setModel(oModel);

			this.byId("productInput").setFilterFunction(function (sTerm, oItem) {
				return oItem.getText().match(new RegExp(sTerm, "i"));
			});
		},
	});
});
1.9 只通过ValueHelper输入的Input
在某些情况下,我们可能不允许用户在Input上直接输入值,而是通过选择的方式来实现。这个时候可以设置Input属性valueHelpOnly="true",这样用户只要点击Input,就是自动弹出valueHelper的对话框,用户只能通过选择来实现输入内容到Input组件中
<Label
	text="Product"
	labelFor="productInput"
/>
<Input
	id="productInput"
	placeholder="Enter product"
	showValueHelp="true"
	valueHelpRequest=".onValueHelpRequest"
	valueHelpOnly="true"
>
</Input>
1.10 按照某一字段分类显示suggestion的Input
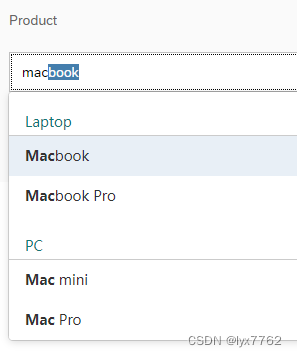
和之前的ComboBox一样,只需要修改suggestionItems的内容,添加相应的分类字段即可。
代码如下:
<mvc:View
	controllerName="sap.ui5.walkthrough.controller.App"
	xmlns:core="sap.ui.core"
	xmlns:mvc="sap.ui.core.mvc"
	xmlns="sap.m"
	xmlns:l="sap.ui.layout"
>
	<l:VerticalLayout class="sapUiContentPadding" width="100%">
		<Label text="Product" labelFor="productInput" />
		<Input
			id="productInput"
			placeholder="Enter product"
			showSuggestion="true"
			showValueHelp="true"
			valueHelpRequest=".onValueHelpRequest"
			suggestionItems="{
				path : '/ProductCollection',
				sorter : {
					path : 'Category',
					group : true,
					ascending : false
				}
			}"
			suggestionItemSelected=".onSuggestionItemSelected">
			<suggestionItems>
				<core:Item key="{ProductId}" text="{Name}" />
			</suggestionItems>
		</Input>
		<Label text="Selected Key" labelFor="selectedKey" />
		<Text id="selectedKeyIndicator" />
	</l:VerticalLayout>
</mvc:View>
1.11 带掩码的Input
通过设置掩码可以实现对用户输入的内容进行限制并进行格式化。
- 匹配任意的10个字符
<MaskInput mask="~~~~~~~~~~" placeholderSymbol="_" placeholder="All characters allowed">
	<rules>
		<MaskInputRule maskFormatSymbol="~" regex="[^_]"/>
	</rules>
</MaskInput>
- 匹配所有的字母和数字
<MaskInput mask="**********" placeholderSymbol="_" placeholder="Latin characters (case insensitive) and numbers">
	<rules>
		<MaskInputRule/>
	</rules>
</MaskInput>
- 匹配所有数字
<MaskInput mask="(999) 999 999999" placeholderSymbol="_" placeholder="Enter twelve-digit number" showClearIcon="true" />
- 只允许数字和大写字母
<MaskInput mask="CCCC-CCCC-CCCC-CCCC-CCCC" placeholderSymbol="_" placeholder="Enter digits and capital letters" showClearIcon="{/showClearIcon}">
	<rules>
		<MaskInputRule maskFormatSymbol="C" regex="[A-Z0-9]"/>
	</rules>
</MaskInput>
- 产品序列号-以SAP开头,后面是大写字母和数字
<MaskInput mask="SAP-CCCCC-CCCCC" placeholderSymbol="_" placeholder="Starts with 'SAP' followed by digits and capital letters" showClearIcon="true">
	<rules>
		<MaskInputRule maskFormatSymbol="C" regex="[A-Z0-9]"/>
	</rules>
</MaskInput>
- 纯数字ISBN
<Label text="ISBN" />
<MaskInput mask="999-99-999-9999-9" placeholderSymbol="_" placeholder="Enter thirteen-digit number" showClearIcon="true" />
通过设置占位符结合正则表达式实现对数据内容的限制
<MaskInputRule maskFormatSymbol="C" regex="[A-Z0-9]"/>
上面的意思就是使用C来代表是任意一个大写字母和数字
2. Radio Button控件
主要注意一下Radio Button控件是如何实现互斥的。
<RadioButtonGroup id="GroupA">
	<RadioButton text="Option 1" selected="true" />
	<RadioButton text="Option 2" />
	<RadioButton text="Option 3" />
	<RadioButton text="Option 4" />
	<RadioButton text="Option 5" />
</RadioButtonGroup>
通过将互斥的一组Radio Button控件放在一组中来实现互斥。
此外,RadioButtonGroup控件还可以实现对RadioButton进行排版。
例如可以设置一行显示3个RadioButton,超出的自动换行到下一行
<RadioButtonGroup id="rbg1" columns="3" width="100%" class="sapUiMediumMarginBottom">
	<RadioButton id="RB1-1" text="Long Option Number 1" />
	<RadioButton id="RB1-2" text="Option 2" enabled="false" />
	<RadioButton id="RB1-3" text="Nr. 3" editable="false" />
	<RadioButton id="RB1-5" text="Option 5" />
	<RadioButton id="RB1-6" text="Nr. 6" />
</RadioButtonGroup>

一行显示3个,超出的部分会自动的转移到下一行
3. Select控件
3.1 不绑定任何数据源
Select可以不绑定任何的数据源,使用方法就是像在HTML中一样。
<Select id="sfcStatusSelect">
	<core:Item key="1" text="{i18n>/PackComplete}" />
	<core:Item key="2" text="{i18n>/PackIncomplete}" />
</Select>
3.2 绑定数据源显示内容
Select也可以绑定数据源显示内容,方法和其他的控件绑定数据源一样。代码如下:
<mvc:View
	controllerName="sap.ui5.walkthrough.controller.App"
	xmlns:core="sap.ui.core"
	xmlns:mvc="sap.ui.core.mvc"
	xmlns:form="sap.ui.layout.form"
	xmlns="sap.m"
	xmlns:l="sap.ui.layout"
>
	<Select
		forceSelection="false"
		items="{
			path: '/ProductCollection',
			sorter: {
				path: 'Name'
			}
		}"
	>
		<core:Item
			key="{ProductId}"
			text="{Name}"
		/>
	</Select>
</mvc:View>
sap.ui.define([
	'sap/ui/core/mvc/Controller',
	'sap/ui/model/json/JSONModel',
	"sap/ui/core/Core",
	"sap/ui/core/library",
	"sap/ui/unified/DateTypeRange",
	"sap/ui/core/date/UI5Date",
	'sap/m/MessageToast',
	"sap/ui/core/Fragment",
	"sap/ui/model/Filter",
	"sap/ui/model/FilterOperator"
], function (Controller,
	JSONModel,
	Core,
	library,
	DateTypeRange,
	UI5Date,
	MessageToast,
	Fragment,
	Filter,
	FilterOperator) {
	"use strict";

	return Controller.extend("sap.ui5.walkthrough.controller.App", {
		onInit: function () {
			var oModel = new JSONModel({
				ProductCollection: [
					{ Name: "Mac mini", ProductId: "001" },
					{ Name: "Mac Pro", ProductId: "002" },
					{ Name: "Macbook", ProductId: "003" },
					{ Name: "Macbook Pro", ProductId: "004" },
				]
			});
			this.getView().setModel(oModel);
		},
	});
});
这个属性
forceSelection="false"可以选择空,如果为true,则用户必须从下拉列表中选择一个Item才可以
如果要显示两列内容,则需要添加showSecondaryValues="true"属性,并且修改Item为ListItem,具体代码如下:
<mvc:View
	controllerName="sap.ui5.walkthrough.controller.App"
	xmlns:core="sap.ui.core"
	xmlns:mvc="sap.ui.core.mvc"
	xmlns:form="sap.ui.layout.form"
	xmlns="sap.m"
	xmlns:l="sap.ui.layout"
>
	<Select
		forceSelection="false"
		showSecondaryValues="true"
		items="{
			path: '/ProductCollection',
			sorter: {
				path: 'Name'
			}
		}"
	>
		<core:ListItem
			key="{ProductId}"
			text="{Name}"
			additionalText="{ProductId}"
		/>
	</Select>
</mvc:View>
3.3 带有图标的Select
在Select中,允许给Item添加icon,只需要给ListItem添加icon属性即可,代码如下:
<mvc:View
	height="100%"
	controllerName="sap.m.sample.SelectWithIcons.Page"
	xmlns:core="sap.ui.core"
	xmlns:mvc="sap.ui.core.mvc"
	xmlns="sap.m">
	<Page
		showHeader="false"
		class="sapUiContentPadding">
		<content>
				<Select
					forceSelection="false"
					selectedKey="{/SelectedProduct}"
					items="{
						path: '/ProductCollection',
						sorter: { path: 'Name' }
					}">
					<core:ListItem key="{ProductId}" text="{Name}" icon="{Icon}"/>
				</Select>
		</content>
	</Page>
</mvc:View>
在UI5中,
onChange和onLiveChange是两个事件,用于监听输入框(Input)或其他控件的值变化。
onChange事件在输入框的值发生变化并且焦点移出输入框时触发。它通常用于捕捉用户最终提交或确认输入的时刻。例如,当用户输入完毕并点击回车键或离开输入框时,onChange事件会被触发。
onLiveChange事件在输入框的值发生变化时实时触发,无需等待焦点移出输入框。它通常用于实时响应用户输入的变化,并进行一些实时的处理或反馈。例如,可以在用户输入时实时验证输入的合法性或进行搜索提示。总的来说,
onChange适用于需要在用户最终确认输入时才进行处理的场景,而onLiveChange适用于需要实时响应用户输入变化的场景。选择使用哪个事件取决于你的业务需求和用户体验的设计。
4. StepInput控件
通过StepInput控件,可以实现步长式输入。

代码如下:
<mvc:View
	controllerName="sap.ui5.walkthrough.controller.App"
	xmlns:core="sap.ui.core"
	xmlns:mvc="sap.ui.core.mvc"
	xmlns:form="sap.ui.layout.form"
	xmlns="sap.m"
	xmlns:l="sap.ui.layout"
>
	<StepInput
		value="0"
		min="0"
		max="100"
		step="0.1"
		displayValuePrecision="3"
		width="50%"
		fieldWidth="60%"
		description="EUR"
	/>
</mvc:View>
displayValuePrecision精确度:精确到小数点后多少位
注意:StepInput控件自带输入合法性验证功能,如果输入的数字不在[min, max]范围内,那么会呈现红色,并报错

