文章目录
- 前言
- 项目结构
- Sort算法实现
- 卡尔曼跟踪器
- 工具类
- 多目标跟踪器
- 整合
前言
昨天挖了个坑,那么今天的话把坑填上,只要是实现Sort算法和Yolov5-Lite的一个整合。当然先前的话,我们在Yolov3–Tiny的时候,也做了一个,不过当时的话,有几个问题没有解决。第一就是当时以中心点进行预测的,这样做的结果就是如果目标框的波动比较大的话,影响会很大,同时,当时设计是为了应对直线旋转平移这样的运动进行捕捉。所以效果比较差。同时就是对于目标点的匹配不合理。那就是,我是按照,当预测点和识别点进行距离计算,计算当前点的最小距离。在同一个类别之下,但是这里有个问题,就是,假设有一个的A,和点B,C,由于B点先进行计算,那么假设A,B匹配了,当C进来的时候,由于C可能和A点的距离更小,但是由于B,A已经匹配导致C没有和A匹配。那么这样一来明明C是最合适A的,但是由于B先来,导致A和B先匹配了(淦,有点像极了人生)
所以,这里的话,还是要引入匈牙利算法,当然这个算法的话,在先前的算法刷题专栏当中已经说过了,那么这里就不重复了,其实就是简单的应用。
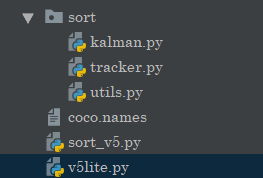
项目结构
这里先说一下,这个项目的基本原理还是类似的:
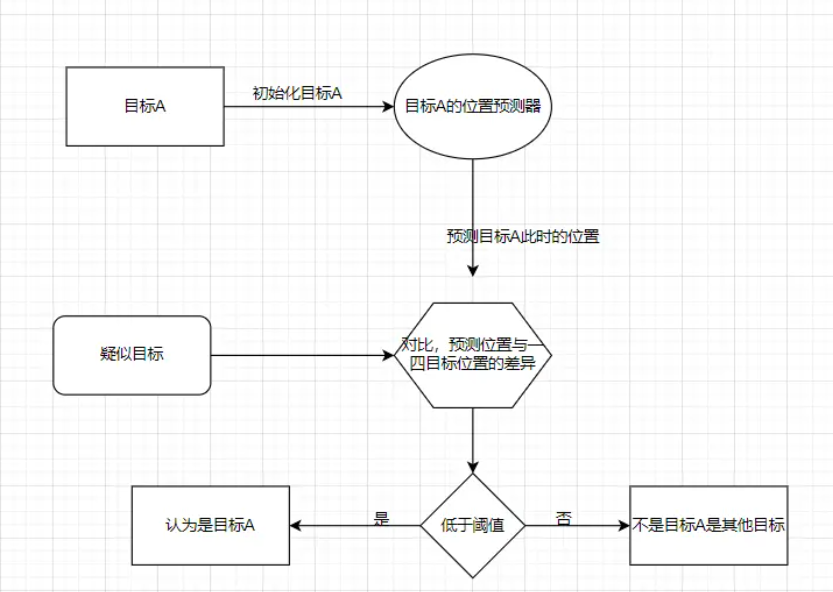
只是,现在匹配我们换成了匈牙利算法。
Sort算法实现
那么,在这里的话,我们先来实现Sort算法。本来是打算嫖个开源的做整合的,但是没想到,他们的代码有很多问题,改别人的bug,还不如自己手写,所以的话,这里的话,我自己手写了一个Sort算法。这里注意的是,Sort算法只是一个匹配算法,通过IOU,和卡尔曼滤波做预测,来匹配当前的跟踪器和新产生的目标框是不是同一个目标。如果你的目标识别算法不准确的话,也就是目标框不稳定,会不断生成新的目标框,那么你的Sort算法就会不断认为这是新的目标的。解决办法的话,可以考虑使用deepsort。 但是的话,我们这里是边缘设备,如果没有deepsort-lite的话实在是不好搞。而且,比如一些简单场景,比如车流量检查,行人检测啥的,机位固定倒也用不上。
卡尔曼跟踪器
那么首先,在这里要实现的就是卡尔曼跟踪器。
这里的话,原理就不扯了,我这里都提到好几次了。
import numpy as np
from filterpy.kalman import KalmanFilter
import cv2
from sort.utils import convert_bbox_to_z, convert_x_to_bbox
np.random.seed(0)

@DeprecationWarning
class ObjectTrackerKF:
    """
    这个滤波是只跟踪中心点坐标,不过,还是会还原为[x1,y1,x2,y2]的
    """

    def __init__(self,bbox, dt=1, sigma=10):

        # 每次创建新的kalman滤波器时,计数ID都会加1
        self.id = 0
        self.hit_streak = 0
        self.bbox = bbox
        # 自上次未匹配成功,经过的帧数
        self.time_since_update = 0
        # 自上次未匹配成功,连续成功匹配的帧数
        self.hit_streak = 0
        self.dt = dt
        x_init, y_init = (bbox[0]+bbox[2])/2 ,(bbox[1]+bbox[3])/2
        # 状态向量,包含位置和速度信息
        self.state = np.array([[x_init], [y_init], [0], [0]], np.float32)

        # 系统矩阵,将状态向量映射为下一时刻的状态向量
        self.A = np.array([
            [1, 0, self.dt, 0],
            [0, 1, 0, self.dt],
            [0, 0, 1, 0],
            [0, 0, 0, 1]], np.float32)

        # 测量矩阵,将状态向量映射为测量向量
        self.H = np.array([
            [1, 0, 0, 0],
            [0, 1, 0, 0]], np.float32)

        # 过程噪声,表示模型中未考虑的外部因素产生的偏差
        self.Q = np.array([
            [self.dt ** 4 / 4, 0, self.dt ** 3 / 2, 0],
            [0, self.dt ** 4 / 4, 0, self.dt ** 3 / 2],
            [self.dt ** 3 / 2, 0, self.dt ** 2, 0],
            [0, 0, 0, self.dt ** 2]], np.float32) * sigma ** 2

        # 测量噪声,表示测量器的误差
        self.R = np.array([
            [1, 0],
            [0, 1]], np.float32) * sigma ** 2

        # 卡尔曼滤波器初始化
        self.kf = cv2.KalmanFilter(4, 2, 0)
        self.kf.statePost = self.state
        self.kf.transitionMatrix = self.A
        self.kf.measurementMatrix = self.H
        self.kf.processNoiseCov = self.Q
        self.kf.measurementNoiseCov = self.R

    def predict(self):
        self.state = self.kf.predict()
        t = self.state[:2].reshape(-1)
        t = list(t)
        w = self.bbox[2] - self.bbox[0]
        h = self.bbox[3] - self.bbox[1]

        box = [(t[0]-w/2),t[1]-h/2,t[0]+w/2,t[1]+h/2,self.bbox[4]]
        self.bbox = box
        if self.time_since_update > 0:
            self.hit_streak = 0
        return self.bbox

    def update(self,bbox):
        x, y = (bbox[0]+bbox[2])/2 ,(bbox[1]+bbox[3])/2
        self.time_since_update = 0
        # 表示连续匹配成功的次数加一
        if(self.hit_streak<=30):
            self.hit_streak+=1
        self.kf.correct(np.array([[x], [y]], np.float32))
        return self.state[:2].reshape(-1)


class KalmanBoxTracker(object):

    # 利用bounding box初始化Kalman滤波轨迹
    def __init__(self, bbox):
        self.id = 0
        #注意这里的bboxs是[x1,y1,x2,y2,conf]是list类型
        self.bbox = bbox
        # 定义恒定速度模型,7个状态变量和4个观测输入
        self.kf = KalmanFilter(dim_x=7, dim_z=4)
        # 状态向量 X = [检测框中心的横坐标,检测框中心的纵坐标,检测框的面积,长宽比,横坐标速度,纵坐标速度,面积速度]
        # SORT假设一个物体在不同帧中检测框的长宽比不变,是个常数,所以速度变化只考虑横坐标、横坐标、检测框面积
        self.kf.F = np.array([[1, 0, 0, 0, 1, 0, 0],
                              [0, 1, 0, 0, 0, 1, 0],
                              [0, 0, 1, 0, 0, 0, 1],
                              [0, 0, 0, 1, 0, 0, 0],
                              [0, 0, 0, 0, 1, 0, 0],
                              [0, 0, 0, 0, 0, 1, 0],
                              [0, 0, 0, 0, 0, 0, 1]])

        self.kf.H = np.array([[1, 0, 0, 0, 0, 0, 0],
                              [0, 1, 0, 0, 0, 0, 0],
                              [0, 0, 1, 0, 0, 0, 0],
                              [0, 0, 0, 1, 0, 0, 0]])

        # R是测量噪声的协方差矩阵,即真实值与测量值差的协方差
        # R = diagonal([1, 1, 10, 10])
        self.kf.R[2:, 2:] *= 10.
        # [[ 1.  0.  0.  0.]
        #  [ 0.  1.  0.  0.]
        #  [ 0.  0. 10.  0.]
        #  [ 0.  0.  0. 10.]]
        # P是先验估计的协方差,对不可观测的初始速度,给予高度不确定性
        # P = diagonal([10,10,10,10,1000,1000,1000])
        self.kf.P[4:, 4:] *= 1000.
        self.kf.P *= 10.
        # [[   10.     0.     0.     0.     0.     0.     0.]
        #  [    0.    10.     0.     0.     0.     0.     0.]
        #  [    0.     0.    10.     0.     0.     0.     0.]
        #  [    0.     0.     0.    10.     0.     0.     0.]
        #  [    0.     0.     0.     0. 10000.     0.     0.]
        #  [    0.     0.     0.     0.     0. 10000.     0.]
        #  [    0.     0.     0.     0.     0.     0. 10000.]]
        # Q是系统状态变换误差的协方差
        # Q = diagonal([1, 1, 1, 1, 0.01, 0.01, 0.0001])
        self.kf.Q[-1, -1] *= 0.01
        self.kf.Q[4:, 4:] *= 0.01
        # [[1.e+00 0.e+00 0.e+00 0.e+00 0.e+00 0.e+00 0.e+00]
        #  [0.e+00 1.e+00 0.e+00 0.e+00 0.e+00 0.e+00 0.e+00]
        #  [0.e+00 0.e+00 1.e+00 0.e+00 0.e+00 0.e+00 0.e+00]
        #  [0.e+00 0.e+00 0.e+00 1.e+00 0.e+00 0.e+00 0.e+00]
        #  [0.e+00 0.e+00 0.e+00 0.e+00 1.e-02 0.e+00 0.e+00]
        #  [0.e+00 0.e+00 0.e+00 0.e+00 0.e+00 1.e-02 0.e+00]
        #  [0.e+00 0.e+00 0.e+00 0.e+00 0.e+00 0.e+00 1.e-04]]
        # Kalman滤波器初始化时,直接用第一次观测结果赋值状态信息

        self.kf.x[:4] = convert_bbox_to_z(self.bbox)
        # 自上次未匹配成功,经过的帧数
        self.time_since_update = 0
        # 自上次未匹配成功,连续成功匹配的帧数
        self.hit_streak = 0


    def update(self, bbox):

        # 重置,每次匹配成功,则会调用update函数,即自上次未匹配成功,经过的帧数变为了0
        self.time_since_update = 0
        self.kf.update(convert_bbox_to_z(bbox))
        self.bbox = bbox
        if(self.hit_streak<=30):
            self.hit_streak+=1


    def predict(self):

        # 如果边界框面积+面积变化速度<=0,就将面积变化速度赋值为0
        # 因为下一时刻边框面积数值,就等于边界框面积+面积变化速度,这样处理可以防止出现面积小于0的情况
        if (self.kf.x[6]+self.kf.x[2]) <= 0:
            self.kf.x[6] *= 0.0

        self.kf.predict()

        self.time_since_update += 1
        if(self.time_since_update>0):
            self.hit_streak=0
        t = list(convert_x_to_bbox(self.kf.x)[0])
        #将置信度设置为上一次的被击中的conf
        t.append(self.bbox[4])
        self.bbox = t
        #[x1,y1,x2,y2,conf]
        return self.bbox

    def get_state(self):
        # 返回当前边界框估计值
        return convert_x_to_bbox(self.kf.x)
工具类
当然,这里还有一些工具类。在这里:
import numpy as np
# 将 [x1,y1,x2,y2] 形式转化为 [center_x,center_y,s,r] 形式
def convert_bbox_to_z(bbox):

    w = bbox[2] - bbox[0]
    h = bbox[3] - bbox[1]
    x = bbox[0] + w/2.
    y = bbox[1] + h/2.
    s = w * h
    r = w / float(h)
    return np.array([x, y, s, r]).reshape((4, 1))


# 输入的x是一个7维的状态向量,我们只用前4维的边框信息
# 将 [center_x,center_y,s,r] 形式转化为 [x1,y1,x2,y2] 形式
# s = w * h , r = w / h
def convert_x_to_bbox(x):

    w = np.sqrt(x[2] * x[3])
    h = x[2] / w

    return np.array([x[0]-w/2., x[1]-h/2., x[0]+w/2., x[1]+h/2.]).reshape((1, 4))


import numpy as np


def calculate_iou(bbox1, bbox2):
    """
    计算两个边界框的IOU(Intersection over Union)

    参数:
        bbox1: 第一个边界框 [x1, y1, x2, y2]
        bbox2: 第二个边界框 [x1, y1, x2, y2]

    返回:
        iou: IOU值
    """
    # 确保输入的边界框为浮点数类型
    bbox1 =  np.array(bbox1, dtype=np.float32)
    bbox2 =  np.array(bbox2, dtype=np.float32)

    # 计算两个边界框的交集区域
    x1 = np.maximum(bbox1[0], bbox2[0])
    y1 = np.maximum(bbox1[1], bbox2[1])
    x2 = np.minimum(bbox1[2], bbox2[2])
    y2 = np.minimum(bbox1[3], bbox2[3])
    intersection = np.maximum(0, x2 - x1 + 1) * np.maximum(0, y2 - y1 + 1)

    # 计算两个边界框的面积
    area_bbox1 = (bbox1[2] - bbox1[0] + 1) * (bbox1[3] - bbox1[1] + 1)
    area_bbox2 = (bbox2[2] - bbox2[0] + 1) * (bbox2[3] - bbox2[1] + 1)

    # 计算IOU
    iou = intersection / (area_bbox1 + area_bbox2 - intersection)

    return iou
多目标跟踪器
之后就是我们的Sort算法的具体实现了,也就是多目标跟踪器。这个其实好办,做组装就好了,原理也不复述了,代码当中有注释。
from sort.kalman import ObjectTrackerKF,KalmanBoxTracker
from sort.utils import calculate_iou
import numpy as np
import cv2

class SortMulObjectTracker():

    def __init__(self, max_age=1, min_hits=1, iou_threshold=0.3):

        self.max_age = max_age
        self.min_hits = min_hits
        self.iou_threshold = iou_threshold    # 0.3
        self.trackers = {}
        self.counts = {}
        self.colours = np.random.rand(32, 3) * 255
        #本次匹配的情况
        self.match_curr = {}

        """
        trackers的数据类型是{类别:[tracker1,tracker2,tracker3]}
        在进行跟踪的时候,需要输入的数据结构为:{类别:[bbox,bbox]}
        其中bbox:[x1,y1,x2,y2,conf]
        为了进行匹配,我们将实现匈牙利算法进行匹配
        """

    def __match(self,st,match,a,pre_bboxs,bboxs,trackers_cls):

        for j in range(len(pre_bboxs)):
            iou_a_j = calculate_iou(pre_bboxs[j], bboxs[a][:4])
            if (not st.get(j,False)):
                st[j] = True
                """
                没有被匹配,iou超过阈值,并且被命中次数大于最小命中次数,进行匹配
                """
                if (match.get(j,[False,False]) == [False,False]):
                    if(iou_a_j>=self.iou_threshold):
                            match[j] = [a,iou_a_j]
                            return True
                    return False
                else:
                    if(iou_a_j > match[j][1] and
                            self.__match(st, match, match[j][0],pre_bboxs,bboxs,trackers_cls)
                    ):
                        match[j] = [a,iou_a_j]
                        return True
        return False

    def HunagerWithTrackers(self,bboxs,trackers_cls,cls):
        """
        右侧的集合元素和左侧的谁进行了匹配,这里记录的是下标,这个算法模板在图算法专栏当中出现了
        现在将其运用在实际项目当中,不同的是,这里匹配的时候,还要计算一下甜蜜值‘iou'以前我们是
        默认,只要女方匹配的男嘉宾可以找到新欢,就让那个男嘉宾找新欢,现在是,按照亲密度最高来匹配
        因此match:{1:[1,0.9]}
        """
        match = {}
        hit_set = []
        bboxs_ids = [i for i in range(len(bboxs))]
        pre_bboxs = [trackers_.predict() for trackers_ in trackers_cls]
        for i in bboxs_ids:
            # 表示右边的那个集合元素有没有遍历,因为每次新上场的男嘉宾不知道女嘉宾的情况,
            # 都需要问一遍。
            st = {}
            if(self.__match(st, match,i,pre_bboxs,bboxs,trackers_cls)):
                hit_set.append(i)
        new_bbox = set(bboxs_ids) - set(hit_set)
        self.match_curr[cls] = [match,new_bbox,bboxs_ids]

    def __gc(self,items):
        """
        先处理,我们这边已经出现的跟踪器
        :param items:
        :return:
        """
        for cls in items.keys():
            match,new_bbox,bboxs_ids= self.match_curr[cls]
            trackers_cls = self.trackers.get(cls,[])
            bboxs = items[cls]
            #先更新
            for m in match.keys():
                trackers_cls[m].update(bboxs[match[m][0]])

            #然后删除
            need_romve = {}
            for i in range(len(trackers_cls)):
                if(trackers_cls[i].time_since_update>=self.max_age
                    or trackers_cls[i].hit_streak<self.min_hits
                ):
                    need_romve[i]=1
            new_trackers_cls = []
            for i in range(len(trackers_cls)):
                if(not need_romve.get(i)):
                    new_trackers_cls.append(trackers_cls[i])
            #然后加入新的跟踪器
            for i in new_bbox:
                new_tracker = KalmanBoxTracker(bboxs[i])
                new_tracker.id = len(new_trackers_cls)
                new_trackers_cls.append(new_tracker)
                self.counts[cls] = self.counts.get(cls, 0) + 1
            #最后生效
            self.trackers[cls] = new_trackers_cls

        cur_keys = set(items.keys())
        have_keys = set(self.trackers.keys())

        #没有出现的类别进行处理
        not_go = have_keys-cur_keys
        for n_key in not_go:
            trackers_cls = self.trackers[n_key]
            #全部预测一下,刷新
            _ = [trackers_.predict() for trackers_ in trackers_cls]

            #执行删除操作即可
            need_romve = {}
            for i in range(len(trackers_cls)):
                if (trackers_cls[i].time_since_update >= self.max_age
                        or trackers_cls[i].hit_streak < self.min_hits
                ):
                    need_romve[i] = 1
            new_trackers_cls = []
            for i in range(len(trackers_cls)):
                if (not need_romve.get(i)):
                    new_trackers_cls.append(trackers_cls[i])
            #完成更新
            self.trackers[n_key] = new_trackers_cls


    def drawTracks(self,frame):
        for cls in self.trackers.keys():
            cls_trackers = self.trackers.get(cls)
            for cls_tracker in cls_trackers:
                frame = self.drawTrack(frame,cls_tracker,cls)
        return frame

    def drawTrack(self,frame,tracker,cls):
        #根具当前的跟踪器返回的情况,进行跟踪
        color = self.colours[tracker.id % 32]
        cv2.rectangle(frame, (int(tracker.bbox[0]), int(tracker.bbox[1])), (int(tracker.bbox[2]),int(tracker.bbox[3])), color, thickness=2)

        label = '%.2f' % tracker.bbox[4]
        label = '%s:%s' % (cls, label)
        label = label+"-ID:"+str(tracker.id)
        # Display the label at the top of the bounding box

        labelSize, baseLine = cv2.getTextSize(label, cv2.FONT_HERSHEY_SIMPLEX, 0.5, 1)
        top = max(int(tracker.bbox[1]), labelSize[1])
        # cv.rectangle(frame, (left, top - round(1.5 * labelSize[1])), (left + round(1.5 * labelSize[0]), top + baseLine), (255,255,255), cv.FILLED)
        cv2.putText(frame, label, (int(tracker.bbox[0]), top - 10), cv2.FONT_HERSHEY_TRIPLEX, 0.5, color, thickness=1)
        return frame


    def tracker(self,items):
        #注意这里的cls都是指标签名
        for cls in items.keys():
            trackers_cls = self.trackers.get(cls,[])
            items_bbox = items.get(cls)
            self.HunagerWithTrackers(items_bbox,trackers_cls,cls)
        self.__gc(items)
到此,Sort算法实现完毕。
整合
之后的话,就是我们的算法整合了。这个很重要,但是也不难。
import cv2
import time
import numpy as np
import argparse
import onnxruntime as ort
from sort.tracker import SortMulObjectTracker


class yolov5_sort():
    """
    同时实现目标检测和目标跟踪
    """
    def __init__(self, model_pb_path, label_path, confThreshold=0.5, nmsThreshold=0.5, objThreshold=0.5):
        so = ort.SessionOptions()
        so.log_severity_level = 3

        self.net = ort.InferenceSession(model_pb_path, so)
        self.classes = list(map(lambda x: x.strip(), open(label_path, 'r').readlines()))
        self.num_classes = len(self.classes)
        anchors = [[10, 13, 16, 30, 33, 23],
                   [30, 61, 62, 45, 59, 119],
                   [116, 90, 156, 198, 373, 326]
                   ]
        self.colours = np.random.rand(32, 3) * 255
        self.nl = len(anchors)
        self.na = len(anchors[0]) // 2
        self.no = self.num_classes + 5
        self.grid = [np.zeros(1)] * self.nl
        self.stride = np.array([8., 16., 32.])
        self.anchor_grid = np.asarray(anchors, dtype=np.float32).reshape(self.nl, -1, 2)

        self.confThreshold = confThreshold
        self.nmsThreshold = nmsThreshold
        self.objThreshold = objThreshold
        self.input_shape = (self.net.get_inputs()[0].shape[2], self.net.get_inputs()[0].shape[3])
        self.sortMulTrackers = SortMulObjectTracker(max_age=10, min_hits=1, iou_threshold=0.3)


    def resize_image(self, srcimg, keep_ratio=True):
        """
        根据网络的输入要求,将图片进行resize
        :param srcimg:
        :param keep_ratio:
        :return:
        """
        top, left, newh, neww = 0, 0, self.input_shape[0], self.input_shape[1]
        if keep_ratio and srcimg.shape[0] != srcimg.shape[1]:
            hw_scale = srcimg.shape[0] / srcimg.shape[1]
            if hw_scale > 1:
                newh, neww = self.input_shape[0], int(self.input_shape[1] / hw_scale)
                img = cv2.resize(srcimg, (neww, newh), interpolation=cv2.INTER_AREA)
                left = int((self.input_shape[1] - neww) * 0.5)
                img = cv2.copyMakeBorder(img, 0, 0, left, self.input_shape[1] - neww - left, cv2.BORDER_CONSTANT,
                                         value=0)  # add border
            else:
                newh, neww = int(self.input_shape[0] * hw_scale), self.input_shape[1]
                img = cv2.resize(srcimg, (neww, newh), interpolation=cv2.INTER_AREA)
                top = int((self.input_shape[0] - newh) * 0.5)
                img = cv2.copyMakeBorder(img, top, self.input_shape[0] - newh - top, 0, 0, cv2.BORDER_CONSTANT, value=0)
        else:
            img = cv2.resize(srcimg, self.input_shape, interpolation=cv2.INTER_AREA)
        return img, newh, neww, top, left

    def _make_grid(self, nx=20, ny=20):
        xv, yv = np.meshgrid(np.arange(ny), np.arange(nx))
        return np.stack((xv, yv), 2).reshape((-1, 2)).astype(np.float32)


    def postprocess_sort(self, frame, outs, pad_hw):
        newh, neww, padh, padw = pad_hw
        frameHeight = frame.shape[0]
        frameWidth = frame.shape[1]
        ratioh, ratiow = frameHeight / newh, frameWidth / neww
        # Scan through all the bounding boxes output from the network and keep only the
        # ones with high confidence scores. Assign the box's class label as the class with the highest score.
        classIds = []
        confidences = []
        box_index = []
        boxes = []
        outs = outs[outs[:, 4] > self.objThreshold]
        for detection in outs:
            scores = detection[5:]
            classId = np.argmax(scores)
            confidence = scores[classId]
            if confidence > self.confThreshold:  # and detection[4] > self.objThreshold:
                center_x = int((detection[0] - padw) * ratiow)
                center_y = int((detection[1] - padh) * ratioh)
                width = int(detection[2] * ratiow)
                height = int(detection[3] * ratioh)
                left = int(center_x - width / 2)
                top = int(center_y - height / 2)
                classIds.append(classId)
                confidences.append(float(confidence))
                boxes.append([left, top, width, height])

        # Perform non maximum suppression to eliminate redundant overlapping boxes with
        # lower confidences.
        # print(boxes)
        indices = cv2.dnn.NMSBoxes(boxes, confidences, self.confThreshold, self.nmsThreshold)

        for ix in indices:
            box_index.append(ix)
        items = {}
        for i in box_index:
            box = boxes[i]
            x1 = box[0]
            y1 = box[1]
            x2 = box[2]+x1
            y2 = box[3]+y1
            conf = confidences[i]
            cls = self.classes[classIds[i]]
            items[cls] = items.get(cls,[])
            items[cls].append([x1,y1,x2,y2,conf])
        #完成目标跟踪
        self.sortMulTrackers.tracker(items)
        frame = self.sortMulTrackers.drawTracks(frame)
        print(self.sortMulTrackers.counts)
        return frame,boxes

    def detect_sort(self, srcimg):
        img, newh, neww, top, left = self.resize_image(srcimg)
        img = cv2.cvtColor(img, cv2.COLOR_BGR2RGB)
        img = img.astype(np.float32) / 255.0

        blob = np.expand_dims(np.transpose(img, (2, 0, 1)), axis=0)

        t1 = time.time()
        outs = self.net.run(None, {self.net.get_inputs()[0].name: blob})[0].squeeze(axis=0)
        cost_time = time.time() - t1
        # print(outs.shape)
        row_ind = 0
        for i in range(self.nl):
            h, w = int(self.input_shape[0] / self.stride[i]), int(self.input_shape[1] / self.stride[i])
            length = int(self.na * h * w)
            if self.grid[i].shape[2:4] != (h, w):
                self.grid[i] = self._make_grid(w, h)

            outs[row_ind:row_ind + length, 0:2] = (outs[row_ind:row_ind + length, 0:2] * 2. - 0.5 + np.tile(
                self.grid[i], (self.na, 1))) * int(self.stride[i])
            outs[row_ind:row_ind + length, 2:4] = (outs[row_ind:row_ind + length, 2:4] * 2) ** 2 * np.repeat(
                self.anchor_grid[i], h * w, axis=0)
            row_ind += length
        srcimg,boxes = self.postprocess_sort(srcimg, outs, (newh, neww, top, left))
        infer_time = 'Inference Time: ' + str(int(cost_time * 1000)) + 'ms'
        cv2.putText(srcimg, infer_time, (5, 20), cv2.FONT_HERSHEY_TRIPLEX, 0.5, (0, 0, 0), thickness=1)
        return srcimg,boxes


    def postprocess(self, frame, outs, pad_hw):
        newh, neww, padh, padw = pad_hw
        frameHeight = frame.shape[0]
        frameWidth = frame.shape[1]
        ratioh, ratiow = frameHeight / newh, frameWidth / neww
        # Scan through all the bounding boxes output from the network and keep only the
        # ones with high confidence scores. Assign the box's class label as the class with the highest score.
        classIds = []
        confidences = []
        box_index = []
        boxes = []
        outs = outs[outs[:, 4] > self.objThreshold]
        for detection in outs:
            scores = detection[5:]
            classId = np.argmax(scores)
            confidence = scores[classId]
            if confidence > self.confThreshold:  # and detection[4] > self.objThreshold:
                center_x = int((detection[0] - padw) * ratiow)
                center_y = int((detection[1] - padh) * ratioh)
                width = int(detection[2] * ratiow)
                height = int(detection[3] * ratioh)
                left = int(center_x - width / 2)
                top = int(center_y - height / 2)
                classIds.append(classId)
                confidences.append(float(confidence))
                boxes.append([left, top, width, height])

        # Perform non maximum suppression to eliminate redundant overlapping boxes with
        # lower confidences.
        # print(boxes)
        indices = cv2.dnn.NMSBoxes(boxes, confidences, self.confThreshold, self.nmsThreshold)

        for ix in indices:
            box_index.append(ix)

        for i in box_index:
            box = boxes[i]
            left = box[0]
            top = box[1]
            width = box[2]
            height = box[3]
            frame = self.drawPred(frame, classIds[i], confidences[i], left, top, left + width, top + height)
        return frame,boxes


    def drawPred(self, frame, classId, conf, left, top, right, bottom):
        # Draw a bounding box.
        color = self.colours[classId % 32]
        cv2.rectangle(frame, (left, top), (right, bottom), color, thickness=2)

        label = '%.2f' % conf
        label = '%s:%s' % (self.classes[classId], label)
        # Display the label at the top of the bounding box

        labelSize, baseLine = cv2.getTextSize(label, cv2.FONT_HERSHEY_SIMPLEX, 0.5, 1)
        top = max(top, labelSize[1])
        # cv.rectangle(frame, (left, top - round(1.5 * labelSize[1])), (left + round(1.5 * labelSize[0]), top + baseLine), (255,255,255), cv.FILLED)
        cv2.putText(frame, label, (left, top - 10), cv2.FONT_HERSHEY_TRIPLEX, 0.5, color, thickness=1)
        return frame

    def showFps(self,frame,fps):

        cv2.putText(frame, 'FPS:{}'.format(int(fps)),
                    (50, 50),
                    cv2.FONT_HERSHEY_SIMPLEX,
                    0.6, (255, 0, 255), 2)
        return frame


    def detect(self, srcimg):
        img, newh, neww, top, left = self.resize_image(srcimg)
        img = cv2.cvtColor(img, cv2.COLOR_BGR2RGB)
        img = img.astype(np.float32) / 255.0

        blob = np.expand_dims(np.transpose(img, (2, 0, 1)), axis=0)

        t1 = time.time()
        outs = self.net.run(None, {self.net.get_inputs()[0].name: blob})[0].squeeze(axis=0)
        cost_time = time.time() - t1
        # print(outs.shape)
        row_ind = 0
        for i in range(self.nl):
            h, w = int(self.input_shape[0] / self.stride[i]), int(self.input_shape[1] / self.stride[i])
            length = int(self.na * h * w)
            if self.grid[i].shape[2:4] != (h, w):
                self.grid[i] = self._make_grid(w, h)

            outs[row_ind:row_ind + length, 0:2] = (outs[row_ind:row_ind + length, 0:2] * 2. - 0.5 + np.tile(
                self.grid[i], (self.na, 1))) * int(self.stride[i])
            outs[row_ind:row_ind + length, 2:4] = (outs[row_ind:row_ind + length, 2:4] * 2) ** 2 * np.repeat(
                self.anchor_grid[i], h * w, axis=0)
            row_ind += length
        srcimg,boxes = self.postprocess(srcimg, outs, (newh, neww, top, left))
        infer_time = 'Inference Time: ' + str(int(cost_time * 1000)) + 'ms'
        cv2.putText(srcimg, infer_time, (5, 20), cv2.FONT_HERSHEY_TRIPLEX, 0.5, (0, 0, 0), thickness=1)
        return srcimg,boxes

class RunTime:
    def __init__(self):
        self.net = yolov5_sort(args.modelpath, args.classfile, confThreshold=args.confThreshold,
                          nmsThreshold=args.nmsThreshold)


    def run(self):
        """
        打开摄像头
        :return:
        """
        cam = cv2.VideoCapture(0)
        if not cam.isOpened():
            raise RuntimeError("无法打开摄像头")
        # 循环读取和处理每一帧图像
        while True:
            ret, frame = cam.read()
            if not ret:
                break
            # 进行目标检测
            start = time.time()
            #进行推理检测,返回的是绘制好的图片
            frame,boxes = self.net.detect(frame)
            end = time.time()
            fps = 1 / (end - start)
            # 绘制边界框,也是返回绘制好的图篇,把这个图片进行发布即可
            frame = self.net.showFps(frame,fps)
            # 显示图像
            cv2.imshow("Frame", frame)
            # 检测按键来退出循环
            if cv2.waitKey(1) == ord('q'):
                break
        # 释放摄像头资源
        cam.release()
        # 关闭所有窗口
        cv2.destroyAllWindows()

    def run_sort(self,fps):
        """
        打开摄像头
        注意,这里的话,会受到fps的影响
        :return:
        """
        cam = cv2.VideoCapture(0)
        if not cam.isOpened():
            raise RuntimeError("无法打开摄像头")
        # 循环读取和处理每一帧图像
        p_time = (1/fps)
        while True:
            ret, frame = cam.read()
            if not ret:
                break
            # 进行目标检测
            start = time.time()
            # 进行推理检测,返回的是绘制好的图片
            frame, boxes = self.net.detect_sort(frame)
            end = time.time()
            s_p = (end - start)
            time.sleep(p_time-s_p)
            end = time.time()
            t_fps = 1/(end-start)
            # 绘制边界框,也是返回绘制好的图篇,把这个图片进行发布即可
            frame = self.net.showFps(frame, t_fps)
            # 显示图像
            cv2.imshow("Frame", frame)
            # 检测按键来退出循环
            if cv2.waitKey(1) == ord('q'):
                break
        # 释放摄像头资源
        cam.release()
        # 关闭所有窗口
        cv2.destroyAllWindows()


if __name__ == '__main__':

    parser = argparse.ArgumentParser()
    parser.add_argument('--modelpath', type=str, default=r'F:\projects\PythonProject\YOLOv5-Lite-master\weights\v5lite-e.onnx', help="onnx filepath")
    parser.add_argument('--classfile', type=str, default='coco.names', help="classname filepath")
    parser.add_argument('--confThreshold', default=0.5, type=float, help='class confidence')
    parser.add_argument('--nmsThreshold', default=0.6, type=float, help='nms iou thresh')
    args = parser.parse_args()
    runner = RunTime()
    # runner.run()
    runner.run_sort(30)
这样的话,就完成了基本的算法整合,后面按照自己的需求去修改定制即可。
具体流程就不搞了,因为比较简单。